Webpack - A Detailed Introduction

Email Newsletter
Weekly tips on front-end & UX.
Trusted by 182,000+ folks.


 Celebrating 10 million developers
 Custom Web Forms for Angular, React, & Vue. Your backend.
In most programming languages (including ECMAScript 2015+, which is one of the most recent versions of the standard for JavaScript, but isn’t fully supported across all browsers yet), you can separate your code into multiple files and import those files into your application to use the functionality contained in them. This wasn’t built into browsers, so module bundlers were built to bring this capability in a couple forms: by asynchronously loading modules and running them when they have finished loading, or by combining all of the necessary files into a single JavaScript file that would be loaded via a <script> tag in the HTML.

Without the module loaders and bundlers, you could always combine your files manually or load your HTML with countless <script> tags, but that has several disadvantages:
- You need to keep track of the proper order in which the files should load, including which files depend on which other files and making sure not to include any files you don’t need.
- Multiple
<script>tags means multiple calls to the server to load all of your code, which is worse for performance. - Obviously, this entails a lot of manual work, instead of letting the computer do it for you.
Most module bundlers also integrate directly with npm or Bower to easily allow you to add third-party dependencies to your application. Just install them and throw in a line of code to import them into your application. Then, run your module bundler, and you’ll have your third-party code combined with your application code, or, if you configure it correctly, you can have all of your third-party code in a separate file, so that when you update the application code, users don’t need to download the vendor code when they need to update their cache of your application code.
Why Webpack?
Now that you have basic knowledge of the purpose of webpack, why should you choose webpack over the competition? There are a few reasons:
- Its relative newness gives it a leg up because it is able to work around or avoid the shortcomings and problems that have popped up in its predecessors.
- Getting started is simple. If you’re just looking to bundle a bunch of JavaScript files together without any other fancy stuff, you won’t even need a configuration file.
- Its plugin system enables it to do so much more, making it quite powerful. So, it might be the only build tool you need.
I’ve seen only a few other module bundlers and build tools that can say the same thing, but webpack seems to have one thing over those: a large community that can help when you get stuck. Browserify’s community is probably just as big, if not larger, but it lacks a few of the potentially essential features that come with webpack. With all the praise I’ve given webpack, I’m sure you’re just waiting for me to move on and show some code, right? Let’s do that, then.
Setting Up Webpack
Before we can use webpack, we need to install it. To do that, we’re going to need Node.js and npm, both of which I’m just going to assume you have. If you don’t have them installed, then the Node.js website is a great place to start.
Now, there are two ways to install webpack (or any other CLI package, for that matter): globally or locally. If you install it globally, you can use it no matter what directory you’re in, but then it won’t be included as a dependency for your project, and you can’t switch between versions of webpack for different projects (some projects might need more work to upgrade to a later version, so they might have to wait). So, I prefer to install CLI packages locally and either use relative paths or npm scripts to run the package. If you’re not used to installing CLI packages locally, you can read about it in a post I wrote about getting rid of global npm packages.
We’re going to be using npm scripts for our examples anyway, so let’s just forge ahead with installing it locally. First things first: Create a directory for the project where we can experiment and learn about webpack. I have a repository on GitHub that you can clone and whose branches you can switch between to follow along, or you can start a new project from scratch and maybe use my GitHub repository for comparison.
Once you’re inside the project directory via your console of choice, you’ll want to initialize the project with npm init. The information you provide really isn’t that important, though, unless you plan on publishing this project on npm.
Now that you have a package.json file all set up (npm init created it), you can save your dependencies in there. So, let’s use npm to install webpack as a dependency with npm install webpack -D. (-D saves it in package.json as a development dependency; you could also use –save-dev.)
Before we can use webpack, we should have a simple application to use it on. When I say simple, I mean it. First, let’s install Lodash just so that we have a dependency to load into our simple app: npm install lodash -S (-S is the same as –save). Then, we’ll create a directory named src, and in there we’ll create a file named main.js with the following contents:
var map = require('lodash/map');

function square(n) {
    return n*n;
}

console.log(map([1,2,3,4,5,6], square));
Pretty simple, right? We’re just creating a small array with the integers 1 through 6, then using Lodash’s map to create a new array by squaring the numbers from the original array. Finally, we’re outputting the new array to the console. This file can even be run by Node.js, which you can see by running node src/main.js, which should show this output: [ 1, 4, 9, 16, 25, 36 ].
But we want to bundle up this tiny script with the Lodash code that we need and make it ready for browsers, which is where webpack comes in? How do we do that?
Using Webpack Command Line
The easiest way to get started with using webpack without wasting time on a configuration file is just to run it from the command line. The simplest version of the command for webpack without using a configuration file takes an input file path and an output file path. Webpack will read from that input file, tracing through its dependency tree, combining all of the files together into a single file and outputting the file at the location you’ve specified as the output path. For this example, our input path is src/main.js, and we want to output the bundled file to dist/bundle.js. So, let’s create an npm script to do that (we don’t have webpack installed globally, so we can’t run it directly from the command line). In package.json, edit the “scripts” section to look like the following:
…
  "scripts": {
    "build": "webpack src/main.js dist/bundle.js",
  }
…
Now, if you run npm run build, webpack should get to work. When it’s done, which shouldn’t take long, there should be a new dist/bundle.js file. Now you can run that file with Node.js (node dist/bundle.js) or run it in the browser with a simple HTML page and see the same result in the console.
Before exploring webpack some more, let’s make our build scripts a little more professional by deleting the dist directory and its contents before rebuilding, and also adding some scripts to execute our bundle. The first thing we need to do is install del-cli so that we can delete directories without upsetting the people who don’t use the same operating system as us (don’t hate me because I use Windows); npm install del-cli -D should do the trick. Then, we’ll update our npm scripts to the following:
…
  "scripts": {
    "prebuild": "del-cli dist -f",
    "build": "webpack src/main.js dist/bundle.js",
    "execute": "node dist/bundle.js",
    "start": "npm run build -s && npm run execute -s"
  }
…
We kept “build” the same as before, but now we have “prebuild” to do some cleanup, which will run prior to “build” every time “build” is told to run. We also have “execute”, which uses Node.js to execute the bundled script, and we can use “start” to do it all with one command (the -s bit just makes it so that the npm scripts don’t output as much useless stuff to the console). Go ahead and run npm start. You should see webpack’s output, quickly followed by our squared array, show up in your console. Congratulations! You’ve just finished everything in the example1 branch of the repository I mentioned earlier.
Using A Configuration File
As fun as it is to use the webpack command line to get started, once you start using more of webpack’s features, you’re going to want to move away from passing in all of your options via the command line and instead use a configuration file, which will have more capability but which will also be more readable because it’s written in JavaScript.
So, let’s create that configuration file. Create a new file named webpack.config.js in your project’s root directory. This is the file name that webpack will look for by default, but you can pass the –config [filename] option to webpack if you want to name your configuration file something else or to put it in a different directory.
For this tutorial, we’ll just use the standard file name, and for now we’ll try to get it working the same way that we had it working with just the command line. To do that, we need to add the following code to the config file:
module.exports = {
    entry: './src/main.js',
    output: {
        path: './dist',
        filename: 'bundle.js'
    }
};
We’re specifying the input file and the output file, just like we did with the command line before. This is a JavaScript file, not a JSON file, so we need to export the configuration object — hence, the module.exports. It doesn’t exactly look nicer than specifying these options through the command line yet, but by the end of the article, you’ll be glad to have it all in here.
Now we can remove those options that we were passing to webpack from the scripts in our package.json file. Your scripts should look like this now:
…
  "scripts": {
    "prebuild": "del-cli dist -f",
    "build": "webpack",
    "execute": "node dist/bundle.js",
    "start": "npm run build -s && npm run execute -s"
  }
…
You can npm start like you did before, and it should look very familiar! That’s all we needed for the example2 branch.
Using Loaders
We have two primary ways to add to webpack’s capabilities: loaders and plugins. We’ll discuss plugins later. Right now we’ll focus on loaders, which are used to apply transformations or perform operations on files of a given type. You can chain multiple loaders together to handle a single file type. For example, you can specify that files with the .js extension will all be run through ESLint and then will be compiled from ES2015 down to ES5 by Babel. If ESLint comes across a warning, it’ll be outputted to the console, and if it encounters any errors, it’ll prevent webpack from continuing.
For our little application, we won’t be setting up any linting, but we will be setting up Babel to compile our code down to ES5. Of course, we should have some ES2015 code first, right? Let’s convert the code from our main.js file to the following:
import { map } from 'lodash';

console.log(map([1,2,3,4,5,6], n => n*n));
This code is doing essentially the same exact thing, but (1) we’re using an arrow function instead of the named square function, and (2) we’re loading map from ‘lodash’ using ES2015’s import. This will actually load a larger Lodash file into our bundle because we’re asking for all of Lodash, instead of just asking for the code associated with map by requesting ‘lodash/map’. You can change that first line to import map from ‘lodash/map’ if you prefer, but I switched it to this for a few reasons:
- In a large application, you’ll likely be using a pretty large chunk of the Lodash library, so you might as well load all of it.
- If you’re using Backbone.js, getting all of the functions you need loaded individually will be very difficult simply because there is no documentation specifying how much of it is needed.
- In the next major version of webpack, the developers plan to include something called tree-shaking, which eliminates unused portions of modules. So, this would work the same either way.
- I’d like to use it as an example to teach you the bullet points I just mentioned.
(Note: These two ways of loading work with Lodash because the developers have explicitly created it to work that way. Not all libraries are set up to work this way.)
Anyway, now that we have some ES2015, we need to compile it down to ES5 so that we can use it in decrepit browsers (ES2015 support is actually looking pretty good in the latest browsers!). For this, we’ll need Babel and all of the pieces it needs to run with webpack. At a minimum, we’ll need babel-core (Babel’s core functionality, which does most of the work), babel-loader (the webpack loader that interfaces with babel-core) and babel-preset-es2015 (which contains the rules that tell Babel to compile from ES2015 to ES5). We’ll also get babel-plugin-transform-runtime and babel-polyfill, both of which change the way Babel adds polyfills and helper functions to your code base, although each does it a bit differently, so they’re suited to different kinds of projects. Using both of them wouldn’t make much sense, and you might not want to use either of them, but I’m adding both of them here so that no matter which you choose, you’ll see how to do it. If you want to know more about them, you can read the documentation pages for the polyfill and runtime transform.
Anyway, let’s install all of that: npm i -D babel-core babel-loader babel-preset-es2015 babel-plugin-transform-runtime babel-polyfill. And now let’s configure webpack to use it. First, we’ll need a section to add loaders. So, update webpack.config.js to this:
module.exports = {
    entry: './src/main.js',
    output: {
        path: './dist',
        filename: 'bundle.js'
    },
    module: {
        rules: [
            …
        ]
    }
};
We’ve added a property named module, and within that is the rules property, which is an array that holds the configuration for each loader you use. This is where we’ll be adding babel-loader. For each loader, we need to set a minimum of these two options: test and loader. test is usually a regular expression that is tested against the absolute path of each file. These regular expressions usually just test for the file’s extension; for example, /.js$/ tests whether the file name ends with .js. For ours, we’ll be setting this to /.jsx?$/, which will match .js and .jsx, just in case you want to use React in your app. Now we’ll need to specify loader, which specifies which loaders to use on files that pass the test.
This can be specified by passing in a string with the loaders’ names, separated by an exclamation mark, such as ‘babel-loader!eslint-loader’. webpack reads these from right to left, so eslint-loader will be run before babel-loader. If a loader has specific options that you want to specify, you can use query string syntax. For example, to set the fakeoption option to true for Babel, we’d change that previous example to ‘babel-loader?fakeoption=true!eslint-loader. You can also use the use option instead of the loader option which allows you to pass in an array of loaders if you think that’d be easier to read and maintain. For example, the last examples would be changed to use: [‘babel-loader?fakeoption=true’, ‘eslint-loader’], which can always be changed to multiple lines if you think it would be more readable.
Because Babel is the only loader we’ll be using, this is what our loader configuration looks like so far:
…
rules: [
    { test: /\.jsx?$/, loader: 'babel-loader' }
]
…
If you’re using only one loader, as we are, then there is an alternative way to specify options for the loader, rather than using the query strings: by using the options object, which will just be a map of key-value pairs. So, for the fakeoption example, our config would look like this:
…
rules: [
    {
        test: /\.jsx?$/,
        loader: 'babel-loader',
        options: {
            fakeoption: true
        }
    }
]
…
We will be using this syntax to set a few options for Babel:
…
rules: [
    {
        test: /\.jsx?$/,
        loader: 'babel-loader',
        options: {
            plugins: ['transform-runtime'],
            presets: ['es2015']
        }
    }
]
…
We need to set the presets so that all of the ES2015 features will be transformed into ES5, and we’re also setting it up to use the transform-runtime plugin that we installed. As mentioned, this plugin isn’t necessary, but it’s there to show you how to do it. An alternative would be to use the .babelrc file to set these options, but then I wouldn’t be able to show you how to do it in webpack. In general, I would recommend using .babelrc, but we’ll keep the configuration in here for this project.
There’s just one more thing we need to add for this loader. We need to tell Babel not to process files in the node_modules folder, which should speed up the bundling process. We can do this by adding the exclude property to the loader to specify not to do anything to files in that folder. The value for exclude should be a regular expression, so we’ll set it to /node_modules/.
…
rules: [
    {
        test: /\.jsx?$/,
        loader: 'babel-loader',
        exclude: /node_modules/,
        options: {
            plugins: ['transform-runtime'],
            presets: ['es2015']
        }
    }
]
…
Alternatively, we could have used the include property and specified that we should only use the src directory, but I think we’ll leave it as it is. With that, you should be able to run npm start again and get working ES5 code for the browser as a result. If you decide that you’d rather use the polyfill instead of the transform-runtime plugin, then you’ll have a change or two to make. First, you can delete the line that contains plugins: [‘transform-runtime], (you can also uninstall the plugin via npm if you’re not going to use it). Then, you need to edit the entry section of the webpack configuration so that it looks like this:
entry: [
    'babel-polyfill',
    './src/main.js'
],
Instead of using a string to specify a single entry point, we use an array to specify multiple entry files, the new one being the polyfill. We specify the polyfill first so that it’ll show up in the bundled file first, which is necessary to ensure that the polyfills exist before we try to use them in our code.
Instead of using webpack’s configuration, we could have added a line at the top of src/main.js, import ‘babel-polyfill;, which would accomplish the exact same thing in this case. We used the webpack entry configuration instead because we’ll need it to be there for our last example, and because it’s a good example to show how to combine multiple entries into a single bundle. Anyway, that’s it for the example3 branch of the repository. Once again, you can run npm start to verify that it’s working.
Using The Handlebars Loader
Let’s add another loader in there: Handlebars. The Handlebars loader will compile a Handlebars template into a function, which is what will be imported into the JavaScript when you import a Handlebars file. This is the sort of thing that I love about loaders: you can import non-JavaScript files, and when it’s all bundled, what is imported will be something useable by JavaScript. Another example would be to use a loader that allows you to import an image file and that transforms the image into a base64-encoded URL string that can be used in the JavaScript to add an image inline to the page. If you chain multiple loaders, one of the loaders might even optimize the image to be a smaller file size.
As usual, the first thing we need to do is install the loader with npm install -D handlebars-loader. If you try to use it, though, you’ll find that it also needs Handlebars itself: npm install -D handlebars. This is so that you have control over which version of Handlebars to use without needing to sync your version with the loader version. They can evolve independently.
Now that we have both of these installed, we have a Handlebars template to use. Create a file named numberlist.hbs in the src directory with the following contents:
<ul>
  {{#each numbers as |number i|}}
    <li>{{number}}</li>
  {{/each}}
</ul>
This template expects an array (of numbers judging by the variable names, but it should work even if they aren’t numbers) and creates an unordered list with the contents.
Now, let’s adjust our JavaScript file to use that template to output a list created from the template, rather than just logging out the array itself. Your main.js file should now look like this:
import { map } from 'lodash';
import template from './numberlist.hbs';

let numbers = map([1,2,3,4,5,6], n => n*n);

console.log(template({numbers}));
Sadly, this won’t work right now because webpack doesn’t know how to import numberlist.hbs, because it’s not JavaScript. If we want to, we could add a bit to the import statement that informs webpack to use the Handlebars loader:
import { map } from 'lodash';
import template from 'handlebars-loader!./numberlist.hbs';

let numbers = map([1,2,3,4,5,6], n => n*n);

console.log(template({numbers}));
By prefixing the path with the name of a loader and separating the loader’s name from the file path with an exclamation point, we tell webpack to use that loader for that file. With this, we don’t have to add anything to the configuration file. However, in a large project, you’ll likely be loading in several templates, so it would make more sense to tell webpack in the configuration file that we should use Handlebars so that we don’t need to add handlebars! to the path for every single import of a template. Let’s update the configuration:
…
rules: [
    {/* babel loader config… */},
    { test: /\.hbs$/, loader: 'handlebars-loader' }
]
…
This one was simple. All we needed to do was specify that we wanted handlebars-loader to handle all files with the .hbs extension. That’s it! We’re done with Handlebars and the example4 branch of the repository. Now when you run npm start, you’ll see the webpack bundling output, as well as this:
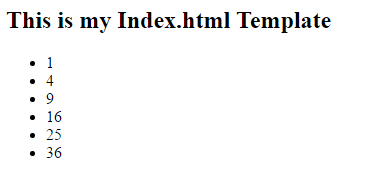
<ul>
    <li>1</li>
    <li>4</li>
    <li>9</li>
    <li>16</li>
    <li>25</li>
    <li>36</li>
</ul>
Using Plugins
Plugins are the way, other than loaders, to install custom functionality into webpack. You have much more freedom to add them to the webpack workflow because they aren’t limited to being used only while loading specific file types; they can be injected practically anywhere and are, therefore, able to do much more. It’s hard to give an impression of how much plugins can do, so I’ll just send you to the list of npm packages that have “webpack-plugin” in the name, which should be a pretty good representation.
We’ll only be touching on two plugins for this tutorial (one of which we’ll see later). We’ve already gone quite long with this post, so why be excessive with even more plugin examples, right? The first plugin we’ll use is HTML Webpack Plugin, which simply generates an HTML file for us — we can finally start using the web!
Before using the plugin, let’s update our scripts so that we can run a simple web server to test our application. First, we need to install a server: npm i -D http-server. Then, we’ll change our execute script to the server script and update the start script accordingly:
…
"scripts": {
  "prebuild": "del-cli dist -f",
  "build": "webpack",
  "server": "http-server ./dist",
  "start": "npm run build -s && npm run server -s"
},
…
After the webpack build is done, npm start will also start up a web server, and you can navigate to localhost:8080 to view your page. Of course, we still need to create that page with the plugin, so let’s move on to that. First, we need to install the plugin: npm i -D html-webpack-plugin.
When that’s done, we need to hop into webpack.config.js and make it look like this:
var HtmlwebpackPlugin = require('html-webpack-plugin');

module.exports = {
    entry: [
        'babel-polyfill',
        './src/main.js'
    ],
    output: {
        path: './dist',
        filename: 'bundle.js'
    },
    module: {
        rules: [
            {
                test: /\.jsx?$/, loader: 'babel-loader', exclude: /node_modules/,
                options: { plugins: ['transform-runtime'], presets: ['es2015'] }
            },
            { test: /\.hbs$/, loader: 'handlebars-loader' }
        ]
    },
    plugins: [
        new HtmlwebpackPlugin()
    ]
};
The two changes we made were to import the newly installed plugin at the top of the file and then add a plugins section at the end of the configuration object, where we passed in a new instance of our plugin.
At this point, we aren’t passing in any options to the plugin, so it’s using its standard template, which doesn’t include much, but it does include our bundled script. If you run npm start and then visit the URL in the browser, you’ll see a blank page, but you should see that HTML being outputted to the console if you open your developer’s tools.
We should probably have our own template and get that HTML to be spitted out onto the page rather than into the console, so that a “normal” person could actually get something from this page. First, let’s make our template by creating an index.html file in the src directory. By default, it’ll use EJS for the templating, however, you can configure the plugin to use any template language available to webpack. We’ll use the default EJS because it doesn’t make much difference. Here are the contents of that file:
<!DOCTYPE html>
<html lang="en">
<head>
    <meta charset="UTF-8">
    <title><%= htmlWebpackPlugin.options.title %></title>
</head>
<body>
    <h2>This is my Index.html Template</h2>
    <div id="app-container"></div>
</body>
</html>
You’ll notice a few things:
- We’re using an option passed to the plugin to define the title (just because we can).
- There’s nothing to specify where the scripts should be added. This is because the plugin will add the scripts to the end of the
bodytag by default. - There’s a random
divwith anidin there. We’ll be using this now.
We now have the template we want; so, at the very least, we won’t have a blank page. Let’s update main.js so that it appends that HTML to that div, instead of putting it into the console. To do this, just update the last line of main.js to document.getElementById(“app-container”).innerHTML = template({numbers});.
We also need to update our webpack configuration to pass in a couple options to the plugin. Your config file should now look like this:
var HtmlwebpackPlugin = require('html-webpack-plugin');

module.exports = {
    entry: [
        'babel-polyfill',
        './src/main.js'
    ],
    output: {
        path: './dist',
        filename: 'bundle.js'
    },
    module: {
        rules: [
            {
                test: /\.jsx?$/, loader: 'babel-loader', exclude: /node_modules/,
                options: { plugins: ['transform-runtime'], presets: ['es2015'] }
            },
            { test: /\.hbs$/, loader: 'handlebars-loader' }
        ]
    },
    plugins: [
        new HtmlwebpackPlugin({
            title: 'Intro to webpack',
            template: 'src/index.html'
        })
    ]
};
The template option specifies where to find our template, and the title option is passed into the template. Now, if you run npm start, you should see the following in your browser:
That brings us to the end of the example5 branch of the repository, in case you’re following along in there. Each plugin will likely have very different options and configurations of their own, because there are so many of them and they can do a wide variety of things, but in the end, they’re practically all added to the plugins array in webpack.config.js. There are also many other ways to handle how the HTML page is generated and populated with file names, which can be handy once you start adding cache-busting hashes to the end of the bundle file names.
If you look at the example project’s repository, you’ll see an example6 branch where I added JavaScript minification via a plugin, but that isn’t necessary unless you want to make some changes to the configuration of UglifyJS. If you don’t like the default settings of UglifyJS, check out the repository (you should only need to look at webpack.config.js) to figure out how to use the plugin and configure it. But if you’re good with the default settings, then all you need to do is pass the -p argument when you run webpack on the command line.
That argument is the “production” shortcut, which is equivalent to using –optimize-minimize and –optimize-occurence-order arguments, the first of which minifies the JavaScript and the second of which optimizes the order in which the modules are included in the bundled script, making for a slightly smaller file size and slightly faster execution. The repository has been done for a while, and I learned about the -p option later, so I decided to keep the plugin example for UglifyJS in there, while informing you of an easier way. Another shortcut you can use is -d, which will show more debugging information from the webpack output, and which will generate source maps without any extra configuration. You can use plenty more command line shortcuts if that’s easier for you.
Lazy-Loading Chunks
One thing that I really enjoyed with RequireJS and couldn’t quite get to work with Browserify (though it may be possible) is lazy-loading modules. One massive JavaScript file will help by limiting the number of HTTP requests required, but it practically guarantees that code will be downloaded that won’t necessarily be used by the visitor in that session.
Webpack has a way of splitting a bundle into chunks that can be lazy-loaded, and it doesn’t even require any configuration. All you need to do is write your code in one of two ways, and webpack will handle the rest. Webpack gives you two methods to do this, one based on CommonJS and the other based on AMD. To lazy-load a module using CommonJS, you’d write something like this:
require.ensure(["module-a", "module-b"], function(require) {
    var a = require("module-a");
    var b = require("module-b");
    // …
});
Use require.ensure, which will make sure the module is available (but not execute it) and pass in an array of module names and then a callback. To actually use the module within that callback, you’ll need to require it explicitly in there using the argument passed to your callback.
Personally, this feels verbose to me, so let’s look at the AMD version:
require(["module-a", "module-b"], function(a, b) {
    // …
});
With AMD, you use require, pass in an array of module dependencies, then pass a callback. The arguments for the callback are references to each of the dependencies in the same order that they appear in the array.
Webpack 2 also supports System.import, which uses promises rather than callbacks. I think this will be a useful improvement, although wrapping this in a promise shouldn’t be hard if you really want them now. Note, however, that System.import is already deprecated in favor of the newer specification for import(). The caveat here, though, is that Babel (and TypeScript) will throw syntax errors if you use it. You can use babel-plugin-dynamic-import-webpack, but that will convert it to require.ensure rather than just helping Babel see the new import function as legal and leave it alone so webpack can handle it. I don’t see AMD or require.ensure going away any time soon, and System.import will be supported until version 3, which should be decently far in the future, so just use whichever one you fancy the best.
Let’s augment our code to wait for a couple seconds, then lazy-load in the Handlebars template and output the list to the screen. To do that, we’ll remove the import of the template near the top and wrap the last line in a setTimeout and an AMD version of require for the template:
import { map } from 'lodash';

let numbers = map([1,2,3,4,5,6], n => n*n);

setTimeout( () => {
    require(['./numberlist.hbs'], template => {
        document.getElementById("app-container").innerHTML = template({numbers});
    })
}, 2000);
Now, if you run npm start, you’ll see that another asset is generated, which should be named 1.bundle.js. If you open up the page in your browser and open your development tools to watch the network traffic, you’ll see that after a 2-second delay, the new file is finally loaded and executed. This, my friend, isn’t all that difficult to implement but it can be huge for saving on file size and can make the user’s experience so much better.
Note that these sub-bundles, or chunks, contain all of their dependencies, except for the ones that are included in each of their parent chunks. (You can have multiple entries that each lazy-load this chunk and that, therefore, have different dependencies loaded into each parent.)
Creating A Vendor Chunk
Let’s talk about one more optimization that can be made: vendor chunks. You can define a separate bundle to be built that will store “common” or third-party code that is unlikely to change. This allows visitors to cache your libraries in a separate file from your application code, so that the libraries won’t need to be downloaded again when you update the application.
To do this, we’ll use a plugin that comes with webpack, called CommonsChunkPlugin. Because it’s included, we don’t need to install anything; all we need to do is make some edits to webpack.config.js:
var HtmlwebpackPlugin = require('html-webpack-plugin');
var UglifyJsPlugin = require('webpack/lib/optimize/UglifyJsPlugin');
var CommonsChunkPlugin = require('webpack/lib/optimize/CommonsChunkPlugin');

module.exports = {
    entry: {
        vendor: ['babel-polyfill', 'lodash'],
        main: './src/main.js'
    },
    output: {
        path: './dist',
        filename: 'bundle.js'
    },
    module: {
        rules: [
            {
                test: /\.jsx?$/, loader: 'babel-loader', exclude: /node_modules/,
                options: { plugins: ['transform-runtime'], presets: ['es2015'] }
            },
            { test: /\.hbs$/, loader: 'handlebars-loader' }
        ]
    },
    plugins: [
        new HtmlwebpackPlugin({
            title: 'Intro to webpack',
            template: 'src/index.html'
        }),
        new UglifyJsPlugin({
            beautify: false,
            mangle: { screw_ie8 : true },
            compress: { screw_ie8: true, warnings: false },
            comments: false
        }),
        new CommonsChunkPlugin({
            name: "vendor",
            filename: "vendor.bundle.js"
        })
    ]
};
Line 3 is where we import the plugin. Then, in the entry section, we use a different setup, an object literal, to specify multiple entry points. The vendor entry marks what will be included in the vendor chunk — which includes the polyfill as well as Lodash — and we put our main entry file into the main entry. Then, we simply need to add the CommonsChunkPlugin to the plugins section, specifying the “vendor” chunk as the chunk to base it on and specifying that the vendor code will be stored in a file named vendor.bundle.js.
By specifying the “vendor” chunk, this plugin will pull all of the dependencies specified by that chunk out of the other entry files and only place them in this vendor chunk. If you do not specify a chunk name here, it’ll create a separate file based on the dependencies that are shared between the entries.
When you run webpack, you should see three JavaScript files now: bundle.js, 1.bundle.js and vendor.bundle.js. You can run npm start and view the result in the browser if you’d like. It seems that webpack will even put the majority of its own code for handling the loading of different modules into the vendor chunk, which is definitely useful.
And that concludes the example8 branch, as well as the tutorial. I have touched on quite a bit, but it only gives you a tiny taste of what is possible with webpack. Webpack enables easy CSS modules, cache-busting hashes, image optimization and much much more — so much that even if I wrote a massive book on the subject, I couldn’t show you everything, and by the time I finished writing that book, most (if not all) of it would be outdated! So, give webpack a try today, and let me know if it improves your workflow. God bless and happy coding!
Further Reading
- Preload With Webpack
- How To Harness The Machines: Being Productive With Task Runners
- Writing Next Generation Reusable JavaScript Modules in ECMAScript 6
- A Glimpse Into The Future With React Native For Web


