Getting Started With VR Interface Design

Email Newsletter
Weekly tips on front-end & UX.
Trusted by 182,000+ folks.


 Custom Web Forms for Angular, React, & Vue. Your backend.
 Celebrating 10 million developers
The virtual realm is uncharted territory for many designers. In the last few years, we’ve witnessed an explosion in virtual reality (VR) hardware and applications. VR experiences range from the mundane to the wondrous, their complexity and utility varying greatly.
Taking your first steps into VR as a UX or UI designer can be daunting. We know because we’ve been there. But fear not! In this article, we’ll share a process for designing VR apps that we hope you’ll use to start designing for VR yourself. You don’t need to be an expert in VR; you just need to be willing to apply your skills to a new domain. Ultimately, as a community working together, we can accelerate VR to reach its full potential faster.
What Kinds Of VR Apps Are There?
Generally speaking from a designer’s perspective, VR applications are made up of two types of components: environments and interfaces.
You can think of an environment as the world that you enter when you put on a VR headset — the virtual planet you find yourself on, or the view from the rollercoaster that you’re riding.
An interface is the set of elements that users interact with to navigate an environment and control their experience. All VR apps can be positioned along two axes according to the complexity of these two components.
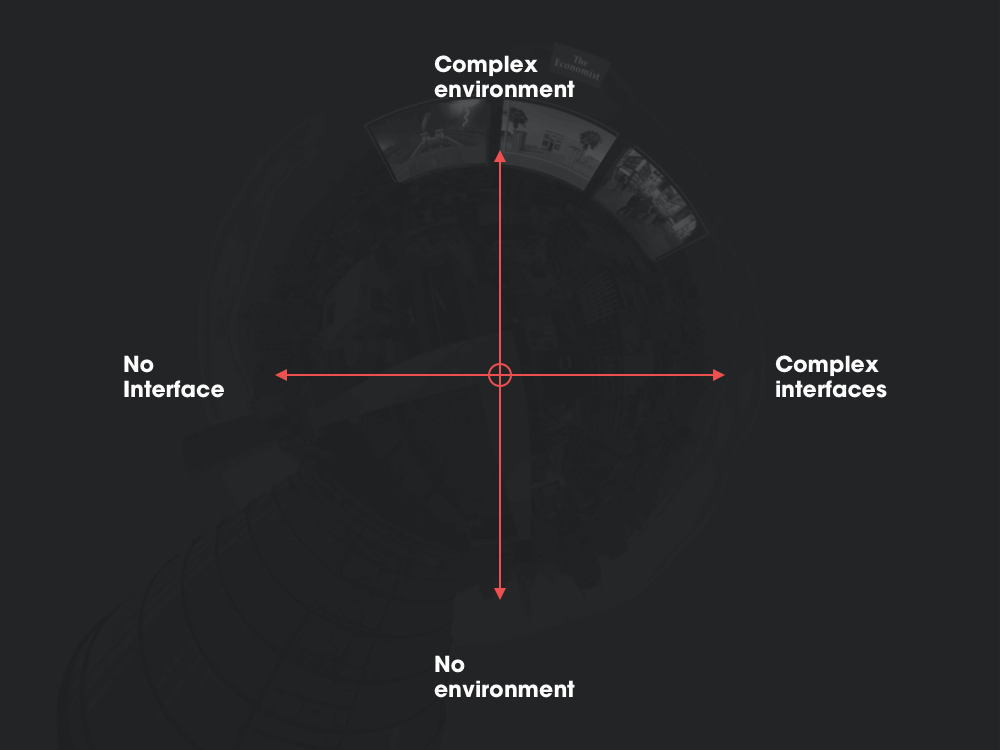
In the top-left quadrant are things like simulators, such as the rollercoaster experience linked to above. These have a fully formed environment but no interface at all. You’re simply locked in for the ride.
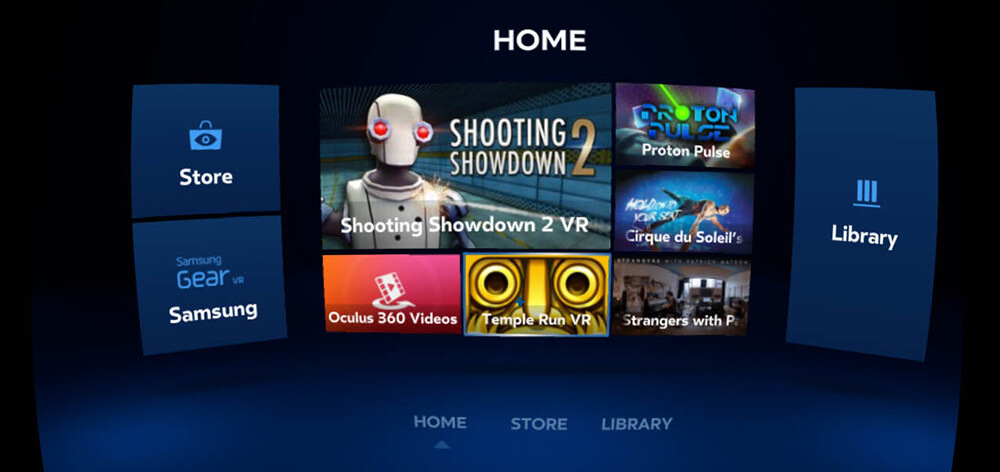
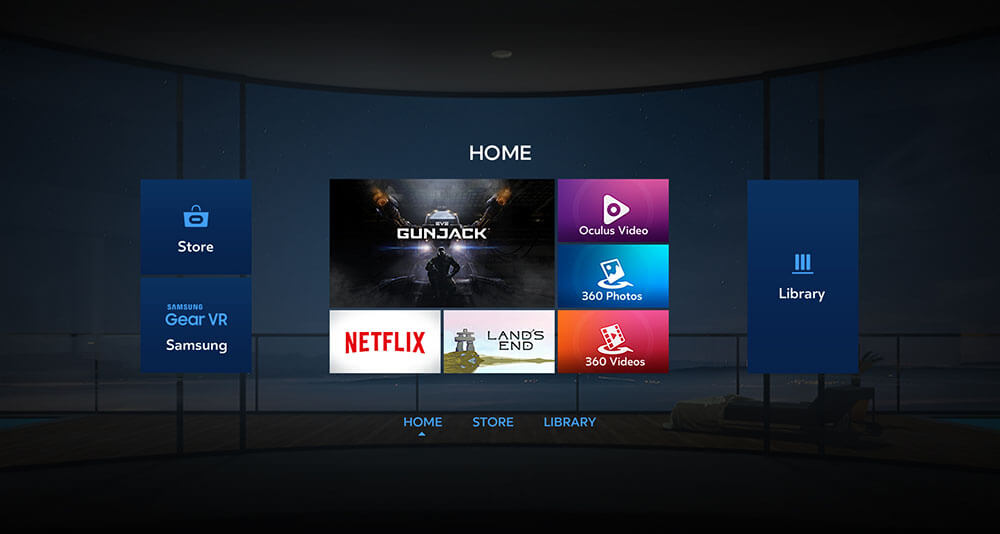
In the opposite quadrant are apps that have a developed interface but little or no environment. Samsung’s Gear VR home screen is a good example.
Designing virtual environments such as places and landscapes requires proficiency with 3D modelling tools, putting these elements out of reach for many designers. However, there’s a huge opportunity for UX and UI designers to apply their skills to designing user interfaces for virtual reality (or VR UIs, for short).
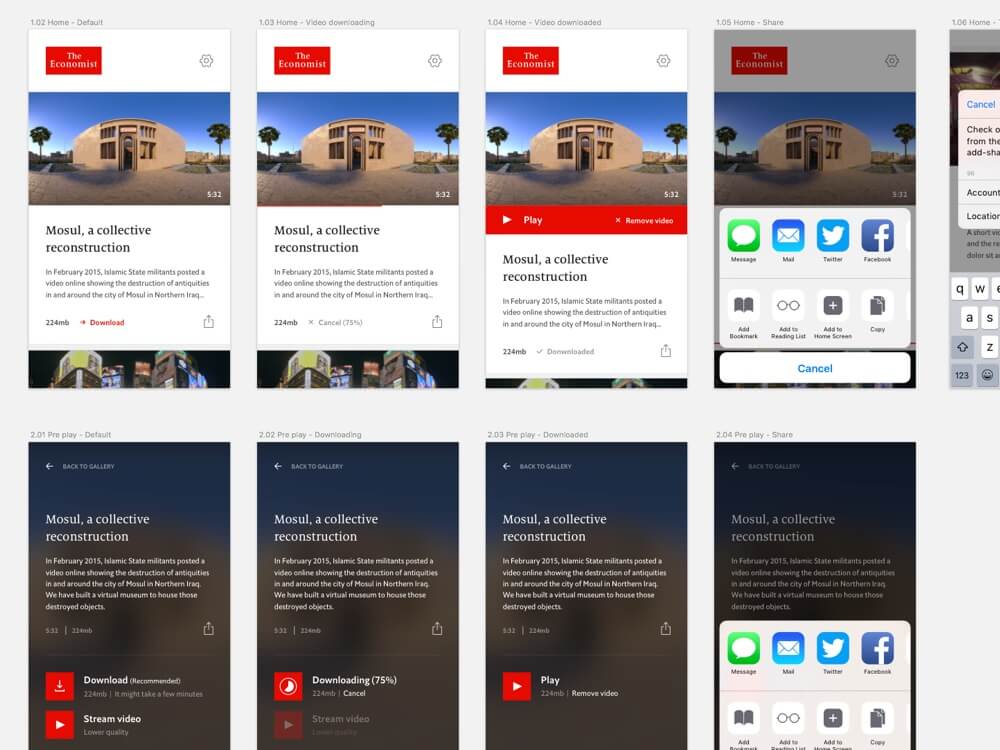
The first full VR UI design we did was an app for The Economist, created in collaboration with VR production studio Visualise. We did the design, while Visualise created the content and developed the app.
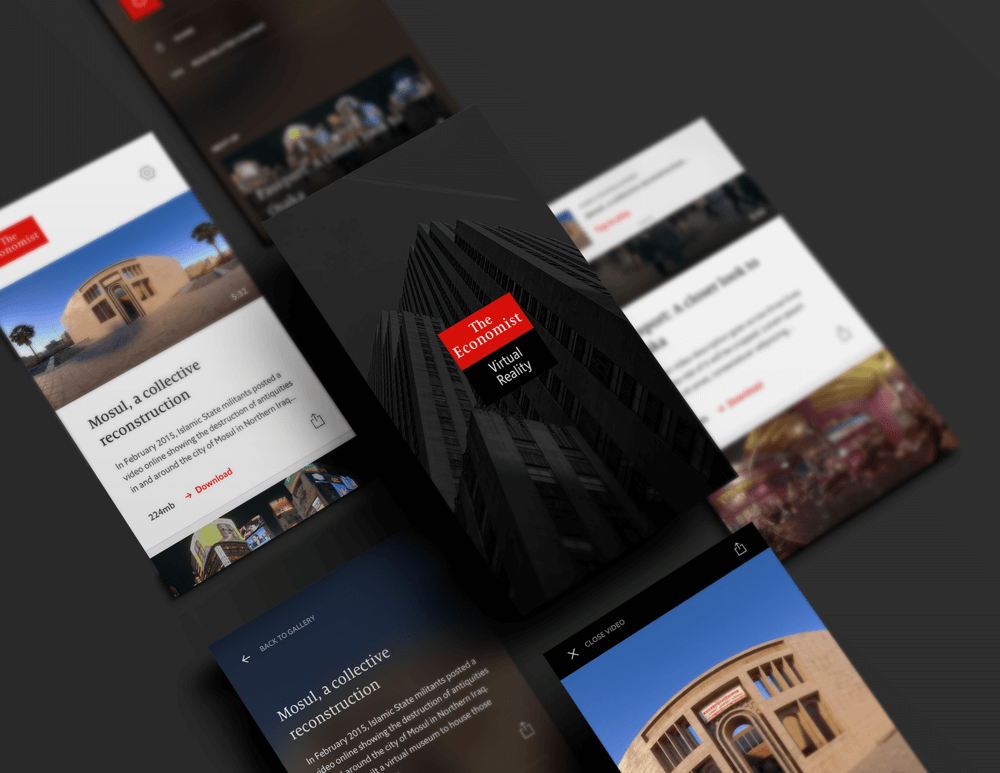
We’ll use this as a working example throughout the next section, in which we’ll lay out an approach to designing VR apps, before getting into the nitty-gritty of designing interfaces for VR. You can download the Economist app for Gear VR from the Oculus website.
A Process For VR UI Design
Whereas most designers have figured out their workflow for designing mobile apps, processes for designing VR interfaces are yet to be defined. When the first VR app design project came through our door, the logical first step was for us to devise a process.
Traditional Workflows, New Territory
When we first played with Gear VR by Samsung, we noticed similarities to traditional mobile apps. Interface-based VR apps work according to the same basic dynamic as traditional apps: Users interact with an interface that helps them navigate pages. We’re simplifying here, but just keep this in mind for now.
Given the similarity to traditional apps, the tried-and-tested mobile app workflows that designers have spent years refining won’t go to waste and can be used to craft VR UIs. You’re closer to designing VR apps than you think!
Before describing how to design VR interfaces, let’s step back and run through the process for designing a traditional mobile app.
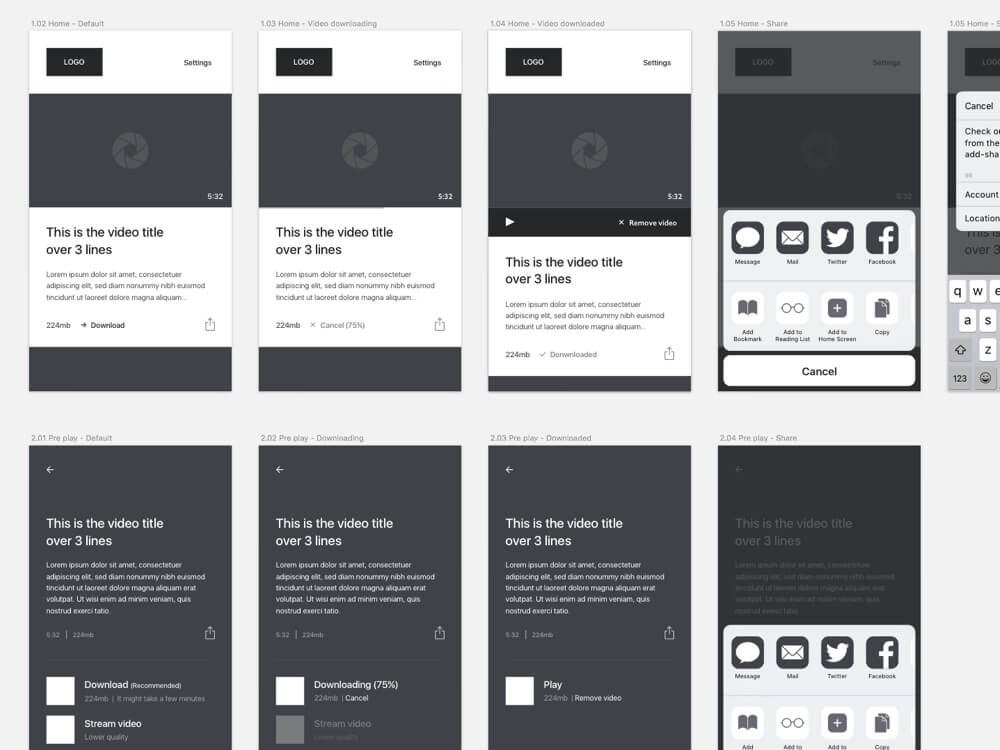
1. Wireframes
First, we’ll go through rapid iterations, defining the interactions and general layout.
2. Visual Design
At this stage, the features and interactions have been approved. Brand guidelines are now applied to the wireframes, and a beautiful interface is crafted.
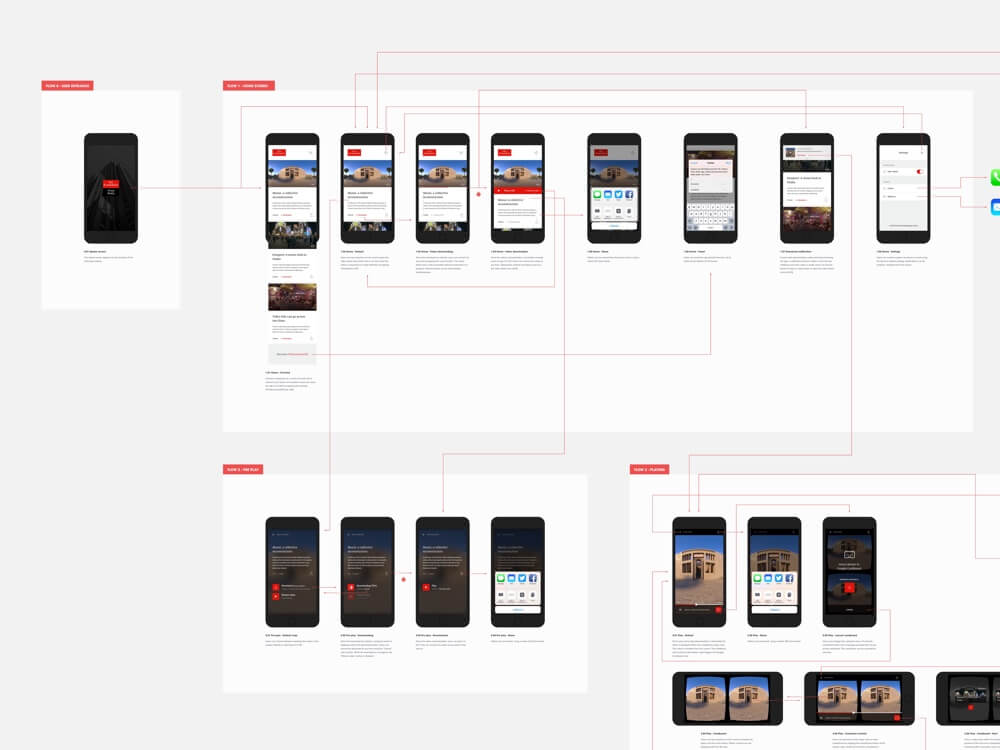
3. Blueprint
Here, we’ll organize screens into flows, drawing links between screens and describing the interactions for each screen. We call this the app’s blueprint, and it will be used as the main reference for developers working on the project.
Now, how can we apply this workflow to virtual reality?
Set Up
Canvas Size
The simplest problems can be the most challenging. Faced with a 360-degree canvas, one might find it difficult to know where to begin. It turns out that UX and UI designers only need to focus on a certain portion of the total space.
We spent weeks trying to figure out what canvas size would make sense for VR. When you work on a mobile app, the canvas size is determined by the device’s size: 1334 × 750 pixels for the iPhone 6 and roughly 1280 × 720 pixels for Android.
To apply this mobile app workflow to VR UIs, you first have to figure out a canvas size that makes sense.
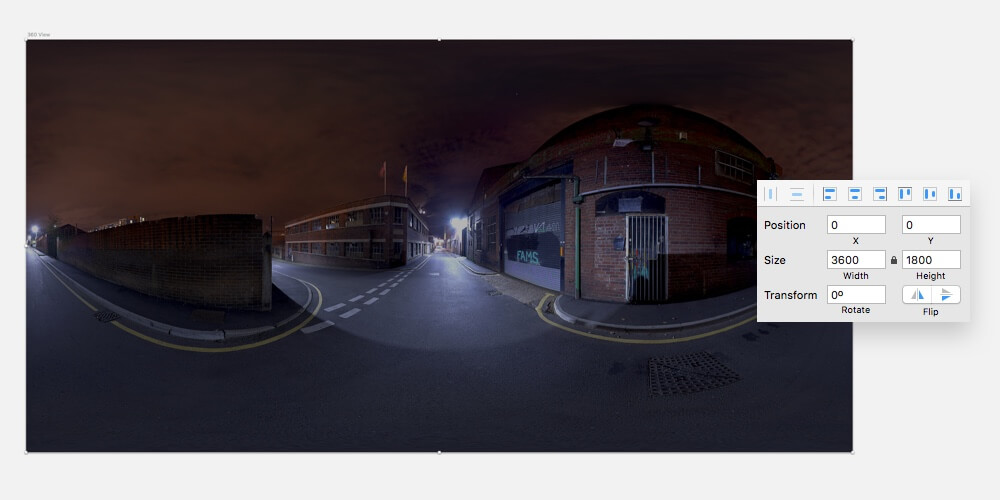
Below is what a 360-degree environment looks like when flattened. This representation is called an equirectangular projection. In a 3D virtual environment, these projections are wrapped around a sphere to mimic the real world.
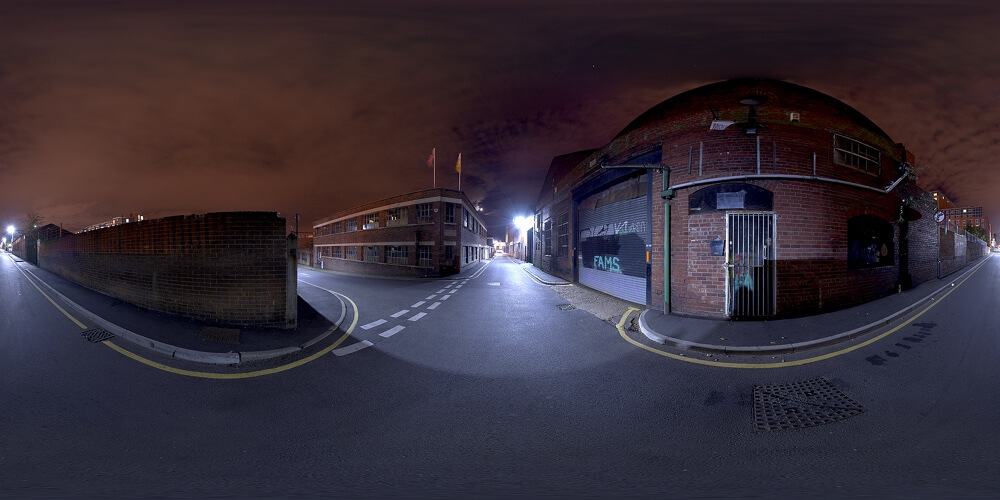
The full width of the projection represents 360 degrees horizontally and 180 degrees vertically. We can use this to define the pixel size of the canvas: 3600 × 1800.
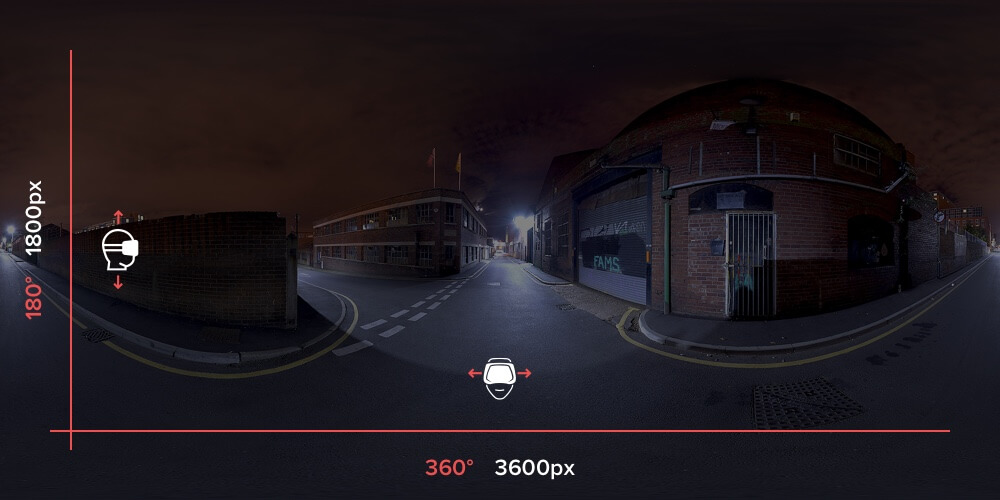
Working with such a big size can be a challenge. But because we’re primarily interested in the interface aspect of VR apps, we can concentrate on a segment of this canvas.
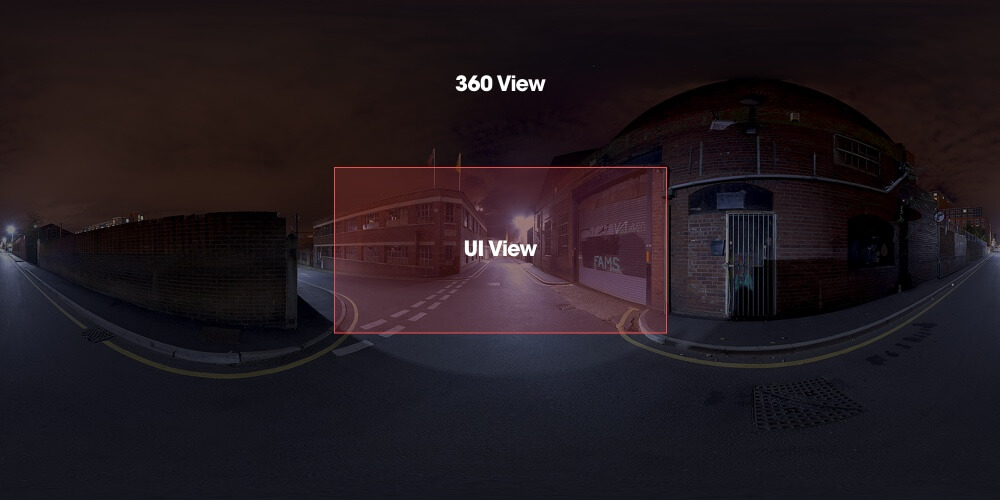
Building on Mike Alger’s early research on comfortable viewing areas, we can isolate a portion where it makes sense to present the interface.
The area of interest represents one ninth of the 360-degree environment. It’s positioned right at the centre of the equirectangular image and is 1200 × 600 pixels in size.
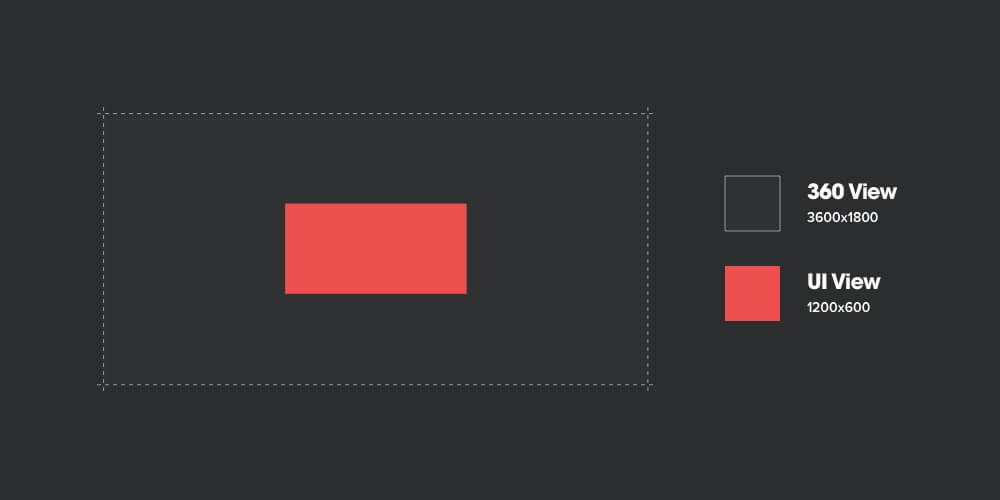
Let’s sum up:
- “360 View“: 3600 × 1800 pixels
- “UI View“: 1200 × 600 pixels
Testing
The reason for using two canvases for a single screen is testing. The “UI View” canvas helps to keep our focus on the interface we’re crafting and makes it easier to design flows.
Meanwhile, the “360 View” is used to preview the interface in a VR environment. To get a real sense of proportions, testing the interface with a VR headset is necessary.

Tools
Before we get started with the walkthrough, here are the tools we’ll need:
- Sketch We’ll use Sketch to design our interfaces and user flows. If you don’t have it, you can download a trial version. Sketch is our preferred interface design software, but if you’re more comfortable using Photoshop or anything else, that would work, too.
- GoPro VR Player GoPro VR Player is a 360-degree content viewer. It’s provided by GoPro and is free. We’ll use it to preview our designs and test them in context.
- Oculus Rift Hooking Oculus Rift into the GoPro VR Player will enable us to test the design in context.
A Process For VR Interface Design
In this section, we’ll run through a short tutorial on how to design a VR interface. We’ll design a simple one together, which should take five minutes tops.
Download the assets pack, which contains presized UI elements and the background image. If you want to use your own assets, go for it; it won’t be a problem.
1. Set Up “360 View”
First things first. Let’s create the canvas that will represent the 360-degree view. Open a new document in Sketch, and create an artboard: 3600 × 1800 pixels.
Import the file named background.jpg, and place it in the middle of the canvas. If you’re using your own equirectangular background, make sure its proportions are 2:1, and resize it to 3600 × 1800 pixels.
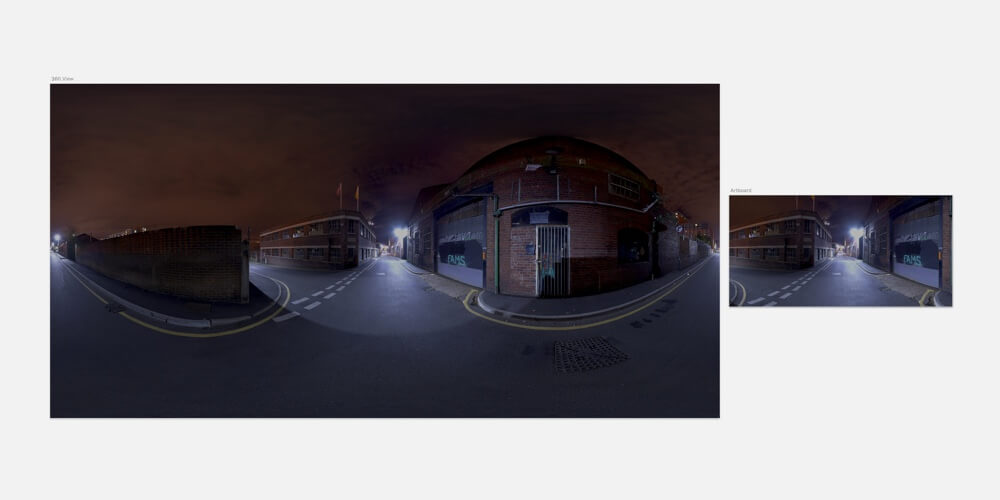
2. Set Up Artboard
As mentioned above, the “UI View” is a cropped version of the “360 View” and focuses on the VR interface only.
Create a new artboard next to the previous one: 1200 × 600 pixels. Then, copy the background that we just added to our “360 View,” and place it in the middle of our new artboard. Don’t resize it! We want to keep a cropped version of the background here.
3. Design The Interface
We’re going to design our interface on the “UI View” canvas. We’ll keep things simple for the sake of this exercise and add a row of tiles. If you’re feeling lazy, just grab the file named tile.png in the assets pack and drag it into the middle of the UI view.
Duplicate it, and create a row of three tiles.
Grab kickpush-logo.png from the assets pack, and place it above the tiles.
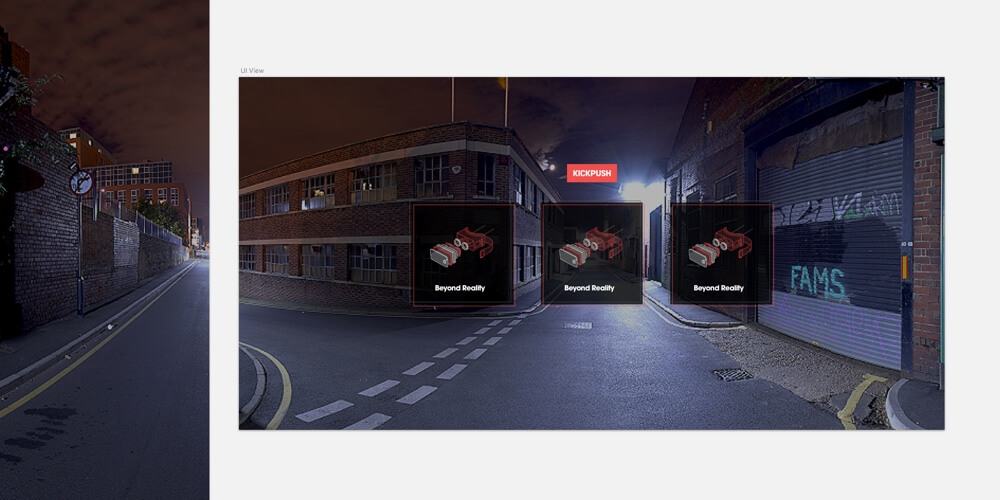
Looking pretty good, eh?
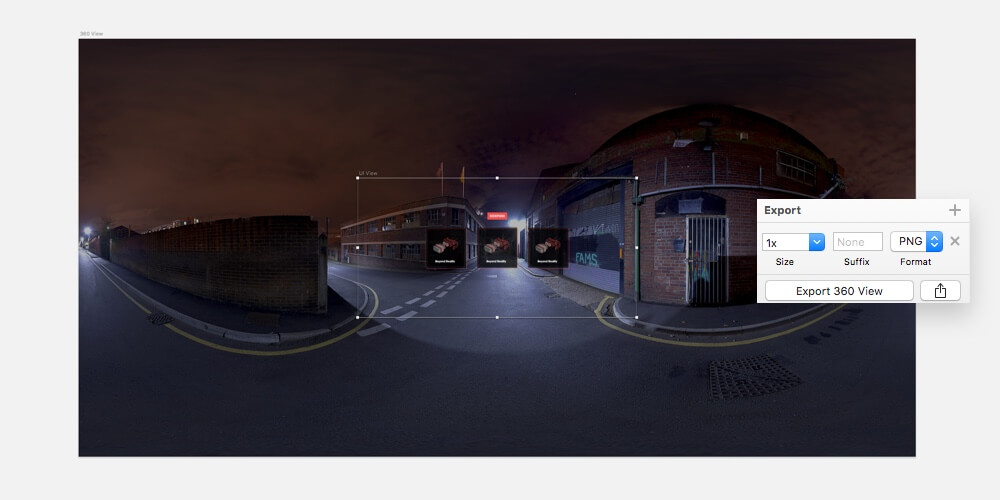
4. Merge Artboards And Export
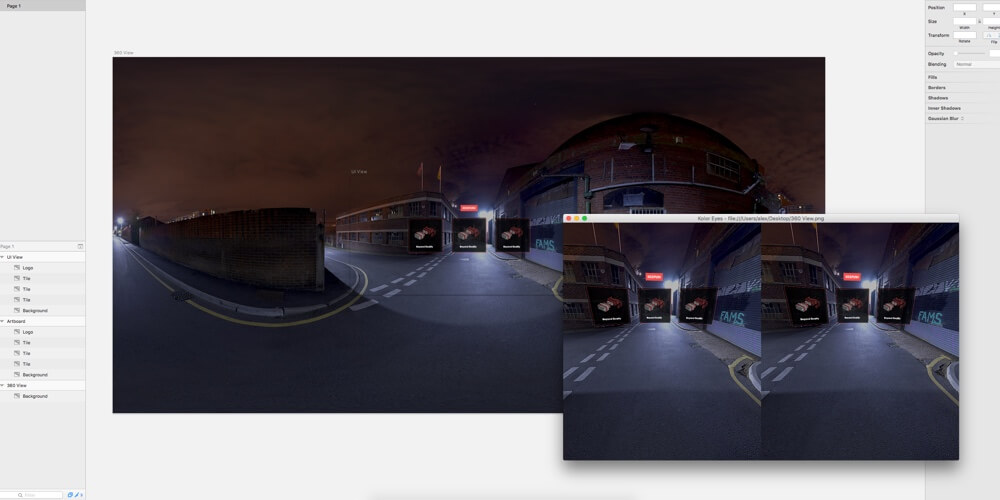
Now for the fun stuff. Make sure the “UI View” artboard is above the “360 View” artboard in the layers list on the left.
Drag the “UI View” artboard to the middle of the “360 View” artboard. Export the “360 View” artboard as a PNG; the “UI View” will be on top of it.
5. Test It In VR
Open the GoPro VR Player and drag the “360 View” PNG that you just exported into the window. Drag the image with your mouse to preview your 360-degree environment.
We’re done! Pretty simple when you know how, right?
If you have an Oculus Rift set up on your machine, then the GoPro VR Player should detect it and allow you to preview the image using your VR device. Depending on your configuration, you might have to mess around with the display settings in MacOS.
Technical Considerations
Low Resolution
The resolution of the VR headset is pretty bad. Well, that’s not entirely true: It’s equivalent to your phone’s resolution. However, considering the device is 5 centimeters from your eyes, the display doesn’t look crisp.
To get a crisp VR experience, we would need an 8K display per eye. That’s a 15,360 × 7680-pixel display. We’re pretty far off from that, but we’ll get there eventually.
Text Readability
Because of the display’s resolution, all of your beautifully crisp UI elements will look pixelated. This means, first, that text will be difficult to read and, secondly, that there will be a high level of aliasing on straight lines. Try to avoid using big text blocks and highly detailed UI elements.
Finishing Touches
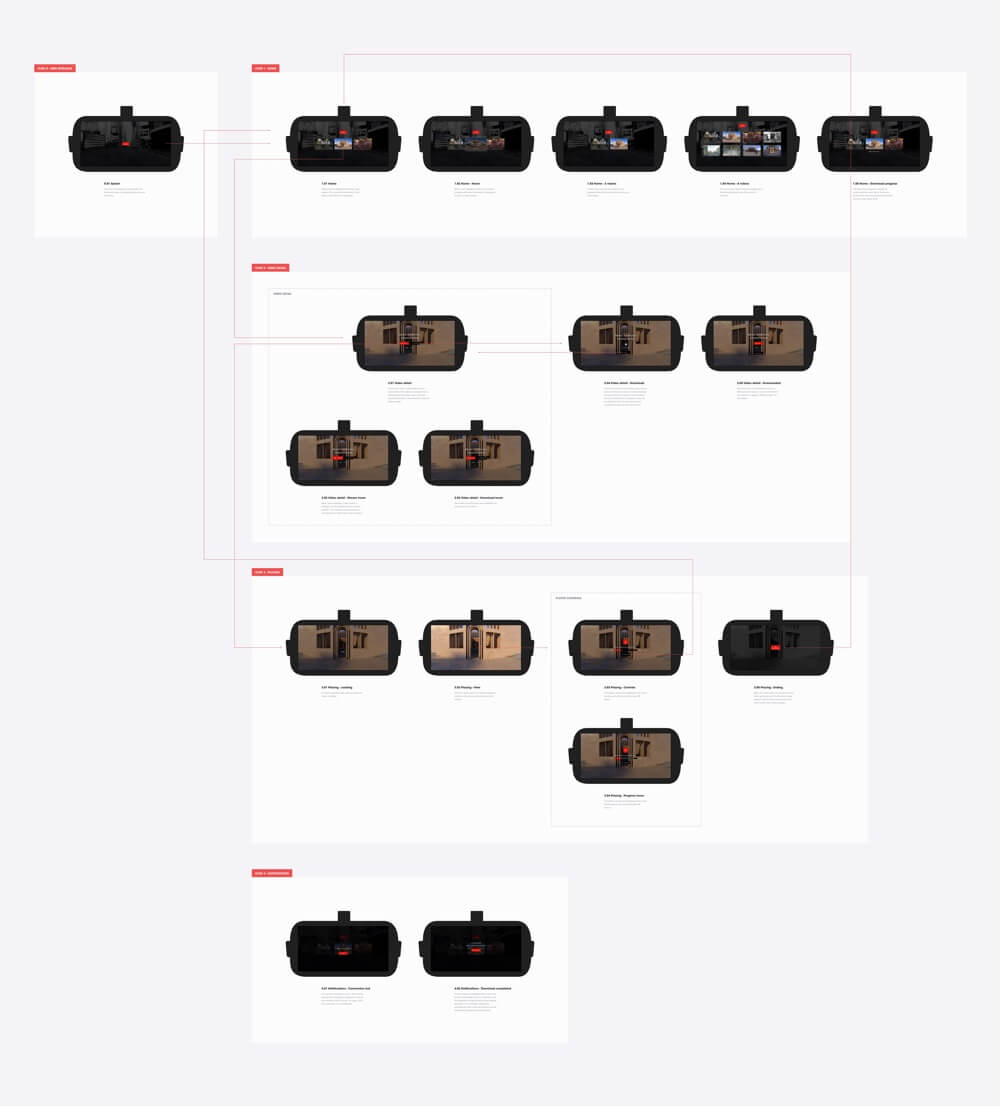
Blueprint
Remember the blueprint from our mobile app design process? We’ve adapted this practice to VR interfaces. Using our UI views, we map and organize our flows into a comprehensible blueprint, ideal for developers to understand the overall architecture of the app we’ve designed.
Motion Design
Designing a beautiful UI is one thing, but showing how it’s supposed to animate is a different story. Once again, we’ve decided to approach it with a two-dimensional perspective.
Using our Sketch designs, we animate the interface with Adobe After Effects and Principle. While the outcome is not a 3D experience, it’s used as a guideline for the development team and to help our clients understand our vision at an early stage of the process.
We know what you’re thinking, though: “That’s cool, but VR apps can get way more complicated.” Yes, they can. The question is, to what extent can we apply our current UX and UI practices to this new medium?
How Far Can VR UIs Go?
Inter-Your-Faces
Some VR experiences rely so heavily on the virtual environment that a traditional interface that sits on top might not be the optimal way for the user to control the app. In this case, you might want users to interact directly with the environment itself.
Imagine that you’re making an app for a luxury travel agent. You’d want to transport the user to potential holiday destinations in the most vivid way possible. So, you invite the user to put on the headset and begin the experience in your swanky Chelsea office.
To transition from the office to some far away place, the user needs to choose where they want to go. They could pick up a travel magazine and flick through it until they land on an appealing page. Or there could be a collection of interesting objects on your desk that whisk the user to different locations depending on which one they pick up.
This is definitely cool, but there are some drawbacks. To get the full effect, you’d need a more advanced VR headset with handheld controllers. Plus, an app like this takes quite a bit more effort to develop than a set of well-presented options organized like in a traditional app interface.
Viva La Revolución!
The reality is that these immersive experiences are not commercially viable for most companies. Unless you’ve got virtually unlimited resources, like Valve and Google, creating an experience like the one described above is probably too costly, too risky and too time-consuming.
This kind of experience is brilliant for showing off that you’re at the cutting edge of media and technology, but not so great for taking your product to market through a new medium. Accessibility is important.
Usually, when a new format emerges, it’s pushed to the limit by early adopters: the creators and innovators of this world. In time, and with enough learning and investment, it becomes accessible to a wider range of potential users.
As VR headsets become more commonplace, companies will start to spot opportunities to integrate VR into the ways that they engage with customers.
From our perspective, VR apps with intuitive UIs — that is, UIs closer to what people are already accustomed to with their wearables, phones, tablets and computers — are what will make VR an affordable and worthwhile investment for the majority of companies that pursue it.
Time To Board The Rocketship
We hope we’ve made the VR space a bit less scary with this article and inspired you to start designing for VR yourself.
They say that if you want to travel fast, go alone. But if you want to travel far, travel together. We want to travel far. At Kickpush, we think that every company will have a VR app someday, just like every company now has a mobile website (or should have — it’s 2017, dang it!).
So, we’re building a rocketship, a joint effort by designers around the globe to boldly go where no designer has gone before. The sooner that producing VR apps make sense for companies, the sooner the whole ecosystem will blow up.
Our next challenges as digital product designers are more complex applications and handling other types of input through controllers. To begin to tackle this we’ll need robust prototyping tools that let us create and test designs quickly and easily. We’ll be writing a follow up article that looks at some of the early attempts to do this, and at some of the new tools in development.
Stay tuned!
Useful Links
- The UX of VR, Max Glenister “A curated list of resources to help you on your journey into the user experience of virtual reality.”
- Mike Alger (research vlog), YouTube channel
- AR & VR Weekly (newsletter), Josh Anon “A curated list of AR/VR/MR news and interesting pieces sent about once a week.”
- Kickpush blog
- “Virtual Reality Glossary,” Freefly VR
Further Reading
- Developing For Virtual Reality: What We Learned
- Gamification And UX: Where Users Win Or Lose
- True Lies Of Optimistic User Interfaces
- Designing Card-Based User Interfaces


