How To Set Up An Automated Testing System Using Android Phones (A Case Study)

Email Newsletter
Weekly tips on front-end & UX.
Trusted by 182,000+ folks.
 Register Free Now

 Try ProtoPie AI free →
 Celebrating 10 million developers

Regression testing is one of the most time-consuming tasks when developing a mobile Android app. Using myMail as a case study, I’d like to share my experience and advice on how to build a flexible and extensible automated testing system for Android smartphones — from scratch.
The team at myMail currently uses about 60 devices for regression testing. On average, we test roughly 20 builds daily. Approximately 600 UI tests and more than 3,500 unit tests are run on each build. The automated tests are available 24⁄7, and save our testers a ton of time helping us to create high-quality applications. Without them, it would have taken us 36 hours (including wait time) to test every unit, or roughly 13 hours without the wait. It takes about 1.5 hours to run an automated test, including setup and translation updates. This cuts out weeks of tester work every day.
In case you write automated tests and do not deal with infrastructure, we will go through the process from the very beginning, from purchasing the phone and reinstalling firmware to creating Docker containers with the automated test phone inside. Watch the video to see the result.
What Phones Are Best For Android Automated Tests?
When Android was just beginning to gain popularity, test developers had to choose the lesser of two evils: buy an expensive set of phones or work with slow and buggy virtual devices. Today, things are much simpler because virtual machines such as Android x86 and HAXM are available.
Yet there is still a choice to make. Many developers prefer virtual machines for automated tests, but actual phones have become a rather affordable option, even if your budget for test automation is limited. Real phones provide the most accurate picture of the application’s actual behavior. By using real phones, you can be certain that users will be able to perform any action in the program.
Recommended reading: Where Are The World’s Best Open Device Labs?
Accordingly, I recommend that even people who currently use virtual machines for test automation on Android obtain some real devices to ensure that their tests are also correct in real life. I’ll tell you how to choose a phone for automated regression testing and tell you what other equipment you’ll need in order to get everything to work together 24⁄7.
First of all, I should warn you that we will be choosing a phone model for regression tests, not configuration tests. Let’s assume that we have a lot of tests, for example 500 to 1000 application tests, that take 10 hours, and that we need several phones to complete them in 15 minutes. This sounds a little counterintuitive — why not just buy 10 to 20 different models of phones? The answer lies in the labor costs for the test automation code. You would end up writing the same test for different phone interfaces. When working with 20 different models, writing even one simple test would take a lot of time. But our present goal is to accelerate the execution of automated tests without increasing the labor costs of the programmer writing the tests.
The phone market is large, so it’s hard to know where to look first. What should be the criteria when choosing a phone? After some trial and error, I ended up with the following requirements (I’m not including any unit prices, since they should be readily available):
- There is a way to obtain the root privileges.
- There is a way to unlock the phone’s bootloader.
- The phone has an Android near-stock version, or there is an option to install the near-stock version. This means you won’t have to try a ton of different tests for various interfaces.
- The phone’s memory is no less than 1 GB. You can work with less, but various large object display checks will take a long time, even with consistently written tests.
- Ideally, the phone has long-term manufacturer support. If this is the case, we have a chance of extending its life with new OS versions.
These criteria for purchasing a phone boil down to two things: Phone should not be slow and stuttering, and its software innards should be customizable as much as possible. Eliminating lag time saves us from the troubles of time-consuming tests, and customizability lets us correct problems that may arise over time (deterioration of operating system versions, internal phone bugs, a need to change system settings). If you find that something incorrectly works on the phone, then you at least have the chance to fix it yourself.
Root privileges, for example, let you use the command line to easily change the time on the phone, switch between Wi-Fi networks, and enable and disable system programs to simulate working with and without them. The unlocked boot sector lets users update the operating system and add custom firmware that extends the phone’s life even if the manufacturer discontinues support (which, unfortunately, is the case with most phones we have now). It would be sad if users running on Android 4.4 or Android 6 encountered an error, but your phones with automated tests run on Android 5, so nothing can be changed.
Unfortunately, you can’t ask the seller about most of these criteria at the time of purchase. That’s why we must first go to the XDA Developers forums and 4PDA forums to find all of the details we need to know about the model. If the model has been out for a while, pay attention to information about defects, memory and battery life — your device will be all but useless without these. Don’t be distracted by screens, buttons, cases, speakers and other features usually important to a user. The phone will work perfectly fine regardless (although this does depend on the specifics of your project).
Recommended reading: The Thumb Zone: Designing For Mobile Users
Once you’ve chosen a model, you should probably order one or two for pretests to be sure that the OS doesn’t have any surprises in store, that all of the written tests run properly and that the hardware matches the manufacturer’s specifications. Below are the worst blunders I’ve seen in my experience as a buyer:
- A phone model with a lot of local subtypes
This is a problem if you can only get root privileges or unlock the bootloader for just some of them. It is hard to find a certified Russian phone in unofficial stores, because fake and authentic phones look the same. Additionally, many sellers or their vendors reflash the model names, hardware specifications, regions and even OS versions. It's quite possible to see one model in the Android settings, another model in the bootloader and a third model in a shell using
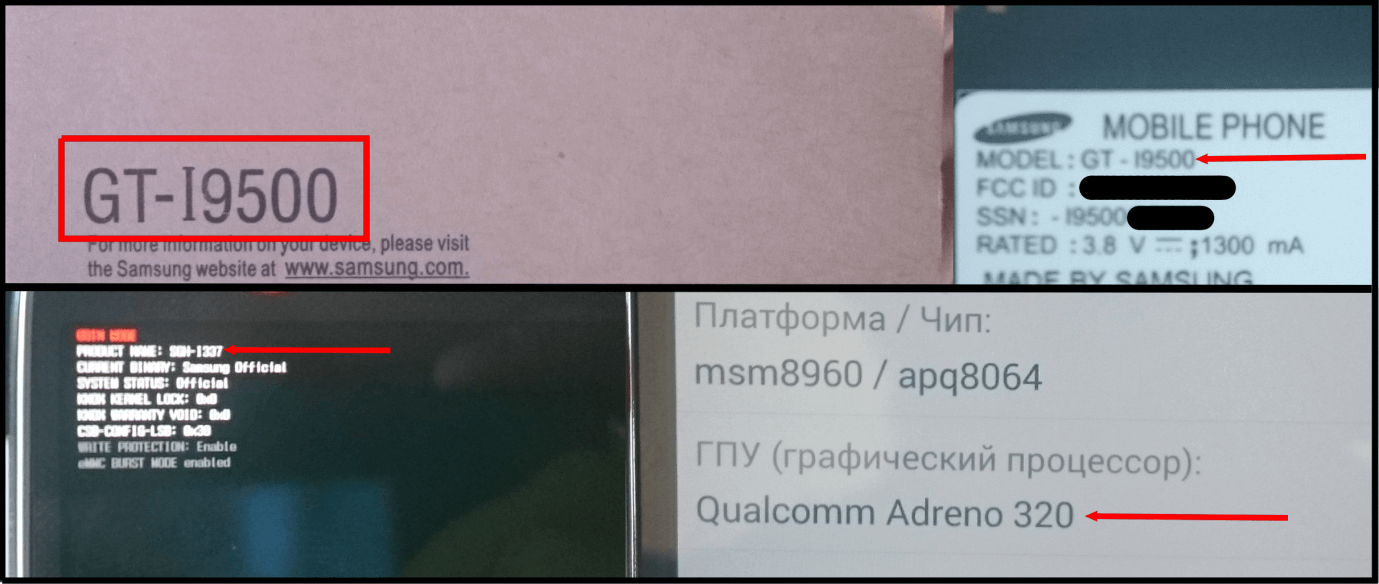
getpropand get-IDs. The issue is that the phone has passed through multiple hands and regions before getting to you. Its first owner was some Verizon subscriber from South Dakota. He returns it, and the now refurbished device somehow ends up with some seller in Tel Aviv, who unskillfully installs his local OS version on the hardware. Then, a seller from Moscow buys it and sells it again as a new phone. The courier brings it to you, and you receive your new eight-core reflashable Russian device, having no clue that you are actually holding a six-core locked area-specific device originally from a US cellular service customer.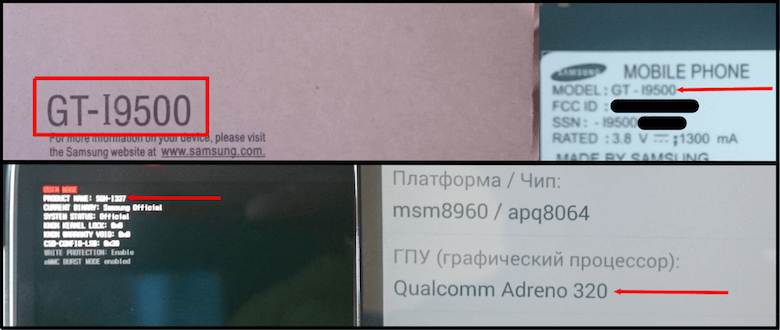
The information in the image above is for an expensive phone with “current” software that, according to its specifications, is actually an older AT&T model that has been reflashed. (View large version) - Identical serial numbers
It's easier to identify the problem here, but unfortunately it's common even among official dealers. The lack of a serial number is a problem associated with many inexpensive devices. If Android Debug Bridge (ADB) is used in your automated tests and several devices are connected to the machine, then you'll need to either rewrite the ADB code (because it would only see one device) or, if the purchase was made according to the previously mentioned criteria, manually enter the unique serial number.
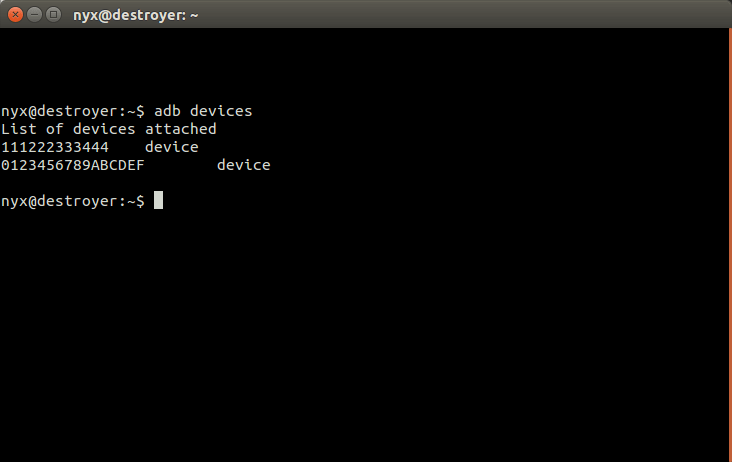
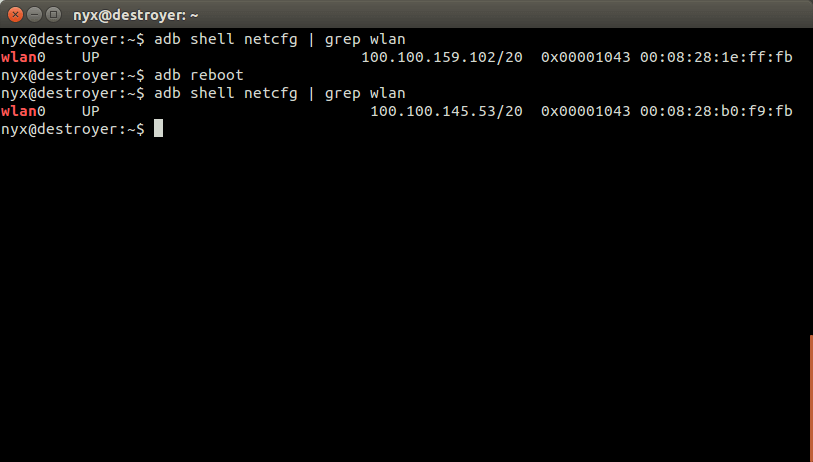
Typical serial numbers for inexpensive phones - A pseudorandom MAC address from the Wi-Fi module after restarting the phone
This was quite a serious issue, because we discovered it only after I was sure that “everything was OK” — i.e. the phone met our requirements, so we ordered 20 more. During our automated tests, the phones sometimes restarted. After a while, the tests started to fail due to a lack of Wi-Fi connectivity, even though everything appeared to be running normally. There was a network connection, and everything worked properly after turning the Wi-Fi module off and on. The problem was that, at some point after the reboots, a couple of the phones would end up having the same MAC address, but the Wi-Fi hotspot would only grant access to the last one. Unfortunately, I couldn't find where on the phones the MAC address is generated, so I had to put a script in the bootloader to force a unique MAC address to be set.

A demonstration of spoofing from a box (View large version)
However, if you stick to the criteria above when choosing your phone, then these problems shouldn’t prove fatal. They can all be manually fixed to make the phone work properly.
So, which phones should you get to create your own test automation farm?
Google Nexus
If you have the resources to buy the latest working models of Google Nexus (these are currently devices such as the Nexus 5X to 6P), then get these without thinking twice. You can install almost any operating system on them, they have an inherently “clean” Android base, and developers also tend to use them to test their applications.
Any “Developer Edition” Phone
Many companies are currently producing phone models for developers. With these phones, you can generally unlock the bootloader, and root privileges are available. If you find a good offer, take it.
Cheap Chinese Phones With An MTK CPU
Many phones with MediaTek (MTK) processors can be reflashed perfectly, and their main advantage is low cost. You’ll need to look for the specific models on the local market in your country, because the phones are typically available under different brand names, depending on location. The real manufacturers are usually large companies such as Gionee, Lenovo, Inventec, Tinno Mobile, Longcheer and Techain. These companies resell their phones in Western countries under brand names including Fly, Zopo, Wiko, Micromax, MyPhone, Blu, Walton, Allview and others. But not all phones are suitable: always evaluate them according to the criteria listed above. Farms with phones like these can often be cheaper than servers with virtual Android machines, so there is a significant chance to save some money here.
In addition to phones, you are going to need a computer and USB hubs to run the automated tests. There are some other things to consider at this stage. For example, constantly operating phones need a good power supply (at least 0.5A per device; more is better). The majority of hubs on the market come with weak adapters, not designed to have a constantly running phone plugged in at every port. Things are even more complicated when it comes to tablets: 9-inch tablets die quickly when running continuously becuase of large screen power consumption, so we have to choose among 7-inch units. In our experience, six to seven phones can be hooked up to a 4A adapter (depending on their workload). Therefore, most multiport hubs with a “3A adapter and 20 USB ports” are useless, to put it mildly. The cream of the crop is server solutions, but they are crazy expensive. So, we are going to have to limit ourselves to the consumer market. To keep the phone running, you have to get 3A four-port hubs or 4A six-port hubs. If a hub has a good power supply and a large number of ports, some ports can simply remain unused.
Preparing The Phone To Work
Let’s look at one phone model as an example. We will solve an OS problem and then try to put several devices together on a simple test stand for test automation. The phone itself is inexpensive and of decent quality, but it is not without its own shortcomings (described above). For example, these phones have the same iSerial, so ADB sees only one device, even if multiple devices are connected. We won’t change it everywhere on the phone, but we’ll make it possible for ADB to distinguish between the phones.
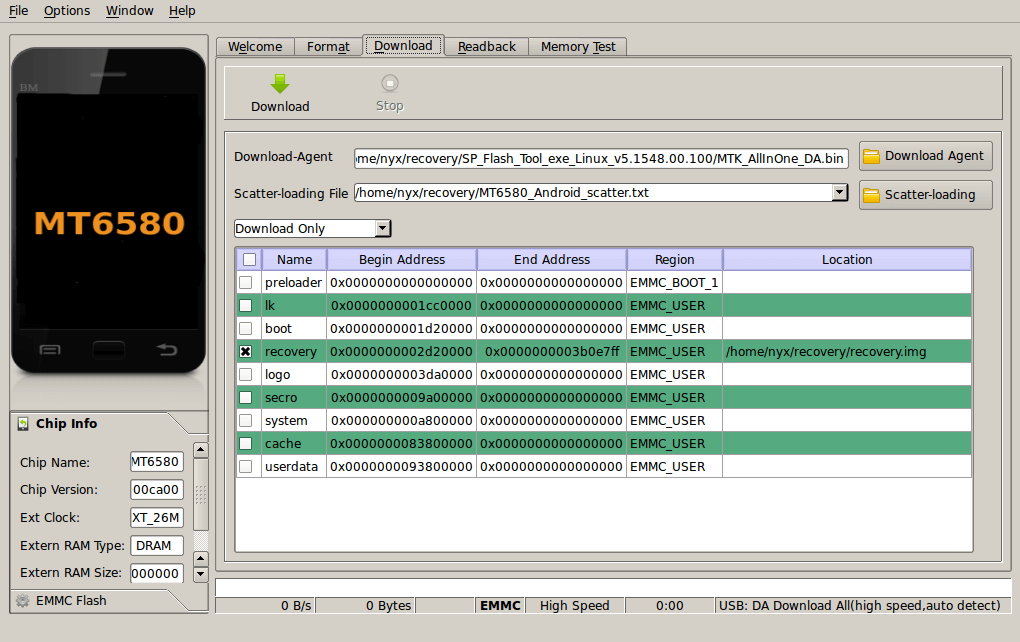
To do this, we have to reflash the phone’s bootloader and install a custom recovery partition on the phone. This is to protect ourselves from any unsuccessful experiments. The manuals on how to flash your specific phone model can be found in the XDA Developers forums. Our phones have MT6580 installed, which is a MTK processor, so we can use SP Flash Tool as well as recovery.img and scatter file devices. These can be found online for almost any device on XDA Developers and 4PDA, but, if desired, a recovery can be compiled for your device using TWRP as a base and creating the scatter file yourself. In any event, we’ll just take our files and reinstall them:
Once the recovery partition is installed, use it to save the bootloader backup and move it to your machine. As a rule, this is where the OS configuration files are located.
In order to hardcode your iSerial, you’ll need to unpack the phone’s bootloader image. This can be done via Android Image Kitchen. Start unpackimg.sh, and get the unpacked image in the ramdisk folder:
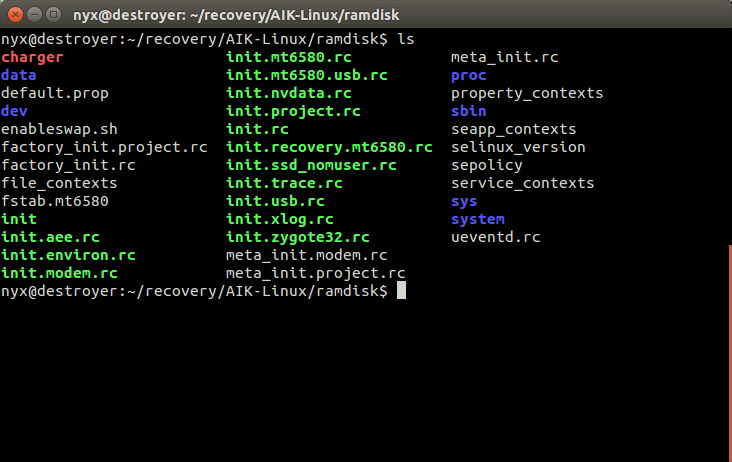
init files here containing different variables, including the serial number.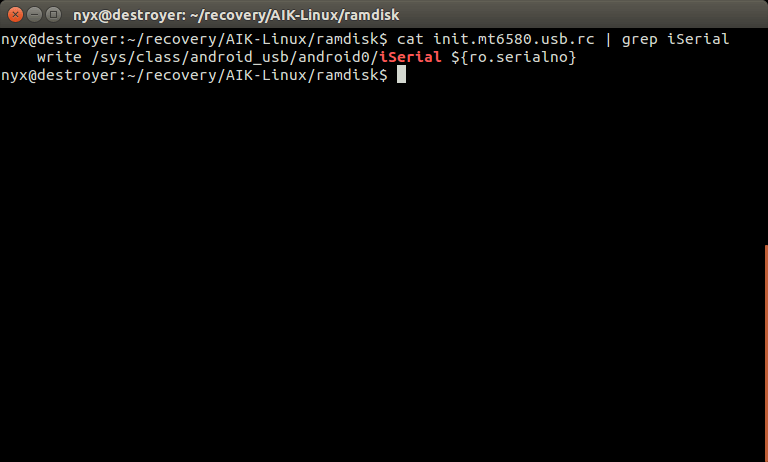
Let’s find the file with the serial number ${ro.serialno and replace it with our own number — for example, 999222333019:
find ramdisk/ -maxdepth 1 -name "init.mt*" -exec sed -i
's/${ro.serialno}/999222333019/g' {} +Now, let’s pack the image back up using repacking.sh, transfer it to the phone and install it using custom recovery. Now ADB can distinguish between devices. All we need to do now is turn on developer mode on the phone and enable debugging in the developer menu. Any similar problems can be solved in exactly the same way. Pretty much everything on the phone can be reinstalled if that is what the tests require.
Setting Up The Test Machine
We will use a standard desktop with Ubuntu as the host for our test system. It might be necessary to transfer the connected phones from one computer to another. We might also need to build separate versions of the app for specific phone models.
To accomplish this, for each phone it’s a good idea to create an isolated virtual environment that we can change if necessary (for example, to install other versions of the Java Development Kit or to configure monitoring), without altering the other phones’ environments. As a result, our machine will be divided into several environments, each one accessible via a single phone (or a group of phones, depending on your requirements). We can establish these environments by creating several virtual machines on the host (this can be done on any operating system). Or you can do what I like to do, which is divide the phones using Docker containers, which work best on Linux. We will use a conventional desktop with Ubuntu as an example of a host for our stand.
There are specifics to consider when ordering or building the machines that the phones will be connected to. Apart from the standard HDD, RAM and CPU specs, pay attention to the number of USB controllers on the motherboard and the supported USB protocol. Phones that use USB 3.0 (xHCI) could significantly limit the maximum number of devices attached to the machine (usually 8 per controller, or 16 devices for a machine with 2 controllers), so it’s worth checking whether it’s possible to turn it off and use only EHCI. You will find those options in the BIOS or OS. It is best to forcibly disable xHCI in the BIOS if you don’t require high-speed devices.
Creating A Container For The Phone
As I wrote earlier, we want an integration system slave-agent to work with a specific phone and see only this phone. This way, the tests won’t accidentally run on other phones and give false pass or error results. To accomplish this, we need to separate them. When an integration system agent launches in a Docker container, each agent has access to only one device, so we can divide tasks in the integration system by specific phone models, operating system versions, screen sizes and other characteristics (for example, a container with a tablet can perform tests that require a wide screen, and a container with a phone could run tests requiring the ability to receive text messages).
Let’s use the example of a system installation and setup on Ubuntu. Here is the installation of Docker itself:
sudo apt-key adv --keyserver hkp://p80.pool.sks-keyservers.net:80 --recv-keys 58118E89F3A912897C070ADBF76221572C52609D
echo 'deb https://apt.Dockerproject.org/repo  main' >> /etc/apt/sources.list.d/Docker.list
sudo apt-get update
sudo apt-get install Docker-engine
We are going to use OverlayFS as a storage driver (it is relatively fast and reliable). You can read about the differences between various storage drivers on the official Docker website.
echo 'DOCKER_OPTS="-s overlay"' >> /etc/default/DockerThen, we will create a Dockerfile, which is an instruction for Docker to install the minimum required software for the virtual environment where a mobile device will be isolated. We will create images from this instruction. Let’s add the Android SDK to the Dockerfile:
FROM ubuntu:trusty

#Update The List Of Repositories And Add Webupd8team Repository, From Which We'll Install Java
RUN apt-get update -y && \
    apt-get install -y software-properties-common && \
    add-apt-repository ppa:webupd8team/java -y && \
    apt-get update -y && \
    echo oracle-java8-installer shared/accepted-oracle-license-v1-1 select true | /usr/bin/debconf-set-selections && \
    apt-get install -y oracle-java8-installer && \
    apt-get remove software-properties-common -y && \
    apt-get autoremove -y && \
    apt-get clean

#Set The Environment Variables For Java And The Desired Version Of Ant
ENV JAVA_HOME /usr/lib/jvm/java-8-oracle
ENV ANT_VERSION 1.9.4

# Install Ant Version Specified Above
RUN cd && \
wget -q https://archive.apache.org/dist/ant/binaries/apache-ant-${ANT_VERSION}-bin.tar.gz && \ tar -xzf apache-ant-${ANT_VERSION}-bin.tar.gz && \ mv apache-ant-${ANT_VERSION} /opt/ant && \ rm apache-ant-${ANT_VERSION}-bin.tar.gz

# Set The Environment Variable For Ant
ENV ANT_HOME /opt/ant
ENV PATH ${PATH}:/opt/ant/bin

#Install Android Build Tools And The Required Version Of Android SDK
#You Can Create Several Versions Of The Dockerfile If You Need To Test
#Several Versions
ENV ANDROID_SDK_VERSION r24.4.1
ENV ANDROID_BUILD_TOOLS_VERSION 23.0.3

RUN dpkg --add-architecture i386 && \
    apt-get update -y && \
    apt-get install -y libc6:i386 libncurses5:i386 libstdc++6:i386 lib32z1 && \
    rm -rf /var/lib/apt/lists/* && \
    apt-get autoremove -y && \
    apt-get clean

ENV ANDROID_SDK_FILENAME android-sdk_${ANDROID_SDK_VERSION}-linux.tgz
ENV ANDROID_SDK_URL https://dl.google.com/android/${ANDROID_SDK_FILENAME}
ENV ANDROID_API_LEVELS android-15,android-16,android-17,android-18,android-19,android-20,android-21,android-22,android-23
ENV ANDROID_HOME /opt/android-sdk-linux
ENV PATH ${PATH}:${ANDROID_HOME}/tools:${ANDROID_HOME}/platform-tools
RUN cd /opt && \
    wget -q ${ANDROID_SDK_URL} && \
    tar -xzf ${ANDROID_SDK_FILENAME} && \
    rm ${ANDROID_SDK_FILENAME} && \
    echo y | android update sdk --no-ui -a --filter tools,platform-tools,${ANDROID_API_LEVELS},build-tools-${ANDROID_BUILD_TOOLS_VERSION}

###Now Add The Integration System File. It Can Be A Jenkins Slave, A Bamboo Agent, Etc., Depending On What You're Working With.
ADD moyagent.sh /agentCI/
You can also add all of the necessary libraries and files for the integration system agent to the Dockerfile. At some point, you might have to build containers not only for your physical devices, but also for virtual Android phone emulators. In this case, you can just add the required settings to the instructions. Now we’ll build the Dockerfile:
Docker build .Now we have a runnable docker image; however, the container that we spawn from it would not see any devices (or, on the contrary, the container would see all USB devices if we run it in privileged mode). We need it to see only those devices we want it to see. So, we specify a symbolic link (or symlink) in our host, which we will transfer to the Docker container created from the image. The symlink uses udev:
echo ‘"SUBSYSTEM=="usb", ATTRS{serial}=="$DEVICE_SERIAL", SYMLINK+="androidDevice1"' >> /etc/udev/rules.d/90-usb-symlink-phones.rulesInstead of $DEVICE_SERIAL, we enter our freshly installed serial number and reload the device’s rule definitions:
udevadm control --reload
udevadm trigger
Now when the phone is attached via USB, we will have a device symlink to the /dev/androidDevice1 path with the serial number $DEVICE_SERIAL. All we have left to do is transfer it to the container on startup:
Docker run -i -t --rm --device=/dev/androidDevice1:/dev/bus/usb/001/1 android-Docker-image:latest adb devicesThis means that we want to create a container from the Android Docker image that must be able to access the device with the /dev/androidDevice1 symlink. We also want to launch the ADB devices command in the container itself, which will show us a list of available devices.
If the phone is visible, then we’re ready. If an integration system agent was installed in the image, we can use the following command to launch it:
Docker run -i -t --rm --device= /dev/androidDevice1:/dev/bus/usb/001/1 android-Docker-image:latest /bin/sh /agentCI/moyagent.shNow we have launched the container in which the system integration agent is running. The agent now has access to the device via the /dev/androidDevice1 symlink and to the virtual environment where all programs specified in Dockerfile (the Android SDK and additional dependencies) are installed.
By the way, it wasn’t until fairly recently that the command line option –device started working with symlinks (see the GitHub master branch). Previously, we had to generate the realpath from symlinks using a script and transfer it to Docker. So, if you can’t manage to connect the device, add the following script to the udev parameter RUN+= (if the connected phone is located at /dev/bus/usb/010/1):
realpath /dev/androidDevice1 | xargs -I linkpath link linkpath /dev/bus/usb/010/1This will let you use old versions of Docker to launch a container that can access the phone:
Docker run --privileged -v /dev/bus/usb/010/:/dev/bus/usb/100/ -i -t android-Docker-image:latest adb devicesThat’s it. You can now connect your slave to the integration system and work with it.
If the phone is visible, then we’re done. If a system integration agent has been installed in the image, then we can run it with the following command:
docker run -i -t --rm --device= /dev/androidDevice1:/dev/bus/usb/001/1 android-docker-image:latest /bin/sh /agentCI/moyagent.shNow we’ve launched our container with the system integration agent launched in it. The device is available to the agent via the /dev/androidDevice1 symlink and also via the virtual environment where you installed the programs from our Dockerfile (the Android SDK and other dependencies). The launched agent must connect to your server (such as Bamboo or Jenkins), from which you can give it commands to perform the automated tests.
When your container is ready, all you need to do is connect it to your integration system. Each of such systems has extensive documentation and a lot of examples of usage:
As soon as you connect your container according to the instruction, you will be able to execute code, launch your tests and work with your container via your systems.
Conclusion
Sooner or later, physical mobile devices will appear in the integration system of every relatively large Android project. The need to fix mistakes, perform non-standard test cases and simply test for the presence of certain features all inevitably require an actual device. In addition, the devices won’t use your server resources, because they have their own processors and memory. Thus, the host for the phones doesn’t have to be super-powerful; any home desktop would handle this load nicely.
Consider the advantages and see what would be best for you — your automated testing system almost certainly has room for physical devices. I wish you all fewer bugs and more test coverage! Real devices have both advantages and disadvantages. It would be great if you could share your opinion and expertise and tell us which is better to use: real devices or virtual machines. Looking forward to your comments!
Further Reading
- Current Trends And Future Prospects Of The Mobile App Market
- Optimizing Your Design For Rapid Prototype Testing
- Five-Second Testing: Taking A Closer Look At First Impressions (Case Study)
- Picture Perfect: Meet Pixo, A Photo Editor For Your End Users


