A Comprehensive Guide To HTTP/2 Server Push

Email Newsletter
Weekly tips on front-end & UX.
Trusted by 182,000+ folks.


 Celebrating 10 million developers
 Custom Web Forms for Angular, React, & Vue. Your backend.
The landscape for the performance-minded developer has changed significantly in the last year or so, with the emergence of HTTP/2 being perhaps the most significant of all. No longer is HTTP/2 a feature we pine for. It has arrived, and with it comes server push!
Aside from solving common HTTP/1 performance problems (e.g., head of line blocking and uncompressed headers), HTTP/2 also gives us server push! Server push allows you to send site assets to the user before they’ve even asked for them. It’s an elegant way to achieve the performance benefits of HTTP/1 optimization practices such as inlining, but without the drawbacks that come with that practice.
In this article, you’ll learn all about server push, from how it works to the problems it solves. You’ll also learn how to use it, how to tell if it’s working, and its impact on performance. Let’s begin!
What Is Server Push, Exactly?
Accessing websites has always followed a request and response pattern. The user sends a request to a remote server, and with some delay, the server responds with the requested content.
The initial request to a web server is commonly for an HTML document. In this scenario, the server replies with the requested HTML resource. The HTML is then parsed by the browser, where references to other assets are discovered, such as style sheets, scripts and images. Upon their discovery, the browser makes separate requests for those assets, which are then responded to in kind.

The problem with this mechanism is that it forces the user to wait for the browser to discover and retrieve critical assets until after an HTML document has been downloaded. This delays rendering and increases load times.
With server push, we have a solution to this problem. Server push lets the server preemptively “push” website assets to the client without the user having explicitly asked for them. When used with care, we can send what we know the user is going to need for the page they’re requesting.
Let’s say you have a website where all pages rely on styles defined in an external style sheet named styles.css. When the user requests index.html from the server, we can push styles.css to the user just after we begin sending the response for index.html.

Rather than waiting for the server to send index.html and then waiting for the browser to request and receive styles.css, the user only has to wait for the server to respond with both index.html and styles.css on the initial request. This means that the browser can begin rendering the page faster than if it had to wait.
As you can imagine, this can decrease the rendering time of a page. It also solves some other problems, particularly in front-end development workflows.
What Problems Does Server Push Solve?
While reducing round trips to the server for critical content is one of the problems that server push solves, it’s not the only one. Server push acts as a suitable alternative for a number of HTTP/1-specific optimization anti-patterns, such as inlining CSS and JavaScript directly into HTML, as well as using the data URI scheme to embed binary data into CSS and HTML.
These techniques found purchase in HTTP/1 optimization workflows because they decrease what we call the “perceived rendering time” of a page, meaning that while the overall loading time of a page might not be reduced, the page will appear to load faster for the user. It makes sense, after all. If you inline CSS into an HTML document within <style> tags, the browser can begin applying styles immediately to the HTML without waiting to fetch them from an external source. This concept holds true with inlining scripts and inlining binary data with the data URI scheme.

Seems like a good way to tackle the problem, right? Sure — for HTTP/1 workflows, where you have no other choice. The poison pill we swallow when we do this, however, is that the inlined content can’t be efficiently cached. When an asset like a style sheet or JavaScript file remains external and modular, it can be cached much more efficiently. When the user navigates to a subsequent page that requires that asset, it can be pulled from the cache, eliminating the need for additional requests to the server.

When we inline content, however, that content doesn’t have its own caching context. Its caching context is the same as the resource it’s inlined into. Take an HTML document with inlined CSS, for instance. If the caching policy of the HTML document is to always grab a fresh copy of the markup from the server, then the inlined CSS will never be cached on its own. Sure, the document that it’s a part of may be cached, but subsequent pages containing this duplicated CSS will be downloaded repeatedly. Even if the caching policy is more lax, HTML documents typically have limited shelf life. This is a trade-off that we’re willing to make in HTTP/1 optimization workflows, though. It does work, and it’s quite effective for first-time visitors. First impressions are often the most important.
These are the problems that server push addresses. When you push assets, you get the practical benefits that come with inlining, but you also get to keep your assets in external files that retain their own caching policy. There is a caveat to this point, though, and it’s covered toward the end of this article. For now, let’s continue.
I’ve talked enough about why you should consider using server push, as well as the problems that it fixes for both the user and the developer. Now let’s talk about how it’s used.
How To Use Server Push
Using server push usually involves using the Link HTTP header, which takes on this format:
Link: </css/styles.css>; rel=preload; as=style
Note that I said usually. What you see above is actually the preload resource hint in action. This is a separate and distinct optimization from server push, but most (not all) HTTP/2 implementations will push an asset specified in a Link header containing a preload resource hint. If either the server or the client opts out of accepting the pushed resource, the client can still initiate an early fetch for the resource indicated.
The as=style portion of the header is not optional. It informs the browser of the pushed asset’s content type. In this case, we use a value of style to indicate that the pushed asset is a style sheet. You can specify other content types. It’s important to note that omitting the as value can result in the browser downloading the pushed resource twice. So don’t forget it!
Now that you know how a push event is triggered, how do we set the Link header? You can do so through two routes:
- your web server configuration (for example, Apache
httpd.confor.htaccess); - a back-end language function (for example, PHP’s
headerfunction).
Setting The Link Header In Your Server Configuration
Here’s an example of configuring Apache (via httpd.conf or .htaccess) to push a style sheet whenever an HTML file is requested:
<FilesMatch "\.html$">
    Header set Link "</css/styles.css>; rel=preload; as=style"
<FilesMatch>
Here, we use the FilesMatch directive to match requests for files ending in .html. When a request comes along that matches this criteria, we add a Link header to the response that tells the server to push the resource at /css/styles.css.
Side note: Apache’s HTTP/2 module can also initiate a push of resources using the H2PushResource directive. The documentation for this directive states that this method can initiate pushes earlier than if the Link header method is used. Depending on your specific setup, you may not have access to this feature. The performance tests shown later in this article use the Link header method.
As of now, Nginx doesn’t support HTTP/2 server push, and nothing so far in the software’s changelog has indicated that support for it has been added. This may change as Nginx’s HTTP/2 implementation matures.
Setting The Link Header In Back-End Code
Another way to set a Link header is through a server-side language. This is useful when you aren’t able to change or override the web server’s configuration. Here’s an example of how to use PHP’s header function to set the Link header:
header("Link: </css/styles.css>; rel=preload; as=style");If your application resides in a shared hosting environment where modifying the server’s configuration isn’t an option, then this method might be all you’ve got to go on. You should be able to set this header in any server-side language. Just be sure to do so before you begin sending the response body, to avoid potential runtime errors.
Pushing Multiple Assets
All of our examples so far only illustrate how to push one asset. What if you want to push more than one? Doing that would make sense, right? After all, the web is made up of more than just style sheets. Here’s how to push multiple assets:
Link: </css/styles.css>; rel=preload; as=style, </js/scripts.js>; rel=preload; as=script, </img/logo.png>; rel=preload; as=image
When you want to push multiple resources, just separate each push directive with a comma. Because resource hints are added via the Link tag, this syntax is how you can mix in other resource hints with your push directives. Here’s an example of mixing a push directive with a preconnect resource hint:
Link: </css/styles.css>; rel=preload; as=style, <https://fonts.gstatic.com>; rel=preconnect
Multiple Link headers are also valid. Here’s how you can configure Apache to set multiple Link headers for requests to HTML documents:
<FilesMatch "\.html$">
    Header add Link "</css/styles.css>; rel=preload; as=style"
    Header add Link "</js/scripts.js>; rel=preload; as=script"
</FilesMatch>
This syntax is more convenient than stringing together a bunch of comma-separated values, and it works just the same. The only downside is that it’s not quite as compact, but the convenience is worth the few extra bytes sent over the wire.
Now that you know how to push assets, let’s see how to tell whether it’s working.
How To Tell Whether Server Push Is Working
So, you’ve added the Link header to tell the server to push some stuff. The question that remains is, how do you know if it’s even working?
This varies by browser. Recent versions of Chrome will reveal a pushed asset in the initiator column of the network utility in the developer tools.

Furthermore, if we hover over the asset in the network request waterfall, we’ll get detailed timing information on the asset’s push:

Firefox is less obvious in identifying pushed assets. If an asset has been pushed, its status in the browser’s network utility in the developer tools will show up with a gray dot.

If you’re looking for a definitive way to tell whether an asset has been pushed by the server, you can use the nghttp command-line client to examine a response from an HTTP/2 server, like so:
nghttp -ans https://jeremywagner.me
This command will show a summary of the assets involved in the transaction. Pushed assets will have an asterisk next to them in the program output, like so:
id  responseEnd requestStart  process code size request path
 13     +50.28ms      +1.07ms  49.21ms  200   3K /
  2     +50.47ms *   +42.10ms   8.37ms  200   2K /css/global.css
  4     +50.56ms *   +42.15ms   8.41ms  200  157 /css/fonts-loaded.css
  6     +50.59ms *   +42.16ms   8.43ms  200  279 /js/ga.js
  8     +50.62ms *   +42.17ms   8.44ms  200  243 /js/load-fonts.js
 10     +74.29ms *   +42.18ms  32.11ms  200   5K /img/global/jeremy.png
 17     +87.17ms     +50.65ms  36.51ms  200  668 /js/lazyload.js
 15     +87.21ms     +50.65ms  36.56ms  200   2K /img/global/book-1x.png
 19     +87.23ms     +50.65ms  36.58ms  200  138 /js/debounce.js
 21     +87.25ms     +50.65ms  36.60ms  200  240 /js/nav.js
 23     +87.27ms     +50.65ms  36.62ms  200  302 /js/attach-nav.js
Here, I’ve used nghttp on my own website, which (at least at the time of writing) pushes five assets. The pushed assets are marked with an asterisk on the left side of the requestStart column.
Now that we can identify when assets are pushed, let’s see how server push actually affects the performance of a real website.
Measuring Server Push Performance
Measuring the effect of any performance enhancement requires a good testing tool. Sitespeed.io is an excellent tool available via npm; it automates page testing and gathers valuable performance metrics. With the appropriate tool chosen, let’s quickly go over the testing methodology.
Testing Methodology
I wanted measure the impact of server push on website performance in a meaningful way. In order for the results to be meaningful, I needed to establish points of comparison across six separate scenarios. These scenarios are split across two facets: whether HTTP/2 or HTTP/1 is used. On HTTP/2 servers, we want to measure the effect of server push on a number of metrics. On HTTP/1 servers, we want to see how asset inlining affects performance in the same metrics, because inlining is supposed to be roughly analogous to the benefits that server push provides. Specifically, these scenarios are the following:
- HTTP/2 without server push In this state, the website runs on the HTTP/2 protocol, but nothing whatsoever is pushed. The website runs “stock,” so to speak.
- HTTP/2 pushing only CSS Server push is used, but only for the website’s CSS. The CSS for the website is quite small, weighing in at a little over 2 KB with Brotli compression applied.
- Pushing the kitchen sink. All assets in use on all pages across the website are pushed. This includes the CSS, as well as 1.4 KB of JavaScript spread across six assets, and 5.9 KB of SVG images spread across five assets. All quoted file sizes are, again, after Brotli compression has been applied.
- HTTP/1 with no assets inlined The website runs on HTTP/1, and no assets are inlined to reduce the number of requests or increase rendering speed.
- Inlining only CSS. Only the website’s CSS is inlined.
- Inlining the kitchen sink. All assets in use on all pages across the website are inlined. CSS and scripts are inlined, but SVG images are base64-encoded and embedded directly into the markup. It should be noted that base64-encoded data is roughly 1.37 times larger than its unencoded equivalent.
In each scenario, I initiated testing with the following command:
sitespeed.io -d 1 -m 1 -n 25 -c cable -b chrome -v https://jeremywagner.me
If you want to know the ins and outs of what this command does, you can check out the documentation. The short of it is that this command tests my website’s home page at https://jeremywagner.me with the following conditions:
- The links in the page are not crawled. Only the specified page is tested.
- The page is tested 25 times.
- A “cable-like” network throttling profile is used. This translates to a round trip time of 28 milliseconds, a downstream speed of 5,000 kilobits per second and an upstream speed of 1,000 kilobits per second.
- The test is run using Google Chrome.
Three metrics were collected and graphed from each test:
- first paint time. This is the point in time at which the page can first be seen in the browser. When we strive to make a page “feel” as though it is loading quickly, this is the metric we want to reduce as much as possible.
- DOMContentLoaded time. This is the time at which the HTML document has completely loaded and has been parsed. Synchronous JavaScript code will block the parser and cause this figure to increase. Using the
asyncattribute on<script>tags can help to prevent parser blocking. - page-loading time. This is the time it takes for the page and its assets to fully load.
With the parameters of the test determined, let’s see the results!
Test Outcomes
Tests were run across the six scenarios specified earlier, with the results graphed. Let’s start by looking at how first paint time is affected in each scenario:

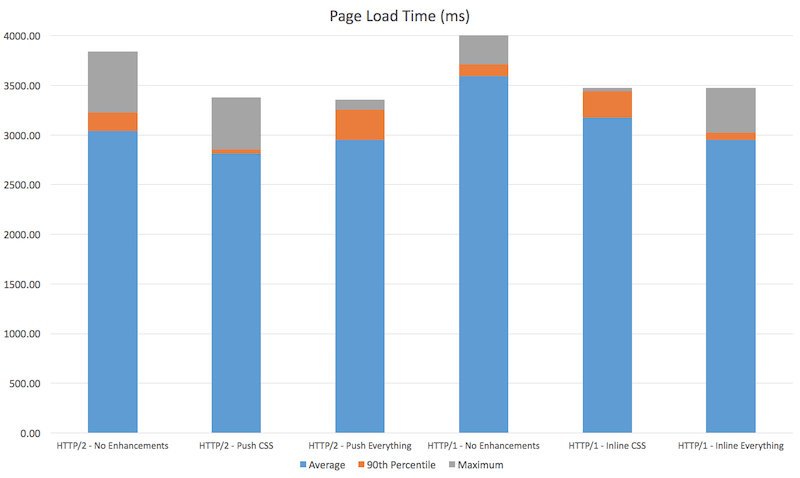
Let’s first talk a bit about how the graph is set up. The portion of the graph in blue represents the average first paint time. The orange portion is the 90th percentile. The grey portion represents the maximum first paint time.
Now let’s talk about what we see. The slowest scenarios are both the HTTP/2- and HTTP/1-driven websites with no enhancements at all. We do see that using server push for CSS helps to render the page about 8% faster on average than if server push is not used at all, and even about 5% faster than inlining CSS on an HTTP/1 server.
When we push all assets that we possibly can, however, the picture changes somewhat. First paint times increase slightly. In HTTP/1 workflows where we inline everything we possibly can, we achieve performance similar to when we push assets, albeit slightly less so.
The verdict here is clear: With server push, we can achieve results that are slightly better than what we can achieve on HTTP/1 with inlining. When we push or inline many assets, however, we observe diminishing returns.
It’s worth noting that either using server push or inlining is better than no enhancement at all for first-time visitors. It’s also worth noting that these tests and experiments are being run on a website with small assets, so this test case may not reflect what’s achievable for your website.
Let’s examine the performance impacts of each scenario on DOMContentLoaded time:

The trends here aren’t much different than what we saw in the previous graph, except for one notable departure: The instance in which we inline as many assets as practical on a HTTP/1 connection yields a very low DOMContentLoaded time. This is presumably because inlining reduces the number of assets needed to be downloaded, which allows the parser to go about its business without interruption.
Now, let’s look at how page-loading times are affected in each scenario:

The established trends from earlier measurements generally persist here as well. I found that pushing only the CSS realized the greatest benefit to loading time. Pushing too many assets could, on some occasions, make the web server a bit sluggish, but it was still better than not pushing anything at all. Compared to inlining, server push yielded better overall loading times than inlining did.
Before we conclude this article, let’s talk about a few caveats you should be aware of when it comes to server push.
Caveats On Using Server Push
Server push isn’t a panacea for your website’s performance maladies. It has a few drawbacks that you need to be cognizant of.
You Can Push Too Much Stuff
In one of the scenarios above, I am pushing a lot of assets, but all of them altogether represent a small portion of the overall data. Pushing a lot of very large assets at once could actually delay your page from painting or being interactive sooner, because the browser needs to download not only the HTML, but all of the other assets that are being pushed alongside of it. Your best bet is to be selective in what you push. Style sheets are a good place to start (so long as they aren’t massive). Then evaluate what else makes sense to push.
You Can Push Something That’s Not On The Page
This is not necessarily a bad thing if you have visitor analytics to back up this strategy. A good example of this may be a multi-page registration form, where you push assets for the next page in the sign-up process. Let’s be crystal clear, though: If you don’t know whether you should force the user to preemptively load assets for a page they haven’t seen yet, then don’t do it. Some users might be on restricted data plans, and you could be costing them real money.
Configure Your HTTP/2 Server Properly
Some servers give you a lot of server push-related configuration options. Apache’s mod_http2 has some options for configuring how assets are pushed. The H2PushPriority setting should be of particular interest, although in the case of my server, I left it at the default setting. Some experimentation could yield additional performance benefits. Every web server has a whole different set of switches and dials for you to experiment with, so read the manual for yours and find out what’s available!
Pushes May Not Be Cached
There has been some gnashing of teeth over whether server push could hurt performance in that returning visitors may have assets needlessly pushed to them again. Some servers do their best to mitigate this. Apache’s mod_http2 uses the H2PushDiarySize setting to optimize this somewhat. H2O Server has a feature called Cache Aware server push that uses a cookie mechanism to remember pushed assets.
If you don’t use H2O Server, you can achieve the same thing on your web server or in server-side code by only pushing assets in the absence of a cookie. If you’re interested in learning how to do this, then check out a post I wrote about it on CSS-Tricks. It’s also worth mentioning that browsers can send an RST_STREAM frame to signal to a server that a pushed asset is not needed. As time goes on, this scenario will be handled much more gracefully.
As sad it may seem, we’re nearing the end of our time together. Let’s wrap things up and talk a bit about what we’ve learned.
Final Thoughts
If you’ve already migrated your website to HTTP/2, you have little reason not to use server push. If you have a highly complex website with many assets, start small. A good rule of thumb is to consider pushing anything that you were once comfortable inlining. A good starting point is to push your site’s CSS. If you’re feeling more adventurous after that, then consider pushing other stuff. Always test changes to see how they affect performance. You’ll likely realize some benefit from this feature if you tinker with it enough.
If you’re not using a cache-aware server push mechanism like H2O Server’s, consider tracking your users with a cookie and only pushing assets to them in the absence of that cookie. This will minimize unnecessary pushes to known users, while improving performance for unknown users. This not only is good for performance, but also shows respect to your users with restricted data plans.
All that’s left for you now is to try out server push for yourself. So get out there and see what this feature can do for you and your users! If you want to know more about server push, check out the following resources:
- “Server Push,” “Hypertext Transfer Protocol Version 2 (HTTP/2),” Internet Engineering Task Force
- “Modernizing Our Progressive Enhancement Delivery,” Scott Jehl, Filament Group
- “Innovating with HTTP 2.0 Server Push,” Ilya Grigorik
Thanks to Yoav Weiss for clarifying that the as attribute is required (and not optional as the original article stated), as well as a couple of other minor technical issues. Additional thanks goes to Jake Archibald for pointing out that the preload resource hint is an optimization distinct from server push.
This article is about an HTTP/2 feature named server push. This and many other topics are covered in Jeremy’s book Web Performance in Action. You can get it or any other Manning Publications book for 42% off with the coupon code sswagner!
Further Reading
- Breaking It Down To The Bits: How The Internet, DNS, And HTTPS Work
- How To Secure Your Web App With HTTP Headers
- Next Generation Server Compression With Brotli
- A Look At The Modern WordPress Server Stack


