Moving From Photoshop And Illustrator To Sketch: A Few Tips For UI Designers

Email Newsletter
Weekly tips on front-end & UX.
Trusted by 182,000+ folks.
 Register for Free
 Custom Web Forms for Angular, React, & Vue. Your backend.

 Celebrating 10 million developers
I’ve been a long time Photoshop and Illustrator user. Both programs are really useful and powerful, and they’ll remain a key part of any digital artist’s or designer’s toolset, including mine. However, for all user interface, web and icon design workflows, I recently converted to Sketch. Here is why.
While Photoshop is awesome at what it does, defining what it is might not be so easy anymore. I remember watching a storyboarding tutorial by Massive Black’s El Coro (unfortunately, it doesn’t seem to be available for sale anymore). In it, he says that 17 or so years ago, Adobe had no idea that digital artists were using Photoshop to digitally paint pictures! So, it had to catch up with its own user base by adding more — you guessed it — painting features.
I feel that the same kind of thing happened a bit later with Photoshop and user interface design. It was the only robust graphics tool that people knew or had access to some years ago, so they started using it for UI design, as well as for illustration and photo editing.
Then, as a result, Adobe started adding more and more features targeted at interface designers, even though the program was initially intended and designed for a completely different purpose.
Switching To Illustrator: The Annoyances
From Photoshop To Illustrator
Because using Photoshop for user interface design is, in my view, a needlessly painful experience (and I am not alone in this view), I first tried switching to Illustrator. Illustrator made things much better for me for a few reasons: Dealing with a lot of artboards is easier; I can select any object on any layer or any artboard with a single click, without ever having to hunt down layer names in the Layers panel; also, exporting assets in the latest Creative Cloud versions has been greatly improved; and so on.
Illustrator’s vector nature has a lot of advantages for designing icons and scalable interfaces, and using it I find it much easier and quicker to draw, modify and expand shapes. It can export my assets to SVG, and it gives me control over the SVG output code. Illustrator also feels more appropriate for this type of work because the paradigm of working with vector graphics is very similar to working with web technologies (containers, CSS styles, document structure, vector fonts). After all, web browsers are essentially vector-rendering engines.
Problems With Illustrator
However, I hit some silly problems every now and again. For example, previewing a design on a mobile device — there is simply no software that allows me to do this directly. Photoshop has Device Preview, but it’s for iOS only, and there is no such tool for Illustrator. So, I had to use a third-party tool named The Preview. And every time I wanted to device-preview a screen, I had to copy my Illustrator artboard into Photoshop, scale it up (I always work in mdpi, and my devices are xhdpi or xxhdpi), and then run The Preview on my device — which sometimes refused to work and which doesn’t support scrolling.
Also, even with the addition of CC libraries and with Illustrator’s dynamic symbols feature, some tasks remained kind of annoying or tedious, like using a large set of icons. In Illustrator, there is no simple and straightforward way to quickly add a premade icon and to quickly override its size or color (without creating a bunch of duplicates).
Specifying My Files
Specifying my files was a problem for me, too. It is, of course, my job to provide developers with a well-specified design. This helps to prevent questions such as “What is the distance between this element and that element?” and “What font size is this text object?”
Photoshop has a whole bunch of specification tools, but I’ve never used them. There aren’t that many for Illustrator, and all have their drawbacks. Arguably, the most feature-full is Specctr, but I had technical difficulties running it (also, it has no dp as a measuring unit). So, I ended up using a slightly modified version of the Illustrator Specify script to measure the sizes of and distances between objects for design specifications. However, as great as that script is, specifying my designs with it was still rather tedious and time-consuming.
My Deal-Breaker
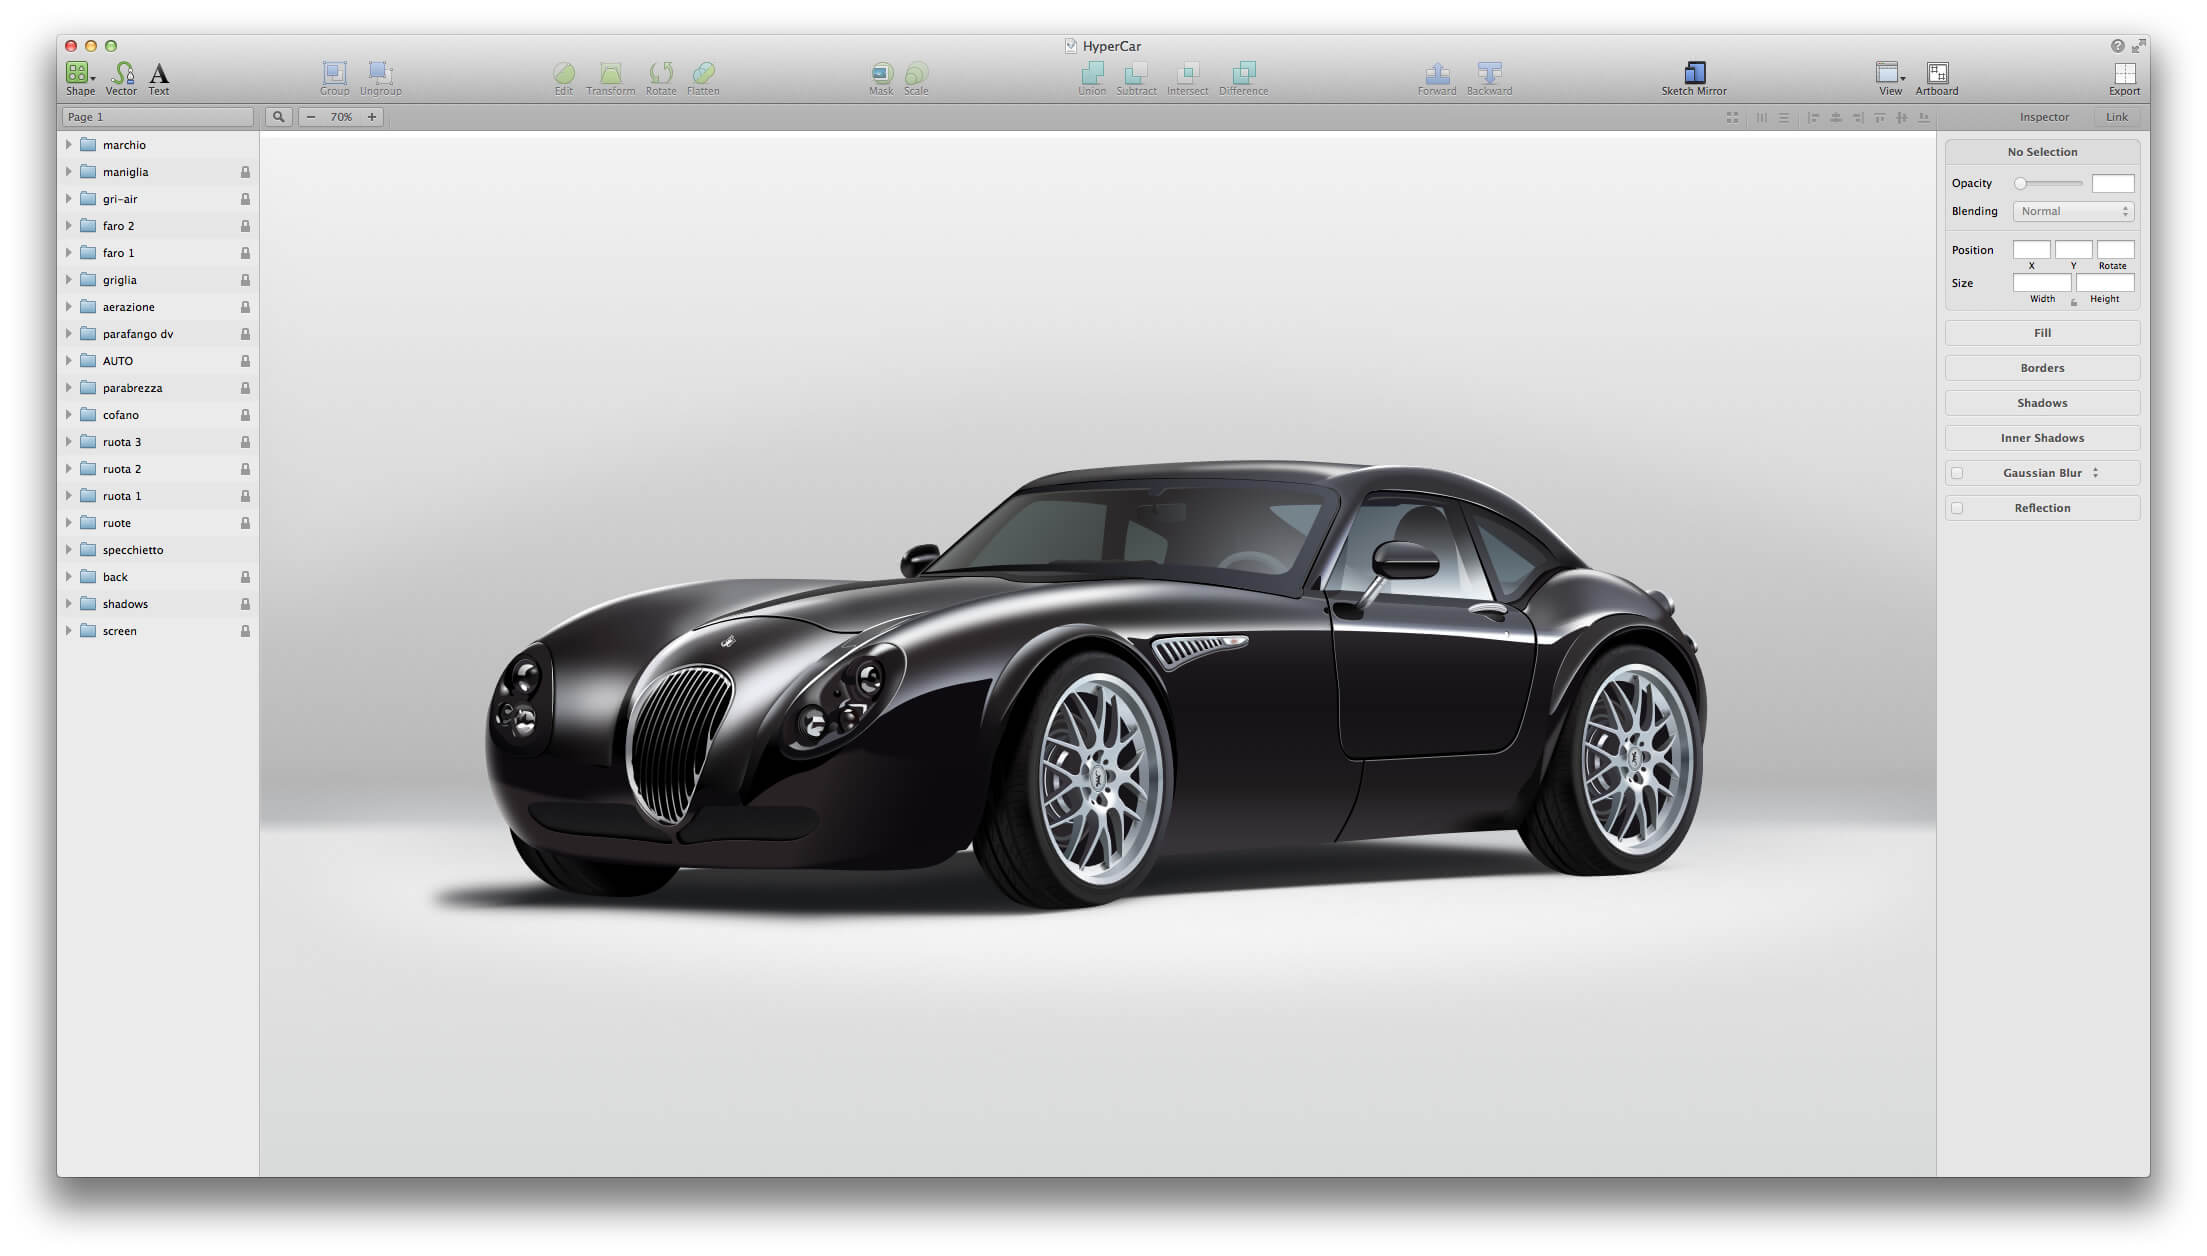
While these problems are arguably annoying and slow down my work, they aren’t things that I couldn’t get used to and overcome. However, the two Android projects I’m currently working on are a file manager and an email client — which means that a lot of my high-fidelity mockups are full of lists, avatars, file icons, file sizes and other types of data.
To further complicate the situation, both projects come with a light and a dark UI theme. Also, a lot of my designs need to be tailored to both phones and tablets in both landscape and portrait modes. This means a lot of copying and pasting, symbol-editing, typing, selecting and deselecting, and so on.
Illustrator’s Dynamic Symbols
Admittedly, Illustrator’s symbols and libraries features can be handy and save me some manual labor. But they can be quite limited — for example, one can’t have multiple iterations of the same symbol or of the same library graphic. For me, this meant that I couldn’t use the same symbol (say, an icon or a button) in both my dark and light theme mockups because I couldn’t change its color without modifying the symbol graphic itself. The same goes for the library feature.
Problems With Data-Driven Design In Illustrator
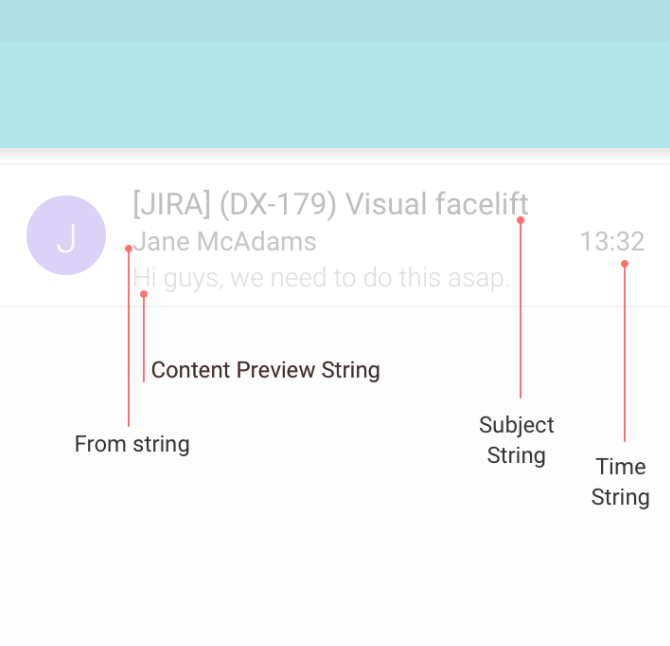
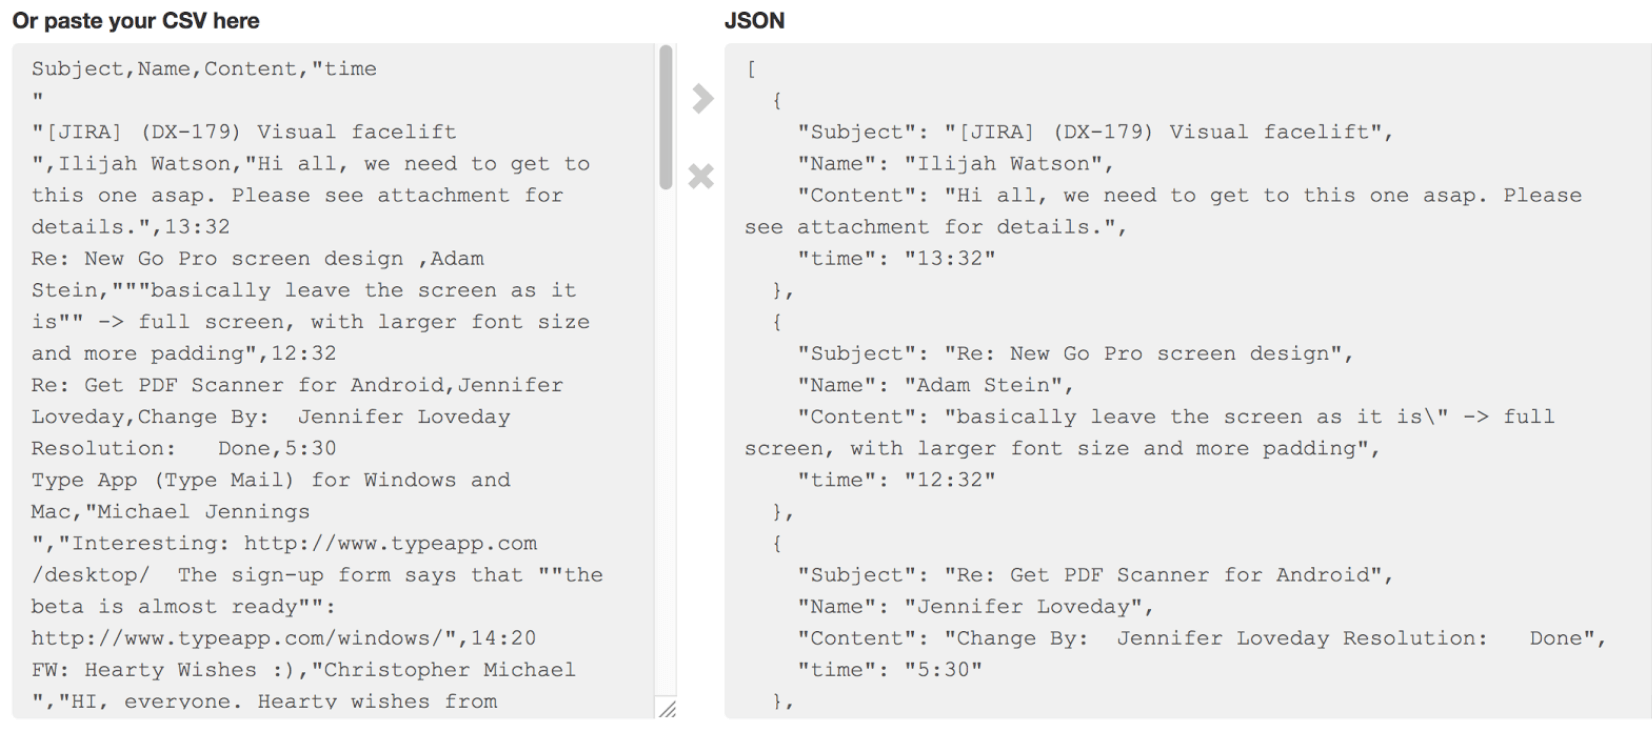
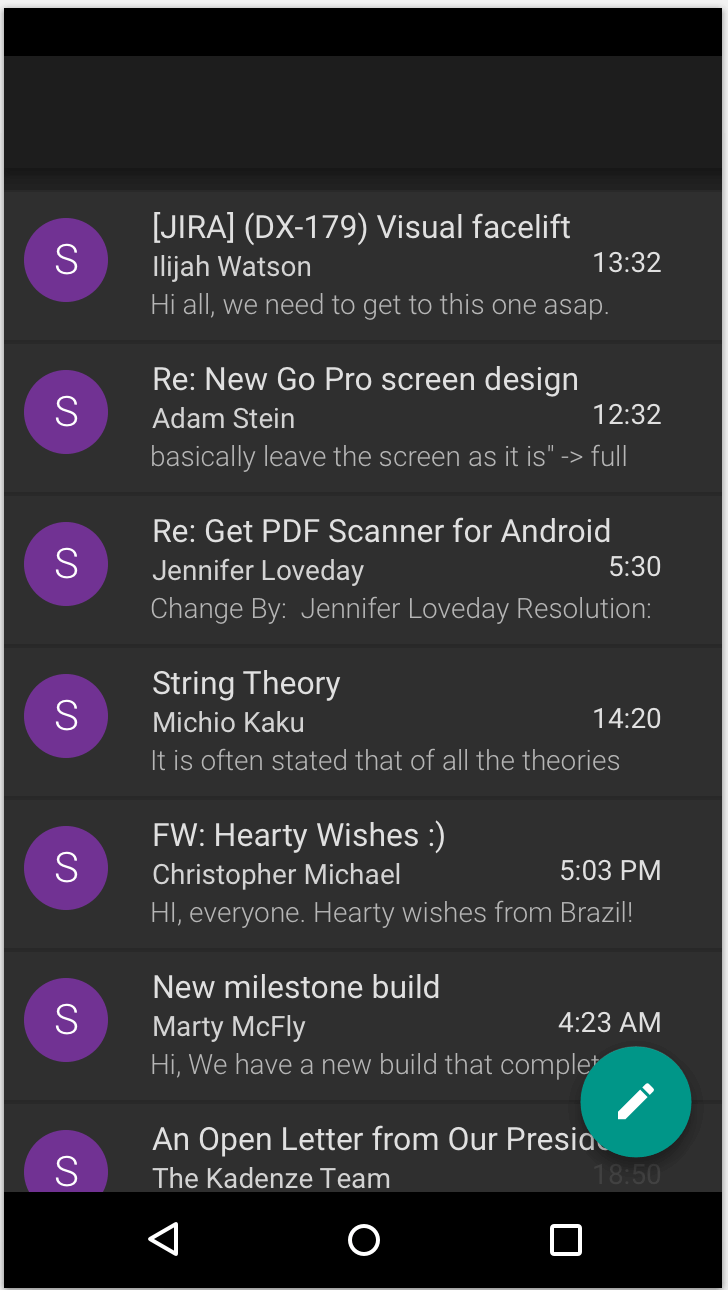
Now, the most efficient way for me to avoid having to copy and paste is to have all text entries — see “Subject,” “From,” “Content Preview” and “Time” in the example below — as variables and to dynamically load predefined strings of data for each entry.
This is, in fact, possible in Illustrator. I could create my spreadsheet with data, import it in Illustrator with the help of a plugin and be ready… with one huge caveat, however: There can be only one variable entry per iteration of the file!
This makes the feature perfect for something like a business-card project, where you’d want to keep the design the same and only change some text (such as the name and phone number). When you export the final PDF files, you’d simply iterate a hundred times through a spreadsheet of data to get a hundred different names and phone numbers. This would produce a hundred nice, corporate business cards for a hundred happy employees.
However, this behavior renders Illustrator’s data features pretty much useless to me, because I need to populate a lot of of text entries simultaneously, each with a different string, on multiple artboards, and so on.
A Potential Creative Cloud Solution?
If you must stay in the Adobe Creative Cloud realm, or if switching to a Mac is not an option, there still might be a solution. Adobe’s new tool, Adobe XD, handles working with dynamic data fairly well. However, because it’s a new tool, it can feel limited in other ways. Also, Adobe XD’s Windows version currently lags behind the Mac one.
The Solution: Switching To Mac And Sketch
Because of all of the little (and big) issues mentioned, I started to search for a better solution. So, I thought about the Sketch app.
I hadn’t had a Mac for the previous three years, and when I did have one I’d never used Sketch on it. However, I missed the operating system, and it always bothered me that Mac users always get the best software gadgets! I did plenty of research on Sketch and on other tools such as Origami, and I got tired of hacking my way through Framer on Windows.
So, a couple of months ago, I decided to switch back to a Mac — both at home and at work.
Enter Sketch!
Sketch cures a lot of my pains — and not just by itself, but also with the help of its vast plugin ecosystem. Compared to Illustrator and Photoshop, Sketch is focused on the needs of the UI and icon designer. And, unlike Photoshop, Sketch was made for UI design right from the start; UI wasn’t an afterthought.
Of course, it’s not perfect. I miss things, such as Illustrator’s Knife tool when I draw illustrations; it lacks some handy filters; there is no basic Photoshop Layer Styles alternative; and so on. But that’s kind of beside the point. Sketch doesn’t seem to be aimed at artists doing complex vector illustrations, and it only covers the very basics of raster editing.
At first, if you’ve been using Photoshop for all of your design tasks so far, you’ll be in awe when you see how you’re able to directly select any piece of graphic on any layer with just a couple of clicks or less. And if you (like me) have been also using Illustrator, then you’ll be impressed by Sketch’s more powerful Symbols feature, better artboard organization and more intuitive interface.
Measuring distances and objects is so much fun in Sketch! I just hold the Alt key, mouse over the objects on the canvas, and I’m able to see all margins, paddings and sizes. I can adjust them on the fly and just have fun, while keeping my designs really neat.
The little things are also important! One example is the ability to do simple math in an object property’s input field in the Inspector panel. I can scale a rectangle object by typing something like 12 / 3 or 2 + 2. Very helpful sometimes.
InVision’s Craft Plugins
I’ve already mentioned Sketch’s plugins. And InVision’s Craft plugins are probably among the most powerful and useful.
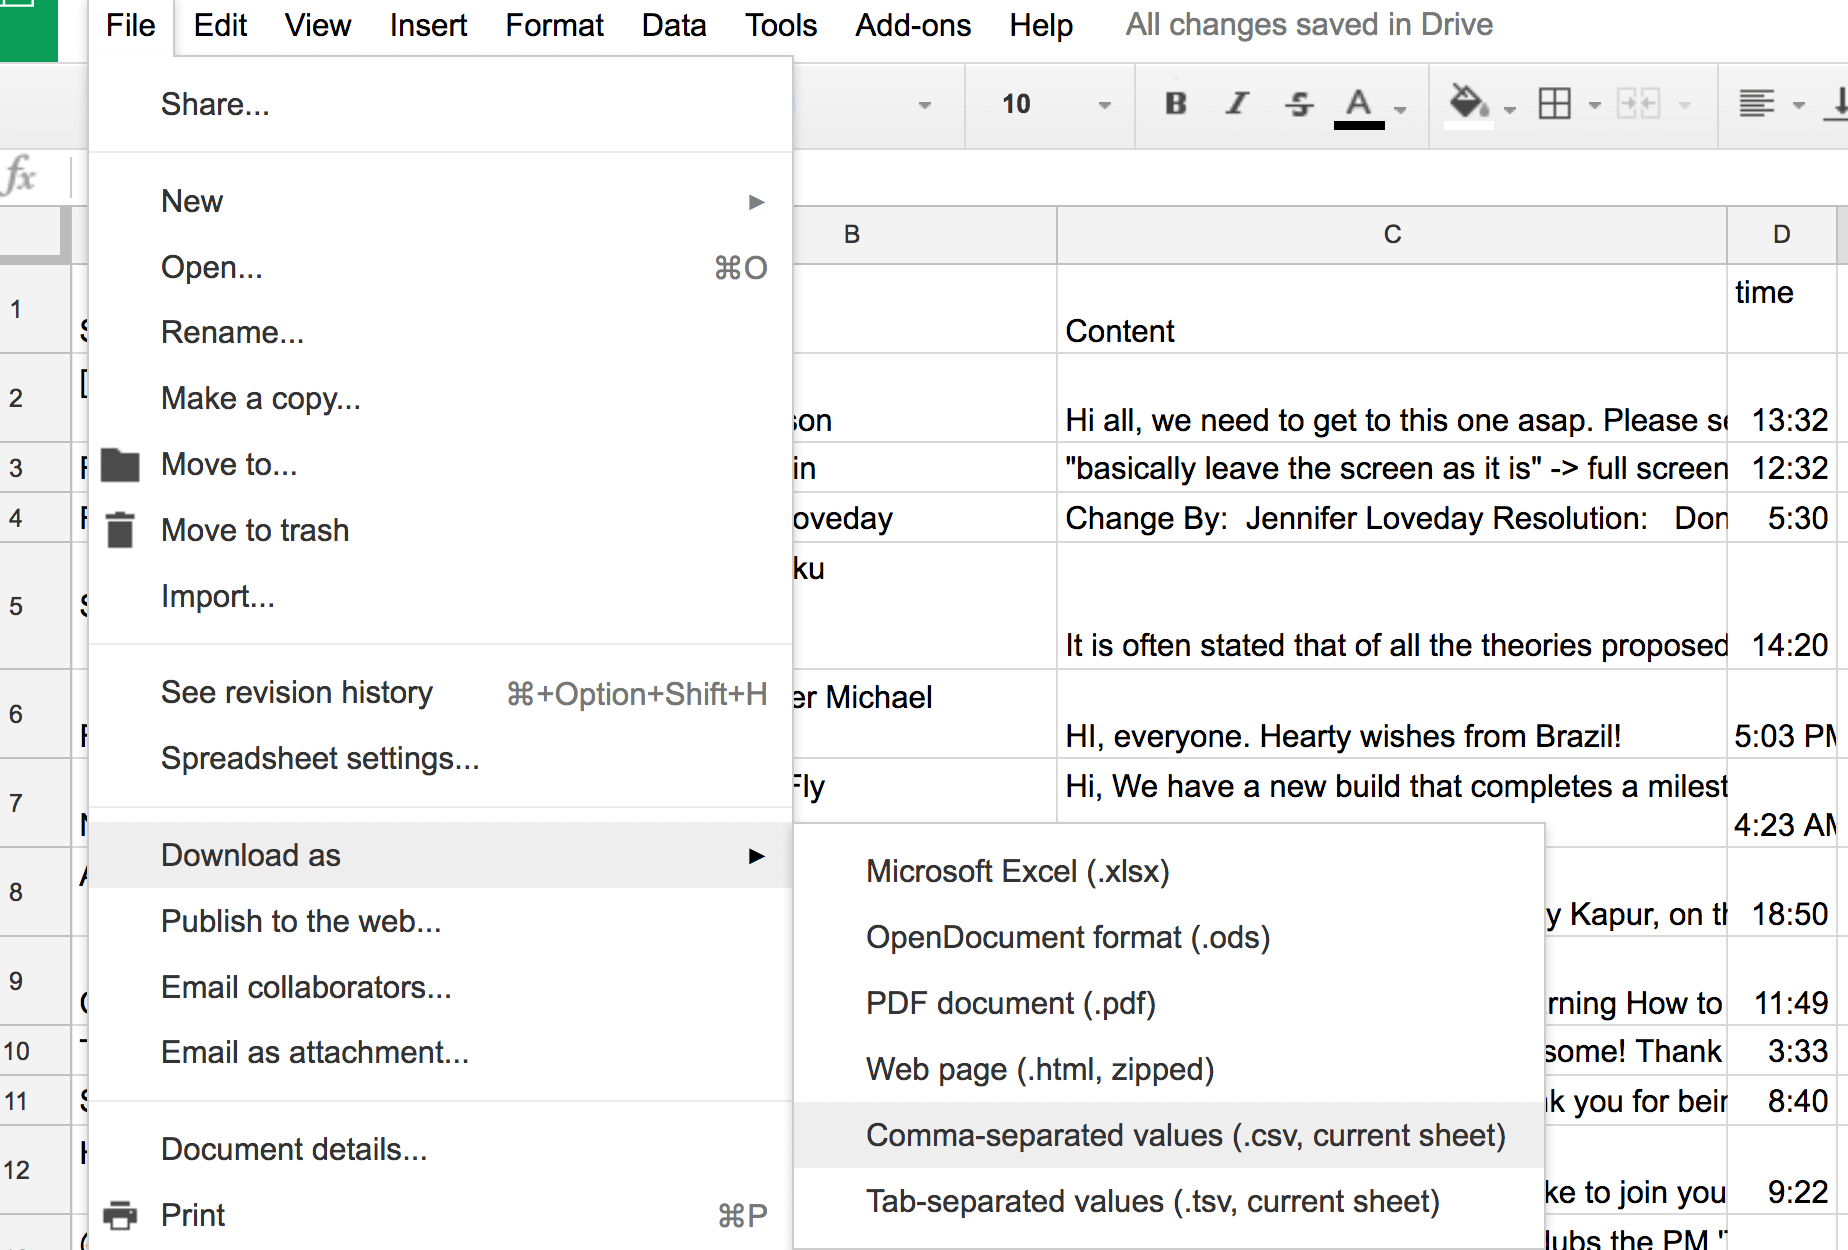
Craft actually solved my aforementioned problem of loading data into my designs. For the email app I’m working on, I can now create a list of (actual or fictitious) email addresses, subjects, content strings and more in a spreadsheet. I only need to make sure that every spreadsheet column’s first entry serves as the title (for example, “Content”).

Unfortunately, the Craft plugin doesn’t support importing data in XLS, CSV or ODS format. It only supports JSON (a file format specifically for exchanging data). I use Google Spreadsheets, and because it doesn’t support direct exporting to JSON, I have to first save to a CSV file, then use an online CSV-to-JSON converter to get the format I need.
Now, I only have to save the JSON file on my computer and drag it into Craft’s Data panel.

The entire conversion process might sound complicated, but it only takes a couple of minutes.
Now, I only need to tell Craft which Sketch text field corresponds to which JSON string. Then, I use the duplicate functionality to make as many duplicate entries as I want:

As for those avatars with letters inside, I don’t need to bother with a spreadsheet. Here’s what I did instead: I used a nested symbol to tint each avatar with a different color. And Sketch’s overrides feature does the job of dynamically replacing each letter!

This approach works well for expanding phone designs into tablet designs because I only need to adjust Sketch’s text fields.

My Other Favorite Sketch Plugins
It’s not only about the Craft plugin, of course. I rely on quite a few plugins in my daily work, and all of them help me to be more efficient.
Sketch Style Inventory Plugin
As mentioned, the projects I’m currently involved in come with a light and a dark theme. Having to provide designs for both themes and for each screen can be tedious and time-consuming. However, using Sketch’s Style Inventory plugin, I can select all items in all of my artboards by name or by current color or by another property, and then batch-adjust them as I like.
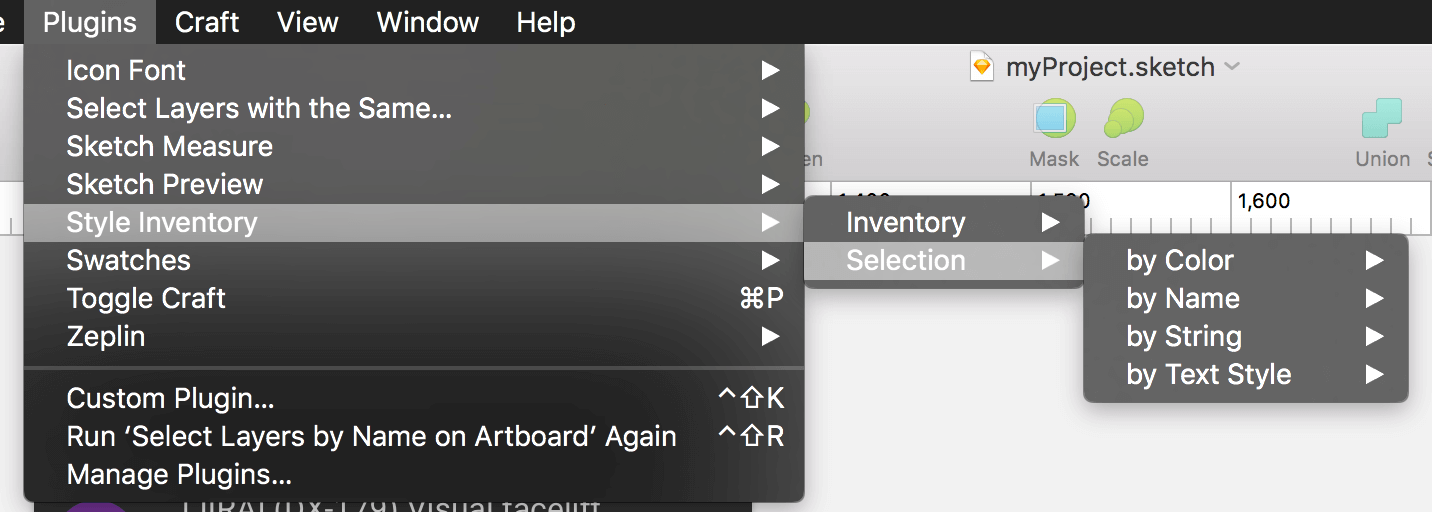
Thus, I can recreate my designs for different themes in just a minute!
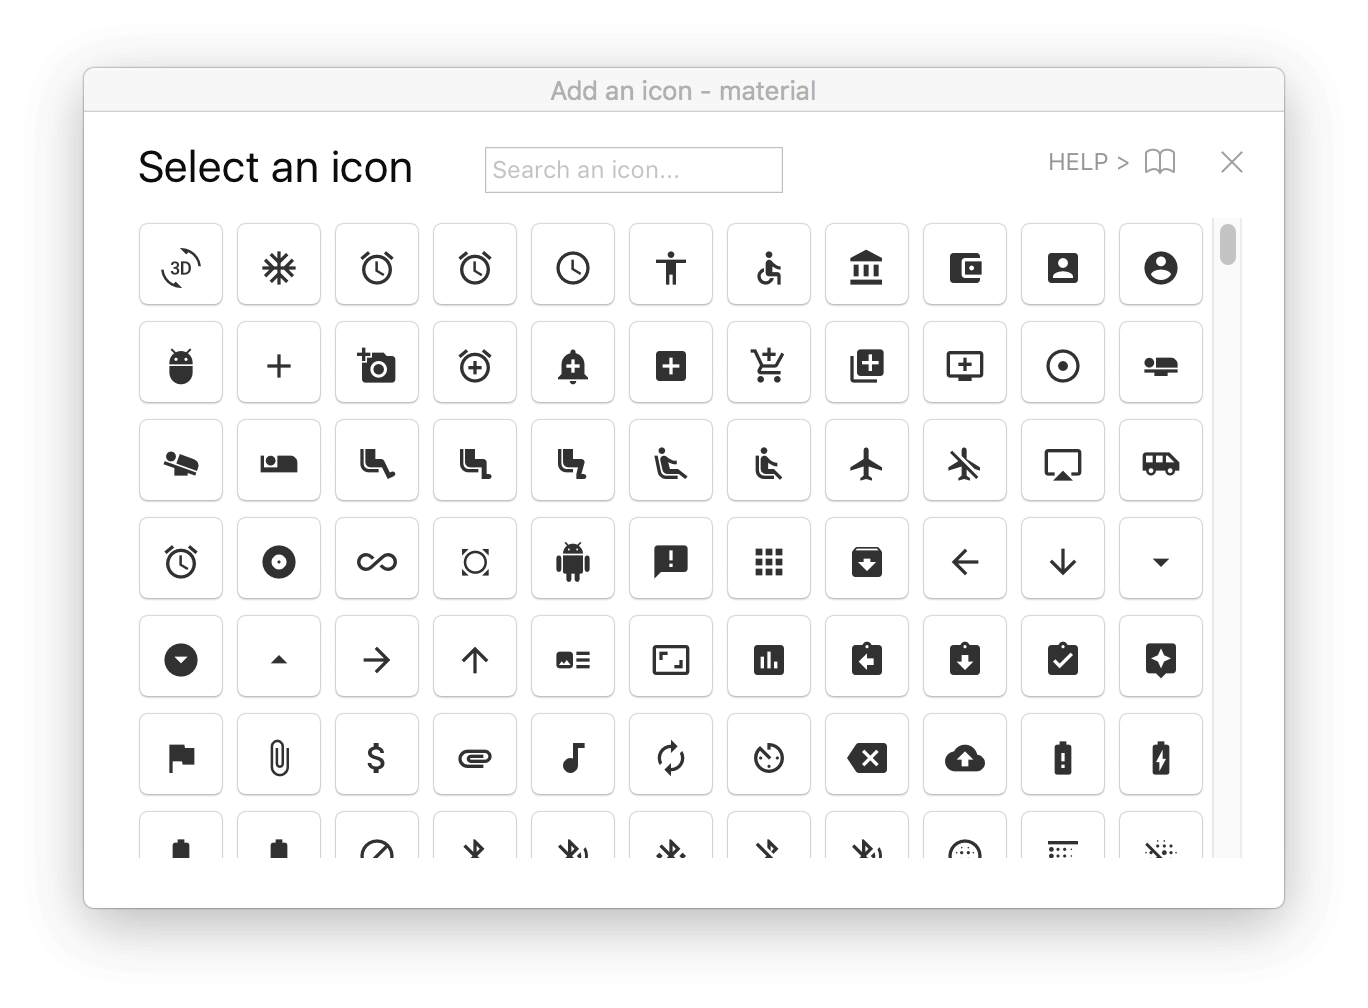
Sketch Icon Font Plugin
Adding a Material icon (or an icon from another font icon set) is a no-brainer with the Sketch Icon Font plugin. It takes only seconds! I don’t have to leave Sketch, and the icon can be scaled, colored and edited in any way I like.
Skala Preview Plugin
Sketch includes previewing functionality called Mirror. However, it works only with iOS devices and web browsers (for web design mockups). Skala Preview, on the other hand, provides excellent device-previewing functionality and (what is most important to me at the moment) support for Android devices.
Skala by itself does not support Sketch directly, but there is the Sketch Preview plugin to help with that. It’s reliable and has never crashed for me, but every now and again I have connection issues. What I love about it is the simple scrolling functionality that The Preview and Photoshop combination lacks.
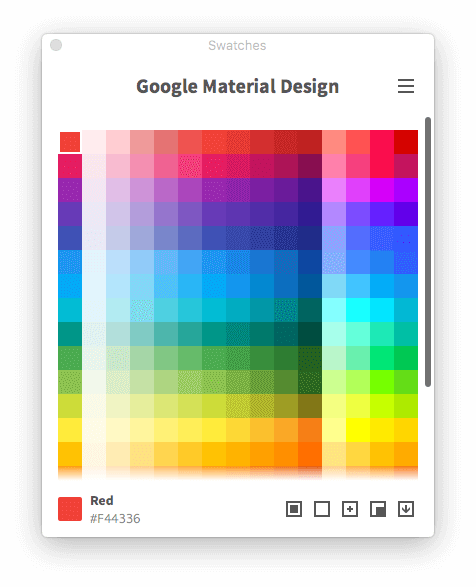
Swatches Plugin
Sketch has functionality similar to Photoshop’s and Illustrator’s swatches. It’s called global and document colors, but it has some minor limitations. For example, the palette colors can’t have names; they can’t be organized in subfolders; and no commonly used palettes come preloaded in Sketch. Also, I think the margins around the color squares are a bit too wide, so a large palette might not fit comfortably in there.

The Swatches plugin improves the situation. It comes preloaded with plenty of standard palettes, such as the Material palette, Pantone and others. I can mouse over a color to see its name, and I can apply it as a fill or stroke color or copy its HEX value with just a click.
Zeplin Plugin
Last, but not least, I need plugins to create design specifications. One of them is Zeplin.
Zeplin is a cloud-based toolset for creating automated design specifications and for designer-developer collaboration. Its main feature is that it reads and parses all of your Sketch artboards in a file, uploads them to a web server, and provides a web interface for other collaborators to view them. Once your artboards have been crunched and uploaded, anyone who checks them out on a computer can click and hover about and see all margins, paddings, fonts, HEX codes and other properties of all objects in the design.
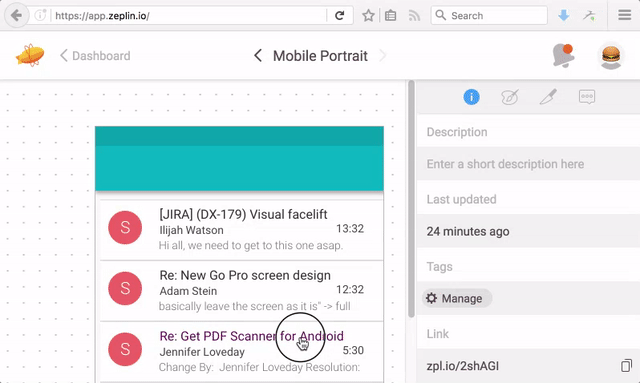
This approach to design specifications is quite helpful because it saves the designer from the time-consuming task of doing specifications manually. It could also reduce confusion and misunderstanding with the development team.
Other features of Zeplin that I find quite helpful are: organization for multiple projects, screen versioning (kind of like Git but designed for screen mockups), project style guidelines, and optimized asset exporting.
A potential downside of Zeplin is that some companies may have concerns over its cloud-based nature.
Sketch Measure Plugin
Zeplin is good for managing and working on entire projects that contain many screens. However, if you’re looking for a simpler (and free) solution, you may want to choose something else: Sketch Measure.
Using this plugin, you can specify your own design document or let the plugin do the dirty work. Like Zeplin, it will export a web page with your design on it, together with an interactive specification overlay! Unlike Zeplin, everything is done locally, but you won’t have the extra project-management tools at your disposal.
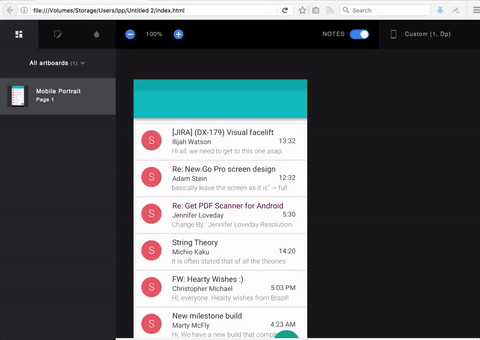
Compress the generated files to ZIP, give them to your developer, and you might save yourself quite a few hours of work!
Managing My Sketch Plugins
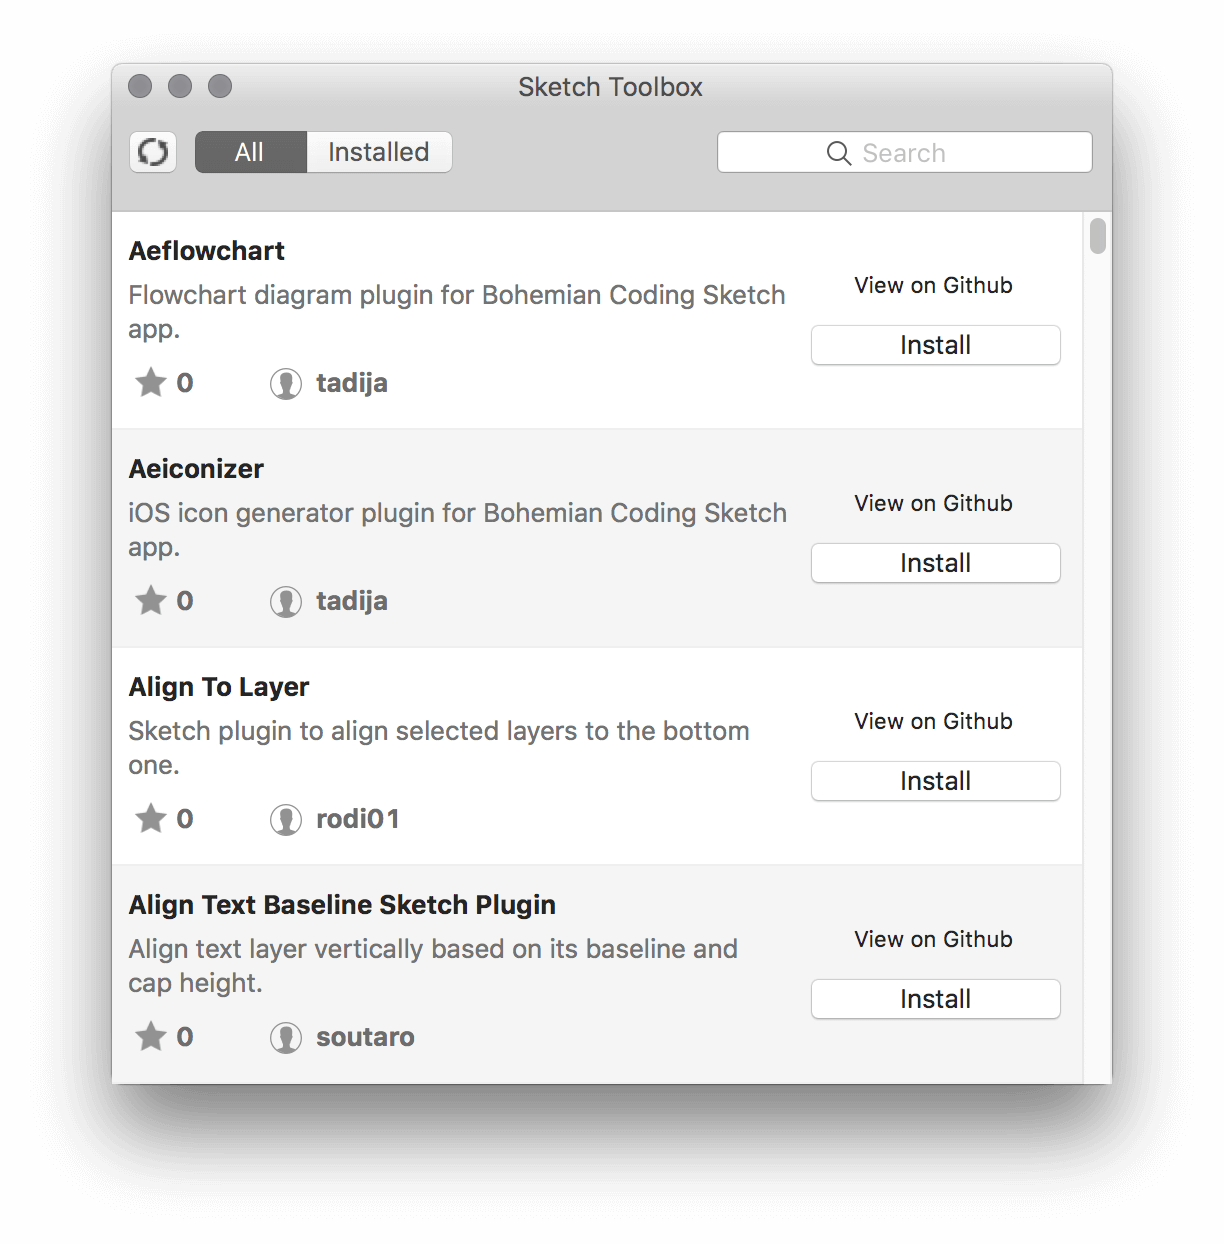
With so many plugins, one needs a reliable way to find, install, manage and update them. Sketch’s built-in manager only lists the plugins that are already available, allowing the user to enable and disable each one. This can be useful when you want to debug a plugin that’s acting up, but having to manually search for and install new plugins can be a hassle.
The best solution to this problem is probably the Sketch Toolbox app, a simple yet very useful tool. It allows you to install (and uninstall) almost any Sketch plugin out there with a single click. Highly recommended!
Prototyping And Framer Integration
Sometimes, static mockups don’t quite cut it if you need to communicate a more complex idea to developers, particularly for motion design and microinteractions. Some very good tools for interactive prototyping are out there, and each takes a different approach to the task.
My prototyping tool of choice is Framer.
Framer
Framer takes the programming approach: The designer is required to program their prototype in CoffeeScript. The prototype is immediately previewable in Framer Studio and can also be viewed on actual devices or in the browser.
I personally like the coding approach to creating prototypes, despite the steep learning curve. It will pay off eventually, because programming gives me a lot of control, and it also forces me to think a bit like a developer, which can be an advantage.
Using Framer And Sketch
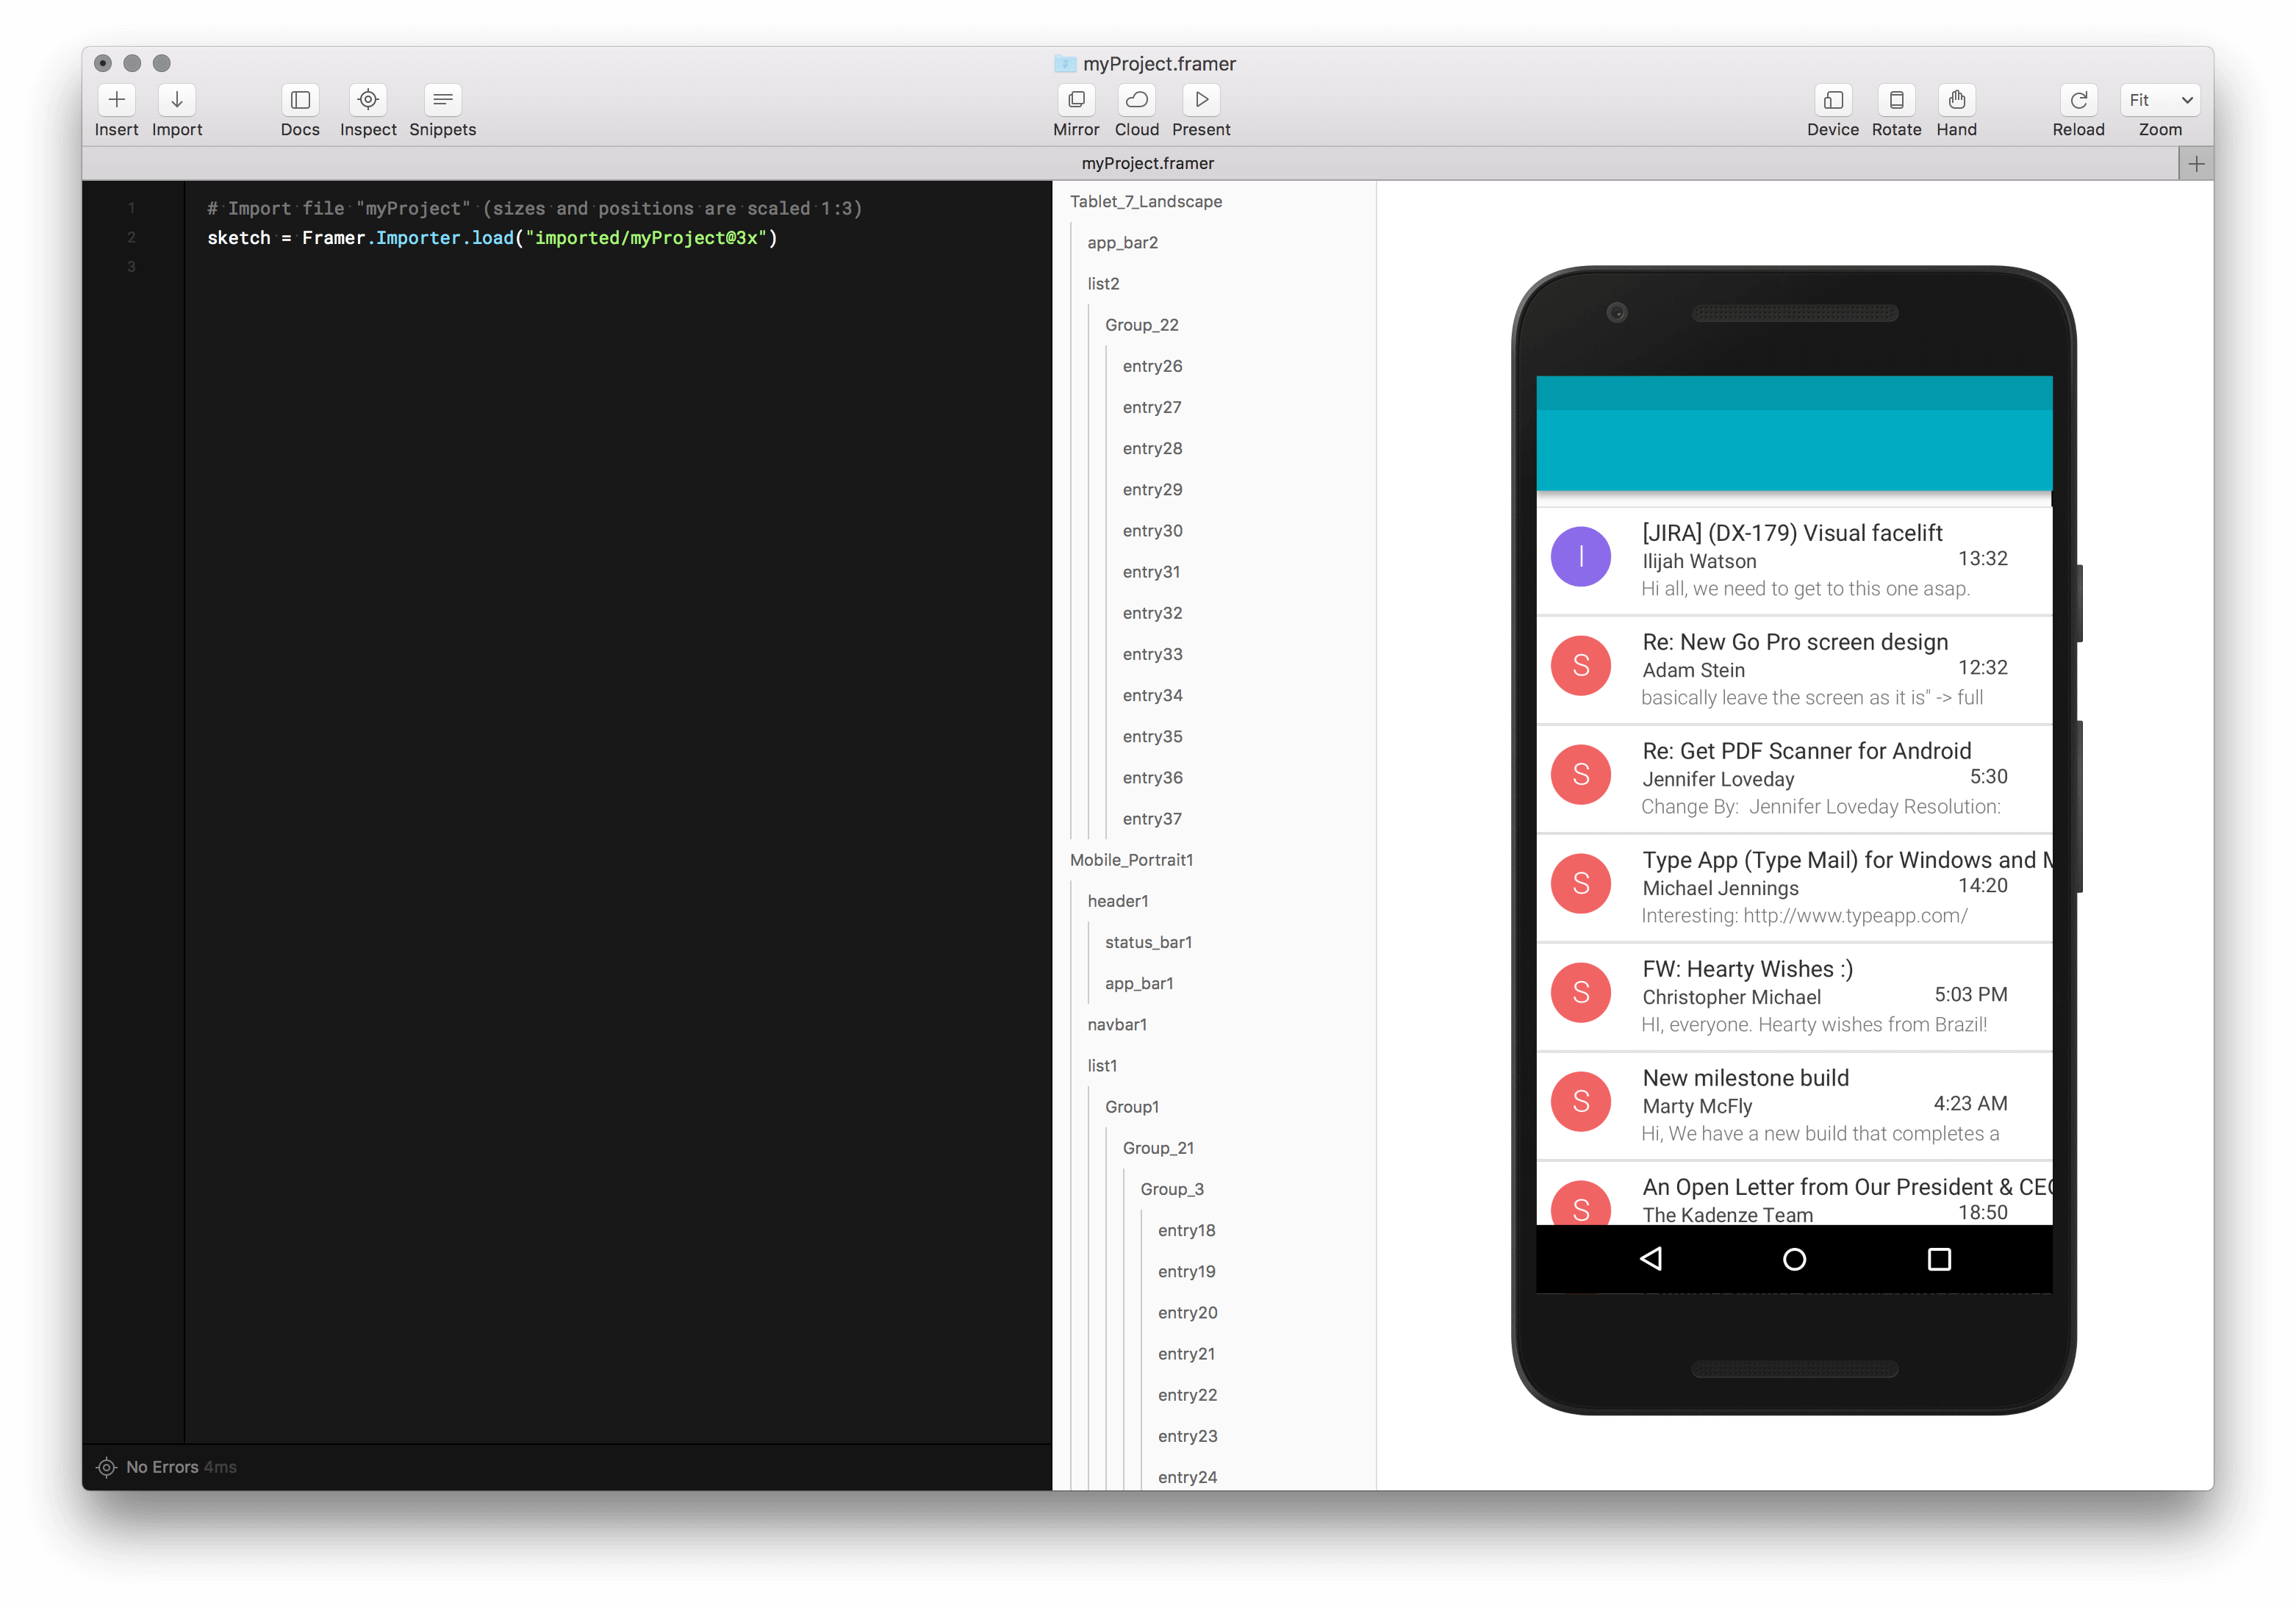
Including Framer in my Sketch workflow was fairly easy because it integrates by default. I only need to import the Sketch design file I’m working on, and I can immediately start to animate or otherwise manipulate any group of layers. The Framer-Sketch integration supports multiple artboards, but you can only import a single page at a time.
I’m still figuring out the most efficient way to work with Sketch and Framer. Currently, I think it’s best to have large per-project Sketch files, with separate pages for each screen of the app (or website) I’m working on. This enables me to easily reuse and organize all project assets, such as icons and buttons, into dynamic symbols. However, this approach produces larger files and slows down the Framer importing process. So, usually I’ll copy and paste the elements or screens that I want to prototype into a new file and then import them from there.
How Photoshop And Illustrator Fit My Workflow Now
I’ve moved to Sketch, but Photoshop and Illustrator are still part of my toolbox.
Because Sketch is a tool for UI design, it’s not the best-suited for creating very complex illustrations, and it doesn’t easily replace a solid vector application for illustration (nor does it attempt to).
I currently use Illustrator when I want to use my Wacom tablet for freehand drawing work, or if I’m doing something that requires complex artistic brushes and filters, or if I need to trace a raster image and convert it vectors. And, though nowadays I rarely do vector work for print (posters, leaflets, etc.), if I have to, I would again choose to use Illustrator.
Now I exclusively use Sketch for all interface and icon design tasks, but I continue to use Photoshop when I need to edit or refine product imagery, when I’m in the mood for some digital painting or drawing, or when I want to enhance a few photos. It has also happened a few times that I’ve opened Photoshop to quickly stitch together a few UI design mockups, so that I could send design previews for approval.
Conclusion
Sketch has solved many of my problems and has made my day-to-day life as a user interface designer a lot better. Mundane little things such as measuring distances and sizes are now much easier and quicker for me. I can now automate parts of my workflow and use real data in my Sketch designs. I can also organize my files more optimally (with the help of pages, artboards, states and symbols); I can reuse assets (through the dynamic symbols feature); and more.
Sketch also has a vibrant community. All of the open-source (and mostly free) plugins that completely transform the app and add some excellent functionality make Sketch a very versatile tool for UI design!
I really like Sketch’s focused approach, and hopefully I’ll continue to discover tiny features, tricks and plugins that make me go, “Whoa, that is so cool!”
If you’re a UI designer and are still using mostly Photoshop or Illustrator, I highly recommend you try Sketch. You might never want to look back!
Further Reading
- Meet Penpot, An Open-Source Design Platform Made For Designers And Developers Alike
- Recovering Deleted Files From Your Git Working Tree
- How To Host A WordPress Site On Amazon Lightsail
- Simplify The Handoff From Sketch To Visual Studio Code With Indigo.Design


