How To Build Your Own Action For Google Home Using API.AI

Email Newsletter
Weekly tips on front-end & UX.
Trusted by 182,000+ folks.

 Celebrating 10 million developers
 Custom Web Forms for Angular, React, & Vue. Your backend.

For the holidays, the owner of (and my boss at) thirteen23 gave each employee a Google Home device. If you don’t already know, Google Home is a voice-activated speaker powered by Google Assistant and is a competing product to Amazon’s line of Alexa products. I already have the Amazon Echo, and as Director of Technology at thirteen23, I love tinkering with software for new products. For the Amazon Echo, you can create what are called “skills”, which allow you to build custom interactions when speaking to the device.
I’ve really enjoyed learning how to build my own skills for Alexa. Now that Google Home is out in the market, Google has its own platform for you to build custom interactions, similar to skills, called “actions”. I checked it out and found that creating and deploying a basic Google action is extremely simple.
If you have a Google Home, you may have played with its prebuilt mad libs. Mad Libs is a game in which one player prompts others for a list of words to substitute for blanks in a story, before reading the — often comical or nonsensical — story aloud. I’ll use this game to show you how to build your own action for Google Home. Below, I’ve detailed steps to build a custom mad lib action, and I’ve explained why certain steps are important and ultimately how they fit into the voice services world. After this exercise, you will better understand voice services and begin your path to programming actions for Google Home.
Google Actions And API.AI
One notable difference between developing skills for Alexa and actions for Google Home is the software you use to set up the actual product. Amazon has a barebones web form that it has built specific to Alexa skills. Google, on the other hand, bought API.AI in September 2016, right before it released Home. Google requires you to use this platform to create your action. There is a short learning curve with API.AI, and the interface takes a little getting used to, but it works pretty well. It also has a lot more built-in power than Alexa’s development portal. The other notable aspect is that you can do a lot more with API.AI outside of Google actions. For this tutorial, we will primarily use this software to create a Google action.
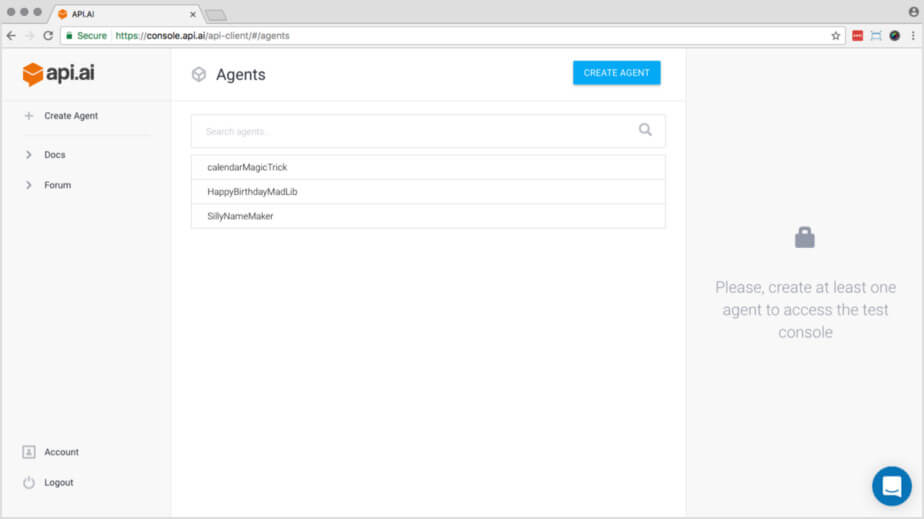
To start off, we will create an API.AI account, create a new agent (which will eventually be our Google Action) and give it a name.
Step 1: Create An API.AI account
Note: If you have a Google Home, make sure the API.AI account is the same Google account logged into that device! Otherwise, you won’t be able to test it on the actual hardware.
Go to API.AI and click “Sign up free.” I signed in with Google because I always have Gmail open. Once signed in, you should see an interface similar to what’s below. Click “Create agent,” and let’s get started!
Step 2: Name Your Agent
The first thing you need to do is name your agent. An API.AI agent represents a conversational interface for your application, device or bot. For this tutorial, our agent represents a conversation to gather words for a happy-birthday mad lib. You can’t have any spaces in the name, so let’s call the agent HappyBirthdayMadLib.
Leave the agent type as “public,” add a description if you want, and click “Save.”

Intents
An intent allows users to say what they want to do and lets the system figure out what activity matches what was said. This is another area in which API.AI and Alexa’s skill-building forms differ greatly: API.AI has a tool specific to creating these intents, whereas Amazon requires you to load a raw intent schema. You should see a screen like the one below.
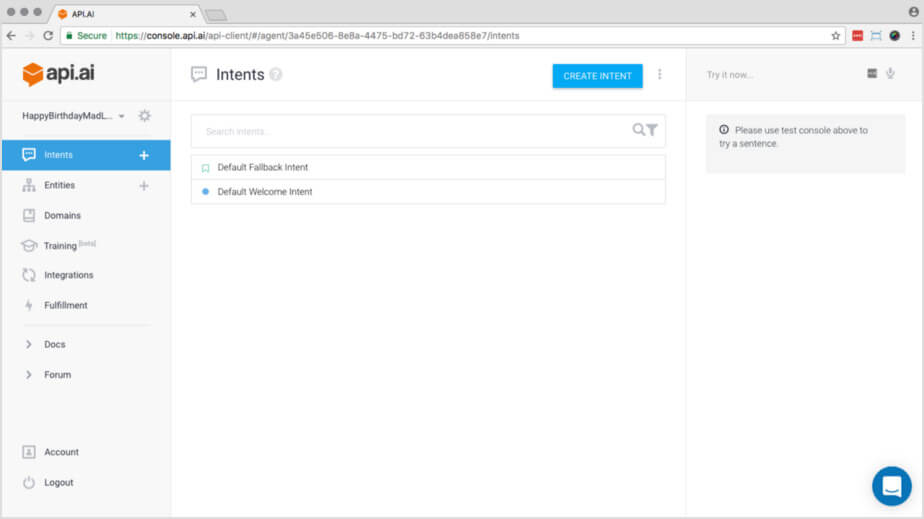
We will now create a welcome intent to introduce the Google action and an intent to gather the words in our mad lib. Our last step in this section is to create the final response — the mad lib!
Step 3: Default Welcome Intent
Let’s now focus on the default welcome intent. (For now, you can ignore the default fallback intent.) The default welcome intent is what fires when your action is invoked through the Google Home device. For instance, when the user says “Hey, Google, open the happy birthday mad lib,” the agent knows to kick off the default welcome intent, which introduces your game to the person speaking to the Google Home device.
Click on “Default welcome intent,” scroll to the bottom, and you should see the screen below:

If you mouse over the responses that you see above, a little trash can will appear on the line. Click the trash cans, and delete all of those prebaked responses. Then, let’s write a custom welcome text response:
"Hello, and welcome to the Happy Birthday Mad Lib. Let’s begin. Give me the name of a female friend."
Click “Save,” and we are done with the default welcome intent! If you see a screen like the one below, then you are on track.

Step 4: Create A New Intent
Click the “Intents” item in the left-hand menu. You will see “Default fallback intent” and “Default welcome intent” listed. We need a new intent to gather words for our mad lib. We are going to create a new intent; so, click “Create intent” in the upper-right. The first thing we will do on this new screen is name the intent: make_madlib.
Step 5: “User Says” Content
Our next step is to populate the “User says” area. “User says” phrases define what users need to say to trigger an intent. We only need a couple here. These will be answers to the request you stated in the default welcome intent: “Give me the name of a female friend.” It ultimately helps with the machine-learning aspect of Google Home. The documentation explains about “User says” and why example answers like this help with machine learning. Using a name of one of your friends or Laura, enter these two values:
- Laura
- A name is Laura
If your entries look like what you see below, then go ahead and click “Save,” and we will move on to creating our action.
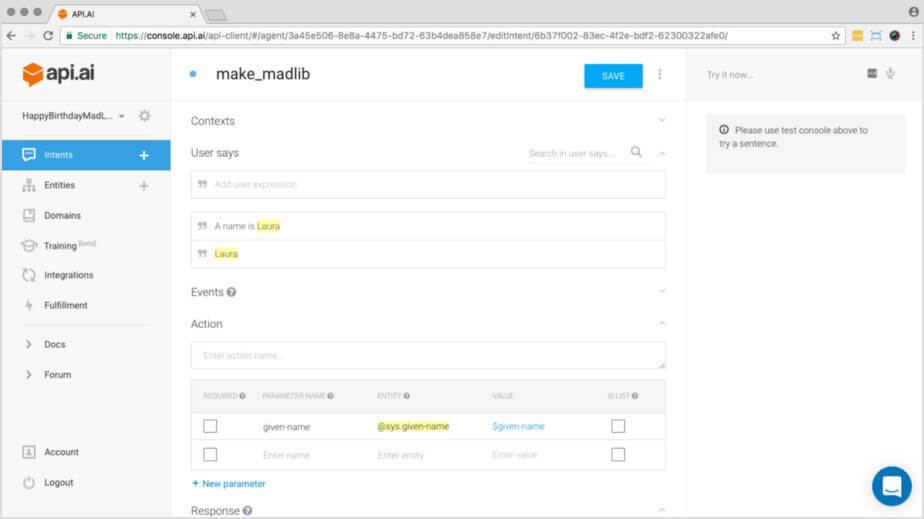
make_madlib intent (View large version)Step 6: Defining Your Action
In order to gather all of the words we need for the happy-birthday mad lib, we will need to create an action. An action corresponds to the step your application will take when a specific intent has been triggered by a user’s input.
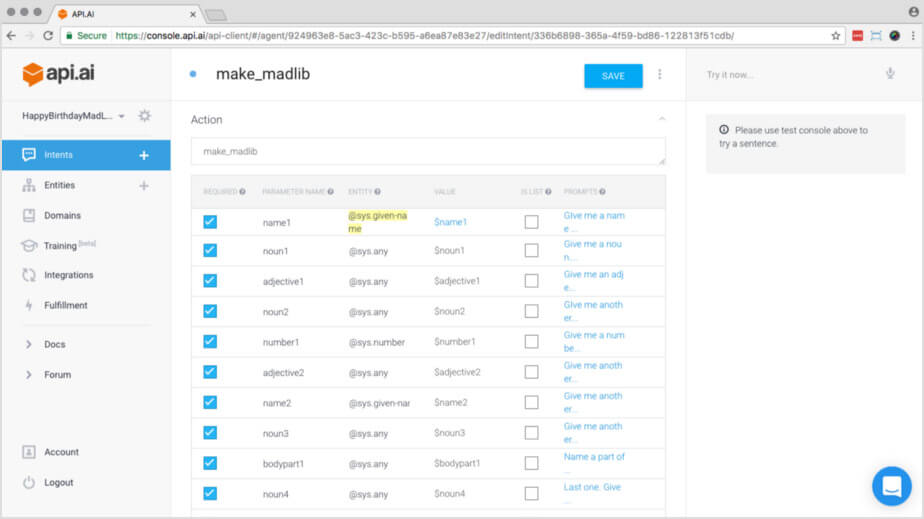
We need to enter an action name in the field. Enter this name: make_madlib.
For our mad libs action, we will gather several words. These will be our parameters for the action. Parameters consist of all of the data we need in order to complete our action. Given that this is a mad lib, we will need to gather various parts of speech, such as nouns and adjectives. These are our parameters for the action of creating a mad lib! So, let’s create some parameters. Each one of these is required, so check the box on each one.
- Edit the
given-nameentry, changing the name toname1. Check it as required, and enter the prompt “Give me a name of a female friend”. - Create a new parameter named
noun1of entity@sys.any, a value of$noun1, mark it as required, and enter the prompt “Give me a noun”. - Create a new parameter named
adjective1of entity@sys.any, a value of$adjective1, mark it as required, and enter the prompt “Give me an adjective”. - Create a new parameter named
noun2of entity@sys.any, a value of$noun2, mark it as required, and enter the prompt “Give me another noun”. - Create a new parameter named
number1of entity@sys.number, a value of$number1, mark it as required, and enter the prompt “Give me a number”. - Create a new parameter named
adjective2of entity@sys.any, a value of$adjective2, mark it as required, and enter the prompt “Give me an adjective”. - Create a new parameter named
name2of entity@sys.given-name, a value of$name2, mark it as required, and enter the prompt “Give me a name of another friend”. - Create a new parameter named
noun3of entity@sys.any, a value of$noun3, mark it as required, and enter the prompt “Give me another noun”. - Create a new parameter named
bodypart1of entity@sys.any, a value of$bodypart1, mark it as required, and enter the prompt “Name a part of the body”. - Create a new parameter named
noun4of entity@sys.any, a value of$noun4, mark it as required, and enter the prompt “Last one. Give me another noun”.
I realize this is a lot. Are you still with me? Great. It is important to name everything exactly as outlined above. At this point, your screen should look like this:
make_madlib intent (View large version)Step 7: Create The Response
Move down to the “Response” section and add this content:
"Friends, this is a surprise party for $name1. We are here to celebrate her $noun1. All of her most $adjective1 friends are here, including me, her devoted and faithful $noun2. I must say that she doesn’t look a day over $number1. Naturally, we have some $adjective2 presents for her. $name2 bought her a beautiful copper $noun3 that she can wear on her lovely $bodypart1. Now, let’s all sing together: “Happy $noun4 day to you!”"
We’re done! This final part should look like what you see below:
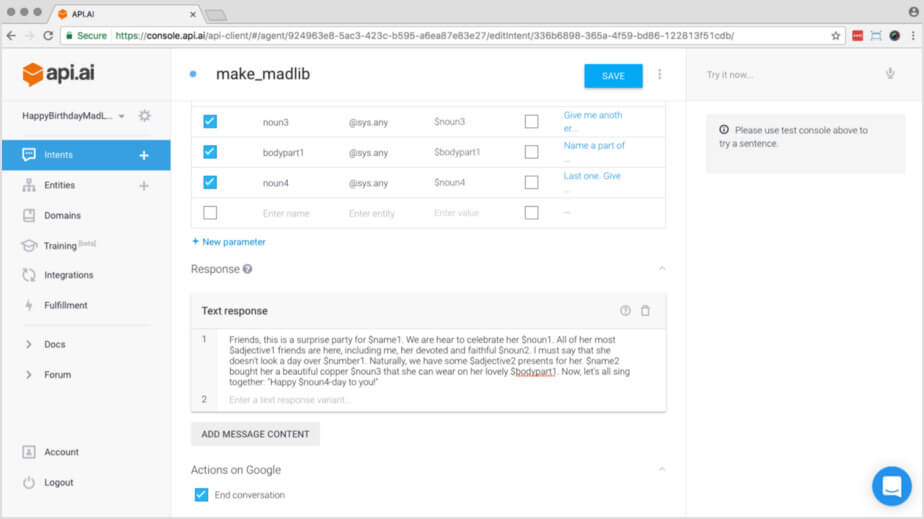
Note: Do you see the bottom of the screen in the image above, where it has “End conversation” checked under the “Actions on Google” heading? In order for that to show up, you need to do the next step. Once it is there, you need to go back to the intent and check that box.
Integration
In order to test what we’ve created on a Google Home device or simulator, we need to integrate this new mad lib agent with the “Actions on Google” integration. API.AI has many different types of integrations to choose from, such as for Facebook Messenger, Slack, Skype, Alexa and Cortana. Remember that API.AI wasn’t built specifically for Google Home. In order for this new action to work on your Google Home, we need to integrate it with “Actions on Google.”
In the next step, we will enable the API.AI agent to work with the Google Home device by integrating it with Google actions.
Step 8: Integrate With Actions On Google
Click on “Integrations” in the left-hand menu. The very top-left item should be “Actions on Google.” Click on that item to open up the settings. You should see something like the screen below:

Turn it on by flipping that toggle in the upper-right corner. Click on the Create Project button in the lower right. This will take you to the Actions on Google site for setting all the publishing parameters for your action as well as being able to test it in the simulator. Next, you can try it out in the Google Home Web Simulator.
Testing Your Action
You can test your new action in a couple of ways. You can use the Google Home Web Simulator, which allows you to test in a browser without an actual Google Home device, or you can test on a device that is logged in with the same account. Let’s test it in the simulator first.
In these final steps, you will test your new Google action in a simulator and, if you have access to one, an actual Google Home device!
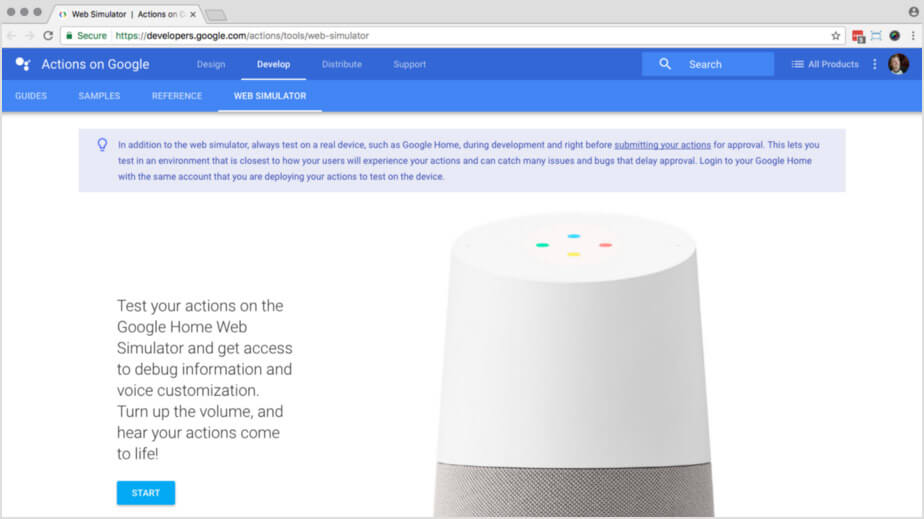
Step 9: Testing On Google Home Web Simulator
To test your Google action, you can run it in the Google Home Web Simulator. Go ahead and open that tool. You will see the screen below. Click “Start.”
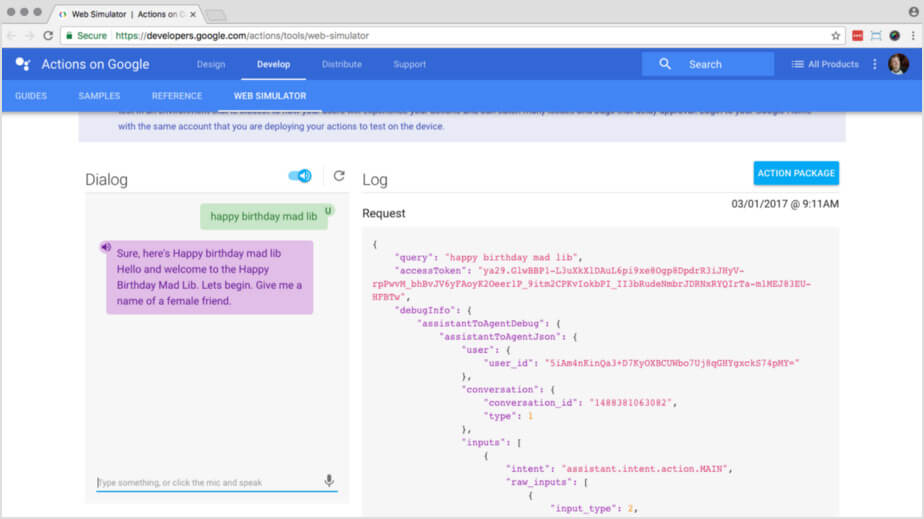
On the next screen, you can type text in the “Dialog” area on the left, hit return and hear a result. On the right side of the screen, under “Log,” you will see the resulting JSON generated behind the scenes. This JSON is generated by the Google Home device upon hearing the user’s command. For this simulator, it comes from the text that you typed in the “Dialog” area. If you scroll down in the “Log” area, under the “Response” subheading, you will see the JSON returned from API.AI after it has processed your JSON request.
Put on some headphones or turn up your speakers! Type the following text in the “Dialog” text field: Talk to my test app
Once you do that and hit return, you should hear the start of your mad lib action, and the screen will look like what you see below:
Go through the rest of the mad lib to finish it up, and the result should look similar to what you see below, but with your own words. Our next step will be to test it on an actual Google Home device.

Step 10: Testing On A Google Home Device
To test the mad lib on a Google Home device, all you need to do is log into the device using the same account that you used to authorize your action for testing in the simulator. Once you authorize your action for previewing, it will automatically be available on the Google Home device assigned to that same account. Note that you need to be authorized in the API.AI account under the same Google account in order for this to work!
In step 8, if you set your invocation name to “Happy birthday mad lib,” then try invoking the action you just built by saying to your device, “OK Google, open happy birthday mad lib.”
Once you do this, Google Home should say the welcome intent (from step 3) back to you:
"Hello, and welcome to the Happy Birthday Mad Lib. Let’s begin. Give me the name of a female friend."
From here, you can give Google Home the name of a female friend, and follow the rest of the prompts until it reads the story back to you!
For this example, we won’t be deploying it for public use, because we would all be deploying the same action. But if you do come up with a unique action and you want to put it out there for the world to use, you can do that by following the simple steps in the documentation. Like when building an Alexa skill, the Google team will need to review your action before accepting it, so be patient!
What’s Next?
In this article, you learned how to create a basic action for Google Home. You learned about the API.AI platform for creating a Google action and how to set up all parameters in order for your action to work properly. Now you have a basic understanding of how to build custom functionality for the Google Home device, and with this knowledge you can explore more complex ideas for applications running on Google Home.
This example is one of the basic ways to build an action for Google Home. What if your action is a bit more complicated? In that case, you should build in your own custom webhook to handle tasks such as querying a database or looking up user data. Luckily, the API.AI interface provides an easy way to use a webhook to pull in what the user says, then to make decisions based on that input and give a response. See Google’s tutorial on GitHub for how to create an action with a webhook.
Good luck, and most of all, have fun! If you have any questions, ask them in the comments section below.
Further Reading
- Intrusive Interstitials: Guidelines To Avoiding Google’s Penalty
- What Are Progressive Web AMPs?
- Is Your Responsive Design Working? Google Analytics Will Tell You
- Targeting Mobile Users Through Google AdWords


