Developing A Chatbot Using Microsoft’s Bot Framework, LUIS And Node.js (Part 1)

Email Newsletter
Weekly tips on front-end & UX.
Trusted by 182,000+ folks.


 Celebrating 10 million developers
 Custom Web Forms for Angular, React, & Vue. Your backend.
This tutorial gives you hands-on access to my journey of creating a digital assistant capable of connecting with any system via a RESTful API to perform various tasks. Here, I’ll be demonstrating how to save a user’s basic information and create a new project on their behalf via natural language processing (NLP).
Note: I am not associated with Microsoft in any way (either directly or indirectly).
Choosing A Bot Framework
The rising wave of artificial intelligence (AI) in the last couple of years has given a massive push to the idea of conversational interfaces, commonly known as chatbots. Creating a high-performing chatbot that can understand natural language was a tedious and complex task a few years back, but like all other user interfaces, we saw some promising advancements in chatbot-building platforms as well.
The tech community has joined forces to boost the growth of various aspects of AI, including natural language processing and machine learning. Big players such as Facebook, Microsoft, IBM and Google have tirelessly been creating platforms and tools to help developers and entrepreneurs ease the process of integrating such technology into their own products and businesses.
Platforms such as Slack, Facebook Messenger, Pandorabots, Telegram, Wit.ai and Microsoft’s Bot Framework have given thousands of technopreneurs like me a strong foundation on which to create useful chatbots that can be integrated with existing platforms and apps in minutes. Some of these frameworks are confined to their own platforms, like Slack and Facebook Messenger, while others integrate with multiple platforms, which saves a lot of effort if you’re aiming for a cross-platform launch. Matching user intent and finding entities from their utterances are the foundation on which these frameworks are built. The most extensive suites of cognitive services that can add true intelligence to your bot are offered by both IBM and Microsoft. Both companies have been investing heavily in this domain, and their services can be used as an extension of the “mind” of your bot.
A few months back, I wrote an article on TechCrunch discussing the role of AI and chatbots in the web development industry. This was the same time when I saw that Bot Framework was picking up speed. Microsoft made its Bot Builder available as an open-source SDK, not just on .NET, but also on Node.js and a REST API.
At this time, I was in discussions with Iflexion and Hema Maps about creating chatbots with extensive natural language and AI capabilities for their future projects. During these meetings, I identified the need to eventually add machine learning as well. So, I thought, why not give Microsoft’s products a try?
The Chatbot Journey
Signing Up And Creating The App
The first part is pretty convenient if you already have a Microsoft account (a work, school or personal account). Just use that to sign in on https://dev.botframework.com/. After you log in, there’s a button to “Register a Bot,” which takes you to a page asking you to fill in some information about the bot:
- name
A friendly name for your bot. - bot handle
Used in the URL for your bot. Cannot be changed once registered. - description
Displayed on your card in the bot directory, if you choose to list it there. - messaging end point
The URL at which your bot will live. You’ll get this URL when setting up the server environment. - app ID
Obtained by clicking the “Create Microsoft App ID and password” button above. While creating your app ID, you’ll be asked to create a password. Copy and save this password safely: You’ll need it in the bot configuration file. - owners
A comma-separated list of email IDs for people who will have editing rights to this bot. - instrumentation key
The Azure App Insights key, if you want to receive analytics about your bot.
Once you have filled in all the information, you can click on “Register.”
Setting Up The Local Environment
We will first set up our local machine to test the bot via the Bot Framework Emulator on Ubuntu (also available for Mac and Windows). When I first downloaded the Bot Framework Emulator for Linux, it was just a version for the command-line interface. Luckily, it soon got replaced with a GUI-based AppImage version, which runs directly without installation.
Because JavaScript is one of my primary coding languages, I chose the Node.js version of the Bot Builder SDK. To run it, you’ll obviously need to install Node.js on your system. I used the Linux package manager to do so, but you can select the method that is convenient for you.
$ sudo apt install nodejsOnce Node.js is installed, create a new folder and a blank JavaScript file in a location of your choice. I’ll use /var/www/aplostestbot as my root folder and create a file, aplostestbot.js, inside it. Open a new command-line editor and change the current working directory to the bot’s folder. Now, run the following commands to fetch the two dependencies that we need to build our bot:
$ sudo npm install botbuilder
$ sudo npm install restify
The BotBuilder is the SDK provided by Microsoft that we’re using to build our bot, and Restify is used to expose the endpoints of our bot as REST APIs. Our local environment is now set up, so it’s coding time.
Writing The Bot’s Code
We’ll now create the bot step by step, simultaneously testing each step so that errors can be identified as they occur. Open the empty aplostestbot.js file in your favorite integrated development environment (IDE) — for me, it is Netbeans — and require the Restify, HTTP and Bot Builder modules:
var restify = require('restify');
var builder = require('botbuilder');
var http = require('http');
Next, we’ll ask the Restify server to listen for incoming messages on port 3978 (this is the port used by the bot framework to communicate with our bot).
var server = restify.createServer();
server.listen(process.env.port || process.env.PORT || 3978, function () {
    console.log('listening to %s', server.url);
});
To test that everything is working fine, open a command-line editor, point to your bot directory and run your script:
$ node aplostestbotThe output in the terminal should be listening to https://[::]:3978, which means that everything is working fine to this step. Now press Ctrl + C to terminate the script and switch back to the IDE.
In order to authenticate the connection with the bot framework, we acquired an app ID and password when creating the app in the first step. Add the following lines to create a connection between your bot and the Bot Framework API (replace YOUR_APP_ID and YOUR_APP_PASSWORD with the credentials you obtained previously).
var connector = new builder.ChatConnector({
    appId: 'YOUR_APP_ID',
    appPassword: 'YOUR_APP_PASSWORD'
});
var bot = new builder.UniversalBot(connector);
Now, add connector.listen() to catch messages on the /api/messages route.
server.post('/api/messages', connector.listen());At this stage, if you run your bot through the command-line editor, it will throw an error because we have not defined a default route for our incoming messages. Add the following code:
bot.dialog('/', function (session, args) {
    session.send("Hi");
    console.log(session.message.text);
});
With the syntax above, the bot.dialog function will capture all incoming messages, and the session parameter will contain all data relevant to the current conversation.
Let’s connect our emulator now and see the bot in action. Run the bot from the command line via the $ node aplostestbot.js command (you should get a message of 138.197.0.221 listening to https://[::]:3978). Then, run the AppImage file that we previously downloaded from emulator.botframework.com (you have to make it executable first by pointing to the folder of your AppImage and running the chmod a+x command). Once your emulator starts, click on the “Enter your endpoint URL” field and enter https://localhost:3978/api/messages. This will reveal the app ID and app password fields; enter the ones we previously acquired for our bot, and click “Connect.” In the “Log” section in the bottom right, you should get a message of POST 202 [conversationUpdate] and ChatConnector: message received in your command line. This means the emulator is able to communicate with your chatbot without any issues.
Send a test message of “Hello” to your bot through the emulator. You should see your message in the console (the output of session.message.text) and a response in your emulator that says “Hi,” sent via the session.send() function.
Now that we have established communication between the emulator and the bot, we can move forward to add the dialogue flow. Modify your bot.dialog default function to look like this:
bot.dialog('/', function (session, args) {
    if (!session.userData.greeting) {
        session.send("Hello. What is your name?");
        session.userData.greeting = true;
    } else if (!session.userData.name) {
        getName(session);
    } else if (!session.userData.email) {
        getEmail(session);
    } else if (!session.userData.password) {
        getPassword(session);
    } else {
        session.userData = null;
    }
    session.endDialog();
});
Here, we are controlling the conversation flow by storing and checking values in the userData session variable, which persists throughout the conversation. First, we check whether session.userData.greeting doesn’t exist, to show the user a greeting message. To send this message to the user, session.send(“your message here”) is used. After sending this message, we set the greeting session variable to true so that upon a response, it goes in the next IF condition.
Note: We could have used Prompts.text to get the information from the user, but when we get into a much more complex scenario with the bot for natural language processing and controlling front-end actions based on the user’s input, this raw approach will come in handy. You can read more about Prompts in the documentation.
Because we set the session.userData.greeting variable to true, the program will enter into the second IF statement, calling the getName() method, in which we save the name and send a response message asking the user for their email address.
function getName(session) {
    name = session.message.text;
    session.userData.name = name;
    session.send("Hello, " + name + ". What is your Email ID?");
}
Upon receiving a response, the program enters into the third IF statement, where getEmail() is called. In this function, we’ll validate the email ID against a regular expression and, if the test passes, move to the next step of setting up a password; otherwise, we’ll ask the user to enter a valid email address.
function getEmail(session) {
    var re = /^(([^<>()\[\]\\.,;:\s@"]+(\.[^<>()\[\]\\.,;:\s@"]+)*)|(".+"))@((\[[0-9]{1,3}\.[0-9]{1,3}\.[0-9]{1,3}\.[0-9]{1,3}])|(([a-zA-Z\-0-9]+\.)+[a-zA-Z]{2,}))$/;
    email = session.message.text;
    if (re.test(email)) {
        session.userData.email = email;
        session.send("Thank you, " + session.userData.name + ". Please set a new password.");
    } else {
        session.send("Please type a valid email address. For example: test@hotmail.com");
    }
}
After we receive a valid email address, the user sets a new password, which is also validated against a regular expression. If the test is passed, the new password is also saved in the session, and the sendData() function is called with the data that we saved in our session.userData
function getPassword(session) {
    var re = /^(?=.*?[A-Z])(?=.*?[a-z])(?=.*?[0-9])(?=.*?[#?!@$%^&*-]).{8,}$/;
    password = session.message.text;
    if (re.test(password)) {
        session.userData.password = password;
        var data = session.userData;
        sendData(data, function (msg) {
            session.send(msg);
            session.userData = null;
        });
    } else {
        session.send("Password must contain at least 8 characters, including at least 1 number, 1 uppercase letter, 1 lowercase letter and 1 special character. For example: Mybot@123");
    }
}
Important: Asking for any sort of password through a bot is highly discouraged in any production-level bot. Microsoft’s Bot Framework uses third-party routes to send and receive information. The typical implementation we’ve seen is for the bot to provide a link that the user clicks to go to a secure web page, and then on the web page they would sign in or set a password; the web page can then send a token back to the bot to continue with the token, like how BotAuth does it.
The sendData() function uses a http.get request to send the data (the first parameter being data) to an API and return the response in a callback (the second parameter being cb).
function sendData(data, cb) {
    http.get("https://local.dev/aplostestbot/saveData.php?name=" + data.name + "&email=" + data.email + "&password=" + data.password, function (res) {
        var msg = '';
        res.on("data", function (chunk) {
            msg += chunk;
        });

        res.on('end', function () {
            cb(msg);
        });

    }).on('error', function (e) {
        console.log("Got error: " + e.message);
    });
}
You can find the complete code in the GitHub repository.
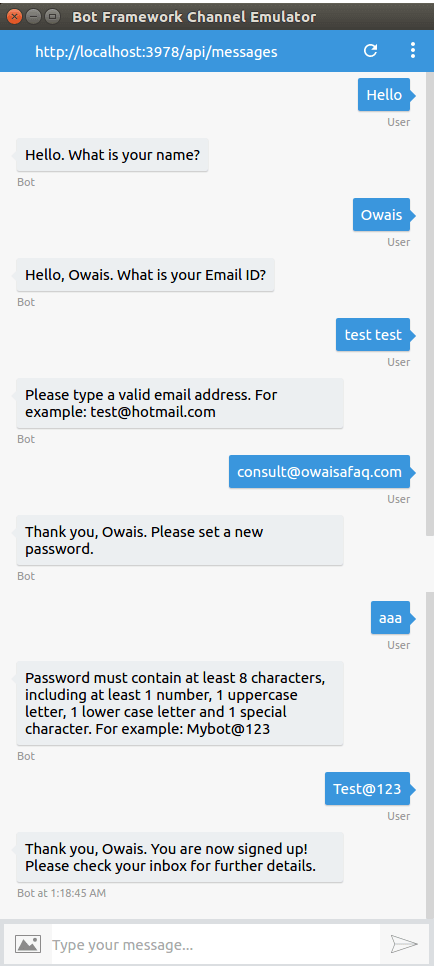
Once you have set up the code as described, you can run your bot through the command line the same way as we have been doing throughout the process and send a “Hello” message in the emulator to start the conversation.
$ node aplostestbot.jsHere’s a screenshot of my conversation with the bot:
Server Deployment And Testing
The server you’ll be deploying your bot to needs to have Node.js running and HTTPS enabled (I used CertBot to set up HTTPS on my Linux server). To enable HTTPS in the bot script, we’ll add the following code (replace the path to the certificate files according to your configuration).
var local = false;

var https_options = {};
if (!local) {
    var fs = require('fs');
    https_options = {
        key: fs.readFileSync('/etc/letsencrypt/live/demoz.online/privkey.pem'),
        certificate: fs.readFileSync('/etc/letsencrypt/live/demoz.online/fullchain.pem'),
    };
}
Notice that I’ve defined a variable named local and set its value to false to identify the environment in which we’re running our bot. This will help us switch between HTTP and HTTPS requests when we deploy to the server and test locally.
Once you’ve added this to the start of your script, pass the https_options object to your restify.createServer() method that we added initially, like this:
var server = restify.createServer(https_options);We’re now set to run our script on the server and connect it with the Bot Framework. Run your bot script with Node.js, and log in to https://dev.botframework.com/ . Go to “MyBots” → “Aplos Test Bot” and edit the bot’s details, putting your server’s URL as the “Messaging end-point,” which should look like https://yourdomain.com:3978/api/messages, replacing yourdomain.com with the URL of your bot on the server.
Save the settings and click on the “Test” button under “Test connection to your bot.” It should display a message saying “Accepted,” which means everything worked fine. You can now use the chat interface on the right to talk to your bot. Software testing is an integral part of the process. Because we have been testing step by step, most errors got resolved then and there, but final testing gives you an opportunity to resolve edge cases that we missed during the development phase. Microsoft’s blog has a very helpful article about unit testing for bot applications, which you should definitely check out.
Recap
In this tutorial, we’ve created a chatbot using Node.js and Microsoft’s Bot Framework SDK; we sent the data collected from the user to an API; we set up both local and server environments; and we deployed it live on dev.botframework.com. The script, with its existing structure, can be scaled to accommodate scenarios of any complexity. You can add your own APIs and modify the data being collected and sent. For example, you could create a set of functions to collect and push data to an existing employee attendance application or hospital management system to engage users in a conversational interface that can be deployed through any of the available channels on the bot framework.
In part 2 of this series, we’ll learn how to add natural language processing using LUIS to make our chatbot intelligent enough to understand human language and to extract information from a user’s utterances. It will help us to create a new project by identifying the data provided by the user.
Chatbots Worth Trying
- Poncho
- RightClick
- Mitsuku
- “BotBuilder Samples,” (code samples on GitHub), Microsoft
Further Reading
- Does Conversation Hurt Or Help The Chatbot UX?
- The Issue With Global Node Packages
- Server-Side Rendering With React, Node And Express
- Conversational Design Essentials: Tips For Building A Chatbot


