From Idea To Development: How To Write Mobile Application Requirements That Work

Email Newsletter
Weekly tips on front-end & UX.
Trusted by 182,000+ folks.
 Try ProtoPie AI free →
 Register Free Now

 Celebrating 10 million developers
 SurveyJS: White-Label Survey Solution for Your JS App
Why write requirements? Well, let’s imagine you want to produce a mobile app, but you don’t have the programming skills. So, you find a developer who can build the app for you, and you describe the idea to him. Surprisingly, when he showcases the app for the first time, you see that it is not exactly what you want. Why? Because you didn’t provide enough detail when describing the idea.
To prevent this from happening, you need to formalize the idea, shape it into something less vague. The best way to do that is to write a requirements document and share it with the developer. A requirements document describes how you see the result of the development process, thus making sure that you and the developer are on the same page.
In this article, we will outline the most common approaches to writing requirements documents. You will learn the basic steps of writing mobile application requirements and what a good requirements document looks like.
How To Approach The Writing
A carefully crafted requirements document eliminates ambiguity, thus ensuring that the developer does exactly what needs to be done. In addition, the document gives a clear picture of the scope of the work, enabling the developer to better assess the time and effort required. But how do we create a good document? Below are some tips that our mobile team at Polecat follows when crafting requirements.
1. Describe The Idea In General
We believe that a proper description of the idea should fit in one sentence. The sentence may include a core feature of the application, so that the reader understands instantly what the app is about. For a calorie-tracking mobile application, it could be, “An app to track calorie consumption to help those who care about their weight.”
Hint: Gua Tabidze shares a few models that others use to describe an idea.
2. Consider The Sequence
Study basic navigation patterns, and describe your application in the same sequence that users would experience while exploring it. Once the idea part is done, describe the first steps of the application, such as the onboarding screens and user registration.
Then, move on to what goes next, such as the application’s home screen. This approach will give the reader a sense of what the user’s journey would look like.
At the end, don’t forget about basic features and screens such as the privacy policy and the “forgot password” feature.
3. Review Existing Applications In The Stores
Review existing applications in Apple’s App Store and Google Play, and refer to them when describing your app. If you like how the “forgot password” feature works in applications A and B, put it in the requirements document.
4. Abstract Away From Detail
Focus on the features of the application, and skip details such as the color of a button. Most app users do not care about such details. What they do care about is whether your application helps to solve their problem. So, when writing requirements, concentrate on things that the user should be able to do in the app.
5. Prioritize Features
Convey which features are more important than others, so that the developer knows what to focus on first. We usually follow the MoSCoW method, marking items with “Must,” “Should,” “Could” and “Won’t” levels of priority.
6. Complement Text With Wireframes
Create wireframes of the screens of the application to accompany your textual description of them. If you have more than four wireframe screens, then drawing a screen map makes sense. We’ll show a screen map later in this article.
Requirements Formats
Now that you know how to write the requirements, you’ll need to choose an appropriate format for the document. There are a few basic formats for writing the requirements for a mobile app, such as a functional specification document (FSD), user stories and wireframes.
Functional Specification Document
An FSD is probably the default format in the software development industry. It consists of a standard list of items that cover what the product should do and how it should do it.
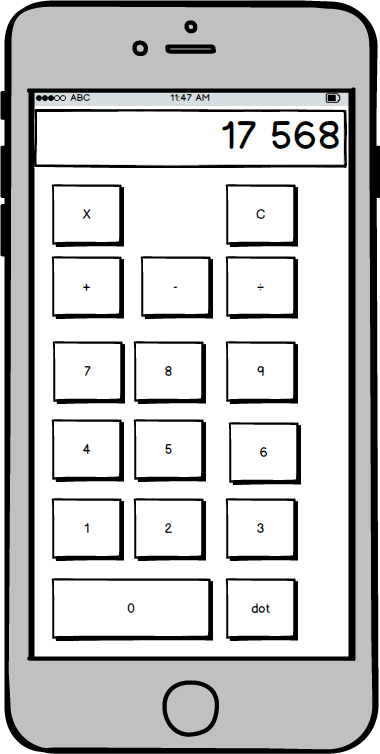
Let’s take a simple calculator application and describe its features as an FSD:
- Application screen presents a digital keyboard with additional buttons for basic arithmetic operations (addition, subtraction, multiplication, division) and a result button (marked with “=”).
- Tapping on a digit button adds it to the display section of the screen. Each new digit is added to the right side of the number.
- Tapping on an operation button causes the current number shown in the display section to be added to the memory. It also clears the display section for the next number.
- Tapping on the display-result button combines the number in memory with the one in the display section according to the operation requested previously. The resulting number is shown in the display section of the screen.
As you can see, this format requires quite a detailed description of the product because the description will be used by both the business and the developers. It ensures that all participants are on the same page.
The person who composes the FSD should have strong experience in software development and should know the specifics of the mobile or other platform for which you are building. Also, because of the high level of detail required, creating and polishing such a document usually takes a decent amount of time.
User Stories
A user story is less formal than an FSD yet still very powerful. It lists the things that the user can do in the application and is described from the user’s perspective. The document could also briefly explain why the user would want to do it, if that’s not obvious.
Let’s take our calculator example and add a few other features, describing them as a user story:
- As a user, I want to be able to change the number notation from decimal to exponential (and vice versa), so that I can work with very small or very large numbers.
- As a user, I want to be able to export a calculation’s history as a PDF file to share with my colleagues.
Because of the explanation, such a format provides not only a technical overview of the requirements, but also a good business case for them. Thus, if a feature is identified that is not critical to the business, you could decide either to completely remove it from the scope or to postpone it to a future release.
Using this format, you can easily split one story into multiple sub-stories to provide more detail. For example, we could split the PDF-exporting story into the following sub-stories:
- As a user, I want to be able to tap on the sharing button (top right of the screen) to see my options (sharing as PDF, text, image).
- Once I select a sharing option, I want to select the calculation timeframe that will be shared, using iOS’ date picker.
Because of the simplicity and non-technical nature of user stories, in most cases, a manager cannot simply ask a developer to implement a particular user story. Turning a story into a task that can be added to a task tracker requires further discussion and detailing between the manager and technical leader.
User stories have become one of the most convenient and popular formats because of their simplicity and flexibility.
Sketches And Wireframes
Another way to outline an application’s requirements is to visualize them in sketches or wireframes. With iOS development, around 70% of development time is spent on interface implementation, so having all of the screens in front of you would give you a good sense of what needs to be done and the scope of the work.
Creating a relevant set of wireframes for a mobile application requires you to know the basics of the user experience: how screens can be linked with each other, which states each screen can have, and how the application will behave when it is opened from a push notification.
Mixing Formats
Don’t be afraid to mix formats. By doing this properly, you take advantage of the strengths of each format. In our experience, mixing user stories and wireframes makes the most sense. While the user stories describe the features of the application and provide a business case for them, the wireframes show how these features would appear on the screens of the app. In addition, putting together user stories and wireframes would take you less time than writing an FSD, with all of its accompanying detail and descriptions of the interactions.
Start by sketching out wireframes for the application. Once the wireframes are done, add two or more user stories for each screen, describing what the user can do on that screen. We’ve found this approach to be the most appropriate for mobile application development, so we use it a lot.
Let’s Practice
I’ll take our What I Eat application as an example. I’ll compose the requirements document as if we were developing the application from scratch.
First, let’s formalize the idea using Steve Blank’s XYZ pattern: “We help X do Y by doing Z.” The premise of the application is to enable users to take control of what they eat during the day and of their calorie intake. According to the XYZ method: “What I Eat helps those who care about their weight to track calorie consumption by providing functionality for a simple meal log.”
As mentioned, mixing user stories and wireframes works best for us, so why not use them here?
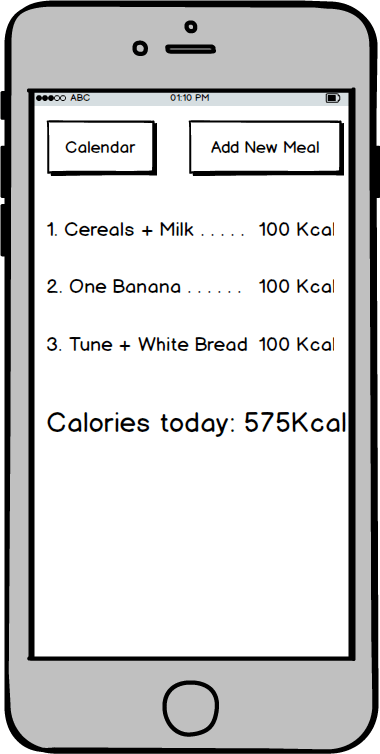
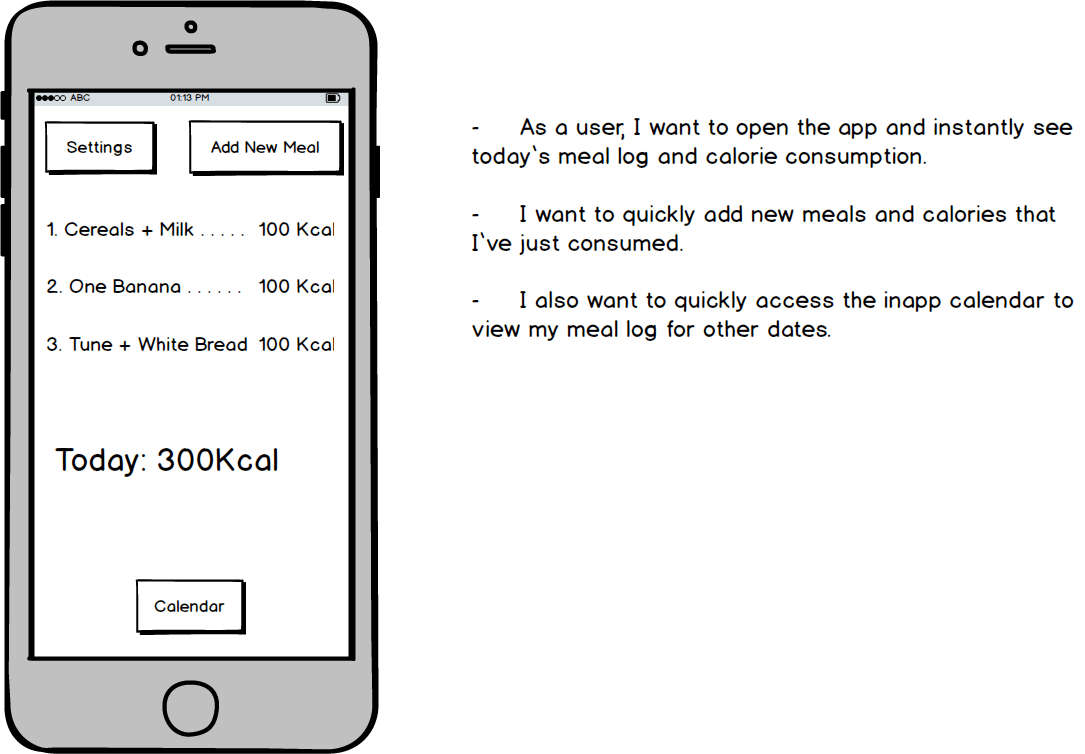
The next step is to describe the What I Eat app as user stories, screen by screen. We’ll begin with the application’s start and home screen:
- As a user, I want to open the app and instantly see today’s meal log and the calories consumed.
- I want to be able to quickly add new meals and calories that I’ve just consumed.
- I also want quick access to the in-app calendar to view my meal logs from previous days.
To avoid any ambiguity, we’ll create a wireframe for this screen.
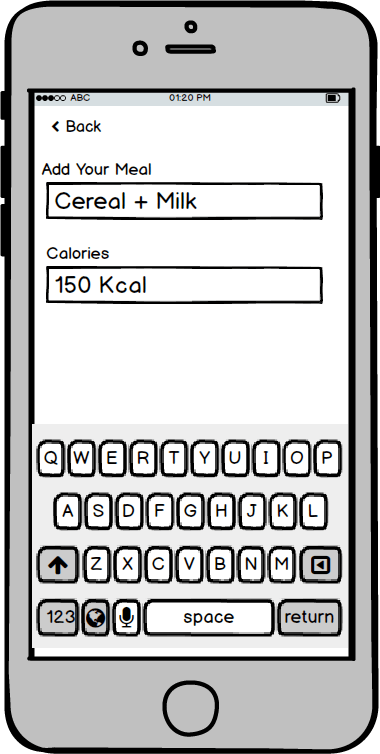
As you can see, we weren’t able to put the “Add new meal” functionality on the home screen. Instead, we added a button to navigate to another screen that presents this feature. Now, we need to put together user stories for this new screen:
- I want to type in the name of the meal I’ve just had.
- Along with the name of the meal, I want to enter the number of calories.
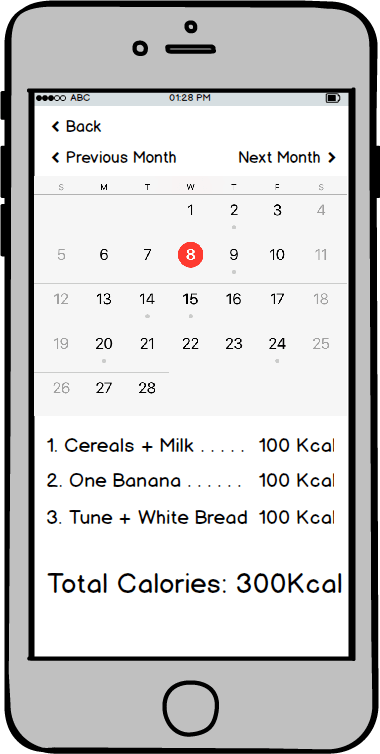
The home screen has a button that opens the calendar. Because there are many other calendar apps, checking their designs first makes sense. We like the iPhone’s default calendar app, so we will use it as a reference.
- As a user, I want to be able to quickly select a date in the current month.
- When selecting a date, I want to see a list of meals for that date below, like in the iPhone’s calendar app.
- I want to be able to switch to the next or previous month.
We will also put a piece of the iPhone calendar’s user interface in the wireframe.
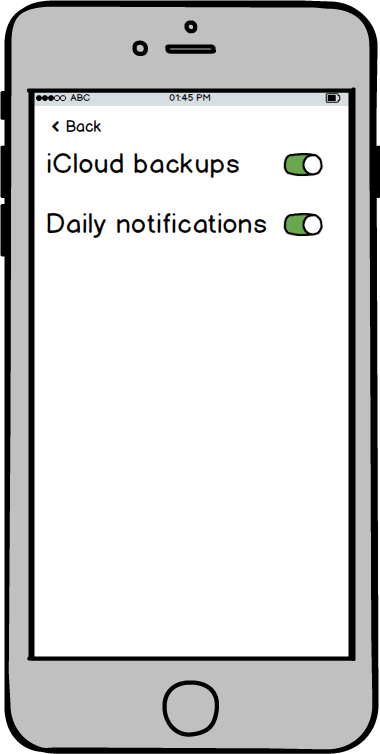
Finally, we need to add some settings to the app.
- I want to be able to enable and disable iCloud backups for my meal records.
- I want to be able to enable and disable daily push notifications that remind me to track my calorie intake.
Phew! Almost done. The final step is to put the wireframes and user stories together in one document, with each wireframe and its respective story on its own page.
In addition, we can draw a map to visualize how the screens are connected to each other. We’ll use miro for that.
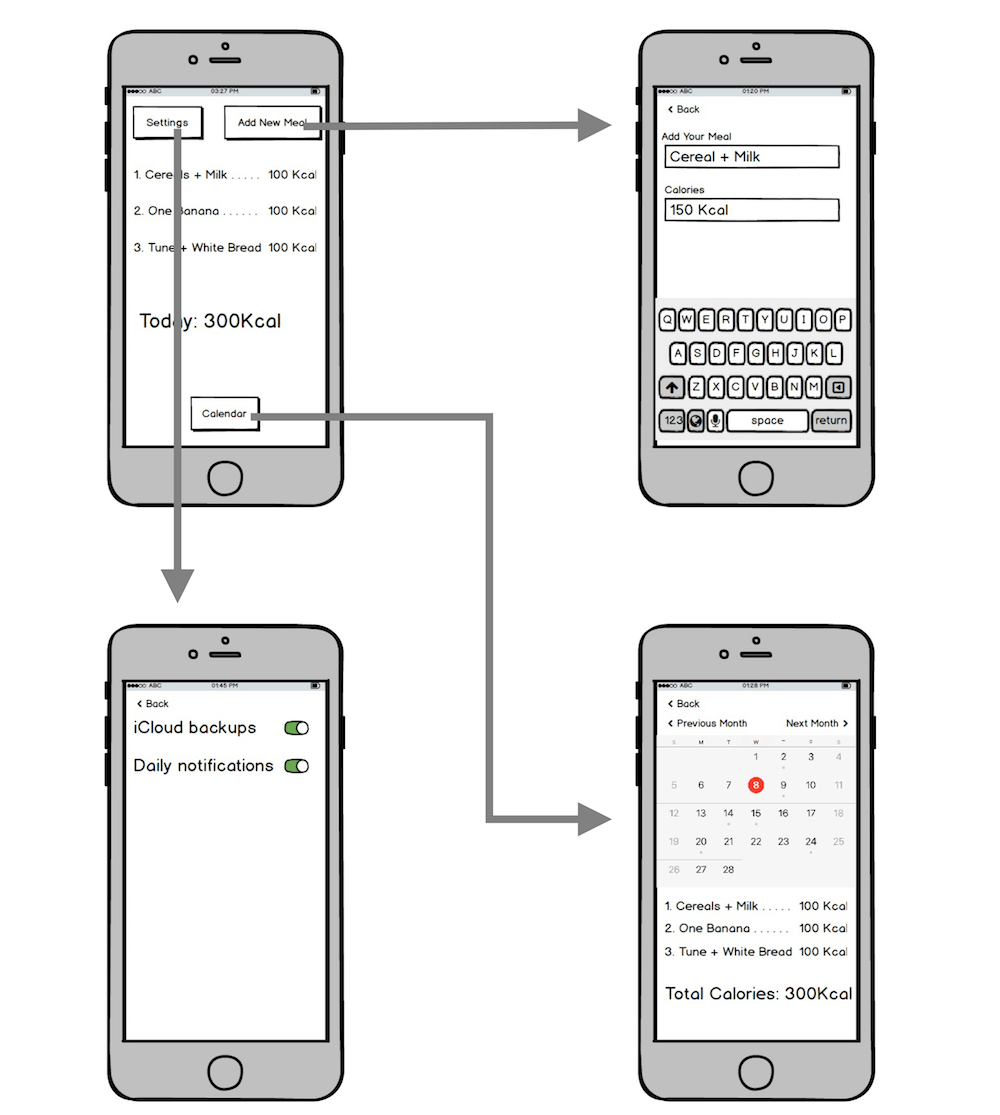
In doing the screen map, we realize that there is no button to go to the settings screen, so we’ll add that to the home screen.
Conclusion
We have created two documents: a PDF with user stories and wireframes, and a screen map that complements the PDF. Together, they describe in detail what features the application should have. We can go ahead and send that to our developer. This time, the application he delivers will correlate with your vision.
Generally speaking, writing a requirements document is mostly about conveying your vision to the rest of the team. Don’t limit yourself to the methodology described above. Feel free to experiment and find the solution that works best for you.
Resources
Delve deeper into the subject with the following resources:
- Story Splitting Cheat Sheet (PDF, 0.25 MB)
- 10 Tips for Writing Good User Stories, Roman Pichler
- The Wireframe Perfectionist’s Guide, Edric Lapniramai, Smashing Magazine
- Designing Features Using Job Stories, Alan Klement, Intercom
We’d love to hear about your approach to creating requirements documents. Please share your thoughts in the comments.
Further Reading
- What You Should Know About The App Design Process
- Creating Wireframes And Prototypes With InDesign
- The Skeptic’s Guide To Low-Fidelity Prototyping
- UX Sketching And Wireframing Templates For Mobile Projects (Free Download)


