The Complete Guide To Switching From HTTP To HTTPS

Email Newsletter
Weekly tips on front-end & UX.
Trusted by 182,000+ folks.
 Register for Free
 Celebrating 10 million developers

 Custom Web Forms for Angular, React, & Vue. Your backend.
Setting up HTTPS can be a bit intimidating for the inexperienced user — it takes many steps with different parties, it requires specific knowledge of encryption and server configuration, and it sounds complicated in general.
A Comprehensive Guide To HTTP/2 Server Push
In this related article, you’ll learn all about server push, from how it works to the problems it solves. You’ll learn how to use it, how to tell if it’s working, and its impact on performance. Read a related article →
In this guide, I will explain the individual components and steps and will clearly cover the individual stages of the setup. Your experience should be easy, especially if your hosting provider also supplies HTTPS certificates — chances are you will be able to perform everything from your control panel quickly and easily.
I have included detailed instructions for owners of shared hosting plans on cPanel, administrators of Apache HTTP servers and of Nginx on Linux and Unix, as well as Internet Information Server on Windows.
Let’s start with the basics.
HTTP Vs. HTTPS Vs. HTTP/2 Vs. SSL Vs. TLS: What’s What?
A lot of acronyms are used to describe the processes of communication between a client and a server. These are often mixed up by people who are not familiar with the internals.
The Hypertext Transfer Protocol (HTTP) is the basic communication protocol that both clients and servers must implement in order to be able to communicate. It covers things such as requests and responses, sessions, caching, authentication and more. Work on the protocol, as well as on the Hypertext Markup Language (HTML), started in 1989 by Sir Tim Berners-Lee and his team at CERN. The first official version of the protocol (HTTP 1.0) was released in 1996, shortly followed by the currently widely adopted version (HTTP 1.1) in 1997.
The protocol transfers information between the browser and the server in clear text, allowing the network, through which the information passes, to see the information transmitted. This is a security concern, so HTTP Secure (HTTPS) was introduced, allowing the client and the server to first establish an encrypted communication channel, and then pass the clear text HTTP messages through it, effectively protecting them from eavesdropping.
The encrypted channel is created using the Transport Layer Security (TLS) protocol, previously called Secure Socket Layer (SSL). The terms SSL and TLS are often used interchangeably, with SSL 3.0 being replaced by TLS 1.0. SSL was a Netscape-developed protocol, while TLS is an IETF standard. At the time of writing, all versions of SSL (1.0, 2.0, 3.0) are deprecated due to various security problems and will produce warnings in current browsers, and the TLS versions (1.0, 1.1, 1.2) are in use, with 1.3 currently a draft.
So, sometime around 1996 and 1997, we got the current stable version of the Internet (HTTP 1.1, with or without SSL and TLS), which still powers the majority of websites today. Previously, HTTP was used for non-sensitive traffic (for example, reading the news), and HTTPS was used for sensitive traffic (for example, authentication and e-commerce); however, increased focus on privacy means that web browsers such as Google Chrome now mark HTTP websites as “not private” and will introduce warnings for HTTP in future.
The next upgrade of the HTTP protocol — HTTP/2 — which is being adopted by a growing number of websites, adds new features (compression, multiplexing, prioritization) in order to reduce latency and increase performance and security.
In HTTP version 1.1, the secure connection is optional (you may have HTTP and/or HTTPS independent of each other), while in HTTP/2 it is practically mandatory — even though the standard defines HTTP/2 with or without TLS, most browser vendors have stated that they will only implement support for HTTP/2 over TLS.
What Does HTTPS Provide?
Why bother with HTTPS in the first place? It is used for three main reasons:
- Confidentiality. This protects the communication between two parties from others within a public medium such as the Internet. For example, without HTTPS, someone running a Wi-Fi access point could see private information such as credit cards when someone using the access point purchases something online.
- Integrity. This makes sure information reaches its destined party in full and unaltered. For example, our Wi-Fi friend could add extra advertisements to our website, reduce the quality of our images to save bandwidth or change the content of articles we read. HTTPS ensures that the website can’t be modified.
- Authentication. This ensures that the website is actually what it claims to be. For example, that same person running the Wi-Fi access point could send browsers to a fake website. HTTPS ensures that a website that says it’s
example.comis actuallyexample.com. Some certificates even check the legal identity behind that website, so that you knowyourbank.comis YourBank, Inc.
Cryptography In A Nutshell
Confidentiality, integrity and authentication aren’t HTTPS-specific: They’re the core concepts of cryptography. Let’s look a little more closely at them.
Confidentiality
Confidentiality is privacy — that is, it protects information from being read by an unauthorized third party. The process usually involves turning a readable (i.e. audible and visible) form of the information, called plaintext, into a scrambled, unreadable version, called ciphertext. This process is called encryption. The reverse process — turning the unreadable ciphertext back into readable plaintext — is called decryption. There are many methods — cipher functions (or algorithms) — to encrypt and decrypt information.
In order for two parties to be able to communicate, they should agree on two things:
- which algorithm (cipher function) they will use in their communication;
- which parameters, password or rules (i.e. secret) will be used with the method selected.
There are two main types of encryption methods:
- symmetric. Both parties share a common secret key.
- asymmetric. One of the parties has a pair of a secret and a public key, the foundation of public key infrastructure (PKI).
The symmetric class of methods relies on both parties having a shared secret, which the sender uses to encrypt the information, which in turn the receiver decrypts using the same method and key (see the figure below). The problem with these methods is how both parties will negotiate (i.e. exchange) the secret without physically meeting each other — they need to have a secure communication channel of some sort.

The asymmetric methods come to solve this kind of problem — they are based on the notion of public and private keys. The plaintext is encrypted using one of the keys and can only be decrypted using the other complementary key.
So, how does it work? Let’s assume we have two parties who are willing to communicate with each other securely — Alice and Bob (these are always the names of the fictional characters in every tutorial, security manual and the like, so we’ll honor the tradition here as well). Both of them have a pair of keys: a private key and a public one. Private keys are known only to their respective owner; public keys are available to anyone.
If Alice wants to send a message to Bob, she would obtain his public key, encrypt the plaintext and send him the ciphertext. He would then use his own private key to decrypt it.
If Bob would like to send a reply to Alice, he would obtain her public key, encrypt the plaintext and send her the ciphertext. She would then use her own private key to decrypt it.

When do we use symmetric and when do we use asymmetric encryption? Asymmetric encryption is used to exchange the secret between the client and the server. In real life, we usually do not need two-way asymmetric communication — it is sufficient if one of the parties (we’ll just call it a server, for the sake of simplicity) has the set of keys, so it can receive an encrypted message. It really protects the security of information in only one direction — from the client to the server, because the information encrypted with the public key can only be decrypted using the private key; hence, only the server can decrypt it. The other direction is not protected — information encrypted with the server’s private key can be decrypted with its public key by anyone. The other party (we’ll similarly call it a client) begins the communication by encrypting a randomly generated session secret with the server’s public key, then sends the ciphertext back to the server, which, in turn, decrypts it using its own private key, now having the secret.
Symmetric encryption is then used to protect the actual data in transit, since it’s much faster than asymmetric encryption. The two parties (the client and the server), with the previously exchanged secret, are the only ones able to encrypt and decrypt the information.
That’s why the first asymmetric part of the handshake is also known (and referred to) as key exchange and why the actual encrypted communication uses algorithms known (and referred to) as cipher methods.
Integrity
Another concern, solved with HTTPS, is data integrity: (1) whether the entire information arrived successfully, and (2) whether it was modified by someone in transit. In order to ensure the information is transmitted successfully, message digest algorithms are used. Computing message authentication codes (MACs) for each message exchanged are a cryptographic hashing process. For example, obtaining a MAC (sometimes called a tag) uses a method that ensures that it is practically impossible (the term commonly used is infeasible) to:
- change the message without affecting the tag,
- generate the same tag from two different messages,
- reverse the process and obtain the original message from the tag.
Authentication
What about authentication? The problem with the real-life application of the public key infrastructure is that both parties have no way of knowing who the other party really is — they are physically separate. In order to prove the identity of the other party, a mutually trusted third party — a certificate authority (CA) — is involved. A CA issues a certificate, stating that the domain name example.com (a unique identifier), is associated with the public key XXX. In some cases (with EV and OV certificates — see below), the CA will also check that a particular company controls that domain. This information is guaranteed by (i.e. certified by) the certificate authority X, and this guarantee is valid no earlier than (i.e. begins on) date Y and no later than (i.e. expires on) date Z. All of this information goes into a single document, called an HTTPS certificate. To present an easily understandable analogy, it is like a country government (a third party trusted by all) issuing an ID or a passport (a certificate) to a person — every party that trusts the government would also accept the identity of the ID holder (assuming the ID is not fake, of course, but that’s outside the scope of this example).
Certification authorities (CAs) are organizations trusted to sign certificates. Operating systems, such as Windows, macOS, iOS and Android, as well as the Firefox browser, have a list of trusted certificates.
You can check which CAs are trusted by your browser:
- Firefox “Options” → “Advanced” → “Certificates” → “View Certificates” → “Authorities”
- Windows “Control Panel” → “Internet Options” → “Content” — “Certificates” → “Trusted Root Certification Authorities / Intermediate Certification Authorities”
- Mac “Applications” → “Utilities” → “Keychain Access.” Under “Category,” pick Certificates”
All certificates are then checked and trusted — by the operating system or browser if directly trusted or by a trusted entity if verified. This mechanism of transitive trust is known as a chain of trust:

You can add other unlisted CAs, which is useful when working with self-signed certificates (which we’ll discuss later).
In most common situations, only the server needs to be known to the client — for example, an e-commerce website to its customers — so, only the website needs a certificate. In other situations, such as e-government systems, both the server and the client, requesting a service, should have their identity proven. This means that both parties should be using certificates to authenticate to the other party. This setup is also outside the scope of this article.
Types Of HTTPS Certificates
There are several types of HTTPS certificates. They can be categorized according to the following criteria.
1. Identity Validation
- Domain validated (DV) The most common type of certificate, a DV certificate verifies that the domain matches a particular public key. The browser establishes a secure connection with the server and displays the closed padlock sign. Clicking the sign will show “This website does not supply ownership information.” There are no special requirements other than having a domain — a DV certificate simply ensures that this is the correct public key for that domain. The browser does not show a legal entity. DV certificates are often cheap (10 USD per year) or free — see the sections on Let’s Encrypt and Cloudflare below.
- Extended validation (EV) EV certificates verify the legal organization behind a website. This is the most trustworthy type of certificate, which is obtained after a CA checks the legal entity that controls the domain. The legal entity is checked with a combination of:
- control of the domain (such as a DV certificate);
- government business records, to make sure the company is registered and active;
- independent business directories, such as Dunn and Bradstreet, Salesforce’s connect.data.com, Yellow Pages, etc.;
- a verification phone call;
- inspection of all domain names in the certificate (wildcards are explicitly forbidden for EV certificates).As well as the closed padlock sign, EV HTTPS certificates display the name of the validated legal entity — typically a registered company — before the URL. Some devices, such as iOS Safari, will only show the validated legal entity, ignoring the URL completely. Clicking the sign will show details about the organization, such as the name and street address. The cost is between 150 and 300 USD per year.
- Organization validated (OV) Like EV, OV certificates verify the legal organization behind a website. However, unlike EV, OV HTTPS certificates do not display the verified legal name in the UI. As a result, OV certificates are less popular, because they have high validation requirements, without the benefits of these being shown to users. Prices are in the 40 to 100 USD per year range.
2. Number of Domains Covered
Once upon a time, HTTPS certificates generally contained a single domain in the CN field. Later, the “subject alternative name” (SAN) field was added to allow additional domains to be covered by a single certificate. These days, all HTTPS certificates are created equal: Even a single-domain certificate will have a SAN for that single domain (and a second SAN for the www version of that domain). However, many certificate vendors still sell single- and multi-domain HTTPS certificates for historical reasons.
- Single domain This is the most common type of certificate, valid for the domain names
example.comandwww.example.com. - Multiple domains (UCC/SAN) This type of certificate, also known as Unified Communications Certificate (UCC) or Subject Alternative Names (SAN) certificate, can cover a list of domains (up to a certain limit). It is not limited to a single domain — you can mix different domains and subdomains. The price usually includes a set number of domains (three to five), with the option to include more (up to the limit) for an additional fee. Using it with related websites is advised, because the client inspecting the certificate of any of the websites will see the main domain, as well as all additional ones.
- Wildcard This type of certificate covers the main domain as well as an unlimited number of subdomains (
*.example.com) — for example,example.com,www.example.com,mail.example.com,ftp.example.com, etc. The limitation is that it covers only subdomains of the main domain.
The variety of HTTPS certificates available is summarized in the table below:
| Certificate type | Domain validated (DV) | Organization validated (OV) | Extended validation (EV) |
|---|---|---|---|
| HTTPS | HTTPS Verified legal owner | HTTPS Verified legal owner Owner info displayed in browser | |
| Single domain | example.com, www.example.com | ||
| Multiple domains | example.com, www.example.com, mail.example.com, example.net, example.org, etc.
predefined list, up to a certain limit (usually 100) | ||
| Wildcard | *.example.com
matches any subdomain | N/A — all names must be included explicitly in the certificate and inspected by the CA. | |
The Configuration
To recap, four components of HTTPS require encryption:
- The initial key exchange This uses asymmetric (private and public key) algorithms.
- The identity certification (the HTTPS certificate, issued by a certification authority) This uses asymmetric (private and public key) algorithms.
- The actual message encryption This uses symmetric (pre-shared secret) algorithms.
- The message digesting This uses cryptographic hashing algorithms.
Each of these components has a set of used algorithms (some of them deprecated already) that use different key sizes. Part of the handshake involves the client and the server agreeing on which combination of methods they will use — select one out of about a dozen public key (key exchange) algorithms, one out of about a dozen symmetric key (cipher) algorithms and one out of three (two deprecated) message-digesting (hashing) algorithms, which gives us hundreds of combinations.
For example, the setting ECDHE-RSA-AES256-GCM-SHA384 means that the key will be exchanged using the Elliptic Curve Diffie-Hellman Ephemeral (ECDHE) key exchange algorithm; the CA signed the certificate using the Rivest-Shamir-Adleman (RSA) algorithm; the symmetric message encryption will use the Advanced Encryption Standard (AES) cipher, with a 256-bit key and GCM mode of operation; and message integrity will be verified using the SHA secure hashing algorithm, using 384-bit digests. (A comprehensive list of algorithm combinations is available.)
So, there are some configuration choices to be made.
Cipher Suites
Deciding the cipher suites to use is a balance between compatibility and security:
- Compatibility with older browsers needs the server to support older cipher suites.
- However, many older cipher suites are no longer considered secure.
OpenSSL lists the supported combinations (see above) in order of cryptographic strength, with the most secure at the top and the weakest at the bottom. It is designed in this way because, during the initial handshake between the client and the server, the combination to be used is negotiated until a match is found that is supported by both parties. It makes sense to first try the most secure combinations and gradually resort to weaker security only if there is no other way.
A very useful and highly recommended resource, advising on what cryptographic methods to enable on the server, is the Mozilla SSL Configuration Generator, which we’ll use later on with actual server configurations.
Key Types
Elliptic Curve Cryptography (ECC) certificates are faster and use less CPU than the RSA certificates, which is particularly important for mobile clients. However, some services, such as Amazon, CloudFront and Heroku, don’t yet, at the time of writing, support ECC certificates.
A 256-bit ECC key is considered sufficient.
Rivest Shamir Adleman (RSA) certificates are slower but compatible with a wider variety of older servers. RSA keys are larger, so a 2048-bit RSA key is considered minimal. RSA certificates of 4096 and above may hurt performance — they’re also likely to be signed by a 2048-bit intermediary, undermining much of the additional security!
You might have noticed the fluidity of the statements above and the lack of any numbers — it is because what is a heavy load on one server is not on another. The best way to determine the impact on performance is to monitor the load on your server, with your real website(s) and your real visitors. And even that will change over time.
Procedures
To obtain an HTTPS certificate, perform the following steps:
- Create a private and public key pair, and prepare a Certificate Signing Request (CSR), including information about the organization and the public key.
- Contact a certification authority and request an HTTPS certificate, based on the CSR.
- Obtain the signed HTTPS certificate and install it on your web server.
There exists a set of files, containing different components of the public key infrastructure (PKI): the private and public keys, the CSR and the signed HTTPS certificate. To make things even more complicated, different parties use different names (and file extensions) to identify one and the same thing.
To start, there are two popular formats for storing the information — DER and PEM. The first one (DER) is binary, and the second (PEM) is a base64-encoded (text) DER file. By default, Windows uses the DER format directly, and the open-source world (Linux and UNIX) uses the PEM-format. There are tools (OpenSSL) to convert between one and the other.
The files we’ll be using as examples in the process are the following:
example.com.keyThis PEM-formatted file contains the private key. The extension.keyis not a standard, so some might use it and others might not. It is to be protected and accessible only by the system super-user.example.com.pubThis PEM-formatted file contains the public key. You do not actually need this file (and it’s never explicitly present), because it can be generated from the private key. It is only included here for illustration purposes.example.com.csrThis is a certificate signing request. A PEM-formatted file containing organizational information, as well as the server’s public key, should be sent to the certification authority issuing the HTTPS certificate.example.com.crtThis HTTPS certificate is signed by the certification authority. It is a PEM-formatted file, including the server’s public key, organizational information, the CA signature, validity and expiry dates, etc. The extension.crtis not a standard; other common extensions include.certand.cer.
File names (and extensions) are not standard; they can be anything you like. I have chosen this naming convention because I think it is illustrative and makes more obvious which component has what function. You can use whatever naming convention makes sense to you, as long as you refer to the appropriate key-certificate files in the commands and server configuration files throughout the process.
The private key is a randomly generated string of a certain length (we’ll use 2048-bit), which looks like the following:
-----BEGIN RSA PRIVATE KEY-----
MIIEowIBAAKCAQEAm+036O2PlUQbKbSSs2ik6O6TYy6+Zsas5oAk3GioGLl1RW9N
i8kagqdnD69Et29m1vl5OIPsBoW3OWb1aBW5e3J0x9prXI1W/fpvuP9NmrHBUN4E
S17VliRpfVH3aHfPC8rKpv3GvHYOcfOmMN+HfBZlUeKJKs6c5WmSVdnZB0R4UAWu
Q30aHEBVqtrhgHqYDBokVe0/H4wmwZEIQTINWniCOFR5UphJf5nP8ljGbmPxNTnf
b/iHS/chjcjF7TGMG36e7EBoQijZEUQs5IBCeVefOnFLK5jLx+BC//X+FNzByDil
Tt+l28I/3ZN1ujhak73YFbWjjLR2tjtp+LQgNQIDAQABAoIBAEAO2KVM02wTKsWb
dZlXKEi5mrtofLhkbqvTgVE7fbOKnW8FJuqCl+2NMH31F1n03l765p4dNF4JmRhv
/+ne4vCgOPHR/cFsH4z/0d5CpHMlC7JZQ5JjR4QDOYNOpUG51smVamPoZjkOlyih
XGk/q72CxeU6F/gKIdLt6Dx03wBosIq9IAE8LwdMnioeuj18qaVg195OMeIOriIn
tpWP4eFya5rTpIFfIdHdIxyXsd6hF/LrRc9BMWTY1/uOLrpYjTf7chbdNaxhwH7k
buvKxBvCvmXmd6v/AeQQAXbUkdSnbTKDaB9B7IlUTcDJyPBJXvFS1IzzjN6vV+06
XBwHx5ECgYEAyRZLzwnA3bw8Ep9mDw8JHDQoGuQkFEMLqRdRRoZ+hxnBD9V9M0T6
HRiUFOizEVoXxf6zPtHm/T7cRD8AFqB+pA/Nv0ug6KpwUjA4Aihf5ADp0gem0DNw
YlVkCA6Bu7c9IUlE0hwF7RLB7YrryJVJit9AymmUTUUHCQTWW2yBhC8CgYEAxoHS
HGXthin5owOTNPwLwPfU2o7SybkDBKyW69uTi0KxAl3610DjyA/cV2mxIcFlPv1y
HualGd9eNoeCMBy/AUtjzI0K77yeRpjj321rj6k8c8bYWPHH539SiBXLWTY/WQ0w
pxfT3d/Z4QMh5d6p+p5f3UIrXESYQd+fAaG5tNsCgYEAksTdTB4YUT9EsWr6eN9G
jPlclFQUKV3OMvq77bfYvg8EJORz32nnDDmWS7SUjoOtemwutBlMeWbaKk25aMp3
5JNMXuV6apeMJ9Dd8GU7qBUqlIvVK31/96XPvzmnYzWZPqRVwO2HPcRFG3YcJmkg
JmZQyexJvCQ3wFNxiYUm+y0CgYBXQSMhFnCUg4jWbbDcHlnwRT+LnjHrN2arPE3O
eKLfGL6DotmqmjxFaStaRPv2MXMWgAMUsB8sQzG/WEsSaOBQaloAxJJlFIyhzXyE
bi1UZXhMD8BzQDu1dxLI/IN4wE6SDykumVuocEfuDxlsWDZxEgJjWD2E/iXK9seG
yRa+9wKBgEydVz+C1ECLI/dOWb20UC9nGQ+2dMa+3dsmvFwSJJatQv9NGaDUdxmU
hRVzWgogZ8dZ9oH8IY3U0owNRfO65VGe0sN00sQtMoweEQi0SN0J6FePiVCnl7pf
lvYBaemLrW2YI2B7zk5fTm6ng9BW/B1KfrH9Vm5wLQBchAN8Pjbu
-----END RSA PRIVATE KEY-----
Keep the private key private! This means protect it by very restricted permissions (600), and do not disclose it to anyone.
Its counterpart — the public key — looks like this:
-----BEGIN PUBLIC KEY-----
MIIBIjANBgkqhkiG9w0BAQEFAAOCAQ8AMIIBCgKCAQEAm+036O2PlUQbKbSSs2ik
6O6TYy6+Zsas5oAk3GioGLl1RW9Ni8kagqdnD69Et29m1vl5OIPsBoW3OWb1aBW5
e3J0x9prXI1W/fpvuP9NmrHBUN4ES17VliRpfVH3aHfPC8rKpv3GvHYOcfOmMN+H
fBZlUeKJKs6c5WmSVdnZB0R4UAWuQ30aHEBVqtrhgHqYDBokVe0/H4wmwZEIQTIN
WniCOFR5UphJf5nP8ljGbmPxNTnfb/iHS/chjcjF7TGMG36e7EBoQijZEUQs5IBC
eVefOnFLK5jLx+BC//X+FNzByDilTt+l28I/3ZN1ujhak73YFbWjjLR2tjtp+LQg
NQIDAQAB
-----END PUBLIC KEY-----
The Certificate Signing Request (CSR) looks like the following:
-----BEGIN CERTIFICATE REQUEST-----
MIICzjCCAbYCAQAwgYgxFDASBgNVBAMMC2V4YW1wbGUuY29tMQswCQYDVQQLDAJJ
VDEPMA0GA1UECAwGTG9uZG9uMRIwEAYDVQQKDAlBQ01FIEluYy4xIDAeBgkqhkiG
9w0BCQEWEWFkbWluQGV4YW1wbGUuY29tMQswCQYDVQQGEwJHQjEPMA0GA1UEBwwG
TG9uZG9uMIIBIjANBgkqhkiG9w0BAQEFAAOCAQ8AMIIBCgKCAQEAm+036O2PlUQb
KbSSs2ik6O6TYy6+Zsas5oAk3GioGLl1RW9Ni8kagqdnD69Et29m1vl5OIPsBoW3
OWb1aBW5e3J0x9prXI1W/fpvuP9NmrHBUN4ES17VliRpfVH3aHfPC8rKpv3GvHYO
cfOmMN+HfBZlUeKJKs6c5WmSVdnZB0R4UAWuQ30aHEBVqtrhgHqYDBokVe0/H4wm
wZEIQTINWniCOFR5UphJf5nP8ljGbmPxNTnfb/iHS/chjcjF7TGMG36e7EBoQijZ
EUQs5IBCeVefOnFLK5jLx+BC//X+FNzByDilTt+l28I/3ZN1ujhak73YFbWjjLR2
tjtp+LQgNQIDAQABoAAwDQYJKoZIhvcNAQELBQADggEBAGIQVhXfuWdINNfceNPm
CkAGv4yzpx88L34bhO1Dw4PYWnoS2f7ItuQA5zNk9EJhjkwK8gYspK7mPkvHDbFa
Um7lPSWsm3gjd3pU7dIaHxQ+0AW9lOw5ukiBlO4t3qgt+jTVZ3EhMbR0jDSyjTrY
kTgfuqQrGOQSmLb5XviEtCcN0rseWib3fKIl8DM69JiA2AALxyk7DCkS1BqLNChT
pnbgvtlUhc4yFXNCtwPGskXIvLsCn2LRy+qdsPM776kDLgD36hK0Wu14Lpsoa/p+
ZRuwKqTjdaV23o2aUMULyCRuITlghEEkRdJsaXadHXtNd5I5vDJOAAt46PIXcyEZ
aQY=
-----END CERTIFICATE REQUEST-----
This particular CSR contains the server's public key and details about the organization ACME Inc., based in London, UK, and which owns the domain name example.com.
Finally, the signed HTTPS certificate looks like the following:
-----BEGIN CERTIFICATE-----
MIIDjjCCAnYCCQCJdR6v1+W5RzANBgkqhkiG9w0BAQUFADCBiDEUMBIGA1UEAwwL
ZXhhbXBsZS5jb20xCzAJBgNVBAsMAklUMQ8wDQYDVQQIDAZMb25kb24xEjAQBgNV
BAoMCUFDTUUgSW5jLjEgMB4GCSqGSIb3DQEJARYRYWRtaW5AZXhhbXBsZS5jb20x
CzAJBgNVBAYTAkdCMQ8wDQYDVQQHDAZMb25kb24wHhcNMTYwNDE5MTAzMjI1WhcN
MTcwNDE5MTAzMjI1WjCBiDEUMBIGA1UEAwwLZXhhbXBsZS5jb20xCzAJBgNVBAsM
AklUMQ8wDQYDVQQIDAZMb25kb24xEjAQBgNVBAoMCUFDTUUgSW5jLjEgMB4GCSqG
SIb3DQEJARYRYWRtaW5AZXhhbXBsZS5jb20xCzAJBgNVBAYTAkdCMQ8wDQYDVQQH
DAZMb25kb24wggEiMA0GCSqGSIb3DQEBAQUAA4IBDwAwggEKAoIBAQCb7Tfo7Y+V
RBsptJKzaKTo7pNjLr5mxqzmgCTcaKgYuXVFb02LyRqCp2cPr0S3b2bW+Xk4g+wG
hbc5ZvVoFbl7cnTH2mtcjVb9+m+4/02ascFQ3gRLXtWWJGl9Ufdod88Lysqm/ca8
dg5x86Yw34d8FmVR4okqzpzlaZJV2dkHRHhQBa5DfRocQFWq2uGAepgMGiRV7T8f
jCbBkQhBMg1aeII4VHlSmEl/mc/yWMZuY/E1Od9v+IdL9yGNyMXtMYwbfp7sQGhC
KNkRRCzkgEJ5V586cUsrmMvH4EL/9f4U3MHIOKVO36Xbwj/dk3W6OFqTvdgVtaOM
tHa2O2n4tCA1AgMBAAEwDQYJKoZIhvcNAQEFBQADggEBABwwkE7wX5gmZMRYugSS
7peSx83Oac1ikLnUDMMOU8WmqxaLTTZQeuoq5W23xWQWgcTtfjP9vfV50jFzXwat
5Ch3OQUS53d06hX5EiVrmTyDgybPVlfbq5147MBEC0ePGxG6uV+Ed+oUYX4OM/bB
XiFa4z7eamG+Md2d/A1cB54R3LH6vECLuyJrF0+sCGJJAGumJGhjcOdpvUVt5gvD
FIgT9B04VJnaBatEgWbn9x50EP4j41PNFGx/A0CCLgbTs8kZCdhE4QFMxU9T+T9t
rXgaspIi7RA4xkSE7x7B8NbvSlgP79/qUe80Z7d8Oolva6dTZduByr0CejdfhLhi
mNU=
-----END CERTIFICATE-----
All parts are connected and should match each other. The final certificate was generated for illustration purposes only — it is the so-called self-signed certificate, because it was not signed by a recognized certification authority.
The process will be illustrated with actual steps for cPanel, Linux, FreeBSD and Windows. This is a universal process, valid for all kinds of certificates. If you are interested in getting a free DV certificate, there are other procedures to follow in the sections on Let’s Encrypt and Cloudflare.
Step 1: Create A Private Key And A Certificate Signing Request (CSR)
In the following examples, we’ll use 2048-bit RSA certificates, for their wide compatibility. If your server provider supports it (for example, if you don’t use Heroku or AWS), you might prefer to use ECC instead.
cPanel
- Log into your host's cPanel.
- Scroll down to the "Security" section and click "SSL/TLS."

cPanel "Security" section (View large version) - You are now in the "SSL/TLS Manager" home. Click "Private Keys (KEY)" to create a new private key.

cPanel "SSL/TLS Manager (View large version) - You will be redirected to a page to "Generate, Paste or Upload a new "Private
Key." Select "2048-bit" in the "Key Size" dropdown, and click "Generate."

cPanel "Private Key" management (View large version) - The new private key will be generated, and you will get a confirmation screen:

cPanel private key confirmation (View large version) - If you go back to the "Private Keys" home, you will see your new key listed:

cPanel "Private Keys" with the new key generated (View large version) - Go back to the "SSL/TLS Manager" home. Click "Certificate Signing Requests (CSR)" to create a new certificate request.

cPanel "SSL/TLS Manager" (View large version) - You will now be presented with the "Generate Service Request" form. Select the previously created private key and fill in the fields. Answer all of the questions correctly (they will be public in your signed certificate!), paying special attention to the "Domains" section, which should exactly match the domain name for which you are requesting the HTTPS certificate. Include the top-level domain only (
example.com); the CA will usually add thewwwsubdomain as well (i.e.www.example.com). When finished, click the "Generate" button.
cPanel "Create New Certificate Signing Request" form (View large version) - The new CSR will be generated, and you will get a confirmation screen:

cPanel CSR confirmation (View large version) - If you go back to the "Certificate Signing Request" home, you will see your new CSR listed:

cPanel "Certificate Signing Request" with the new CSR generated (View large version)


Linux, FreeBSD
Make sure OpenSSL is installed. You can check by using:
openssl versionIf it’s not already present, open the command line and install it for your platform:
Debian, Ubuntu and clones
sudo apt-get install opensslRed Hat, CentOS and clones
sudo yum install opensslFreeBSD
make -C /usr/ports/security/openssl install clean
Then, generate a private key and a CSR with a single command:
openssl req -newkey rsa:2048 -nodes -keyout example.com.key -out example.com.csrThe private key will be generated, and you will be asked some information for the CSR:
Generating a 2048 bit RSA private key
........................+++
................................................................+++
writing new private key to 'example.com.key'
-----
You are about to be asked to enter information that will be incorporated
into your certificate request.
What you are about to enter is what is called a Distinguished Name or a DN.
There are quite a few fields but you can leave some blank
For some fields there will be a default value,
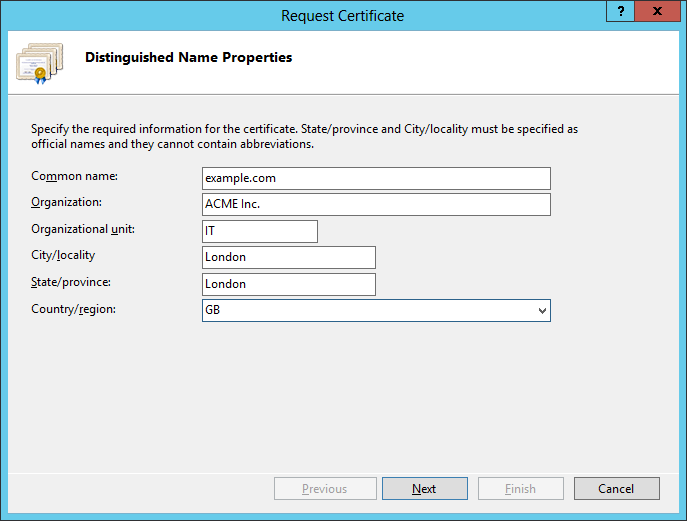
If you enter ‘.', the field will be left blank.Answer all questions correctly (they will be public in your signed certificate!), paying special attention to the “Common Name” section (for example, server FQDN or YOUR name), which should exactly match the domain name for which you are requesting the HTTPS certificate. Include the top-level domain only (example.com), the CA will usually add the www subdomain as well (i.e. www.example.com):
Country Name (2 letter code) [AU]:GB
State or Province Name (full name) [Some-State]:London
Locality Name (eg, city) []:London
Organization Name (eg, company) [Internet Widgits Pty Ltd]:ACME Inc.
Organizational Unit Name (eg, section) []:IT
Common Name (e.g. server FQDN or YOUR name) []:example.com
Email Address []:admin@example.com

Please enter the following 'extra' attributes
to be sent with your certificate request
A challenge password []:
An optional company name []:
Internet Information Server (IIS) on Windows
- Open "Start" → "Administrative Tools" → "Internet Information Services (IIS) Manager." Click the server name. Double-click "Server Certificates" in the middle column:
 Manager. Double-click Server Certificates")
Open "Internet Information Services (IIS) Manager." Double-click "Server Certificates." (View large version) - Click "Create Certificate Request" in the right column.

Click "Create Certificate Request" in the right column. (View large version) - Enter your organization's details, paying special attention to "Common
Name," which should match your domain name. Click "Next."

Enter your organization's details. (View large version) - Leave the default "Cryptographic Service Provider." Set the "Bit length" to
2048. Click "Next."
Set the "Bit length" to 2048. (View large version) - Browse for a place to save the generated CSR and click "Finish."

Browse for a place to save the generated CSR and click ‘Finish'. (View large version)
 Manager. Double-click Server Certificates")


Step 2: Obtaining The HTTPS Certificate
In order to get your website certificate, first purchase a HTTPS certificate credit of a chosen type (DV, OV, EV, single site, multisite, wildcard — see above) from an HTTPS certificate provider. Once the process is complete, you will have to provide the certificate signing request, which will spend the purchased credit for your chosen domain. You’ll be asked to provide (i.e. to paste in a field or to upload) the whole CSR text, including the —–BEGIN CERTIFICATE REQUEST—– and —–END CERTIFICATE REQUEST—– lines. If you would like to have an EV or OV certificate, you’ll need to provide the legal entity for which you’re requesting the certificate — you might also be asked to provide additional documents to confirm that you represent this company. The certificate registrar will then verify your request (and any supporting documents) and issue the signed HTTPS certificate.
We’ve partnered with InMotion Hosting to bring you a great price on their fast and reliable hosting services. InMotion Hosting provides a free AutoSSL for all of your websites to have HTTPS and they make it very easy to install. Click here or anywhere that says shared hosting in this article to check out their plans and get started!
Getting an HTTPS Certificate
Your hosting provider or HTTPS registrar might have a different product and registration procedure, but the general logic should be similar.
- Find an HTTPS certificate vendor.
- Select a type of certificate (DV, OV, EV, single site, multisite, wildcard), and click “Add to cart.” Specify your preferred payment method and complete the payment.
- Activate the new HTTPS certificate for your domain. You can either paste or upload the certificate signing request. The system will extract the certificate details from the CSR.
- You will be asked to select a method of “Domain Control Validation” — whether by email, uploading an HTML file (HTTP-based) or adding a
TXTrecord to your domain zone file (DNS-based). Follow the instructions for your DCV method of choice to validate. - Wait several minutes until the validation is performed and the HTTPS certificate is issued. Download the signed HTTPS certificate.
Self-Signed Certificates
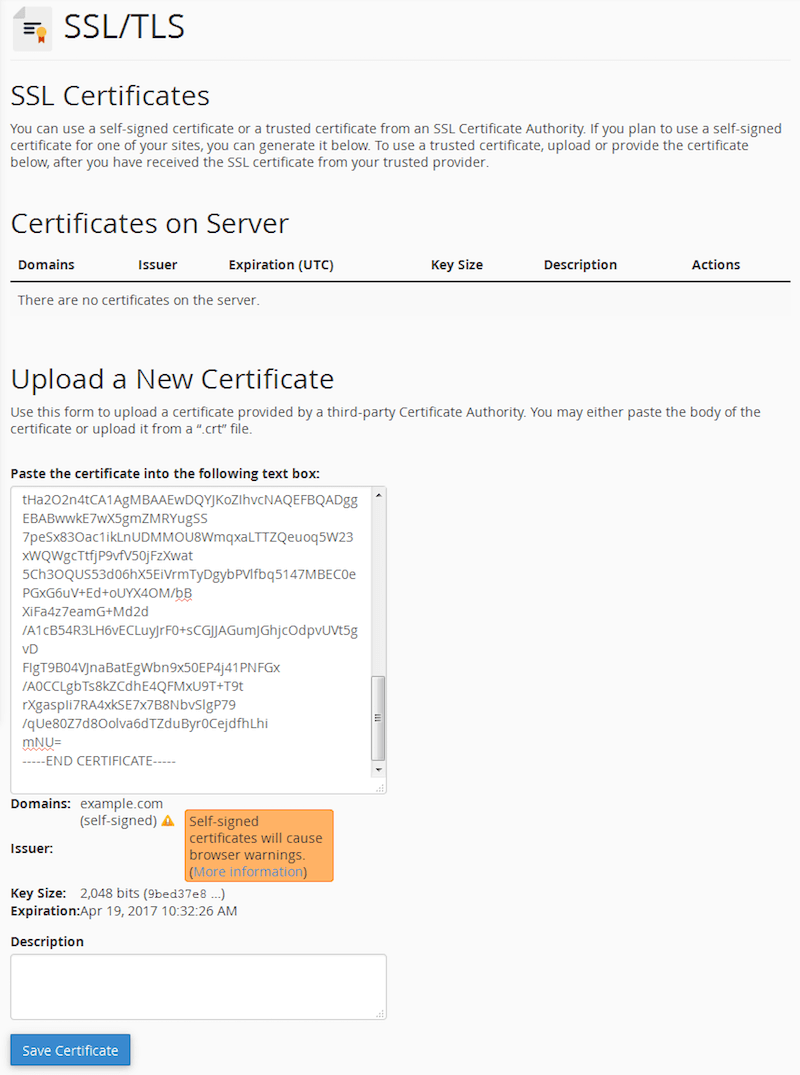
It is also possible to sign a certificate yourself, rather than have a certificate authority do it. This is good for testing purposes because it will be cryptographically as good as any other certificate, but it will not be trusted by browsers, which will fire a security warning — you can claim you are anything you want, but it wouldn’t be verified by a trusted third party. If the user trusts the website, they could add an exception in their browser, which would store the certificate and trust it for future visits.
The example certificate above is a self-signed one — you can use it for the domain example.com, and it will work within its validity period.
You can create a self-signed certificate on any platform that has OpenSSL available:
openssl x509 -signkey example.com.key -in example.com.csr -req -days 365 -out example.com.crtOnce the certificate is available, you will have to install it on your server. If you are using hosting and HTTPS registration services from the same provider (many hosting providers also sell HTTPS certificates), there might be an automated procedure to install and enable your newly obtained HTTPS certificate for the website. If you are hosting your website elsewhere, you will need to download the certificate and configure your server to use it.
Step 3: Installing The HTTPS Certificate For Your Website
cPanel
- Go back to the "SSL/TLS Manager" home. Click "Certificates (CRT)" to import the new certificate.

cPanel "SSL/TLS Manager" (View large version) - You will be redirected to a page to "Paste, Upload or Generate" a new "Certificate." Paste the contents of the certificate file received from the HTTPS registrar or upload it using the "Browse" button.

cPanel "Import" a new HTTPS certificate (View large version) - When you paste the contents of the HTTPS certificate, it will be parsed, and plain text values will be presented to you for confirmation. Review the contents and click the "Save Certificate" button.

cPanel "Review" and confirm HTTPS certificate (View large version) - The new HTTPS certificate will be saved, and you will get a confirmation screen:

cPanel HTTPS certificate confirmation (View large version) - If you go back to the "Certificates (CRT)" home, you will see your new HTTPS certificate listed:

cPanel "Certificates" with the new HTTPS certificate listed (View large version) - Go back to the "SSL/TLS Manager" home. Click "Install and Manage SSL for your website (HTTPS)" to assign the new certificate to your existing website.

cPanel "SSL/TLS Manager" (View large version) - You will be presented with the "Install an SSL Website" form. Click the "Browse Certificates" button and select your HTTPS certificate. Select your website domain from the dropdown list (if it's not automatically selected), and verify that the fields for "Certificate" and "Private Key" are populated.

cPanel "Install an SSL Website" (View large version)


Test to see that you can access your website at the address https://www.example.com. If all works OK, you will most probably want to permanently redirect your HTTP traffic to HTTPS. To do so, you’ll have to include several lines of code to an .htaccess file (if you’re using an Apache web server) in your website’s root folder:
RewriteEngine On

RewriteCond %{HTTPS} off
RewriteRule ^(.*)$ https://%{HTTP_HOST}%{REQUEST_URI} [L,R=301]
If the .htaccess file already exists, then paste the RewriteCond and RewriteRule lines only, right after the existing RewriteEngine On directive.
Linux, FreeBSD
Place the generated private key (example.com.key), Certificate Signing Request (example.com.csr) and the valid HTTPS certificate (example.com.crt) in the appropriate locations:
Debian, Ubuntu and clones, FreeBSD
cp example.com.crt /etc/ssl/certs/
cp example.com.key /etc/ssl/private/
cp example.com.csr /etc/ssl/private/
Red Hat, CentOS and clones
cp example.com.crt /etc/pki/tls/certs/
cp example.com.key /etc/pki/tls/private/
cp example.com.csr /etc/pki/tls/private/
restorecon -RvF /etc/pki
The files should be owned by root and protected by a permission setting of 600.
Debian, Ubuntu and clones
chown -R root. /etc/ssl/certs /etc/ssl/private
chmod -R 0600 /etc/ssl/certs /etc/ssl/private
Red Hat, CentOS and clones
chown -R root. /etc/pki/tls/certs /etc/pki/tls/private
chmod -R 0600 /etc/pki/tls/certs /etc/pki/tls/private
FreeBSD
chown -R root:wheel /etc/ssl/certs /etc/ssl/private
chmod -R 0600 /etc/ssl/certs /etc/ssl/private
Apache
To enable the HTTPS version of your website, you should:
- make sure that mod_ssl is installed on your server,
- upload the received HTTPS certificate (
.crt) file to your server, - edit the Apache server configuration files.
Start by checking mod_ssl. Depending on your operating system, either one should work:
apache2 -M | grep ssl
or
httpd -M | grep ssl
If mod_ssl is installed, you should get either this…
ssl_module (shared)
Syntax OK
… or something similar.
If it’s not present or not enabled, then try this:
Debian, Ubuntu and clones
sudo a2enmod ssl
sudo service apache2 restart
Red Hat, CentOS and clones
sudo yum install mod_ssl
sudo service httpd restart
FreeBSD (select the SSL option)
make -C /usr/ports/www/apache24 config install clean
apachectl restart
Edit the Apache configuration file (httpd.conf):
- Debian, Ubuntu
/etc/apache2/apache2.conf - Red Hat, CentOS
/etc/httpd/conf/httpd.conf - FreeBSD
/usr/local/etc/apache2x/httpd.conf
Listen          80
Listen          443

<VirtualHost *:80>
    ServerName example.com
    ServerAlias www.example.com
    Redirect 301 / https://www.example.com/
</VirtualHost>

<VirtualHost *:443>
    ServerName example.com
    Redirect 301 / https://www.example.com/
</VirtualHost>

<VirtualHost *:443>
    ServerName www.example.com
    ...
    SSLEngine on
    SSLCertificateFile/path/to/signed_certificate_followed_by_intermediate_certs
    SSLCertificateKeyFile /path/to/private/key

    # Uncomment the following directive when using client certificate authentication
    #SSLCACertificateFile  /path/to/ca_certs_for_client_authentication

    # HSTS (mod_headers is required) (15768000 seconds = 6 months)
    Header always set Strict-Transport-Security "max-age=15768000"
    ...
</VirtualHost>

# intermediate configuration, tweak to your needs
SSLProtocol         all -SSLv3
SSLCipherSuite      ECDHE-ECDSA-CHACHA20-POLY1305:ECDHE-RSA-CHACHA20-POLY1305:ECDHE-ECDSA-AES128-GCM-SHA256:ECDHE-RSA-AES128-GCM-SHA256:ECDHE-ECDSA-AES256-GCM-SHA384:ECDHE-RSA-AES256-GCM-SHA384:DHE-RSA-AES128-GCM-SHA256:DHE-RSA-AES256-GCM-SHA384:ECDHE-ECDSA-AES128-SHA256:ECDHE-RSA-AES128-SHA256:ECDHE-ECDSA-AES128-SHA:ECDHE-RSA-AES256-SHA384:ECDHE-RSA-AES128-SHA:ECDHE-ECDSA-AES256-SHA384:ECDHE-ECDSA-AES256-SHA:ECDHE-RSA-AES256-SHA:DHE-RSA-AES128-SHA256:DHE-RSA-AES128-SHA:DHE-RSA-AES256-SHA256:DHE-RSA-AES256-SHA:ECDHE-ECDSA-DES-CBC3-SHA:ECDHE-RSA-DES-CBC3-SHA:EDH-RSA-DES-CBC3-SHA:AES128-GCM-SHA256:AES256-GCM-SHA384:AES128-SHA256:AES256-SHA256:AES128-SHA:AES256-SHA:DES-CBC3-SHA:!DSS
SSLHonorCipherOrder on
SSLCompression          off
SSLSessionTickets       off

# OCSP Stapling, only in httpd 2.3.3 and later
SSLUseStapling                  on
SSLStaplingResponderTimeout     5
SSLStaplingReturnResponderErrors    off
SSLStaplingCache                shmcb:/var/run/ocsp(128000)
This configuration was generated using the Mozilla SSL Configuration Generator, mentioned earlier. Check with it for an up-to-date configuration. Make sure to edit the paths to the certificate and private key. The configuration provided was generated using the intermediate setting — read the limitations and supported browser configurations for each setting to decide which one suits you best.
Some modifications to the generated code were made (marked in bold above) to handle redirects from HTTP to HTTPS, as well as non-www to the www domain (useful for SEO purposes).
nginx
Edit the nginx configuration file (nginx.conf):
- Debian, Ubuntu, Red Hat, CentOS
/etc/nginx/nginx.conf - FreeBSD
/usr/local/etc/nginx/nginx.conf
server {
    listen 80 default_server;
    listen [::]:80 default_server;

    # Redirect all HTTP requests to HTTPS with a 301 Moved Permanently response.
    return 301 https://$host$request_uri;
}

server {
    listen 443 ssl http2;
    listen [::]:443 ssl http2;

    # certs sent to the client in SERVER HELLO are concatenated in ssl_certificate
    ssl_certificate /path/to/signed_cert_plus_intermediates;
    ssl_certificate_key /path/to/private_key;
    ssl_session_timeout 1d;
    ssl_session_cache shared:SSL:50m;
    ssl_session_tickets off;

    # Diffie-Hellman parameter for DHE ciphersuites, recommended 2048 bits
    ssl_dhparam /path/to/dhparam.pem;

    # intermediate configuration. tweak to your needs.
    ssl_protocols TLSv1 TLSv1.1 TLSv1.2;
    ssl_ciphers 'ECDHE-ECDSA-CHACHA20-POLY1305:ECDHE-RSA-CHACHA20-POLY1305:ECDHE-ECDSA-AES128-GCM-SHA256:ECDHE-RSA-AES128-GCM-SHA256:ECDHE-ECDSA-AES256-GCM-SHA384:ECDHE-RSA-AES256-GCM-SHA384:DHE-RSA-AES128-GCM-SHA256:DHE-RSA-AES256-GCM-SHA384:ECDHE-ECDSA-AES128-SHA256:ECDHE-RSA-AES128-SHA256:ECDHE-ECDSA-AES128-SHA:ECDHE-RSA-AES256-SHA384:ECDHE-RSA-AES128-SHA:ECDHE-ECDSA-AES256-SHA384:ECDHE-ECDSA-AES256-SHA:ECDHE-RSA-AES256-SHA:DHE-RSA-AES128-SHA256:DHE-RSA-AES128-SHA:DHE-RSA-AES256-SHA256:DHE-RSA-AES256-SHA:ECDHE-ECDSA-DES-CBC3-SHA:ECDHE-RSA-DES-CBC3-SHA:EDH-RSA-DES-CBC3-SHA:AES128-GCM-SHA256:AES256-GCM-SHA384:AES128-SHA256:AES256-SHA256:AES128-SHA:AES256-SHA:DES-CBC3-SHA:!DSS';
    ssl_prefer_server_ciphers on;

    # HSTS (ngx_http_headers_module is required) (15768000 seconds = 6 months)
    add_header Strict-Transport-Security max-age=15768000;

    # OCSP Stapling ---
    # fetch OCSP records from URL in ssl_certificate and cache them
    ssl_stapling on;
    ssl_stapling_verify on;

    ## verify chain of trust of OCSP response using Root CA and Intermediate certs
    ssl_trusted_certificate /path/to/root_CA_cert_plus_intermediates;
    resolver <IP DNS resolver>;

    ....
}
This configuration was generated using the Mozilla SSL Configuration Generator, mentioned earlier. Check with it for an up-to-date configuration. Make sure to edit the paths to the certificate and private key. The configuration provided was generated using the intermediate setting — read the limitations and supported browser configurations for each setting to decide which one suits you best.
The generator automatically generates code for handling redirects from HTTP to HTTPS, and it enables HTTP/2 out of the box!
Internet Information Server (IIS) on Windows
- Open "Start" → "Administrative Tools" → "Internet Information Services (IIS) Manager." Click the server name. Double-click "Server Certificates" in the middle column:
Open "Internet Information Services (IIS) Manager." Double-click "Server Certificates." (View large version) - Click "Complete Certificate Request" in the right column.

Click "Complete Certificate Request" in the right column. (View large version) - Select the signed certificate file (
example.com.crt) that you obtained from the CA. Enter some name in the "Friendly name" field to be able to distinguish the certificate later. Place the new certificate in the "Personal" certificate store (IIS 8+). Click "OK."
Select the signed certificate file. (View large version) - If the process went OK, you should see the certificate listed under "Server
Certificates."

You should see the certificate listed under "Server Certificates." (View large version) - Expand the server name. Under "Sites," select the website to which you want to assign the HTTPS certificate. Click "Bindings" from the right column.

Select the website and click "Bindings." (View large version) - In the "Site bindings" window, click the "Add" button.

Click the "Add" button. (View large version) - In the new window, select:
- "Type": "https"
- "IP address": "All Unassigned"
- "Port": "443"

Select "HTTPS," and select the installed HTTPS certificate. (View large version) - You should now have both HTTP and HTTPS installed for this website.

You should now have both HTTP and HTTPS installed for this website. (View large version)


Mixed-Content Warnings
You might get a warning sign next to the address bar and a message such as “Connection is not secure! Parts of this page are not secure (such as images).” This does not mean that your installation is wrong; just make sure that all links to resources (images, style sheets, scripts, etc.), whether local or from remote servers, do not start with https://. All resources should be pointed to with paths relative to the root (/images/image.png, /styles/style.css, etc.) or relative to the current document (../images/image.png), or they should be full URLs beginning with https://, such as <script src=“https://code.jquery.com/jquery-3.1.0.min.js”></script>.
These tips should eliminate the mixed-content warnings, and your browser should display the closed padlock without an exclamation mark.
Testing Your Server
After you have configured your server and have the website up and running on HTTPS, I strongly recommend checking its security configuration using the Qualys SSL Server Test. This performs a scan of your website, including a comprehensive evaluation of its configuration, possible weaknesses and recommendations. Follow the advice there to further improve your server’s security configuration.
Renewal
Your certificate is valid for a set period — typically, a year. Don’t wait to renew it at the last moment — your registrar will start sending you emails as the renewal date approaches. Do issue a new certificate as soon as you get your first reminder. The procedure is pretty much the same: Create a new certificate signing request, get a new HTTPS certificate, and install it on your server. The certificate’s validity will start running at the time of signing, while the expiration will be set one year after your current certificate expires. Thus, there will be a time when both your old and new certificates will be valid, and then a full new year after the expiration of the old certificate. During the overlap, you will be able to make sure that the new certificate is working OK, before the old one expires, allowing for uninterrupted service of your website.
Revocation
If your server is compromised or if you think someone might have access to your private key, you should immediately revoke your current HTTPS certificate. Different registrars have different procedures, but it generally boils down to marking the compromised certificate as inactive in a special database of your registrar, and then issuing a new HTTPS certificate. Of course, revoke the current certificate as soon as possible, so that nobody can impersonate you, and get the new certificate only after you have investigated and fixed the cause of the security breach. Please ask your registrar for assistance.
Let’s Encrypt
To quote the Let’s Encrypt website:
Let’s Encrypt is a free, automated, and open certificate authority (CA), run for the public’s benefit. Let’s Encrypt is a service provided by the Internet Security Research Group (ISRG).The key principles behind Let’s Encrypt are:
- Free Anyone who owns a domain name can use Let’s Encrypt to obtain a trusted certificate at zero cost.
- Automatic Software running on a web server can interact with Let’s Encrypt to painlessly obtain a certificate, securely configure it for use, and automatically take care of renewal.
- Secure Let’s Encrypt will serve as a platform for advancing TLS security best practices, both on the CA side and by helping website operators properly secure their servers.
- Transparent All certificates issued or revoked will be publicly recorded and available for anyone to inspect.
- Open The automatic issuance and renewal protocol will be published as an open standard that others can adopt.
- Cooperative Much like the underlying Internet protocols themselves, Let’s Encrypt is a joint effort to benefit the community, beyond the control of any one organization.
To take advantage of Let’s Encrypt, set up your hosting account or server properly. Let’s Encrypt offers short-term certificates that need to be renewed regularly in order to keep an HTTPS website operational.
How It Works
There are some substantial differences in the mode of operation between Let’s Encrypt and the other CAs. Following the first three points above, here are the main ones:
- Free. The Let’s Encrypt HTTPS certificates are completely free for the whole lifespan of your website.
- Automatic. The Let’s Encrypt HTTPS certificates are valid for 90 days, unlike regular HTTPS certificates, which are valid for one year. People are encouraged to automate their certificate renewal; for example, the administrator of the server would set up a dedicated software service (or would periodically invoke software from cron) to manage the initial domain validation and subsequent renewal for all hosted domains — set-it-and-forget-it style.
- Secure. Let’s Encrypt HTTPS certificates are issued with no compromise on security, leading to certain incompatibilities with older and more exotic platforms. Check the compatibility page to determine whether you are fine cutting off incompatible platforms.
Limitations
Let’s Encrypt provides only DV certificates. OV and EV are not supported, and there are currently no plans to support them. Single- and multiple-domain HTTPS certificates are offered, but no wildcard ones at the moment. See the Let’s Encrypt FAQ for more information.
Let’s Encrypt’s automated mode of operation enforces some usage limits in order to protect the infrastructure from intentional and unintentional abuse. The rate limits are high enough not to affect regular users with even hundreds of domains. However, if you manage HTTPS certificates at a very large scale, you might want to check them out.
Older and exotic clients (prior to Windows XP SP3) are not supported. Check the compatibility page for details.
Using The Let’s Encrypt HTTPS Certificates In Practice
cPanel
- Log into your host's cPanel
- Scroll down to the "Security" section, and click "Let's Encrypt for cPanel."

cPanel "Security" section (View large version) - You are now in the "Let's Encrypt for cPanel" section. Check both domain names (
example.comandwww.example.com), and click "Issue Multiple."
Check both domain names and click "Issue Multiple." (View large version) - You will be taken to a confirmation screen. Your top-level (i.e. non-
www) domain name will be selected as the primary, and yourwwwdomain name as an alias, which will be placed in the HTTPS certificate's "Subject Alt Name" (SAN) record. Click "Issue" to continue. Please be patient and do not refresh the page, because the initial validation might take longer — about a minute or two.
Click "Issue" and be patient for about a minute or two. (View large version) - If the process completes successfully, you will see a confirmation message. Click "Go back" to see the installed HTTPS certificate.

If the process completes successfully, you will see a confirmation message. (View large version) - You will see your domain listed under "Your domains with Let's Encrypt certificates." You may check the certificate's details and verify that the website opens with the
https://prefix in your browser.
Your domains with Let's Encrypt certificates (View large version)


Linux, FreeBSD, Other
The easiest way to set up Let’s Encrypt on your server is with Certbot. Just select your web server and operating system and follow the instructions.

Internet Information Server on Windows
There is currently no official client for IIS on Windows, but there are workarounds.
There are several projects to create a native Windows client for Let’s Encrypt:
- ACMESharp (PowerShell) is the first effort to write a Windows client.
- letsencrypt-win-simple (for the command line) seems the easiest to use.
- Certify provides a GUI on top of ACMESharp, but is still in alpha.
Cloudflare
Cloudflare is a service that provides a content delivery network (CDN), website security, and protection against distributed denial of service (DDoS) attacks. It features a free HTTPS certificate with all subscription plans, including the free one — a shared DV Cloudflare Universal SSL certificate. In order to have a unique HTTPS certificate, you need to upgrade to the Business plan.
To take advantage, simply create an account, set up your website, and visit the “Crypto” section.
CertSimple
CertSimple is an EV-only HTTPS certificate vendor. It is disrupting the EV HTTPS certificate market in a way similar to what Let’s Encrypt is doing in the DV HTTPS certificate market, by providing a faster, easier process of organization validation — an otherwise slow and cumbersome routine. Here are its advantages:
- Simplified application procedure. No software to install or command line questions. Live validation, with most details checked before payment.
- Fast validation time. Three hours on average versus the industry standard 7 to 10 days.
- Free reissues for the lifetime of the certificate. Easily add domain names later or fix a lost private key.
You can read an excellent, in-depth review of the process on Troy Hunt’s blog.
Multiple HTTPS Websites On A Single IP Address
Due to the nature of the handshake process, virtual hosts with a single IP address are a problem for TLS. Virtual hosts work by having the client include the domain name as part of the HTTP request header, but when HTTPS is used, the TLS handshake happens before the HTTP headers are sent — the secure channel should be initialized and fully functional before transmitting any plain-text HTTP, including headers. So, the server does not know which HTTPS certificate to present up front to a connecting client, so it presents the first one it finds in its configuration file, which, of course, only works correctly for the first TLS-enabled website.
There are several workarounds: to have a unique IP for each TLS-enabled domain, or to have all domains in a single certificate. Both are impractical — the IPv4 address space is now used up, and having one big HTTPS certificate means that if you want to add a single website to this server, you’ll need to reissue the whole multiple-domain certificate.
An extension to the TLS protocol, named Server Name Indication (SNI), was introduced to overcome this limitation. Both servers and clients should support it, and although SNI support is nowadays widely available, it is still not 100% bulletproof, if compatibility with all possible clients is a requirement.
You can read more about running SNI for Apache, nginx and IIS (8+) in the respective documentation.
Useful Resources
- Mozilla SSL Configuration Generator
- SSL Server Test, Qualys
- “Security/Server Side TLS,” Mozilla wiki
- “SSL and TLS Deployment Best Practices,” SSL Labs
- Documentation, Qualys SSL Labs
- “Database Search and Replace Script in PHP,” Interconnect IT For replacing all instances of HTTP with HTTPS (links, images, etc.) in a WordPress database.
Footnotes
- Chrome and Firefox explicitly mark websites that provide forms on pages without HTTPS as being non-secure.
- HTTPS has become an SEO ranking factor,
- HTTPS has a serious privacy impact.


