Building A Simple AI Chatbot With Web Speech API And Node.js

Email Newsletter
Weekly tips on front-end & UX.
Trusted by 182,000+ folks.
 Custom Web Forms for Angular, React, & Vue. Your backend.

 Celebrating 10 million developers

Using voice commands has become pretty ubiquitous nowadays, as more mobile phone users use voice assistants such as Siri and Cortana, and as devices such as Amazon Echo and Google Home have been invading our living rooms. These systems are built with speech recognition software that allows their users to issue voice commands. Now, our web browsers will become familiar with to Web Speech API, which allows users to integrate voice data in web apps.
With the current state of web apps, we can rely on various UI elements to interact with users. With the Web Speech API, we can develop rich web applications with natural user interactions and minimal visual interface, using voice commands. This enables countless use cases for richer web applications. Moreover, the API can make web apps accessible, helping people with physical or cognitive disabilities or injuries. The future web will be more conversational and accessible!
Enhancing User Experience
Web Speech API enables websites and web apps not only to speak to you, but to listen, too. Take a look at just some great examples of how it can be used to enhance the user experience. Read a related article →
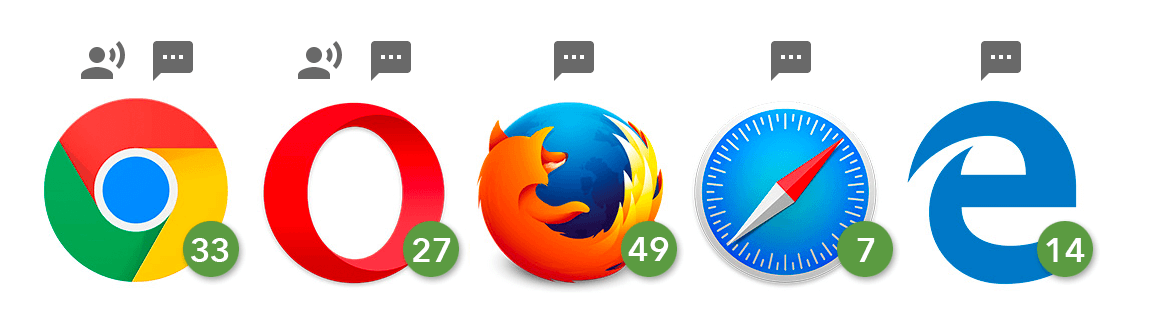
In this tutorial, we will use the API to create an artificial intelligence (AI) voice chat interface in the browser. The app will listen to the user’s voice and reply with a synthetic voice. Because the Web Speech API is still experimental, the app works only in supported browsers. The features used for this article, both speech recognition and speech synthesis, are currently only in the Chromium-based browsers, including Chrome 25+ and Opera 27+, while Firefox, Edge and Safari support only speech synthesis at the moment.
This video shows the demo in Chrome, and this is what we are going to build in this tutorial!
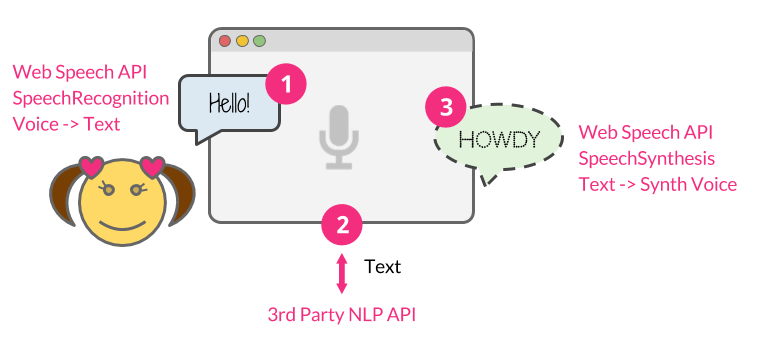
To build the web app, we’re going to take three major steps:
- Use the Web Speech API’s
SpeechRecognitioninterface to listen to the user’s voice. - Send the user’s message to a commercial natural-language-processing API as a text string.
- Once API.AI returns the response text back, use the
SpeechSynthesisinterface to give it a synthetic voice.
The entire source code used for this tutorial is on GitHub.
Prerequisites
This tutorial relies on Node.js. You’ll need to be comfortable with JavaScript and have a basic understanding of Node.js.
Make sure Node.js is installed on your machine, and then we’ll get started!
Setting Up Your Node.js Application
First, let’s set up a web app framework with Node.js. Create your app directory, and set up your app’s structure like this:
.
├── index.js
├── public
│   ├── css
│   │   └── style.css
│   └── js
│       └── script.js
└── views
    └── index.html
Then, run this command to initialize your Node.js app:
$ npm init -fThe -f accepts the default setting, or else you can configure the app manually without the flag. Also, this will generate a package.json file that contains the basic info for your app.
Now, install all of the dependencies needed to build this app:
$ npm install express socket.io apiai --saveWith the --save flag added, your package.json file will be automatically updated with the dependencies.
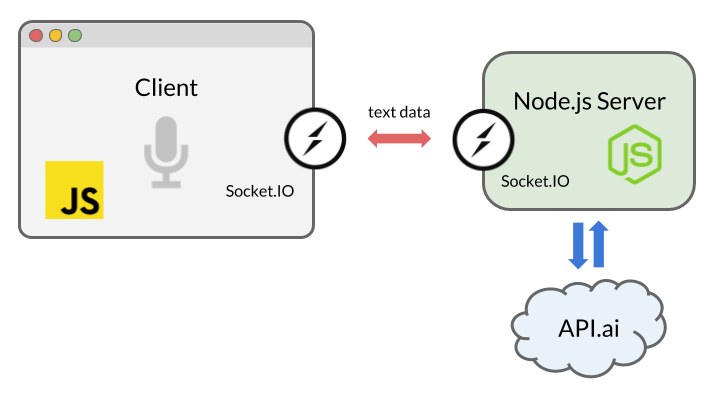
We are going to use Express, a Node.js web application server framework, to run the server locally. To enable real-time bidirectional communication between the server and the browser, we’ll use Socket.IO. Also, we’ll install the natural language processing service tool, API.AI in order to build an AI chatbot that can have an artificial conversation.
Socket.IO is a library that enables us to use WebSocket easily with Node.js. By establishing a socket connection between the client and server, our chat messages will be passed back and forth between the browser and our server, as soon as text data is returned by the Web Speech API (the voice message) or by API.AI API (the “AI” message).
Now, let’s create an index.js file and instantiate Express and listen to the server:
const express = require('express');
const app = express();

app.use(express.static(__dirname + '/views')); // html
app.use(express.static(__dirname + '/public')); // js, css, images

const server = app.listen(5000);
app.get('/', (req, res) => {
  res.sendFile('index.html');
});
Now, let’s work on our app! In the next step, we will integrate the front-end code with the Web Speech API.
Receiving Speech With The SpeechRecognition Interface
The Web Speech API has a main controller interface, named SpeechRecognition, to receive the user’s speech from a microphone and understand what they’re saying.
Creating The User Interface
The UI of this app is simple: just a button to trigger voice recognition. Let’s set up our index.html file and include our front-end JavaScript file (script.js) and Socket.IO, which we will use later to enable the real-time communication:
<html lang="en">
  <head>…</head>
  <body>
    …
    <script src="https://cdnjs.cloudflare.com/ajax/libs/socket.io/2.0.1/socket.io.js"></script>
    <script src="js/script.js"></script>
  </body>
</html>
Then, add a button interface in the HTML’s body:
<button>Talk</button>To style the button as seen in the demo, refer to the style.css file in the source code.
Capturing Voice With JavaScript
In script.js, invoke an instance of SpeechRecognition, the controller interface of the Web Speech API for voice recognition:
const SpeechRecognition = window.SpeechRecognition || window.webkitSpeechRecognition;
const recognition = new SpeechRecognition();
We’re including both prefixed and non-prefixed objects, because Chrome currently supports the API with prefixed properties.
Also, we are using some of ECMAScript6 syntax in this tutorial, because the syntax, including the const and arrow functions, are available in browsers that support both Speech API interfaces, SpeechRecognition and SpeechSynthesis.
Optionally, you can set varieties of properties to customize speech recognition:
recognition.lang = 'en-US';
recognition.interimResults = false;
Then, capture the DOM reference for the button UI, and listen for the click event to initiate speech recognition:
document.querySelector('button').addEventListener('click', () => {
  recognition.start();
});
Once speech recognition has started, use the result event to retrieve what was said as text:
recognition.addEventListener('result', (e) => {
  let last = e.results.length - 1;
  let text = e.results[last][0].transcript;

  console.log('Confidence: ' + e.results[0][0].confidence);

  // We will use the Socket.IO here later…
});
This will return a SpeechRecognitionResultList object containing the result, and you can retrieve the text in the array. Also, as you can see in the code sample, this will return confidence for the transcription, too.
Now, let’s use Socket.IO to pass the result to our server code.
Real-Time Communication With Socket.IO
Socket.IO is a library for real-time web applications. It enables real-time bidirectional communication between web clients and servers. We are going to use it to pass the result from the browser to the Node.js code, and then pass the response back to the browser.
You may be wondering why are we not using simple HTTP or AJAX instead. You could send data to the server via POST. However, we are using WebSocket via Socket.IO because sockets are the best solution for bidirectional communication, especially when pushing an event from the server to the browser. With a continuous socket connection, we won’t need to reload the browser or keep sending an AJAX request at a frequent interval.
Instantiate Socket.IO in script.js somewhere:
const socket = io();
Then, insert this code where you are listening to the result event from SpeechRecognition:
socket.emit('chat message', text);
Now, let’s go back to the Node.js code to receive this text and use AI to reply to the user.
Getting A Reply From AI
Numerous platforms and services enable you to integrate an app with an AI system using speech-to-text and natural language processing, including IBM’s Watson, Microsoft’s LUIS and Wit.ai. To build a quick conversational interface, we will use API.AI, because it provides a free developer account and allows us to set up a small-talk system quickly using its web interface and Node.js library.
Setting Up API.AI
Once you’ve created an account, create an “agent.” Refer to the “Getting Started” guide, step one.
Then, instead of going the full customization route by creating entities and intents, first, simply click the “Small Talk” preset from the left menu, then, secondly, toggle the switch to enable the service.
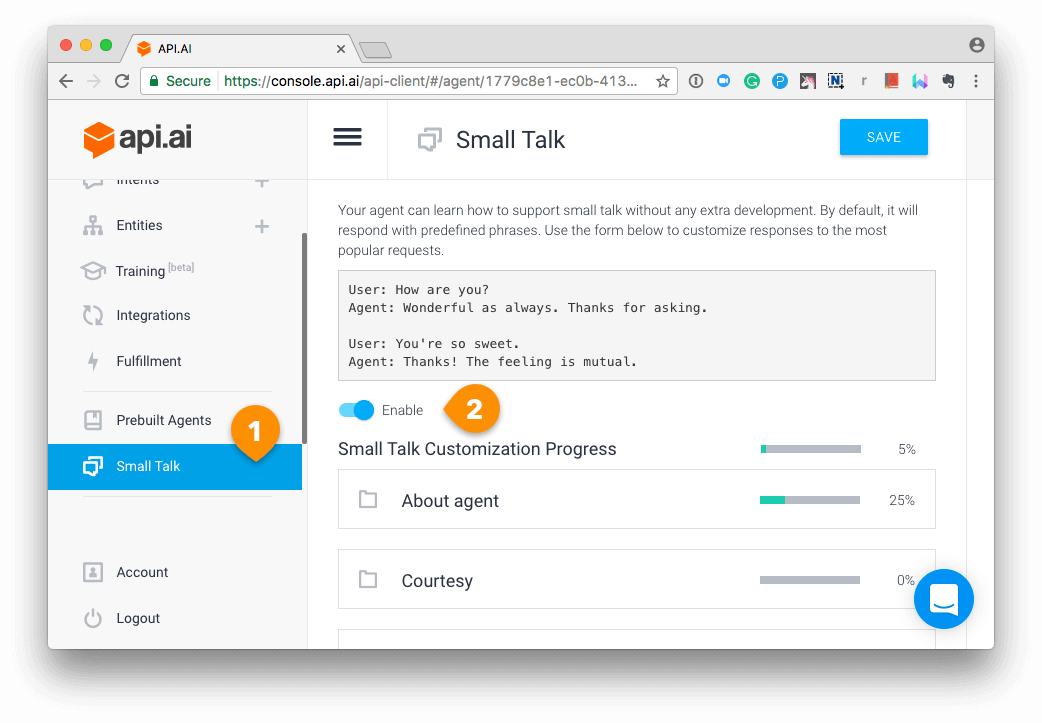
Customize your small-talk agent as you’d like using the API.AI interface.
Go to the “General Settings” page by clicking the cog icon next to your agent’s name in the menu, and get your API key. You will need the “client access token” to use the Node.js SDK.
Using The API.AI Node.js SDK
Let’s hook up our Node.js app to API.AI using the latter’s Node.js SDK! Go back to your index.js file and initialize API.AI with your access token:
const apiai = require('apiai')(APIAI_TOKEN);
If you just want to run the code locally, you can hardcode your API key here. There are multiple ways to set your environment variables, but I usually set an .env file to include the variables.
Now we are using the server-side Socket.IO to receive the result from the browser.
Once the connection is established and the message is received, use the API.AI APIs to retrieve a reply to the user’s message:
io.on('connection', function(socket) {
  socket.on('chat message', (text) => {

    // Get a reply from API.AI

    let apiaiReq = apiai.textRequest(text, {
      sessionId: APIAI_SESSION_ID
    });

    apiaiReq.on('response', (response) => {
      let aiText = response.result.fulfillment.speech;
      socket.emit('bot reply', aiText); // Send the result back to the browser!
    });

    apiaiReq.on('error', (error) => {
      console.log(error);
    });

    apiaiReq.end();

  });
});
When API.AI returns the result, use Socket.IO’s socket.emit() to send it back to the browser.
Giving The AI A Voice With The SpeechSynthesis Interface
Let’s go back to script.js once again to finish off the app!
Create a function to generate a synthetic voice. This time, we are using the SpeechSynthesis controller interface of the Web Speech API.
The function takes a string as an argument and enables the browser to speak the text:
function synthVoice(text) {
  const synth = window.speechSynthesis;
  const utterance = new SpeechSynthesisUtterance();
  utterance.text = text;
  synth.speak(utterance);
}
In the function, first, create a reference to the API entry point, window.speechSynthesis. You might notice that there is no prefixed property this time: This API is more widely supported than SpeechRecognition, and all browsers that support it have already dropped the prefix for SpeechSysthesis.
Then, create a new SpeechSynthesisUtterance() instance using its constructor, and set the text that will be synthesised when the utterance is spoken. You can set other properties, such as voice to choose the type of the voices that the browser and operating system should support.
Finally, use the SpeechSynthesis.speak() to let it speak!
Now, get the response from the server using Socket.IO again. Once the message is received, call the function.
socket.on('bot reply', function(replyText) {
  synthVoice(replyText);
});
You are done! Let’s try a chit-chat with our AI bot!
Note that the browser will ask you for permission to use the microphone the first time. Like other web APIs, such as the Geolocation API and the Notification API, the browser will never access your sensitive information unless you grant it, so your voice will not be secretly recorded without your knowledge.
You will soon get bored with the conversation because the AI is too simple. However, API.AI is configurable and trainable. Read the API.AI documentation to make it smarter.
I hope you’ve enjoyed the tutorial and created a fun chatbot!
Push The Web To The Future!
Voice interaction has transformed the way users control computing and connected devices. Now with the Web Speech API, the user experience is transforming on the web, too. Combined with AI and deep learning, your web apps will become more intelligent and provide better experiences for users!
References
This tutorial has covered only the core features of the API, but the API is actually pretty flexible and customizable. You can change the language of recognition and synthesis, the synthetic voice, including the accent (like US or UK English), the speech pitch and the speech rate. You can learn more about the API here:
- “Web Speech API,” Mozilla Developer Network
- “Web Speech API Specification,” W3C
- “Web Speech API: Speech Synthesis” (Microsoft Edge documentation) Microsoft
Also, to learn Node.js and the libraries used in this tutorial, check out the following:
- Guide, Node.js
- Documentation, npm
- “Hello world example,” Express
- “Get Started,” Socket.IO
Finally, check out the different natural-language-processing tools and conversational platforms!
Further Reading
- Gradients, Blend Modes, And A Really Cool Hover Effect
- Using Friction As A Feature In Machine Learning Algorithms
- Creating Accessible UI Animations
- Better Context Menus With Safe Triangles


