User Authentication For Web And iOS Apps With AWS Cognito (Part 1)

Email Newsletter
Weekly tips on front-end & UX.
Trusted by 182,000+ folks.
 Celebrating 10 million developers


 Custom Web Forms for Angular, React, & Vue. Your backend.
Developers and organizations alike are looking for a way to have more agility with mobile solutions. There is a desire to decrease the time from idea to test. As a developer, I often run up against one hurdle that can slow down the initial build of a mobile hypothesis: user management.
Over the years, I have built at least three user management systems from scratch. Much of the approach can be based on a boilerplate, but there are always a few key items that need to be customized for a particular client. This is enough of a concern that an entire category of user management, authentication and authorization services have sprung up to meet this need. Services like Auth0 have entire solutions based on user and identity management that developers can integrate with.
One service that provides this functionality is Amazon Web Services’ (AWS’) Cognito. Cognito is a tool for enabling users to sign up for and sign into web and mobile applications that you create. In addition to this functionality, it also allows for storage of user data offline, and it provides synchronization of this data. As Amazon states, “With Amazon Cognito, you can focus on creating great app experiences instead of worrying about building, securing, and scaling a solution to handle user management, authentication, and sync across devices.”
Underestimating Carousels
Carousels don't really deserve the bad reputation they’ve gained throughout the years. They can prove to be very effective and come in many shapes and sizes. Read a related article →
Last year, Amazon introduced an addition to its Cognito service, custom user pools. This functionality now provides what I and other developers need in order to have a complete, customizable, cross-platform user management system, with the flexibility needed to fit most use cases. To understand why, we need to take a quick look at what user management is and what problems it solves.
In this article, we will spend a majority of our time walking through the process of configuring a user pool for our needs. Then, we will integrate this user pool with an iOS application and allow a user to log in and fetch the attributes associated with their user account. By the end, we’ll have a limited demo application, but one that handles the core of user management. In addition, after this is in place, there will be a follow-up article that takes this quite a bit deeper.
What Do We Need From User Management?
If you have a mobile or web app, what exactly do you need in terms of user management? While user log-in is probably the first thing you would think of, we cannot stop there. If we want a flexible user management system that would work for most web and mobile app use cases, it would need to have the following functionality:
- username and password log-in;
- secure password hashing and storage;
- password changes;
- password policy and validation;
- user lifecycle triggers (welcome email, goodbye email, etc.);
- user attributes (first name, last name, etc.);
- required configuration and optional attributes per user;
- handling of forgotten passwords;
- phone number validation through SMS;
- email verification;
- API access to endpoints based on permissions;
- secure storage of access token(s) on mobile devices;
- offline storage of user attributes for mobile devices;
- synchronization of user attributes for online and offline states;
- multi-factor authentication.
While user management might at first seem like a log-in system, the functionality must go far beyond that in order for the system to be truly flexible enough to handle most use cases. This clearly goes far beyond just a username and password.
One additional item needs to be called out here: security. One of the requirements of any user management system is that it needs to be continually evaluated for the security of the system as a whole. Many custom user management systems have vulnerabilities that simply haven’t been corrected. Within the last year, there have been security breaches of user management systems of companies such as Dropbox, Dailymotion, Twitter and Yahoo. If you choose to build a custom solution, you are on the hook for securing your system.
Enter Amazon Cognito
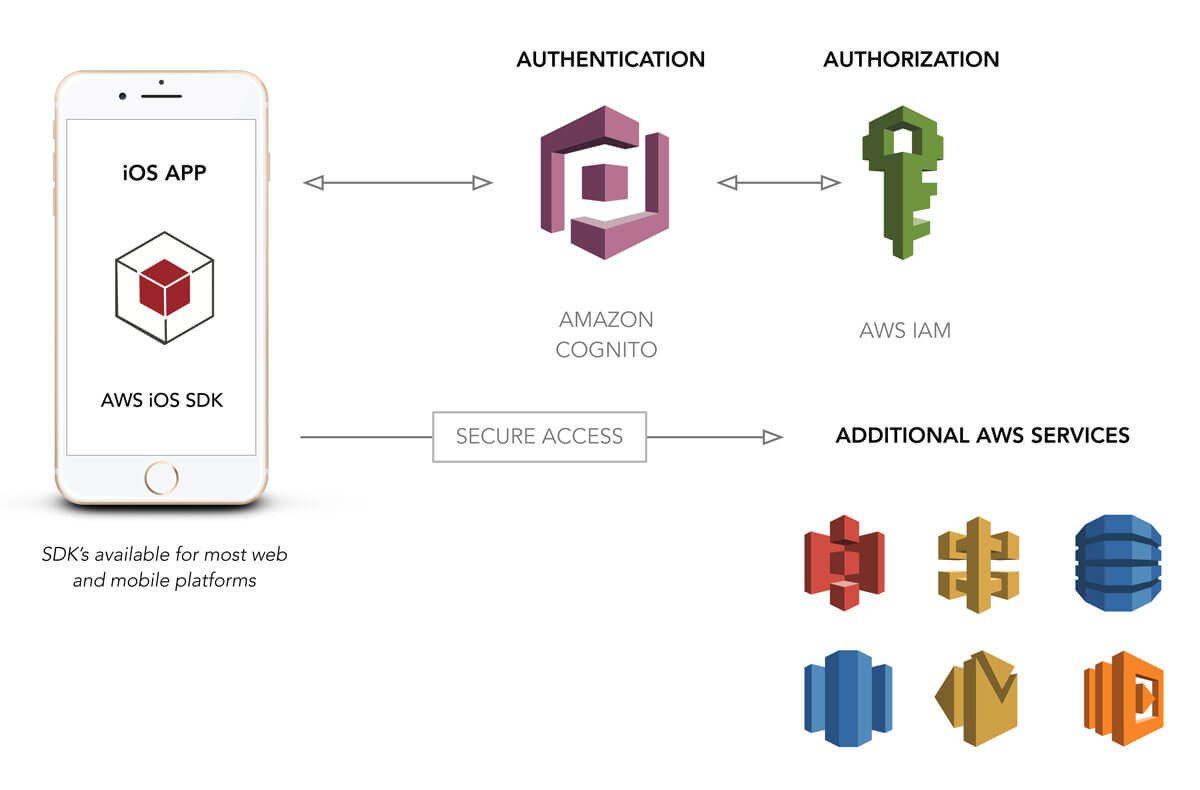
Amazon Cognito is a managed service that enables you to integrate a flexible and scalable user management system into your web and mobile applications. Cognito provides two distinct ways to utilize the service: federated identities, which allow for log-in via social networks such as Facebook, and user pools, which give you completely custom user management capabilities for a specific app or suite of applications.
Federated identities are great if you want users to be able to log in with Facebook (or Google, Amazon, etc.), but this means that a portion of the user management process will have been outsourced to Facebook. While this might be acceptable in some cases, users might not want to connect their Facebook account to your application. In addition, you might want to manage more of the user’s lifecycle directly, and for this, federated identities aren’t as flexible. For the purpose of today’s article, we will focus on user pools because they provide the flexibility needed for a robust user management platform that would fit most any use case. In this manner, you will have an approach that can be used in most any project.
Because this is an AWS service, there are other benefits of using Cognito. Cognito can integrate with API Gateway to provide a painless way to authorize API access based on the tokens that are returned from a Cognito log-in. In addition, if you are already leveraging other AWS services for your mobile application, you can use your user pool as an identity provider for your AWS credentials.
As with any other AWS service, there is a cost involved. Pricing for Cognito is based on monthly active users (MAUs). The great news for most developers is that there is an indefinite free tier that is capped at 50,000 MAUs when using a custom user pool. If you have a large application, this will give you a large number of users to pilot a new approach to user management. However, I suspect that many of you have experiences that will never go beyond 50,000 users. In this case, core user management will be pretty much free. The only exception to this is other AWS services that you will be leveraging as part of the user management process, such as Lambda, SNS and S3.
Creating A User Pool
The first step in integrating a user pool into your mobile application is to create a Cognito user pool. This will give us the configuration values needed to plug into our example application. To create a new user pool, walk through the wizard provided in Amazon’s Cognito console.
Let’s walk through the process of creating a user pool. I must warn you that this is a lengthy process. In many ways, this is a good thing because it shows areas of flexibility. However, you’ll want to grab a cup of coffee and buckle in for this one.
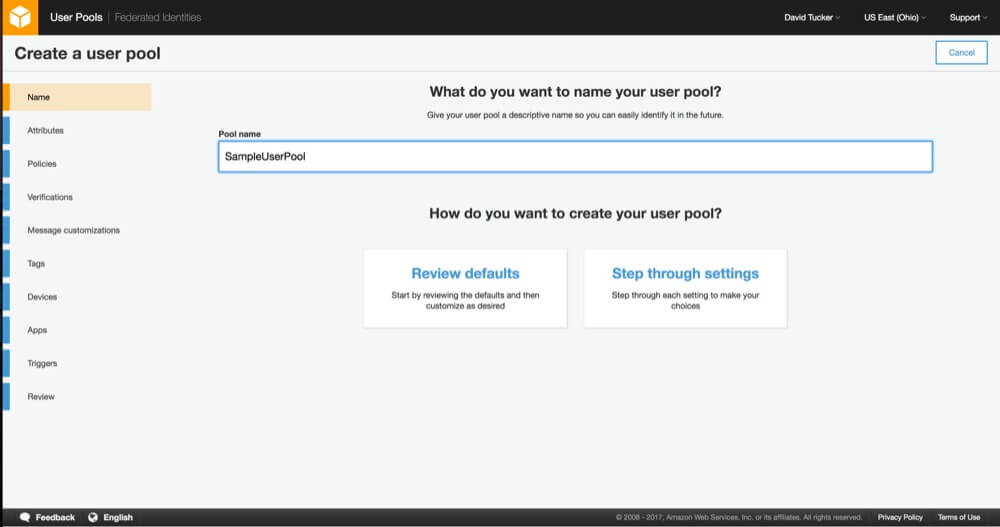
1. Name
The initial step in creating a user pool involves setting a name for your user pool and selecting the approach you will be taking to create the user pool. You can either review the defaults or “step through” the settings. Because we want to have a good working knowledge of how the user pool is being configured, choose the option “Step through settings.”
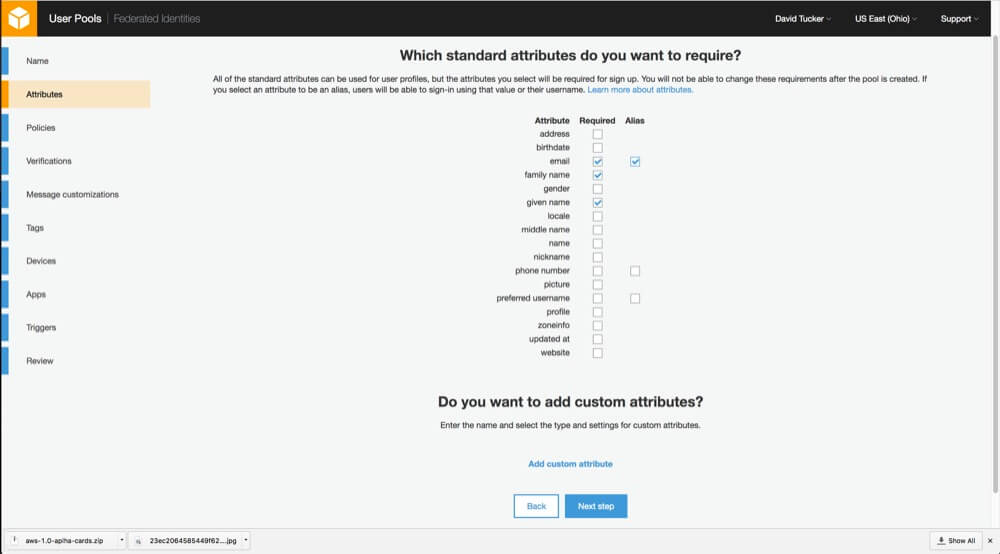
2. Attributes
Configuring attributes will require a bit of thought. For each user pool, you will need to determine which attributes will be stored in the system and which ones are required. Because the system will enforce required values, you cannot change this down the road. The best approach here is to mark only truly essential values here as required. In addition, if you want users to be able to log in with their email address, be sure to mark that one as an alias.
If you want to include custom values, you will need to do that here as well. Each custom value will have a type, optional validation rules, and an option to be mutable (changeable) or non-mutable (unchangeable). There is a hard limit of 25 custom attributes.
Finally, a point needs to be made here about usernames. The username value for each user is immutable (unchangeable). This means that, in most cases, making this value automatically generated would make sense. This is why the “preferred username” value exists. If you want to users to have a username value that they can edit, just mark the “preferred username” attribute as an alias. If you want users simply to log in with their email address, be sure to mark the “email” attribute as both required and an alias.
For our demo application, I chose to make “email,” “given name” and “family name” required.
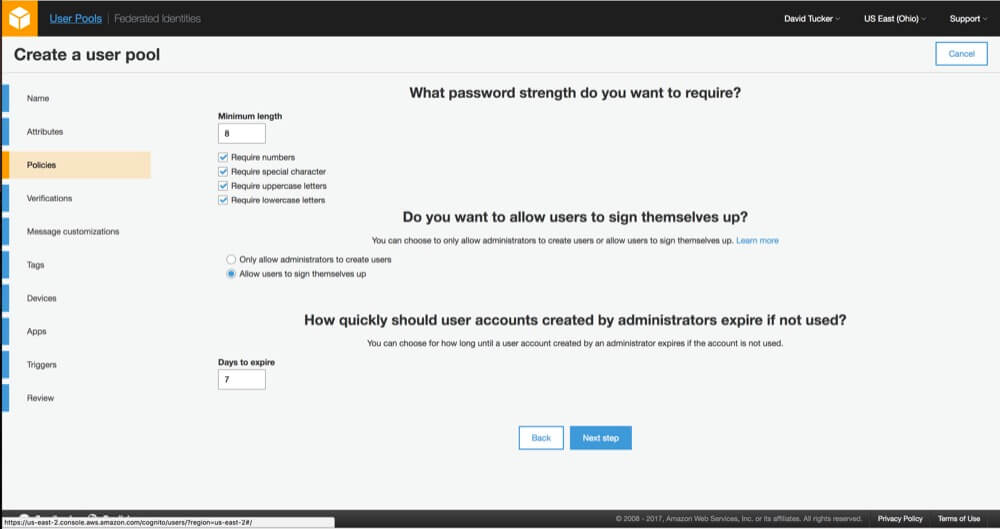
3. Policies
After configuring the attributes, you will be able to configure the policies for the account. The first policy to configure is the password policy. The policy allows you to configure both the length and whether you require numbers, special characters, uppercase letters or lowercase letters. This policy will be enforced on both passwords that users enter as well as passwords that administrators assign to users.
The next policies relate to user sign-up. For a public application, you will likely want to allow users to sign up themselves. However, depending on the type of application, you might want to restrict sign-up and have the system be invitation-only. In addition, you will have to configure how quickly these invitations will expire if they are not used.
For our demo application, I chose to use just the default values, with the exception that I don’t want users to be able to sign up on their own. With these values in place, we can proceed to verifications.
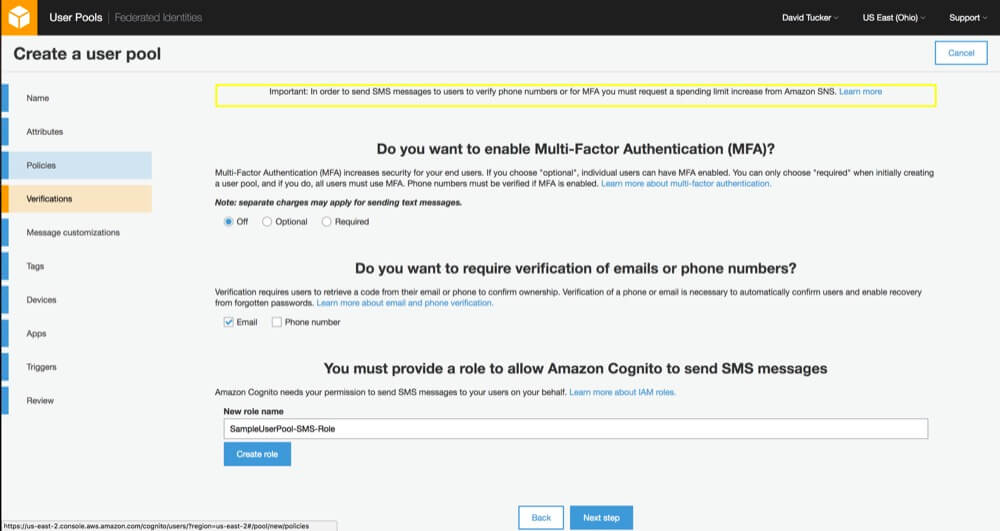
4. Verifications
The verifications step allows you to set up multi-factor authentication, as well as email and phone verification. While this functionality is relatively easy to set up in the console, note that you will need to request a spending increase for AWS SNS if you want to either verify phone numbers or use multi-factor authentication.
For our demo application, I chose to use just the default values.
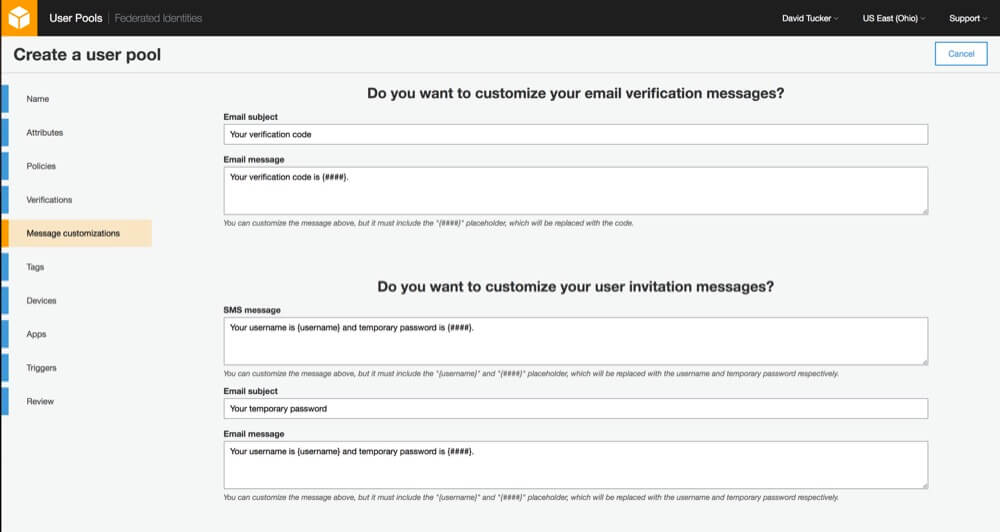
5. Message Customizations
This step allows you to customize the email and SMS messages that your user pool will send, as well as the “from” and “reply to” email addresses. For the purpose of our demo application, I will leave the default values here and proceed.
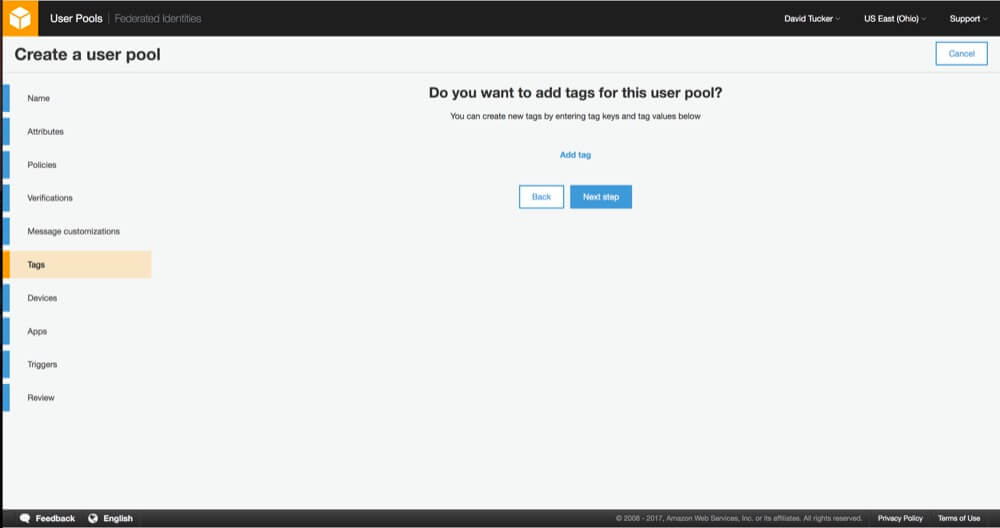
6. Tags
If you are new to AWS, you might not need to specify any tags. However, in case your organization uses AWS regularly, tags provide a way to analyze spending and assign permissions with IAM. For example, some organizations specify tags per environment (development, staging, production) and by project.
No matter what you enter in this step, it won’t affect our demo application.
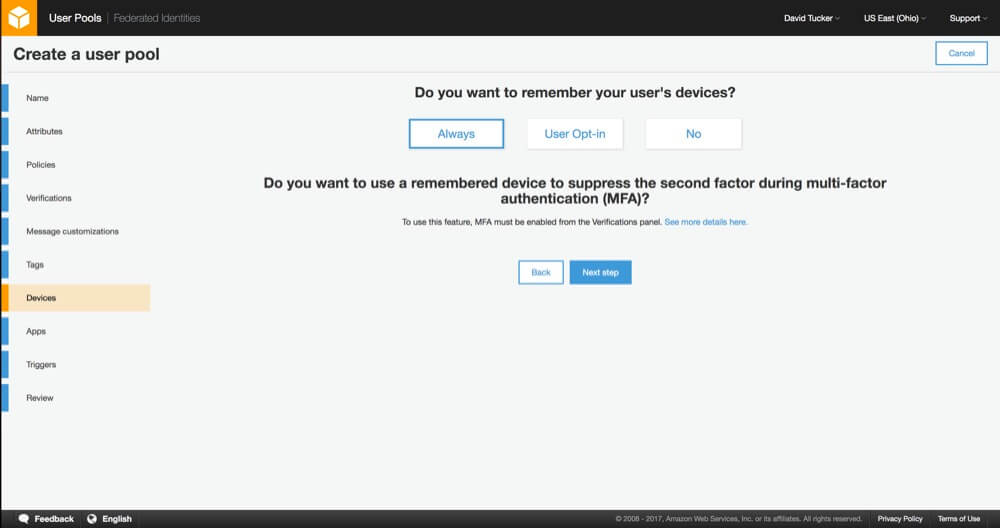
7. Devices
The next step allows you to define whether the user pool will remember your user’s devices. This is an additional security step that allows you to see what devices a specific account has been logged into with. This has an extra value when you are leveraging multi-factor authentication (MFA). If the device is remembered, you can elect not to require an MFA token upon each log-in.
For the purpose of the demo application, I have chosen to set the value to “Always.”
8. App Clients
For each application for which you want to use the user pool (such as an iOS application, web application, Android application, etc.), you should create an app. However, you can come back and create these after the user pool has been created, so there is no pressing need to add all of these just yet.
Each application has several values that you can configure. For this demo application, we will give the app a name and then leave the default values. Next, you can configure which user attributes each app can read and write.
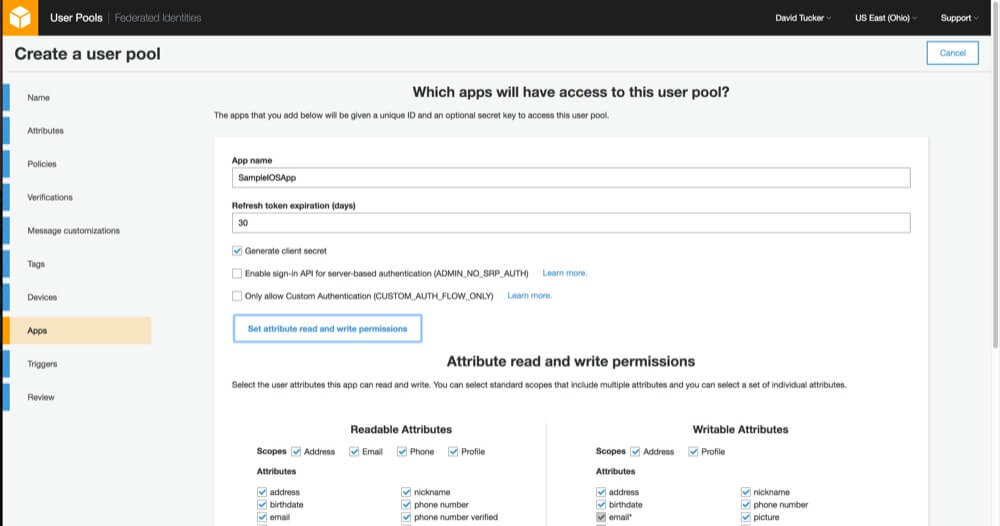
You can set whichever values you like in this step, as long as the email address, family name and given name are all readable and writable by the application. Be sure to click the option to “Create App Client” before proceeding.
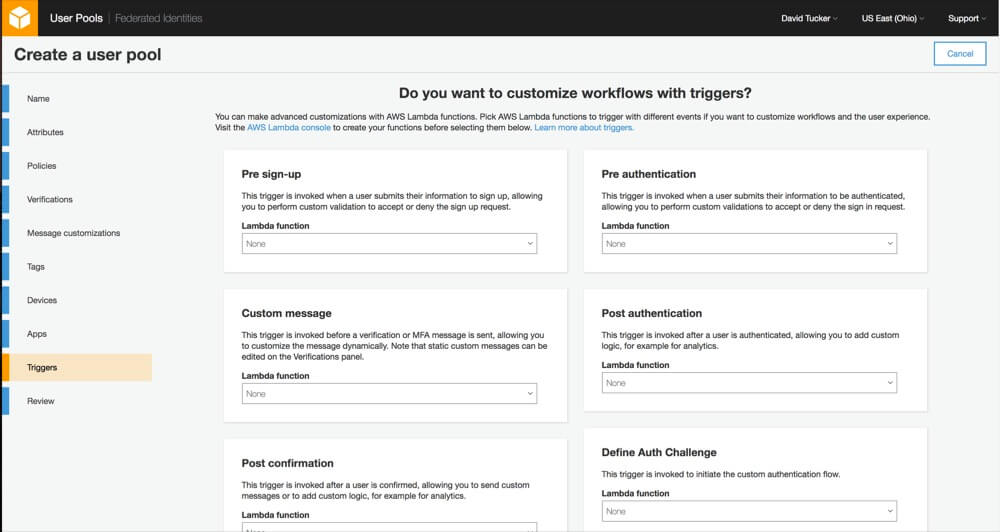
9. Triggers
With triggers, you can use Lambda functions to completely customize the user lifecycle process. For example, if you only want users with an email address from your company’s domain to be able to sign up, you could add a Lambda function for the “Pre sign-up” trigger to perform this validation and reject any sign-up request that doesn’t pass.
For our demo application, I will not add any triggers.
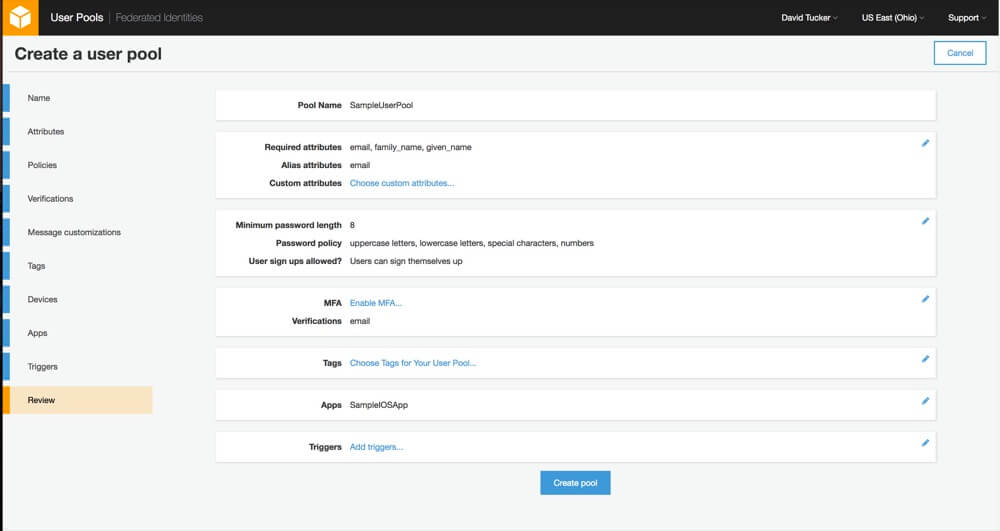
10. Review
I realize that this might have seemed like a lengthy and arduous process. But bear in mind that each step in creating a user pool has flexibility that allows for the solution to fit more use cases. And now for the news you’ve been waiting to hear: This is the last step.
Just review the settings to make sure you have configured them correctly for the demo application. From this screen, you can go back and edit any of the previous settings. Once the user pool is created, some configuration values (such as required attributes) cannot be changed.
With your new user pool created, you can now proceed to integrate them in a sample iOS application using the AWS SDK for iOS.
Setting Up Your iOS Application For Your User Pool
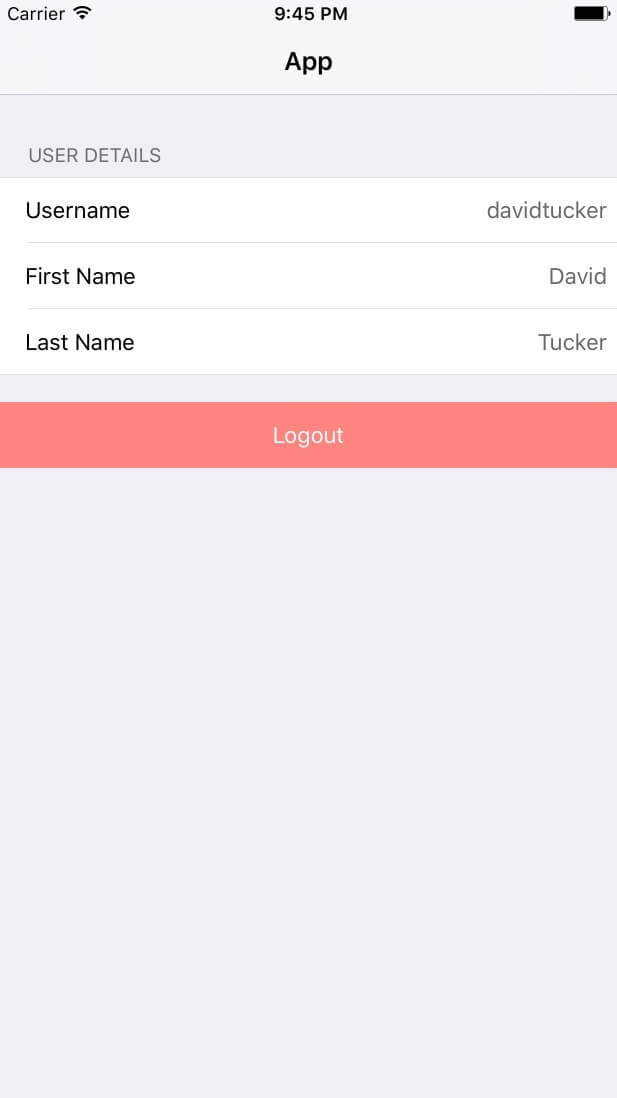
I have created a sample iOS application that integrates with Cognito to allow the user to log in, log out, enter their first and last name, and set a password. For this initial demo, user sign-up is not included, so I’ve used Cognito’s console to add a new user for testing.
The code for this application can be found in my GitHub repository.
Configuring Dependencies
This application uses CocoaPods for managing dependencies. At this point, the only dependencies are the specific pieces of the AWS iOS SDK that relate to Cognito user pools.
(A full description of CocoaPods is beyond the scope of this article, however, a resource on CocoaPods’ website will help you get up and running, in case this concept is new to you.)
The contents of the Podfile for this application can be seen below:
source 'https://github.com/CocoaPods/Specs.git'

platform :ios, '10.0'
use_frameworks!

target 'CognitoApplication' do
    pod 'AWSCore', '~> 2.5.5'
    pod 'AWSCognitoIdentityProvider', '~> 2.5.5'
end
Assuming that CocoaPods is installed on your machine, you can just run pod install, and the necessary dependencies will be installed for you.
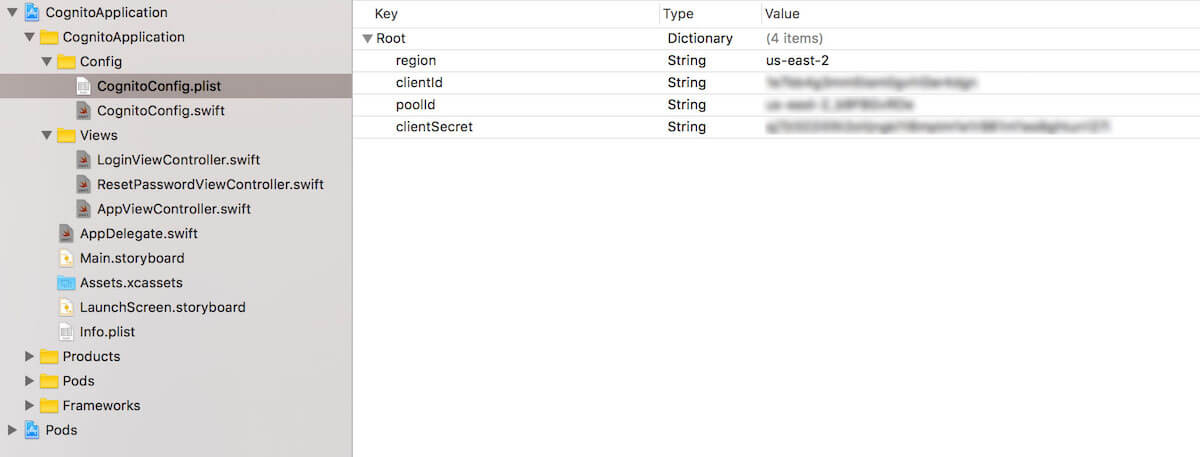
User Pool Configuration
The next step is to include the values for your user pool and client application. The demo application is configured to use a file, CognitoApplication/CognitoConfig.plist, from which to pull this information. Four values need to be defined:
region(string)
This is the region in which you created your user pool. This needs to be the standard region identifier, such asus-east-1orap-southeast-1.poolId(string)
This is the ID of the user pool that you created.clientId(string)
This is theclientIdconfigured as a part of the app that you attached to the user pool.clientSecret(string)
This is theclientSecretthat is configured as a part of the app that you attached to the user pool.
With that file and the proper values in place, the demo application can be launched. If any exceptions occur during launch, be sure that you have included each of the four values shown below and that the file is placed in the correct directory.
plist file (View large version)App Delegate Integration
The core of the integration with Amazon Cognito happens within the application’s AppDelegate. Our first step is to ensure that we have set up logging and have connected to our user pool. As a part of that process, we will assign our AppDelegate as the delegate of the user pool. For this basic example, we can keep this logic within the AppDelegate. For larger projects, it might make sense to handle this elsewhere.
func application(_ application: UIApplication, didFinishLaunchingWithOptions launchOptions: [UIApplicationLaunchOptionsKey: Any]?) -> Bool {
    // set up logging for AWS and Cognito
    AWSDDLog.sharedInstance.logLevel = .verbose
    AWSDDLog.add(AWSDDTTYLogger.sharedInstance)

    // set up Cognito config
    self.cognitoConfig = CognitoConfig()

    // set up Cognito
    setupCognitoUserPool()

    return true
}

func setupCognitoUserPool() {
    // we pull the needed values from the CognitoConfig object
    // this just pulls the values in from the plist
    let clientId:String = self.cognitoConfig!.getClientId()
    let poolId:String = self.cognitoConfig!.getPoolId()
    let clientSecret:String = self.cognitoConfig!.getClientSecret()
    let region:AWSRegionType = self.cognitoConfig!.getRegion()

    // we need to let Cognito know which region we plan to connect to
    let serviceConfiguration:AWSServiceConfiguration = AWSServiceConfiguration(region: region, credentialsProvider: nil)
    // we need to pass it the clientId and clientSecret from the app and the poolId for the user pool
    let cognitoConfiguration:AWSCognitoIdentityUserPoolConfiguration = AWSCognitoIdentityUserPoolConfiguration(clientId: clientId, clientSecret: clientSecret, poolId: poolId)
    AWSCognitoIdentityUserPool.register(with: serviceConfiguration, userPoolConfiguration: cognitoConfiguration, forKey: userPoolID)
    let pool:AWSCognitoIdentityUserPool = AppDelegate.defaultUserPool()
    // we need to set the AppDelegate as the user pool's delegate, which will get called when events occur
    pool.delegate = self
}
After this configuration is in place, we need to configure the delegate methods for the user pool. The protocol that we are implementing is AWSCognitoIdentityInteractiveAuthenticationDelegate. This delegate will get called any time the user needs to log in, reset their password or provide a multi-factor authentication code or if we need to query the user about whether they would like their device to be remembered. For our example, we only need to implement the startPasswordAuthentication and the startNewPasswordRequired methods:
extension AppDelegate: AWSCognitoIdentityInteractiveAuthenticationDelegate {

    // This method is called when we need to log into the application.
    // It will grab the view controller from the storyboard and present it.
    func startPasswordAuthentication() -> AWSCognitoIdentityPasswordAuthentication {
        if(self.navigationController == nil) {
            self.navigationController = self.window?.rootViewController as? UINavigationController
        }

        if(self.loginViewController == nil) {
            self.loginViewController = self.storyboard?.instantiateViewController(withIdentifier: "LoginViewController") as? LoginViewController
        }

        DispatchQueue.main.async {
            if(self.loginViewController!.isViewLoaded || self.loginViewController!.view.window == nil) {
                self.navigationController?.present(self.loginViewController!, animated: true, completion: nil)
            }
        }

        return self.loginViewController!
    }

    // This method is called when we need to reset a password.
    // It will grab the view controller from the storyboard and present it.
    func startNewPasswordRequired() -> AWSCognitoIdentityNewPasswordRequired {
        if (self.resetPasswordViewController == nil) {
            self.resetPasswordViewController = self.storyboard?.instantiateViewController(withIdentifier: "ResetPasswordController") as? ResetPasswordViewController
        }

        DispatchQueue.main.async {
            if(self.resetPasswordViewController!.isViewLoaded || self.resetPasswordViewController!.view.window == nil) {
                self.navigationController?.present(self.resetPasswordViewController!, animated: true, completion: nil)
            }
        }

        return self.resetPasswordViewController!
    }

}
One key thing to note is that both of these methods return a view controller that implements a specific protocol. For example, the LoginViewController implements AWSCognitoIdentityPasswordAuthentication, which has a single method that gets called with the parameters needed to enable the user to complete the log-in process.
Authentication Flow
With all of these pieces in place in the demo application, you can now see the log-in process work from beginning to end. The main view of the application shows the username and the first name and last name of the user. To make this happen, the following steps occur:
- In the
AppViewController, we call thefetchUserAttributesmethod in theviewDidLoadmethod. If the user isn’t logged in, this will trigger the log-in process. - The
startPasswordAuthenticationmethod in theAppDelegatewill be triggered. This method loads theLoginViewControllerand presents it. - The
getDetailsmethod ofLoginViewControlleris called by the AWS SDK. This includes an object that is an instance ofAWSTaskCompletionSource, which we can use to allow the user to attempt to log in. - When the user presses the “Log in” button, we pass the log-in credentials to that object. This will then call the
didCompleteStepWithErrormethod, and we can handle the result accordingly. If there is no error, we can dismiss the view controller. - If we created the user in the console, we will have another step to handle here. Because we gave the user a temporary password, they will need to set a more permanent one. In addition, because we set the given name and family name as required parameters, we need to allow the user to enter those, too. The AWS SDK will detect this and call the
startNewPasswordRequiredmethod in theAppDelegate. This will present theResetPasswordViewControllerand set its instance ofAWSTaskCompletionSource. - The
ResetPasswordViewControllerworks almost identically to theLoginViewController. We simply need to ask the user for the correct values and then submit those values. Once this process is completed successfully, we dismiss the view controller. - Once the entire log-in process has completed, the SDK will securely store the tokens returned by Cognito. Then, we will finally retrieve the user details, and we can use those to populate the
AppViewControllerwith the user’s username, given name and family name.
Conclusion
While the user pool set-up process might have several steps, those steps are easy to navigate. In addition, the amount of configuration possible should give you confidence that it can support a majority of use cases. In my day job at Universal Mind, I’ve worked with several clients who are moving their existing applications over to leverage the capabilities that Cognito provides for user management.
Regardless of whether you need to implement a user management system regularly, this is a tool that every mobile and web developer should have in their toolbox. In the next article in this series, we will begin to explore the capabilities of Cognito a bit more by implementing a more full-featured demo application that implements more of the common user management use cases.
With a bit of practice, you can go and impress all of your friends by setting up a new application that satisfies all of these user management use cases within a day. That’s pretty good for a day’s work.
Links And Resources
- Amazon Cognito
- “Developer Resources,” Amazon Cognito
- AWS Mobile SDK
- “CocoaPods Tutorial for Swift: Getting Started,” Joshua Greene, raywenderlich.com
Further Reading
- How To Design Error States For Mobile Apps
- High-Impact, Minimal-Effort Cross-Browser Testing
- Automating Art Direction With The Responsive Image Breakpoints Generator
- When 24/7/365 Fails: Turning Off Work On Weekends


