Creating Secure Password Resets With JSON Web Tokens

Email Newsletter
Weekly tips on front-end & UX.
Trusted by 182,000+ folks.
 Celebrating 10 million developers

 Custom Web Forms for Angular, React, & Vue. Your backend.

When a user of your application has forgotten their password, it can and should be reset securely. To accomplish a secure password reset, I will demonstrate how to use JSON Web Tokens (JWT) to generate a URL-safe token. The JWT contains encoded information about the user and a signature that, when decoded, is validated to ensure that the token has not been tampered with.
Once the JWT is validated, your application can securely allow the user to generate a new password, instead of sending them their forgotten one.
“Why Can’t I Just Send The User Their Password?”
There was a time when your password was stored in your favorite website’s database just as you typed it. In fact, it still seems to occur far too often. An entire website is dedicated to telling people whether their email address or username has been exposed.
In those days (and I use the past tense loosely), when a user forgot their password, they would arrive on a page that asked for their username or email address. The website would then send them an email “reminding” them of their password. This should be a red flag to you, as both a user of the website and as a developer. Either your password is stored in plain text or it can be decrypted, instead of having the much stronger, more secure one-way encryption.
Because (secure) passwords cannot be decrypted, that leaves us with one of two common choices when a user forgets their password:
- Generate a new, temporary password and send it via email.
- Generate an email that contains a one-time-use link within the contents of the email, which will take the user to a page where they can enter a new secure password.
Both options send out an email, which in the long term should not be considered a secure storage medium. With the first option, the password is shown in plain text. If the user were to leave this email in their inbox as their method of remembering their password (especially because they didn’t choose it), it would be almost as insecure as writing down their password on a sticky note and leaving it beside their computer. OK, not that bad, but you get the idea.
Another concern with option one is that a malicious user who knows their email address could easily lock out a user from the website by resetting their password. If the malicious user repeated this over and over again, it would make it almost impossible for the user to ever log in again because their password would never remain the same.
Password-Reset Process Overview
The goal of this tutorial isn’t to learn how to secure your users’ passwords in your database; you’ve already done that! This tutorial will show you how to reset the password of a user who has forgotten theirs by generating a special link that enables them to securely reset their password. The link will look similar to the following example:
https://localhost:3000/resetpassword/1/eyJ0eXAiOiJKV1QiLCJhbGciOiJIUzI1NiJ9.eyJ1c2VySWQiOjF9.uKe3CzH_g6oHxlFstQ1BL_Q8_zJKPyJ0dUvZkJsRKBg
Contained within this link is a special JWT that is used to securely validate the user who is trying to reset their password.
By the end of this tutorial, I will have walked you through creating an application that contains the following functionality:
- We’ll have a form that accepts the email address of a user who has forgotten their password.
- We’ll create a link with a JWT token embedded in the URL. The user will click this link and be allowed to reset their password.
- We’ll create a page for resetting the password. This page will require the token and will decode it to ensure it is valid.
- When the token has been successfully validated, a form will be displayed allowing the user to reset their password.
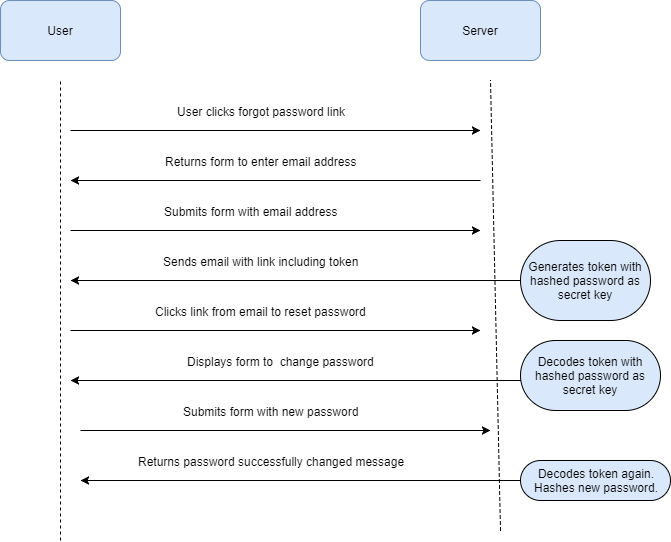
The following is an application diagram that demonstrates what the user does and how the server processes and responds to each action initiated by the user.
I mentioned earlier that email should not be considered secure for long-term storage. To help prevent this issue with option two, the link contained in the email is to be used once. Once the user has clicked the link and changed their password, if they (or a malicious person) were to click the link again, it would not be valid and the user would be unable to change their password. The user would, thus, be forced through option two again: generating a new email with a new one-time-use link.
This solution also prevents the secondary negative side effect of option one. If a malicious user were to attempt to constantly reset the user’s password, the original password would be unaffected and the user would never be locked out.
Before creating the application, let’s better understand what JWTs are and learn how to create, encode and decode them.
What Are JSON Web Tokens?
A JSON Web Token (JWT), in its simplest form, is a URL-safe string that contains an encoded JSON object. JWTs are an open industry standard that are fully described in RFC 7519, which contains an immense amount of detail, specifically regarding how JWT claims function to ensure the security of a generated token. Feel free to peruse the full RFC specifications at your leisure.
Let’s look at an example token:
eyJ0eXAiOiJKV1QiLCJhbGciOiJIUzI1NiJ9.eyJ1c2VySWQiOjF9.uKe3CzH_g6oHxlFstQ1BL_Q8_zJKPyJ0dUvZkJsRKBg
Notice that the token contains two periods (.) separating the three pieces of the outputted token, those three pieces being the following:
- header
The header contains information that identifies what the hashing algorithm is, so that it can be used to properly decrypt and validate the signature. - payload
This contains the information you wish to send with your JWT. Note that the payload is not secure and can be decoded without a secret key. JWTs are not meant to send sensitive information, such as passwords or credit card numbers. - signature
The signature combines the encoded header and the payload with a secret key and securely encodes it using the hashing algorithm defined in the header — for example, HMAC with SHA-256.
To summarize, each time you generate a token:
- the header will remain constant (assuming you do not change the hashing algorithm);
- the payload will remain constant when the payload to encode is the same;
- the signature will encrypt these two pieces of information based on the hashing algorithm with a secret key. This means that if you do not generate a unique secret key or change the payload, then the signature will also remain the same.
Encoding And Decoding JWTs
We are going to create a new application to demonstrate the basics of encoding and decoding tokens. Once we have a solid understanding of JWTs, we are going to recreate the application and I’ll demonstrate how to securely reset a user’s password.
To begin, please ensure you have Node.js installed. If you do not have it installed, I suggest visiting the download page and selecting the appropriate installer for you.
Our new application will be named “passwordreset.” In a command prompt, I ran the following commands to create a basic application. Ensure that you start in the current working directory of where you wish to host your Node.js application.
mkdir passwordreset
cd passwordreset
npm init
The npm init process asks a lot of questions to help you customize your final package.json file. In my case, I have left everything as their defaults.
Creating Our First JWT
To make generating JWTs easy, we are going to use an existing npm package named JWT Simple, which will obfuscate a lot of the complexities of encrypting and decrypting a token.
To install the package, in your command prompt where your application resides, enter the following command:
npm install jwt-simple --save
In this first code example, I have created a new index.js file, which creates a JavaScript object that I encrypted into a JWT:
var jwt = require('jwt-simple');

var payload = { userId: 1 };
var secret = 'fe1a1915a379f3be5394b64d14794932';
var token = jwt.encode(payload, secret);

console.log(token);
Let’s look at what is happening. The application begins by including the JWT Simple module. We then create a payload object. This object is what we will be encoding inside the token. We have created an object that contains a single property, named userId. I’ve used a hardcoded value of 1.
A token needs to be encrypted (and decrypted) with a secret key. I’ve generated a random string that will be used each time (in this sample application).
With the prerequisites set, we are finally able to create our token. This is done by calling the encode function from the JWT Simple module. This function accepts our payload and the secret key. The result of this function is our URL-friendly token, which contains our encoded header, payload and signature. The final line outputs our token to the console.
Running our application will output the following:
node index.js

eyJ0eXAiOiJKV1QiLCJhbGciOiJIUzI1NiJ9.eyJ1c2VySWQiOjF9.uKe3CzH_g6oHxlFstQ1BL_Q8_zJKPyJ0dUvZkJsRKBg
As you might have observed, this is the same token from earlier that I broke apart and whose three parts I described (header, payload and signature). Let’s now update our index.js file to decode the token and log it to the console:
var decode = jwt.decode(token, secret);

console.log(decode);
Now, when we run the application, we receive the following output:
node index.js

eyJ0eXAiOiJKV1QiLCJhbGciOiJIUzI1NiJ9.eyJ1c2VySWQiOjF9.uKe3CzH_g6oHxlFstQ1BL_Q8_zJKPyJ0dUvZkJsRKBg

{ userId: 1 }
Yep, our token was successfully decoded and contains our userId property, with the correct value of 1!
If the token was tampered with and any of the three parts were not able to be decoded and decrypted, then the JWT Simple module would throw exceptions.
Resetting The User’s Password
Let’s put our JWT knowledge to good use and create the final application, allowing the user to reset their password. To focus on the one-time-use password-reset link, we will not implement a database or an email. Nevertheless, our application will contain the following functionality, with several comments about where the application could be enhanced to integrate those features:
- The application will display a form that accepts the user’s email address.
- It will handle the form’s
POSTwith the user’s email address. - This will create a link, with a JWT token embedded in the URL. The user will click this link and be allowed to reset their password.
- The application will create a password-reset page. This page will require the token and will decode it to ensure it is valid.
- If successful, a form will be displayed allowing the user to reset their password.
- The application will handle the form’s
POSTwith the user’s new password. - This page will also decode and validate the token before saving the new password.
It’s now time to create the application to reset the user’s password, leveraging JWTs to validate the user throughout the process.
To handle the HTTP communication, we are going to use the Express module. We will also be using the BodyParser module to parse the content from our form’s POSTs.
These can be installed by running the following commands in your project’s working directory:
npm install express --save
npm install body-parser --save
We will be pseudo-coding the spots where we would be leveraging a database and sending emails, in order to keep this article focused on how JWTs are used throughout the password-reset process. I am going to repurpose my previously created index.js file for the final application.
The following code examples will all be subsets of my full index.js file, allowing me to incrementally demonstrate the process that I am building.
The first thing we need to do is include the required modules and create a web server that allows the user to reset their password:
const express = require('express');
const bodyParser = require('body-parser');
const jwt = require('jwt-simple');
const app = express();

app.use(bodyParser.urlencoded({ extended: false }));

app.listen(3000, function () {
    console.log('Node started on port 3000!')
});
The first three lines include the modules required to serve the web pages, parse our forms and encode and decode our JWTs.
The next set of lines set up Express to listen on port 3000 for HTTP requests, and they initialize the BodyParser module to decode standard form data.
With our web server set up, the next set of code will display a form that asks the user for their email address. This will begin the password-reset process:
app.get('/forgotpassword', function (req, res) {
    res.send('<form action="/passwordreset" method="POST">' +
        '<input type="email" name="email" value="" placeholder="Enter your email address..." />' +
        '<input type="submit" value="Reset Password" />' +
    '</form>');
});
This page can be accessed via https://localhost:3000/forgotpassword. The form it creates will POST to passwordreset with the user’s email address. Our basic form looks as follows. Once the user has entered their email address and submitted the form, our application needs to handle it:
app.post('/passwordreset', function (req, res) {
    if (req.body.email !== undefined) {
        var emailAddress = req.body.email;

        // TODO: Using email, find user from your database.
        var payload = {
            id: 1,        // User ID from database
            email: emailAddress
        };

        // TODO: Make this a one-time-use token by using the user's
        // current password hash from the database, and combine it
        // with the user's created date to make a very unique secret key!
        // For example:
        // var secret = user.password + ‘-' + user.created.getTime();
        var secret = 'fe1a1915a379f3be5394b64d14794932-1506868106675';

        var token = jwt.encode(payload, secret);

        // TODO: Send email containing link to reset password.
        // In our case, will just return a link to click.
        res.send('<a href="/resetpassword/' + payload.id + '/' + token + '">Reset password</a>');
    } else {
        res.send('Email address is missing.');
    }
});
Quite a bit is going on here, so let’s break it down:
- We ensure that the
POST’s body contains theemailproperty. If it doesn’t, then a basic error message is returned to the user. - Store the email from the
POST’s body in a local variable,emailAddress. - Now our first pseudo-code occurs. I’ve placed a
TODOmessage that says you should search your user database for a valid user with the email address supplied. - Next, we generate the payload for the token. My payload consists of the user’s ID and email address.
- To make this token a one-time-use token, I encourage you to use the user’s current password hash in conjunction with the user’s created date (in ticks) as the secret key to generate the JWT. This helps to ensure that if the user’s password was the target of a previous attack (on an unrelated website), then the user’s created date will make the secret key unique from the potentially leaked password.
- With the combination of the user’s password hash and created date, the JWT will become a one-time-use token, because once the user has changed their password, it will generate a new password hash invalidating the secret key that references the old password.
- Because we don’t have a database, we are simply using a static string.
- The token is then generated using our payload and secret key.
- The final bit of pseudo-code occurs, to send the password-reset link to the user’s email address in an email.
- To continue focusing on how tokens are being used, let’s return the link to the browser. This can be clicked to finish the password-reset process. This link would be the same link that the user clicks in the email they received.
In all cases where you send an email to the user, the response should indicate that an email has been sent to the user and instruct them to click the link in the email.
When the user receives the email, they will click the link that takes them to the password-reset page. This page accepts the user’s ID and token as URL parameters (which were set in the link generated in the previous code example). The following code will handle this page. Upon successful decoding and validation of the token, a form is displayed allowing the user to set their new password:
app.get('/resetpassword/:id/:token', function(req, res) {
    // TODO: Fetch user from database using
    // req.params.id
    // TODO: Decrypt one-time-use token using the user's
    // current password hash from the database and combine it
    // with the user's created date to make a very unique secret key!
    // For example,
    // var secret = user.password + ‘-' + user.created.getTime();
    var secret = 'fe1a1915a379f3be5394b64d14794932-1506868106675';
    var payload = jwt.decode(req.params.token, secret);

    // TODO: Gracefully handle decoding issues.
    // Create form to reset password.
    res.send('<form action="/resetpassword" method="POST">' +
        '<input type="hidden" name="id" value="' + payload.id + '" />' +
        '<input type="hidden" name="token" value="' + req.params.token + '" />' +
        '<input type="password" name="password" value="" placeholder="Enter your new password..." />' +
        '<input type="submit" value="Reset Password" />' +
    '</form>');
});
Similar pseudo-code from the previous example has been included in this example to help secure the application:
- Using the ID from the URL parameters, we fetch and validate that the user exists in our database.
- We decode the token from the URL parameters. To ensure it is a one-time-use token, I encouraged you in the previous example to encode it with the user’s current password hash in combination with the user’s created date (represented in ticks); thus, it should be decoded with that same hash.
- This is how it becomes a one-time-use token. Once the user has successfully changed their password, if they attempt to use the same token again, the token would not decode properly because the password hash would be different for that user.
- It would be a good idea to gracefully handle any errors that occur while decoding the token.
- Finally, a new form is returned that places the ID and token as hidden form fields and that includes a form field to accept the new password.
This is an example of our basic form for the user to reset their password.
The final part now is to handle the form’s POST with the user’s new password:
app.post('/resetpassword', function(req, res) {
    // TODO: Fetch user from database using
    // req.body.id
    // TODO: Decrypt one-time-use token using the user's
    // current password hash from the database and combining it
    // with the user's created date to make a very unique secret key!
    // For example,
    // var secret = user.password + ‘-' + user.created.getTime();
    var secret = 'fe1a1915a379f3be5394b64d14794932-1506868106675';

    var payload = jwt.decode(req.body.token, secret);

    // TODO: Gracefully handle decoding issues.
    // TODO: Hash password from
    // req.body.password
    res.send('Your password has been successfully changed.');
});
The first part of this code is nearly identical to the previous example where the pseudo-code fetches the user and decodes the token with their current password hash, and the user’s created date is converted to ticks.
Notice the minor change in accessing the user’s ID and token. In the previous example, we used req.params. In this example, we are using req.body. The difference is that the first example was a GET request with the variables in the URL. This example is a POST request in which the variables are in the form.
The final TODO is for you to hash the user’s new password once the token has been validated.
This completes our sample application, which uses a single JWT to allow the user to change their password if they have forgotten it.
Additional Password-Reset Security Measures
Our application focuses specifically on securing the password-reset form by generating and validating a special link embedded with a JWT.
This is just the tip of the iceberg to ensure that the entire password process is more secure. Below is a list of several other enhancements that could further secure your website:
- Limit the number of password-reset attempts to prevent a malicious user from giving your end user a negative experience of flooding their inbox with password-reset emails.
- Always indicate success when the user enters their email address in the forgotten-password page.
- Ensure that your website uses HTTPS to prevent any plain-text communication between the user and server when they are entering or resetting their password.
- Ensure that the user’s new password is secure and is not the same as their last password.
- Implement a CAPTCHA — the “Are you a human?” test — on both the forgotten-password and password-reset pages. Some websites even implement the CAPTCHA test on the log-in screen.
- Implement forgotten-password security questions, where the user must answer a security question (that they’ve previously created) before an email is ever sent to reset their password.
“How Else Can I Use JWTs?”
By now, I’ll bet you are addicted to creating and consuming JWTs! Now you want to use them more. Here are a few examples of how else I have used them:
- Single sign-on
A friendly third-party website would generate a JWT with information that your website would require to authenticate the user in your application. You and the friendly website would privately share the secret key used to encode and decode the token. - Information exchange
Similar to single sign-on, you or the friendly website would generate a token with a privately shared secret key that contains the information you wish to send or receive. Be sure not to share sensitive data! - Tokens required for the “OAuth dance”
Note that, because a generated JWT is a string, it can be decoded by a server other than the one that generated it. For example, you might generate a token with your Node.js server, and I could consume it with my PHP application as long as we use the same secret key and hashing algorithm!
Conclusion
Almost every day, we hear about a new security leak. And, let’s be honest, locks only keep out honest people. This means that, as developers, we need to try harder to make better locks. A JWT provides a URL-safe token that, when generated securely, makes for a more secure password-reset process by ensuring that a malicious user cannot easily generate their own token.
This article focused on the password-reset process by securing the password-reset flow with a URL-safe token that is validated with a signature. If you haven’t already done so, I suggest enhancing your processes further by reviewing the additional password-reset security measures and adding the ones that work for you.
If you have any further security processes, be sure to leave a comment below to help your fellow developers ensure that their password policies are more secure.
Further Reading
- A Guide To Test-Driven Development Using Node.js
- Building And Dockerizing A Node.js App With Stateless Architecture With Help From Kinsta
- json-api-normalizer: An Easy Way To Integrate The JSON API And Redux
- Passkeys: A No-Frills Explainer On The Future Of Password-Less Authentication


