Now You See Me: How To Defer, Lazy-Load And Act With IntersectionObserver

Email Newsletter
Weekly tips on front-end & UX.
Trusted by 182,000+ folks.

 Custom Web Forms for Angular, React, & Vue. Your backend.

 Celebrating 10 million developers
Once upon a time, there lived a web developer who successfully convinced his customers that sites should not look the same in all browsers, cared about accessibility, and was an early adopter of CSS grids. But deep down in his heart it was performance that was his true passion: He constantly optimized, minified, monitored, and even employed psychological tricks in his projects.
Then, one day, he learned about lazy-loading images and other assets that are not immediately visible to users and are not essential for rendering meaningful content on the screen. It was the beginning of the dawn: The developer entered the evil world of lazy-loading jQuery plugins (or maybe the not-so-evil world of async and defer attributes). Some even say that he got straight into the core of all the evils: the world of scroll event listeners. We’ll never know for sure where he ended up, but then again this developer is absolutely fictitious, and any similarity to any developer is merely coincidental.

Well, you can now say that Pandora’s box has been opened and that our fictitious developer doesn’t make the issue any less real. Nowadays, prioritizing the above-the-fold content became utterly important for the performance of our web projects from both speed and page weight points of view.
In this article, we are going to go out of the scroll darkness and talk about the modern way of lazy-loading resources. Not just lazy-loading images, but loading any asset for that matter. More so, the technique we are going to talk about today is capable of much more than just lazy-loading assets: We will be able to provide any type of deferred functionality based on the elements’ visibility to users.

Ladies and gentlemen, let’s talk about the Intersection Observer API. But before we begin, let’s take a look at the modern tools’ landscape that led us to IntersectionObserver.
2017 was a very good year for tools built into our browsers, helping us to improve the quality as well as the style of our code-base without too much effort. These days, the web seems to be moving away from sporadic solutions based on very different to solving very typical to a more well-defined approach of Observer interfaces (or just “Observers”): Well-supported MutationObserver got new family members that were quickly adopted in modern browsers:
- IntersectionObserver and
- PerformanceObserver (as part of Performance Timeline Level 2 specification).
One more potential family member, FetchObserver, is a work in progress and guides us more into the lands of a network proxy, but today I would like to talk more about front-end instead.

PerformanceObserver and IntersectionObserver aim at helping front-end developers improve the performance of their projects at different points. The former gives us the tool for the Real User Monitoring, while the latter is the tool, providing us with tangible performance improvement. As mentioned before, this article will take a detailed look exactly at the latter one: IntersectionObserver. In order to understand the mechanics of IntersectionObserver in particular, we should take a look at how a generic Observer is supposed to work in the modern web.
Pro Tip: You can skip the theory and dive into the mechanics of IntersectionObserver right away or, even further, straight to the possible applications of IntersectionObserver.
Observer Vs. Event
An “Observer,” as the name implies, is intended to observe something that happens in the context of a page. Observers can watch something happening on a page, like DOM changes. They can also watch for page’s lifecycle events. Observers can also run some callback functions. Now attentive reader might immediately spot the issue here and ask, “So, what is the point? Don’t we have events for this purpose already? What makes Observers different?” Very good point! Let’s take a closer look and sort it out.
The crucial difference between regular Event and Observer is that by default, the former reacts synchronously for every occurrence of the Event, affecting the main thread’s responsiveness, while the latter should react asynchronously without affecting performance that much. At least, this is true for the currently presented Observers: All of them behave asynchronously, and I don’t think this will change in the future.
This leads to the main difference in handling the callbacks of Observers that might confuse the beginners: Observers’ async nature might result in several observables being passed to a callback function at the same time. Because of this, the callback function should expect not a single entry but an Array of entries (even though sometimes the Array will contain only one entry in it).
Moreover, some Observers (in particular the one we are talking about today) provide a very handy pre-computed properties, which otherwise, we used to calculate ourselves using expensive (from performance standpoint) methods and properties when using regular events. To clarify this point, we will get to an example a bit later in the article.
So if it’s hard for somebody to step aside from the Event paradigm, I would say that Observers are events on steroids. Another description would be: Observers are a new level of approximation on top of the events. But no matter which definition you prefer, it should come without saying that Observers are not intended to replace events (at least not yet); there are enough use cases for both, and they can happily live side-by-side.

Generic Observer’s Structure
The generic structure of an Observer (any of those available at the time of writing) looks similar to this:
/**
* Typical Observer's registration
*/
let observer = new YOUR-TYPE-OF-OBSERVER(function (entries) {
  // entries: Array of observed elements
  entries.forEach(entry => {
      // Here we can do something with each particular entry
  });
});

// Now we should tell our Observer what to observe
observer.observe(WHAT-TO-OBSERVE);
Again, note that entries is an Array of values, not a single entry.
This is the generic structure: Implementations of particular Observers differ in the arguments being passed into it’s observe() and the arguments passed into its callback. For example MutationObserver should also get a configuration object to know more about what changes in the DOM to observe. PerformanceObserver doesn’t observe nodes in DOM, but instead has the dedicated set of entry types it can observe.
Here, let’s finish the “generic” part of this discussion and dive deeper into the topic of today’s article — IntersectionObserver.
Deconstructing IntersectionObserver
First of all, let’s sort out what IntersectionObserver is.
"The Intersection Observer API provides a way to asynchronously observe changes in the intersection of a target element with an ancestor element or with a top-level document's viewport."
Simply put, IntersectionObserver asynchronously observes overlapping of one element by another element. Let’s talk about what those elements are for in IntersectionObserver.
IntersectionObserver Initialization
In one of the previous paragraphs, we have seen the structure of a generic Observer. IntersectionObserver extends this structure a bit. First of all, this type of Observer requires a configuration with three main elements:
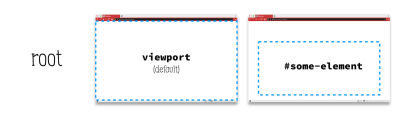
root: This is the root element used for the observation. It defines the basic “capturing frame” for observable elements. By default, therootis the viewport of your browser but can really be any element in your DOM (then you setrootto something likedocument.getElementById('your-element')). Keep in mind though that the elements you want to observe must “live” inroot’s DOM tree in this case.
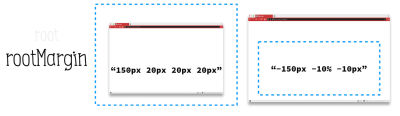
root property defines the base for 'capturing frame' for our elements.rootMargin: Defines margin around yourrootelement that extends or shrinks the “capturing frame” when yourroot’s dimensions do not provide enough flexibility. The options for this configuration’s values are similar to those ofmarginin CSS, such asrootMargin: '50px 20px 10px 40px'(top, right bottom, left). The values can be shorthanded (likerootMargin: '50px') and can be expressed in eitherpxor%. By default,rootMargin: '0px'.
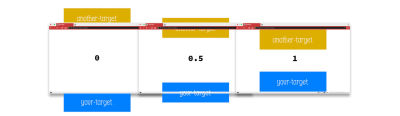
rootMargin property expands/contracts the 'capturing frame' which is defined by root.threshold: It’s not always wanted to react instantly when an observed element intersects a border of the “capturing frame” (defined as a combination ofrootandrootMargin).thresholddefines the percentage of such intersection at which Observer should react. It can be defined as a single value or as an array of values. To better understandthreshold’s effect (I know it might be confusing sometimes), here are some examples:threshold: 0: The default valueIntersectionObservershould react when the very first or very last pixel of an observed element intersects one of the borders of the “capturing frame.” Keep in mind thatIntersectionObserveris direction-agnostic, meaning that it will react in both scenarios: a) when the element enters and b) when it leaves the “capturing frame.”threshold: 0.5: Observer should be fired when 50% of an observed element intersects the “capturing frame”;threshold: [0, 0.2, 0.5, 1]: Observer should react in 4 cases:- The very first pixel of an observed element enters the “capturing frame”: the element is still not really within that frame, or the very last pixel of the observed element leaves the “capturing frame”: the element is no longer within the frame;
- 20% of the element is within the “capturing frame” (again, direction doesn’t matter for
IntersectionObserver); - 50% of the element is within the “capturing frame”;
- 100% of the element is within the “capturing frame.” This is strictly opposite to
threshold: 0.
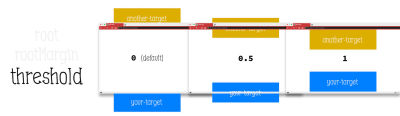
threshold property defines by how much the element should intersect our 'capturing frame' before the Observer gets fired.In order to inform our IntersectionObserver of our desired configuration, we simply pass our config object into our Observer’s constructor along with our callback function like this:
const config = {
  root: null, // avoiding 'root' or setting it to 'null' sets it to default value: viewport
  rootMargin: '0px',
  threshold: 0.5
};
let observer = new IntersectionObserver(function(entries) {
    …
}, config);
Now, we should give IntersectionObserver the actual element to observe. This is done simply by passing the element to observe() function:
…
const img = document.getElementById('image-to-observe');
observer.observe(image);
A couple of things to note about this observed element:
- It has been mentioned previously, but is worth being mentioned again: In case you set
rootas an element in the DOM, the observed element should be located within the DOM tree ofroot. IntersectionObservercan accept only one element for observation at a time and doesn’t support batch supply for observations. This means if you need to observe several elements (let’s say several images on a page), you have to iterate over all of them and observe each of them separately:
…
const images = document.querySelectorAll('img');
images.forEach(image => {
    observer.observe(image);
});
- When loading a page with Observer in place, you might notice that the
IntersectionObserver’s callback has been fired for all observed elements at once. Even those that do not match the supplied configuration. “Well… not really what I expected,” is the usual thought when experiencing this for the first time. But don’t get confused here: this doesn’t necessarily mean that those observed elements somehow intersect the “capturing frame” while the page is loading.
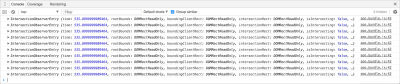
IntersectionObserver will be fired for all observed elements once they are registered, but it doesn't mean that they all intersect our 'capturing frame'.What it means though, is that the entry for this element became initialized and is now controlled by your IntersectionObserver. This might add unnecessary noise to your callback function though, and it becomes your responsibility to detect which elements do indeed intersect the “capturing frame” and which we still don’t need to account for. To understand how to do that detection, let’s get a bit deeper into the anatomy of our callback function and take a look at what such entries consist of.
IntersectionObserver Callback
First of all, the callback function for an IntersectionObserver takes two arguments, and we will talk about these in reversed order starting with the second argument. Along with the aforementioned Array of observed entries, intersecting our “capturing frame,” the callback function gets the Observer itself as the second argument.
Reference To Observer Itself
new IntersectionObserver(function(entries, SELF) {…});
Getting the reference to the Observer itself is useful in a lot of scenarios when you want to stop observing some element after it has been detected by the IntersectionObserver for the first time. Scenarios like lazy loading of the images, deferred fetch of other assets, etc. are of this kind. When you want to stop observing an element, IntersectionObserver provides a unobserve(element-to-stop-observing) method that can be run in the callback function after performing some actions on the observed element (like actual lazy loading of an image, for example).
Some of these scenarios will be reviewed further in the article, but with this second argument out of our way, let’s get to the main actors of this callback play.
IntersectionObserverEntry
new IntersectionObserver(function(ENTRIES, self) {…});
The entries we are getting in our callback function as an Array are of the special type: IntersectionObserverEntry. This interface provides us with a pre-defined and pre-calculated set of properties concerning each particular observed element. Let’s take a look at the most interesting ones.
First of all, entries of IntersectionObserverEntry type come with information about three different rectangles — defining coordinates and boundaries of the elements involved in the process:
rootBounds: A rectangle for the “capturing frame” (root+rootMargin);boundingClientRect: A rectangle for the observed element itself;intersectionRect: An area of the “capturing frame” intersected by the observed element.
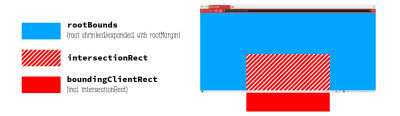
The really cool thing about these rectangles being calculated for us asynchronously is that it gives us important information related to element’s positioning without us calling getBoundingClientRect(), offsetTop, offsetLeft and other expensive positioning properties and methods triggering layout thrashing. Pure win for performance!
Another property of IntersectionObserverEntry interface that is interesting for us is isIntersecting. This is a convenience property indicating whether the observed element is currently intersecting the “capturing frame” or not. We could, of course, get this information by looking at the intersectionRect (if this rectangle is not 0×0, the element is intersecting the “capturing frame”) but having this pre-calculated for us is quite convenient.
isIntersecting can be used to find out whether the observed element is just entering the “capturing frame” or is already leaving it. To find this out, save the value of this property as a global flag and when the new entry for this element arrives to your callback function, compare it’s new isIntersecting with that global flag:
- If it was
falseand now it’strue, then the element is entering the “capturing frame”; - If it’s the opposite and it’s
falsenow while it wastruebefore, then the element is leaving the “capturing frame.”
isIntersecting is exactly the property that helps us solve the problem we discussed earlier, i.e., separate entries for the elements that really intersect the “capturing frame” from the noise of those being just the entry’s initialization.
let isLeaving = false;
let observer = new IntersectionObserver(function(entries) {
  entries.forEach(entry => {
    if (entry.isIntersecting) {
      // we are ENTERING the "capturing frame". Set the flag.
      isLeaving = true;
          // Do something with entering entry
    } else if (isLeaving) {
      // we are EXITING the "capturing frame"
      isLeaving = false;
      // Do something with exiting entry
    }
  });
}, config);
NOTE: In Microsoft Edge 15, isIntersecting property was not implemented, returning undefined despite full support for IntersectionObserver otherwise. This has been fixed in July 2017 though and is available since Edge 16.
IntersectionObserverEntry interface provides one more pre-calculated convenience property: intersectionRatio. This parameter can be used for the same purposes as isIntersecting but provides more granular control due to it being a floating point number instead of boolean value. The value of intersectionRatio indicates how much of the observed element’s area is intersecting the “capturing frame” (the ratio of intersectionRect area to boundingClientRect area). Again, we could make this calculation ourselves using information from those rectangles, but it’s good to have it done for us.
intersectionRatio property is similar to threshold property of Observer's config. The difference is that the latter defines *when* to fire up Observer, the former indicates real intersection's situation (that is slightly different from threshold due to asynchronous nature of Observer).target is one more property of the IntersectionObserverEntry interface that you might need to get to quite often. But there is absolutely no magic here – it’s just the original element that had been passed to observe() function of your Observer. Just like event.target you’ve got used to when working with events.
To get the full list of properties for the IntersectionObserverEntry interface do check the specification.
Possible Applications
I realize that you most probably came to this article exactly because of this chapter: who cares about mechanics when we have code snippets for copy and paste after all? So won’t bother you with more discussion now: we’re getting into the land of code and examples. I hope that the comments included within the code will make things more clear.
Deferred Functionality
First of all, let’s review an example revealing the basic principles underlying the idea of IntersectionObserver.
Let’s say you have an element that has to do a lot of computations once it’s on the screen. For example, your ad should register a view only when it has actually been shown to a user. But now, let’s imagine that you have an auto-played carousel element somewhere below the first screen on your page.

Running a carousel, in general, is a heavy task. Usually, it involves JavaScript timers, calculations to automatically scroll through the elements, etc. All of these tasks load the main thread, and when it’s done in auto-play mode, it’s hard for us to know when our main thread gets this hit. When we are talking about prioritizing content on our first screen and want to hit First Meaningful Paint and Time To Interactive as soon as possible, blocked main thread becomes a bottleneck for our performance.
To fix the issue, we might defer playback of such a carousel until it gets into the browser’s viewport. For this case, we will employ our knowledge and example for the isIntersecting parameter of the IntersectionObserverEntry interface.
const carousel = document.getElementById('carousel');
let isLeaving = false;
let observer = new IntersectionObserver(function(entries) {
  entries.forEach(entry => {
        if (entry.isIntersecting) {
          isLeaving = true;
          entry.target.startCarousel();
        } else if (isLeaving) {
          isLeaving = false;
          entry.target.stopCarousel();
        }
    });
}
observer.observe(carousel);
Here, we play the carousel only when it gets into our viewport. Notice the absence of config object passed to IntersectionObserver’s initialization: this means we rely on default configuration options. When the carousel gets out of our viewport, we should stop playing it to not spend resources on the not-important-anymore elements.
Lazy Loading Of Assets
This is, probably, the most obvious use-case for IntersectionObserver: we do not want to spend resources to download something that user doesn’t need right now. This will give a huge benefit to your users: users won’t need to download, and their mobile devices won’t need to parse and compile a lot of useless information that they do not need at the moment. Unsurprisingly at all, it will also help the performance of your app.

Previously, in order to defer downloading and processing resources until the moment user might get them on screen, we were dealing with event listeners on events like scroll. The problem is obvious: this triggered the listeners way too often. So we had to come up with the idea of throttling or debouncing the callback’s execution. But all of this added a lot of pressure on our main thread blocking it when we most needed it.
So, getting back to IntersectionObserver in a lazy-loading scenario, what should we keep an eye on? Let’s check a simple example of lazy-loading images.
See the Pen Lazy loading in IntersectionObserver by Denys Mishunov (@mishunov) on CodePen.
Try slowly scrolling that page to the “third screen” and watch the monitoring window in the top right corner: it will let you know how many images have been downloaded so far.
In the core of HTML markup for this task lays a simple sequence of images:
…
<img data-src="https://blah-blah.com/foo.jpg">
…
As you can see, the images should come without src tags: once a browser sees src attribute, it will start downloading that image right away that is opposite to our intentions. Hence we should not put that attribute on our images in HTML, and instead, we might rely on some data- attribute like data-src here.
Another part of this solution is, of course, JavaScript. Let’s focus on the main bits here:
const images = document.querySelectorAll('[data-src]');
const config = { … };

let observer = new IntersectionObserver(function (entries, self) {
  entries.forEach(entry => {
      if (entry.isIntersecting) { … }
  });
}, config);
images.forEach(image => { observer.observe(image); });
Structure-wise, there is nothing new here: we have covered all of this before:
- We get all messages with our
data-srcattributes; - Set
config: for this scenario you want to expand your “capturing frame” to detect elements a bit lower than the bottom of the viewport; - Register
IntersectionObserverwith that config; - Iterate over our images and add all of them to be observed by this
IntersectionObserver;
The interesting part happens within the callback function invoked on the entries. There three essential steps involved.
- First of all, we process only the items that are really intersecting our “capturing frame.” This snippet should be familiar to you by now.
entries.forEach(entry => {
  if (entry.isIntersecting) { … }
});
- Then, we somehow process the entry by converting our image with
data-srcinto a real<img src="…">.
if (entry.isIntersecting) {
  preloadImage(entry.target);
  …
}
This will trigger the browser to finally download the image. preloadImage() is a very simple function not worth being mentioned here. Just read the source.
- Next and final step: since lazy loading is a one-time action and we do not need to download the image every time the element gets into our “capturing frame,” we should
unobservethe already-processed image. The same way as we should do it withelement.removeEventListener()for our regular events when those are not needed anymore to prevent memory leaks in our code.
if (entry.isIntersecting) {
  preloadImage(entry.target);
  // Observer has been passed as `self` to our callback
  self.unobserve(entry.target);
}
Note. Instead of unobserve(event.target) we could also call disconnect(): it completely disconnects our IntersectionObserver and would not observe images anymore. This is useful if the only thing you care about is the first ever hit for your Observer. In our case, we need the Observer to keep monitoring the images, so we shouldn’t disconnect just yet.
Feel free to fork the example and play with different settings and options. There is one interesting thing to mention though when you want to lazy load the images in particular. You should always keep the box, generated by the observed element in mind! If you check the example, you will notice that the CSS for images on lines 41–47 contains supposedly redundant styles, incl. min-height: 100px. This is done to give the image placeholders (<img> without src attribute) some vertical dimension. What for?
- Without vertical dimensions, all
<img>tags would generate 0×0 box; - Since
<img>tag generates some sort ofinline-blockbox by default, all of those 0×0 boxes would be aligned side-by-side on the same line; - This means that your
IntersectionObserverwould register all (or, depending on how fast you scroll, almost all of) the images at once — probably not quite what you want to achieve.
Current Section’s Highlighting
IntersectionObserver is much more than just lazy loading, of course. Here is another example of replacing scroll event with this technology. In this one we have a pretty common scenario: on the fixed navigation bar we should highlight current section based on the scrolling position of the document.
See the Pen Highlighting current section in IntersectionObserver by Denys Mishunov (@mishunov) on CodePen.
Structurally, it’s similar to the example for lazy-loading images and has the same base structure with the following exceptions:
- Now we want to observe not images, but the sections on the page;
- Obviously enough, we also have a different function to process the entries in our callback (
intersectionHandler(entry)). But this one is not interesting: all it does is toggling the CSS class.
What is interesting here is the config object though:
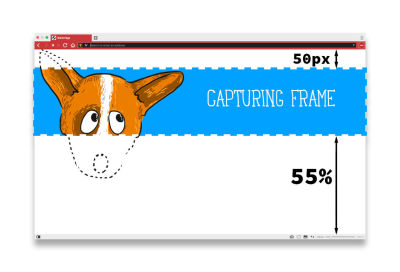
const config = { rootMargin: '-50px 0px -55% 0px' };
Why not the default value of 0px for rootMargin, you ask? Well, simply because highlighting the current section and lazy loading an image are quite different in what we try to achieve. With lazy loading, we want to start loading before the image gets into the view. Hence for that purpose, we extended our “capturing frame” by 50px at the bottom. On the contrary, when we want to highlight the current section, we have to be sure that the section is actually visible on the screen. And not only that: we have to be sure that user is, actually, reading or going to read exactly this section. Hence, we want a section to go a bit more than half the viewport from the bottom before we could declare it the active section. Also, we want to account for the height of the navigation bar, and so we remove the bar’s height from the “capturing frame.”
Also, note that in case of highlighting the current navigation item, we do not want to stop observing anything. Here we should always keep IntersectionObserver in charge, hence you will find neither disconnect() nor unobserve() here.
Summary
IntersectionObserver is a very straight-forward technology. It has a pretty good support in the modern browsers and if you want to implement it for browsers that still (or won’t at all) support it, of course, there is a polyfill for that. But all in all, this is a great technology that allows us to do all sorts of things related to detecting elements in a viewport while helping to achieve a really good performance boost.
Why Is IntersectionObserver Good For You?
IntersectionObserveris an async non-blocking API!IntersectionObserverreplaces our expensive listeners onscrollorresizeevents.IntersectionObserverdoes all the expensive calculations likegetClientBoundingRect()for you so that you don’t need to.IntersectionObserverfollows the structural pattern of other Observers out there so, theoretically, should be easy to understand if you’re familiar with how other Observers work.
Things To Keep In Mind
If we compare IntersectionObserver’s capabilities to the world of window.addEventListener('scroll') from where it all came, it will be hard to see any cons in this Observer. So, let’s just note some things to keep in mind instead:
- Yes,
IntersectionObserveris an async non-blocking API. This is great to know! But it is even more important to understand that the code you’re running in your callbacks will not be run asynchronously by default even though the API itself is async. So there is still a chance to eliminate all the benefits you get fromIntersectionObserverif your callback function’s calculations make the main thread unresponsive. But this is a different story. - If you’re using
IntersectionObserverfor lazy loading the assets (like images, for example), run.unobserve(asset)after the asset has been loaded. IntersectionObservercan detect intersections only for the elements that appear in the formatting structure of the document. To make it clear: the observable elements should generate a box and somehow affect the layout. Here are just some examples to give you a better understanding:- Elements with
display: noneare out of the question; opacity: 0orvisibility:hiddendo create the box (even though invisible) so these will be detected;- Absolutely positioned elements with
width:0px; height:0pxare fine. Though, it has to be noted that absolutely positioned elements fully positioned outside of parent’s borders (with negative margins or negativetop,left, etc.) and are cut out by parent’soverflow: hiddenwon’t be detected: their box is out of scope for the formatting structure.
- Elements with

I know it was a long article, but if you’re still around, here are some links for you to get an even better understanding and different perspectives on the Intersection Observer API:
- Intersection Observer API on MDN;
- IntersectionObserver polyfill;
- IntersectionObserver polyfill as
npmmodule; - Lazy-Loading Images with IntersectionObserver [video] by amazing Paul Lewis;
- Basic and short (just 01:39), but very informative introduction to IntersectionObserver [video] by Surma.
With this, I would like to make a pause in our discussion to give you an opportunity to play with this technology and realize all of its convenience. So, go play with it. The article is finally over. This time I really mean it.
Further Reading
- Generating Real-Time Audio Sentiment Analysis With AI
- SolidStart: A Different Breed Of Meta-Framework
- Web Development Is Getting Too Complex, And It May Be Our Fault
- Preparing For Interaction To Next Paint, A New Web Core Vital


