Adding Code-Splitting Capabilities To A WordPress Website Through PoP

Email Newsletter
Weekly tips on front-end & UX.
Trusted by 182,000+ folks.
 Celebrating 10 million developers

 Custom Web Forms for Angular, React, & Vue. Your backend.

Speed is among the top priorities for any website nowadays. One way to make a website load faster is by code-splitting: splitting an application into chunks that can be loaded on demand — loading only the required JavaScript that is needed and nothing else. Websites based on JavaScript frameworks can immediately implement code-splitting through Webpack, the popular JavaScript bundler. For WordPress websites, though, it is not so easy. First, Webpack was not intentionally built to work with WordPress, so setting it up will require quite some workaround; secondly, no tools seem to be available that provide native on-demand asset-loading capabilities for WordPress.
Given this lack of an appropriate solution for WordPress, I decided to implement my own version of code-splitting for PoP, an open-source framework for building WordPress websites that I created. A WordPress website with PoP installed will have code-splitting capabilities natively, so it will not need depend on Webpack or any other bundler. In this article, I will show you how it’s done, explaining what decisions were taken based on aspects of the framework’s architecture. In the end, I will analyze the performance of a website with and without code-splitting, and the benefits and downsides of using a custom implementation over an external bundler. I hope you enjoy the ride!
Defining The Strategy
Code-splitting can be broadly divided into these two steps:
- Calculating which assets must be loaded for every route,
- Dynamically loading those assets on demand.
To tackle the first step, we will need to produce an asset-dependency map, including all of the assets in our application. Assets must be added recursively to this map — dependencies of dependencies must also be added, until no further asset is needed. We can then calculate all of the dependendencies required for a specific route by traversing the asset-dependency map, starting from the route's entry point (i.e. the file or piece of code from which it starts execution) all the way down to the last level.
To tackle the second step, we could calculate which assets are needed for the requested URL on the server-side, and then either send the list of needed assets in the response, upon which the application would need to load them, or directly HTTP/2 push the resources alongside the response.
These solutions, however, are not optimal. In the first case, the application must request all assets after the response is returned, so there would be an additional series of round-trip requests to fetch the assets, and the view could not be generated before all of them have loaded, resulting in the user having to wait (this problem is eased by having all assets precached through service workers, so waiting time is reduced, but we can't avoid the parsing of the assets that happens only after the response is back). In the second case, we might push the same assets repeatedly (unless we add some extra logic, such as to indicate which resources we have already loaded through cookies, but this indeed adds undesired complexity and blocks the response from being cached), and we cannot serve the assets from a CDN.
Because of this, I decided to have this logic handled on the client-side. A list of which assets are needed for each route is made available to the application on the client, so that it already knows which assets are needed for the requested URL. This addresses the problems stated above:
- Assets can be loaded immediately, not having to wait for the server's response. (When we couple that with service workers, we can be pretty sure that, by the time the response is back, all resources will have been loaded and parsed, so there is no additional waiting time.)
- The application knows which assets have already loaded; hence, it won’t request all assets required for that route, but only those assets that have not loaded yet.
The negative aspect to delivering this list to the front end is that it might get heavy, depending on the size of the website (such as how many routes it makes available). We need to find a way to load it without increasing the application's perceived loading time. More on this later.
Having made these decisions, we can proceed to design and then implement code-splitting in the application. To ease understanding, the process has been divided into the following steps:
- Understanding the architecture of the application,
- Mapping asset-dependencies,
- Listing all application routes,
- Generating a list that defines which assets are required for each route,
- Dynamically loading assets,
- Applying optimizations.
Let's get right into it!
0. Understanding The Architecture Of The Application
We will need to map the relationship of all assets to each other. Let’s go over the particularities of PoP's architecture in order to design the most suitable solution to achieve this goal.
PoP is a layer that wraps around WordPress, enabling us to use WordPress as the CMS that powers the application, yet providing a custom JavaScript framework to render content on the client-side to build dynamic websites. It redefines the building components of the web page: whereas WordPress is currently based on the concept of hierarchical templates that produce HTML (such as single.php, home.php and archive.php), PoP is based on the concept of “modules,” which are either an atomic functionality or a composition of other modules. Building a PoP application is akin to playing with LEGO — stacking modules on top of each other or wrapping each other, ultimately creating a more complex structure. It could also be thought of as an implementation of Brad Frost's atomic design, and it looks like this:

Modules can be grouped into higher-order entities, namely: blocks, blockGroups, pageSections and topLevels. These entities are modules, too, just with additional properties and responsibilities, and they contain each other following a strictly top-down architecture in which each module can see and change the properties of all its inner modules. The relationship between modules is like this:
- 1 topLevel contains N pageSections,
- 1 pageSection contains N blocks or blockGroups,
- 1 blockGroup contains N blocks or blockGroups,
- 1 block contains N modules,
- 1 module contains N modules, ad infinitum.
Executing JavaScript Code In PoP
PoP dynamically creates HTML by, starting at the pageSection level, iterating through all of the modules down the line, rendering each of them through the module's predefined Handlebars template and, finally, adding the module's corresponding newly created elements into the DOM. Once this is done, it executes JavaScript functions on them, which are predefined on a module-by-module basis.
PoP differs from JavaScript frameworks (such as React and AngularJS) in that the flow of the application does not originate on the client, but it is still configured in the back end, inside the module's configuration (which is coded in a PHP object). Influenced by WordPress action hooks, PoP implements a publish–subscribe pattern:
- Each module defines which JavaScript functions must be executed on its corresponding newly created DOM elements, not necessarily knowing in advance what will execute this code or where it will come from.
- JavaScript objects must register which JavaScript functions they implement.
- Finally, on runtime, PoP calculates which JavaScript objects must execute which JavaScript functions, and invokes them appropriately.
For instance, through its corresponding PHP object, a calendar module indicates that it needs the calendar function to be executed on its DOM elements like this:
class CalendarModule {
function get_jsmethods() {
$methods = parent::get_jsmethods();
$this->add_jsmethod($methods, 'calendar');
return $methods;
}
...
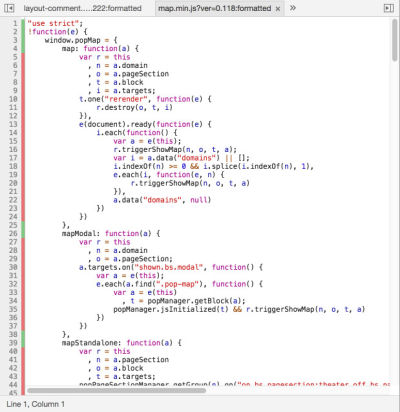
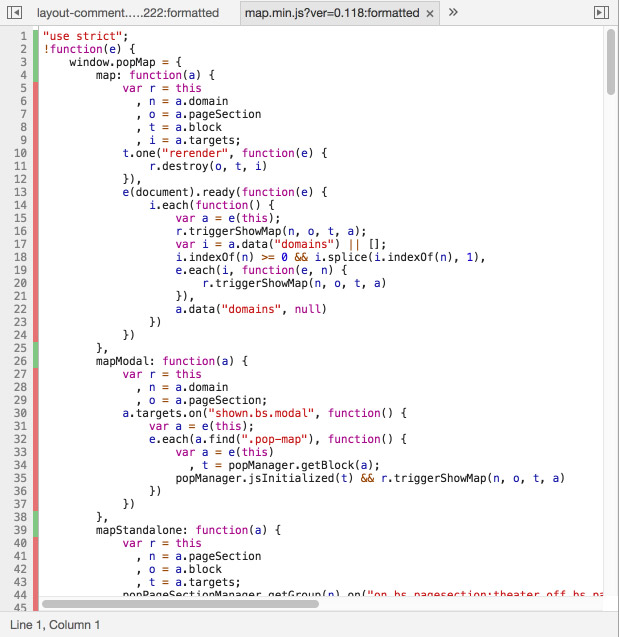
}Then, a JavaScript object — in this case, popFullCalendar — announces that it’s implemented the calendar function. This is done by calling popJSLibraryManager.register:
window.popFullCalendar = {

  calendar : function(elements) {

    ...
  }
};
popJSLibraryManager.register(popFullCalendar, ['calendar', ...]);
Finally, popJSLibraryManager does the matching on what executes what code. It allows JavaScript objects to register which functions they implement, and provides a method to execute a particular function from all subscribed JavaScript objects:
window.popJSLibraryManager = {

  libraries: [],
  methods: {},

  register : function(library, methods) {

    this.libraries.push(library);
    for (var i = 0; i < methods.length; i++) {

      var method = methods[i];
      this.methods[method] = this.methods[method] || [];
      this.methods[method].push(library);
    }
  },

  execute : function(method, elements) {

    var libraries = this.methods[method] || [];
    for (var i = 0; i < libraries.length; i++) {

      var library = libraries[i];
      library[method](elements);
    }
  }
}
After a new calendar element is added to the DOM, which has an ID of calendar-293, PoP will simply execute the following function:
popJSLibraryManager.execute("calendar", document.getElementById("calendar-293"));Entry Point
For PoP, the entry point to executing JavaScript code is this line at the end of the HTML output:
<script type="text/javascript">popManager.init();</script>popManager.init() first initializes the front-end framework, and then it executes the JavaScript functions defined by all rendered modules, as explained above. Below is a very simplied form of this function. By invoking popJSLibraryManager.execute('pageSectionInitialized', pageSection) and popJSLibraryManager.execute('documentInitialized'), all JavaScript objects that implement those functions (pageSectionInitialized and documentInitialized) will execute them.
(function($){
window.popManager = {

  // The configuration for all the modules (including pageSections and blocks) in the application
  configuration : {...},

  init : function() {

    var that = this;
    $.each(this.configuration, function(pageSectionId, configuration) {

      // Obtain the pageSection element in the DOM from the ID
      var pageSection = $('#'+pageSectionId);

      // Run all required JavaScript methods on it
      this.runJSMethods(pageSection, configuration);

      // Trigger an event marking the block as initialized
      popJSLibraryManager.execute('pageSectionInitialized', pageSection);
    });

    // Trigger an event marking the document as initialized
    popJSLibraryManager.execute('documentInitialized');
  },

  ...
};
})(jQuery);
The runJSMethods function executes the JavaScript methods defined for each and every module, starting from the pageSection, which is the top-most module, and then down the line for all of its inner blocks and their inner modules:
(function($){
window.popManager = {

  ...

  runJSMethods : function(pageSection, configuration) {

    // Initialize the heap with "modules", starting from the top one, and recursively iterate over its inner modules
    var heap = [pageSection.data('module')], i;
    while (heap.length > 0) {

      // Get the first element of the heap
      var module = heap.pop();

      // The configuration for that module contains which JavaScript methods to execute, and which are the module's inner modules
      var moduleConfiguration = configuration[module];

      // The list of all JavaScript functions that must be executed on the module's newly created DOM elements
      var jsMethods = moduleConfiguration['js-methods'];

      // Get all of the elements added to the DOM for that module, which have been stored in JavaScript object `popJSRuntimeManager` upon creation
      var elements = popJSRuntimeManager.getDOMElements(module);

      // Iterate through all of the JavaScript methods and execute them, passing the elements as argument
      for (i = 0; i < jsMethods.length; i++) {
        popJSLibraryManager.execute(jsMethods[i], elements);
      }

      // Finally, add the inner-modules to the heap
      heap = heap.concat(moduleConfiguration['inner-modules']);
    }
  },
};
})(jQuery);
In summary, JavaScript execution in PoP is loosely coupled: Instead of having hard-fixed dependencies, we execute JavaScript functions through hooks that any JavaScript object can subscribe to.
Web Pages And APIs
A PoP website is a self-consumed API. In PoP, there is no distinction between a web page and API: Each URL returns the web page by default, and by just adding the parameter output=json, it returns its API instead (for example, getpop.org/en/ is a web page, and getpop.org/en/?output=json is its API). The API is used for dynamically rendering content in PoP; so, when clicking on a link to another page, the API is what gets requested, because by then the frame of the website will have loaded (such as the top and side navigation) — then the set of resources needed for the API mode will be a subset of that from the web page. We will need to take this into account when calculating the dependencies for a route: Loading the route when first loading the website or loading it dynamically by clicking on some link will produce different sets of required assets.
These are the most important aspects of PoP that will define the design and implementation of code-splitting. Let's proceed with the next step.
1. Mapping Asset-Dependencies
We could add a configuration file for each JavaScript file, detailing their explicit dependencies. However, this would duplicate code and would be difficult to keep consistent. A cleaner solution would be to keep the JavaScript files as the only source of truth, extracting the code from within them and then analyzing this code to recreate the dependencies.
The meta data we are looking for in the JavaScript source files, to be able to recreate the mapping, is the following:
- internal method calls, such as
this.runJSMethods(...); - external method calls, such as
popJSRuntimeManager.getDOMElements(...); - all occurrences of
popJSLibraryManager.execute(...), which executes a JavaScript function in all of those objects that implement it; - all occurrences of
popJSLibraryManager.register(...), to obtain which JavaScript objects implement which JavaScript methods.
We will use jParser and jTokenizer to tokenize our JavaScript source files in PHP and extract the meta data, as follows:
- Internal method calls (such as
this.runJSMethods) are deduced when finding the following sequence: either tokenthisorthat+.+ some other token, which is the name for the internal method (runJSMethods). - External method calls (such as
popJSRuntimeManager.getDOMElements) are deduced when finding the following sequence: a token included in the list of all JavaScript objects in our application (we will need this list in advance; in this case, it will contain objectpopJSRuntimeManager) +.+ some other token, which is the name for the external method (getDOMElements). - Whenever we find
popJSLibraryManager.execute("someFunctionName")we deduce Javascript method to besomeFunctionName. - Whenever we find
popJSLibraryManager.register(someJSObject, ["someFunctionName1", "someFunctionName2"])we deduce Javascript objectsomeJSObjectto implement methodssomeFunctionName1,someFunctionName2.
I have implemented the script but will not describe it here. (It's too long doesn't add much value, but it can be found in PoP’s repository). The script, which runs upon requesting an internal page on the website's development server (the methodology of which I have written about in a previous article on service workers), will generate the mapping file and store it on the server. I have prepared an example of the generated mapping file. It is a simple JSON file, containing the following attributes:
internalMethodCalls
For each JavaScript object, list the dependencies from internal functions among themselves.externalMethodCalls
For each JavaScript object, list the dependencies from internal functions to functions from other JavaScript objects.publicMethods
List all of the registered methods and, for each method, which JavaScript objects implement it.methodExecutions
For each JavaScript object and each internal function, list all of the methods executed throughpopJSLibraryManager.execute('someMethodName').
Please note that the result is not an asset-dependency map yet, but rather a JavaScript object-dependency map. From this map, we can establish, whenever a function from some object is executed, what other objects will also be required. We still need to configure which JavaScript objects are contained in each asset, for all assets (in the jTokenizer script, JavaScript objects are the tokens we are looking for to identify the external method calls, so this information is an input to the script and can't be obtained from the source files themselves). This is done through ResourceLoaderProcessor PHP objects, like resourceloader-processor.php.
Finally, by combining the map and the configuration, we will be able to calculate all of the required assets for every route in the application.
2. Listing All Application Routes
We need to identify all of the routes available in our application. For a WordPress website, this list will start with the URL from each of the template hierarchies. The ones implemented for PoP are these:
- home page: https://getpop.org/en/
- author: https://getpop.org/en/u/leo/
- single: https://getpop.org/en/blog/new-feature-code-splitting/
- tag: https://getpop.org/en/tags/internet/
- page: https://getpop.org/en/philosophy/
- category: https://getpop.org/en/blog/ (the category is actually implemented as a page, to remove
category/from the URL path) - 404: https://getpop.org/en/this-page-does-not-exist/
For each of these hierarchies, we must obtain all of the routes that produce a unique configuration (i.e. which will require a unique set of assets). In the case of PoP, we have the following:
- home page and 404 are unique.
- Tag pages always have the same configuration for any tag. Thus, a single URL for any tag will suffice.
- Single post depends on the combination of the post type (such as “event” or “post”) and the main category of the post (such as “blog” or “article”). Then, we need a URL for each of these combinations.
- A category page's configuration depends on the category. So, we’ll need the URL of every post category.
- An author page depends on the role of the author (“individual”, “organization” or “community”). So, we’ll need URLs for three authors, each of them with one of these roles.
- Each page can have its own configuration (“log in,” “contact us,” “our mission,” etc.). So, all page URLs must be added to the list.
As we can see, the list is already quite long. In addition, our application may add parameters to the URL that change the configuration, potentially also changing which assets are required. PoP, for instance, offers to add the following URL parameters:
- tab (
?tab=…), to show a related piece of information: https://getpop.org/en/blog/new-feature-code-splitting/?tab=authors; - format (
?format=…), to change how the data is displayed: https://getpop.org/en/blog/?format=list; - target (
?target=…), to open the page in a different pageSection: https://getpop.org/en/add-post/?target=addons.
Some of the initial routes can have one, two or even three of the parameters above, creating a wide array of combinations:
- single post: https://getpop.org/en/blog/new-feature-code-splitting/
- single post's authors: https://getpop.org/en/blog/new-feature-code-splitting/?tab=authors
- single post's authors as a list: https://getpop.org/en/blog/new-feature-code-splitting/?tab=authors&format=list
- single post's authors as a list in a modal window: https://getpop.org/en/blog/new-feature-code-splitting/?tab=authors&format=list&target=modals
In summary, for PoP, all of the possible routes are a combination of the following items:
- all of the initial template hierarchy routes;
- all of the different values for which the hierarchy will produce a different configuration;
- all of the possible tabs for each hierarchy (different hierarchies may have different tab values: A single post can have the tabs “authors” and “responses,” while an author can have the tabs “posts” and “followers”);
- all of the possible formats for each tab (different tabs may be applied different formats: the “authors” tab may have the format “map,” but the “responses” tab may not);
- all of the possible targets indicating the pageSections where each route may be displayed (while a post can be created in the main section or in a floating window, the “Share with your friends” page may be set to open in a modal window).
Hence, for a slightly complex application, producing the list with all of the routes cannot be done manually. We must, then, create a script to extract this information from the database, manipulate it and, finally, output it in the format that is needed. This script will obtain all of the post categories, from which we can produce the list of all different category-page URLs, and then, for each category, query the database for any post under the same, which will produce the URL for a single post under every category, and so on. The full script is available, starting from function get_resources(), which exposes hooks to be implemented by each of the hierarchy cases.
3. Generating The List That Defines Which Assets Are Required For Each Route
By now, we have the asset-dependency map and the list of all of the routes in the application. It is now time to combine these two and produce a list that indicates, for each route, which assets are required.
To create this list, we apply the following procedure:
- Produce a list containing all of the JavaScript methods to be executed for every route:
Calculate the route's modules, then obtain the configuration for each module, then extract from the configuration which JavaScript functions the module needs to execute, and add them all together. - Next, traverse the asset-dependency map for each JavaScript function, gather the list of all its required dependencies, and add them all together.
- Finally, add the Handlebars templates needed to render each module inside that route.
In addition, as stated before, each URL has web page and API modes, so we need to run the procedure above twice, once for each mode (i.e. once adding parameter output=json to the URL, representing the route for the API mode, and once keeping the URL unchanged for web page mode). We will then produce two lists, which will have different uses:
- The web page mode list will be used when initially loading the website, so that the corresponding scripts for that route are included in the initial HTML response. This list will be stored on the server.
- The API mode list will be used when dynamically loading a page on the website. This list will be loaded on the client, to enable the application to calculate what extra assets must be loaded, on demand, when a link is clicked.
The bulk of the logic has been implemented starting from function add_resources_from_settingsprocessors($fetching_json, ...), (you can find it in the repository). The parameter $fetching_json differentiates between web page (false) and API (true) modes.
When the script for the web page mode is run, it will output resourceloader-bundle-mapping.json, which is a JSON object with the following properties:
bundle-ids
This is a collection of up to four resources (their names have been mangled for the production environment:eq=>handlebars,er=>handlebars-helpers, etc.), grouped under a bundle ID.bundlegroup-ids
This is a collection ofbundle-ids. Each bundleGroup represents a unique set of resources.key-ids
This is the mapping between routes (represented by their hash, which identifies the set of all attributes that make a route unique) and their corresponding bundleGroup.
As can be observed, the mapping between a route and its resources is not straight. Instead of mapping key-ids to a list of resources, it maps them to a unique bundleGroup, which is itself a list of bundles, and only each bundle is a list of resources (of up to four elements each bundle). Why was it done like this? This serves two purposes:
- It enables us to identify all resources under a unique bundleGroup. Thus, instead of including all resources in the HTML response, we are able to include a unique JavaScript asset, which is the corresponding bundleGroup file instead, which bundles within all of the corresponding resources. This is useful when serving devices that still do not support HTTP/2, and it will also boost loading time, because Gzip’ing a single bundled file is more effective than compressing its constituent files on their own and then adding them up together. Alternatively, we could also load a series of bundles instead of a unique bundleGroup, which is a compromise between resources and bundleGroups (loading bundles is slower than bundleGroups because of Gzip’ing, but it is more performant if invalidation happens often, so that we would download only the updated bundle and not the whole bundleGroup). The scripts for bundling all resources into bundles and bundleGroups are found in filegenerator-bundles.php and filegenerator-bundlegroups.php.
- Dividing the sets of resources into bundles allows us to identify common patterns (for example, identifying sets of four resources that are shared among many routes), consequently allowing different routes to link to the same bundle. As a result, the generated list will have a smaller size. This might not be of great use for the web page list, which lives on the server, but it is great for the API list, which will be loaded on the client, as we shall see later.
When the script for API mode is run, it will output the resources.js file, with the following properties:
bundlesandbundle-groupsserve the same purpose as stated for the web page modekeysalso serve the same purpose askey-idsfor web page mode. However, instead of having a hash as the key to represent the route, it is a concatenation of all those attributes that make a route unique — in our case, format (f), tab (t) and target (r).sourcesis the source file for each resource.typesis the CSS or JavaScript for each resource (even though, for simplicity’s sake, we have not covered in this article that JavaScript resources may also set CSS resources as dependencies, and modules may load their own CSS assets, implementing the progressive CSS loading strategy).resourcescaptures which bundleGroups must be loaded for each hierarchy.ordered-load-resourcescontains which resources must be loaded in order, to prevent scripts from being loaded before their depended-upon scripts (by default, they are async).
We will explore how to use this file in the next section.
4. Dynamically Loading The Assets
As stated, the API list will be loaded on the client, so that we can start loading the required assets for a route immediately after the user clicks on a link.
Loading The Mapping Script
The generated JavaScript file with the list of resources for all routes in the application is not light — in this case, it came out to 85 KB (which is itself optimized, having mangled the resource names and produced bundles to identify common patterns across routes). Parsing time should not be a big bottleneck, because parsing JSON is 10 times faster than parsing JavaScript for the same data. However, the size is a problem from network transfer, so we must load this script in a way that does not affect the application's perceived loading time or keep the user waiting.
The solution I’ve implemented is to precache this file using service workers, load it using defer so that it doesn't block the main thread while executing the critical JavaScript methods, and then show a fallback notification message if the user clicks on a link before the script has loaded: “The website is still loading, please wait a few moments to click on links.” This is accomplished by adding a fixed div with a class of loadingscreen placed on top of everything while the scripts are loading, then adding the notification message, with a class of notificationmsg, inside the div, and these few lines of CSS:
.loadingscreen > .notificationmsg {
  display: none;
}
.loadingscreen:focus > .notificationmsg,
.loadingscreen:active > .notificationmsg {
  display: block;
}
Another solution is to split up this file into several ones and load them progressively as needed. Moreover, the 85 KB file includes all possible routes in the application, including such routes as “the author's announcements, shown in thumbnails, displayed in the modals window,” which might be accessed once in a blue moon, if at all. The routes that are mostly accessed are barely a few (home page, single, author, tag and all of the pages, all of them without extra attributes), which should produce a much smaller file, in the neighborhood of 30 KB.
Obtaining The Route From The Requested URL
We must be able to identify the route from the requested URL. For instance:
https://getpop.org/en/u/leo/maps to the route “author”,https://getpop.org/en/u/leo/?tab=followersmaps to the route “author's followers”,https://getpop.org/en/tags/internet/maps to the route “tag”,https://getpop.org/en/tags/maps to the route “page/tags/”,- and so on.
To accomplish this, we will need to evaluate the URL, and deduce from it the elements that make a route unique: the hierarchy and all of the attributes (format, tab and target). Identifying the attributes is no problem, because those are parameters in the URL. The only challenge is to infer the hierarchy (home, author, single, page or tag) from the URL, by matching the URL to several patterns. For example,
- Anything starting with
https://getpop.org/en/u/is an author. - Anything starting with but is not exactly
https://getpop.org/en/tags/is a tag. If it is exactlyhttps://getpop.org/en/tags/, then it is a page. - And so on.
The function below, implemented starting from line 321 of resourceloader.js, must be fed with a configuration with the patterns for all of these hierarchies. It first checks whether there is no subpath in the URL — in which case, it is “home”. Then, it checks one by one to match the hierarchies for “author”, “tag” and “single”. If it doesn't succeed with any of those, then it is the default case, which is “page”:
window.popResourceLoader = {

  // The config will be populated externally, using a config.js file, generated by a script
  config : {},
  getPath : function(url) {

    var parser = document.createElement('a');
    parser.href = url;
    return parser.pathname;
  },
  getHierarchy : function(url) {

    var path = this.getPath(url);
    if (!path) {

      return 'home';
    }

    var config = this.config;
    if (path.startsWith(config.paths.author) && path != config.paths.author) {

      return 'author';
    }
    if (path.startsWith(config.paths.tag) && path != config.paths.tag) {

      return 'tag';
    }
    // We must also check that this path is, itself, not a potential page (https://getpop.org/en/posts/articles/ is "page", but https://getpop.org/en/posts/this-is-a-post/ is "single")
    if (config.paths.single.indexOf(path) === -1 && config.paths.single.some(function(single_path) { return path.startsWith(single_path) && path != single_path;})) {

      return 'single';
    }

    return 'page';
  },

  ...
};
Because all of the required data is already in the database (all of the categories, all of the page slugs, etc.), we will execute a script to create this configuration file automatically in a development or staging environment. The implemented script is resourceloader-config.php, which produces config.js with the URL patterns for the hierarchies “author”, “tag” and “single”, under the key “paths”:
popResourceLoader.config = {
    "paths": {
        "author": "u/",
        "tag": "tags/",
        "single": ["posts/articles/", "posts/announcements/", ...]
    },
    ...
};
Loading Resources For The Route
Once we have identified the route, we can obtain the required assets from the generated JavaScript file under the key “resources”, which looks like this:
config.resources = {
  "home": {
    "1": [1, 110, ...],
    "2": [2, 111, ...],
    ...
  },
  "author": {
    "7": [6, 114, ...],
    "8": [7, 114, ...],
    ...
  },
  "tag": {
    "119": [66, 127, ...],
    "120": [66, 127, ...],
    ...
  },
  "single": {
    "posts/": {
      "7": [190, 142, ...],
      "3": [190, 142, ...],
      ...
    },
    "events/": {
      "7": [213, 389, ...],
      "3": [213, 389, ...],
      ...
    },
    ...
  },
  "page": {
    "log-in/": {
      "3": [233, 115, ...]
    },
    "log-out/": {
      "3": [234, 115, ...]
    },
    "add-post/": {
      "3": [239, 398, ...]
    },
    "posts/": {
      "120": [268, 127, ...],
      "122": [268, 127, ...],
      ...
    },
    ...
  }
};
At the first level, we have the hierarchy (home, author, tag, single or page). Hierarchies are divided into two groups: those that have only one set of resources (home, author and tag), and those that have a specific subpath (page permalink for the pages, custom post type or category for the single). Finally, at the last level, for each key ID (which represents a unique combination of the possible values of “format”, “tab” and “target”, stored under “keys”), we have an array of two elements: [JS bundleGroup ID, CSS bundleGroup ID], plus additional bundleGroup IDs if executing progressive booting (JS bundleGroups to be loaded as "async" or "defer" are bundled separately; this will be explained in the optimizations section below).
Please note: For the single hierarchy, we have different configurations depending on the custom post type. This can be reflected in the subpath indicated above (for example, events and posts) because this information is in the URL (for example, https://getpop.org/en/posts/the-winners-of-climate-change-techno-fixes/ and https://getpop.org/en/events/debate-post-fork/), so that, when clicking on a link, we will know the corresponding post type and can thus infer the corresponding route. However, this is not the case with the author hierarchy. As indicated earlier, an author may have three different configurations, depending on the user role (individual, organization or community); however, in this file, we’ve defined only one configuration for the author hierarchy, not three. That is because we are not able to tell from the URL what is the role of the author: user leo (under https://getpop.org/en/u/leo/) is an individual, whereas user pop (under https://getpop.org/en/u/pop/) is a community; however, their URLs have the same pattern. If we could instead have the URLs https://getpop.org/en/u/individuals/leo/ and https://getpop.org/en/u/communities/pop/, then we could add a configuration for each user role. However, I’ve found no way to achieve this in WordPress. As a consequence, only for the API mode, we must merge the three routes (individuals, organizations and communities) into one, which will have all of the resources for the three cases; and clicking on the link for user leo will also load the resources for organizations and communities, even if we don't need them.
Finally, when a URL is requested, we obtain its route, from which we obtain the bundleGroup IDs (for both JavaScript and CSS assets). From each bundleGroup, we find the corresponding bundles under bundlegroups. Then, for each bundle, we obtain all resources under the key bundles. Finally, we identify which assets have not yet been loaded, and we load them by getting their source, which is stored under the key sources. The whole logic is coded starting from line 472 in resourceloader.js.
And with that, we have implemented code-splitting for our application! From now on, we can get better loading times by applying optimizations. Let's tackle that next.
5. Applying Optimizations
The objective is to load as little code as possible, as delayed as possible, and to cache as much of it as possible. Let's explore how to do this.
Splitting Up The Code Into Smaller Units
A single JavaScript asset may implement several functions (by calling popJSLibraryManager.register), yet maybe only one of those functions is actually needed by the route. Thus, it makes sense to split up the asset into several subassets, implementing a single function on each of them, and extracting all common code from all of the functions into yet another asset, depended upon by all of them.
For instance, in the past, there was a unique file, waypoints.js, that implemented the functions waypointsFetchMore, waypointsTheater and a few more. However, in most cases, only the function waypointsFetchMore was needed, so I was loading the code for the function waypointsTheater unnecessarily. Then, I split up waypoints.js into the following assets:
- waypoints.js, with all common code and implementing no public functions;
- waypoints-fetchmore.js, which implements just the public function
waypointsFetchMore; - waypoints-theater.js, which implements just the public function
waypointsTheater.
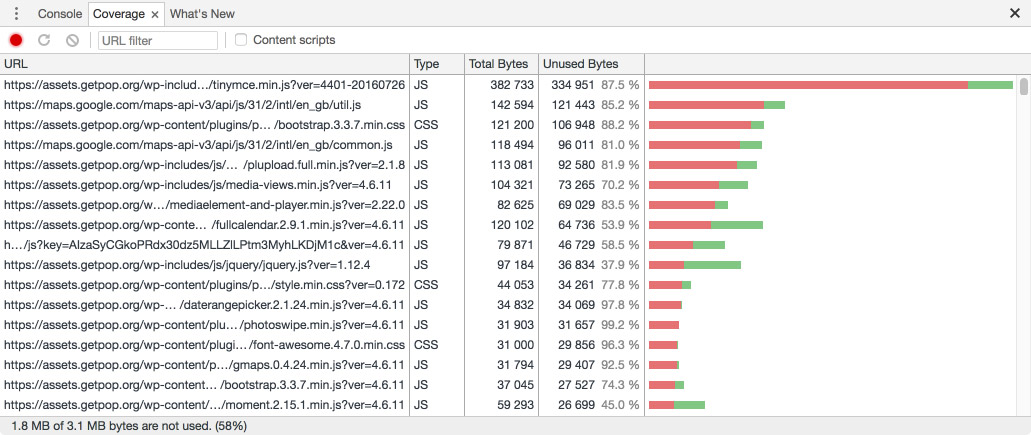
Evaluating how to split the files is a manual job. Luckily, there is a tool that greatly eases the task: Chrome Developer Tools’ “Coverage” tab, which displays in red those portions of JavaScript code that have not been invoked:

By using this tool, we can better understand how to split our JavaScript files into more granular units, thus reducing the amount of unneeded code that is loaded.
Integration With Service Workers
By precaching all of the resources using service workers, we can be pretty sure that, by the time the response is back from the server, all of the required assets will have been loaded and parsed. I wrote an article on Smashing Magazine on how to accomplish this.
Progressive Booting
PoP's architecture plays very nice with the concept of loading assets in different stages. When defining the JavaScript methods to execute on each module (by doing `$this->add_jsmethod($methods, 'calendar')`), these can be set as either critical or non-critical. By default, all methods are set as non-critical, and critical methods must be explicitly defined by the developer, by adding an extra parameter: `$this->add_jsmethod($methods, 'calendar', 'critical')`. Then, we will be able to load scripts immediately for critical functions, and wait until the page is loaded to load non-critical functions, the JavaScript files of which are loaded using defer.
(function($){
window.popManager = {

  init : function() {

    var that = this;
    $.each(this.configuration, function(pageSectionId, configuration) {

      ...
      this.runJSMethods(pageSection, configuration, 'critical');
      ...
    });

    window.addEventListener('load', function() {

      $.each(this.configuration, function(pageSectionId, configuration) {

        ...
        this.runJSMethods(pageSection, configuration, 'non-critical');
        ...
      });
    });

    ...
  },

  ...
};
})(jQuery);
The gains from progressive booting are major: The JavaScript engine needs not spend time parsing non-critical JavaScript initially, when a quick response to the user is most important, and overall reduces the time to interactive.
Testing And Analizying Performance Gains
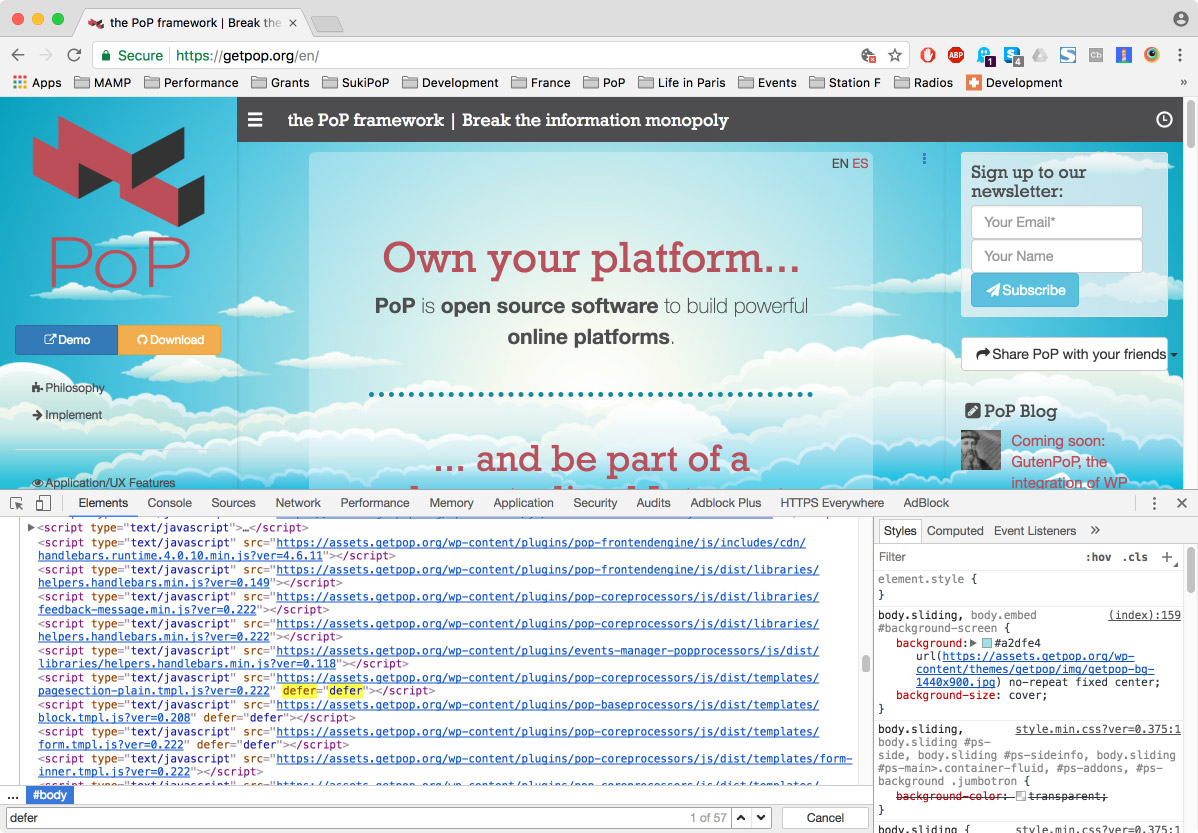
We can use https://getpop.org/en/, a PoP website, for testing purposes. When loading the home page, opening Chrome Developer Tools’ “Elements” tab and searching for “defer”, it shows 4 occurrences. Thanks to progressive booting, that is 4 bundleGroup JavaScript files containing the contents of 57 Javascript files with non-critical methods that could wait until the website finished loading to be loaded:

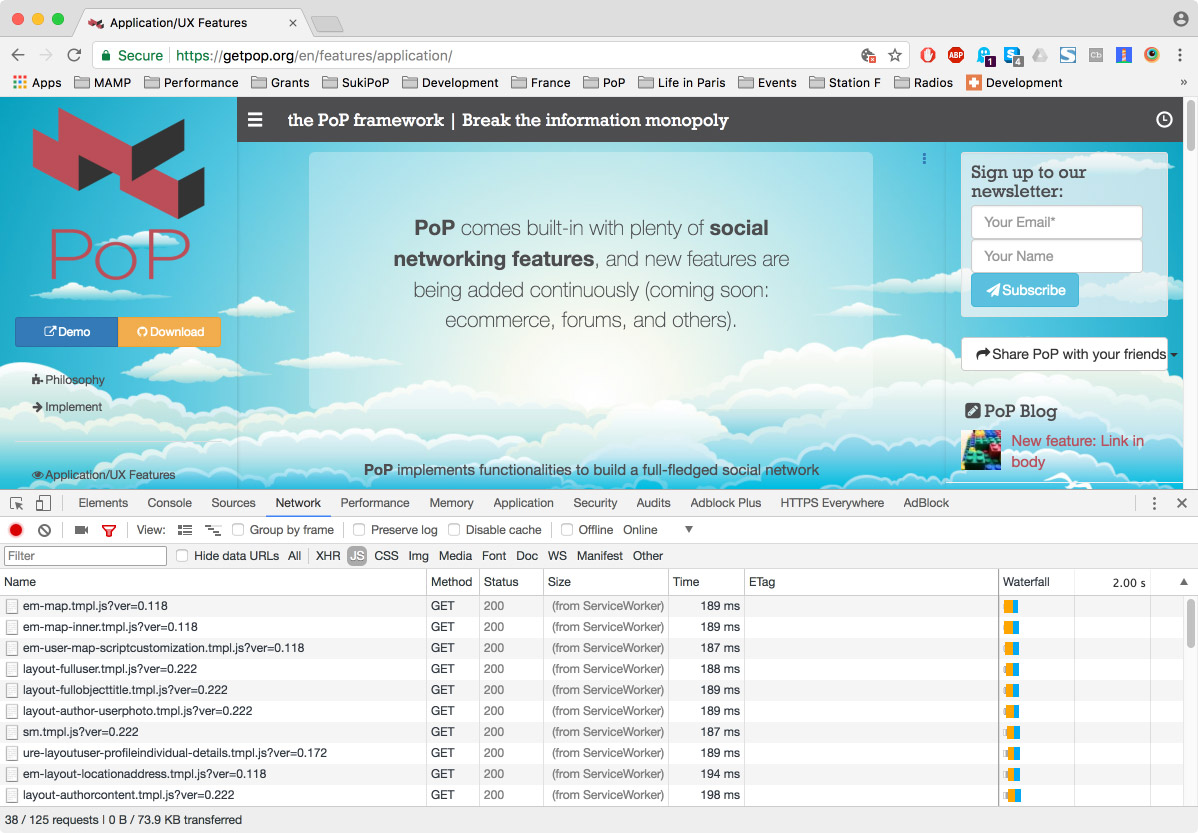
If we now switch to the “Network” tab and click on a link, we can see which assets get loaded. For instance, click on the link “Application/UX Features” on the left side. Filtering by JavaScript, we see it loaded 38 files, including JavaScript libraries and Handlebars templates. Filtering by CSS, we see it loaded 9 files. These 47 files have all been loaded on demand:
Let's check whether the loading time got boosted. We can use WebPagetest to measure the application with and without code-splitting, and calculate the difference.
- Without code-splitting: testing URL

- With code-splitting, loading resources: testing URL

- With code-splitting, loading a bundleGroup: testing URL

We can see that when loading the app bundle with all resources or when doing code-splitting and loading resources, there is not so much gain. However, when doing code-splitting and loading a bundleGroup, the gains are significant: 1.7 seconds in loading time, 500 milliseconds to the first meaningful paint, and 1 second to interactive.
Conclusion: Is It Worth It?
You might be thinking, Is it worth it all this trouble? Let's analyze the advantages and disadvantages of implementing our own code-splitting features.
Disadvantages
- We must maintain it.
If we just used Webpack, we could rely on its community to keep the software up to date and could benefit from its plugin ecosystem. - The scripts take time to run.
The PoP website Agenda Urbana has 304 different routes, from which it produces 422 sets of unique resources. For this website, running the script that generates the asset-dependency map, using a MacBook Pro from 2012, takes around 8 minutes, and running the script that generates the lists with all of the resources and creates the bundle and bundleGroup files takes 15 minutes. That is more than enough time to go for a coffee! - It requires a staging environment.
If we need to wait around 25 minutes to run the scripts, then we can't run it on production. We’d need to have a staging environment with exactly the same configuration as the production system. - Extra code is added to the website, just for management.
The 85 KB of code is not functional by itself, but simply code to manage other code. - Complexity is added.
This is unavoidable in any case if we want to split our assets into smaller units. Webpack would also add complexity to the application.
Advantages
- It works with WordPress.
Webpack does not work with WordPress out of the box, and to make it work needs quite some workaround. This solution does work out of the box for WordPress (as long as PoP is installed). - It’s scalable and extensible.
The application’s size and complexity can grow without bounds, because the JavaScript files are loaded on demand. - It supports Gutenberg (a.k.a. the WordPress of tomorrow).
Because it allows us to load JavaScript frameworks on demand, it will support Gutenberg's blocks (called Gutenblocks), which are expected to be coded in the framework chosen by the developer, with the potential result of different frameworks being needed for the same application. - It’s convenient.
The build tool takes care of generating the configuration files. Aside from waiting, no extra effort from us is needed. - It makes optimization easy.
Currently, if a WordPress plugin wants to selectively load JavaScript assets, it will use plenty of conditionals to check whether the page ID is the right one. With this tool, there is no need for that; the process is automatic. - The application will load more quickly.
This was the whole reason why we coded this tool. - It requires a staging environment.
A positive side effect is increased reliability: We won't run the scripts on production, so we will not break anything there; the deployment process will not fail from unexpected behavior; and the developer will be forced to test the application using the same configuration as in production. - It is customized to our application.
There is no overhead or workarounds. What we get is exactly what we need, based on the architecture we are working with.
In conclusion: yes, it is worth it, because now we are able to apply load assets on demand on our WordPress website and make it load faster.
Other Resources
- Webpack, including “”Code Splitting” guide
- “Better Webpack Builds” (video), K. Adam White
Integration of Webpack with WordPress - “Gutenberg and the WordPress of Tomorrow,” Morten Rand-Hendriksen, WP Tavern
- “WordPress Explores a JavaScript Framework-Agnostic Approach to Building Gutenberg Blocks,” Sarah Gooding, WP Tavern
Further Reading
- The Modern Way To Create And Host A WordPress Site
- WordPress Playground: From 5-Minute Install To Instant Spin-Up
- WordPress Full-Site Editing: A Deep Dive Into The New Feature
- Tree-Shaking: A Reference Guide


