Getting Started With The Web MIDI API

Email Newsletter
Weekly tips on front-end & UX.
Trusted by 182,000+ folks.
 Celebrating 10 million developers


 SurveyJS: White-Label Survey Solution for Your JS App
 Register Free Now
As the web continues to evolve and new browser technologies continue to emerge, the line between native and web development becomes more and more blurred. New APIs are unlocking the ability to code entirely new categories of software in the browser.
Until recently, the ability to interact with digital musical instruments has been limited to native, desktop applications. The Web MIDI API is here to change that.
In this article, we’ll cover the basics of MIDI and the Web MIDI API to see how simple it can be to create a web app that responds to musical input using JavaScript.
What Is MIDI?
MIDI has been around for a long time but has only recently made its debut in the browser. MIDI (Musical Instrument Digital Interface) is a technical standard that was first published in 1983 and created the means for digital instruments, synthesizers, computers, and various audio devices to communicate with each other. MIDI messages relay musical and time-based information back and forth between devices.
A typical MIDI setup might consist of a digital piano keyboard which can send messages relaying information such as pitch, velocity (how loudly or softly a note is played), vibrato, volume, panning, modulation, and more to a sound synthesizer which converts that into audible sound. The keyboard could also send its signals to desktop music scoring software or a digital audio workstation (DAW) which could then convert the signals into written notation, save them as a sound file, and more.
MIDI is a fairly versatile protocol, too. In addition to playing and recording music, it has become a standard protocol in stage and theater applications, as well, where it is often used to relay cue information or control lighting equipment.
MIDI In The Browser
The WebMIDI API brings all the utility of MIDI to the browser with some pretty simple JavaScript. We only need to learn about a few new methods and objects.
Introduction
First, there’s the navigator.requestMIDIAccess() method. It does exactly what it sounds like—it will request access to any MIDI devices (inputs or outputs) connected to your computer. You can confirm the browser supports the API by checking for the existence of this method.
if (navigator.requestMIDIAccess) {
    console.log('This browser supports WebMIDI!');
} else {
    console.log('WebMIDI is not supported in this browser.');
}
Second, there’s the MIDIAccess object which contains references to all available inputs (such as piano keyboards) and outputs (such as synthesizers). The requestMIDIAccess() method returns a promise, so we need to establish success and failure callbacks. And if the browser is successful in connecting to your MIDI devices, it will return a MIDIAccess object as an argument to the success callback.
navigator.requestMIDIAccess()
    .then(onMIDISuccess, onMIDIFailure);

function onMIDISuccess(midiAccess) {
    console.log(midiAccess);

    var inputs = midiAccess.inputs;
    var outputs = midiAccess.outputs;
}

function onMIDIFailure() {
    console.log('Could not access your MIDI devices.');
}
Third, MIDI messages are conveyed back and forth between inputs and outputs with a MIDIMessageEvent object. These messages contain information about the MIDI event such as pitch, velocity (how softly or loudly a note is played), timing, and more. We can start collecting these messages by adding simple callback functions (listeners) to our inputs and outputs.
Going Deeper
Let’s dig in. To send MIDI messages from our MIDI devices to the browser, we’ll start by adding an onmidimessage listener to each input. This callback will be triggered whenever a message is sent by the input device, such as the press of a key on the piano.
We can loop through our inputs and assign the listener like this:
function onMIDISuccess(midiAccess) {
    for (var input of midiAccess.inputs.values())
        input.onmidimessage = getMIDIMessage;
    }
}

function getMIDIMessage(midiMessage) {
    console.log(midiMessage);
}
The MIDIMessageEvent object we get back contains a lot of information, but what we’re most interested in is the data array. This array typically contains three values (e.g. [144, 72, 64]). The first value tells us what type of command was sent, the second is the note value, and the third is velocity. The command type could be either “note on,” “note off,” controller (such as pitch bend or piano pedal), or some other kind of system exclusive (“sysex”) event unique to that device/manufacturer.
For the purposes of this article, we’ll just focus on properly identifying “note on” and “note off” messages. Here are the basics:
- A command value of 144 signifies a “note on” event, and 128 typically signifies a “note off” event.
- Note values are on a range from 0–127, lowest to highest. For example, the lowest note on an 88-key piano has a value of 21, and the highest note is 108. A “middle C” is 60.
- Velocity values are also given on a range from 0–127 (softest to loudest). The softest possible “note on” velocity is 1.
- A velocity of 0 is sometimes used in conjunction with a command value of 144 (which typically represents “note on”) to indicate a “note off” message, so it’s helpful to check if the given velocity is 0 as an alternate way of interpreting a “note off” message.
Given this knowledge, we can expand our getMIDIMessage handler example above by intelligently parsing our MIDI messages coming from our inputs and passing them along to additional handler functions.
function getMIDIMessage(message) {
    var command = message.data[0];
    var note = message.data[1];
    var velocity = (message.data.length > 2) ? message.data[2] : 0; // a velocity value might not be included with a noteOff command

    switch (command) {
        case 144: // noteOn
            if (velocity > 0) {
                noteOn(note, velocity);
            } else {
                noteOff(note);
            }
            break;
        case 128: // noteOff
            noteOff(note);
            break;
        // we could easily expand this switch statement to cover other types of commands such as controllers or sysex
    }
}
Browser Compatibility And Polyfill
As of the writing of this article, the Web MIDI API is only available natively in Chrome, Opera, and Android WebView.
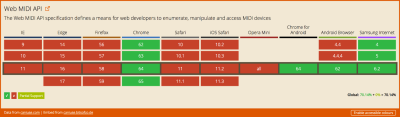
For all other browsers that don’t support it natively, Chris Wilson’s WebMIDIAPIShim library is a polyfill for the Web MIDI API, of which Chris is a co-author. Simply including the shim script on your page will enable everything we’ve covered so far.
<script src="WebMIDIAPI.min.js"></script>
<script>
if (navigator.requestMIDIAccess) { //... returns true
</script>
This shim also requires Jazz-Soft.net’s Jazz-Plugin to work, unfortunately, which means it’s an OK option for developers who want the flexibility to work in multiple browsers, but an extra barrier to mainstream adoption. Hopefully, within time, other browsers will adopt the Web MIDI API natively.
Making Our Job Easier With WebMIDI.js
We’ve only really scratched the surface of what’s possible with the WebMIDI API. Adding support for additional functionality besides basic “note on” and “note off” messages starts to get much more complex.
If you’re looking for a great JavaScript library to radically simplify your code, check out WebMidi.js by Jean-Philippe Côté on Github. This library does a great job of abstracting all the parsing of MIDIAccess and MIDIMessageEvent objects and lets you listen for specific events and add or remove listeners in a much simpler way.
WebMidi.enable(function () {

    // Viewing available inputs and outputs
    console.log(WebMidi.inputs);
    console.log(WebMidi.outputs);

    // Retrieve an input by name, id or index
    var input = WebMidi.getInputByName("My Awesome Keyboard");
    // OR...
    // input = WebMidi.getInputById("1809568182");
    // input = WebMidi.inputs[0];

    // Listen for a 'note on' message on all channels
    input.addListener('noteon', 'all',
        function (e) {
            console.log("Received 'noteon' message (" + e.note.name + e.note.octave + ").");
        }
    );

    // Listen to pitch bend message on channel 3
    input.addListener('pitchbend', 3,
        function (e) {
            console.log("Received 'pitchbend' message.", e);
        }
    );

    // Listen to control change message on all channels
    input.addListener('controlchange', "all",
        function (e) {
            console.log("Received 'controlchange' message.", e);
        }
    );

    // Remove all listeners for 'noteoff' on all channels
    input.removeListener('noteoff');

    // Remove all listeners on the input
    input.removeListener();

});
Real-World Scenario: Building A Breakout Room Controlled By A Piano Keyboard
A few months ago, my wife and I decided to build a “breakout room” experience in our house to entertain our friends and family. We wanted the game to include some kind of special effect to help elevate the experience. Unfortunately, neither of us have mad engineering skills, so building complex locks or special effects with magnets, lasers, or electrical wiring was outside the realm of our expertise. I do, however, know my way around the browser pretty well. And we have a digital piano.
Thus, an idea was born. We decided that the centerpiece of the game would be a series of passcode locks on a computer that players would have to “unlock” by playing certain note sequences on our piano, a la Willy Wonka.
Sound cool? Here’s how I did it.
Setup
We’ll begin by requesting WebMIDI access, identifying our keyboard, attaching the appropriate event listeners, and creating a few variables and functions to help us step through the various stages of the game.
// Variable which tell us what step of the game we're on.
// We'll use this later when we parse noteOn/Off messages
var currentStep = 0;

// Request MIDI access
if (navigator.requestMIDIAccess) {
    console.log('This browser supports WebMIDI!');

    navigator.requestMIDIAccess().then(onMIDISuccess, onMIDIFailure);

} else {
    console.log('WebMIDI is not supported in this browser.');
}

// Function to run when requestMIDIAccess is successful
function onMIDISuccess(midiAccess) {
    var inputs = midiAccess.inputs;
    var outputs = midiAccess.outputs;

    // Attach MIDI event "listeners" to each input
    for (var input of midiAccess.inputs.values()) {
        input.onmidimessage = getMIDIMessage;
    }
}

// Function to run when requestMIDIAccess fails
function onMIDIFailure() {
    console.log('Error: Could not access MIDI devices.');
}

// Function to parse the MIDI messages we receive
// For this app, we're only concerned with the actual note value,
// but we can parse for other information, as well
function getMIDIMessage(message) {
    var command = message.data[0];
    var note = message.data[1];
    var velocity = (message.data.length > 2) ? message.data[2] : 0; // a velocity value might not be included with a noteOff command

    switch (command) {
        case 144: // note on
            if (velocity > 0) {
                noteOn(note);
            } else {
                noteOff(note);
            }
            break;
        case 128: // note off
            noteOffCallback(note);
            break;
        // we could easily expand this switch statement to cover other types of commands such as controllers or sysex
    }
}

// Function to handle noteOn messages (ie. key is pressed)
// Think of this like an 'onkeydown' event
function noteOn(note) {
    //...
}

// Function to handle noteOff messages (ie. key is released)
// Think of this like an 'onkeyup' event
function noteOff(note) {
    //...
}

// This function will trigger certain animations and advance gameplay
// when certain criterion are identified by the noteOn/noteOff listeners
// For instance, a lock is unlocked, the timer expires, etc.
function runSequence(sequence) {
    //...
}
Step 1: Press Any Key To Begin
To kick off the game, let’s have the players press any key to begin. This is an easy first step which will clue them into how the game works and also start a countdown timer.
function noteOn(note) {
    switch(currentStep) {
        // If the game hasn't started yet.
        // The first noteOn message we get will run the first sequence
        case 0:
            // Run our start up sequence
            runSequence('gamestart');

            // Increment the currentStep so this is only triggered once
            currentStep++;

            break;
    }
}

function runSequence(sequence) {
    switch(sequence) {
        case 'gamestart':
            // Now we'll start a countdown timer...
            startTimer();

            // code to trigger animations, give a clue for the first lock
            break;
    }
}
Step 2: Play The Correct Note Sequence
For the first lock, the players must play a particular sequence of notes in the right order. I’ve actually seen this done in a real breakout room, only it was with an acoustic upright piano rigged to a lock box. Let’s re-create the effect with MIDI.
For every “note on” message received, we’ll append the numeric note value to an array and then check to see if that array matches a predefined array of note values.
We’ll assume some clues in the breakout room have told the players which notes to play. For this example, it will be the beginning of the tune to “Amazing Grace” in the key of F major. That note sequence would look like this.
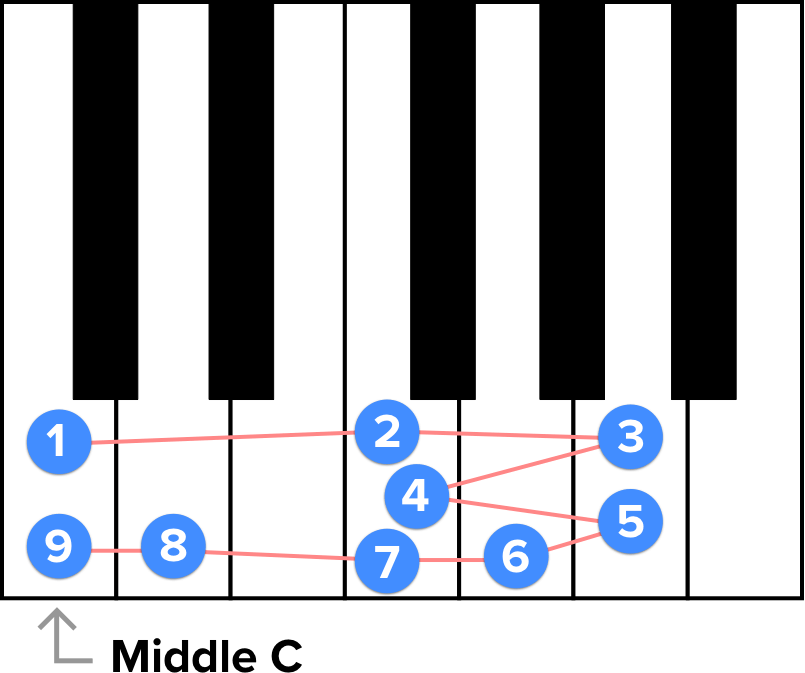
The MIDI note values in array form would be: [60, 65, 69, 65, 69, 67, 65, 62, 60].
var correctNoteSequence = [60, 65, 69, 65, 69, 67, 65, 62, 60]; // Amazing Grace in F
var activeNoteSequence = [];

function noteOn(note) {
    switch(currentStep) {
        // ... (case 0)

        // The first lock - playing a correct sequence
        case 1:
            activeNoteSequence.push(note);

            // when the array is the same length as the correct sequence, compare the two
            if (activeNoteSequence.length == correctNoteSequence.length) {
                var match = true;
                for (var index = 0; index < activeNoteSequence.length; index++) {
                    if (activeNoteSequence[index] != correctNoteSequence[index]) {
                        match = false;
                        break;
                    }
                }

                if (match) {
                    // Run the next sequence and increment the current step
                    runSequence('lock1');
                    currentStep++;
                } else {
                    // Clear the array and start over
                    activeNoteSequence = [];
                }
            }
            break;
    }
}

function runSequence(sequence) {
    switch(sequence) {
        // ...

        case 'lock1':
            // code to trigger animations and give clue for the next lock
            break;
    }
}
Step 3: Play The Correct Chord
The next lock requires the players to play a combination of notes at the same time. This is where our “note off” listener comes in. For every “note on” message received, we’ll add that note value to an array; for every “note off” message received, we’ll remove that note value from the array. Therefore, this array will reflect which notes are currently being pressed at any time. Then, it’s a matter of checking that array every time a note value is added to see if it matches a master array with the correct values.
For this clue, we’ll make the correct answer a C7 chord in root position starting on middle C. That looks like this.
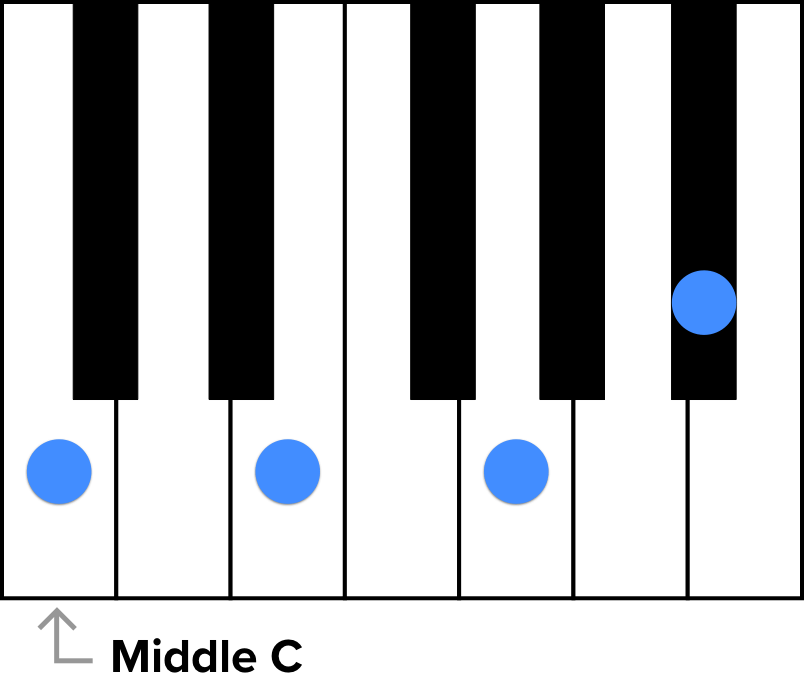
The correct MIDI note values for this chord are: [60, 64, 67, 70].
var correctChord = [60, 64, 67, 70]; // C7 chord starting on middle C
var activeChord = [];

function noteOn(note) {
    switch(currentStep) {
        // ... (case 0, 1)

        case 2:
            // add the note to the active chord array
            activeChord.push(note);

            // If the array is the same length as the correct chord, compare
            if (activeChord.length == correctChord.length) {
                var match = true;
                for (var index = 0; index < activeChord.length; index++) {
                    if (correctChord.indexOf(activeChord[index]) < 0) {
                        match = false;
                        break;
                    }
                }

                if (match) {
                    runSequence('lock2');
                    currentStep++;
                }
            }
            break;
    }

function noteOff(note) {
    switch(currentStep) {
        case 2:
            // Remove the note value from the active chord array
            activeChord.splice(activeChord.indexOf(note), 1);
            break;
    }
}

function runSequence(sequence) {
    switch(sequence) {
        // ...

        case 'lock2':
            // code to trigger animations, stop clock, end game
            stopTimer();

            break;
    }
}
Now all that’s left to do is to add some additional UI elements and animations and we have ourselves a working game!
Here’s a video of the entire gameplay sequence from start to finish. This is running in Google Chrome. Also shown is a virtual MIDI keyboard to help visualize which notes are currently being played. For a normal breakout room scenario, this can run in full-screen mode and with no other inputs in the room (such as a mouse or computer keyboard) to prevent users from closing the window.
If you don’t have a physical MIDI device laying around and you still want to try it out, there are a number of virtual MIDI keyboard apps out there that will let you use your computer keyboard as a musical input, such as VMPK. Also, if you’d like to further dissect everything that’s going on here, check out the complete prototype on CodePen.
See the Pen WebMIDI Breakout Room Demo by Peter Anglea (@peteranglea) on CodePen.
Conclusion
MIDI.org says that “Web MIDI has the potential to be one of the most disruptive music [technologies] in a long time, maybe as disruptive as MIDI was originally back in 1983.” That’s a tall order and some seriously high praise.
I hope this article and sample app has gotten you excited about the potential that this API has to spur the development of new and exciting kinds of browser-based music applications. In the coming years, hopefully, we’ll start to see more online music notation software, digital audio workstations, audio visualizers, instrument tutorials, and more.
If you want to read more about Web MIDI and its capabilities, I recommend the following:
- “Making the Web Rock: Web MIDI,” Chris Wilson, co-editor of Web MIDI (slide deck)
- “Introduction to Web MIDI,” Stuart Memo, Envato Tuts+
- “Creating Browser-Based Audio Applications Controlled by MIDI Hardware,” Stéphane P. Péricat, Toptal
And for further inspiration, here are some other examples of the Web MIDI API in action:
- Web Audio MIDI Synthesizer A simple synthesizer UI which can be controlled via a MIDI device
- Web Audio Drum Machine A fun app to create your own drum loops
- Noteflight An online music notation software which uses Web MIDI as a potential input method
Further Reading
- Inspiring Everyday Graphic Design
- 33 Tempting E-Commerce Icons For Free
- Breaking Out Of The Box: Design Inspiration
- Modern Art Movements To Inspire Your Logo Design


