How To Create An Audio/Video Recording App With React Native: An In-Depth Tutorial

Email Newsletter
Weekly tips on front-end & UX.
Trusted by 182,000+ folks.
 Register for Free


 Custom Web Forms for Angular, React, & Vue. Your backend.
 Celebrating 10 million developers
React Native is a young technology, already gaining popularity among developers. It is a great option for smooth, fast, and efficient mobile app development. High-performance rates for mobile environments, code reuse, and a strong community: These are just some of the benefits React Native provides.
In this guide, I will share some insights about the high-level capabilities of React Native and the products you can develop with it in a short period of time.
We will delve into the step-by-step process of creating a video/audio recording app with React Native and Expo. Expo is an open-source toolchain built around React Native for developing iOS and Android projects with React and JavaScript. It provides a bunch of native APIs maintained by native developers and the open-source community.
After reading this article, you should have all the necessary knowledge to create video/audio recording functionality with React Native.
Let's get right to it.
Brief Description Of The Application
The application you will learn to develop is called a multimedia notebook. I have implemented part of this functionality in an online job board application for the film industry. The main goal of this mobile app is to connect people who work in the film industry with employers. They can create a profile, add a video or audio introduction, and apply for jobs.
The application consists of three main screens that you can switch between with the help of a tab navigator:
- the audio recording screen,
- the video recording screen,
- a screen with a list of all recorded media and functionality to play back or delete them.
Check out how this app works by opening this link with Expo, but please note that opening the app on iOS with the latest expo version (SDK 26) can't be performed (falling back to Apple's guidelines). The iOS client will no longer be able to open projects published by other Expo users. You will only be able to open projects published by the same account that’s signed into the Expo client. The Android client will continue with the same functionality as always.
First, download Expo to your mobile phone. There are two options to open the project :
- Open the link in the browser, scan the QR code with your mobile phone, and wait for the project to load.
- Open the link with your mobile phone and click on “Open project using Expo”.
You can also open the app in the browser. Click on “Open project in the browser”. If you have a paid account on Appetize.io, visit it and enter the code in the field to open the project. If you don’t have an account, click on “Open project” and wait in an account-level queue to open the project.
However, I recommend that you download the Expo app and open this project on your mobile phone to check out all of the features of the video and audio recording app.
You can find the full code for the media recording app in the repository on GitHub.
Dependencies Used For App Development
As mentioned, the media recording app is developed with React Native and Expo.
You can see the full list of dependencies in the repository’s package.json file.
These are the main libraries used:
- React-navigation, for navigating the application,
- Redux, for saving the application’s state,
- React-redux, which are React bindings for Redux,
- Recompose, for writing the components’ logic,
- Reselect, for extracting the state fragments from Redux.
Let's look at the project's structure:

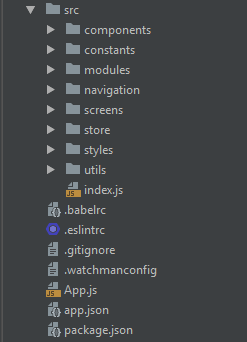
src/index.js: root app component imported in theapp.jsfile;src/components: reusable components;src/constants: global constants;src/styles: global styles, colors, fonts sizes and dimensions.src/utils: useful utilities and recompose enhancers;src/screens: screens components;src/store: Redux store;src/navigation: application’s navigator;src/modules: Redux modules divided by entities as modules/audio, modules/video, modules/navigation.
Let’s proceed to the practical part.
Create Audio Recording Functionality With React Native
First, it's important to сheck the documentation for the Expo Audio API, related to audio recording and playback. You can see all of the code in the repository. I recommend opening the code as you read this article to better understand the process.
When launching the application for the first time, you’ll need the user's permission for audio recording, which entails access to the microphone. Let's use Expo.AppLoading and ask permission for recording by using Expo.Permissions (see the src/index.js) during startAsync.
Await Permissions.askAsync(Permissions.AUDIO_RECORDING);
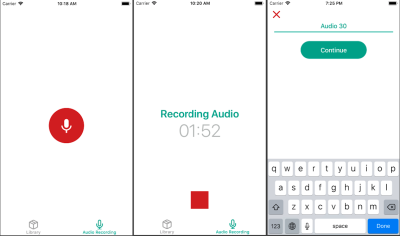
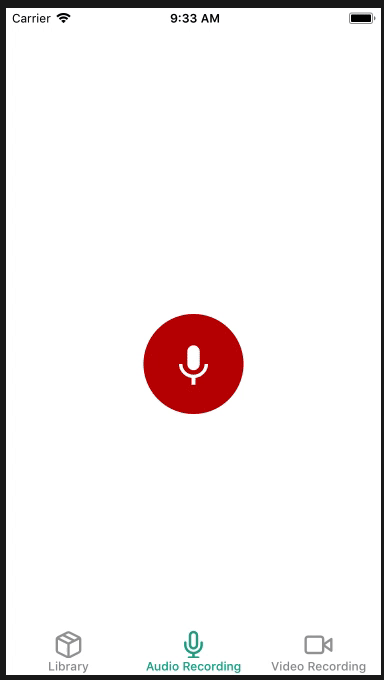
Audio recordings are displayed on a seperate screen whose UI changes depending on the state.
First, you can see the button “Start recording”. After it is clicked, the audio recording begins, and you will find the current audio duration on the screen. After stopping the recording, you will have to type the recording’s name and save the audio to the Redux store.
My audio recording UI looks like this:
I can save the audio in the Redux store in the following format:
audioItemsIds: [‘id1’, ‘id2’],
audioItems: {
 ‘id1’: {
    id: string,
    title: string,
    recordDate: date string,
    duration: number,
    audioUrl: string,
 }
},
Let’s write the audio logic by using Recompose in the screen’s container src/screens/RecordAudioScreenContainer.
Before you start recording, customize the audio mode with the help of Expo.Audio.set.AudioModeAsync (mode), where mode is the dictionary with the following key-value pairs:
playsInSilentModeIOS: A boolean selecting whether your experience’s audio should play in silent mode on iOS. This value defaults to false.allowsRecordingIOS: A boolean selecting whether recording is enabled on iOS. This value defaults to false. Note: When this flag is set to true, playback may be routed to the phone receiver, instead of to the speaker.interruptionModeIOS: An enum selecting how your experience’s audio should interact with the audio from other apps on iOS.shouldDuckAndroid: A boolean selecting whether your experience’s audio should automatically be lowered in volume (“duck”) if audio from another app interrupts your experience. This value defaults to true. If false, audio from other apps will pause your audio.interruptionModeAndroid: An enum selecting how your experience’s audio should interact with the audio from other apps on Android.
Note: You can learn more about the customization of AudioMode in the documentation.
I have used the following values in this app:
interruptionModeIOS: Audio.INTERRUPTION_MODE_IOS_DO_NOT_MIX, — Our record interrupts audio from other apps on IOS.
playsInSilentModeIOS: true,
shouldDuckAndroid: true,
interruptionModeAndroid: Audio.INTERRUPTION_MODE_ANDROID_DO_NOT_MIX — Our record interrupts audio from other apps on Android.
allowsRecordingIOS Will change to true before the audio recording and to false after its completion.
To implement this, let's write the handler setAudioMode with Recompose.
withHandlers({
 setAudioMode: () => async ({ allowsRecordingIOS }) => {
   try {
     await Audio.setAudioModeAsync({
       allowsRecordingIOS,
       interruptionModeIOS: Audio.INTERRUPTION_MODE_IOS_DO_NOT_MIX,
       playsInSilentModeIOS: true,
       shouldDuckAndroid: true,
       interruptionModeAndroid: Audio.INTERRUPTION_MODE_ANDROID_DO_NOT_MIX,
     });
   } catch (error) {
     console.log(error) // eslint-disable-line
   }
 },
}),
To record the audio, you’ll need to create an instance of the Expo.Audio.Recording class.
const recording = new Audio.Recording();After creating the recording instance, you will be able to receive the status of the Recording with the help of recordingInstance.getStatusAsync().
The status of the recording is a dictionary with the following key-value pairs:
canRecord:a boolean.isRecording:a boolean describing whether the recording is currently recording.isDoneRecording:a boolean.durationMillis:current duration of the recorded audio.
You can also set a function to be called at regular intervals with recordingInstance.setOnRecordingStatusUpdate(onRecordingStatusUpdate).
To update the UI, you will need to call setOnRecordingStatusUpdate and set your own callback.
Let’s add some props and a recording callback to the container.
withStateHandlers({
    recording: null,
    isRecording: false,
    durationMillis: 0,
    isDoneRecording: false,
    fileUrl: null,
    audioName: '',
  }, {
    setState: () => obj => obj,
    setAudioName: () => audioName => ({ audioName }),
   recordingCallback: () => ({ durationMillis, isRecording, isDoneRecording }) =>
      ({ durationMillis, isRecording, isDoneRecording }),
  }),
The callback setting for setOnRecordingStatusUpdate is:
recording.setOnRecordingStatusUpdate(props.recordingCallback);
onRecordingStatusUpdate is called every 500 milliseconds by default. To make the UI update valid, set the 200 milliseconds interval with the help of setProgressUpdateInterval:
recording.setProgressUpdateInterval(200);
After creating an instance of this class, call prepareToRecordAsync to record the audio.
recordingInstance.prepareToRecordAsync(options) loads the recorder into memory and prepares it for recording. It must be called before calling startAsync(). This method can be used if the recording instance has never been prepared.
The parameters of this method include such options for the recording as sample rate, bitrate, channels, format, encoder and extension. You can find a list of all recording options in this document.
In this case, let’s use Audio.RECORDING_OPTIONS_PRESET_HIGH_QUALITY.
After the recording has been prepared, you can start recording by calling the method recordingInstance.startAsync().
Before creating a new recording instance, check whether it has been created before. The handler for beginning the recording looks like this:
onStartRecording: props => async () => {
      try {
        if (props.recording) {
          props.recording.setOnRecordingStatusUpdate(null);
          props.setState({ recording: null });
        }

        await props.setAudioMode({ allowsRecordingIOS: true });

        const recording = new Audio.Recording();
        recording.setOnRecordingStatusUpdate(props.recordingCallback);
        recording.setProgressUpdateInterval(200);

        props.setState({ fileUrl: null });

await recording.prepareToRecordAsync(Audio.RECORDING_OPTIONS_PRESET_HIGH_QUALITY);
        await recording.startAsync();

        props.setState({ recording });
      } catch (error) {
        console.log(error) // eslint-disable-line
      }
    },
Now you need to write a handler for the audio recording completion. After clicking the stop button, you have to stop the recording, disable it on iOS, receive and save the local URL of the recording, and set OnRecordingStatusUpdate and the recording instance to null:
onEndRecording: props => async () => {
      try {
        await props.recording.stopAndUnloadAsync();
        await props.setAudioMode({ allowsRecordingIOS: false });
      } catch (error) {
        console.log(error); // eslint-disable-line
      }

      if (props.recording) {
        const fileUrl = props.recording.getURI();
        props.recording.setOnRecordingStatusUpdate(null);
        props.setState({ recording: null, fileUrl });
      }
    },
After this, type the audio name, click the “continue” button, and the audio note will be saved in the Redux store.
onSubmit: props => () => {
      if (props.audioName && props.fileUrl) {
        const audioItem = {
          id: uuid(),
          recordDate: moment().format(),
          title: props.audioName,
          audioUrl: props.fileUrl,
          duration: props.durationMillis,
        };

        props.addAudio(audioItem);
        props.setState({
          audioName: '',
          isDoneRecording: false,
        });

        props.navigation.navigate(screens.LibraryTab);
      }
    },
Audio Playback With React Native
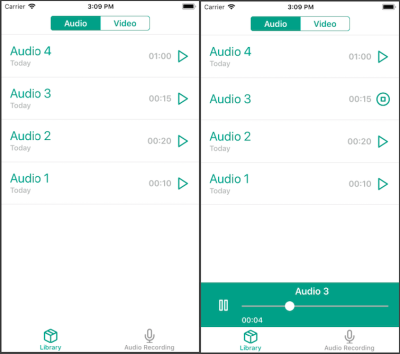
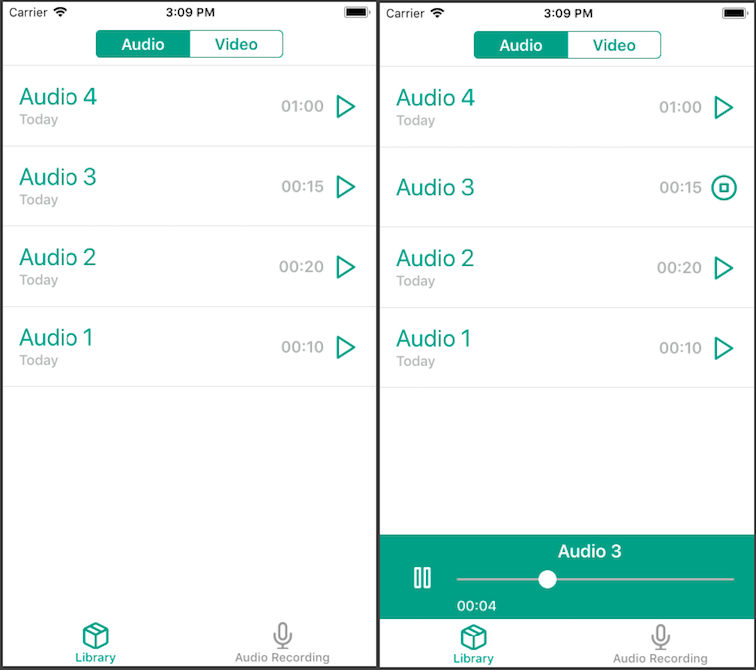
You can play the audio on the screen with the saved audio notes. To start the audio playback, click one of the items on the list. Below, you can see the audio player that allows you to track the current position of playback, to set the playback starting point and to toggle the playing audio.
Here’s what my audio playback UI looks like:
The Expo.Audio.Sound objects and Expo.Video components share a unified imperative API for media playback.
Let's write the logic of the audio playback by using Recompose in the screen container src/screens/LibraryScreen/LibraryScreenContainer, as the audio player is available only on this screen.
If you want to display the player at any point of the application, I recommend writing the logic of the player and audio playback in Redux operations using redux-thunk.
Let's customize the audio mode in the same way we did for the audio recording. First, set allowsRecordingIOS to false.
lifecycle({
    async componentDidMount() {
      await Audio.setAudioModeAsync({
        allowsRecordingIOS: false,
        interruptionModeIOS: Audio.INTERRUPTION_MODE_IOS_DO_NOT_MIX,
        playsInSilentModeIOS: true,
        shouldDuckAndroid: true,
        interruptionModeAndroid: Audio.INTERRUPTION_MODE_ANDROID_DO_NOT_MIX,
      });
    },
  }),
We have created the recording instance for audio recording. As for audio playback, we need to create the sound instance. We can do it in two different ways:
const playbackObject = new Expo.Audio.Sound();Expo.Audio.Sound.create(source, initialStatus = {}, onPlaybackStatusUpdate = null, downloadFirst = true)
If you use the first method, you will need to call playbackObject.loadAsync(), which loads the media from source into memory and prepares it for playing, after creation of the instance.
The second method is a static convenience method to construct and load a sound. It сreates and loads a sound from source with the optional initialStatus, onPlaybackStatusUpdate and downloadFirst parameters.
The source parameter is the source of the sound. It supports the following forms:
- a dictionary of the form
{ uri: 'https://path/to/file' }with a network URL pointing to an audio file on the web; require('path/to/file')for an audio file asset in the source code directory;- an Expo.Asset object for an audio file asset.
The initialStatus parameter is the initial playback status. PlaybackStatus is the structure returned from all playback API calls describing the state of the playbackObject at that point of time. It is a dictionary with the key-value pairs. You can check all of the keys of the PlaybackStatus in the documentation.
onPlaybackStatusUpdate is a function taking a single parameter, PlaybackStatus. It is called at regular intervals while the media is in the loaded state. The interval is 500 milliseconds by default. In my application, I set it to 50 milliseconds interval for a proper UI update.
Before creating the sound instance, you will need to implement the onPlaybackStatusUpdate callback. First, add some props to the screen container:
withClassVariableHandlers({
    playbackInstance: null,
    isSeeking: false,
    shouldPlayAtEndOfSeek: false,
    playingAudio: null,
  }, 'setClassVariable'),
  withStateHandlers({
    position: null,
    duration: null,
    shouldPlay: false,
    isLoading: true,
    isPlaying: false,
    isBuffering: false,
    showPlayer: false,
  }, {
    setState: () => obj => obj,
  }),
Now, implement onPlaybackStatusUpdate. You will need to make several validations based on PlaybackStatus for a proper UI display:
withHandlers({
    soundCallback: props => (status) => {
      if (status.didJustFinish) {
        props.playbackInstance().stopAsync();
      } else if (status.isLoaded) {
        const position = props.isSeeking()
          ? props.position
          : status.positionMillis;
        const isPlaying = (props.isSeeking() || status.isBuffering)
          ? props.isPlaying
          : status.isPlaying;
        props.setState({
          position,
          duration: status.durationMillis,
          shouldPlay: status.shouldPlay,
          isPlaying,
          isBuffering: status.isBuffering,
        });
      }
    },
  }),
After this, you have to implement a handler for the audio playback. If a sound instance is already created, you need to unload the media from memory by calling playbackInstance.unloadAsync() and clear OnPlaybackStatusUpdate:
loadPlaybackInstance: props => async (shouldPlay) => {
      props.setState({ isLoading: true });

      if (props.playbackInstance() !== null) {
        await props.playbackInstance().unloadAsync();
        props.playbackInstance().setOnPlaybackStatusUpdate(null);
        props.setClassVariable({ playbackInstance: null });
      }
      const { sound } = await Audio.Sound.create(
        { uri: props.playingAudio().audioUrl },
        { shouldPlay, position: 0, duration: 1, progressUpdateIntervalMillis: 50 },
        props.soundCallback,
      );

      props.setClassVariable({ playbackInstance: sound });

      props.setState({ isLoading: false });
    },
Call the handler loadPlaybackInstance(true) by clicking the item in the list. It will automatically load and play the audio.
Let's add the pause and play functionality (toggle playing) to the audio player. If audio is already playing, you can pause it with the help of playbackInstance.pauseAsync(). If audio is paused, you can resume playback from the paused point with the help of the playbackInstance.playAsync() method:
onTogglePlaying: props => () => {
      if (props.playbackInstance() !== null) {
        if (props.isPlaying) {
          props.playbackInstance().pauseAsync();
        } else {
          props.playbackInstance().playAsync();
        }
      }
    },
When you click on the playing item, it should stop. If you want to stop audio playback and put it into the 0 playing position, you can use the method playbackInstance.stopAsync():
onStop: props => () => {
      if (props.playbackInstance() !== null) {
        props.playbackInstance().stopAsync();

        props.setShowPlayer(false);
        props.setClassVariable({ playingAudio: null });
      }
    },
The audio player also allows you to rewind the audio with the help of the slider. When you start sliding, the audio playback should be paused with playbackInstance.pauseAsync().
After the sliding is complete, you can set the audio playing position with the help of playbackInstance.setPositionAsync(value), or play back the audio from the set position with playbackInstance.playFromPositionAsync(value):
onCompleteSliding: props => async (value) => {
      if (props.playbackInstance() !== null) {
        if (props.shouldPlayAtEndOfSeek) {
          await props.playbackInstance().playFromPositionAsync(value);
        } else {
          await props.playbackInstance().setPositionAsync(value);
        }
        props.setClassVariable({ isSeeking: false });
      }
    },
After this, you can pass the props to the components MediaList and AudioPlayer (see the file src/screens/LibraryScreen/LibraryScreenView).

Video Recording Functionality With React Native
Let's proceed to video recording.
We’ll use Expo.Camera for this purpose. Expo.Camera is a React component that renders a preview of the device’s front or back camera. Expo.Camera can also take photos and record videos that are saved to the app’s cache.
To record video, you need permission for access to the camera and microphone. Let's add the request for camera access as we did with the audio recording (in the file src/index.js):
await Permissions.askAsync(Permissions.CAMERA);Video recording is available on the “Video Recording” screen. After switching to this screen, the camera will turn on.
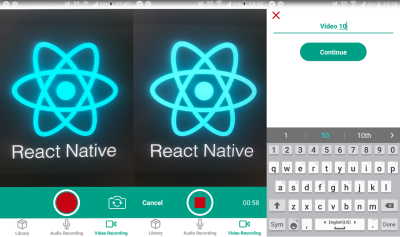
You can change the camera type (front or back) and start video recording. During recording, you can see its general duration and can cancel or stop it. When recording is finished, you will have to type the name of the video, after which it will be saved in the Redux store.
Here is what my video recording UI looks like:
Let’s write the video recording logic by using Recompose on the container screen
src/screens/RecordVideoScreen/RecordVideoScreenContainer.
You can see the full list of all props in the Expo.Camera component in the document.
In this application, we will use the following props for Expo.Camera.
type: The camera type is set (front or back).onCameraReady: This callback is invoked when the camera preview is set. You won't be able to start recording if the camera is not ready.style: This sets the styles for the camera container. In this case, the size is 4:3.ref: This is used for direct access to the camera component.
Let's add the variable for saving the type and handler for its changing.
cameraType: Camera.Constants.Type.back,
toggleCameraType: state => () => ({
      cameraType: state.cameraType === Camera.Constants.Type.front
        ? Camera.Constants.Type.back
        : Camera.Constants.Type.front,
    }),
Let's add the variable for saving the camera ready state and callback for onCameraReady.
isCameraReady: false,

setCameraReady: () => () => ({ isCameraReady: true }),
Let's add the variable for saving the camera component reference and setter.
cameraRef: null,

setCameraRef: () => cameraRef => ({ cameraRef }),
Let's pass these variables and handlers to the camera component.
<Camera
          type={cameraType}
          onCameraReady={setCameraReady}
          style={s.camera}
          ref={setCameraRef}
        />
Now, when calling toggleCameraType after clicking the button, the camera will switch from the front to the back.
Currently, we have access to the camera component via the reference, and we can start video recording with the help of cameraRef.recordAsync().
The method recordAsync starts recording a video to be saved to the cache directory.
Arguments:
Options (object) — a map of options:
quality(VideoQuality): Specify the quality of recorded video. Usage: Camera.Constants.VideoQuality[''], possible values: for 16:9 resolution 2160p, 1080p, 720p, 480p (Android only) and for 4:3 (the size is 640x480). If the chosen quality is not available for the device, choose the highest one. maxDuration(number): Maximum video duration in seconds.maxFileSize(number): Maximum video file size in bytes.mute(boolean): If present, video will be recorded with no sound.
recordAsync returns a promise that resolves to an object containing the video file’s URI property. You will need to save the file’s URI in order to play back the video hereafter. The promise is returned if stopRecording was invoked, one of maxDuration and maxFileSize is reached or the camera preview is stopped.
Because the ratio set for the camera component sides is 4:3, let's set the same format for the video quality.
Here is what the handler for starting video recording looks like (see the full code of the container in the repository):
onStartRecording: props => async () => {
      if (props.isCameraReady) {
        props.setState({ isRecording: true, fileUrl: null });
        props.setVideoDuration();
        props.cameraRef.recordAsync({ quality: '4:3' })
          .then((file) => {
            props.setState({ fileUrl: file.uri });
          });
      }
    },
During the video recording, we can’t receive the recording status as we have done for audio. That's why I have created a function to set video duration.
To stop the video recording, we have to call the following function:
stopRecording: props => () => {
      if (props.isRecording) {
        props.cameraRef.stopRecording();
        props.setState({ isRecording: false });
        clearInterval(props.interval);
      }
    },
Check out the entire process of video recording.

Video Playback Functionality With React Native
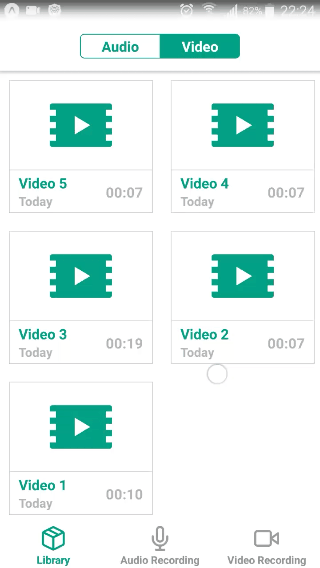
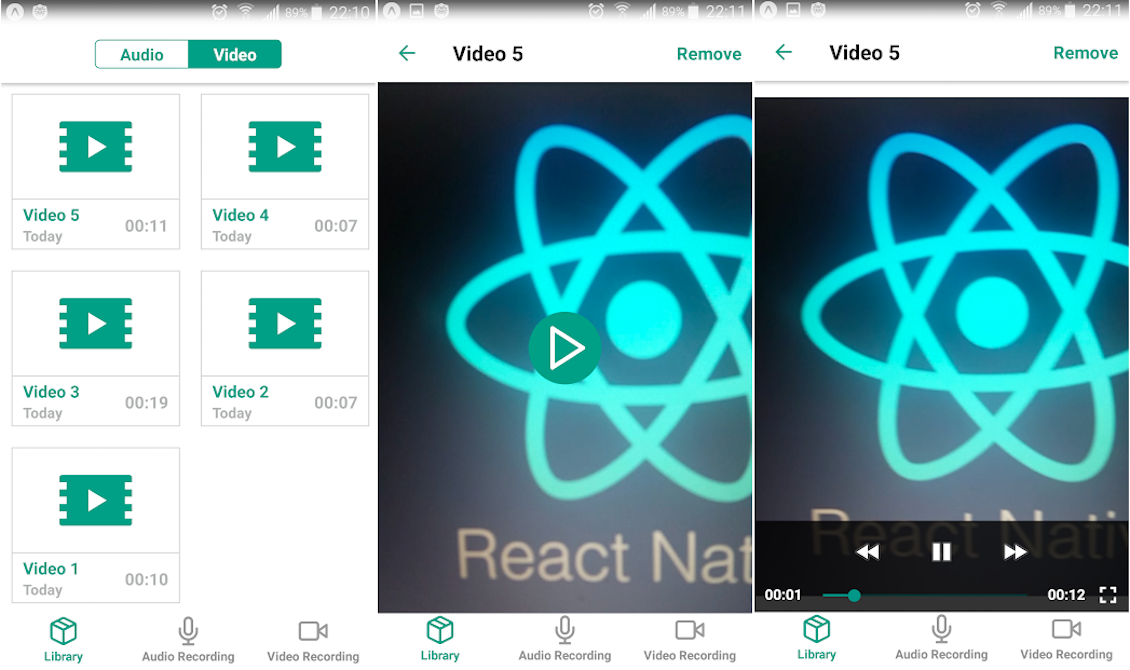
You can play back the video on the “Library” screen. Video notes are located in the “Video” tab.
To start the video playback, click the selected item in the list. Then, switch to the playback screen, where you can watch or delete the video.
The UI for video playback looks like this:

To play back the video, use Expo.Video, a component that displays a video inline with the other React Native UI elements in your app.
The video will be displayed on the separate screen, PlayVideo.
You can check out all of the props for Expo.Video here.
In our application, the Expo.Video component uses native playback controls and looks like this:
<Video
        source={{ uri: videoUrl }}
        style={s.video}
        shouldPlay={isPlaying}
        resizeMode="contain"
        useNativeControls={isPlaying}
        onLoad={onLoad}
        onError={onError}
      />
source
This is the source of the video data to display. The same forms as for Expo.Audio.Sound are supported.resizeMode
This is a string describing how the video should be scaled for display in the component view’s bounds. It can be “stretch”, “contain” or “cover”.shouldPlay
This boolean describes whether the media is supposed to play.useNativeControls
This boolean, if set to true, displays native playback controls (such as play and pause) within the video component.onLoad
This function is called once the video has been loaded.onError
This function is called if loading or playback has encountered a fatal error. The function passes a single error message string as a parameter.
When the video is uploaded, the play button should be rendered on top of it.
When you click the play button, the video turns on and the native playback controls are displayed.
Let’s write the logic of the video using Recompose in the screen container src/screens/PlayVideoScreen/PlayVideoScreenContainer:
const defaultState = {
  isError: false,
  isLoading: false,
  isPlaying: false,
};

const enhance = compose(
  paramsToProps('videoUrl'),
  withStateHandlers({
    ...defaultState,
    isLoading: true,
  }, {
    onError: () => () => ({ ...defaultState, isError: true }),
    onLoad: () => () => defaultState,
   onTogglePlaying: ({ isPlaying }) => () => ({ ...defaultState, isPlaying: !isPlaying }),
  }),
);
As previously mentioned, the Expo.Audio.Sound objects and Expo.Video components share a unified imperative API for media playback. That's why you can create custom controls and use more advanced functionality with the Playback API.
Check out the video playback process:
See the full code for the application in the repository.
You can also install the app on your phone by using Expo and check out how it works in practice.
Wrapping Up
I hope you have enjoyed this article and have enriched your knowledge of React Native. You can use this audio and video recording tutorial to create your own custom-designed media player. You can also scale the functionality and add the ability to save media in the phone’s memory or on a server, synchronize media data between different devices, and share media with others.
As you can see, there is a wide scope for imagination. If you have any questions about the process of developing an audio or video recording app with React Native, feel free to drop a comment below.
Further Reading
- Modern Methods For Improving Drupal’s Largest Contentful Paint Core Web Vital
- The Safest Way To Hide Your API Keys When Using React
- Animating React Components With GreenSock
- Knip: An Automated Tool For Finding Unused Files, Exports, And Dependencies


