Hit The Ground Running With Vue.js And Firestore

Email Newsletter
Weekly tips on front-end & UX.
Trusted by 182,000+ folks.


 Celebrating 10 million developers

 Custom Web Forms for Angular, React, & Vue. Your backend.
Google Firebase has a new data storage possibility called ‘Firestore’ (currently in beta stage) which builds on the success of the Firebase Realtime Database but adds some nifty features. In this article, we’ll set up the basics of a web app using Vue.js and Firestore.
Let’s say you have this great idea for a new product (e.g. the next Twitter, Facebook, or Instagram, because we can never have too much social, right?). To start off, you want to make a prototype or Minimum Viable Product (MVP) of this product. The goal is to build the core of the app as fast as possible so you can show it to users and get feedback and analyze usage. The emphasis is heavily on development speed and quick iterating.
But before we start building, our amazing product needs a name. Let’s call it “Amazeballs.” It’s going to be legen — wait for it — dary!
Here’s a shot of how I envision it:
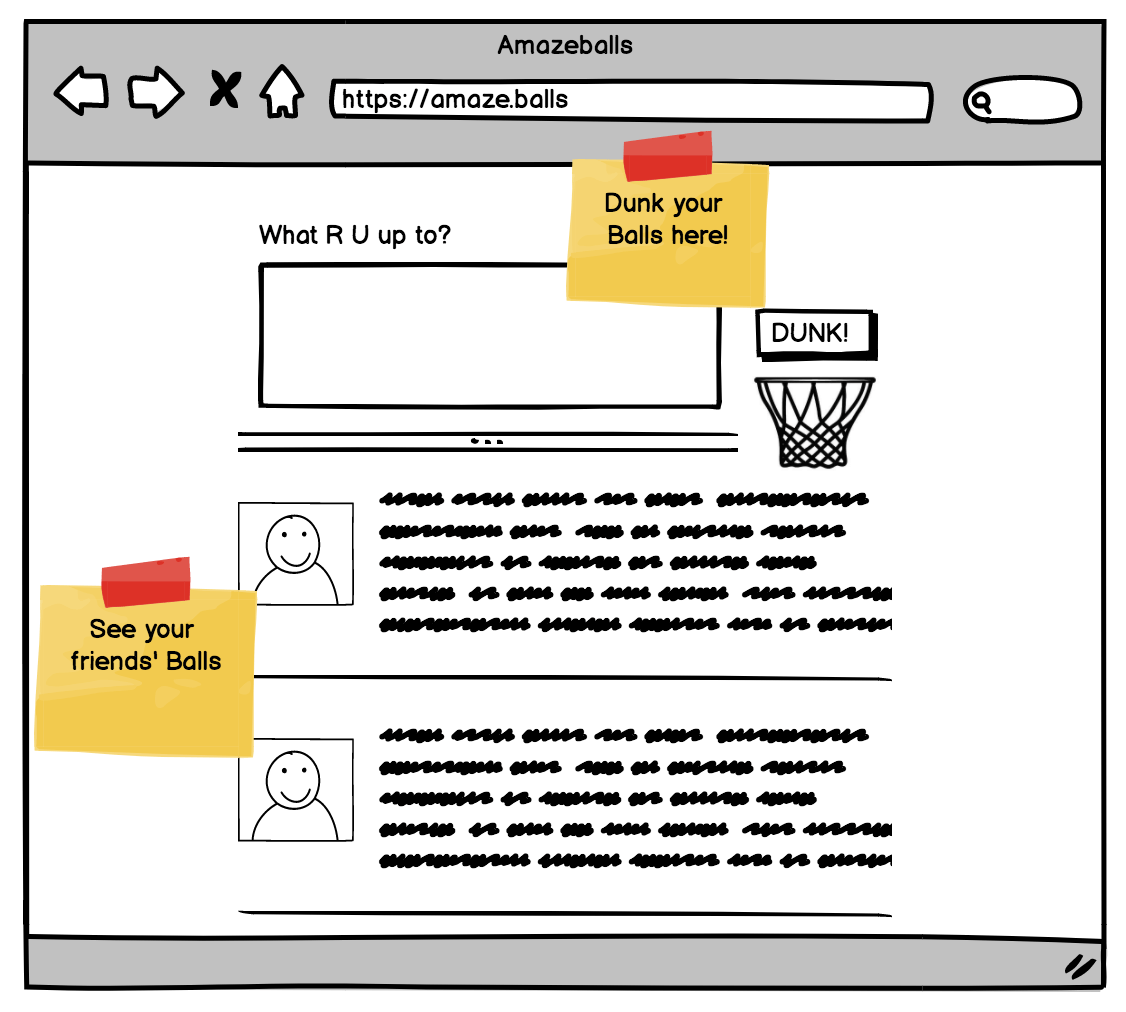
Our Amazeballs app is — of course — all about sharing cheesy tidbits of your personal life with friends, in so-called Balls. At the top is a form for posting Balls, below that are your friends’ Balls.
When building an MVP, you’ll need tooling that gives you the power to quickly implement the key features as well as the flexibility to quickly add and change features later on. My choice falls on Vue.js as it’s a Javascript-rendering framework, backed by the Firebase suite (by Google) and its new real-time database called Firestore.
Firestore can directly be accessed using normal HTTP methods which makes it a full backend-as-a-service solution in which you don’t have to manage any of your own servers but still store data online.
Sounds powerful and daunting, but no sweat, I’ll guide you through the steps of creating and hosting this new web app. Notice how big the scrollbar is on this page; there’s not a huge amount of steps to it.
Let’s Start
We’re starting out with Vue.js. It’s great for Javascript beginners, as you start out with HTML and gradually add logic to it. But don’t underestimate; it packs a lot of powerful features. This combination makes it my first choice for a front-end framework.
Vue.js has a command-line interface (CLI) for scaffolding projects. We’ll use that to get the bare-bones set-up quickly. First, install the CLI, then use it to create a new project based on the “webpack-simple” template.
npm install -g vue-cli

vue init webpack-simple amazeballs
If you follow the steps on the screen (npm install and npm run dev) a browser will open with a big Vue.js logo.
Congrats! That was easy.
Next up, we need to create a Firebase project. Head on over to https://console.firebase.google.com/ and create a project. A project starts out in the free Spark plan, which gives you a limited database (1 GB data, 50K reads per day) and 1 GB of hosting. This is more than enough for our MVP, and easily upgradable when the app gains traction.
Click on the ‘Add Firebase to your web app’ to display the config that you need. We’ll use this config in our application, but in a nice Vue.js manner using shared state.
First npm install firebase, then create a file called src/store.js. This is the spot that we’re going to put the shared state in so that each Vue.js component can access it independently of the component tree. Below is the content of the file. The state only contains some placeholders for now.
import Vue from 'vue';
import firebase from 'firebase/app';
import 'firebase/firestore';

// Initialize Firebase, copy this from the cloud console
// Or use mine :)
var config = {
  apiKey: "***",
  authDomain: "amazeballs-by-q42.firebaseapp.com",
  databaseURL: "https://amazeballs-by-q42.firebaseio.com",
  projectId: "amazeballs-by-q42",
  storageBucket: "amazeballs-by-q42.appspot.com",
  messagingSenderId: "972553621573"
};
firebase.initializeApp(config);

// The shared state object that any vue component can get access to.
// Has some placeholders that we’ll use further on!
export const store = {
  ballsInFeed: null,
  currentUser: null,
  writeBall: (message) => console.log(message)
};
Now we’ll add the Firebase parts. One piece of code to get the data from the Firestore:
// a reference to the Balls collection
const ballsCollection = firebase.firestore()
  .collection('balls');

// onSnapshot is executed every time the data
// in the underlying firestore collection changes
// It will get passed an array of references to
// the documents that match your query
ballsCollection
  .onSnapshot((ballsRef) => {
    const balls = [];
    ballsRef.forEach((doc) => {
      const ball = doc.data();
      ball.id = doc.id;
      balls.push(ball);
    });
    store.ballsInFeed = balls;
  });
And then replace the writeBall function with one that actually executes a write:
writeBall: (message) => ballsCollection.add({
  createdOn: new Date(),
  author: store.currentUser,
  message
})
Notice how the two are completely decoupled. When you insert into a collection, the onSnapshot is triggered because you’ve inserted an item. This makes state management a lot easier.
Now you have a shared state object that any Vue.js component can easily get access to. Let’s put it to good use.
Post Stuff!
First, let’s find out who the current user is.
Firebase has authentication APIs that help you with the grunt of the work of getting to know your user. Enable the appropriate ones on the Firebase Console in Authentication → Sign In Method. For now, I’m going to use Google Login — with a very non-fancy button.
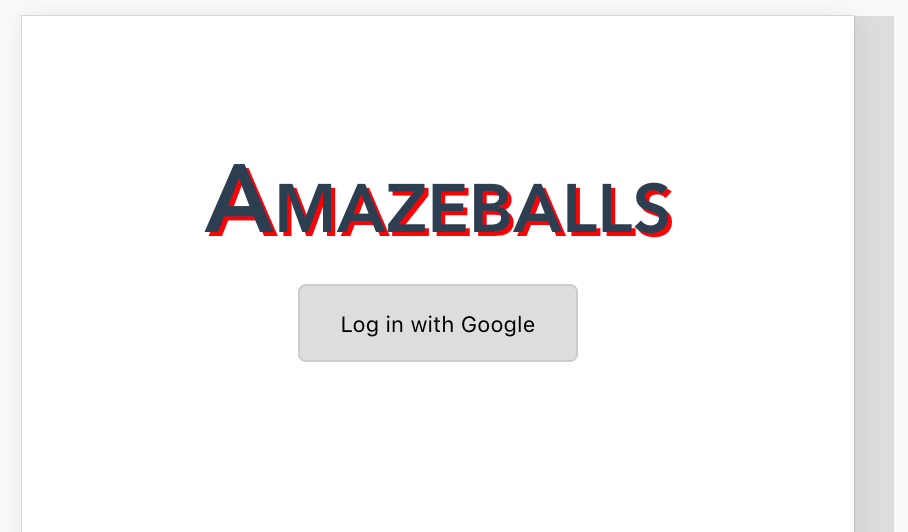
Firebase doesn’t give you any interface help, so you’ll have to create your own “Login with Google/Facebook/Twitter” buttons, and/or username/password input fields. Your login component will probably look a bit like this:
<template>
  <div>
    <button @click.prevent="signInWithGoogle">Log in with Google</button>
  </div>
</template>

<script>
import firebase from 'firebase/app';
import 'firebase/auth';

export default {
  methods: {
    signInWithGoogle() {
      var provider = new firebase.auth.GoogleAuthProvider();
      firebase.auth().signInWithPopup(provider);
    }
  }
}
</script>
Now there’s one more piece of the login puzzle, and that’s getting the currentUser variable in the store. Add these lines to your store.js:
// When a user logs in or out, save that in the store
firebase.auth().onAuthStateChanged((user) => {
  store.currentUser = user;
});
Due to these three lines, every time the currently-logged-in user changes (logs in or out), store.currentUser also changes. Let’s post some Balls!
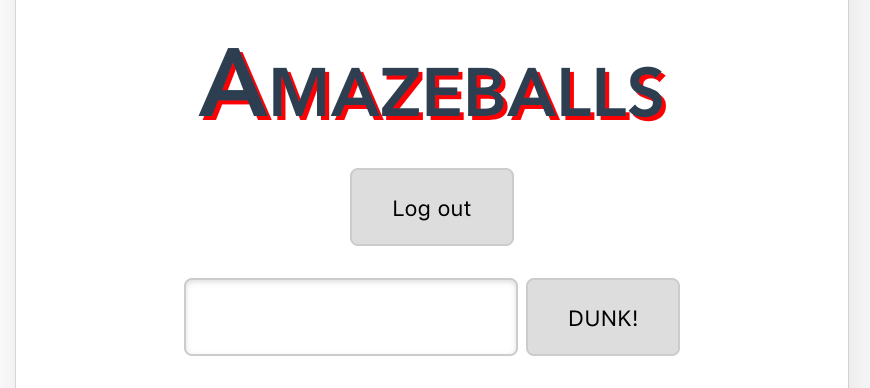
The input form is a separate Vue.js component that is hooked up to the writeBall function in our store, like this:
<template>
  <form @submit.prevent="formPost">
    <textarea v-model="message" />
    <input type="submit" value="DUNK!" />
  </form>
</template>

<script>
import { store } from './store';

export default {
  data() {
    return {
      message: null,
    };
  },
  methods: {
    formPost() {
      store.writeBall(this.message);
    }
  },
}
</script>
Awesome! Now people can log in and start posting Balls. But wait, we’re missing authorization. We want you to only be able to post Balls yourself, and that’s where Firestore Rules come in. They’re made up of Javascript-ish code that defines access privileges to the database. You can enter them via the Firestore console, but you can also use the Firebase CLI to install them from a file on disk. Install and run it like this:
npm install -g firebase-tools
firebase login
firebase init firestore
You’ll get a file named firestore.rules where you can add authorization for your app. We want every user to be able to insert their own balls, but not to insert or edit someone else’s. The below example do nicely. It allows everyone to read all documents in the database, but you can only insert if you’re logged in, and the inserted resource has a field “author” that is the same as the currently logged in user.
service cloud.firestore {
  match /databases/{database}/documents {
    match /{document=**} {
      allow read: if true;
      allow create: if request.auth.uid != null && request.auth.uid == request.resource.data.author;
    }
  }
}
It looks like just a few lines of code, but it’s very powerful and can get complex very quickly. Firebase is working on better tooling around this part, but for now, it’s trial-and-error until it behaves the way you want.
If you run firebase deploy, the Firestore rules will be deployed and securing your production data in seconds.
Adding Server Logic
On your homepage, you want to see a timeline with your friends’ Balls. Depending on how you want to determine which Balls a user sees, performing this query directly on the database could be a performance bottleneck. An alternative is to create a Firebase Cloud Function that activates on every posted Ball and appends it to the walls of all the author’s friends. This way it’s asynchronous, non-blocking and eventually consistent. Or in other words, it’ll get there.
To keep the examples simple, I’ll do a small demo of listening to created Balls and modifying their message. Not because this is particularly useful, but to show you how easy it is to get cloud functions up-and-running.
const functions = require('firebase-functions');

exports.createBall = functions.firestore
  .document('balls/{ballId}')
  .onCreate(event => {
    var createdMessage = event.data.get('message');
    return event.data.ref.set({
      message: createdMessage + ', yo!'
    }, {merge: true});
});
Oh, wait, I forgot to tell you where to write this code.
firebase init functionsThis creates the functions directory with an index.js. That’s the file you can write your own Cloud Functions in. Or copy-paste mine if you’re very impressed by it.
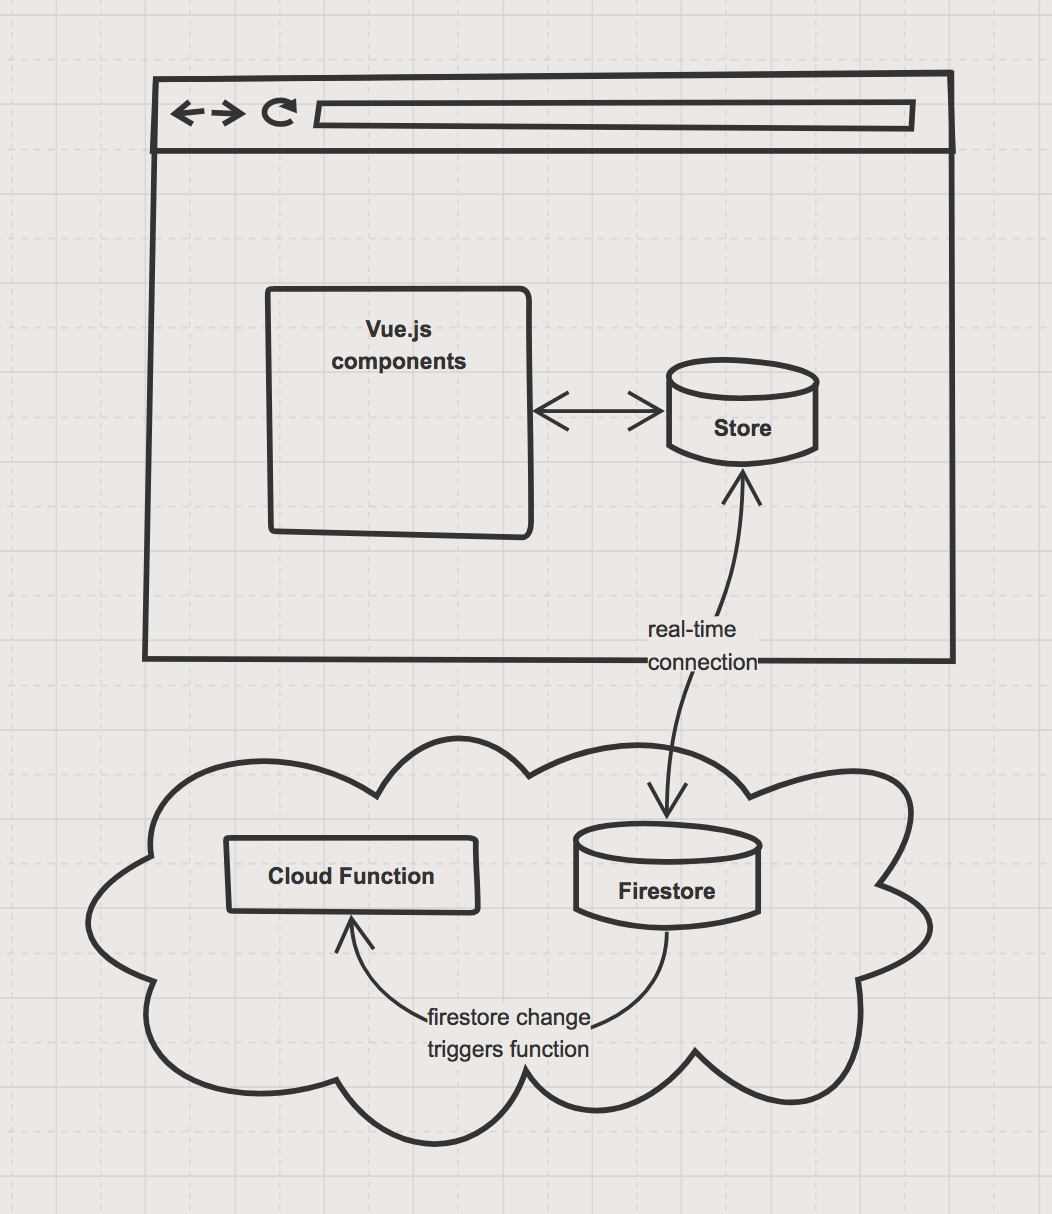
Cloud Functions give you a nice spot to decouple different parts of your application and have them asynchronously communicate. Or, in architectural drawing style:
Last Step: Deployment
Firebase has its Hosting option available for this, and you can use it via the Firebase CLI.
firebase init hostingChoose distas a public directory, and then ‘Yes’ to rewrite all URLs to index.html. This last option allows you to use vue-router to manage pretty URLs within your app.
Now there’s a small hurdle: the dist folder doesn’t contain an index.html file that points to the right build of your code. To fix this, add an npm script to your package.json:
{
  "scripts": {
    "deploy": "npm run build && mkdir dist/dist && mv dist/*.* dist/dist/ && cp index.html dist/ && firebase deploy"
  }
}
Now just run npm deploy, and the Firebase CLI will show you the URL of your hosted code!
When To Use This Architecture
This setup is perfect for an MVP. By the third time you’ve done this, you’ll have a working web app in minutes — backed by a scalable database that is hosted for free. You can immediately start building features.
Also, there’s a lot of space to grow. If Cloud Functions aren’t powerful enough, you can fall back to a traditional API running on docker in Google Cloud for instance. Also, you can upgrade your Vue.js architecture with vue-router and vuex, and use the power of webpack that’s included in the vue-cli template.
It’s not all rainbows and unicorns, though. The most notorious caveat is the fact that your clients are immediately talking to your database. There’s no middleware layer that you can use to transform the raw data into a format that’s easier for the client. So, you have to store it in a client-friendly way. Whenever your clients request change, you’re going to find it pretty difficult to run data migrations on Firebase. For that, you’ll need to write a custom Firestore client that reads every record, transforms it, and writes it back.
“
So what are examples of projects using these tools? Amongst the big names that use Vue.js are Laravel, GitLab and (for the Dutch) nu.nl. Firestore is still in beta, so not a lot of active users there yet, but the Firebase suite is already being used by National Public Radio, Shazam, and others. I’ve seen colleagues implement Firebase for the Unity-based game Road Warriors that was downloaded over a million times in the first five days. It can take quite some load, and it’s very versatile with clients for web, native mobile, Unity, and so on.
Where Do I Sign Up?!
If you want to learn more, consider the following resources:
- Working sample containing all of the above code
- Documentation on Vue.js, vue-router, vue-cli
- Documentation on Firebase
- An entertaining way to get to know Firebase better — their YouTube Blog
Happy coding!
Further Reading
- Vanilla JavaScript, Libraries, And The Quest For Stateful DOM Rendering
- A Simple Guide To Retrieval Augmented Generation Language Models
- How To Deal With Big Tooling Upgrades In Large Organizations
- Moving From Vue 1 To Vue 2 To Vue 3: A Case Study Of Migrating A Headless CMS System


