Visual Studio Live Share Can Do That?

Email Newsletter
Weekly tips on front-end & UX.
Trusted by 182,000+ folks.
 Register for Free
 Custom Web Forms for Angular, React, & Vue. Your backend.
 Celebrating 10 million developers


A few months ago, Microsoft released its free Visual Studio (VS) Live Share service. VS Live Share is Google Docs level collaboration for code. Multiple developers can collaborate on the same file at the same time without ever leaving their own editor.
After the release of Live Share, I realized that many of us have resigned ourselves to being isolated in our code and we’re not even aware that there are better ways to work with a service like VS Live Share. This is partly because we are stuck in old habits and partly because we just aren’t aware of what all VS Live Share can do. That last part I can help with!
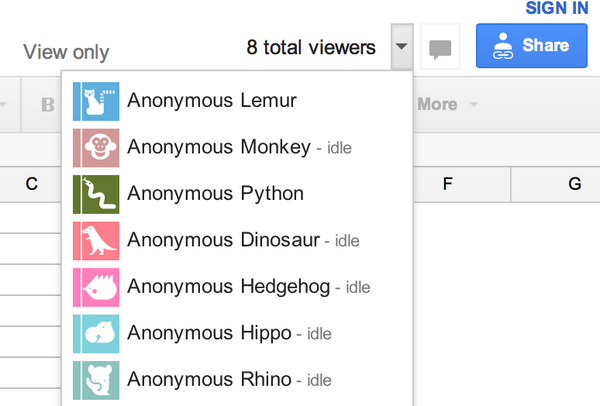
In this article, we’ll go over the features and best practices for VS Live Share that make developer collaboration as easy as being an “Anonymous Hippo.”
Share Your Code
Live Share comes as an extension for both Visual Studio and Visual Studio Code (VS Code). In this article, we’re going to focus on VS Code.
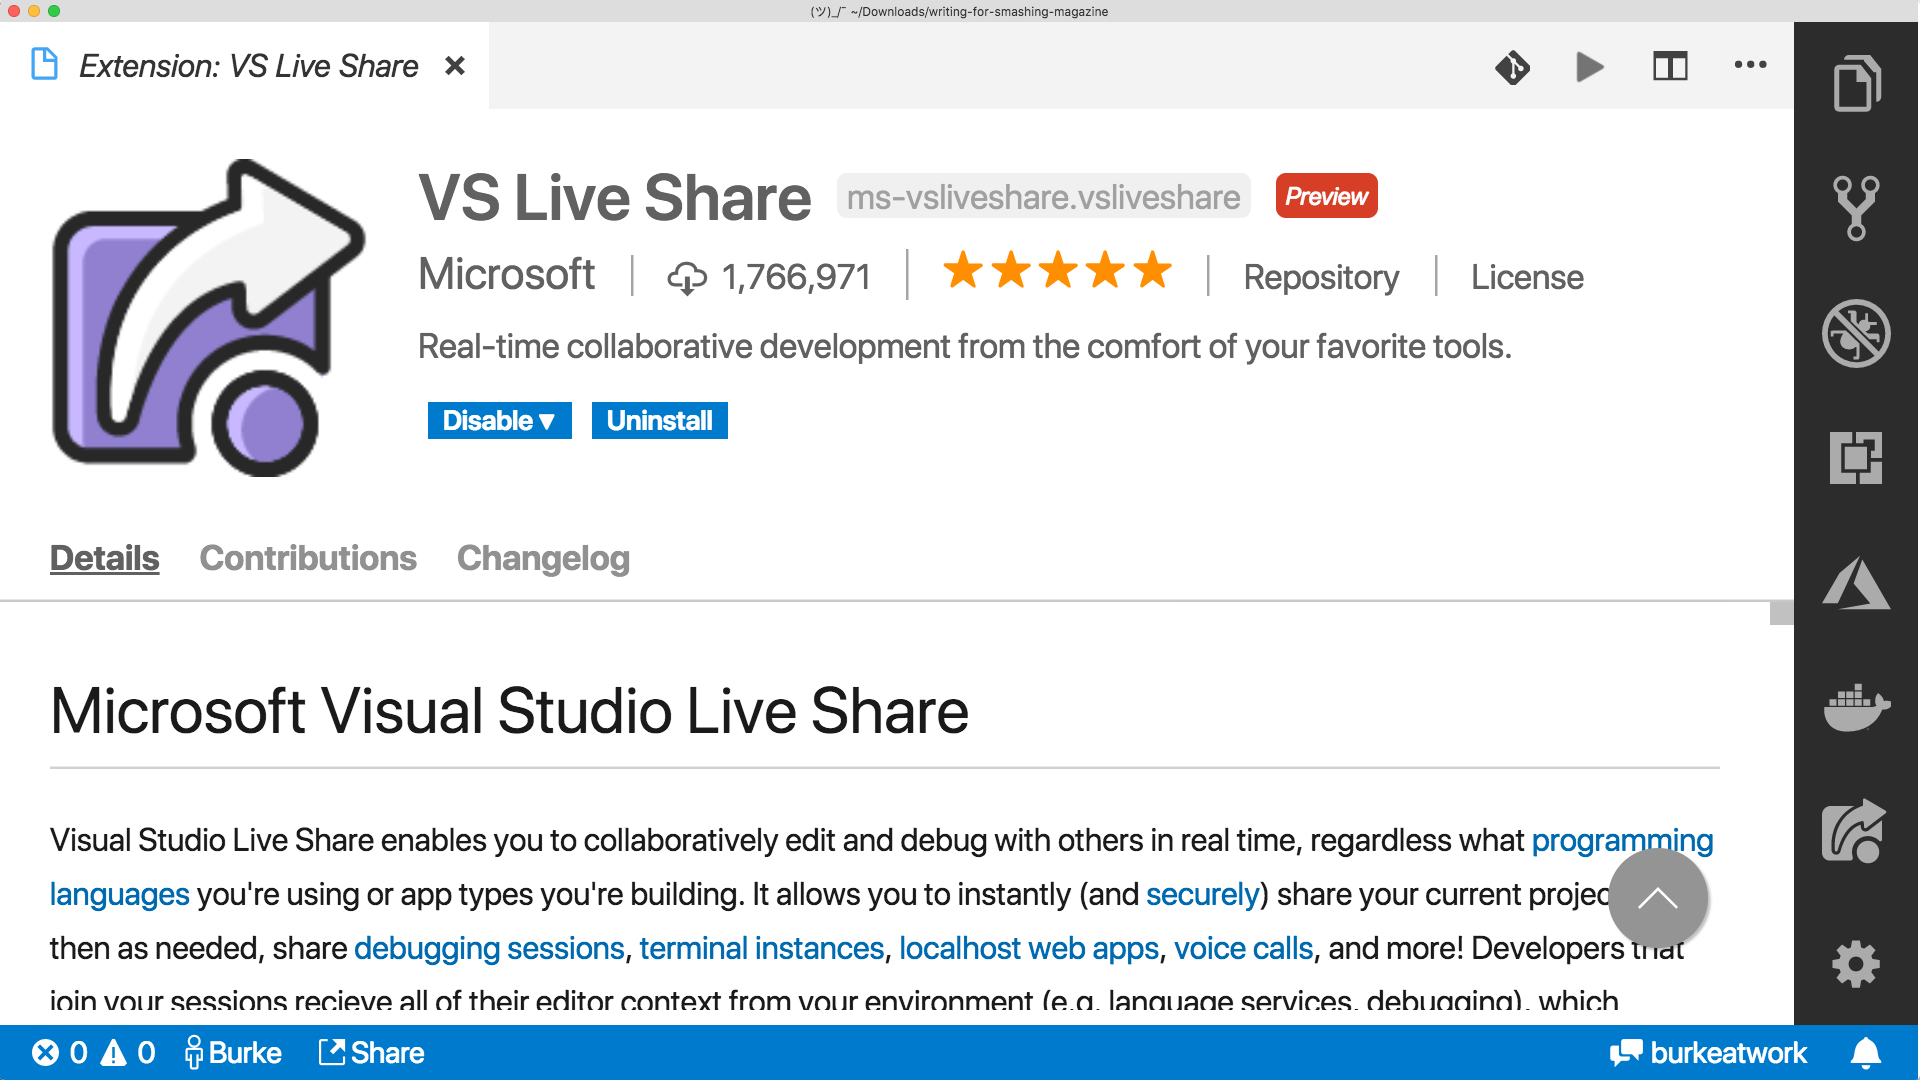
You can also install it via the VS Live Share Extension Pack, which includes the following extensions, all of which we are going to cover in this article…
- VS Live Share
- VS Live Share Audio
- Slack Chat extension
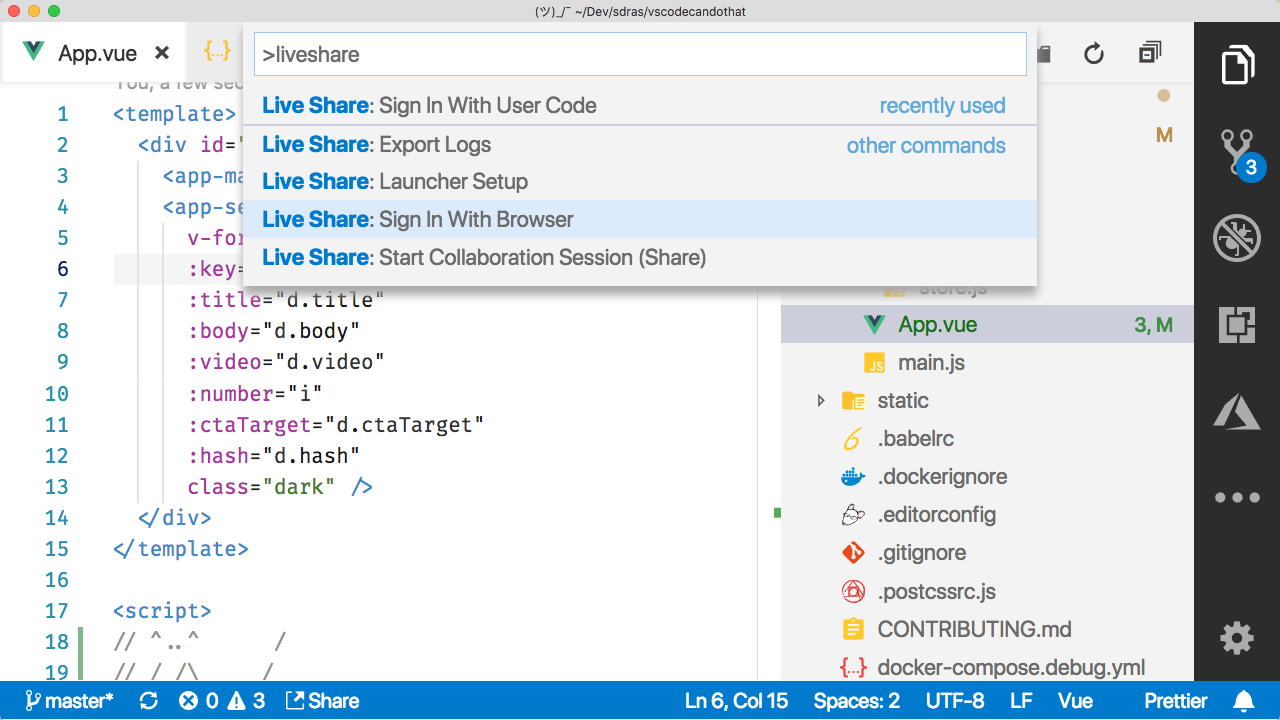
Once the extension is installed, you will need to log in to the VS Live Share service. You can do that by opening the Command Palette Ctrl/Cmd + Shift + P and select “Sign In With Browser”. If you don’t log in and you try and start a new sharing session, you will be prompted to log in at that time.
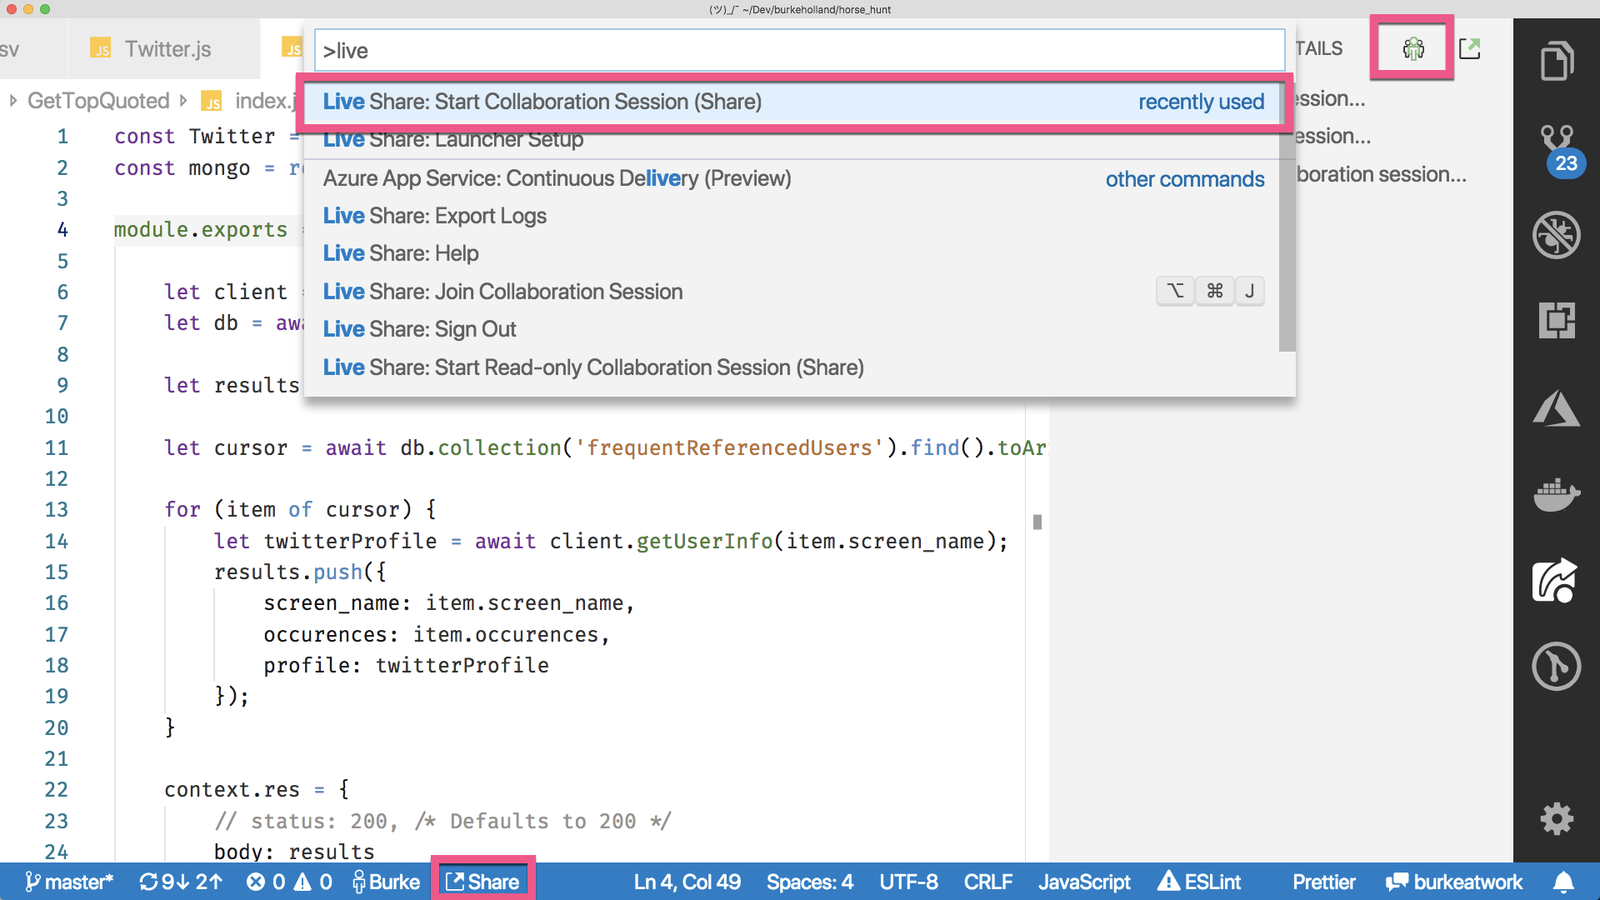
There are several ways to kick off a VS Live Share session. You can do it from the Command Palette, you can click that “Share” button in the bottom toolbar, or you can use the VS Live Share explorer view in the Sidebar.
A link is copied to your clipboard. You can then send that link to others, and they can join your Live Share session — provided they are using VS Code as well. Which, aren’t we all?
Now you can collaborate just like you were working on a regular old Word document:
The other person can not only see your code, but they can edit it, save it, execute it and even debug it. For you, they show up as a cursor with a name on it. You show up in their editor the same way.
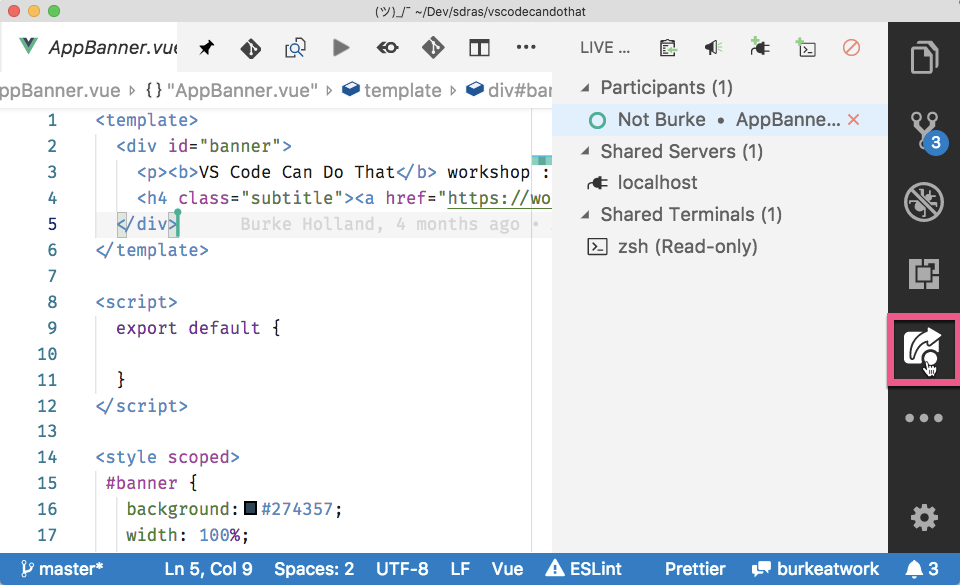
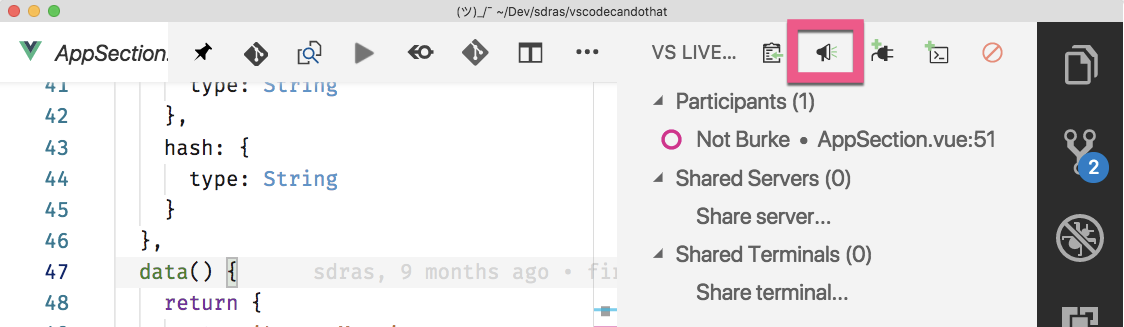
The VS Live Share Explorer
The VS Live Share explorer shows up as a new icon in the Action Bar — which is that bar of icons on the far right of my screen (the far left of yours for default Action Bar placement). This is a sort of “ground zero” for everything VS Live Share. From here, you can start sessions, end them, share terminals, servers, and see who is connected.
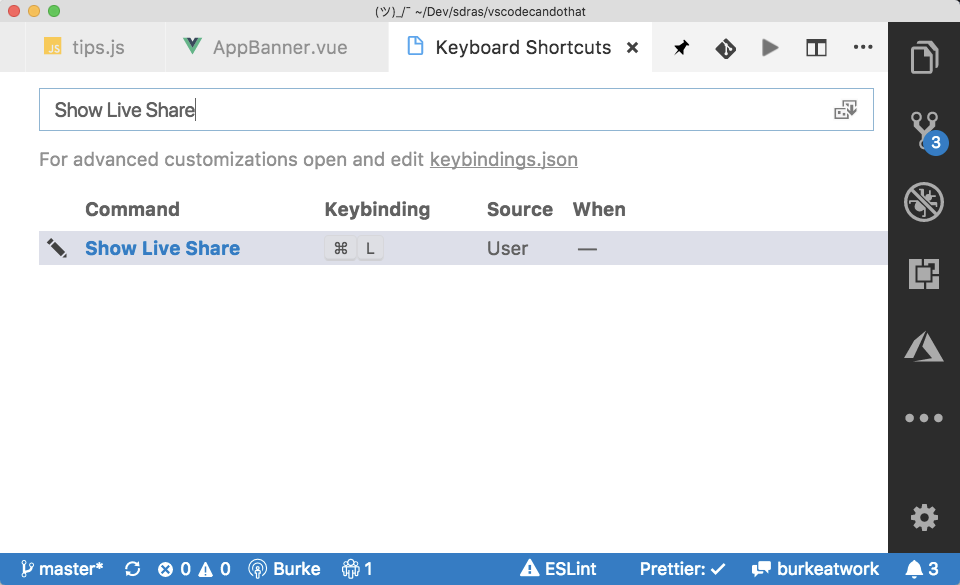
It’s a good idea to bind a keyboard shortcut to this VS Live Share Explorer view so that you can quickly toggle between that and your files. You can do this by pressing Ctrl/Cmd + K (or Ctrl/Cmd + S) and then searching for “Show Live Share”. I bound mine to Ctrl/Cmd + L, which doesn’t seem to be bound to anything else. I find this shortcut to be intuitive (L for Live Share) and easy to hit on the keyboard.
Share Code Read-Only
When you start a new sharing session, you will be notified thusly and asked if you would like to share your workspace read-only. If you select read-only, people will be able to see your code and follow your movements, but they will not be able to interact.
This mode is useful when you are sharing with someone that you don’t necessarily trust — maybe a vendor, partner or an estranged ex.
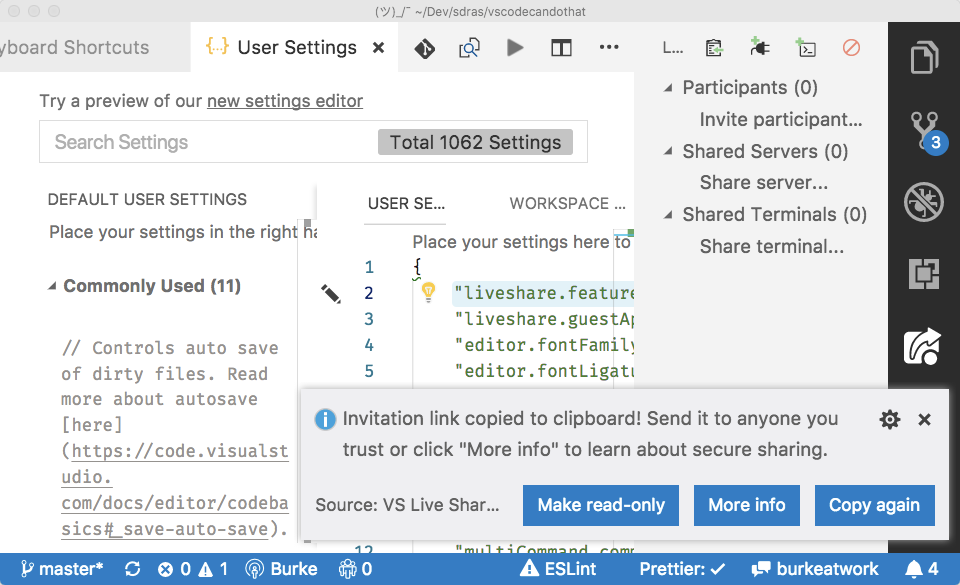
It’s also particularly useful for instructors. Note that at the time of this writing, VS Live Share is locked to 5 concurrent users. Since you probably are going to want more than that in read-only mode, especially if you’re teaching a group, you can up the limit to 30 by adding the following line to your User Settings file: Ctrl/Cmd + ,.
"liveshare.features": "experimental"
Change The Default Join Behavior
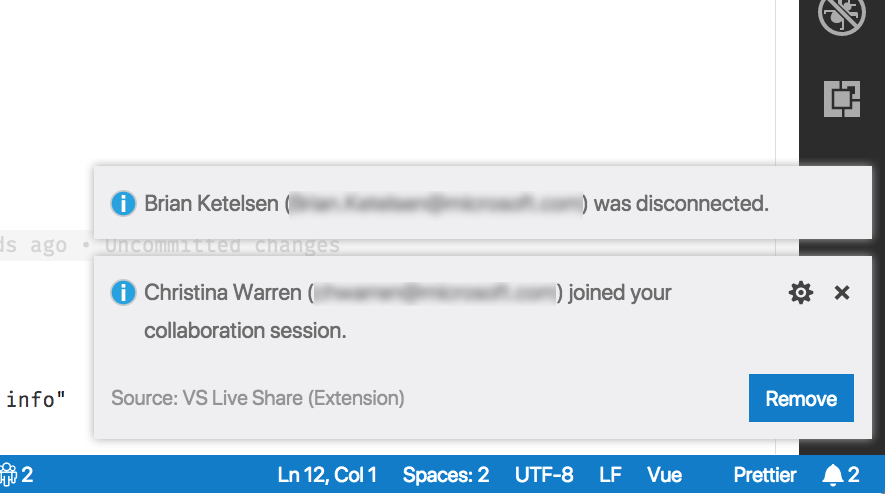
Anyone with the link can join your Live Share session. When they join, you’ll see a pop-up letting you know. Likewise, when they disconnect, you get notified. This is the default behavior for VS Live Share.
It’s a good idea to change this so that you have to manually approve someone before they can join your session. This is to protect you in the case where you go to lunch and forget to disconnect your session. Your co-workers can’t log back in, change one letter in your database connection string and then laugh while you spend the next four hours trying to figure out how your life has gone so horribly wrong.
To enable this, add the following line to your User Settings file Ctrl/Cmd + ,.
"liveshare.guestApprovalRequired": true
Now you’ll be prompted when someone wants to join. If you block someone, they are blocked for the duration of the session. If they try to join again, you won’t be notified and they will be unceremoniously rejected by VS Live Share.
Go and enjoy your lunch. Your computer is safe.
Focus Followers
By default, anyone who joins your Live Share session is “following” you. That means that their editor will load up whatever file you are in and scroll whenever you scroll. Even if you switch files, participants will see exactly what you see.
The second that a person makes changes to a file, they are no longer following you. So if you are both working on a file together, and then you go to a different file, they won’t automatically go with you. That can lead to a lot of confusion with you talking about code in the file you’re in while the other person is looking at something entirely different.
Besides just telling each other where you are (which works, btw), there is a handy command called “Focus Participants” that is in the Command Palette Ctrl/Cmd + Shift + P.
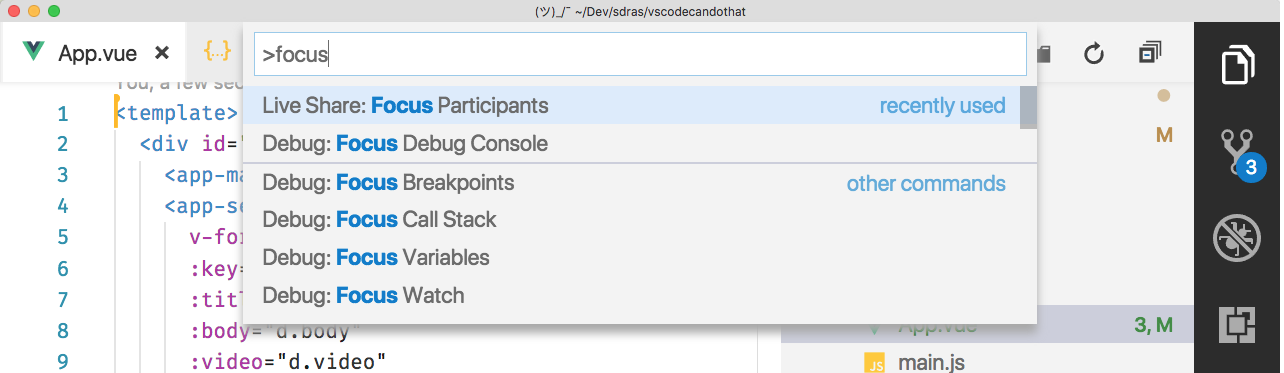
You can also access it as an icon in the VS Live Share Explorer view.
This will focus your participants on the next thing you click on or scroll to. By default, VS Live Share focus requests are accepted implicitly. If you don’t want people to be able to focus you, you can add the following line to your User Settings file.
"liveshare.focusBehavior": "prompt"
Also note that you can follow participants. If you click on their name in the VS Live Share Explorer view, you will begin to follow them.
Because following is turned off as soon as the other person begins editing code, it can be tough to know exactly when people are following you and when they aren’t. One place you can look is in the VS Live Share Explorer view. It will tell you the file that a person is in, but not whether or not they are following you.
A good practice is to just remember that focus is always changing so people may or may not see what you see at any given time.
Debug As A Team
Participants can share any debug sessions that you run. If you start a debug session, they will get the exact same experience that you do. If it breaks on your side, it breaks on theirs, and they get the full debug view into all of your code.
They can step in, out, over, add watches, evaluate in the Debug Console; any debugging that you can do, they can do too, and they can control it.
Debugging can also be launched by participants. Be default, though, VS Code does not allow your debugger to be started remotely. To enable this, add the following line to your User Settings file Ctrl/Cmd + ,:
"liveshare.allowGuestDebugControl": true
Share Your Terminal
A lot of the work we do as developers isn’t in our code; it’s in the terminal. Some days it seems like I spend about as much time on my terminal as I do in my editor. This means that if you have an error on your terminal or need to type some command, it would be nice if your participants in VS Live Share can see your terminal in addition to your code.
VS Code has an integrated terminal, and you can share it with VS Live Share.
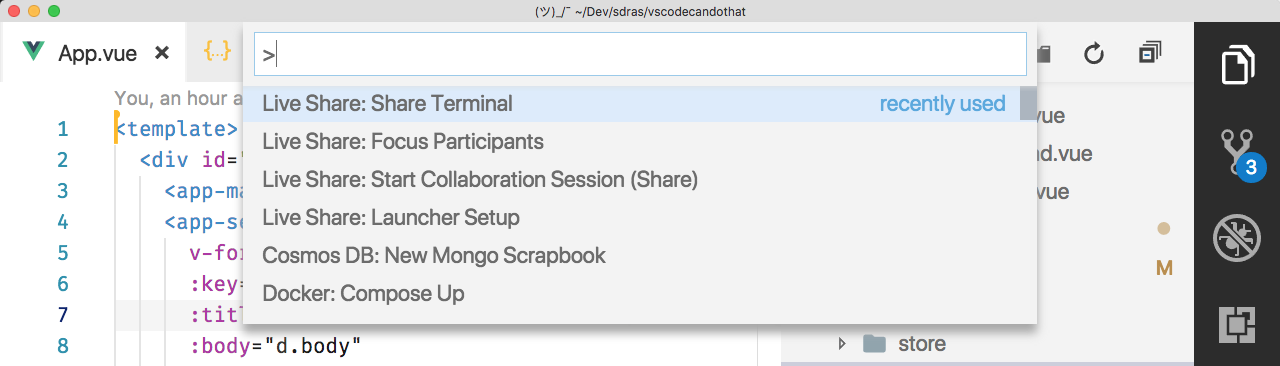
When you do this, you have the opportunity to share your terminal as read-only, or as read-write.

By default, you should be sharing your terminal as read-only. When you share your terminal read-write, the user can execute arbitrary commands directly on your terminal. Let that sink in for a moment. That’s heavy.
It goes without saying that having remote write access to someone’s terminal comes with a lot of trust and responsibility. You should only ever share your terminal read-write with people that you trust implicitly. Estranged ex’s are probably off the table.
Sharing your terminal read-only safely allows the person on the other end of the line to see what you are typing and your terminal output in real time, but restricts them from typing anything into that terminal.
Should you find yourself in a scenario where it would be quicker for the other person to just get at your terminal instead of trying to walk you through some wacky command with a ton of flags, you can share your terminal read-write. In this mode, the other person has full remote access to your terminal. Choose your friends wisely.
Share Your localhost
In the video above, the terminal command ends with a link to a site running on https://localhost:8080. With VS Live Share, you can share that localhost so that the other person can access it just like it was their own localhost.
If you are running a shared debug session, when the participant hits that localhost URL on their end, it will break for both of you if a breakpoint is hit. Even better, you can share any TCP process. That means that you can share something like a database or a Redis cache. For instance, you could share your local Mongo DB server. Seriously! This means no more changing config files or trying to get a shared database up. Just share the port for your local Mongo DB instance.
Share The Right Files The Right Way
Sometimes you don’t want collaborators to see certain files. There are likely private keys and passwords in your project that are not checked into source control and not suitable for public viewing. In this case, you would want to hide those files from anyone participating in your Live Share session.
By default, VS Live Share will hide any file that is specified in your .gitignore. If there is a file that you want to hide, just add it to your .gitignore. Note though, that this only hides the file in the project view. If you are in a shared debugging session and you step into a file that is in the .gitignore, it is still loaded up in the editor and your collaborators will be able to see it.
You can get more fine-grained control over how you share files by creating a .vsls.json file.
For instance, if you wanted to make sure that any files that are in the .gitignore are never visible, even during debugging, you can set the gitignore property to exclude.
{
    "$schema": "https://json.schemastore.org/vsls",
    "gitignore":"exclude"
}
Likewise, you could show everything in your .gitignore and control file visibilty directly from the .vsls.json file. To do that, set the gitignore to none and then use the excludeFiles and hideFiles properties. Remember — exclude means never visible, and hide means “not visible in the file explorer.”
{
    "$schema": "https://json.schemastore.org/vsls",
    "gitignore":"none",
    "excludeFiles":[
        "*.env"
    ],
    "hideFiles": [
        "dist"
    ]
}
Sharing And Extensions
Part of the appeal of VS Code to a lot of developers is the massive extensions marketplace. Most people will have more than a few installed. It’s important to understand how extensions will work, or not work, in the context of VS Live Share.
VS Live Share will synchronize anything that is specific to the context of the project you are sharing. For instance, if you have the Vetur extension installed because you are working with a Vue project, it will be shared across to any participants — regardless of whether or not they have it installed as well. The same is true for other context-specific things, like linters, formatters, debuggers, and language services.
VS Live Share does not synchronize extensions that are user specific. These would be things like themes, icons, keyboard bindings, and so on. As a general rule of thumb, VS Live Share shares your context, not your screen. You can consult the official docs article on this subject for a more in-depth explanation of what extensions you can expect to be shared.
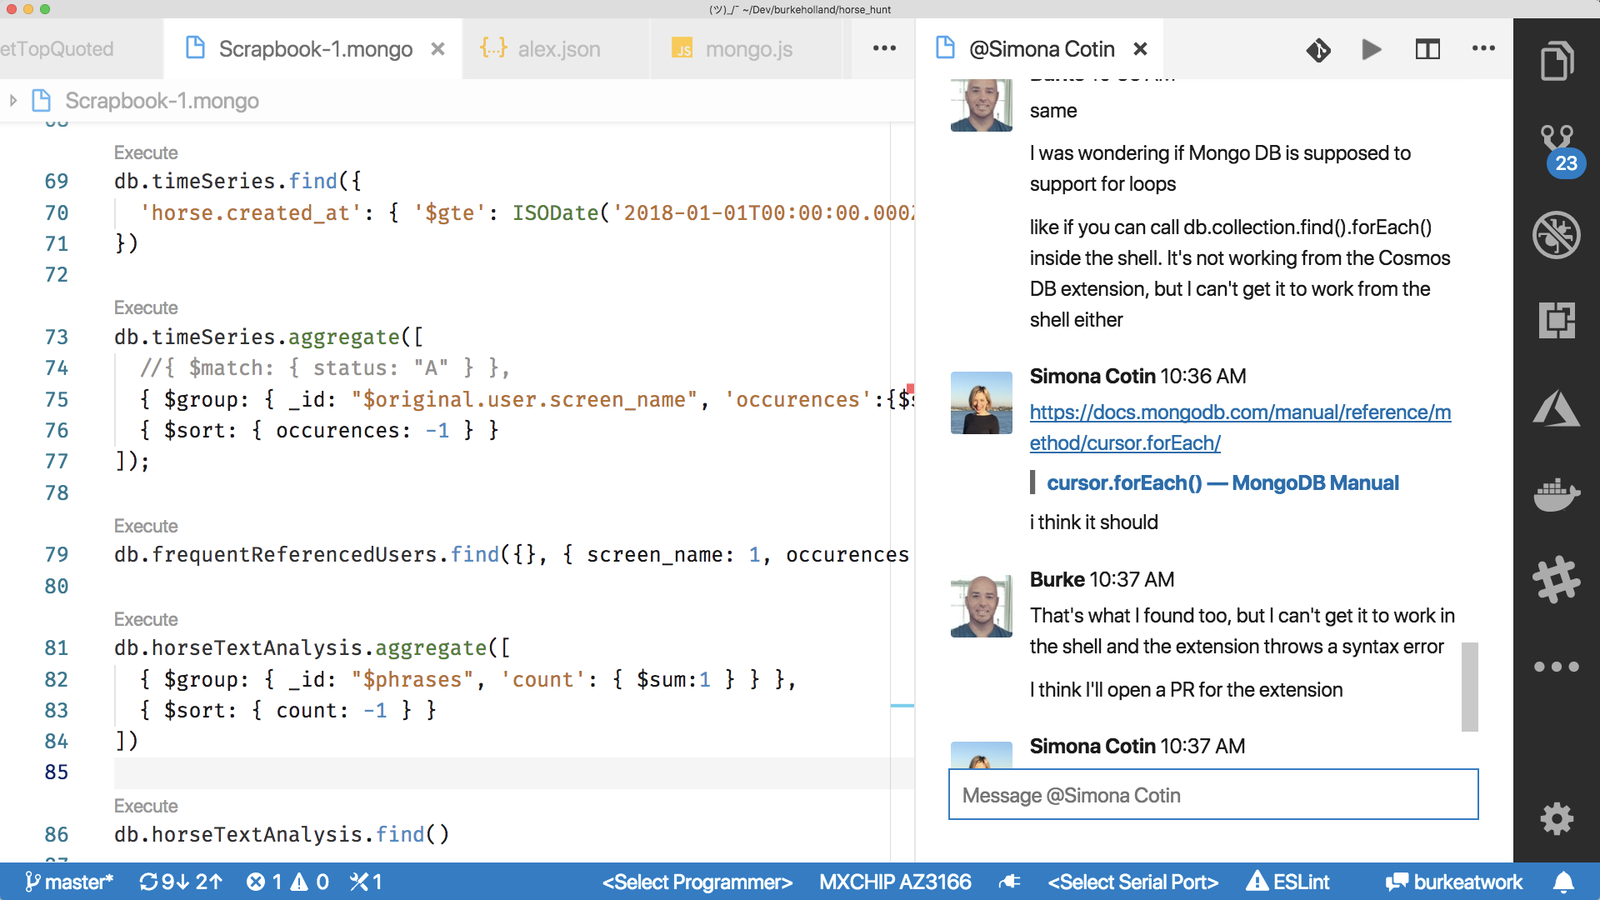
Communicate While You Collaborate
One of the first things people do on their inaugural VS Live Share experience is to try to communicate by typing in code comments. This seems like the write (get it?) thing to do, but not really how VS Live Share was designed to be used.
VS Live Share is not meant to replace your chat client of choice. You likely already have a preferred chat mechanism, and VS Live Share assumes that you will continue to use that.
If you’re already using Slack, there is a VS Code extension called Slack Chat. This extension is still a tad early in its development, but it looks quite promising. It puts VS Code in split mode and embeds Slack on the right-hand side. Even better, you can start a Live Share session directly from the Slack chat.
Another tool that looks quite interesting is called CodeStream.
CodeStream
While VS Live Share looks to improve collaboration from the editor, CodeStream is aiming to solve that same problem from a chat perspective.
The CodeStream extension allows you to chat directly within VS Code and those chats become part of your code history. You can highlight a chunk of code to discuss and it goes directly into the chat so there is context for your comments. These comments are then saved as part of your Git repo. They also show up in your code as little comment icons, and these comments will show up no matter which branch you are on.
When it comes to VS Live Share, CodeStream offers a complimentary set of features. You can start new sessions directly from the chat pane, as well as by clicking on an avatar. New sessions automatically create a corresponding chat channel that you can persist with the code, or dispose of when you are done.
If chatting isn’t enough to get the job done, and you need to collaborate like it’s 1999, help is just a phone call away.
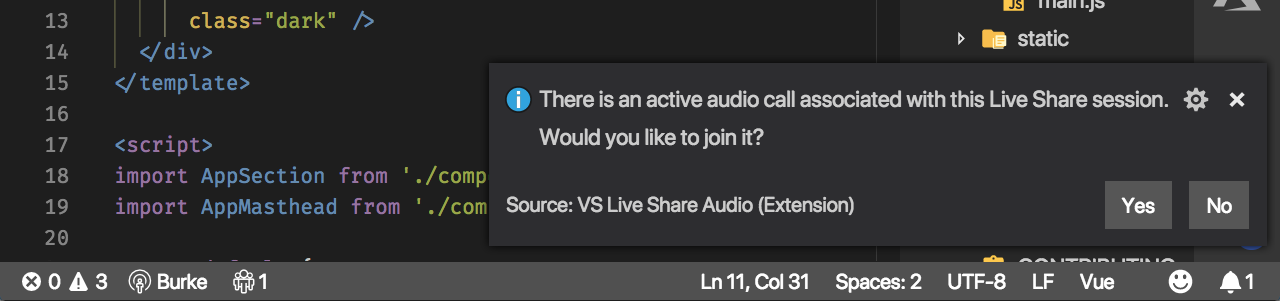
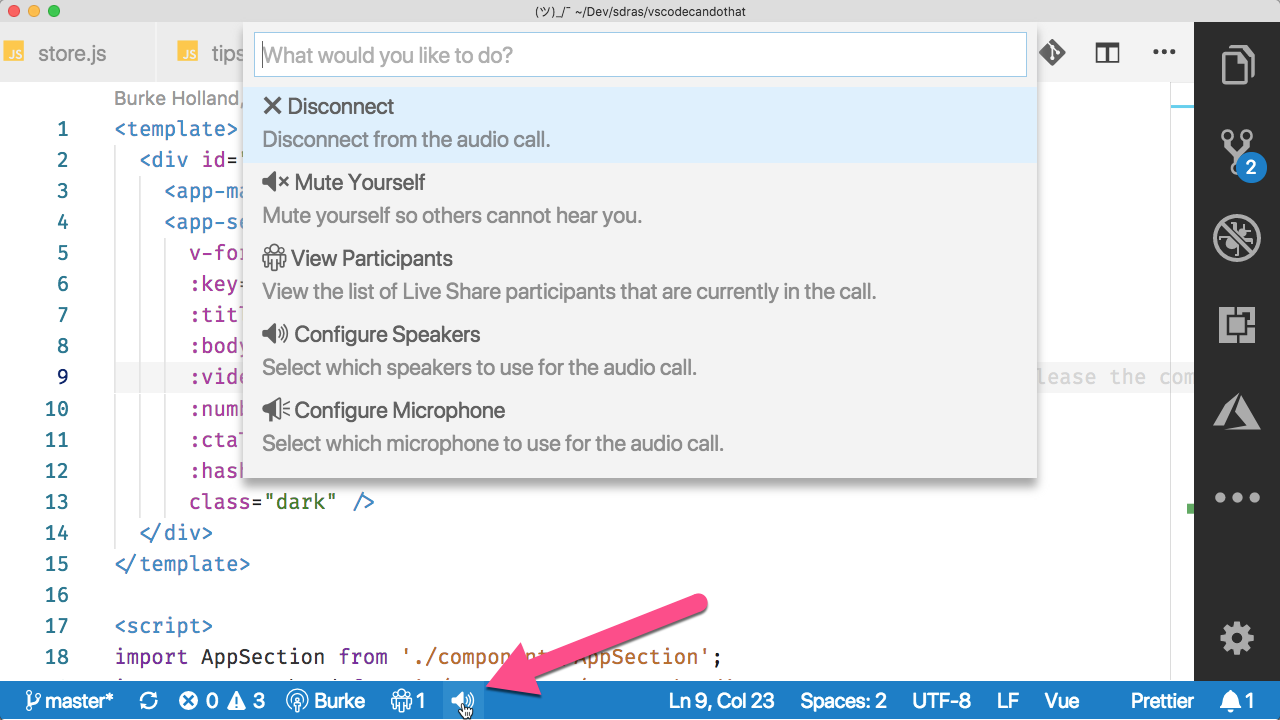
VS Live Share Audio
While VS Live Share isn’t trying to reinvent chat, it does re-invent your telephone. Kind of.
With the VS Live Share Audio extension, you can call someone directly and do voice chat from within VS Code.

The other person will then get a prompt to join your call.
You will see a speaker icon in the bottom status bar when you are connected to a call. You can click on that speaker to change your audio device, mute yourself, or disconnect from the call.
The last tip I’ll give you is probably the most important, and it’s not a fancy feature or obscure setting you didn’t know existed.
Change Your Muscle Memory
We’ve got years of learned behavior when it comes to getting help or sharing our code. The state of developer collaboration tools has been so bad for so long that we are conditioned to paste code into Slack, start an awkward Skype calls that consist mostly of “tell me when you can see my screen”, or crowd around a monitor and point excessively, i.e. stock photo style.

The most important thing you can do to get the most out of VS Live Share is to actually use VS Live Share. And it will have to be a “conscious” effort.
Your brain is good at patterns. You are constantly recognizing and classifying the world around you based on patterns you have identified, and you are so good at it, you don’t even realize you are doing it. You then develop default responses to these patterns. You form instincts. This is why you will default to the old ways of collaboration without even thinking about what you are doing. Before you know it you will be on a Skype call with someone sharing your screen — even if you have Live Share installed.
I’ve written a lot about VS Code and people will ask me from time to time how they can get more productive with their editor. I always say the same thing: the next time you reach for the mouse to do something, stop. Can you do that something with the keyboard instead? You probably can. Look up the shortcut and then make yourself use it. At first it’s going to be slower, but if you are willing to deliberately adopt a different behavior, you will be astonished at how fast your brain will default to the more productive way of doing something.
The same goes for Live Share. You will be on a call sharing your screen when it occurs to you that you could be using Live Share. At that moment, stop; click that “Share” button in the bottom of VS Code.
Yes, the person on the other end may not have the extension installed. Yes, it may take a moment to set it up. But if you work on establishing this behavior now, the next time you go to do this, it will “just work” and it won’t be long before you don’t even have to think about it, and at that point, you will finally have achieved that “Anonymous Hippo” level of collaboration.
More Resources
Further Reading
- Vanilla JavaScript, Libraries, And The Quest For Stateful DOM Rendering
- How Marketing Changed OOP In JavaScript
- Top Front-End Tools Of 2023
- Event Calendars For Web Made Easy With These Commercial Options


