Styling An Angular Application With Bootstrap

Email Newsletter
Weekly tips on front-end & UX.
Trusted by 182,000+ folks.
 Celebrating 10 million developers


 Custom Web Forms for Angular, React, & Vue. Your backend.
In case you’ve already tried building a web application with Angular 7, it’s time to kick it up a notch. Let’s see how we can integrate Bootstrap CSS styles and JavaScript files with an Angular project generated using the Angular CLI, and how to use form controls and classes to create beautiful forms and how to style HTML tables using Table styles.
For the Angular part, we’ll be creating a simple client-side application for creating and listing contacts. Each contact has an ID, name, email, and description, and we’ll be using a simple data service that stores the contacts in a TypeScript array. You can use an advanced in-memory API instead. (Check out “A Complete Guide To Routing In Angular”.)
Note: You can get the source code of this tutorial from this GitHub repository and see the live example over here.
Requirements
Before we start creating the demo application, let’s see the requirements needed for this tutorial.
Basically, you will need the following:
- Node.js and NPM installed (you can simply head on over to the official website and download the binaries for your system),
- Familiarity with TypeScript,
- Working experience of Angular,
- Basic knowledge of CSS and HTML.
Installing Angular CLI
Let’s start by installing the latest version of Angular CLI. In your terminal, run the following command:
$ npm install -g @angular/cli
At the time writing, v7.0.3 of Angular CLI is installed. If you have the CLI already installed, you can make sure you have the latest version by using this command:
$ ng --version
Creating A Project
Once you have Angular CLI installed, let’s use it to generate an Angular 7 project by running the following command:
$ ng new angular-bootstrap-demo
The CLI will then ask you:
"Would you like to add Angular routing?"
Press Y. Next, it will ask you:
"Which stylesheet format would you like to use?"
Choose “CSS”.
Adding Bootstrap
After creating the project, you need to install Bootstrap 4 and integrate it with your Angular project.
First, navigate inside your project’s root folder:
$ cd angular-bootstrap-demo
Next, install Bootstrap 4 and jQuery from npm:
$ npm install --save bootstrap jquery
(In this case, bootstrap v4.2.1 and jquery v3.3.1 are installed.)
Finally, open the angular.json file and add the file paths of Bootstrap CSS and JS files as well as jQuery to the styles and scripts arrays under the build target:
"architect": {
  "build": {
    [...],
    "styles": [
      "src/styles.css",
        "node_modules/bootstrap/dist/css/bootstrap.min.css"
      ],
      "scripts": [
        "node_modules/jquery/dist/jquery.min.js",
        "node_modules/bootstrap/dist/js/bootstrap.min.js"
      ]
    },
Check out how to add Bootstrap to an Angular 6 project for options on how to integrate Bootstrap with Angular.
Adding A Data Service
After creating a project and adding Bootstrap 4, we’ll create an Angular service that will be used to provide some demo data to display in our application.
In your terminal, run the following command to generate a service:
$ ng generate service data
This will create two src/app/data.service.spec.ts and src/app/data.service.ts files.
Open src/app/data.service.ts and replace its contents with the following:
import { Injectable } from '@angular/core';

@Injectable({
  providedIn: 'root'
})
export class DataService {

  contacts = [
    {id: 1, name: "Contact 001", description: "Contact 001 des", email: "c001@email.com"},
    {id: 2, name: "Contact 002", description: "Contact 002 des", email: "c002@email.com"},
    {id: 3, name: "Contact 003", description: "Contact 003 des", email: "c003@email.com"},
    {id: 4, name: "Contact 004", description: "Contact 004 des", email: "c004@email.com"}
  ];

  constructor() { }

  public getContacts():Array<{id, name, description, email}>{
    return this.contacts;
  }
  public createContact(contact: {id, name, description, email}){
    this.contacts.push(contact);
  }
}
We add a contacts array with some demo contacts, a getContacts() method which returns the contacts and a createContact() which append a new contact to the contacts array.
Adding Components
After creating the data service, next we need to create some components for our application. In your terminal, run:
$ ng generate component home
$ ng generate component contact-create
$ ng generate component contact-list
Next, we’ll add these components to the routing module to enable navigation in our application. Open the src/app/app-routing.module.ts file and replace its contents with the following:
import { NgModule } from '@angular/core';
import { Routes, RouterModule } from '@angular/router';
import { ContactListComponent } from './contact-list/contact-list.component';
import { ContactCreateComponent } from './contact-create/contact-create.component';
import { HomeComponent } from './home/home.component';

const routes: Routes = [
  {path:  "", pathMatch:  "full",redirectTo:  "home"},
  {path: "home", component: HomeComponent},
  {path: "contact-create", component: ContactCreateComponent},
  {path: "contact-list", component: ContactListComponent}
];

@NgModule({
  imports: [RouterModule.forRoot(routes)],
  exports: [RouterModule]
})
export class AppRoutingModule { }
We use the redirectTo property of the router’s path to redirect users to the home page when they visit our application.
Adding Header And Footer Components
Next, let’s create the header and footer components:
$ ng generate component header
$ ng generate component footer
Open the src/app/header/header.component.html file and add the following code:
<nav class="navbar navbar-expand-md bg-dark navbar-dark fixed-top">
  <a class="navbar-brand" href="#">Angular Bootstrap Demo</a>
  <button class="navbar-toggler" type="button" data-toggle="collapse" data-target="#navbarCollapse" aria-controls="navbarCollapse"
    aria-expanded="false" aria-label="Toggle navigation">
    <span class="navbar-toggler-icon"></span>
  </button>
  <div class="collapse navbar-collapse" id="navbarCollapse">
    <ul class="navbar-nav mr-auto">

      <li class="nav-item">
        <a class="nav-link" routerLink="/home">Home</a>
      </li>
      <li class="nav-item">
        <a class="nav-link" routerLink="/contact-list">Contacts</a>
      </li>
      <li class="nav-item">
        <a class="nav-link" routerLink="/contact-create">Create</a>
      </li>

    </ul>
  </div>
</nav>
A navigation bar will be created with Bootstrap 4, and we’ll use the routerLink directive to link to different components.
Use the .navbar, .navbar-expand{-sm|-md|-lg|-xl} and .navbar-dark classes to create Bootstrap navigation bars. (For more information about nav bars, check out Bootstrap’s documentation on “Navbar”.
Next, open the src/app/header/header.component.css file and add:
.nav-item{
    padding:2px;
    margin-left: 7px;
}
Next, open the src/app/footer/footer.component.html file and add:
<footer>
  <p  class="text-xs-center">© Copyright 2019. All rights reserved.</p>
</footer>
Open the src/app/footer/footer.component.css file and add:
footer {
    position: absolute;
    right: 0;
    bottom: 0;
    left: 0;
    padding: 1rem;
    text-align: center;
}
Next, open the src/app/app.component.html file and replace its contents with the following:
<app-header></app-header>
<router-outlet></router-outlet>
<app-footer></app-footer>
We’re creating an application shell by using the header and footer components which means that they will be present on every page of our application. The only part that will be changed is what will be inserted in the router outlet (check out “The Application Shell” on the Angular website for more information).
Adding A Bootstrap Jumbotron
According to the Bootstrap docs:
“A Jumbotron is a lightweight, flexible component that can optionally extend the entire viewport to showcase key marketing messages on your site.”
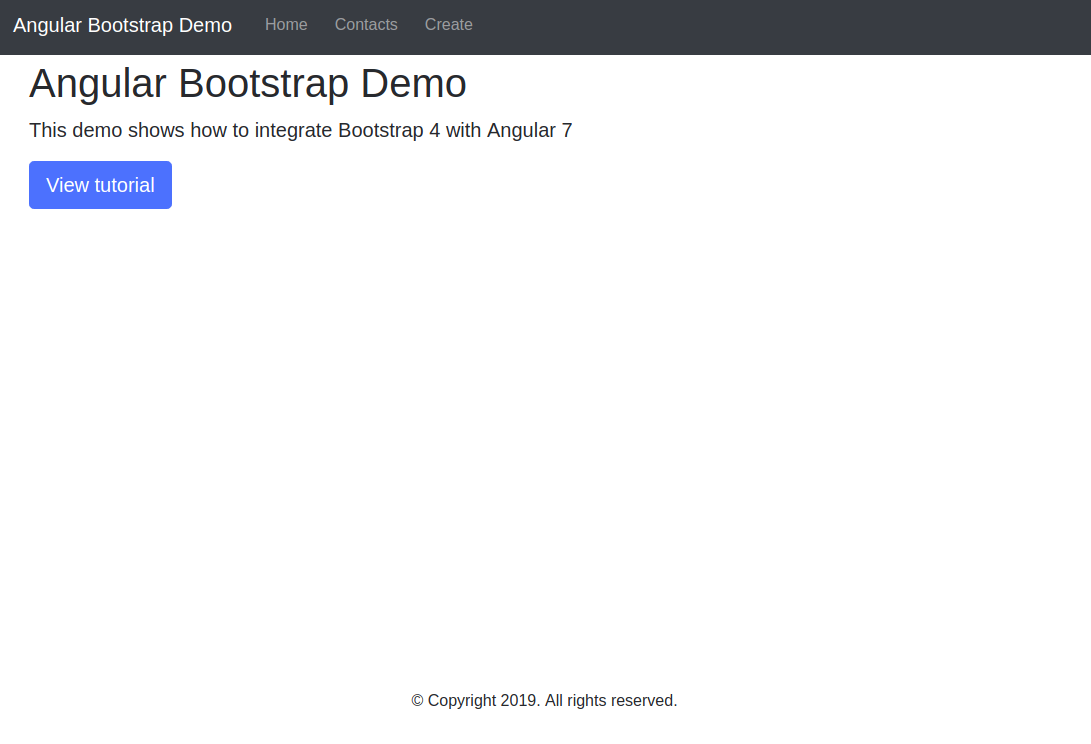
Let’s add a Jumbotron component to our home page. Open the src/app/home/home.component.html file and add:
<div class="jumbotron" style="background-color: #fff; height: calc(95vh);">
  <h1>Angular Bootstrap Demo</h1>
  <p class="lead">
    This demo shows how to integrate Bootstrap 4 with Angular 7
  </p>
  <a class="btn btn-lg btn-primary" href="" role="button">View tutorial</a>
</div>
The .jumbotron class is used to create a Bootstrap Jumbotron.
Adding A List Component: Using A Bootstrap Table
Now let’s create a component-to-list data from the data service and use a Bootstrap 4 table to display tabular data.
First, open the src/app/contact-list/contact-list.component.ts file and inject the data service then call the getContacts() method to get data when the component is initialized:
import { Component, OnInit } from '@angular/core';
import { DataService } from '../data.service';

@Component({
  selector: 'app-contact-list',
  templateUrl: './contact-list.component.html',
  styleUrls: ['./contact-list.component.css']
})
export class ContactListComponent implements OnInit {

  contacts;
  selectedContact;

  constructor(public dataService: DataService) { }

  ngOnInit() {
    this.contacts = this.dataService.getContacts();
  }
  public selectContact(contact){
    this.selectedContact = contact;
  }
}
We added two variables contactsand selectedContact which hold the set of contacts and the selected contact. And a selectContact() method which assigns the selected contact to the selectedContact variable.
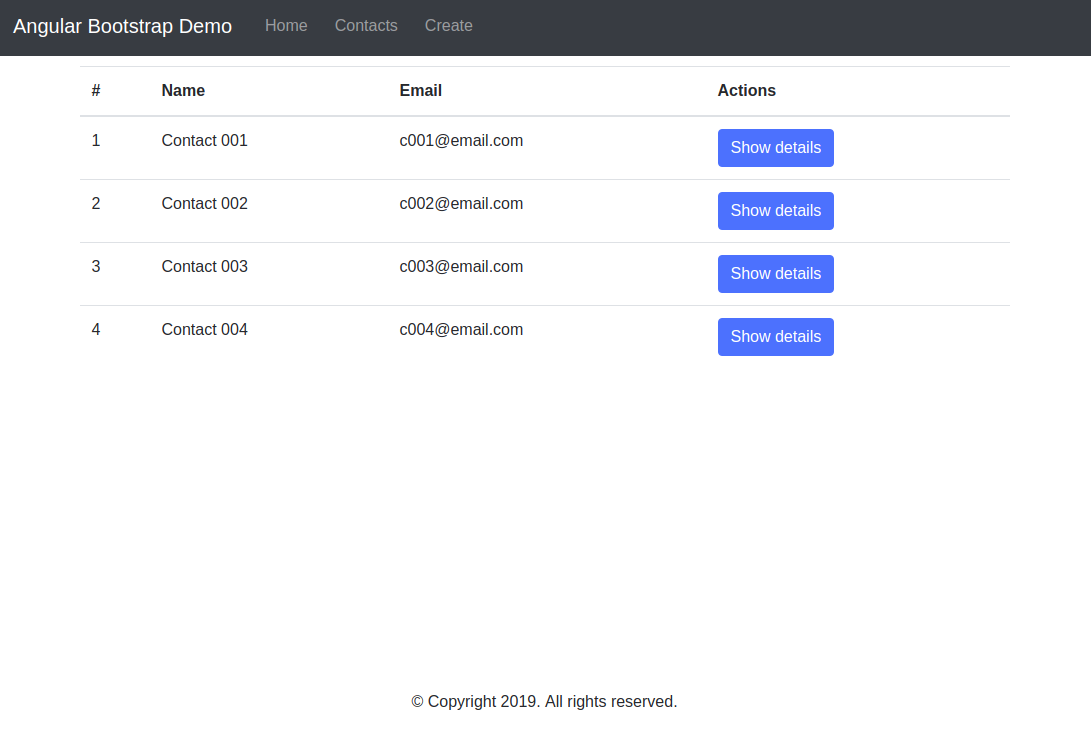
Open the src/app/contact-list/contact-list.component.html file and add:
<div class="container" style="margin-top: 70px;">
  <table class="table table-hover">
    <thead>
      <tr>
        <th>#</th>
        <th>Name</th>
        <th>Email</th>
        <th>Actions</th>
      </tr>
    </thead>
    <tbody>
      <tr *ngFor="let contact of contacts">

        <td>{{ contact.id }}</td>
        <td> {{ contact.name }}</td>
        <td> {{ contact.email }}</td>
        <td>
          <button class="btn btn-primary" (click)="selectContact(contact)"> Show details</button>
        </td>
      </tr>
    </tbody>
  </table>
  <div class="card text-center" *ngIf="selectedContact">
      <div class="card-header">
        # {{selectedContact.id}}
      </div>
      <div class="card-block">
        <h4 class="card-title">{{selectedContact.name}}</h4>
        <p class="card-text">
          {{selectedContact.description}}
        </p>
      </div>

    </div>
</div>
We simply loop through the contacts array and display each contact details and a button to select a contact. If the contact is selected, a Bootstrap 4 Card with more information will be displayed.
This is the definition of a Card from Bootstrap 4 docs:
“A card is a flexible and extensible content container. It includes options for headers and footers, a wide variety of content, contextual background colors, and powerful display options. If you’re familiar with Bootstrap 3, cards replace our old panels, wells, and thumbnails. Similar functionality to those components is available as modifier classes for cards.”
We use the .table and .table-hover classes to create Bootstrap-styled tables, the .card, .card-block, .card-title and .card-text classes to create cards. (For more information, check out Tables and Cards.)
Adding A Create Component: Using Bootstrap Form Controls And Classes
Let’s now add a form to our contact-create component. First, we need to import the FormsModule in our main application module. Open the src/app/app.module.ts file, import FormsModule from @angular/forms, and add it to the imports array:
import { BrowserModule } from '@angular/platform-browser';
import { NgModule } from '@angular/core';
import { AppRoutingModule } from './app-routing.module';
import { FormsModule } from '@angular/forms';

/* ... */

@NgModule({
  declarations: [
  /* ... */
  ],
  imports: [
    BrowserModule,
    AppRoutingModule,
    FormsModule
  ],
  providers: [],
  bootstrap: [AppComponent]
})
export class AppModule { }
Next, open the src/app/contact-create/contact-create.component.ts file and replace its contents with the following:
import { Component, OnInit } from '@angular/core';
import { DataService } from '../data.service';

@Component({
  selector: 'app-contact-create',
  templateUrl: './contact-create.component.html',
  styleUrls: ['./contact-create.component.css']
})
export class ContactCreateComponent implements OnInit {

  contact : {id, name, description, email} = {id: null, name: "", description: "", email: ""};

  constructor(public dataService: DataService) { }

  ngOnInit() {
  }

  createContact(){
    console.log(this.contact);
    this.dataService.createContact(this.contact);
    this.contact = {id: null, name: "", description: "", email: ""};

  }
}
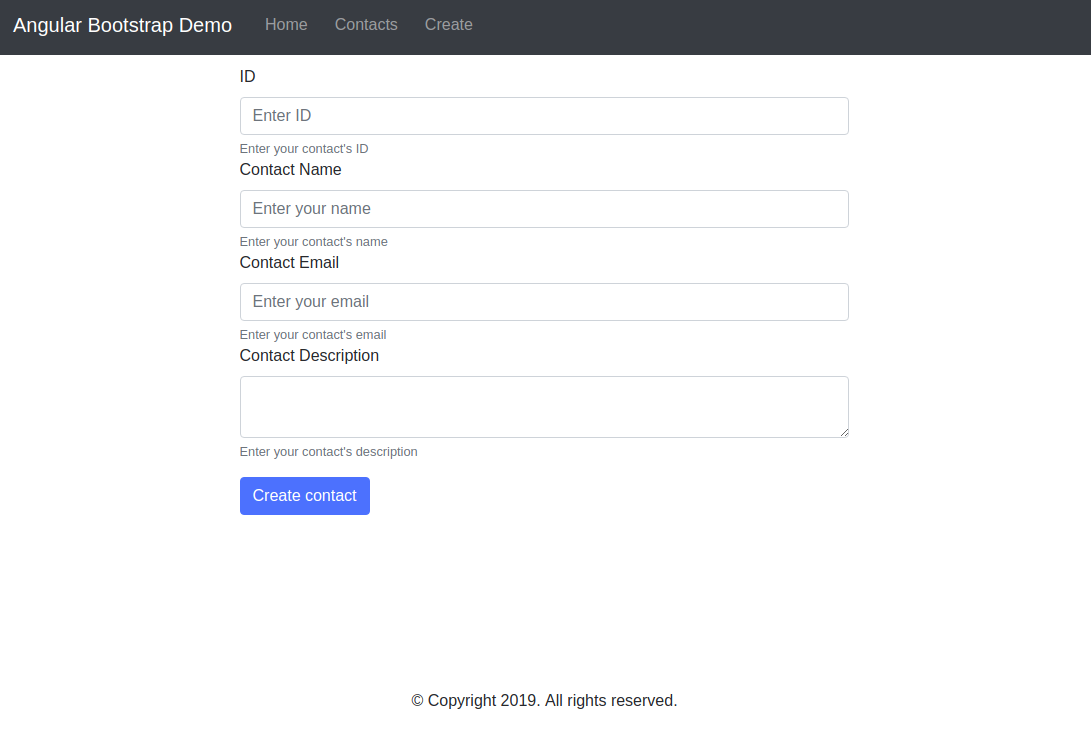
Next, open the src/app/contact-create/contact-create.component.html file and add the following code:
<div class="container" style="margin-top: 70px;">

  <div class="row">

    <div class="col-sm-8 offset-sm-2">

      <div>
        <form>
          <div class="form-group">
            <label for="id">ID</label>
            <input [(ngModel)]="contact.id" type="text" name="id" class="form-control" id="id" aria-describedby="idHelp" placeholder="Enter ID">
            <small id="idHelp" class="form-text text-muted">Enter your contact’s ID</small>

            <label for="name">Contact Name</label>
            <input [(ngModel)]="contact.name" type="text" name="name" class="form-control" id="name" aria-describedby="nameHelp" placeholder="Enter your name">
            <small id="nameHelp" class="form-text text-muted">Enter your contact’s name</small>

            <label for="email">Contact Email</label>
            <input [(ngModel)]="contact.email" type="text" name="email" class="form-control" id="email" aria-describedby="emailHelp"
              placeholder="Enter your email">
            <small id="nameHelp" class="form-text text-muted">Enter your contact’s email</small>

            <label for="description">Contact Description</label>
            <textarea [(ngModel)]="contact.description" name="description" class="form-control" id="description" aria-describedby="descHelp">
                      </textarea>
            <small id="descHelp" class="form-text text-muted">Enter your contact’s description</small>

          </div>
        </form>
        <button class="btn btn-primary" (click)="createContact()">Create contact</button>
      </div>
    </div>
  </div>
</div>
We use the .form-group, .form-control classes to create a Bootstrap-styled form (check out “Forms” for more information).
We use the ngModel directive to bind the form fields to the components’ variable. For data binding to properly work, you need to give each form field a name.
Recommended reading: Managing Image Breakpoints With Angular by Tamas Piros
Running The Angular Application
At this step, let’s run the application and see if everything works as expected. Head over to your terminal, make sure you are in the root folder of your project then run the following command:
$ ng serve
A live-reload development server will be running from the https://localhost:4200 address. Open your web browser and navigate to that address. You should see the following interface:
If you navigate to the Contacts page, you should see:
If you navigate to the “Create contact” page, you should see:
Conclusion
In this tutorial, we’ve seen how to create a simple Angular application with a Bootstrap interface. You can find the complete source code on GitHub and see the live example here.
Further Reading
- Using AI To Detect Sentiment In Audio Files
- Setting And Persisting Color Scheme Preferences With CSS And A “Touch” Of JavaScript
- Things I Wish I Had Known About Angular When I Started
- Converting Plain Text To Encoded HTML With Vanilla JavaScript


