Get Started With Node: An Introduction To APIs, HTTP And ES6+ JavaScript

Email Newsletter
Weekly tips on front-end & UX.
Trusted by 182,000+ folks.


 Custom Web Forms for Angular, React, & Vue. Your backend.
 Celebrating 10 million developers

You’ve probably heard of Node.js as being an “asynchronous JavaScript runtime built on Chrome’s V8 JavaScript engine”, and that it “uses an event-driven, non-blocking I/O model that makes it lightweight and efficient”. But for some, that is not the greatest of explanations.
What is Node in the first place? What exactly does it mean for Node to be “asynchronous”, and how does that differ from “synchronous”? What is the meaning “event-driven” and “non-blocking” anyway, and how does Node fit into the bigger picture of applications, Internet networks, and servers?
We’ll attempt to answer all of these questions and more throughout this series as we take an in-depth look at the inner workings of Node, learn about the HyperText Transfer Protocol, APIs, and JSON, and build our very own Bookshelf API utilizing MongoDB, Express, Lodash, Mocha, and Handlebars.
What Is Node.js
Node is only an environment, or runtime, within which to run normal JavaScript (with minor differences) outside of the browser. We can use it to build desktop applications (with frameworks like Electron), write web or app servers, and more.
Blocking/Non-Blocking And Synchronous/Asynchronous
Suppose we are making a database call to retrieve properties about a user. That call is going to take time, and if the request is “blocking”, then that means it will block the execution of our program until the call is complete. In this case, we made a “synchronous” request since it ended up blocking the thread.
So, a synchronous operation blocks a process or thread until that operation is complete, leaving the thread in a “wait state”. An asynchronous operation, on the other hand, is non-blocking. It permits execution of the thread to proceed regardless of the time it takes for the operation to complete or the result it completes with, and no part of the thread falls into a wait state at any point.
Let’s look at another example of a synchronous call that blocks a thread. Suppose we are building an application that compares the results of two Weather APIs to find their percent difference in temperature. In a blocking manner, we make a call to Weather API One and wait for the result. Once we get a result, we call Weather API Two and wait for its result. Don’t worry at this point if you are not familiar with APIs. We’ll be covering them in an upcoming section. For now, just think of an API as the medium through which two computers may communicate with one another.
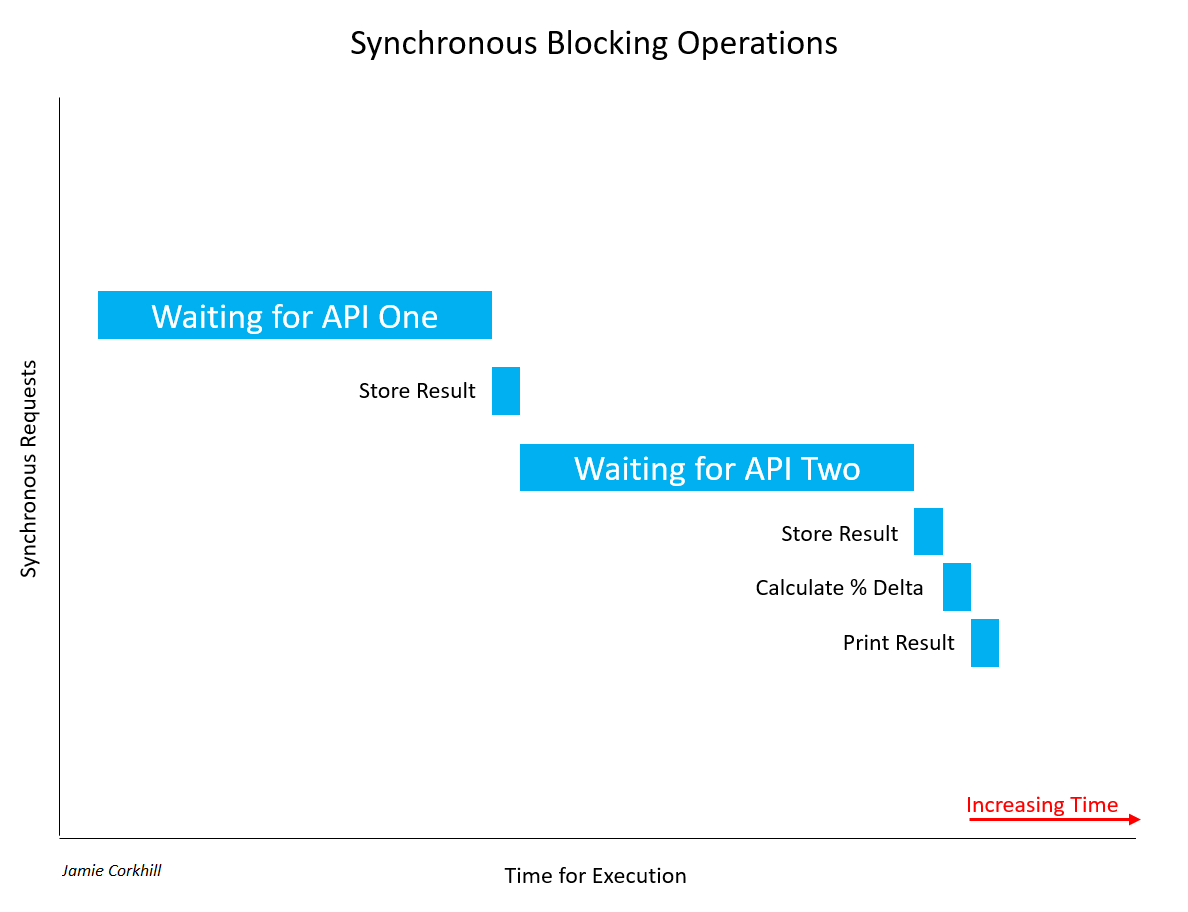
Allow me to note, it’s important to recognize that not all synchronous calls are necessarily blocking. If a synchronous operation can manage to complete without blocking the thread or causing a wait state, it was non-blocking. Most of the time, synchronous calls will be blocking, and the time they take to complete will depend on a variety of factors, such as the speed of the API’s servers, the end user’s internet connection download speed, etc.
In the case of the image above, we had to wait quite a while to retrieve the first results from API One. Thereafter, we had to wait equally as long to get a response from API Two. While waiting for both responses, the user would notice our application hang — the UI would literally lock up — and that would be bad for User Experience.
In the case of a non-blocking call, we’d have something like this:
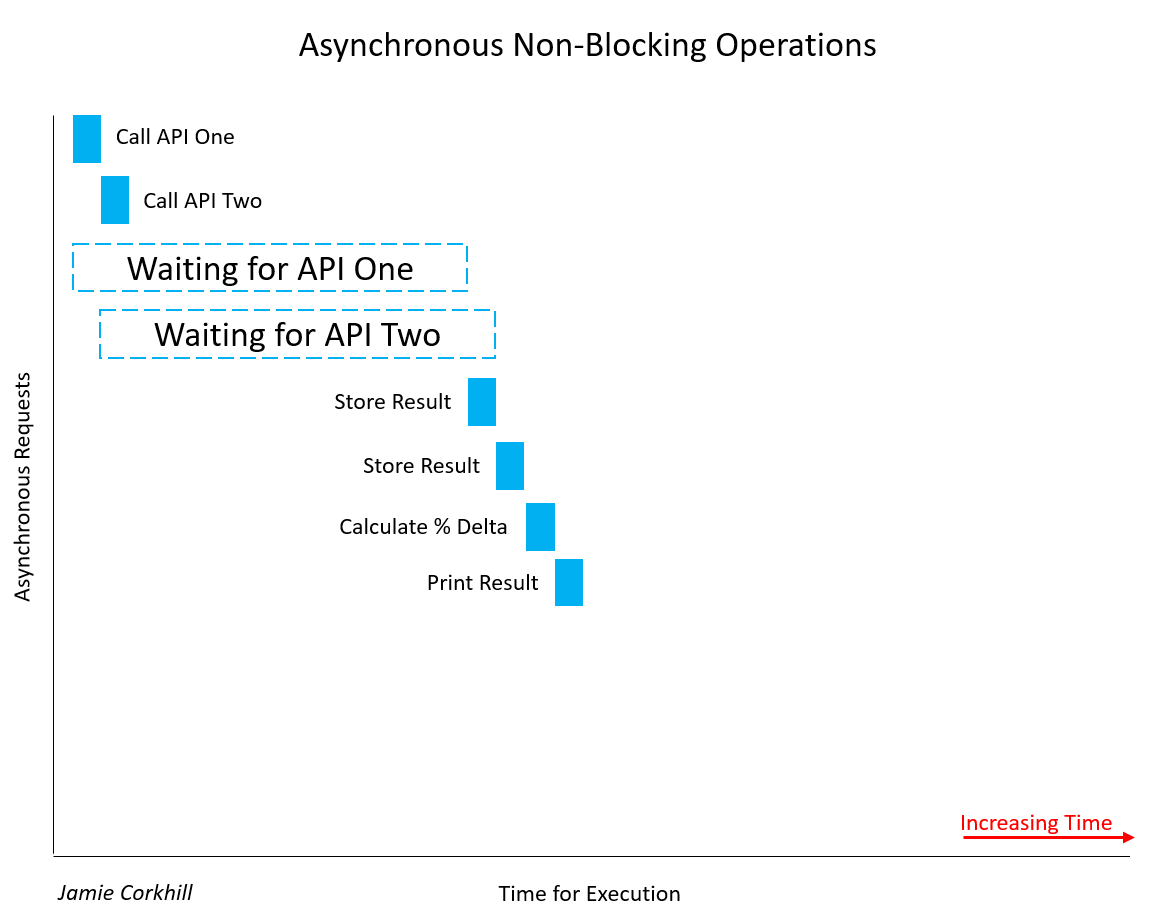
You can clearly see how much faster we concluded execution. Rather than wait on API One and then wait on API Two, we could wait for both of them to complete at the same time and achieve our results almost 50% faster. Notice, once we called API One and started waiting for its response, we also called API Two and began waiting for its response at the same time as One.
At this point, before moving into more concrete and tangible examples, it is important to mention that, for ease, the term “Synchronous” is generally shortened to “Sync”, and the term “Asynchronous” is generally shortened to “Async”. You will see this notation used in method/function names.
Callback Functions
You might be wondering, “if we can handle a call asynchronously, how do we know when that call is finished and we have a response?” Generally, we pass in as an argument to our async method a callback function, and that method will “call back” that function at a later time with a response. I’m using ES5 functions here, but we’ll update to ES6 standards later.
function asyncAddFunction(a, b, callback) {
  callback(a + b); //This callback is the one passed in to the function call below.
}

asyncAddFunction(2, 4, function(sum) {
  //Here we have the sum, 2 + 4 = 6.
});
Such a function is called a “Higher-Order Function” since it takes a function (our callback) as an argument. Alternatively, a callback function might take in an error object and a response object as arguments, and present them when the async function is complete. We’ll see this later with Express. When we called asyncAddFunction(...), you’ll notice we supplied a callback function for the callback parameter from the method definition. This function is an anonymous function (it does not have a name) and is written using the Expression Syntax. The method definition, on the other hand, is a function statement. It’s not anonymous because it actually has a name (that being “asyncAddFunction”).
Some may note confusion since, in the method definition, we do supply a name, that being “callback”. However, the anonymous function passed in as the third parameter to asyncAddFunction(...) does not know about the name, and so it remains anonymous. We also can’t execute that function at a later point by name, we’d have to go through the async calling function again to fire it.
As an example of a synchronous call, we can use the Node.js readFileSync(...) method. Again, we’ll be moving to ES6+ later.
var fs = require('fs');
var data = fs.readFileSync('/example.txt'); // The thread will be blocked here until complete.
If we were doing this asynchronously, we’d pass in a callback function which would fire when the async operation was complete.
var fs = require('fs');
var data = fs.readFile('/example.txt', function(err, data) { //Move on, this will fire when ready.
  if(err) return console.log('Error: ', err);
  console.log('Data: ', data); // Assume var data is defined above.
});
// Keep executing below, don’t wait on the data.
If you have never seen return used in that manner before, we are just saying to stop function execution so we don’t print the data object if the error object is defined. We could also have just wrapped the log statement in an else clause.
Like our asyncAddFunction(...), the code behind the fs.readFile(...) function would be something along the lines of:
function readFile(path, callback) {
 // Behind the scenes code to read a file stream.
 // The data variable is defined up here.
 callback(undefined, data); //Or, callback(err, undefined);
}
Allow us to look at one last implementation of an async function call. This will help to solidify the idea of callback functions being fired at a later point in time, and it will help us to understand the execution of a typical Node.js program.
setTimeout(function() {
  // ...
}, 1000);
The setTimeout(...) method takes a callback function for the first parameter which will be fired after the number of milliseconds specified as the second argument has occurred.
Let’s look at a more complex example:
console.log('Initiated program.');

setTimeout(function() {
  console.log('3000 ms (3 sec) have passed.');
}, 3000);

setTimeout(function() {
  console.log('0 ms (0 sec) have passed.');
}, 0);

setTimeout(function() {
  console.log('1000 ms (1 sec) has passed.');
}, 1000);

console.log('Terminated program');
The output we receive is:
Initiated program.
Terminated program.
0 ms (0 sec) have passed.
1000 ms (1 sec) has passed.
3000 ms (3 sec) have passed.
You can see that the first log statement runs as expected. Instantaneously, the last log statement prints to the screen, for that happens before 0 seconds have surpassed after the second setTimeout(...). Immediately thereafter, the second, third, and first setTimeout(...) methods execute.
If Node.js was not non-blocking, we’d see the first log statement, wait 3 seconds to see the next, instantaneously see the third (the 0-second setTimeout(...), and then have to wait one more second to see the last two log statements. The non-blocking nature of Node makes all timers start counting down from the moment the program is executed, rather than the order in which they are typed. You may want to look into Node APIs, the Callstack, and the Event Loop for more information about how Node works under the hood.
It is important to note that just because you see a callback function does not necessarily mean there is an asynchronous call in the code. We called the asyncAddFunction(…) method above “async” because we are assuming the operation takes time to complete — such as making a call to a server. In reality, the process of adding two numbers is not async, and so that would actually be an example of using a callback function in a fashion that does not actually block the thread.
Promises Over Callbacks
Callbacks can quickly become messy in JavaScript, especially multiple nested callbacks. We are familiar with passing a callback as an argument to a function, but Promises allow us to tack, or attach, a callback to an object returned from a function. This would allow us to handle multiple async calls in a more elegant manner.
As an example, suppose we are making an API call, and our function, not so uniquely named ‘makeAPICall(...)’, takes a URL and a callback.
Our function, makeAPICall(...), would be defined as
function makeAPICall(path, callback) {
  // Attempt to make API call to path argument.
  // ...
  callback(undefined, res); // Or, callback(err, undefined); depending upon the API’s response.
}
and we would call it with:
makeAPICall('/example', function(err1, res1) {
  if(err1) return console.log('Error: ', err1);
  // ...
});
If we wanted to make another API call using the response from the first, we would have to nest both callbacks. Suppose I need to inject the userName property from the res1 object into the path of the second API call. We would have:
makeAPICall('/example', function(err1, res1) {
  if(err1) return console.log('Error: ', err1);
  makeAPICall('/newExample/' + res1.userName, function(err2, res2) {
    if(err2) return console.log('Error: ', err2);
    console.log(res2);
  });
});
Note: The ES6+ method to inject the res1.userName property rather than string concatenation would be to use "Template Strings". That way, rather than encapsulate our string in quotes (', or "), we would use backticks (`). located beneath the Escape key on your keyboard. Then, we would use the notation ${} to embed any JS expression inside the brackets. In the end, our earlier path would be: /newExample/${res.UserName}, wrapped in backticks.
It is clear to see that this method of nesting callbacks can quickly become quite inelegant, so-called the “JavaScript Pyramid of Doom”. Jumping in, if we were using promises rather than callbacks, we could refactor our code from the first example as such:
makeAPICall('/example').then(function(res) { // Success callback.
  // ...
}, function(err) { // Failure callback.
  console.log('Error:', err);
});
The first argument to the then() function is our success callback, and the second argument is our failure callback. Alternatively, we could lose the second argument to .then(), and call .catch() instead. Arguments to .then() are optional, and calling .catch() would be equivalent to .then(successCallback, null).
Using .catch(), we have:
makeAPICall('/example').then(function(res) { // Success callback.
  // ...
}).catch(function(err) {  // Failure Callback
  console.log('Error: ', err);
});
We can also restructure this for readability:
makeAPICall('/example')
  .then(function(res) {
    // ...
  })
  .catch(function(err) {
    console.log('Error: ', err);
  });
It is important to note that we can’t just tack a .then() call on to any function and expect it to work. The function we are calling has to actually return a promise, a promise that will fire the .then() when that async operation is complete. In this case, makeAPICall(...) will do it’s thing, firing either the then() block or the catch() block when completed.
To make makeAPICall(...) return a Promise, we assign a function to a variable, where that function is the Promise constructor. Promises can be either fulfilled or rejected, where fulfilled means that the action relating to the promise completed successfully, and rejected meaning the opposite. Once the promise is either fulfilled or rejected, we say it has settled, and while waiting for it to settle, perhaps during an async call, we say that the promise is pending.
The Promise constructor takes in one callback function as an argument, which receives two parameters — resolve and reject, which we will call at a later point in time to fire either the success callback in .then(), or the .then() failure callback, or .catch(), if provided.
Here is an example of what this looks like:
var examplePromise = new Promise(function(resolve, reject) {
  // Do whatever we are going to do and then make the appropiate call below:
  resolve('Happy!'); // — Everything worked.
  reject('Sad!'); // — We noticed that something went wrong.
}):
Then, we can use:
examplePromise.then(/* Both callback functions in here */);
// Or, the success callback in .then() and the failure callback in .catch().
Notice, however, that examplePromise can’t take any arguments. That kind of defeats the purpose, so we can return a promise instead.
function makeAPICall(path) {
  return new Promise(function(resolve, reject) {
    // Make our async API call here.
    if (/* All is good */) return resolve(res); //res is the response, would be defined above.
    else return reject(err); //err is error, would be defined above.
  });
}
Promises really shine to improve the structure, and subsequently, elegance, of our code with the concept of “Promise Chaining”. This would allow us to return a new Promise inside a .then() clause, so we could attach a second .then() thereafter, which would fire the appropriate callback from the second promise.
Refactoring our multi API URL call above with Promises, we get:
makeAPICall('/example').then(function(res) { // First response callback. Fires on success to '/example' call.
  return makeAPICall(`/newExample/${res.UserName}`); // Returning new call allows for Promise Chaining.
}, function(err) { // First failure callback. Fires if there is a failure calling with '/example'.
  console.log('Error:', err);
}).then(function(res) { // Second response callback. Fires on success to returned '/newExample/...' call.
  console.log(res);
}, function(err) { // Second failure callback. Fire if there is a failure calling with '/newExample/...'
  console.log('Error:', err);
});
Notice that we first call makeAPICall('/example'). That returns a promise, and so we attach a .then(). Inside that then(), we return a new call to makeAPICall(...), which, in and of itself, as seen earlier, returns a promise, permitting us chain on a new .then() after the first.
Like above, we can restructure this for readability, and remove the failure callbacks for a generic catch() all clause. Then, we can follow the DRY Principle (Don’t Repeat Yourself), and only have to implement error handling once.
makeAPICall('/example')
  .then(function(res) { // Like earlier, fires with success and response from '/example'.
    return makeAPICall(`/newExample/${res.UserName}`); // Returning here lets us chain on a new .then().
   })
  .then(function(res) { // Like earlier, fires with success and response from '/newExample'.
    console.log(res);
   })
  .catch(function(err) { // Generic catch all method. Fires if there is an err with either earlier call.
    console.log('Error: ', err);
   });
Note that the success and failure callbacks in .then() only fire for the status of the individual Promise that .then() corresponds to. The catch block, however, will catch any errors that fire in any of the .then()s.
ES6 Const Vs. Let
Throughout all of our examples, we have been employing ES5 functions and the old var keyword. While millions of lines of code still run today employing those ES5 methods, it is useful to update to current ES6+ standards, and we’ll refactor some of our code above. Let’s start with const and let.
You might be used to declaring a variable with the var keyword:
var pi = 3.14;
With ES6+ standards, we could make that either
let pi = 3.14;
or
const pi = 3.14;
where const means “constant” — a value that cannot be reassigned to later. (Except for object properties — we’ll cover that soon. Also, variables declared const are not immutable, only the reference to the variable is.)
In old JavaScript, block scopes, such as those in if, while, {}. for, etc. did not affect var in any way, and this is quite different to more statically typed languages like Java or C++. That is, the scope of var is the entire enclosing function — and that could be global (if placed outside a function), or local (if placed within a function). To demonstrate this, see the following example:
function myFunction() {
  var num = 5;
  console.log(num); // 5
  console.log('--');
  for(var i = 0; i < 10; i++)
  {
    var num = i;
    console.log(num); //num becomes 0 — 9
  }
  console.log('--');
  console.log(num); // 9
  console.log(i); // 10
}

myFunction();
Output:
5
---
0
1 2 3 ... 7 8 9
---
9
10
The important thing to notice here is that defining a new var num inside the for scope directly affected the var num outside and above the for. This is because var’s scope is always that of the enclosing function, and not a block.
Again, by default, var i inside for() defaults to myFunction’s scope, and so we can access i outside the loop and get 10.
In terms of assigning values to variables, let is equivalent to var, it’s just that let has block scoping, and so the anomalies that occurred with var above will not happen.
function myFunction() {
  let num = 5;
  console.log(num); // 5
  for(let i = 0; i < 10; i++)
  {
    let num = i;
    console.log('--');
    console.log(num); // num becomes 0 — 9
  }
  console.log('--');
  console.log(num); // 5
  console.log(i); // undefined, ReferenceError
}
Looking at the const keyword, you can see that we attain an error if we try to reassign to it:
const c = 299792458; // Fact: The constant "c" is the speed of light in a vacuum in meters per second.
c = 10; // TypeError: Assignment to constant variable.
Things become interesting when we assign a const variable to an object:
const myObject = {
  name: 'Jane Doe'
};

// This is illegal: TypeError: Assignment to constant variable.
myObject = {
  name: 'John Doe'
};

// This is legal. console.log(myObject.name) -> John Doe
myObject.name = 'John Doe';
As you can see, only the reference in memory to the object assigned to a const object is immutable, not the value its self.
ES6 Arrow Functions
You might be used to creating a function like this:
function printHelloWorld() {
  console.log('Hello, World!');
}
With arrow functions, that would become:
const printHelloWorld = () => {
  console.log('Hello, World!');
};
Suppose we have a simple function that returns the square of a number:
const squareNumber = (x) => {
  return x * x;
}

squareNumber(5); // We can call an arrow function like an ES5 functions. Returns 25.
You can see that, just like with ES5 functions, we can take in arguments with parentheses, we can use normal return statements, and we can call the function just like any other.
It’s important to note that, while parentheses are required if our function takes no arguments (like with printHelloWorld() above), we can drop the parentheses if it only takes one, so our earlier squareNumber() method definition can be rewritten as:
const squareNumber = x => { // Notice we have dropped the parentheses for we only take in one argument.
  return x * x;
}
Whether you choose to encapsulate a single argument in parentheses or not is a matter of personal taste, and you will likely see developers use both methods.
Finally, if we only want to implicitly return one expression, as with squareNumber(...) above, we can put the return statement in line with the method signature:
const squareNumber = x => x * x;
That is,
const test = (a, b, c) => expression
is the same as
const test = (a, b, c) => { return expression }
Note, when using the above shorthand to implicitly return an object, things become obscure. What stops JavaScript from believing the brackets within which we are required to encapsulate our object is not our function body? To get around this, we wrap the object’s brackets in parentheses. This explicitly lets JavaScript know that we are indeed returning an object, and we are not just defining a body.
const test = () => ({ pi: 3.14 }); // Spaces between brackets are a formality to make the code look cleaner.
To help solidify the concept of ES6 functions, we’ll refactor some of our earlier code allowing us to compare the differences between both notations.
asyncAddFunction(...), from above, could be refactored from:
function asyncAddFunction(a, b, callback){
  callback(a + b);
}
to:
const aysncAddFunction = (a, b, callback) => {
  callback(a + b);
};
or even to:
const aysncAddFunction = (a, b, callback) => callback(a + b); // This will return callback(a + b).
When calling the function, we could pass an arrow function in for the callback:
asyncAddFunction(10, 12, sum => { // No parentheses because we only take one argument.
  console.log(sum);
}
It is clear to see how this method improves code readability. To show you just one case, we can take our old ES5 Promise based example above, and refactor it to use arrow functions.
makeAPICall('/example')
  .then(res => makeAPICall(`/newExample/${res.UserName}`))
  .then(res => console.log(res))
  .catch(err => console.log('Error: ', err));
Now, there are some caveats with arrow functions. For one, they do not bind a this keyword. Suppose I have the following object:
const Person = {
  name: 'John Doe',
  greeting: () => {
    console.log(`Hi. My name is ${this.name}.`);
  }
}
You might expect a call to Person.greeting() will return “Hi. My name is John Doe.” Instead, we get: “Hi. My name is undefined.” That is because arrow functions do not have a this, and so attempting to use this inside an arrow function defaults to the this of the enclosing scope, and the enclosing scope of the Person object is window, in the browser, or module.exports in Node.
To prove this, if we use the same object again, but set the name property of the global this to something like ‘Jane Doe’, then this.name in the arrow function returns ‘Jane Doe’, because the global this is within the enclosing scope, or is the parent of the Person object.
this.name = 'Jane Doe';

const Person = {
  name: 'John Doe',
  greeting: () => {
    console.log(`Hi. My name is ${this.name}.`);
  }
}

Person.greeting(); // Hi. My name is Jane Doe
This is known as ‘Lexical Scoping’, and we can get around it by using the so-called ‘Short Syntax’, which is where we lose the colon and the arrow as to refactor our object as such:
const Person = {
  name: 'John Doe',
  greeting() {
    console.log(`Hi. My name is ${this.name}.`);
  }
}

Person.greeting() //Hi. My name is John Doe.
ES6 Classes
While JavaScript never supported classes, you could always emulate them with objects like the above. EcmaScript 6 provides support for classes using the class and new keywords:
class Person {
   constructor(name) {
      this.name = name;
   }
   greeting() {
      console.log(`Hi. My name is ${this.name}.`);
   }
}

const person = new Person(‘John’);
person.greeting(); // Hi. My name is John.
The constructor function gets called automatically when using the new keyword, into which we can pass arguments to initially set up the object. This should be familiar to any reader who has experience with more statically typed object-oriented programming languages like Java, C++, and C#.
Without going into too much detail about OOP concepts, another such paradigm is “inheritance”, which is to allow one class to inherit from another. A class called Car, for example, will be very general — containing such methods as “stop”, “start”, etc., as all cars need. A sub-set of the class called SportsCar, then, might inherit fundamental operations from Car and override anything it needs custom. We could denote such a class as follows:
class Car {
   constructor(licensePlateNumber) {
      this.licensePlateNumber = licensePlateNumber;
   }
   start() {}
   stop() {}
   getLicensePlate() {
      return this.licensePlateNumber;
   }
   // …
}

class SportsCar extends Car {
   constructor(engineRevCount, licensePlateNumber) {
      super(licensePlateNumber); // Pass licensePlateNumber up to the parent class.
      this.engineRevCount = engineRevCount;
   }
   start() {
      super.start();
   }
   stop() {
      super.stop();
   }
   getLicensePlate() {
      return super.getLicensePlate();
   }
   getEngineRevCount() {
      return this.engineRevCount;
   }
}
You can clearly see that the super keyword allows us to access properties and methods from the parent, or super, class.
JavaScript Events
An Event is an action that occurs to which you have the ability to respond. Suppose you are building a login form for your application. When the user presses the “submit” button, you can react to that event via an “event handler” in your code — typically a function. When this function is defined as the event handler, we say we are “registering an event handler”. The event handler for the submit button click will likely check the formatting of the input provided by the user, sanitize it to prevent such attacks as SQL Injections or Cross Site Scripting (please be aware that no code on the client-side can ever be considered safe. Always sanitize data on the server — never trust anything from the browser), and then check to see if that username and password combination exits within a database to authenticate a user and serve them a token.
Since this is an article about Node, we’ll focus on the Node Event Model.
We can use the events module from Node to emit and react to specific events. Any object that emits an event is an instance of the EventEmitter class.
We can emit an event by calling the emit() method and we listen for that event via the on() method, both of which are exposed through the EventEmitter class.
const EventEmitter = require('events');

const myEmitter = new EventEmitter();
With myEmitter now an instance of the EventEmitter class, we can access emit() and on():
const EventEmitter = require('events');

const myEmitter = new EventEmitter();

myEmitter.on('someEvent', () => {
  console.log('The "someEvent" event was fired (emitted)');
});

myEmitter.emit('someEvent'); // This will call the callback function above.
The second parameter to myEmitter.on() is the callback function that will fire when the event is emitted — this is the event handler. The first parameter is the name of the event, which can be anything we like, although the camelCase naming convention is recommended.
Additionally, the event handler can take any number of arguments, which are passed down when the event is emitted:
const EventEmitter = require('events');

const myEmitter = new EventEmitter();

myEmitter.on('someEvent', (data) => {
  console.log(`The "someEvent" event was fired (emitted) with data: ${data}`);
});

myEmitter.emit('someEvent', 'This is the data payload');
By using inheritance, we can expose the emit() and on() methods from ‘EventEmitter’ to any class. This is done by creating a Node.js class, and using the extends reserved keyword to inherit the properties available on EventEmitter:
const EventEmitter = require('events');

class MyEmitter extends EventEmitter {
  // This is my class. I can emit events from a MyEmitter object.
}
Suppose we are building a vehicle collision notification program that receives data from gyroscopes, accelerometers, and pressure gauges on the car’s hull. When a vehicle collides with an object, those external sensors will detect the crash, executing the collide(...) function and passing to it the aggregated sensor data as a nice JavaScript Object. This function will emit a collision event, notifying the vendor of the crash.
const EventEmitter = require('events');

class Vehicle extends EventEmitter {
  collide(collisionStatistics) {
    this.emit('collision', collisionStatistics)
  }
}

const myVehicle = new Vehicle();
myVehicle.on('collision', collisionStatistics => {
  console.log('WARNING! Vehicle Impact Detected: ', collisionStatistics);
  notifyVendor(collisionStatistics);
});

myVehicle.collide({ ... });
This is a convoluted example for we could just put the code within the event handler inside the collide function of the class, but it demonstrates how the Node Event Model functions nonetheless. Note that some tutorials will show the util.inherits() method of permitting an object to emit events. That has been deprecated in favor of ES6 Classes and extends.
The Node Package Manager
When programming with Node and JavaScript, it’ll be quite common to hear about npm. Npm is a package manager which does just that — permits the downloading of third-party packages that solve common problems in JavaScript. Other solutions, such as Yarn, Npx, Grunt, and Bower exist as well, but in this section, we’ll focus only on npm and how you can install dependencies for your application through a simple Command Line Interface (CLI) using it.
Let’s start simple, with just npm. Visit the NpmJS homepage to view all of the packages available from NPM. When you start a new project that will depend on NPM Packages, you’ll have to run npm init through the terminal in your project’s root directory. You will be asked a series of questions which will be used to create a package.json file. This file stores all of your dependencies — modules that your application depends on to function, scripts — pre-defined terminal commands to run tests, build the project, start the development server, etc., and more.
To install a package, simply run npm install [package-name] --save. The save flag will ensure the package and its version is logged in the package.json file. Since npm version 5, dependencies are saved by default, so --save may be omitted. You will also notice a new node_modules folder, containing the code for that package you just installed. This can also be shortened to just npm i [package-name]. As a helpful note, the node_modules folder should never be included in a GitHub repository due to its size. Whenever you clone a repo from GitHub (or any other version management system), be sure to run the command npm install to go out and fetch all the packages defined in the package.json file, creating the node_modules directory automatically. You can also install a package at a specific version: npm i [package-name]@1.10.1 --save, for example.
Removing a package is similar to installing one: npm remove [package-name].
You can also install a package globally. This package will be available across all projects, not just the one your working on. You do this with the -g flag after npm i [package-name]. This is commonly used for CLIs, such as Google Firebase and Heroku. Despite the ease this method presents, it is generally considered bad practice to install packages globally, for they are not saved in the package.json file, and if another developer attempts to use your project, they won’t attain all the required dependencies from npm install.
APIs & JSON
APIs are a very common paradigm in programming, and even if you are just starting out in your career as a developer, APIs and their usage, especially in web and mobile development, will likely come up more often than not.
An API is an Application Programming Interface, and it is basically a method by which two decoupled systems may communicate with each other. In more technical terms, an API permits a system or computer program (usually a server) to receive requests and send appropriate responses (to a client, also known as a host).
Suppose you are building a weather application. You need a way to geocode a user’s address into a latitude and longitude, and then a way to attain the current or forecasted weather at that particular location.
As a developer, you want to focus on building your app and monetizing it, not putting the infrastructure in place to geocode addresses or placing weather stations in every city.
Luckily for you, companies like Google and OpenWeatherMap have already put that infrastructure in place, you just need a way to talk to it — that is where the API comes in. While, as of now, we have developed a very abstract and ambiguous definition of the API, bear with me. We’ll be getting to tangible examples soon.
Now, it costs money for companies to develop, maintain, and secure that aforementioned infrastructure, and so it is common for corporations to sell you access to their API. This is done with that is known as an API key, a unique alphanumeric identifier associating you, the developer, with the API. Every time you ask the API to send you data, you pass along your API key. The server can then authenticate you and keep track of how many API calls you are making, and you will be charged appropriately. The API key also permits Rate-Limiting or API Call Throttling (a method of throttling the number of API calls in a certain timeframe as to not overwhelm the server, preventing DOS attacks — Denial of Service). Most companies, however, will provide a free quota, giving you, as an example, 25,000 free API calls a day before charging you.
Up to this point, we have established that an API is a method by which two computer programs can communicate with each other. If a server is storing data, such as a website, and your browser makes a request to download the code for that site, that was the API in action.
Let us look at a more tangible example, and then we’ll look at a more real-world, technical one. Suppose you are eating out at a restaurant for dinner. You are equivalent to the client, sitting at the table, and the chef in the back is equivalent to the server.
Since you will never directly talk to the chef, there is no way for him/her to receive your request (for what order you would like to make) or for him/her to provide you with your meal once you order it. We need someone in the middle. In this case, it’s the waiter, analogous to the API. The API provides a medium with which you (the client) may talk to the server (the chef), as well as a set of rules for how that communication should be made (the menu — one meal is allowed two sides, etc.)
Now, how do you actually talk to the API (the waiter)? You might speak English, but the chef might speak Spanish. Is the waiter expected to know both languages to translate? What if a third person comes in who only speaks Mandarin? What then? Well, all clients and servers have to agree to speak a common language, and in computer programming, that language is JSON, pronounced JAY-sun, and it stands for JavaScript Object Notation.
At this point, we don’t quite know what JSON looks like. It’s not a computer programming language, it’s just, well, a language, like English or Spanish, that everyone (everyone being computers) understands on a guaranteed basis. It’s guaranteed because it’s a standard, notably RFC 8259, the JavaScript Object Notation (JSON) Data Interchange Format by the Internet Engineering Task Force (IETF).
Even without formal knowledge of what JSON actually is and what it looks like (we’ll see in an upcoming article in this series), we can go ahead introduce a technical example operating on the Internet today that employs APIs and JSON. APIs and JSON are not just something you can choose to use, it’s not equivalent to one out of a thousand JavaScript frameworks you can pick to do the same thing. It is THE standard for data exchange on the web.
Suppose you are building a travel website that compares prices for aircraft, rental car, and hotel ticket prices. Let us walk through, step-by-step, on a high level, how we would build such an application. Of course, we need our User Interface, the front-end, but that is out of scope for this article.
We want to provide our users with the lowest price booking method. Well, that means we need to somehow attain all possible booking prices, and then compare all of the elements in that set (perhaps we store them in an array) to find the smallest element (known as the infimum in mathematics.)
How will we get this data? Well, suppose all of the booking sites have a database full of prices. Those sites will provide an API, which exposes the data in those databases for use by you. You will call each API for each site to attain all possible booking prices, store them in your own array, find the lowest or minimum element of that array, and then provide the price and booking link to your user. We’ll ask the API to query its database for the price in JSON, and it will respond with said price in JSON to us. We can then use, or parse, that accordingly. We have to parse it because APIs will return JSON as a string, not the actual JavaScript data type of JSON. This might not make sense now, and that’s okay. We’ll be covering it more in a future article.
Also, note that just because something is called an API does not necessarily mean it operates on the web and sends and receives JSON. The Java API, for example, is just the list of classes, packages, and interfaces that are part of the Java Development Kit (JDK), providing programming functionality to the programmer.
Okay. We know we can talk to a program running on a server by way of an Application Programming Interface, and we know that the common language with which we do this is known as JSON. But in the web development and networking world, everything has a protocol. What do we actually do to make an API call, and what does that look like code-wise? That’s where HTTP Requests enter the picture, the HyperText Transfer Protocol, defining how messages are formatted and transmitted across the Internet. Once we have an understanding of HTTP (and HTTP verbs, you’ll see that in the next section), we can look into actual JavaScript frameworks and methods (like fetch()) offered by the JavaScript API (similar to the Java API), that actually allow us to make API calls.
HTTP And HTTP Requests
HTTP is the HyperText Transfer Protocol. It is the underlying protocol that determines how messages are formatted as they are transmitted and received across the web. Let’s think about what happens when, for example, you attempt to load the home page of Smashing Magazine in your web browser.
You type the website URL (Uniform Resource Locator) in the URL bar, where the DNS server (Domain Name Server, out of scope for this article) resolves the URL into the appropriate IP Address. The browser makes a request, called a GET Request, to the Web Server to, well, GET the underlying HTML behind the site. The Web Server will respond with a message such as “OK”, and then will go ahead and send the HTML down to the browser where it will be parsed and rendered accordingly.
There are a few things to note here. First, the GET Request, and then the “OK” response. Suppose you have a specific database, and you want to write an API to expose that database to your users. Suppose the database contains books the user wants to read (as it will in a future article in this series). Then there are four fundamental operations your user may want to perform on this database, that is, Create a record, Read a record, Update a record, or Delete a record, known collectively as CRUD operations.
Let’s look at the Read operation for a moment. Without incorrectly assimilating or conflating the notion of a web server and a database, that Read operation is very similar to your web browser attempting to get the site from the server, just as to read a record is to get the record from the database.
This is known as an HTTP Request. You are making a request to some server somewhere to get some data, and, as such, the request is appropriately named “GET”, capitalization being a standard way to denote such requests.
What about the Create portion of CRUD? Well, when talking about HTTP Requests, that is known as a POST request. Just as you might post a message on a social media platform, you might also post a new record to a database.
CRUD’s Update allows us to use either a PUT or PATCH Request in order to update a resource. HTTP’s PUT will either create a new record or will update/replace the old one.
Let’s look at this a bit more in detail, and then we’ll get to PATCH.
An API generally works by making HTTP requests to specific routes in a URL. Suppose we are making an API to talk to a DB containing a user’s booklist. Then we might be able to view those books at the URL .../books. A POST requests to .../books will create a new book with whatever properties you define (think id, title, ISBN, author, publishing data, etc.) at the .../books route. It doesn’t matter what the underlying data structure is that stores all the books at .../books right now. We just care that the API exposes that endpoint (accessed through the route) to manipulate data. The prior sentence was key: A POST request creates a new book at the ...books/ route. The difference between PUT and POST, then, is that PUT will create a new book (as with POST) if no such book exists, or, it will replace an existing book if the book already exists within that aforementioned data structure.
Suppose each book has the following properties: id, title, ISBN, author, hasRead (boolean).
Then to add a new book, as seen earlier, we would make a POST request to .../books. If we wanted to completely update or replace a book, we would make a PUT request to .../books/id where id is the ID of the book we want to replace.
While PUT completely replaces an existing book, PATCH updates something having to do with a specific book, perhaps modifying the hasRead boolean property we defined above — so we’d make a PATCH request to …/books/id sending along the new data.
It can be difficult to see the meaning of this right now, for thus far, we’ve established everything in theory but haven’t seen any tangible code that actually makes an HTTP request. We shall, however, get to that soon, covering GET in this article, ad the rest in a future article.
There is one last fundamental CRUD operation and it’s called Delete. As you would expect, the name of such an HTTP Request is “DELETE”, and it works much the same as PATCH, requiring the book’s ID be provided in a route.
We have learned thus far, then, that routes are specific URLs to which you make an HTTP Request, and that endpoints are functions the API provides, doing something to the data it exposes. That is, the endpoint is a programming language function located on the other end of the route, and it performs whatever HTTP Request you specified. We also learned that there exist such terms as POST, GET, PUT, PATCH, DELETE, and more (known as HTTP verbs) that actually specify what requests you are making to the API. Like JSON, these HTTP Request Methods are Internet standards as defined by the Internet Engineering Task Force (IETF), most notably, RFC 7231, Section Four: Request Methods, and RFC 5789, Section Two: Patch Method, where RFC is an acronym for Request for Comments.
So, we might make a GET request to the URL .../books/id where the ID passed in is known as a parameter. We could make a POST, PUT, or PATCH request to .../books to create a resource or to .../books/id to modify/replace/update a resource. And we can also make a DELETE request to .../books/id to delete a specific book.
A full list of HTTP Request Methods can be found here.
It is also important to note that after making an HTTP Request, we’ll receive a response. The specific response is determined by how we build the API, but you should always receive a status code. Earlier, we said that when your web browser requests the HTML from the web server, it’ll respond with “OK”. That is known as an HTTP Status Code, more specifically, HTTP 200 OK. The status code just specifies how the operation or action specified in the endpoint (remember, that’s our function that does all the work) completed. HTTP Status Codes are sent back by the server, and there are probably many you are familiar with, such as 404 Not Found (the resource or file could not be found, this would be like making a GET request to .../books/id where no such ID exists.)
A complete list of HTTP Status Codes can be found here.
MongoDB
MongoDB is a non-relational, NoSQL database similar to the Firebase Real-time Database. You will talk to the database via a Node package such as the MongoDB Native Driver or Mongoose.
In MongoDB, data is stored in JSON, which is quite different from relational databases such as MySQL, PostgreSQL, or SQLite. Both are called databases, with SQL Tables called Collections, SQL Table Rows called Documents, and SQL Table Columns called Fields.
We will use the MongoDB Database in an upcoming article in this series when we create our very first Bookshelf API. The fundamental CRUD Operations listed above can be performed on a MongoDB Database.
It’s recommended that you read through the MongoDB Docs to learn how to create a live database on an Atlas Cluster and make CRUD Operations to it with the MongoDB Native Driver. In the next article of this series, we will learn how to set up a local database and a cloud production database.
Building A Command Line Node Application
When building out an application, you will see many authors dump their entire code base at the beginning of the article, and then attempt to explain each line thereafter. In this text, I’ll take a different approach. I’ll explain my code line-by-line, building the app as we go. I won’t worry about modularity or performance, I won’t split the codebase into separate files, and I won’t follow the DRY Principle or attempt to make the code reusable. When just learning, it is useful to make things as simple as possible, and so that is the approach I will take here.
Let us be clear about what we are building. We won’t be concerned with user input, and so we won’t make use of packages like Yargs. We also won’t be building our own API. That will come in a later article in this series when we make use of the Express Web Application Framework. I take this approach as to not conflate Node.js with the power of Express and APIs since most tutorials do. Rather, I’ll provide one method (of many) by which to call and receive data from an external API which utilizes a third-party JavaScript library. The API we’ll be calling is a Weather API, which we’ll access from Node and dump its output to the terminal, perhaps with some formatting, known as “pretty-printing”. I’ll cover the entire process, including how to set up the API and attain API Key, the steps of which provide the correct results as of January 2019.
We’ll be using the OpenWeatherMap API for this project, so to get started, navigate to the OpenWeatherMap sign-up page and create an account with the form. Once logged in, find the API Keys menu item on the dashboard page (located over here). If you just created an account, you’ll have to pick a name for your API Key and hit “Generate”. It could take at least 2 hours for your new API Key to be functional and associated with your account.
Before we start building out the application, we’ll visit the API Documentation to learn how to format our API Key. In this project, we’ll be specifying a zip code and a country code to attain the weather information at that location.
From the docs, we can see that the method by which we do this is to provide the following URL:
api.openweathermap.org/data/2.5/weather?zip={zip code},{country code}
Into which we could input data:
api.openweathermap.org/data/2.5/weather?zip=94040,us
Now, before we can actually attain relevant data from this API, we’ll need to provide our new API Key as a query parameter:
api.openweathermap.org/data/2.5/weather?zip=94040,us&appid={YOUR_API_KEY}
For now, copy that URL into a new tab in your web browser, replacing the {YOUR_API_KEY} placeholder with the API Key you obtained earlier when you registered for an account.
The text you can see is actually JSON — the agreed upon language of the web as discussed earlier.
To inspect this further, hit Ctrl + Shift + I in Google Chrome to open the Chrome Developer tools, and then navigate to the Network tab. At present, there should be no data here.
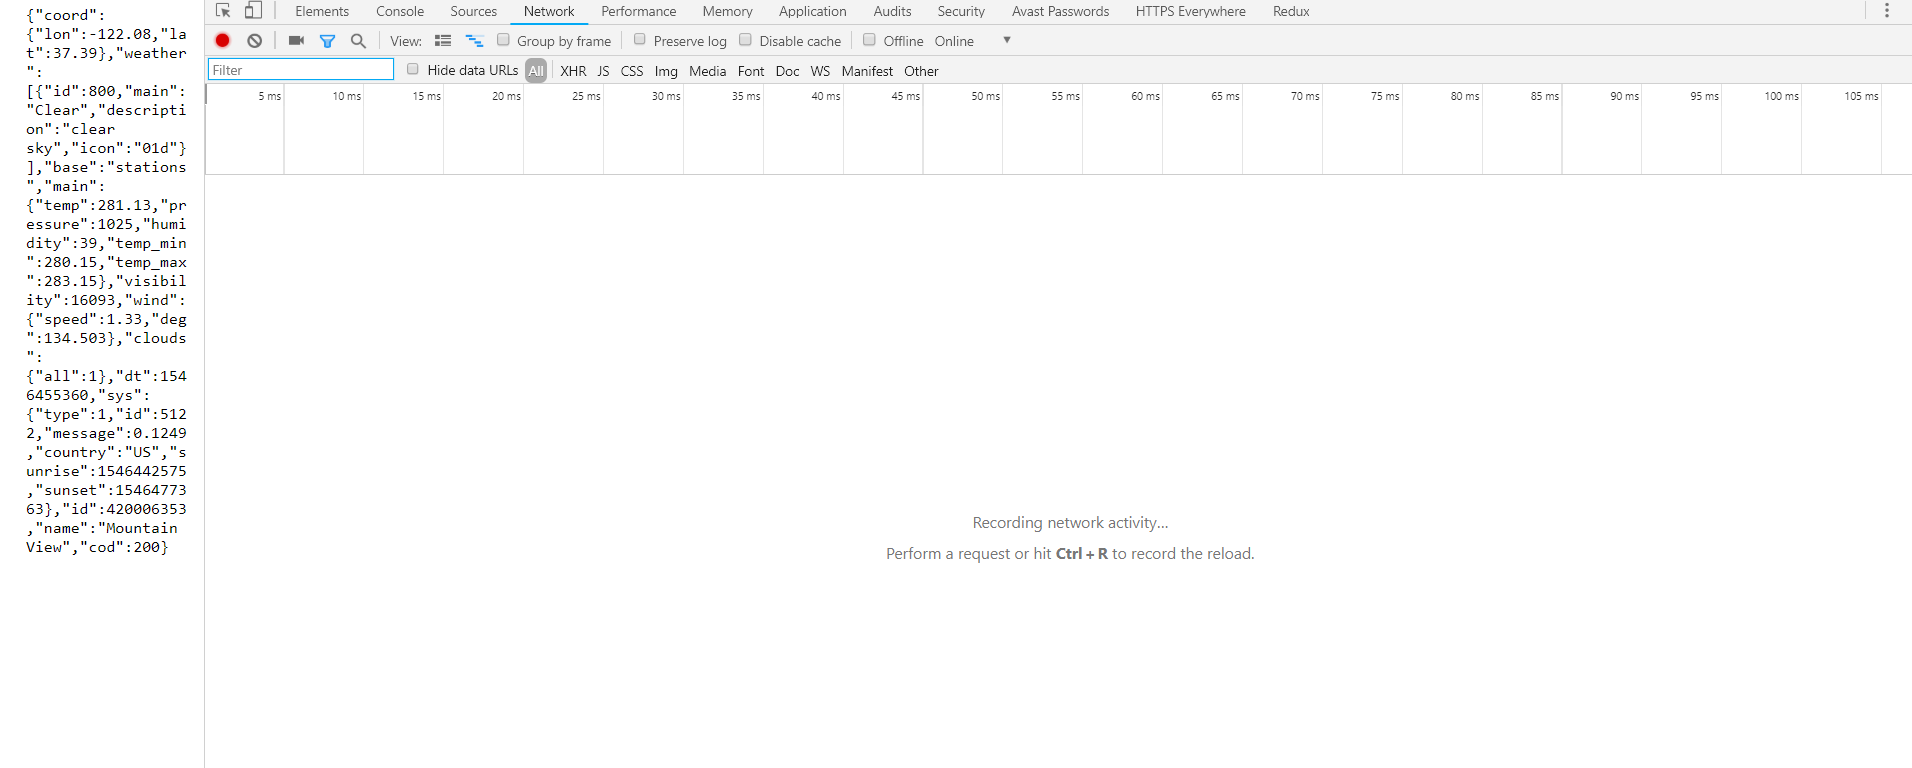
To actually monitor network data, reload the page, and watch the tab be populated with useful information. Click the first link as depicted in the image below.
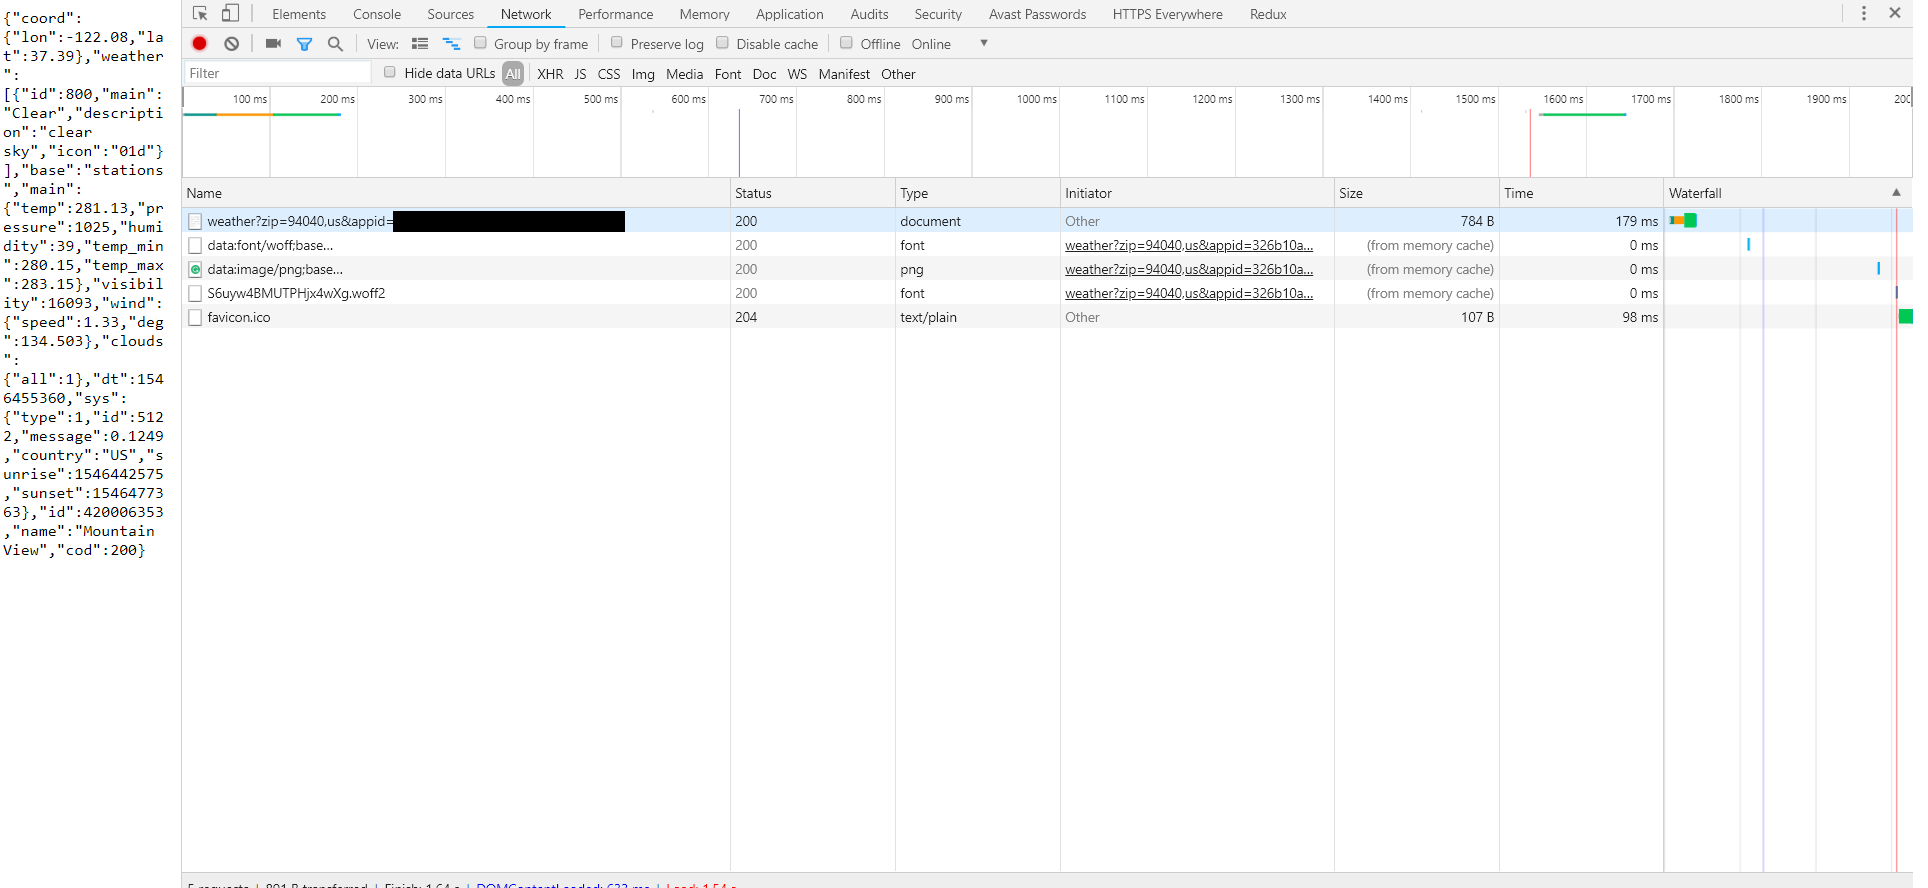
Once you click on that link, we can actually view HTTP specific information, such as the headers. Headers are sent in the response from the API (you can also, in some cases, send your own headers to the API, or you can even create your own custom headers (often prefixed with x-) to send back when building your own API), and just contain extra information that either the client or server may need.
In this case, you can see that we made an HTTP GET Request to the API, and it responded with an HTTP Status 200 OK. You can also see that the data sent back was in JSON, as listed under the “Response Headers” section.
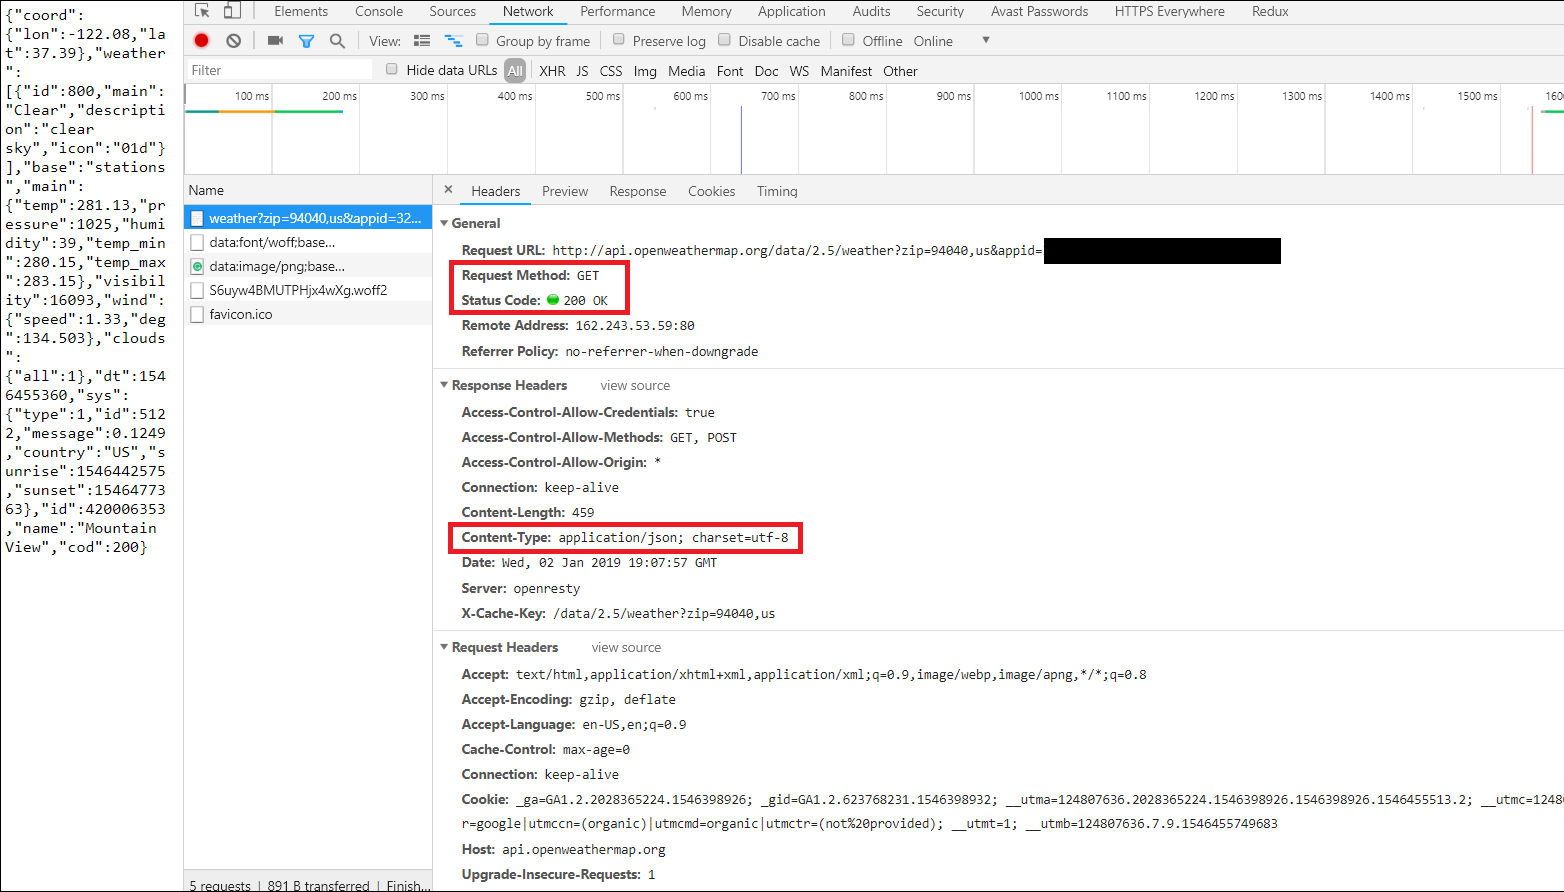
If you hit the preview tab, you can actually view the JSON as a JavaScript Object. The text version you can see in your browser is a string, for JSON is always transmitted and received across the web as a string. That’s why we have to parse the JSON in our code, to get it into a more readable format — in this case (and in pretty much every case) — a JavaScript Object.
You can also use the Google Chrome Extension “JSON View” to do this automatically.
To start building out our application, I’ll open a terminal and make a new root directory and then cd into it. Once inside, I’ll create a new app.js file, run npm init to generate a package.json file with the default settings, and then open Visual Studio Code.
mkdir command-line-weather-app && cd command-line-weather-app
touch app.js
npm init
code .
Thereafter, I’ll download Axios, verify it has been added to my package.json file, and note that the node_modules folder has been created successfully.
In the browser, you can see that we made a GET Request by hand by manually typing the proper URL into the URL Bar. Axios is what will allow me to do that inside of Node.
Starting now, all of the following code will be located inside of the app.js file, each snippet placed one after the other.
The first thing I’ll do is require the Axios package we installed earlier with
const axios = require('axios');
We now have access to Axios, and can make relevant HTTP Requests, via the axios constant.
Generally, our API calls will be dynamic — in this case, we might want to inject different zip codes and country codes into our URL. So, I’ll be creating constant variables for each part of the URL, and then put them together with ES6 Template Strings. First, we have the part of our URL that will never change as well as our API Key:
const API_URL = 'https://api.openweathermap.org/data/2.5/weather?zip=';
const API_KEY = 'Your API Key Here';
I’ll also assign our zip code and country code. Since we are not expecting user input and are rather hard coding the data, I’ll make these constant as well, although, in many cases, it will be more useful to use let.
const LOCATION_ZIP_CODE = '90001';
const COUNTRY_CODE = 'us';
We now need to put these variables together into one URL to which we can use Axios to make GET Requests to:
const ENTIRE_API_URL = `${API_URL}${LOCATION_ZIP_CODE},${COUNTRY_CODE}&appid=${API_KEY}`;
Here is the contents of our app.js file up to this point:
const axios = require('axios');

// API specific settings.
const API_URL = 'https://api.openweathermap.org/data/2.5/weather?zip=';
const API_KEY = 'Your API Key Here';

const LOCATION_ZIP_CODE = '90001';
const COUNTRY_CODE = 'us';

const ENTIRE_API_URL = `${API_URL}${LOCATION_ZIP_CODE},${COUNTRY_CODE}&appid=${API_KEY}`;
All that is left to do is to actually use axios to make a GET Request to that URL. For that, we’ll use the get(url) method provided by axios.
axios.get(ENTIRE_API_URL)
axios.get(...) actually returns a Promise, and the success callback function will take in a response argument which will allow us to access the response from the API — the same thing you saw in the browser. I’ll also add a .catch() clause to catch any errors.
axios.get(ENTIRE_API_URL)
    .then(response => console.log(response))
    .catch(error => console.log('Error', error));
If we now run this code with node app.js in the terminal, you will be able to see the full response we get back. However, suppose you just want to see the temperature for that zip code — then most of that data in the response is not useful to you. Axios actually returns the response from the API in the data object, which is a property of the response. That means the response from the server is actually located at response.data, so let’s print that instead in the callback function: console.log(response.data).
Now, we said that web servers always deal with JSON as a string, and that is true. You might notice, however, that response.data is already an object (evident by running console.log(typeof response.data)) — we didn’t have to parse it with JSON.parse(). That is because Axios already takes care of this for us behind the scenes.
The output in the terminal from running console.log(response.data) can be formatted — “pretty-printed” — by running console.log(JSON.stringify(response.data, undefined, 2)). JSON.stringify() converts a JSON object into a string, and take in the object, a filter, and the number of characters by which to indent by when printing. You can see the response this provides:
{
  "coord": {
    "lon": -118.24,
    "lat": 33.97
  },
  "weather": [
    {
      "id": 800,
      "main": "Clear",
      "description": "clear sky",
      "icon": "01d"
    }
  ],
  "base": "stations",
  "main": {
    "temp": 288.21,
    "pressure": 1022,
    "humidity": 15,
    "temp_min": 286.15,
    "temp_max": 289.75
  },
  "visibility": 16093,
  "wind": {
    "speed": 2.1,
    "deg": 110
  },
  "clouds": {
    "all": 1
  },
  "dt": 1546459080,
  "sys": {
    "type": 1,
    "id": 4361,
    "message": 0.0072,
    "country": "US",
    "sunrise": 1546441120,
    "sunset": 1546476978
  },
  "id": 420003677,
  "name": "Lynwood",
  "cod": 200
}
Now, it is clear to see that the temperature we are looking for is located on the main property of the response.data object, so we can access it by calling response.data.main.temp. Let’s look at out application’s code up to now:
const axios = require('axios');

// API specific settings.
const API_URL = 'https://api.openweathermap.org/data/2.5/weather?zip=';
const API_KEY = 'Your API Key Here';

const LOCATION_ZIP_CODE = '90001';
const COUNTRY_CODE = 'us';

const ENTIRE_API_URL = `${API_URL}${LOCATION_ZIP_CODE},${COUNTRY_CODE}&appid=${API_KEY}`;

axios.get(ENTIRE_API_URL)
    .then(response => console.log(response.data.main.temp))
    .catch(error => console.log('Error', error));
The temperature we get back is actually in Kelvin, which is a temperature scale generally used in Physics, Chemistry, and Thermodynamics due to the fact that it provides an “absolute zero” point, which is the temperature at which all thermal motion of all inner particles cease. We just need to convert this to Fahrenheit or Celcius with the formulas below:
F = K * 9/5 - 459.67
C = K - 273.15
Let’s update our success callback to print the new data with this conversion. We’ll also add in a proper sentence for the purposes of User Experience:
axios.get(ENTIRE_API_URL)
    .then(response => {
        // Getting the current temperature and the city from the response object.
        const kelvinTemperature = response.data.main.temp;
        const cityName = response.data.name;
        const countryName = response.data.sys.country;

        // Making K to F and K to C conversions.
        const fahrenheitTemperature = (kelvinTemperature * 9/5) — 459.67;
        const celciusTemperature = kelvinTemperature — 273.15;

        // Building the final message.
        const message = (
            `Right now, in \
            ${cityName}, ${countryName} the current temperature is \
            ${fahrenheitTemperature.toFixed(2)} deg F or \
            ${celciusTemperature.toFixed(2)} deg C.`.replace(/\s+/g, ' ')
        );

        console.log(message);
    })
    .catch(error => console.log('Error', error));
The parentheses around the message variable are not required, they just look nice — similar to when working with JSX in React. The backslashes stop the template string from formatting a new line, and the replace() String prototype method gets rid of white space using Regular Expressions (RegEx). The toFixed() Number prototype methods rounds a float to a specific number of decimal places — in this case, two.
With that, our final app.js looks as follows:
const axios = require('axios');

// API specific settings.
const API_URL = 'https://api.openweathermap.org/data/2.5/weather?zip=';
const API_KEY = 'Your API Key Here';

const LOCATION_ZIP_CODE = '90001';
const COUNTRY_CODE = 'us';

const ENTIRE_API_URL = `${API_URL}${LOCATION_ZIP_CODE},${COUNTRY_CODE}&appid=${API_KEY}`;

axios.get(ENTIRE_API_URL)
    .then(response => {
        // Getting the current temperature and the city from the response object.
        const kelvinTemperature = response.data.main.temp;
        const cityName = response.data.name;
        const countryName = response.data.sys.country;

        // Making K to F and K to C conversions.
        const fahrenheitTemperature = (kelvinTemperature * 9/5) — 459.67;
        const celciusTemperature = kelvinTemperature — 273.15;

        // Building the final message.
        const message = (
            `Right now, in \
            ${cityName}, ${countryName} the current temperature is \
            ${fahrenheitTemperature.toFixed(2)} deg F or \
            ${celciusTemperature.toFixed(2)} deg C.`.replace(/\s+/g, ' ')
        );

        console.log(message);
    })
    .catch(error => console.log('Error', error));
Conclusion
We have learned a lot about how Node works in this article, from the differences between synchronous and asynchronous requests, to callback functions, to new ES6 features, events, package managers, APIs, JSON, and the HyperText Transfer Protocol, Non-Relational Databases, and we even built our own command line application utilizing most of that new found knowledge.
In future articles in this series, we’ll take an in-depth look at the Call Stack, the Event Loop, and Node APIs, we’ll talk about Cross-Origin Resource Sharing (CORS), and we’ll build a Full Stack Bookshelf API utilizing databases, endpoints, user authentication, tokens, server-side template rendering, and more.
From here, start building your own Node applications, read the Node documentation, go out and find interesting APIs or Node Modules and implement them yourself. The world is your oyster and you have at your fingertips access to the largest network of knowledge on the planet — the Internet. Use it to your advantage.
Further Reading
- Understanding And Using REST APIs
- New JavaScript Features That Will Change How You Write Regex
- Keeping Node.js Fast: Tools, Techniques, And Tips For Making High-Performance Node.js Servers
- Building A Simple AI Chatbot With Web Speech API And Node.js


