SVG Web Page Components For IoT And Makers (Part 2)
Email Newsletter
Weekly tips on front-end & UX.
Trusted by 182,000+ folks.


 Custom Web Forms for Angular, React, & Vue. Your backend.

 Celebrating 10 million developers
So, we already have ways of dynamically loading a menu of SVG icons made to react by loading panels if we so desire, but the icons were not actual components. We were able to use a simple trick of bringing in the SVG for each icon and passing it into the Vue application. It was simple enough to generate a list of icons, and each icon reacted in a similar way except for small data differences. The data difference made it possible to bind the name of a panel to each icon in such a way that the handler for the icon’s button click could pass it on.
When a panel is loaded in the form of Vue component, everything about the panel and its components has to be loaded, templates, JavaScript, and more. So, the job of just managing loading the panel is bigger than what we have encountered so far in this discussion.
Let’s look at Vue’s way of providing a hook for async loading. The following snippet is from the Vue guide.
Vue.component('async-example', function (resolve, reject) {
  setTimeout(function () {
    // Pass the component definition to the resolve callback
    resolve({
      template: '<div>I am async!</div>'
    })
  }, 1000)
})
The guide tells us that the setTimeout function is an example of how to use the synchronicity with Vue components. Notice that where before there had been an object as the second parameter to Vue.component, there is now a function, which is referred to as a factory function. Within the resolve callback is a component definition, that would have been the second parameter to Vue.component before.
So, I had to stare at this example a while before it made sense to me. Here is another example, which suits me better:
Vue.component('async-example', function (resolve, reject) {
  // Vue will call this function and promise itself to handle
  // it when it gets back with data.

  // this function can then call a promising object loader
  // here the 'loader' function is some abstract function.
  // Most likely the application will use 'fetch'
  // but it could be something else.
  loader('/my/resource/on/server.json').
    then(function (JSON_data) {
         var object = transformJSONToJSObject(JSON_data);
          resolve(object)
    }).catch( (error) => { handle it } );
It seems like the right thing to do to make a more general function to go around this form.
function componentLoader(c_name,resource_url) {
  Vue.component(c_name, function (resolve, reject) {
    loader(resource_url).
      then(function (JSON_data) {
           var object = transformJSONToJSObject(JSON_data);
            resolve(object)
      }).catch( (error) => { handle it } );
}
So, in general, to load a component, we would just need a line like the following:
componentLoader('ThermoPanel','./JSON/thermo-panel.json');
So now, just what is the JSON that is being loaded? It can include everything about the component. In this case, as a panel component, it can include thermometers, machine switches, sliders, gauges, and more. While it seemed nicer to keep the components parts on the web page, it may actually work better to use the subcomponent field that is in the longer example for ‘thermo-panel’ that we made before and also for the other similarly constructed panels. The JSON will contain a complete panel structure.
However, if the reader will notice the inclusion of the function call to transformJSONToJSObject, he will understand that JSON might be coded in some way to make transport easier and to make it easier for a server to handle the definition. After all, the definition will include complete SVG templates, function definitions, and other JavaScript expressions. Also, the JSON object may contain more than just the panel definition because some information may simply aid in bookkeeping or validation. So, one can expect that there will be some treatment of the object upon receipt.
As for the encoding, the data coming in from the server may be encoded in a number of ways. Perhaps it will be simply URL encoded. Or more securely, it might be enciphered. For this discussion, we can just use URL encoding.
Some of the tools that are available for creating Vue applications no doubt take care of the JSON transformation. But, this discussion has so far avoided the use of command line tools. This omission is not that bad as we have also used Vue with the minimum of resources, using only one script tag for the referring to the CDN. However, I certainly do recommend looking into the command line tools especially for organizing projects.
When the JSON arrives at the page, given the component is completely assembled with subcomponents, no more work has to be done to fetch the parts. We can make the assumption that all components will come in fully defined for the rest of this discussion. But, assembling complete component hierarchies will require command line tools at some point.
The SVG editing process will also require some work. The SVG editing processes allow a designer to draw a panel and all the components on it. But, each subcomponent has to be identified, called out in a group, or given a place holder. Any approach to using the drawing requires some treatment of the SVG so that Vue component tags can replace the groups or graphic elements. In this way, any artist rendering can become a template. And, the drawn subcomponents will have to be disassembled into templates for Vue subcomponents.
This sort of parsimony is contrary to the workflow of most of the JavaScript frameworks. The frameworks are about assembling pages. But, editing or drawing, results in something already assembled by an artist. In practice, the result of editing does not provide a text file that corresponds directly to a framework component definition.
More about the editing process may be considered in some other discussion. There is a lot to it. But, for now, we have the tools we need in order to load hierarchal components and make them come alive.
The Lazy Application
For our IoT panel construction, we already have a selection bar that responds to searches. And, we have a way of loading components when we need them. We just need to connect up these parts. And, at last, we have to make sure that the panels appear and that they start working when they do.
The lazy loading of panels done by the async code above provides a sketch of an idea. But, thankfully, some people have experimented to find ways of making sure that all kinds of components can be loaded. There is one codepen entry that shows how to update Vue apps with new components of varying types. That is the mechanism that is needed for updating a designated part of the page with different types of panel.
With the ability to add in different kinds of panels and with a simple mechanism to load their definitions, we can, at last, have our panel searching page.
Here is the HTML that we need in our page so that the Vue app can place components in dynamically:
<template v-for="(panel, index) in panelList">
  <component :is="panel" :key="panel.name"></component>
</template>
The component tag is a Vue meta tag. See the reference for dynamic components. The properties, special attributes, used for the component tag in this case are is and key. The is attribute exists for dynamic components. And, the key ensures that the new children will have different identities from each other and helps Vue to decide what to draw.
“Children of the same common parent must have unique keys. Duplicate keys will cause rendering errors.”
The template tag will loop through components that are provided in the panelList data field of the application.
So, starting with the application level Vue definition for the icon app, we can make changes to include the panelList in the data elements. (Let’s now call it the panelApp).
var panelApp = new Vue({
        el: '#PanelApp',
        data: {
        iconList: [  // Where is the data? Still on the server.
        ],
        panelList: [
        ],
        queryToken : "Thermo Batches"  // picked a name for demo
        },
        methods : {
          goGetPanel: function (pname) {
            //
              var url = panelURL(pname);  // this is custom to the site.
              fetch(url).then((response) => {  // this is now browser native
                response.text().then((text) => {
                      var newData = decodeURIComponent(text);
                       eval(pHat);  // widgdef = object def, must be assignment
                       pHat = widgdef;
                     var pnameHat = pname + pcount++;
                     pHat.name = pnameHat; // this is needed for the key
                     this.panelList.push(pHat);  // now it’s there.
                  }).catch( error => { /* handle it */ });
          }
        }
    });
Besides adding in the panel, goGetPanel is now in a form required for getting a component definition from a database or other store. The server side must be careful about delivering JavaScript code in the correct format. As for what the object looks like coming from the server, we have already seen it. It is the kind of object used as a parameter to Vue.component.
Here is the complete body of the Vue app that provides a menu as a search result and a place to put panels fetched from the server when the user clicks an icon.
<div id="PanelApp"> <!-- Recognize the name from the Vue doc -->
<div>
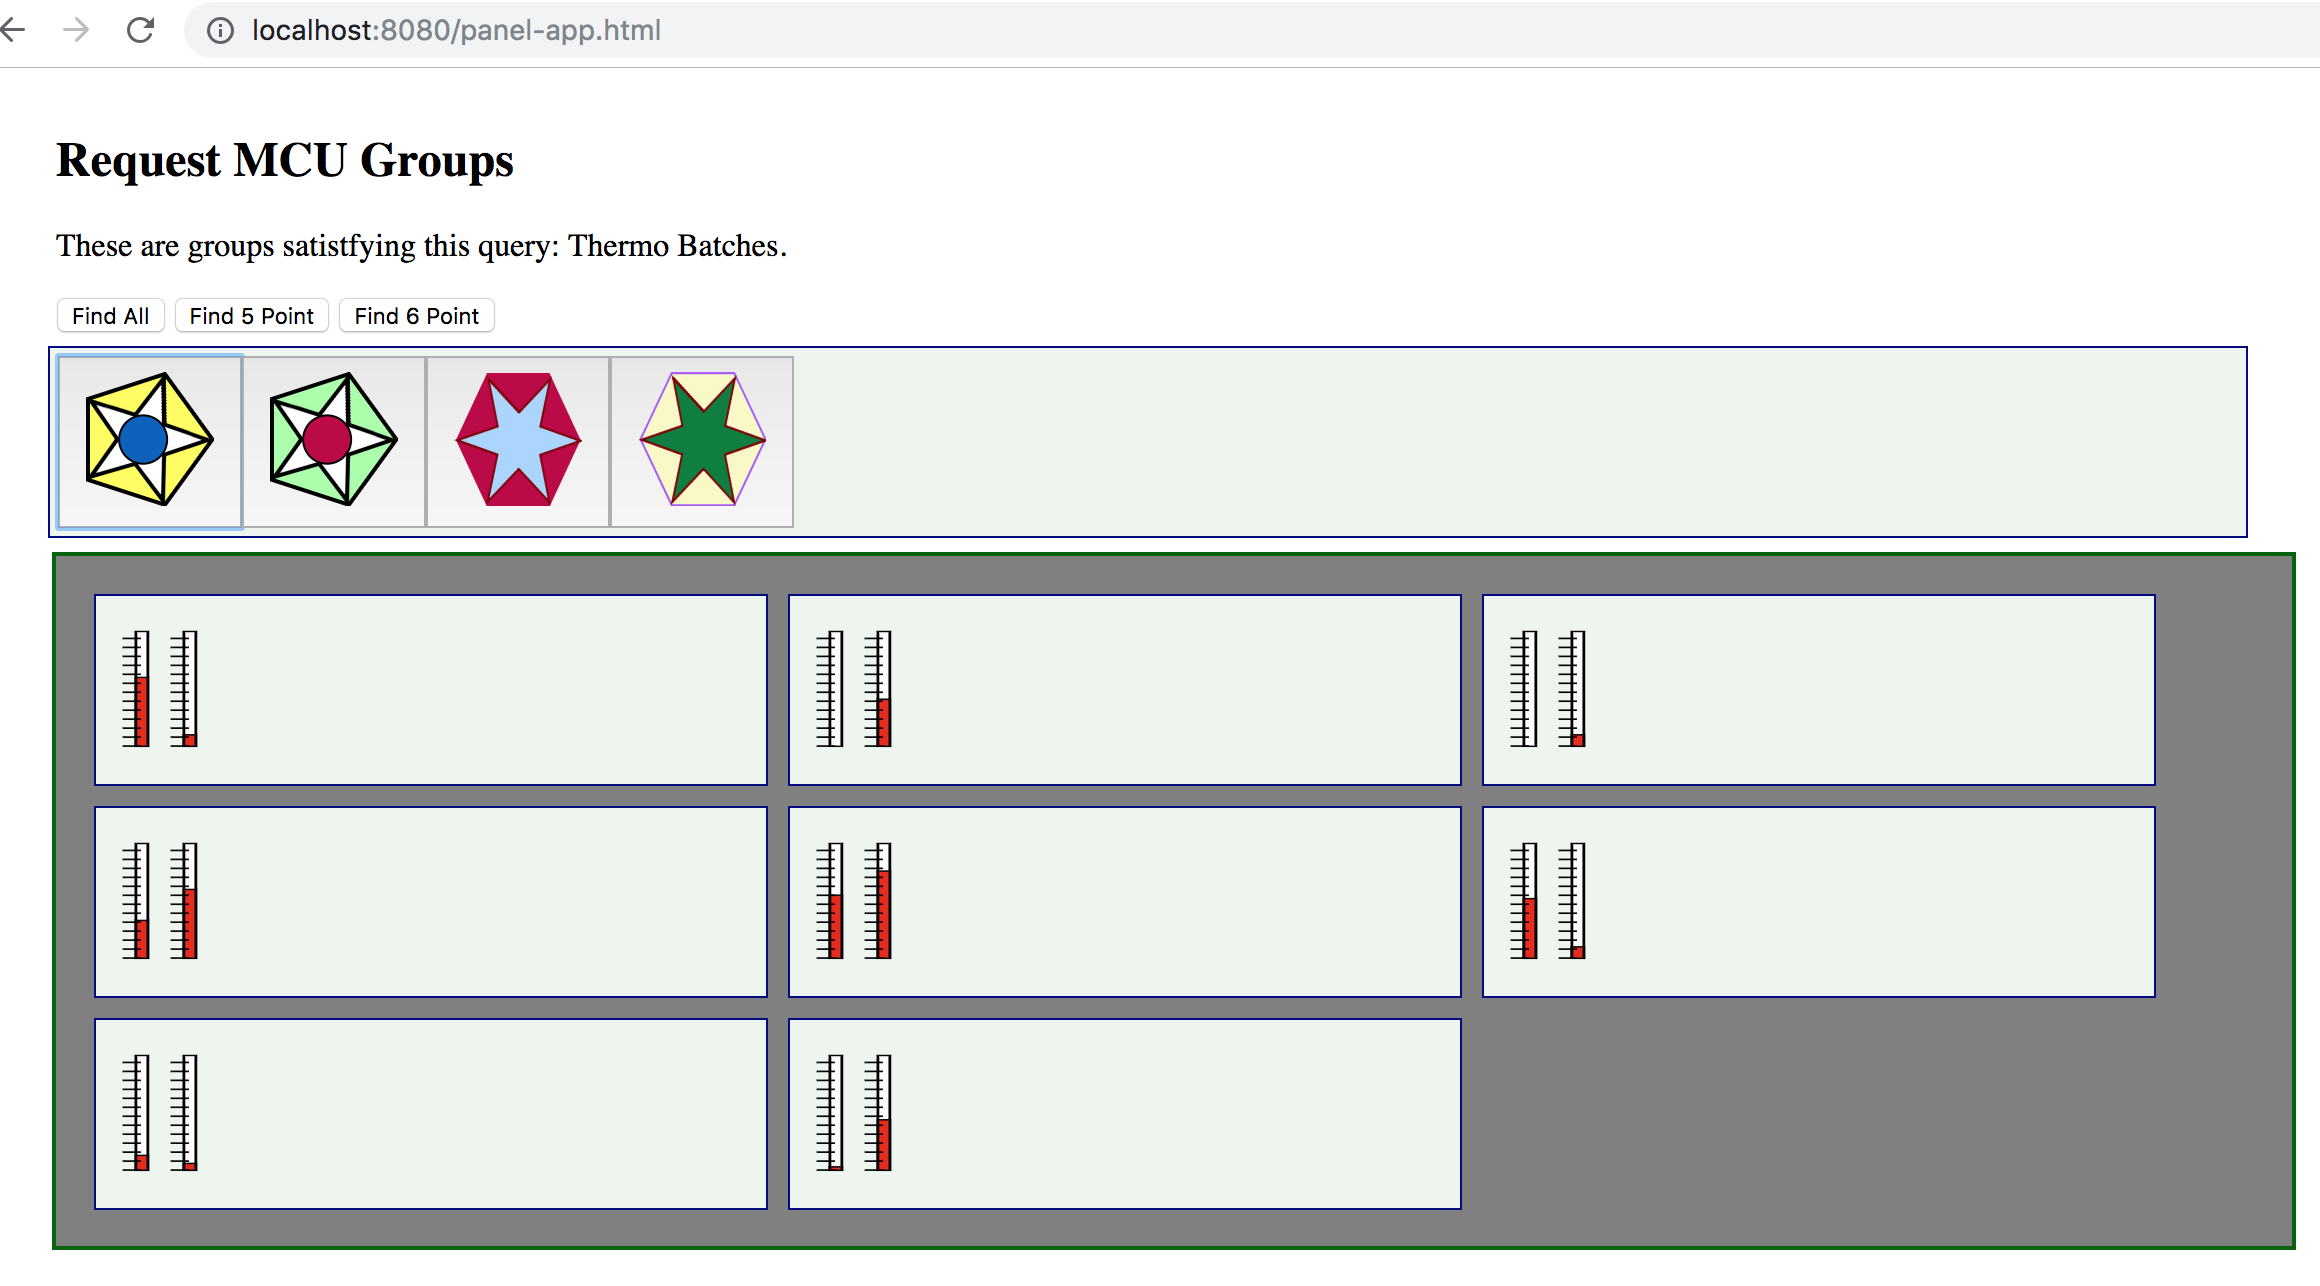
<h2 itemprop="name">Request MCU Groups</h2>
<p itemprop="description">These are groups satistfying this query: {{queryToken}}.</p>
<button onclick="GetIcons(11)">Find All</button>
<button onclick="GetIcons(5)">Find 5 Point</button>
<button onclick="GetIcons(6)">Find 6 Point</button>
</div>
<!-- Here is a Vue loop for generating a lit -->
<div class="entryart" style="padding:4px">
<button v-for="iconEntry in iconList" @click="goGetPanel(iconEntry.name)" >
<div v-html="iconEntry.icon">
</div>
</button>
</div>
<div class="entryart" style="padding:4px" >
<template v-for="(panel, index) in panelList">
<component :is="panel" :key="panel.name" :ref="panel.name" ></component>
</template>
</div>
</div>
In the last div, the component tag now has a ref parameter bound to the panel name. The ref parameter allows Vue app to identify which component to update with data and keeps components separate. The ref parameters also allow our application access to the new dynamically loaded components.
In one test version of the panel app, I have the following interval handler:
setInterval(() => {
  var refall = panelApp.$refs;   // all named children that panels
  for ( var pname in refall ) {  // in an object
    var pdata = refall[pname][0];  // off Vue translation, but it’s there.
    pdata.temp1 = Math.round(Math.random()*100);  // make thermos jump around.
    pdata.temp2 = Math.round(Math.random()*100);
  }
},2000)
The code provides a little animation, changing thermometers randomly. Each panel has two thermometers, and the app allows the user to keep adding panels. (In the final version, some panels must be thrown away.) The refs are being accessed using panelApp.$refs, a field that Vue creates given the refs information in the component tag.
So, this is what the randomly jumping thermometers look like in one snapshot:
Connecting The Panel To The IoT Device
So, the last piece of code is a setInterval test updating thermometers with random values every two seconds. But, what we want to do is read in real data from real machines. In order to do that, we will need some form of communication.
There are a variety of ways. But, let’s use MQTT which is a pub/sub message system. Our SPWA can subscribe to messages from devices at any time. When it gets those messages the SPWA can direct each message to the appropriate data handler for the panel mapped to the device identified in the message.
So, basically what we need to do is replace the setInterval with a response handler. And, that will be for one panel. We probably want to map panels to handlers as they are loaded. And, it is up to the web server to see that the correct mapping is delivered.
Once the web server and the SPWA have the page ready for operation, the web server no longer needs to take care of messaging between the page and the device. the MQTT protocol specifies a routing server to handle pub/sub. A number of MQTT servers have been made. Some of them are open source. One very popular one is Mosquito, and there are a few developed on top of Node.js.
The process for the page is simple. The SPWA subscribes to a topic. One good version of a topic is an identifier for an MCU such as a MAC address or a serial number. Or, the SPWA could subscribe to all temperature readings. But, then the page would have to do the work of filtering the messages from all devices. Publication in MQTT is essentially a broadcast or multicast.
Let’s take a look at how the SPWA will interface with MQTT.
Initializing MQTT On The SPWA
There are several client libraries to choose from. One, for instance, is a MQTT.js. Another is eclipse paho. There are more of course. Let’s use Eclipse Paho since it has a CDN stored version. We just need to add the following line to our page:
<script src="https://cdnjs.cloudflare.com/ajax/libs/paho-mqtt/1.0.1/mqttws31.min.js" type="text/javascript"></script>
The MQTT client has to connect to a server before it can send and receive messages. So, lines setting up the connection also need to be included in the JavaScript. We can add in a function MQTTinitialize which sets up the client and the responses for connection management and message receipt.
var messagesReady = false;
var mqttClient = null;

function MQTTinitialize() {
  mqttClient = new Paho.MQTT.Client(MQTTHostname, Number(MQTTPort), "clientId");
  mqttClient.onMessageArrived = onMessageArrived;
  // connect the client
  mqttClient.connect({
           onSuccess: () => {
             messagesReady = true;
           }
        });
  // set callback handlers
  mqttClient.onConnectionLost = (response) => {
    //
    messagesReady = false;
    //
    if (response.errorCode !== 0) {
      console.log("onConnectionLost:"+response.errorMessage);
    }
    setTimeout(() => {
            MQTTinitialize()
           },1000); // try again in a second
  };
}
Setting Up Subscription
With the connection ready, the client can subscribe to message channels, send messages on them, etc. Just a few routines can do most of the work necessary to connect panels with the MQTT pathways.
For the panel SPWA, the moment of subscription can be used to establish the association between the panel and the topic, the MCU identifier.
function panelSubcription(topic,panel) {
    gTopicToPanel[topic] = panel;
    gPanelToTopic[panel] = topic;
    mqttClient.subscribe(topic);
}
Given that an MCU is publishing on its topic, the SPWA will receive a message. Here, the Paho message is unpacked. And, then the message is passed on into the application mechanics.
function onMessageArrived(pmessage) {
  //
  var topic = pmessage.destinationName;
  var message = pmessage.payloadString;
  //
  var panel = gTopicToPanel[topic];
  deliverToPanel(panel,message);
}
So, now all we need to do is create deliverToPanel which should be somewhat like the interval handler that we had before. However, the panel is clearly identified, and only the keyed data sent in the particular message may be updated.
function deliverToPanel(panel,message) {
  var refall = panelApp.$refs;   // all named children that panels
  var pdata = refall[panel][0];  // off Vue translation, but it’s there.
  var MCU_updates = JSON.parse(message);
  for ( var ky in MCU_updates ) {
    pdata[ky] = MCU_updates[ky]
  }
}
This deliverToPanel function is abstract enough to allow any panel definition with any number of data points for animation.
Sending Messages
To complete the application loop between the MCU and the SPWA, we define a function to send a message.
function sendPanelMessage(panel,message) {
    var topic = gPanelToTopic[panel];
    var pmessage = new Paho.MQTT.Message(message);
    pmessage.destinationName = topic;
    mqttClient.send(pmessage);
}
The sendPanelMessage function does no more than sending the message out on the same topic pathway that the SPWA subscribes to.
As we plan to make the icon buttons responsible for bringing in some number of panels for a single cluster of MCU’s, there will be more than one panel to take care of. But, we keep in mind that each panel corresponds to a single MCU, so we have a one-one mapping, for which we may use two JavaScript maps for the map and the inverse.
So, when do we send messages? Usually, the panel application will send a message when it wants to change the state of the MCU.
Keeping The View (Vue) State In Sync With Devices
One of the great things about Vue is that it is very easy to keep the data model synchronized with the activity of the user, who may edit fields, click on buttons, use sliders, etc. One can be sure that button and field changes will be reflected immediately in the components’ data fields.
But, we want changes to fire off messages to the MCU as soon as the changes occur. So, we seek to make use of the interface events that Vue may govern. We seek to respond to such an event, but only after the Vue data model is ready with the current value.
I created another kind of panel, this one with a fairly artistic looking button (perhaps inspired by Jackson Pollock). And, I went about turning it into something whose click reports the state back to the panel that contains it. That was not so simple a process.
One thing that threw me off is that I had forgotten some of the oddities in managing SVG. I first tried to change the style string so that the display field of the CSS style would either be “None” or “something”. But, the browser never rewrote the styles string. But, as that was cumbersome, I tried changing the CSS class. That also had no effect. But, there the visibility attribute, which most of us recall from old HTML (version 1.0 perhaps), but that is very up to date in SVG. And, that works well. All, I had to do was to get the button click event to propagate.
Vue has designed properties to propagate in one direction, parent to child. So, to change data in the application, or in the panel, you have to send a change event to the parent. Then, you can change the data. The change of the data element controlling the button causes Vue to update the property affecting the visibility of the SVG element we have chosen to indicate state. Here is an example:
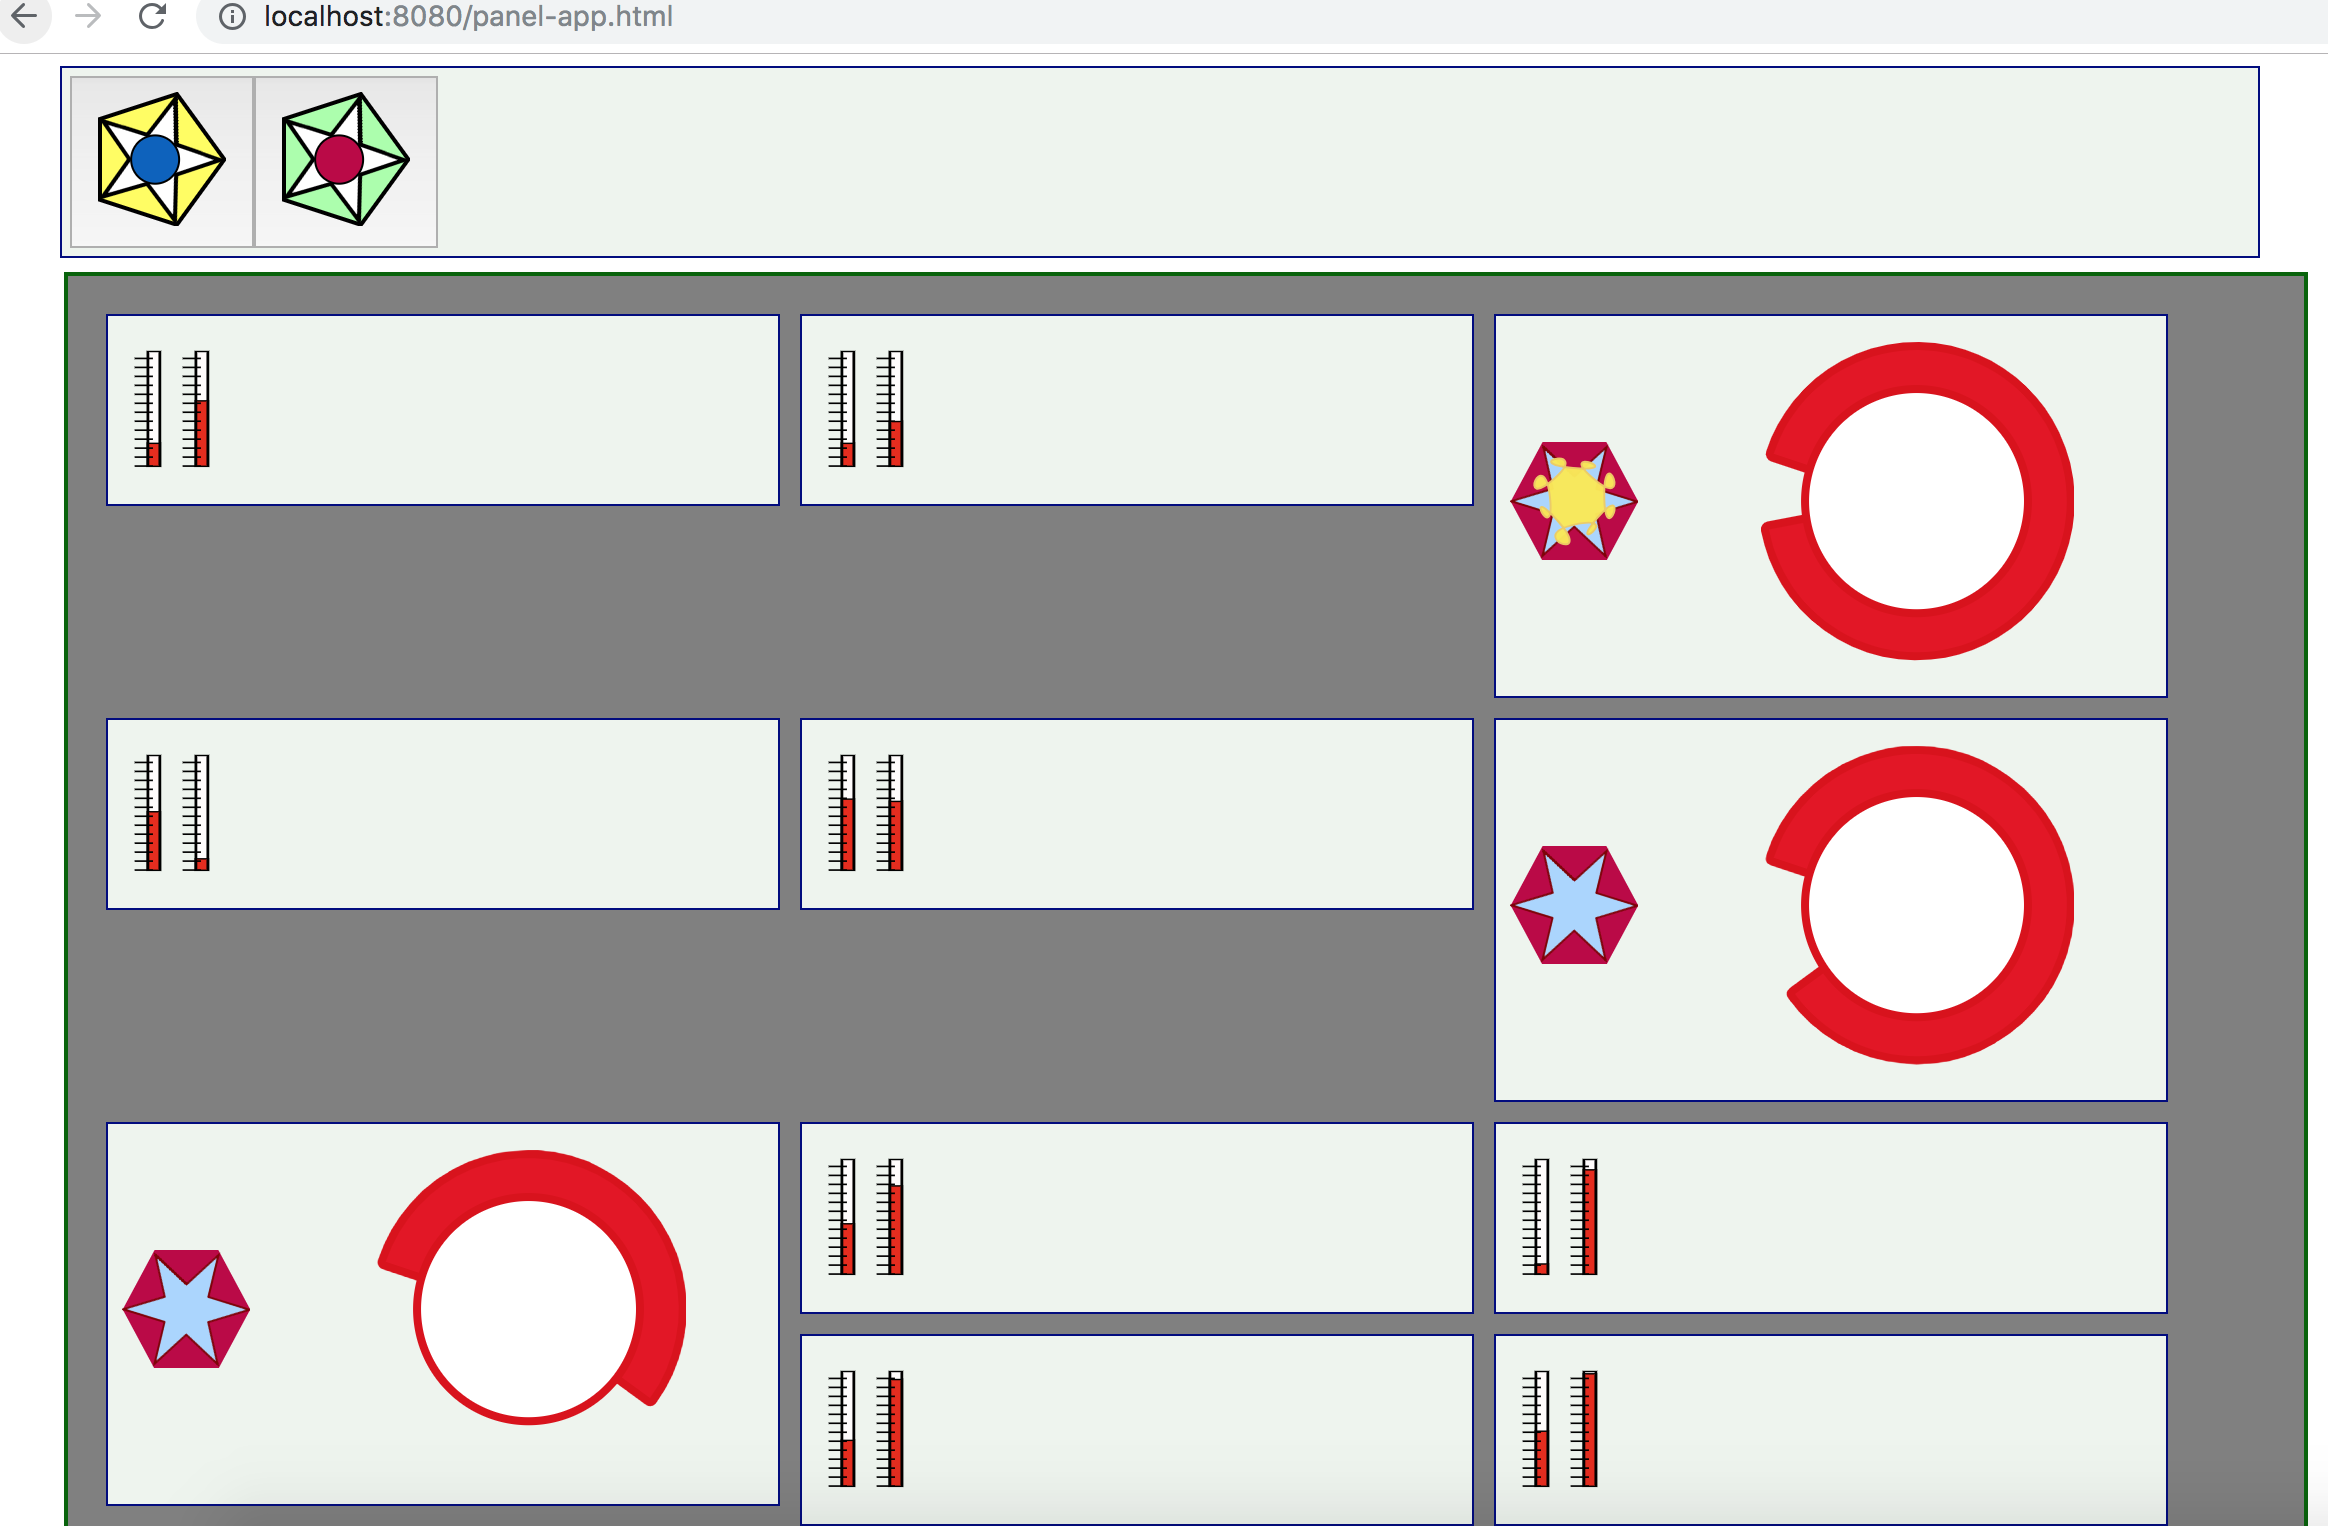
Each instance of the squiggly button panel is independent. So, some are ON and some are OFF.
This snippet of SVG contains the odd-looking yellow indicator:
<path
     :visibility="stateView"
     style="opacity:0.98000004;fill:#faea4a;fill-opacity:1;stroke:#eecd5c;stroke-width:1;stroke-miterlimit:4;stroke-dasharray:none;stroke-opacity:1"
       id="sunthing"
       d="m -36.544616,12.266886 c 19.953088,17.062165 5.07961,-19.8251069 5.317463,8.531597 0.237853,28.356704 13.440044,-8.847959 -3.230451,10.779678 -16.670496,19.627638 14.254699,-2.017715 -11.652451,3.586456 -25.90715,5.60417 10.847826,19.889979 -8.095928,-1.546575 -18.943754,-21.436555 -1.177383,14.210702 -4.176821,-12.416207 -2.999438,-26.6269084 -17.110198,8.030902 2.14399,-8.927709 19.254188,-16.9586105 -19.075538,-8.0837048 9.448721,-5.4384245 28.52426,2.6452804 -9.707612,-11.6309807 10.245477,5.4311845 z"
       transform="translate(78.340803,6.1372042)" />
The visibility is populated by stateView, a computed variable that maps the state boolean to a string for SVG.
Here is the panel component definition template:
<script type="text/x-template" id="mcu-control-panel-template">
  <div>
    <control-switch :state="bstate" v-on:changed="saveChanges" ></control-switch>
    <gauge :level="fluidLevel" ></gauge>
  </div>
</script>
And, this is the JavaScript definition of the Vue panel with its children as subcomponents:
var widgdef = {
  data: function () {
    var currentPanel = {  // at the top level, values controlling children
      bstate : true,
      fluidLevel : Math.round(Math.random()*100)
    }
    //
    return currentPanel
  },
  template: '#mcu-control-panel-template',
  methods: {
    saveChanges: function() {  // in real life, there is more specificity
      this.bstate = !this.bstate
      relayToMCU(this.name,"button",this.bstate) // to be defined
    }
  },
  components: {
    'control-switch' : {  // the odd looking button
      props: [’state'],
      template: '#control-switch-template',  // for demo it is in the page.
      computed: {
        // you saw this in the SVG above.
        stateView : function() {
          return ( this.state ) ?  "visible" : "hidden"
        }
      },
      methods : {
        // the button handler is in the SVG template at the top.
        stateChange : function () {  // can send
          this.$emit('changed');  // tell the parent. See on the template instance
        }
      }
    },
    'gauge' : { // some other nice bit of SVG
      props: ['level'],
      template: '#gauge-template'
    }
  }
}
So, now the mechanism for a single button embedded in a panel has been laid out. And, there has to be a hook for telling the MCU that something has taken place. It must be called immediately after the data state of the panel component has been updated. Let’s define it here:
function relayToMCU(panel,switchName,bstate) {
  var message = switchName + ':' + bstate  // a on element parameter string.
  sendPanelMessage(panel,message)
}
There is the state change on it’s way to hardware in just two lines of code.
But, this is a fairly simple case. Any switch can be viewed as a function call to a piece of hardware out in the world. So, the string might contain the switch name and several other data elements. So, the component method that registers change will have to have some custom handling in it in order that it might gather together all the pieces of data set on the panel and send them along in one command string. Even the command string is a little simple. If the MCU is quite small, the command string might have to be translated into a code. If the MCU has a great deal of capability, the command string might actually be a JSON structure or perhaps all the data that the panel hosts.
In this discussion, the buttons on the icon panel contain the name of the panel to fetch. That may also be fairly simplified as well. It seems to make sense that that parameter can stand for any panel that might be stored in an enterprises databases. But, perhaps it is some formula. Perhaps, information about the panel should be wrapped around the panel definition that we receive from the server. In any case, the basics can be easily expanded upon once certain headaches are out of the way, like making the SVG respond to clicks properly.
Conclusion
This discussion has laid out some basic steps and decisions that lead to the realization of a Single Page Web App (SPWA) that can interface with IoT devices. We now know how to get panels from a web server and turn them into MCU interface.
There is much more to this discussion with quite a few other discussions that may follow. Starting with Vue is one thing to think about. But, then there is the whole MCU story, which we have only briefly touched upon.
In particular, by selecting MQTT as a communication substrate, we assume that IoT devices on the other end can somehow be ruled by MQTT. But, that may not always be the case. Sometimes gateways are needed if MQTT is to gain access to a device with serial links or Bluetooth. Or, perhaps all one ever needs from on the web page is WebSockets. Nevertheless, we used MQTT as an example to show how Vue could both receive and send data while keeping its data state in sync with devices.
Once again we only have part of the story. This time it is for synchronization because the page should be able to deal with alerts and bother the user if something critical is happening. Sometimes messages can get lost. So, we have to have a mechanism for acknowledgments.
Finally, it is my opinion that Vue makes updating data upon receipt quite elegant. But, sending the state changes is not so straight forward. It does not seem to make the job much simpler than can be done with vanilla JavaScript. But, there is a way and it makes sense.
Perhaps a clean library can be built to make a universal set of components for all panels. The elements for making such libraries and having them stored in a database have been briefly mentioned. Tools that go beyond just making SVG pictures may have to be developed. In any case, there are likely many things that can be done for the next steps.
Further Reading
- The Forensics Of React Server Components (RSCs)
- Setting And Persisting Color Scheme Preferences With CSS And A “Touch” Of JavaScript
- An Introduction To Quasar Framework: Building Cross-Platform Applications
- Accessible SVGs: Perfect Patterns For Screen Reader Users


