Switching From WordPress To Hugo

Email Newsletter
Weekly tips on front-end & UX.
Trusted by 182,000+ folks.
When WordPress 5 was released, I was excited about making use of the Gutenberg editor to create custom blocks, as posts on my personal blog had a couple of features I could turn into a block, making it easier to set up my content. It was definitely a cool thing to have, yet it still felt quite bloated.
Around the same time, I started reading more and more about static site generators and the JAMstack (this article by Chris Ferdinandi convinced me). With personal side projects, you can kind of dismiss a wide variety of issues, but as a professional, you have to ensure you output the best quality possible. Performance, security and accessibility become the first things to think about. You can definitely optimize WordPress to be pretty fast, but faster than a static site on a CDN that doesn’t need to query the database nor generate your page every time? Not so easy.
I thought that I could put this into practice with a personal project of mine to learn and then be able to use this for professional projects, and maybe some of you would like to know how, too. In this article, I will go over how I made the transition from WordPress to a specific static site generator named Hugo.
Hugo is built in Go, which is a pretty fast and easy to use language once you get used to the syntax, which I will explain. It all compiles locally so you can preview your site right on your computer. The project will then be saved to a private repository. Additionally, I will walk you through how to host it on Netlify, and save your images on a Git LFS (Large File Storage). Finally, we’ll have a look at how we can set up a content management system to add posts and images (similar to the WordPress backend) with Netlify CMS.
Note that all of this is absolutely free, which is pretty amazing if you ask me (although you’ll have to pay extra if you use up all your LFS storage or if your site traffic is intense). Also, I am writing this from a Bitbucket user point of view, running on a Mac. Some steps might be slightly different but you should be able to follow along, no matter what setup you use.
You’ll need to be somewhat comfortable with HTML, CSS, JS, Git and the command terminal. Having a few notions with templating languages such as Liquid could be useful as well, but we will review Hugo’s templates to get you started. I will, nonetheless, provide as many details as possible!
I know it sounds like a lot, and before I started looking into this, it was for me, too. I will try to make this transition as smooth as possible for you by breaking down the steps. It’s not very difficult to find all the resources, but there was a bit of guesswork involved on my part, going from one documentation to the next.
- Exporting The Content From WordPress
- Preparing Your Blog Design
- Setting Up A New Repository
- Activating Git LFS (Optional)
- Creating The Site On Netlify
- Preparing For Netlify Large Media (Optional)
- Setting Up Hugo On Your Computer
- Creating Your Custom Theme
- Notes On The Hugo Syntax
- Content And Data
- Deploying On Netlify
- Setting Up A Custom Domain
- Editing Content On Netlify CMS
Note: If you have trouble with some of these, please let me know in the comments and I’ll try to help, but please note this is destined to be applied to a simple, static blog that doesn’t have a dozen widgets or comments (you can set that up later), and not a company site or personal portfolio. You undoubtedly could, though, but for the sake of simplicity, I’ll stick to a simple, static blog.
Prerequisites
Before we do anything, let’s create a project folder where everything from our tools to our local repository is going to reside. I’ll call it “WP2Hugo” (feel free to call it anything you want).
This tutorial will make use of a few command line tools such as npm and Git. If you don’t have them already, install those on your machine:
- Install Git
- Install Node.js and npm (Node.js includes npm)
- Install Homebrew (recommended for macOS/Linux users)
With these installed, let’s get started!
1. Exporting The Content From WordPress
First off, we’ll need to export your content from WordPress: posts, pages, and uploads. There are a few tools available that Hugo mentions but personally, only one of them worked: blog2md. This one works by running a JavaScript file with Node.js in your command terminal. It takes the XML files exported by WordPress, and outputs Markdown files with the right structure, converting your HTML to Markdown and adding what is called the Front Matter, which is a way to format metadata at the start of each file.
Go to your WordPress admin, and open the Tools menu, Export submenu. You can export what you want from there. I’ll refer to the exported file as YOUR-WP-EXPORT.xml.
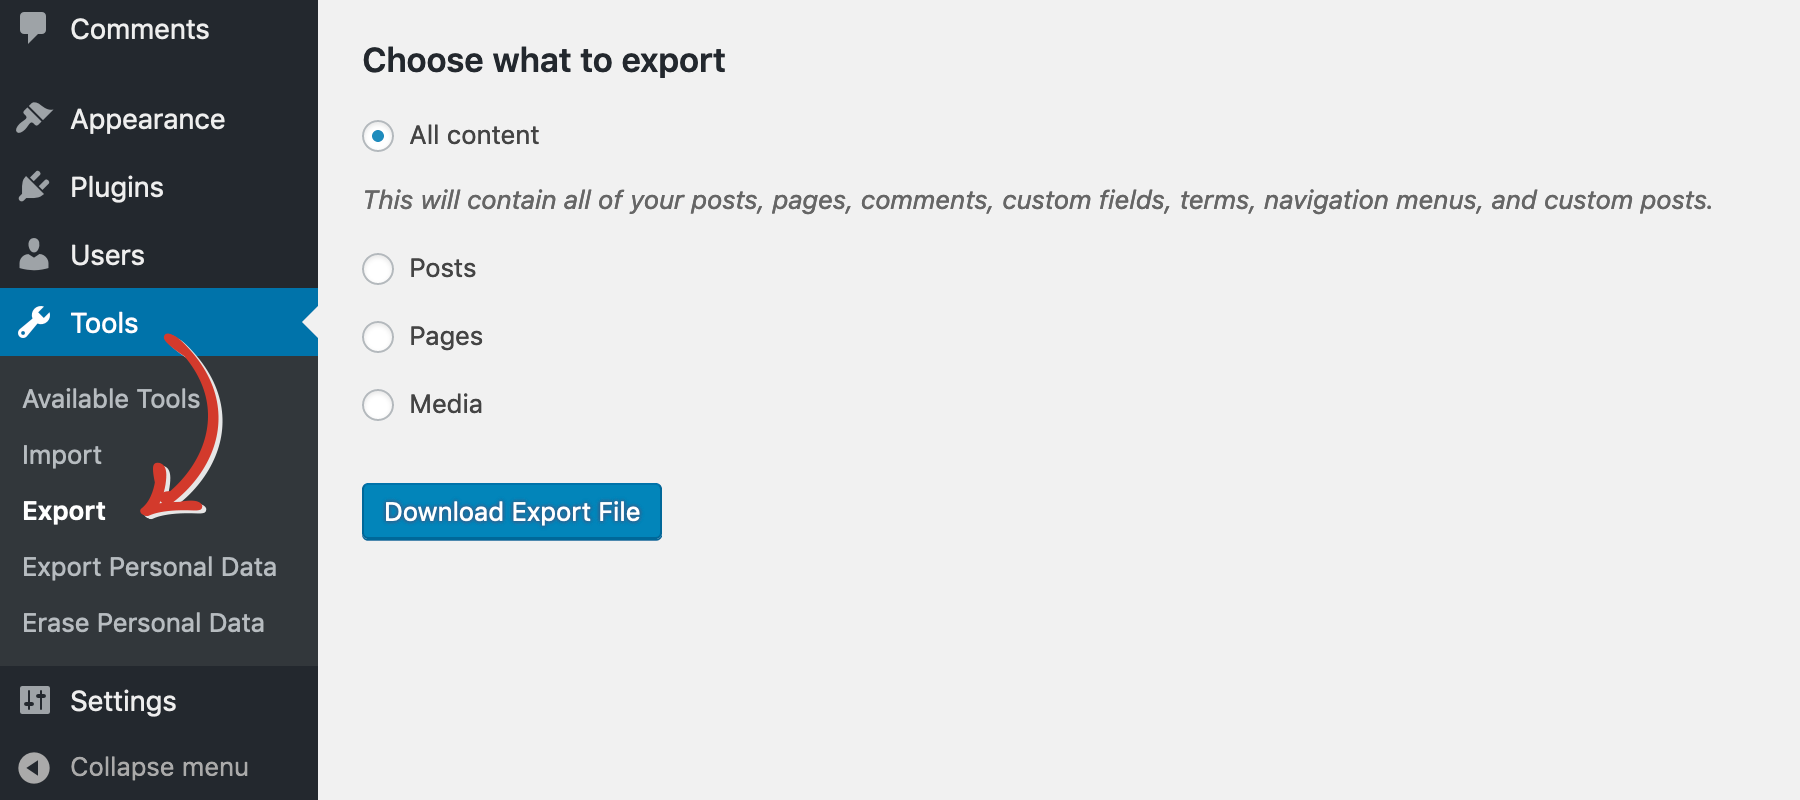
You can select exactly what data you want to export from your WordPress blog.
Inside our WP2Hugo folder, I recommend creating a new folder named blog2md in which you’ll place the files from the blog2md tool, as well as your XML export from WordPress (YOUR-WP-EXPORT.xml). Also, create a new folder in there called out where your Markdown posts will go. Then, open up your command terminal, and navigate with the cd command to your newly created “blog2md” folder (or type cd with a space and drag the folder into the terminal).
You can now run the following commands to get your posts:
npm install
node index.js w YOUR-WP-EXPORT.xml out
Look into the /WP2Hugo/blog2md/out directory to check whether all of your posts (and potential pages) are there. If so, you might notice there’s something about comments in the documentation: I had a comment-free blog so I didn’t need them to be carried through but Hugo does offer several options for comments. If you had any comments on WordPress, you can export them for later re-implementation with a specialized service like Disqus.
If you’re familiar enough with JS, you can tweak the index.js file to change how your post files will come out by editing the wordpressImport function. You may want to capture the featured image, remove the permalink, change the date format, or set the type (if you have posts and pages). You’ll have to adapt it to your needs, but know that the loop (posts.forEach(function(post){ ... })) runs through all the posts from the export, so you can check for the XML content of each post in that loop and customize your Front Matter.
Additionally, if you need to update URLs contained in your posts (in my case, I wanted to make image links relative instead of absolute) or the date formatting, this is a good time to do so, but don’t lose sleep over it. Many text editors offer bulk editing so you can plug in a regular expression and make the changes you want across your files. Also, you can run the blog2md script as many times as needed, as it will overwrite any previously existing files in the output folder.
Once you have your exported Markdown files, your content is ready. The next step is to get your WordPress theme ready to work in Hugo.
2. Preparing Your Blog Design
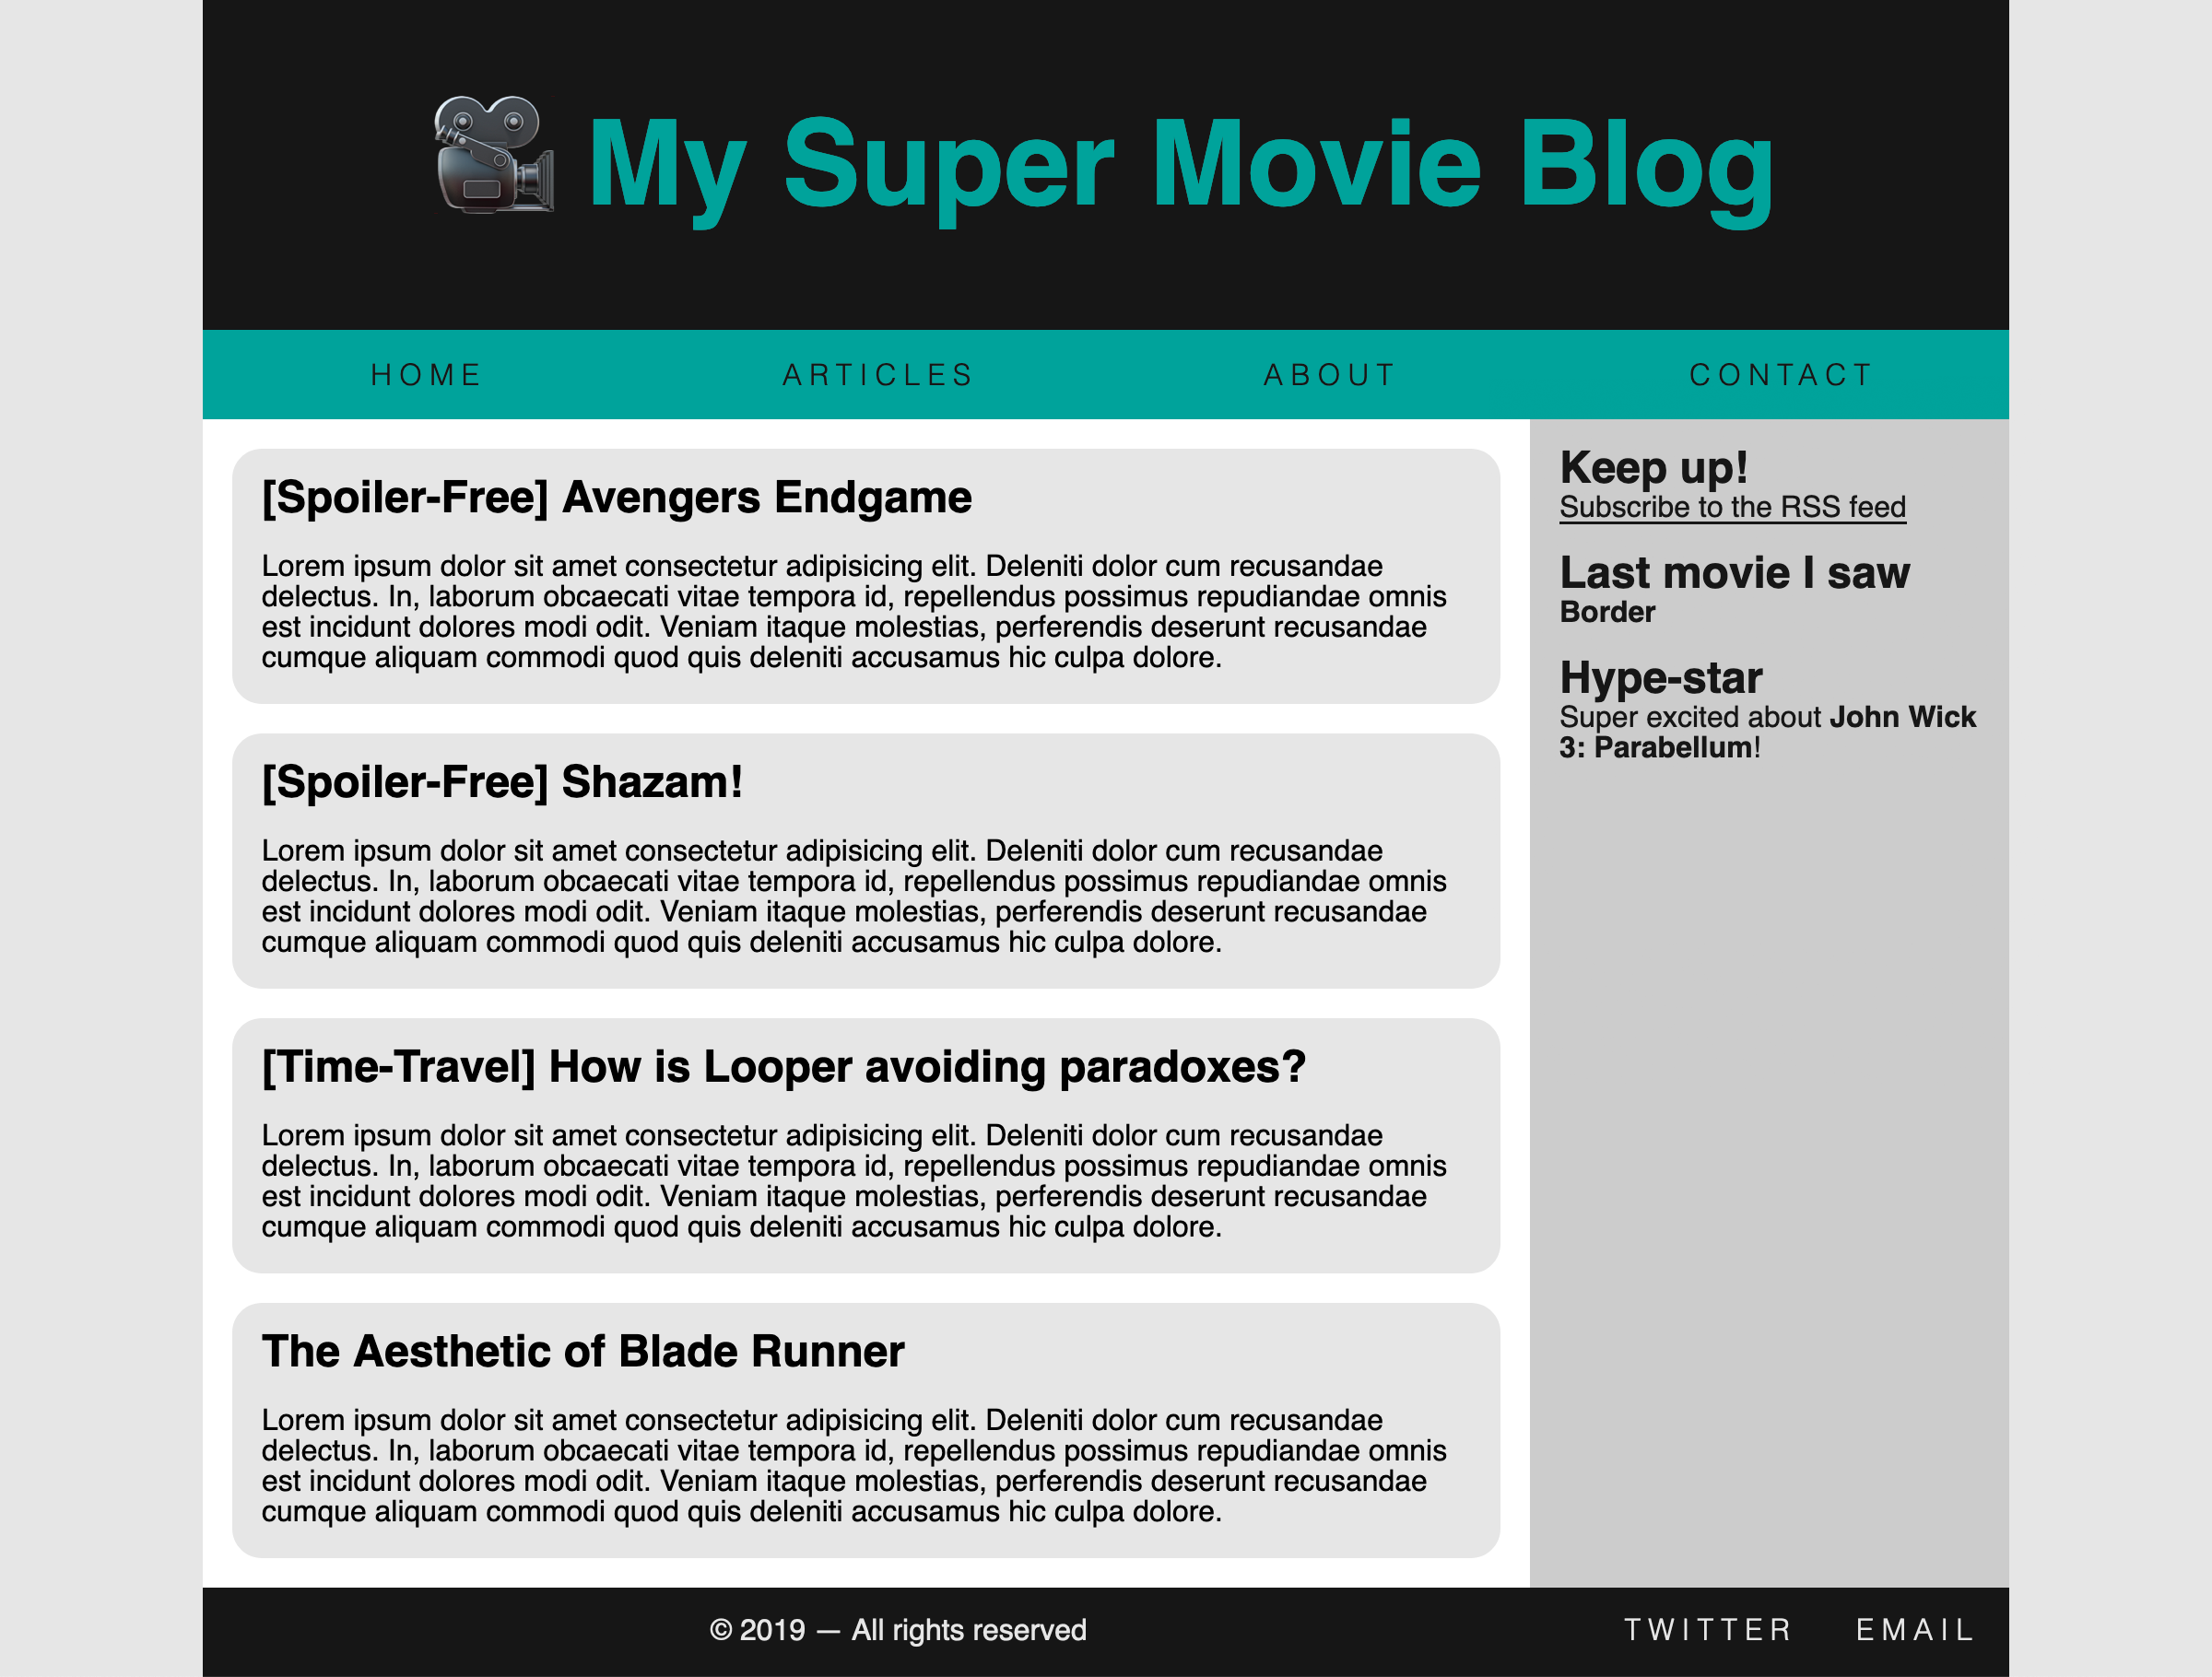
My blog had a typical layout with a header, a navigation bar, content and sidebar, and a footer — quite simple to set up. Instead of copying pieces of my WordPress theme, I rebuilt it all from scratch to ensure there was no superfluous styles or useless markup. This is a good time to implement new CSS techniques (pssst… Grid is pretty awesome!) and set up a more consistent naming strategy (something like CSS Wizardry’s guidelines). You can do what you want, but remember we’re trying to optimize our blog, so it’s good to review what you had and decide if it’s still worth keeping.
Start by breaking down your blog into parts so you can clearly see what goes where. This will help you structure your markup and your styles. By the way, Hugo has the built-in ability to compile Sass to CSS, so feel free to break up those styles into smaller files as much as you want!
When I say simple, I mean really simple.
Alternatively, you can completely bypass this step for now, and style your blog as you go when your Hugo site is set up. I had the basic markup in place and preferred an iterative approach to styles. It’s also a good way to see what works and what doesn’t.
3. Setting Up A New Repository
Now that that is out of the way, we need to set up a repository. I’m going to assume you will want to create a new repository for this, which is going to be a great opportunity to use Git LFS (Large File System). The reason I advise to do this now is that implementing Git LFS when you already have hundreds of images is not as smooth. I’ve done it, but it was a headache you’re likely to want to avoid. This will also provide other benefits down the road with Netlify.
While I’ll be doing all this via Bitbucket and their proprietary Git GUI, Sourcetree, you can absolutely do this with GitHub and GitLab and their own desktop tools. You can also do it directly in the command terminal, but I like to automate and simplify the process as much as I can, reducing the risk of making silly mistakes.
When you’ve created your new repository on the Git platform of your choice, create an empty folder inside your local project folder (WP2Hugo), e.g. hugorepo, then open up your command terminal or Git GUI tool and initialize your local Git repository; then, link it to the remote repository (you can usually find the exact command to use on the newly created remote repository).
I’d recommend creating a dev (or stage) branch so that your main branch is strictly used for production deployments. It’ll also limit new builds to be generated only when you’re done with a potential series of changes. Creating a branch can be done locally or on your repository’s remote webpage.
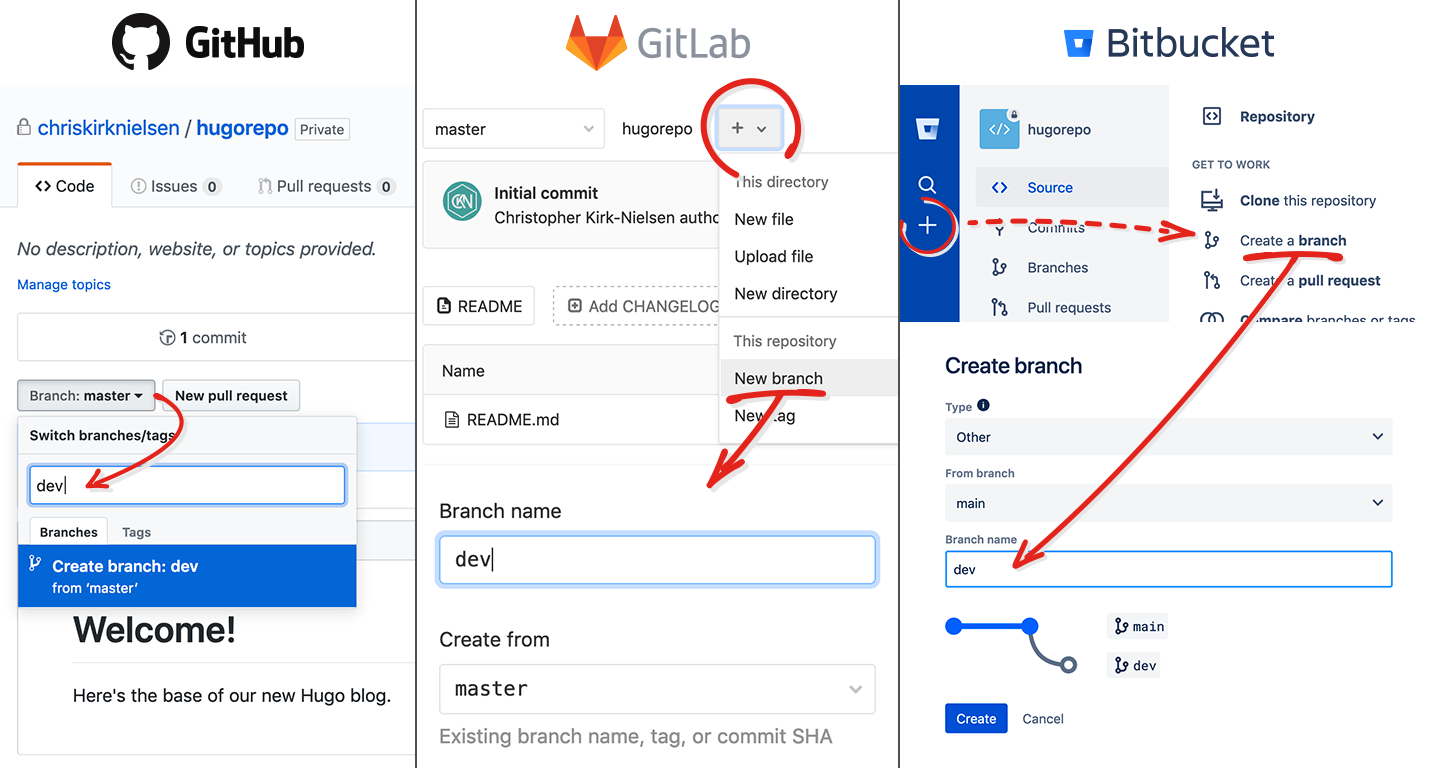
GitHub makes it easy to create a branch by clicking the branch switcher and typing a new name. On GitLab, you need to open the “Plus” dropdown to access the option. Bitbucket requires you to open the “Plus” menu on the left to open the slide-out menu and click “Create a branch” in the “Get to work” section.
4. Activating Git LFS (Optional)
Git Large File System is a Git feature that allows you to save large files in a more efficient way, such as Photoshop documents, ZIP archives and, in our case, images. Since images can need versioning but are not exactly code, it makes sense to store them differently from regular text files. The way it works is by storing the image on a remote server, and the file in your repository will be a text file which contains a pointer to that remote resource.
Alas, it’s not an option you just click to enable. You must set up your repository to activate LFS and this requires some work locally. With Git installed, you need to install a Git-LFS extension:
git lfs install
If, like me, that command didn’t work for you, try the Homebrew alternative (for macOS or Linux):
brew install git-lfs
Once that’s done, you’ll have to specify which files to track in your repository. I will host all of the images I uploaded in WordPress’s /upload folder in an identically-named folder on my Hugo setup, except that this folder will be inside a /static folder (which will resolves to the root once compiled). Decide on your folder structure, and track your files inside:
git lfs track "static/uploads/*"
This will track any file inside the /static/uploads folder. You can also use the following:
git lfs track "*.jpg"
This will track any and all JPG files in your repository. You can mix and match to only track JPGs in a certain folder, for example.
With that in place, you can commit your LFS configuration files to your repository and push that to your remote repository. The next time you locally commit a file that matches the LFS tracking configuration, it will be “converted” to an LFS resource. If working on a development branch, merge this commit into your main branch.
Let’s now take a look at Netlify.
5. Creating The Site On Netlify
At this point, your repository is set up, so you can go ahead and create an account on Netlify. You can even log in with your GitHub, GitLab or Bitbucket account if you like. Once on the dashboard, click the “New site from Git” button in the top right-hand corner, and create your new Netlify site.
Note: You can leave all the options at their default values for now.
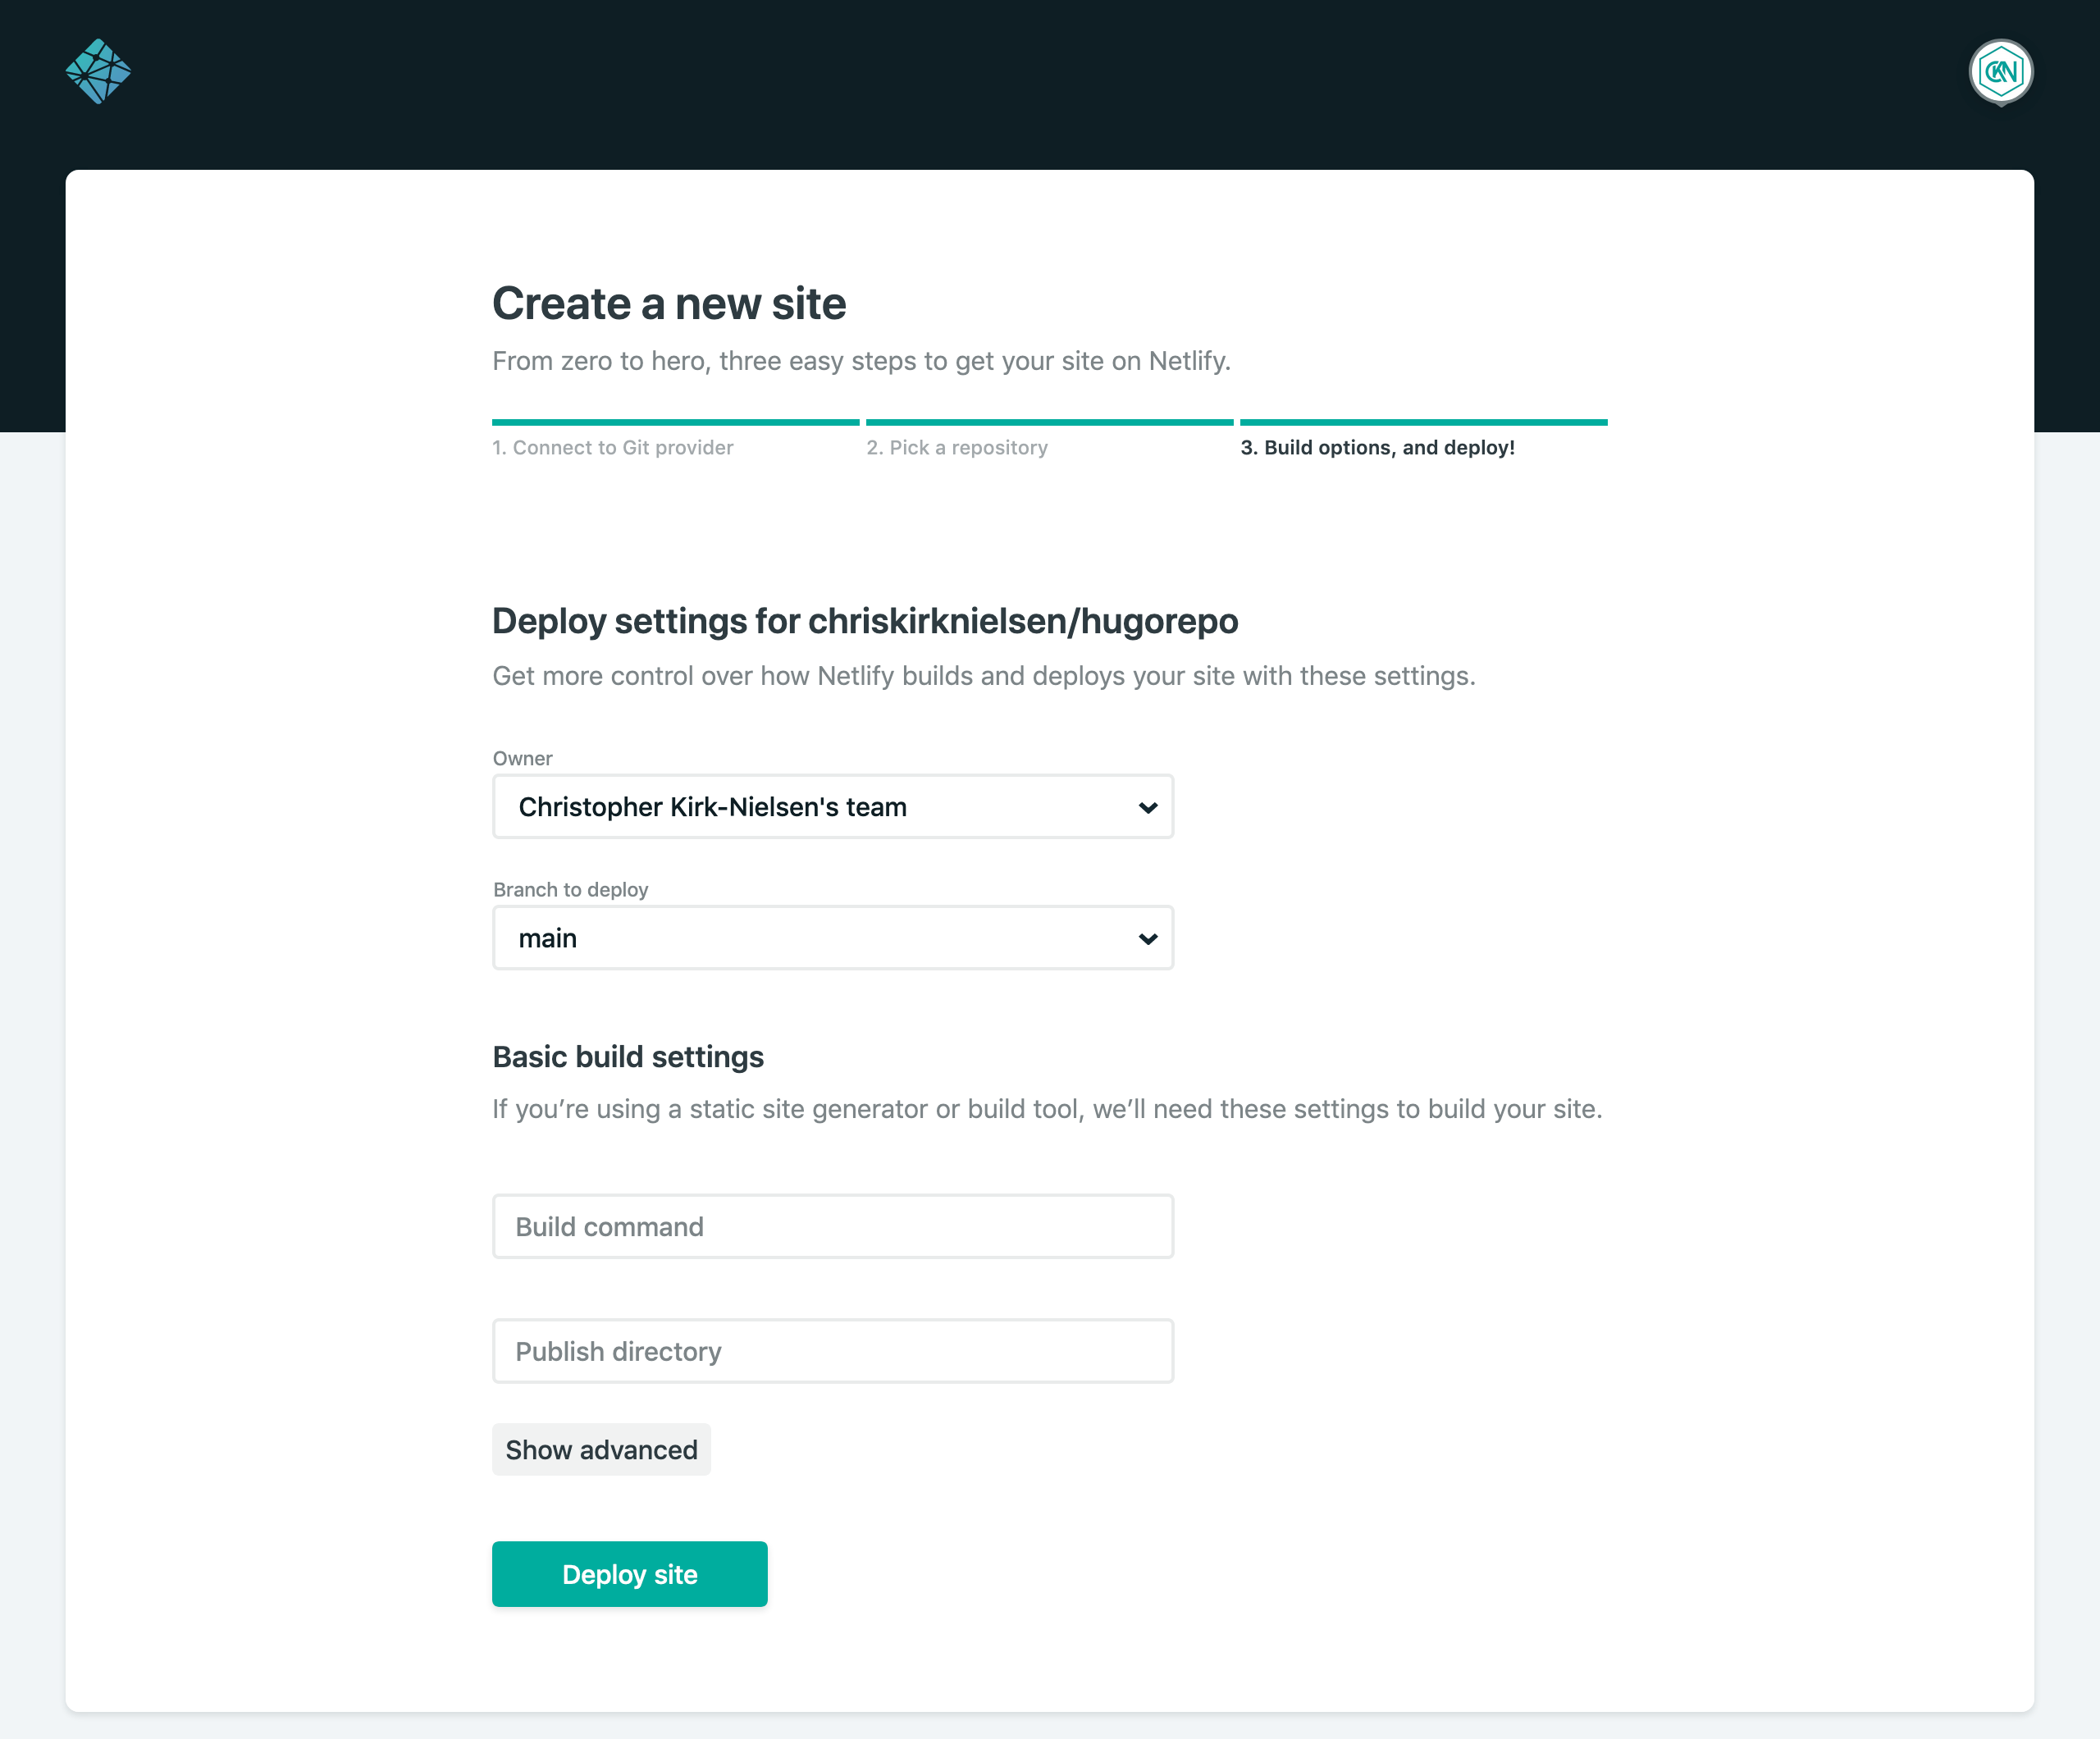
Select your Git provider: this will open a pop-up window to authenticate you. When that is done, the window will close and you’ll see a list of repositories on that Git provider you have access to. Select your freshly created repo and continue. You’ll be asked a few things, most of which you can just leave by default as all the options are editable later on.
For now, in the Site Settings, click “Change site name” and name your site anything you want — I’ll go with chris-smashing-hugo-blog. We will now be able to access the site via chris-smashing-hugo-blog.netlify.com: a beautiful 404 page!
6. Preparing For Netlify Large Media (Optional)
If you set up Git LFS and plan on using Netlify, you’ll want to follow these steps. It’s a bit more convoluted but definitely worth it: it’ll enable you to set query strings on image URLs that will be automatically transformed.
Let’s say you have a link to portrait.jpg which is an image that’s 900×1600 pixels. With Netlify Large Media, you can call the file portrait.jpg?nf_resize=fit&w=420, which will proportionally scale it. If you define both w and h, and set nf_resize=smartcrop, it’ll resize by cropping to focus on the point of interest of the image (as determined by a fancy algorithm, a.k.a. robot brain magic!). I find this to be a great way to have thumbnails like the ones WordPress generates, without needing several files for an image on my repository.
If this sounds appealing to you, let’s set it up!
The first step is installing Netlify’s command-line interface (CLI) via npm:
npm install netlify-cli -g
If it worked, running the command netlify should result in info about the tool.
You’ll then need to make sure you are in your local repository folder (that I named “hugorepo” earlier), and execute:
netlify login
Authorize the token. Next, we’ll have to install the Netlify Large Media plugin. Run:
netlify plugins:install netlify-lm-plugin
netlify lm:install
There should be a command line shown at the end of the resulting message that you must copy (which should look like /Users/YOURNAME/.netlify/helper/path.bash.inc on Mac) — run it. Note that Keychain might ask you for your machine’s administrator password on macOS.
The next step is to link Netlify:
netlify link
You can provide your site name here (I provided the chris-smashing-hugo-blog name I gave it earlier). With this in place, you just need to set up the Large Media feature by executing the following:
netlify lm:setup
Commit these new changes to your local repository, and push them to the remote development branch. I had a few errors with Sourcetree and Keychain along the lines of git "credential-netlify" is not a git command. If that’s your case, try to manually push with these commands:
git add -A
git commit -m "Set up Netlify Large media"
git push
If that didn’t work, you might need to install Netlify credential Helper. Here’s how to do it with Homebrew:
brew tap netlify/git-credential-netlify
brew install git-credential-netlify
Try pushing your commit through now (either with your GUI or command terminal): it should work!
Note: If you change your Netlify password, run netlify logout and netlify login again.
You might ask: “All this, and we still haven’t even initialized our Hugo build?” Yes, I know, it took a while but all the preparations for the transition are done. We can now get our Hugo blog set up!
7. Setting Up Hugo On Your Computer
You’ll first need to install Hugo on your computer with any of the provided options. I’ll be using Homebrew but Windows users can use Scoop or Chocolatey, or download a package directly.
brew install hugo
You’ll then need to create a new Hugo site but it won’t like setting it up in a non-empty folder. First option: you can create it in a new folder and move its contents to the local repository folder:
hugo new site your_temporary_folder
Second option: you can force it to install in your local repository with a flag, just make sure you’re running that in the right folder:
hugo new site . --force
You now have a Hugo site, which you can spin up with this command:
hugo server
You’ll get a local preview on localhost. Sadly, you have no content and no theme of your own. Not to worry, we’ll get that set up really soon!
Let’s first have a look at the configuration file (config.toml in my case): let’s set up the blog’s name and base URL (this must match the URL on your Netlify dashboard):
title = "Chris’ Smashing Hugo Blog"
baseURL = "https://chris-smashing-hugo-blog.netlify.com"
This link will be overwritten while you develop locally, so you shouldn’t run into 404 errors.
Let’s give Hugo our exported articles in Markdown format. They should be sitting in the /WP2Hugo/blog2md/out folder from the first step. In the Hugo folder (a.k.a. the local repository directory), access the content folder and create a subfolder named posts. Place your Markdown files in there, and then let’s get a theme set up.
8. Creating Your Custom Theme
For this step, I recommend downloading the Saito boilerplate, which is a theme with all the partials you’ll need to get started (and no styles) — a very useful starting point. You could, of course, look at this collection of ready-made themes for Hugo if you want to skip over this part of the process. It’s all up to you!
From the local repository folder, clone the theme into themes/saito:
git submodule add https://github.com/hakuoku/saito-boilerplate.git themes/saito
You can rename this folder to anything you want, such as cool-theme. You’ll have to tell your Hugo configuration which theme you want to use by editing your config.toml/yaml/json file. Edit the theme value to saito, or cool-theme, or whatever your theme’s folder name is. Your preview should now show your blog’s title along with a copyright line. It’s a start, right?
Open the theme’s layout/partials/home.html file and edit it to display your content, limiting to the five first items which are of type posts (inside the content/posts/ folder), with range, first and where:
<div class="container">
{{ range first 5 (where .Paginator.Pages "Type" "posts") }}
    <article class="post post--{{ .Params.class }}">
        <h2 class="post__title">{{ .Title }}</h2>
        <section class="post__content">
            {{ .Content }}
        </section>
    </article>
{{ end }}
</div>
Your content is now visible, in the most basic of ways. It’s time to make it yours — let’s dive in!
Templating With Hugo
You can first read the Introduction to Hugo templating if you like, but I’ll try to go over a few essentials that will help you understand the basics.
All operations in Hugo are defined inside delimiters: double curly braces (e.g. {{ .Title }}), which should feel familiar if you’ve done a bit of templating before. If you haven’t, think of it as a way to execute operations or inject values at a specific point in your markup. For blocks, they end with the {{ end }} tag, for all operations aside from shortcodes.
Themes have a layout folder which contains the pieces of the layout. The _default folder will be Hugo’s starting point, baseof.html being (you guessed it!) the base of your layout. It will call each component, called “partials” (more on this on Hugo’s documentation about Partial Template), similar to how you would use include in PHP, which you may have already seen in your WordPress theme. Partials can call other partials — just don’t make it an infinite loop.
You can call a partial with {{ partial "file.html" . }} syntax. The partial section is pretty straightforward, but the two other ones might need explaining. You might expect to have to write partials/file.html but since all partials are to be in the partials” folder, Hugo can find that folder just fine. Of course, you can create subfolders inside the “partials” folder if you need more organization.
You may have noticed a stray dot: this is the context you’re passing to your partial. If you had a menu partial, and a list of links and labels, you could pass that list into the partial so that it could only access to that list, and nothing else. I’ll talk more about this elusive dot in the next section.
Your baseof.html file is a shell that calls all the various partials needed to render your blog layout. It should have minimal HTML and lots of partials:
<!DOCTYPE html>
<html lang="{{ .Site.LanguageCode }}">
    <head>
        <title>{{ block "title" . }}{{ .Site.Title }}{{ end }}</title>
        {{ partial "head.html" . }}
    </head>
    <body>
        {{ partial "header.html" . }}
        {{ partial "nav.html" . }}

        <main>
            {{ block "main" . }}{{ end }}
        </main>

        <aside>
            {{ partial "sidebar.html" . }}
        </aside>

        {{ partial "footer.html" . }}
    </body>
</html>
The {{ block "main" . }}{{ end }} line is different because it is a block that is defined with a template based on the content of the current page (homepage, single post page, etc.) with {{ define "main" }}.
Stylesheets
In your theme, create a folder named assets in which we will place a css folder. It will contain our SCSS files, or a trusty ol’ CSS file. Now, there should be a css.html file in the partials folder (which gets called by head.html). To convert Sass/SCSS to CSS, and minify the stylesheet, we would use this series of functions (using the Hugo Pipes syntax instead of wrapping the functions around each other):
{{ $style := resources.Get "css/style.scss" | toCSS | minify | fingerprint }}
As a bonus — since I struggled to find a straight answer — if you want to use Autoprefixer, Hugo also implements PostCSS. You can add an extra pipe function between toCSS and minify on the first line, like so:
{{ $style := resources.Get "css/style.scss" | toCSS | postCSS | minify | fingerprint }}
Create a “postcss.config.js” file at the root of your Hugo blog, and pass in the options, such as:
module.exports = {
    plugins: {
        autoprefixer: {
            browsers: [
                "> 1%",
                "last 2 versions"
            ]
        }
    },
}
And presto! From Sass to prefixed, minified CSS. The “fingerprint” pipe function is to make sure the filename is unique, like style.c66e6096bdc14c2d3a737cff95b85ad89c99b9d1.min.css. If you change the stylesheet, the fingerprint changes, so the filename is different, and thus, you get an effective cache busting solution.
9. Notes On The Hugo Syntax
I want to make sure you understand “the Dot”, which is how Hugo scopes variables (or in my own words, provides a contextual reference) that you will be using in your templates.
The Dot And Scoping
The Dot is like a top-level variable that you can use in any template or shortcode, but its value is scoped to its context. The Dot’s value in a top-level template like baseof.html is different from the value inside loop blocks or with blocks.
Let’s say this is in our template in our head.html partial:
{{ with .Site.Title }}{{ . }} {{ end }}
Even though we are running this in the main scope, the Dot’s value changes based on context, which is .Site.Title in this case. So, to print the value, you only need to write . instead of re-typing the variable name again. This confused me at first but you get used to it really quick, and it helps with reducing redundancy since you only name the variable once. If something doesn’t work, it’s usually because you’re trying to call a top-level variable inside a scoped block.
So how do you use the top-level scope inside a scoped block? Well, let’s say you want to check for one value but use another. You can use $ which will always be the top-level scope:
{{ with .Site.Params.InfoEnglish }}{{ $.Site.Params.DescriptionEnglish }}{{ end }}
Inside our condition, the scope is .Site.Params.InfoEnglish but we can still access values outside of it with $, where intuitively using .Site.Params.DescriptionEnglish would not work because it would attempt to resolve to .Site.Params.InfoEnglish.Site.Params.DescriptionEnglish, throwing an error.
Custom Variables
You can assign variables by using the following syntax:
{{ $customvar := "custom value" }}
The variable name must start with $ and the assignment operator must be := if it’s the first time it’s being assigned, = otherwise like so:
{{ $customvar = "updated value" }}
The problem you might run into is that this won’t transpire out of the scope, which brings me to my next point.
Scratch
The Scratch functionality allows you to assign values that are available in all contexts. Say you have a list of movies in a movies.json file:
[
    {
        "name": "The Room",
        "rating": 4
    },
    {
        "name": "Back to the Future",
        "rating": 10
    },
    {
        "name": "The Artist",
        "rating": 7
    }
]
Now, you want to iterate over the file’s contents and store your favorite one to use later. This is where Scratch comes into play:
{{ .Scratch.Set "favouriteMovie" "None" }}{{ /* Optional, just to get you to see the difference syntax based on the scope */ }}

{{ range .Site.Data.movies }}
        {{ if ge .rating 10 }}
            {{ /* We must use .Scratch prefixed with a $, because the scope is .Site.Data.movies, at the current index of the loop */ }}
            {{ $.Scratch.Set "favouriteMovie" .name }}
        {{ end }}
{{ end }}
[...]
My favourite movie is {{ .Scratch.Get "favouriteMovie" }}
<!-- Expected output => My favourite movie is Back to the Future -->
With Scratch, we can extract a value from inside the loop and use it anywhere. As your theme gets more and more complex, you will probably find yourself reaching for Scratch.
Note: This is merely an example as this loop can be optimized to output this result without Scratch, but this should give you a better understanding of how it works.
Conditionals
The syntax for conditionals is a bit different from what you’d expect — from a JavaScript or PHP perspective. There are, in essence, functions which take two arguments (parenthesis optional if you call the values directly):
{{ if eq .Site.LanguageCode "en-us" }}Welcome!{{ end }}
There are several of these functions:
eqchecks for equalitynechecks for inequalitygtcheck for greater thangecheck for great than or equal toltchecks for lesser thanlechecks for lesser than or equal to
Note: You can learn all about the functions Hugo offers in the Hugo Functions Quick Reference.
Whitespace
If you’re as picky about the output as I am, you might notice some undesired blank lines. This is because Hugo will parse your markup as is, leaving blank lines around conditionals that were not met, for example.
Let’s say we have this hypothetical partial:
{{ if eq .Site.LanguageCode "en-us" }}
<p>Welcome to my blog!</p>
{{ end }}
<img src="/uploads/portrait.jpg" alt="Blog Author">
If the site’s language code is not en-us, this will be the HTML output (note the three empty lines before the image tag):
<img src="/uploads/portrait.jpg" alt="Blog Author">
Hugo provides a syntax to address this with a hyphen beside the curly braces on the inside of the delimiter. {{- will trim the whitespace before the braces, and -}} will trim the whitespace after the braces. You can use either or both at the same time, but just make sure there is a space between the hyphen and the operation inside of the delimiter.
As such, if your template contains the following:
{{- if eq .Site.LanguageCode "en-us" -}}
<p>Welcome to my blog!</p>
{{- end -}}
<img src="/uploads/portrait.jpg" alt="Blog Author">
…then the markup will result in this (with no empty lines):
<img src="/uploads/portrait.jpg" alt="Blog Author">
This can be helpful for other situations like elements with display: inline-block that should not have whitespace between them. Conversely, if you want to make sure each element is on its own line in the markup (e.g. in a {{ range }} loop), you’ll have to carefully place your hyphens to avoid “greedy” whitespace trimming.
The example above would output the following if the site’s language code matches “en-us” (no more line breaks between the p and img tags):
<p>Welcome to my blog!</p><img src="/uploads/portrait.jpg" alt="Blog Author">
10. Content And Data
Your content is stored as Markdown files, but you can use HTML, too. Hugo will render it properly when building your site.
Your homepage will call the _default/list.html layout, which might look like this:
{{ define "main" }}
    {{ partial "list.html" . }}
{{ end }}
The main block calls the list.html partial with the context of ., a.k.a. the top level. The list.html partial may look like this:
{{ define "main" }}
<ol class="articles">
    {{ range .Paginator.Pages }}
        <li>
            <article>
                <a href="{{ .URL }}">
                    <h2>{{ .Title }}</h2>
                    <img src="{{ .Params.featuredimage }}" alt="">
                    <time datetime="{{ .Date.Format "2006-01-02" }}">
                        {{ .Date.Format "January 2 2006" }}
                    </time>
                </a>
            </article>
        </li>
    {{ end }}
</ol>
{{ partial "pagination.html" . }}
{{ end }}
Now we have a basic list of our articles, which you can style as you wish! The number of articles per page is defined in the configuration file, with paginate = 5 (in TOML).
You might be utterly confused as I was by the date formatting in Hugo. Each time the unit is mapped out to a number (first month, second day, third hour, etc.) made a lot more sense to me once I saw the visual explanation below that the Go language documentation provides — which is kind of weird, but kind of smart, too!
 Jan 2 15:04:05 2006 MST
=> 1 2  3  4  5    6  -7
Now all that’s left to do is to display your post on a single page. You can edit the post.html partial to customize your article’s layout:
<article>
    <header>
        <h1>{{ .Title }}</h1>
        <p>
            Posted on <time datetime="{{ .Date.Format "2006-01-02" }}">{{ .Date.Format "2006. 1. 2" }}</time>
        </p>
    </header>
    <section>
        {{ .Content }}
    </section>
</article>
And that’s how you display your content!
If you’d like to customize the URL, update your configuration file by adding a [permalinks] option (TOML), which in this case will make the URLs look like my-blog.com/post-slug/:
[permalinks]
    posts = ":filename/"
If you want to generate an RSS feed of your content (because RSS is awesome), add the following in your site configuration file (Saito’s default template will display the appropriate tags in head.html if these options are detected):
rssLimit = 10
[outputFormats]
    [outputFormats.RSS]
        mediatype = "application/rss"
        baseName = "feed"
But what if you had some sort of content outside of a post? That’s where data templates comes in: you can create JSON files and extract their data to create your menu or an element in your sidebar. YAML and TOML are also options but less readable with complex data (e.g. nested objects). You could, of course, set this in your site’s configuration file, but it is — to me — a bit less easy to navigate and less forgiving.
Let’s create a list of “cool sites” that you may want to show in your sidebar — with a link and a label for each site as an array in JSON:
{
    "coolsites": [
        { "link": "https://smashingmagazine.com", "label": "Smashing Magazine" },
        { "link": "https://gohugo.io/", "label": "Hugo" },
        { "link": "https://netlify.com", "label": "Netlify" }
    ]
}
You can save this file in your repository root, or your theme root, inside a data folder, such as /data/coolsites.json. Then, in your sidebar.html partial, you can iterate over it with range using .Site.Data.coolsites:
<h3>Cool Sites:</h3>
<ul>
{{ range .Site.Data.coolsites.coolsites }}
    <li><a href="{{ .link }}">{{ .label }}</a></li>
{{ end }}
</ul>
This is very useful for any kind of custom data you want to iterate over. I used it to create a Google Fonts list for my theme, which categories the posts can be in, authors (with bio, avatar and homepage link), which menus to show and in which order. You can really do a lot with this, and it is pretty straightforward.
A final thought on data and such: anything you put in your Hugo /static folder will be available on the root (/) on the live build. The same goes for the theme folder.
11. Deploying On Netlify
So you’re done, or maybe you just want to see what kind of magic Netlify operates? Sounds good to me, as long as your local Hugo server doesn’t return an error.
Commit your changes and push them to your remote development branch (dev). Head over to Netlify next, and access your site’s settings. You will see an option for “Build & deploy”. We’re going to need to change a couple of things here.
- First, in the “Build settings” section, make sure “Build command” is set to
hugoand that “Publish directory” is set topublic(the default that is recommended you keep on your Hugo config file); - Next, in the “Deploy contexts” section, set “Production branch” to your main branch in your repository. I also suggest your “Branch deploys” to be set to “Deploy only the production branch”;
- Finally, in the “Environment variables” section, edit the variables and click “New variable”. We’re going to set the Hugo environment to 0.53 with the following pair: set key to
HUGO_VERSIONand value to0.53.
Now head on over to your remote repository and merge your development branch into your main branch: this will be the hook that will deploy your updated blog (this can be customized but the default is reasonable to me).
Back to your Netlify dashboard, your site’s “Production deploys” should have some new activity. If everything went right, this should process and resolve to a “Published” label. Clicking the deploy item will open an overview with a log of the operations. Up top, you will see “Preview deploy”. Go on, click it — you deserve it. It’s alive!
12. Setting Up A Custom Domain
Having the URL as my-super-site.netlify.com isn’t to your taste, and you already own my-super-site.com? I get it. Let’s change that!
Head over to your domain registrar and go to your domain’s DNS settings. Here, you’ll have to create a new entry: you can either set an ALIAS/CNAME record that points to my-super-site.netlify.com, or set an A record that points your domain to Netlify’s load balancer, which is 104.198.14.52 at the time of writing.
You can find the latest information on Netlify’s documentation on custom domains. The load balancer IP will be in the DNS settings section, under “Manual DNS configuration for root and www custom domains”.
When that’s done, head over to your site’s dashboard on Netlify and click “Domain settings”, where you’ll see “Add custom domain”. Enter your domain name to verify it.
You can also manage your domains via your dashboard in the Domains tab. The interface feels less confusing on this page, but maybe it will help make more sense of your DNS settings as it did for me.
Note: Netlify can also handle everything for you if you want to buy a domain through them. It’s easier but it’s an extra cost.
After you’ve set up your custom domain, in “Domain settings”, scroll down to the “HTTPS” section and enable the SSL/TLS certificate. It might take a few minutes but it will grant you a free certificate: your domain now runs on HTTPS.
13. Editing Content On Netlify CMS
If you want to edit your articles, upload images and change your blog settings like you’d do on WordPress’ back-end interface, you can use Netlify CMS which has a pretty good tutorial available. It’s a single file that will handle everything for you (and it is generator-agnostic: it will work with Jekyll, Eleventy, and so on).
You just need to upload two files in a folder:
- the CMS (a single HTML file);
- a config file (a YAML file).
The latter will hold all the settings of your particular site.
Go to your Hugo root’s /static folder and create a new folder which you will access via my-super-site.com/FOLDER_NAME (I will call mine admin). Inside this admin folder, create an index.html file by copying the markup provided by Netlify CMS:
<!doctype html>
<html>
<head>
    <meta charset="utf-8" />
    <meta name="viewport" content="width=device-width, initial-scale=1.0" />
    <title>Content Manager</title>
</head>
<body>
<!-- Include the script that builds the page and powers Netlify CMS -->
    <script src="https://unpkg.com/netlify-cms@^2.0.0/dist/netlify-cms.js"></script>
</body>
</html>
The other file you’ll need to create is the configuration file: config.yml. It will allow you to define your site’s settings (name, URL, etc.) so that you can set up what your posts’ front matter should contain, as well as how your data files (if any) should be editable. It’s a bit more complex to set up, but that doesn’t mean it isn’t easy.
If you’re using GitHub or GitLab, start your config.yml file with:
backend:
    name: git-gateway
    branch: dev # Branch to update (optional; defaults to master)
If you’re using Bitbucket, it’s a bit different:
backend:
    name: bitbucket
    repo: your-username/your-hugorepo
    branch: dev # Branch to update (optional; defaults to master)
Then, for our uploads, we’ll have to tell the CMS where to store them:
media_folder: "static/images/uploads" # Media files will be stored in the repo under static/images/uploads
public_folder: "/images/uploads" # The src attribute for uploaded media will begin with /images/uploads
When you create a new post, the CMS will generate the slug for the filename which you can customize with three options:
slug:
    encoding: "ascii" # You can also use "unicode" for non-Latin
    clean_accents: true # Removes diacritics from characters like é or å
    sanitize_replacement: "-" # Replace unsafe characters with this string
Finally, you’ll need to define how the data in your posts is structured. I will also define how the data file coolsites is structured — just in case I want to add another site to the list. These are set with the collections object which will definitely be the most verbose one.
collections:
    - name: "articles" # Used in routes, e.g., /admin/collections/blog
        label: "Articles" # Used in the Netlify CMS user interface
        folder: "content/posts" # The path to the folder where the posts are stored, usually content/posts for Hugo
        create: true # Allow users to create new documents in this collection
        slug: "{{slug}}" # Filename template, e.g., post-title.md
        fields: # The fields for each document, usually in front matter
            - {label: "Title", name: "title", widget: "string", required: true}
            - {label: "Draft", name: "draft", widget: "boolean", default: true }
            - {label: "Type", name: "type", widget: "hidden", default: "post" }
            - {label: "Publish Date", name: "date", widget: "date", format: "YYYY-MM-DD"}
            - {label: "Featured Image", name: "featuredimage", widget: "image"}
            - {label: "Author", name: "author", widget: "string"}
            - {label: "Body", name: "body", widget: "markdown"}
    - name: 'coolsites'
            label: 'Cool Sites'
            file: 'data/coolsites.json'
            description: 'Website to check out'
            fields:
                - name: coolsites
                    label: Sites
                    label_singular: 'Site'
                    widget: list
                    fields:
                        - { label: 'Site URL', name: 'link', widget: 'string', hint: 'https://…' }
                        - { label: 'Site Name', name: 'label', widget: 'string' }
Authentication
The last thing we need to do is to ensure only authorized users can access the backend! Using your Git provider’s authentication is an easy way to go about this.
Head over to your Netlify site and click the “Settings” tab. Then go to “Access control” which is the last link in the menu on the left side. Here, you can configure OAuth to run via GitHub, GitLab or Bitbucket by providing a key and a secret value defined for your user account (not in the repository). You’ll want to use the same Git provider as the one your repo is saved on.
GitHub
Go to your “Settings” page on GitHub (click your avatar to reveal the menu), and access “Developer Settings”. Click “Register a new application” and provide the required values:
- a name, such as “Netlify CMS for my super blog”;
- a homepage URL, the link to your Netlify site;
- a description, if you feel like it;
- the application callback URL, which must be “
https://api.netlify.com/auth/done”.
Save, and you’ll see your Client ID and Client Secret. Provide them to Netlify’s Access Control.
GitLab
Click your avatar to access the Settings page, and click “Applications” in the “User Settings” menu on the left. You’ll see a form to add a new application. Provide the following information:
- a name, such as “Netlify CMS for my super blog”;
- a redirect URI, which must be “
https://api.netlify.com/auth/done”; - the scopes that should be checked are:
apiread_userread_repositorywrite_repositoryread_registry
Saving your application will give you your Application ID and Secret, that you can now enter on Netlify’s Access Control.
Bitbucket
Head over to your user account settings (click your avatar, then “Bitbucket settings”). Under “Access Management”, click “OAth”. In the “OAuth consumers” section, click “Add consumer”. You can leave most things at their default values except for these:
- a name, such as “Netlify CMS for my super blog”;
- a callback URL, which must be “
https://api.netlify.com/auth/done”; - the permissions that should be checked are:
- Account: Email, Read, Write
- Repositories: Read, Write, Admin
- Pull Requests: Read, Write
- Webhooks: Read and write
After saving, you can access your key and secret, which you can then provide back on Netlify’s Access Control.
After providing the tokens, go to Netlify, and find the Site Settings. Head to “Identity” and enable the feature. You can now add an External Provider: select your Git provider and click on “Enable”.
You can now access your Netlify site’s backend and edit content. Every edit is a commit on your repo, in the branch specified in your configuration file. If you kept your main branch as the target for Netlify CMS, each time you save, it will run a new build. More convenient, but not as clean with “in-between states”.
Having it save on a dev branch allows you to have finer control on when you want to run a new build. This is especially important if your blog has a lot of content and requires a longer build time. Either way will work; it’s just a matter of how you want to run your blog.
Also, please note that Git LFS is something you installed locally, so images uploaded via Netlify CMS will be “normal”. If you pull in your remote branch locally, the images should be converted to LFS, which you can then commit and push to your remote branch. Also, Netlify CMS does currently not support LFS so the image will not be displayed in the CMS, but they will show up on your final build.
Recommended reading: Static Site Generators Reviewed: Jekyll, Middleman, Roots, Hugo
Conclusion
What a ride! In this tutorial, you’ve learned how to export your WordPress post to Markdown files, create a new repository, set up Git LFS, host a site on Netlify, generate a Hugo site, create your own theme and edit the content with Netlify CMS. Not too bad!
What’s next? Well, you could experiment with your Hugo setup and read more about the various tools Hugo offers — there are many that I didn’t cover for the sake of brevity.
Explore! Have fun! Blog!
Further Resources
Further Reading
- WordPress Full-Site Editing: A Deep Dive Into The New Feature
- Building The SSG I’ve Always Wanted: An 11ty, Vite And JAM Sandwich
- A Deep Dive Into Eleventy Static Site Generator
- How To Build A Localized Website With Hugo And Strapi