Image Optimization In WordPress

Email Newsletter
Weekly tips on front-end & UX.
Trusted by 182,000+ folks.


 Celebrating 10 million developers
 Custom Web Forms for Angular, React, & Vue. Your backend.
A slow website is everyone’s concern. Not only that it chases visitors away but it also affects your SEO. So trying to keep it ‘in shape’ is definitely one of the main items to tick when you run a business or even a personal site.
There are many ways to speed up your WordPress site, each one complementing the other. There is not a universal method. Improving your site speed is actually the sum of more of these methods combined. One of them is image optimization, which we will tackle extensively in this post.
So read further to learn how to manually and automatically optimize all the images on your WordPress site. This is a step-by-step guide on image optimization that will make your site lightweight and faster.
The Importance Of Image Optimization
According to Snipcart, the three main reasons why images are affecting your WordPress site are:
- They are too large. Use smaller sizes. I will talk about this later in the article.
- They are too many, which demands as many HTTP requests. Using a CDN will help.
- They contribute to a synchronous loading of elements, together with HTML, CSS, and JavaScript. This ends up with an increase of the render time. Displaying your images progressively (via lazy loading) will stop your images from loading at the same time with the other elements, which will make the page load quicker.
So yes, optimizing your images is an essential practice to make your site lighter. But first, you need to discover what makes your site load slowly. This is where speed tests intervene.
How To Test Your WordPress Site Speed
There are many tools that test your website’s speed. The simplest method is Pingdom.
Pingdom is a popular tool used by both casual users and developers. All you need to do is to open Pingdom and insert your WordPress site URL, choose the location that’s closest to the data center location of your hosting (based on your hosting’s servers), and start the test. If you have a CDN installed on your site, the location matters a great deal. But more on that later.
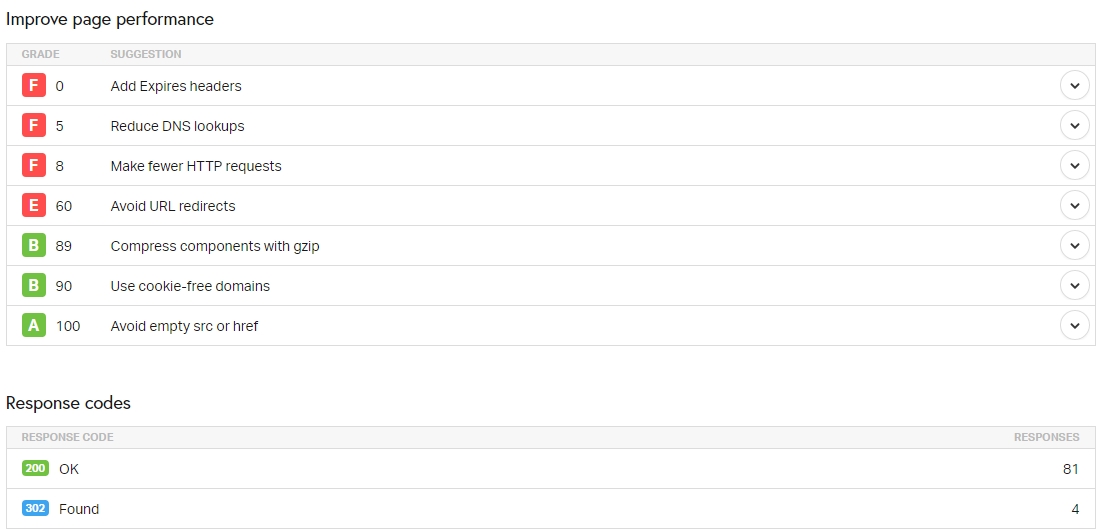
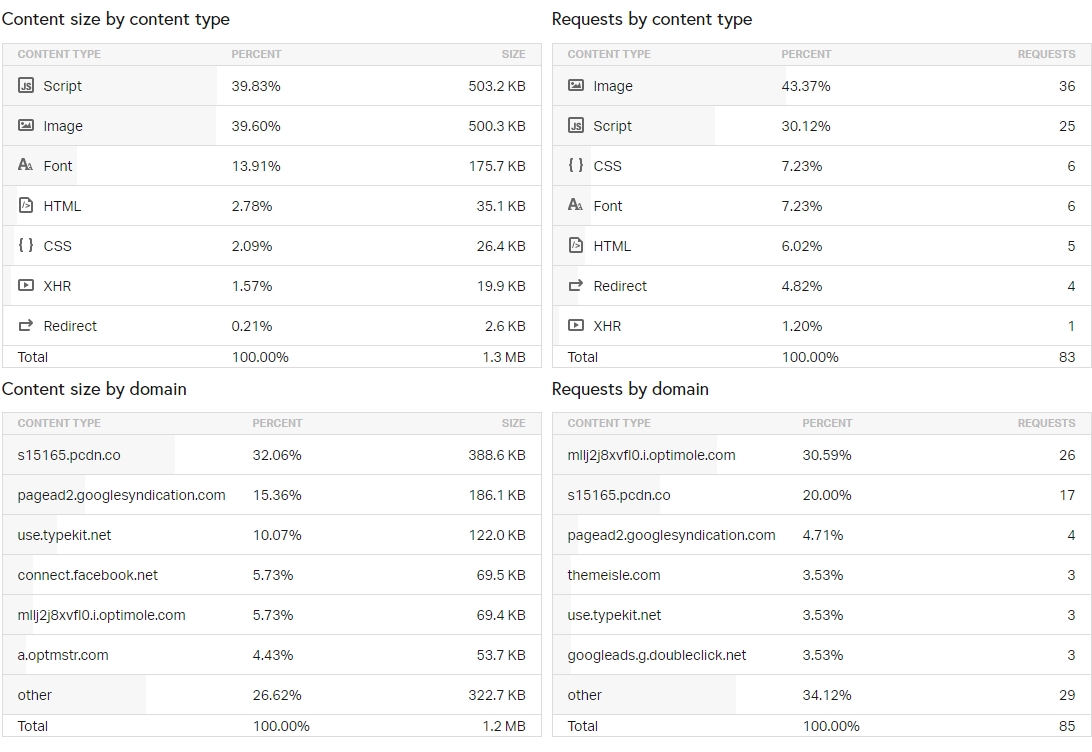
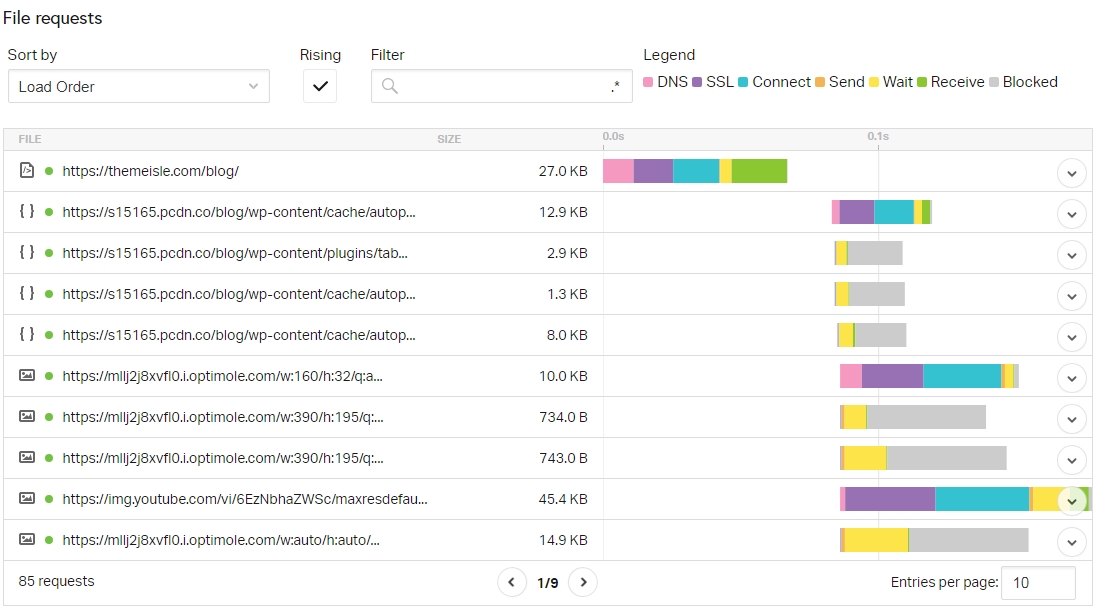
What’s nice about this tool is that, regardless of how simple its interface is, it displays advanced information about how a website performs, which is pure music to developers’ ears.
From these statistics, you will find out whether your site is doing well or it needs to be improved (or both). It’s nice because it gives you plenty of data and advice on pages, requests, and other sorts of issues and performance analysis.
On the same page, GTmetrix is another cool tool that’s similar to Pingdom and which will analyze your site’s speed and performance in depth.
Note: GTmetrix usually displays a rather slower WordPress website than Pingdom; this is how the tool calculates the metrics. There are no discrepancies, it’s just that GTmetrix measures the fully loaded time, unlike Pingdom which only counts the onload time.
The onload time calculates the speed after a page has been processed completely and all the files on that page have finished downloading. That’s why the onload time will always be faster than the fully loaded time.
The fully loaded time happens after the onload process when a page starts transferring data over again, which means that GTmetrix includes the onload times when it calculates the speed of a page. It basically measures the whole cycle of responses and transfers it gets from the page in question. Hence the slower times.
Google PageSpeed Insights is yet another popular tool for testing your site speed. Unlike the first two tools that only display your site performance on desktops, Google’s official testing tool is good at measuring the speed of your website’s mobile version, too.
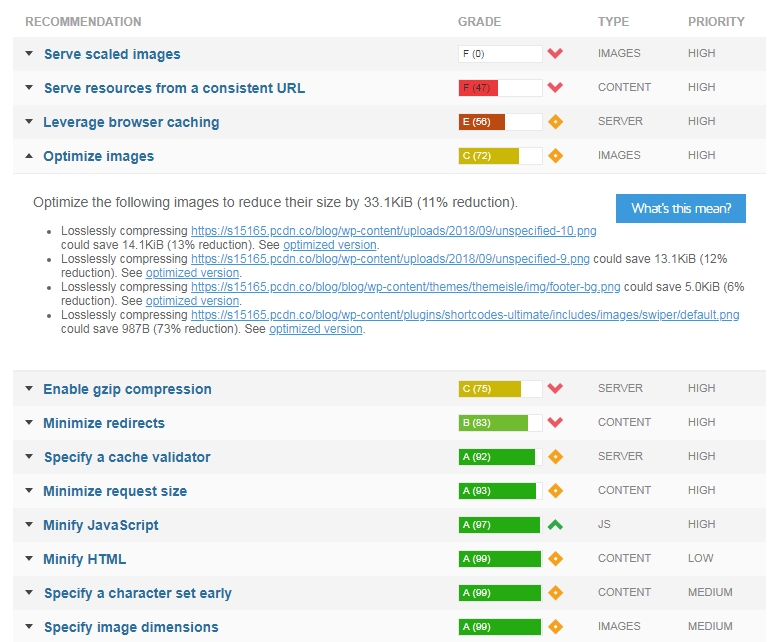
Apart from that, Google will also give you its best recommendations on what needs to be improved on your site for getting faster loading times.
Usually, with either of these three tools, you can detect how heavily your images are affecting your site speed.
How To Speed Up Your WordPress Website
Of course, since this article is about image optimization, you guessed right that this is one of the methods. But before getting into the depths of the image optimization per se, let’s briefly talk about other ways that will help you if you have loads of images uploaded on your site.
Caching
Caching is the action of temporarily storing data in a cache so that, if a user accesses your site frequently, the data will be automatically delivered without going through the initial loading process again (which takes place when the site files are requested for the first time). A cache is a sort of memory that collects data that’s being requested many times from the same viewport and is used to increase the speed of serving this data.
Caching is in fact really simple. No matter if you do it manually or by installing a plugin, it can be implemented on your site pretty quickly. Some of the best plugins are WP Super Cache and W3 Total Cache and WP Super Cache — they are both free and best rated on WordPress.org official repository.
Content Delivery Networks
A CDN will request your site content from the nearest server location to your readers’ accessing point. It means that it keeps a copy of your site in many data centers located in different places around the world. Once a visitor accesses your site via their home location, the nearest server will request your content, which translates into faster loading times. Cloudflare and MaxCDN (now StackPath) are the most popular solutions for WordPress.
GZIP Compression
Through this method, you can compress your site’s files by making them smaller. This will reduce your site bandwidth and will transfer the respective files to the browser faster.
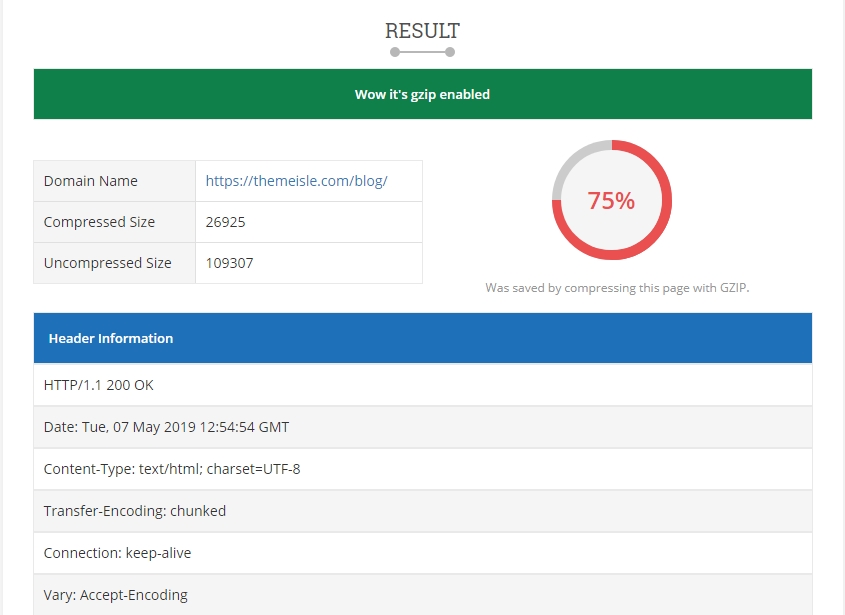
Both WP Super Cache and W3 Total Cache come with GZIP compression feature that you can enable after installation. Also, many of the popular WordPress hosting providers have this feature already enabled via their standard packages. To find out if GZIP compression is enabled on your site, use this tool for a quick inspection.
You can also add GZIP compression to your WordPress site manually by modifying the .htaccess file.
Other simple and common (sometimes omitted, though) tricks would be to use a lightweight WordPress theme, deactivate unnecessary plugins (those that you don’t use anymore or those that you don’t need temporarily), and clean your WordPress database regularly.
Paying attention to these details also contributes to reducing the time that WordPress needs to build and display a page. Sometimes, a feature-heavy theme or plugin can be a major factor in slowing down your site. Caching plugins can intervene in this situation but keeping your WordPress site as light and clean as possible might be a better approach.
Image Optimization
This is a very efficient and simple technique that contributes to speeding up your WordPress site. And this is today’s topic, so let’s break it down into pieces.
Why Image Optimization?
Nowadays, websites are using more visuals than ever in their quest to catch the user’s attention. Multimedia (images, videos, podcasts) grew in popularity so much over the last five years, which led site owners to use pages that are increasingly graphical and image-heavy.
"At this very moment, we are surrounded by billions of high-resolution images, videos, and graphics. They are the key to better-converting sites, hence to better marketing and business cards."
Sometimes, people tend to forget or simply do not pay enough attention to the fact that uploading images on a regular basis affects their WordPress site speed gradually.
Especially if you have an image-heavy site and your content relies mostly on images and visuals, this should be your main concern.
How To Optimize Your Website Images
This can be done either manually or with plugins. Let’s start with the manual method. (This is mostly for those of you who are very keen on having control over your site and doing everything on your own.) Optimizing images manually will also help you understand to a great extent how plugins (the automated method that we’ll talk about a bit later) work.
If you want to automate the process of image optimization, you have a backup. There are lots of great WordPress plugins out there that can save you a lot of time and also deliver great results. We’ll talk more about that and test a few tools later on.
Optimize Your Website Images Manually
Optimizing might mean a lot of stuff. Here, we can talk about compression, resizing, using the right formats, cropping and so on.
Use The Right Image Format
How can you tell what format is the best for your site images and which one has a higher resistance when it comes to editing and compression? The answer is, there is no general best format, but there are recommended formats based on the content that each image has.
PNG is mostly used for graphics, logos, illustrations, icons, design sketches or text because it can be easily edited in photo editors and still keep a great quality after compression. That’s because the PNGs are lossless — they don’t lose any significant data during compression.
JPG is more popular among photographers, casual users, or bloggers. It is lossy and can be compressed to smaller sizes while still preserving a good quality as seen with the naked eye. JPG is the format that supports millions of colors, that’s why people use it mostly for photos. It also supports high-compression levels.
An alternative to JPG and PNG could be WebP, a web image format introduced by Google, which has the role of providing even smaller sizes than JPG (or any other formats) while keeping the image quality similar to the latter. WebP format allows both lossy and lossless compression options. According to Google, a WebP image can get up to 34% smaller than a JPG image and up to 26% smaller than PNG images.
But WebP image format has its cons, such as not being supported by all browsers yet or by WordPress by default (you need tools for that). Learn more about how to integrate WebP images with WordPress.
The conclusion regarding the image formats is that there is no such thing as a universally right format. It really depends on the type of images that you need on your site. If you’re using photos with a large variety of colors, JPG might be the right format because it’s good at compressing color-heavy photos, which can be reduced to a considerable extent. It does not suit images with only a few color data like graphics or screenshots.
Let’s do a quick test. I saved a JPG image containing a multitude of colors, then converted it to PNG. After conversion, the photo became much bigger in size. Then, I used ImageResize.org tool to compress both images (I chose this tool because it allowed me to compress both formats and use files larger than 1MB).
This is the uncompressed image (via MyStock.photos):

And these are the results:

On the other hand, PNG is the right format if you’re using many screenshots, graphics, logos, or transparent images — in general, images with very few colors or images that contain block colors (for instance, transitions between light and dark backgrounds). PNG is lossless and can often result in very small sizes after compression, which could otherwise be bigger as JPG. Saving this kind of images as JPG can make them low-quality and blurry.
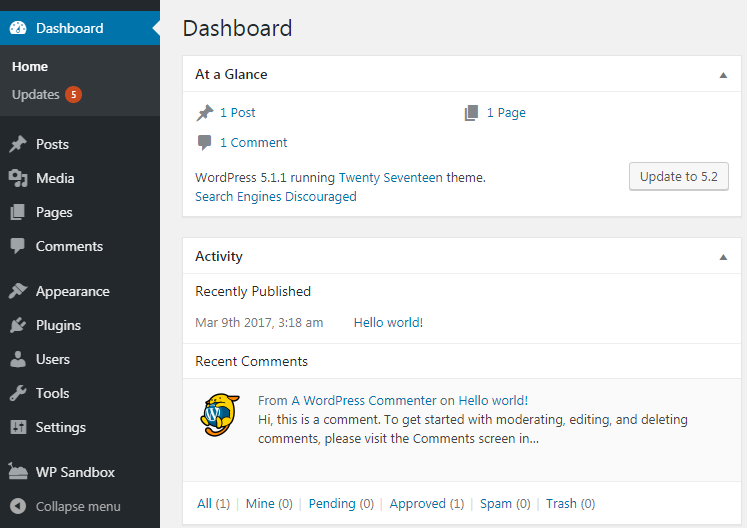
Let’s do another test. I saved a screenshot of my WordPress dashboard both as JPG and PNG. Then I used the same ImageResize.org for compressing each format. It’s worth mentioning that the PNG file was saved in a significantly smaller size than the JPG to begin with.
This is the image:
The results after compression:

Find Out The Maximum Display Size Of Your Images
If you’re into optimizing images by yourself, you should first find out what’s their maximum display size. Since your site is responsive, all the images you upload will be served at different resolutions based on the user viewport (the device they’re browsing your site from).
The maximum display size is the largest resolution the image can take counting all the potential viewports and screens that can access it.
How can you check the maximum display size of an image?
First, open a page or a post that contains the image you want to check. You need to resize your browser manually (make it gradually smaller by dragging its edges) to the point where the image jumps to the largest dimension. This point is called a “breakpoint” — because the image size suddenly breaks.
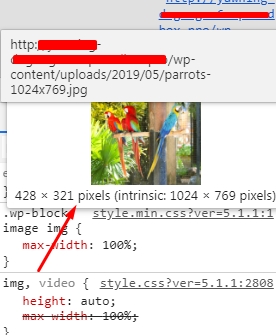
After the image jumped to the large dimension, press right click -> Inspect (if your browser is Chrome). Hover over the URL of the image in the top-right of the screen and you’ll see both the dimensions it is served at and its original dimensions (intrinsic). The latter is what the users will be downloading, while the former ones represent the maximum display size of the image on that page.
With this information in mind, you can now resize and crop your image so it can correspond to the given dimensions. This way, you’ll make sure you will optimize it efficiently so it can still look great on the screen and, at the same time, not weigh much on your site.
For instance, if you want your images to be Retina-friendly, edit them using twice the maximum display size for better quality. The image in the screenshot has 428x321 pixels, so make it 856x642 pixels for a better Retina quality.
Resize And Crop Images
When you’re dealing with files that have dimensions a lot bigger than you normally need to showcase on your site, you can simply resize or crop them and only then upload them on your site. You will save disk space and keep your site lighter.
Of course, if you have a photography portfolio and it’s important for you that the visitors see your works in their original form, then yes, you have a real motive for presenting them at their best.
You can also crop your images anytime if there’s only one single detail that you want to show to the people and there’s no reason to upload the broad, full image if the rest of the content is redundant.
Compress Images
All the photo editors have this option where they ask you at what quality you want to save your edited image. You usually go with a quality of 100% (for obvious reasons), but you can lower it a bit to, say, 70-80%. You won’t notice a big difference if the image already has a huge resolution. Its size will be smaller in this case.
After you’ve set a lower quality percentage and saved the image, you can go deeper with another round of optimization of the same image by using an online tool to reduce its size even more.
JPEG Optimizer and JPEG.io have a reduction percentage of around 60%, while TinyPNG (if you choose to work with PNGs) of around 70%. Kraken is good for both formats, returning files of around 70% smaller via lossy compression.
Mac users can try ImageOptim, which compresses both JPG and PNG formats up to 50%.
Set Image Optimization On Autopilot
In order to automate the image optimization process on your site, you need tools (aka WordPress plugins). It means that they will do all the things that we talked about earlier but on autopilot.
There are several automatic WordPress solutions for image optimization but, in this post, I will only present to you those that come with solid features that can put on the table the full set for complete image optimization.
I’ll also show you the tests I conducted with each of the next three tools so you can observe everything in detail.
We are going to compare Optimole, ShortPixel, and Smush.
Optimole
Optimole is probably the most complex of them all because it encapsulates all the features one might need for efficient image optimization. So if you’re looking for smart image optimization in its all aspects, then you might like Optimole.
Optimole transfers your images to a cloud where they are being optimized. Then, the optimized images are sifted through a CDN that makes them load fast. The plugin replaces each image’s URL with a custom one.
Adapting the images to each user’s screen size is another key feature of Optimole. It means that it automatically optimizes your images to the right dimension based on the user viewport, so if you’re seeing the image from a tablet, it will deliver the perfect size and quality for a tablet standard. These transformations are being made fast, without consuming any extra space on your site.
Another smart approach that you will enjoy about Optimole is its wit for detecting when a user has a slower connection. When it recognizes a slow connection, the plugin compresses the images on your site on a higher rate so that your visitors’ page loading time won’t be affected.
If you want lazy loading, the plugin also allows you to use it on your site. You just tick one box and Optimole does the work for you.
Another interesting thing about Optimole is that it won’t optimize all the images in your WordPress media library automatically. It only optimizes the images that people request by entering a page on your site. So don’t panic if you install the plugin and nothing happens. Once an image is requested by a user, the plugin will do what I already explained above. This is very space-saving since this plugin only uses one image, which it transforms in the cloud based on the users’ requests and devices.
What I love about this plugin is that it is smart and efficient and it’s never doing unnecessary work or conversions. We are using it on three of our sites: ThemeIsle, CodeinWP, and JustFreeThemes. You can check them out as demos.
ShortPixel
ShortPixel is a popular WordPress plugin that’s great at optimizing your images in bulk. The plugin works on autopilot and optimizes by default every image that you upload to your media library. You can deactivate this option if you don’t need it, though.
The plugin offers lossy, glossy, and lossless compression, which you can apply even to thumbnails. All the modified images are saved in a separate folder on your site where you can always go back and forth to undo/redo an optimization. For example, convert back from lossless to lossy and vice-versa, or simply restore to the original files.
Moreover, if you go to the WordPress media library and select the list view instead of the grid view that comes by default, you will notice that the last column keeps you up to date regarding the compression status. This way, you can manually skim through all the images and compress/decompress those that you need. For every image, you will see by what percentage it was compressed.
If you want to optimize them all at once, just select Bulk Actions -> Optimize with ShortPixel (or any of its sub-items), and click Apply. Your images will be compressed in just a few moments.
Moreover, ShortPixel lets you convert PNG to JPG automatically, create WebP versions of your images, and optimize PDF files. It also provides CMYK to RGB conversion. It works with Cloudflare CDN service to upload the optimized images on a cloud server.
Smush

Another big name in the WordPress plugin space, Smush is a friendly tool that optimizes your images on the run. Smush comes with a beautiful tracking dashboard where it keeps you up to date on your website’s total savings, how many items were not optimized yet, how many were optimized already, and what methods it used for that.
It also has bulk compression, lazy loading, automatic PNG to JPG, and CDN integration. Same as ShortPixel, Smush also adds the compression status to each image in your media library, so you can either manage them individually or in bulk.
Smush uses lossless compression by default, focusing on keeping the images as close to their original version as possible. The downside of this plugin is that it doesn’t offer the same amount of features in the free version, like the aforementioned plugins do. You need to pay for some of the basic functionality.
Testing The Three Image Optimization Plugins
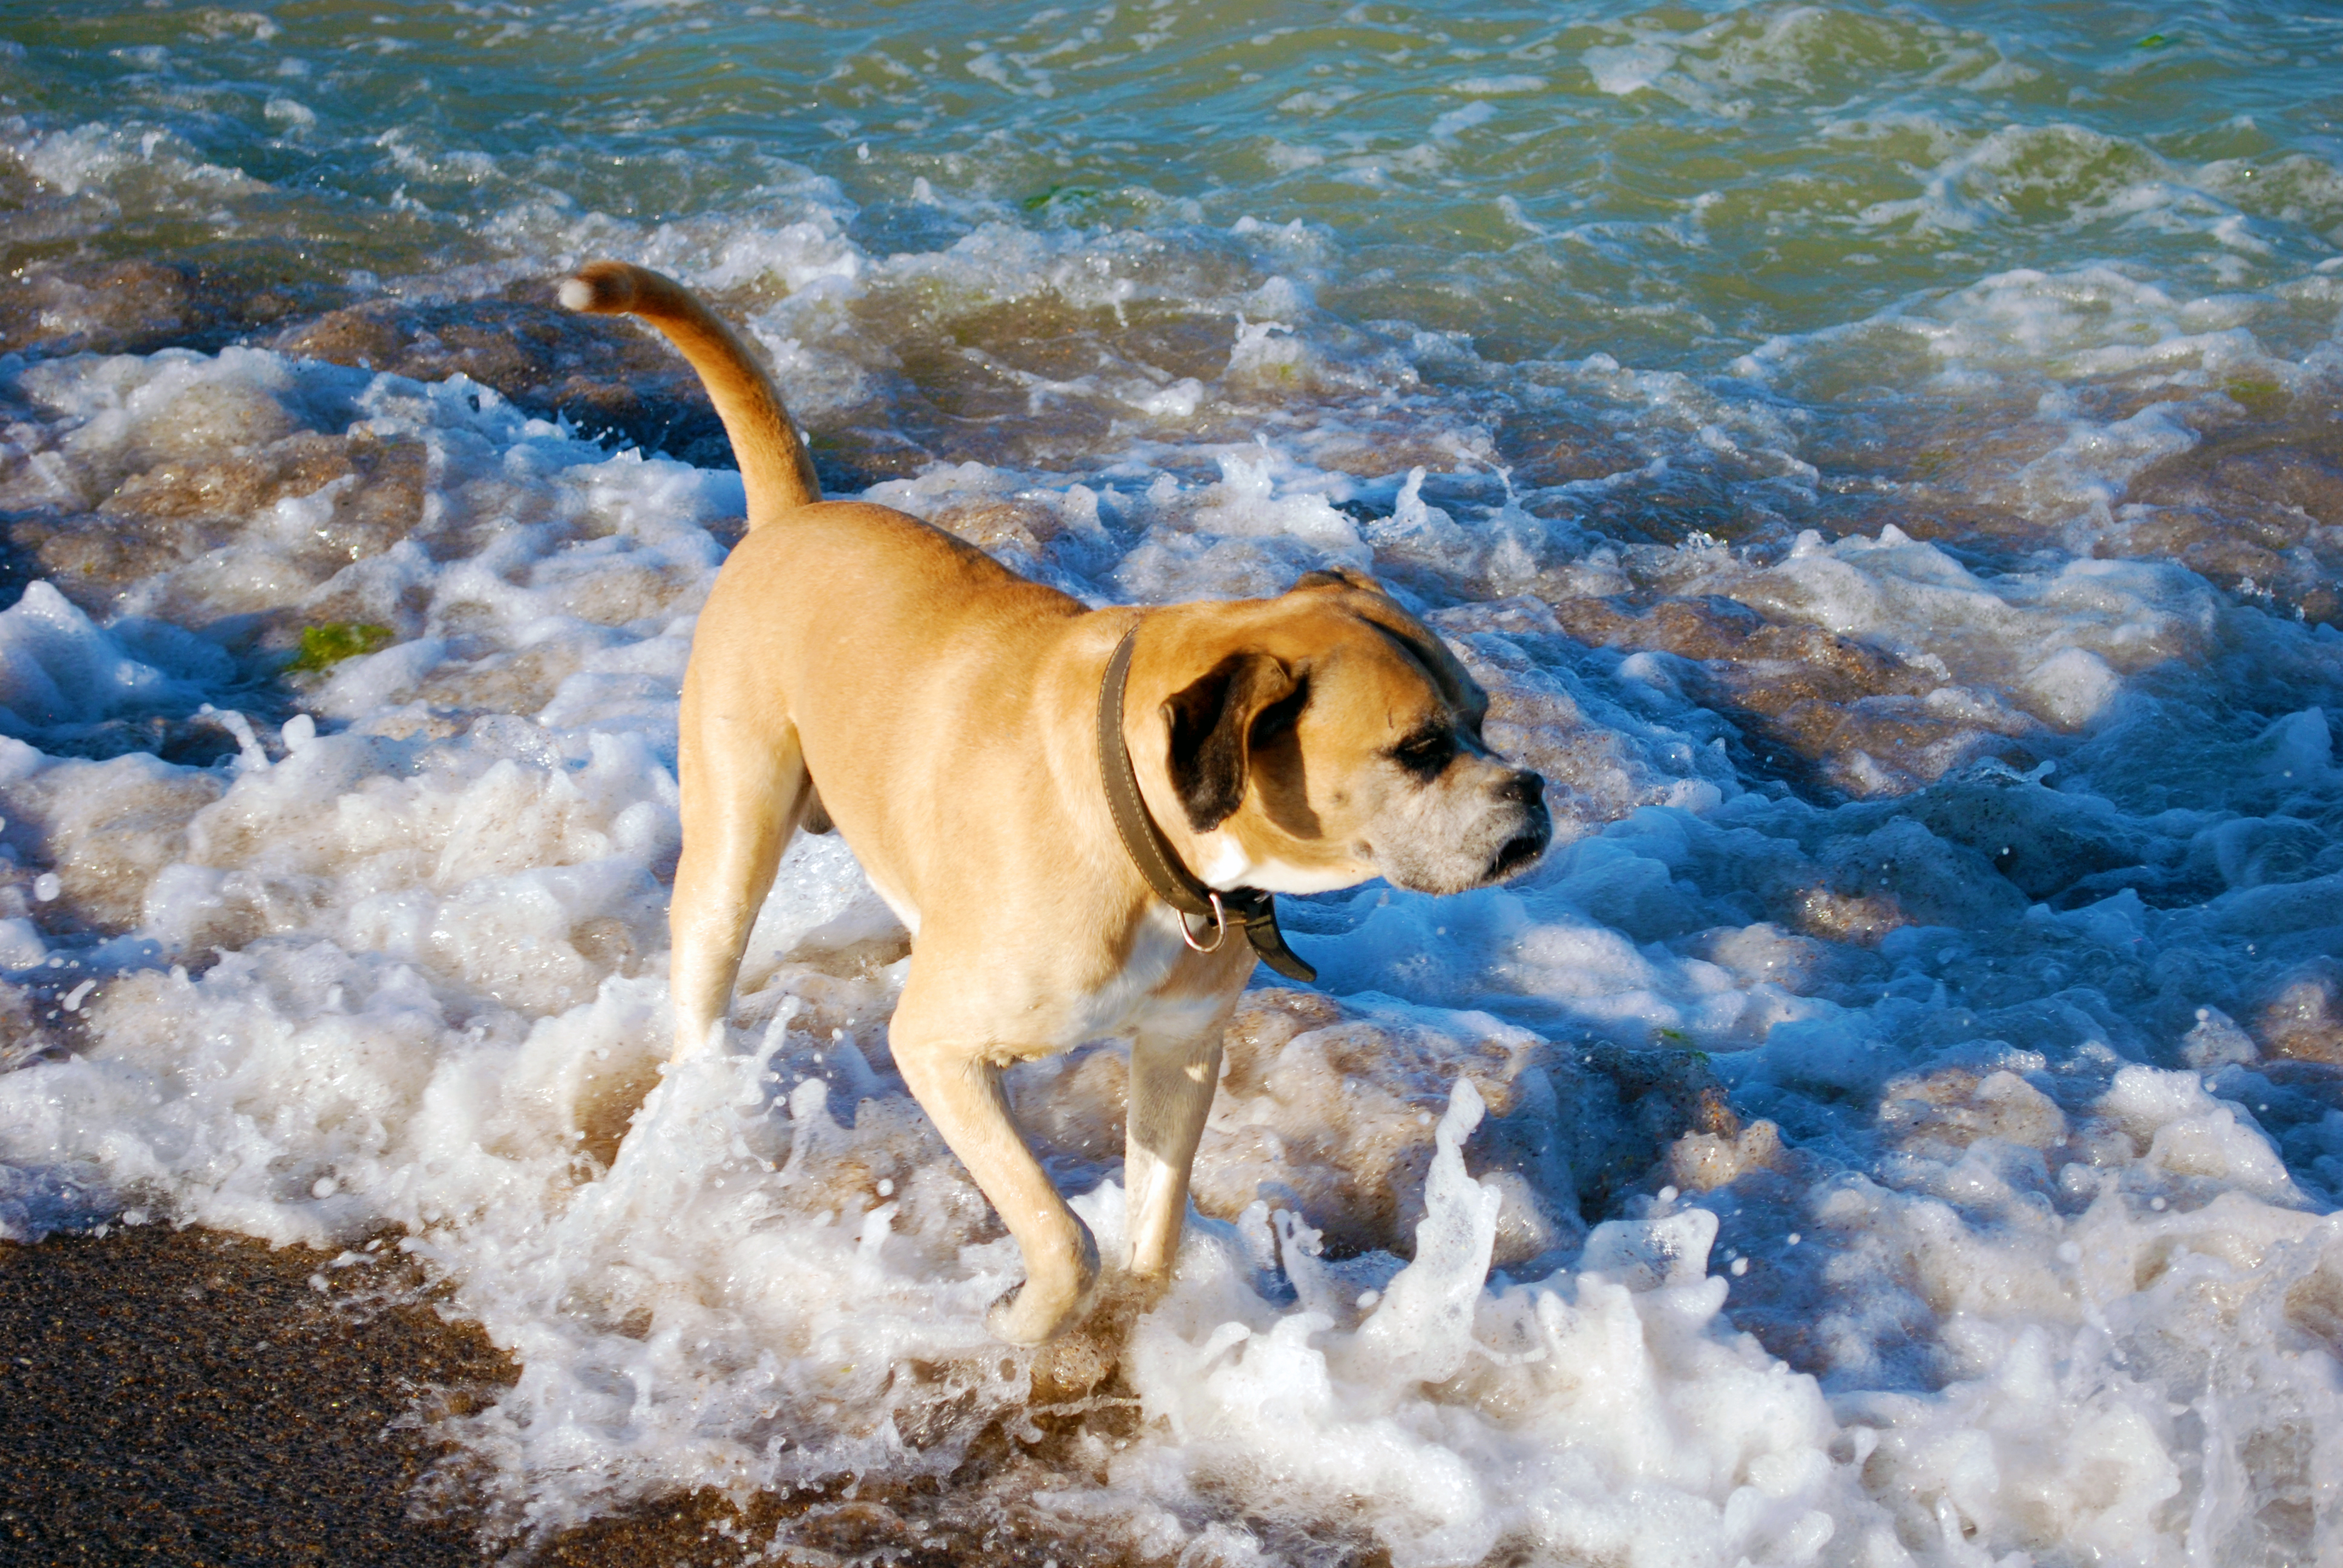
I took the next image of 904 KB from MyStock.photos and ran it through a series of tests with the three plugins I presented above.

This is how the plugins performed:
- Optimole: 555 KB (312 KB if you pick the High compression level)
- ShortPixel: 197.87 KB
- Smush: 894 KB
*Optimole and ShortPixel are using lossy compression, while Smush is using lossless compression.
The next approach is even more interesting.
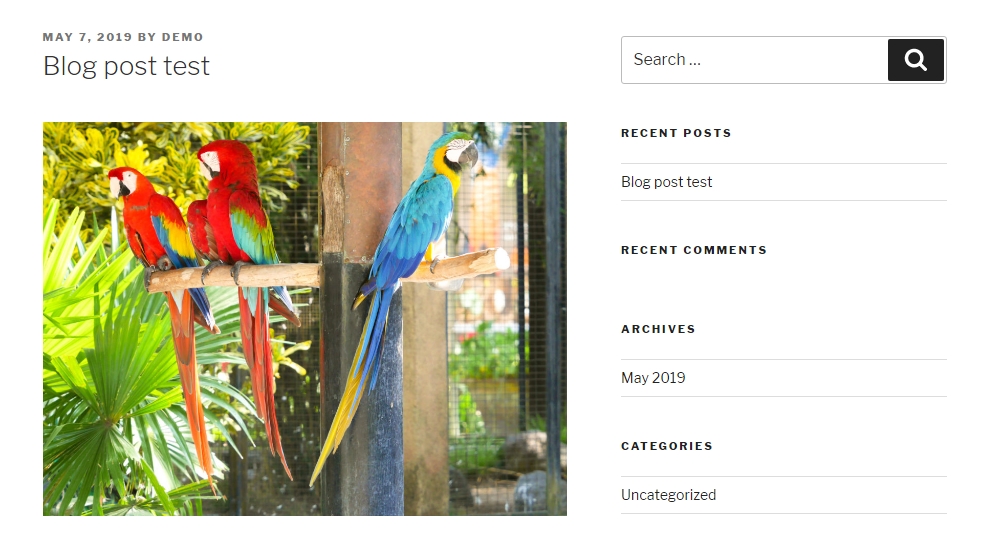
I uploaded this very image on my WordPress site and used it in a blog post afterwards. Both Optimole and ShortPixel automatically reduced its size to make it match my screen resolution and post layout. So instead of using an almost 1 MB image, shrunk to fit the post, I am now using the same image reduced to its maximum display size. The plugins found the right size and dimensions needed in my blog post and modified the image accordingly.
And these are the reduced dimensions per each plugin:
- Optimole: 158 KB, 524x394 pixels
- ShortPixel: 71.7 KB, 768x577 pixels
- Smush: didn’t optimize for this specific request
That being said, it’s important to note down two things:
- ShortPixel returned the best compression size but in larger dimensions; overall, a good result only it lost a bit of the image’s original quality.
- Optimole (which I set on Auto compression this time) returned a higher size but with smaller dimensions and with better quality as seen with the naked eye. Optimole somehow found a great mix between size and dimensions so that the quality won’t lose much ground here.

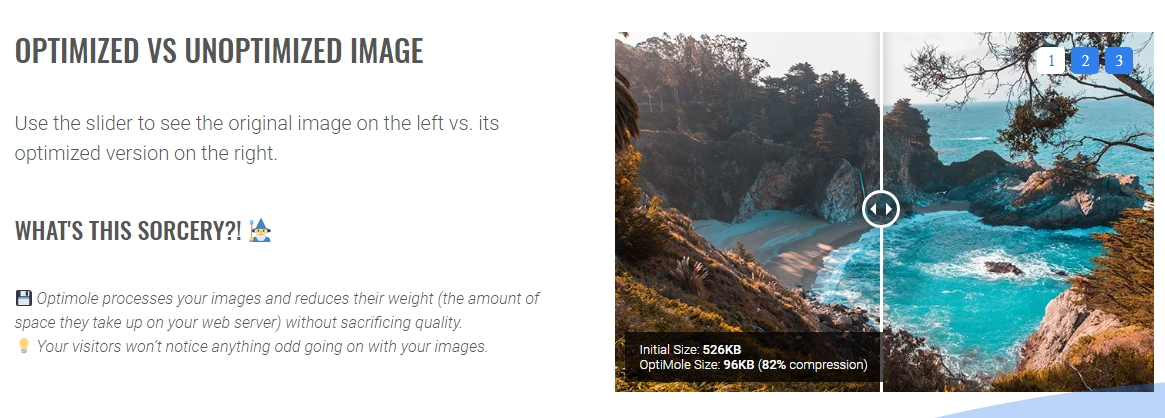
This is how it’s supposed to look on the live website:
If you ask me, Optimole adapted better to this specific request and the user’s viewport (in this case, my laptop screen).
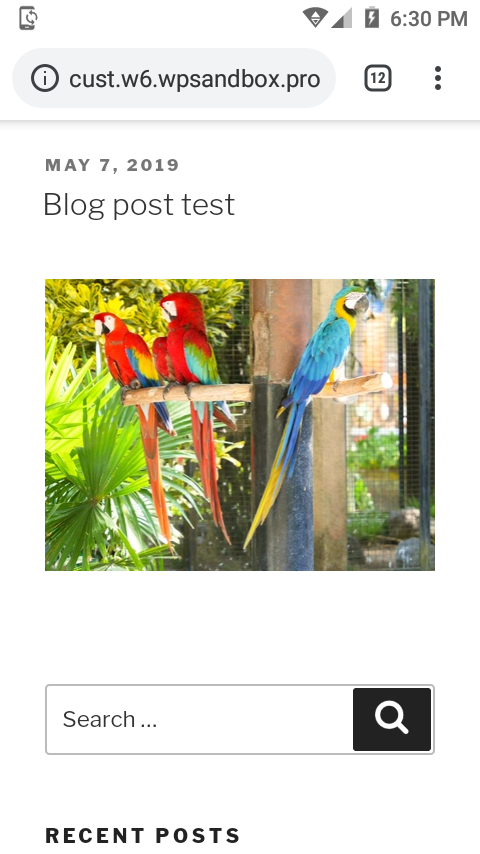
Now, let’s have a quick peek at how these plugins adapt to mobile screens:
I followed the same routine. I activated one plugin at once and requested the same website page via my mobile (Android). The results:

Smush: didn’t optimize the image for mobile.
My mobile demo screen:
As it happened in the first example, Optimole returned a bigger, more quality-focused version, while ShortPixel converted the image to a better size but with a slight loss in quality.
I initially used an image of 6 MB for the main desktop test but, since Smush doesn’t allow files larger than 1 MB in its free version (the others do allow), I had to pick an image under 1 MB.
I’ll do this test anyway with Optimole and ShortPixel only.
So, let’s do the fourth test, this time on a larger image.
The original image has 6.23 MB.
The optimized sizes are:
- Optimole: 798 KB with Auto compression level, 480 KB with High compression level
- ShortPixel: 400.58 KB
There’s also EWWW Image Optimizer plugin that, similarly to Smush, only uses lossless compression and only reduces images by a fairly small percentage.
The conclusions after the four tests:
- ShortPixel is delivering the best optimization rates (around 70-80%), while Optimole is somewhere at 40% on Auto compression level and at 70% on High compression level.
- Optimole is adapting the content better to the users’ viewport and internet connection. If you set it on Auto, it will know how to both reduce size consistently and preserve a great quality. I like that it knows how to juggle with all these variables so it both helps to improve your site’s loading time and display high-quality images to your visitors.
If I had to put together not only the results of the tests but also the other features of the plugins (aka simplicity and user-friendliness), I would go with Optimole. But ShortPixel is also a great contender that I warmly recommend. Smush is a decent option too if you are willing to pay for it or you are a photographer that wants to keep their images as little processed as possible.
Wrapping Up
Do not underestimate the impact of image optimization. Images are always one of the main reasons for a slow website. Google doesn’t like slow websites and nor do your visitors and clients. Especially if you’re seeking monetization via your WordPress site. An unoptimized site will influence your SEO, drag you down in SERPs, increase your bounce rates, and will lose you money.
No matter if you prefer doing the image optimization manually or choosing a plugin to automate it for you, you will see the good results sooner rather than later.
What other methods are you using to hold the images in check on your WordPress site?
Further Reading
- WordPress Playground: From 5-Minute Install To Instant Spin-Up
- Programmatically Discovering Sharing Code With oEmbed
- How To Monitor And Optimize Google Core Web Vitals
- Transforming The Relationship Between Designers And Developers


