How To Build A Sketch Plugin With JavaScript, HTML And CSS (Part 1)

Email Newsletter
Weekly tips on front-end & UX.
Trusted by 182,000+ folks.
 Custom Web Forms for Angular, React, & Vue. Your backend.


 Celebrating 10 million developers
This tutorial is intended for people who know and use the Sketch app and are not afraid of dabbling with code. To profit from it the most, you will need to have at least some basic experience writing JavaScript (and, optionally, HTML/CSS).
The plugin we’ll be creating is called “Mosaic”. In part one, we’ll learn about the basic files that make up a Sketch plugin; we’ll write some JavaScript and create a user interface for our plugin with the help of some HTML and CSS. The next article will be about how to connect the user interface to the core plugin code, how to implement the plugin’s main features, and at the end of it, you will also learn how to optimize the code and the way the plugin works.
I’ll also be sharing the plugin’s code (JS, HTML, CSS) and files which you’ll be able to examine and use for learning purposes.
What Are Sketch Plugins, And How Do They Work?
In Sketch, plugins are a way to add features and functionality that aren’t present in Sketch “out of the box.” Considering that there’s almost always going to be some missing feature or integration in any given program (especially given the vast number of needs any individual designer might have!), one can begin to imagine how plugins might be especially useful and powerful. Sketch plugins are able to do pretty much everything you’d expect, like manipulating the color, shape, size, order, style, grouping, and effects of layers, but also able to do things like make requests to internet resources, present a user interface, and much, much more!
On the programming side, all Sketch plugins are written in JavaScript code. Well, actually, that’s not entirely true. It’s more accurate to say that most Sketch plugins are written in JavaScript, as it’s also possible to write a Sketch plugin in one of Apple’s programming languages, Objective-C and Swift, though even they require a small amount of JavaScript knowledge.
Don’t worry though. In this article, we’ll focus on how to build Sketch plugins using JavaScript, HTML, and CSS alone. We won’t be going over the basics of HTML, CSS, or JavaScript — this article assumes at least some knowledge and experience with all of these three. The MDN developer website provides a great place to learn more about web development.
Let’s Get Started!
Firstly, What Are We Making?
In this tutorial, I’ll teach you how to build a basic, beginner-friendly plugin that will be able to create, duplicate, and modify layers, as well as present the user with a nice user interface. By doing so, my goal is to establish a fundamental knowledge on which you can build on and use it to create your own plugins.
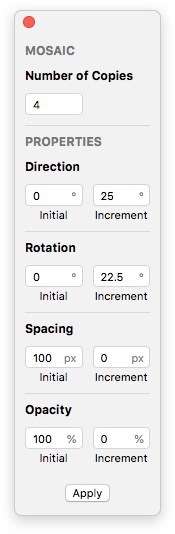
The plugin we’ll be building is called Mosaic, and is effectively a “pattern generator”. Feed it your layers, tweak a few settings, and it’ll create a pattern:
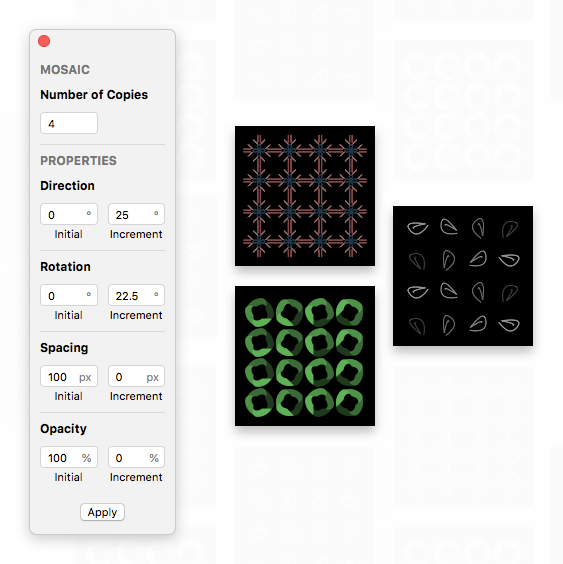
If you’d like to install and play around with Mosaic, you can download the completed plugin from GitHub.
A bit of history: Mosaic is inspired in large part by an old-school Adobe Fireworks plugin called Twist-and-Fade. Twist-and-Fade was pretty powerful, able to duplicate a layer any number of times while adjusting its hue, position, rotation, size, and opacity. The plugin was even able to generate animated GIFs, like this one, where it created the frames for the two rotating elements in the cassette tape:

(Here’s a video demoing Twist and Fade if you’re interested in seeing exactly how it worked.)
For the purposes of this tutorial, we’ll be building a somewhat similar plugin for Sketch, though intentionally simplified so as to keep the tutorial as accessible as possible. Specifically, our plugin will be able to:
- Duplicate any Sketch layer (bitmap or vector) and tweak the duplicates’ layer’s position, rotation, and opacity. This will give us an introduction to manipulating layers using Sketch’s JavaScript APIs.
- Display a user interface created using HTML, CSS, and JS, which will teach you about how to easily create an interface for the plugin, by using web technologies that you may already be familiar with. The plugin interface is pretty important since it’s how we’ll gather the user’s inputs regarding how the user wants the resulting mosaic image to look.
Creating Our Base Plugin In Ten Seconds Flat
First, we’ll be creating the “base” (or template) for the plugin we want to build. We could create all the necessary files and folders that make up a plugin manually, but luckily we don’t have to — because Sketch can do it for us. After we’ve generated the template plugin, we’ll be able to customize it as we see fit.
There’s a really quick and easy technique we can use to create the template plugin, which is pretty much my go-to method when I need to whip a plugin together to solve whatever problem I’m dealing with at a given moment. Here’s how it works:
With Sketch open, check the menu bar at the top of the screen and click Plugins -> Run Script. This will open up a dialog box that we can use to test and run the code. We can also save any code we enter in it as a plugin, which is the part we’re specifically interested in right now.
Clear whatever code is already in this dialog and replace it with the following demo code:
const UI = require("sketch/ui");

UI.message("😍 Hey there, you fantastic plugin developer you! This is your plugin! Talking to you from the digital computer screen! In Sketch! Simply stupendous!");
Next, hit Save Script as Plugin in the bottom-left of the window, enter whatever name you’d like for this plugin to have (in our case, this is “Mosaic”), then Save Script as Plugin once more.
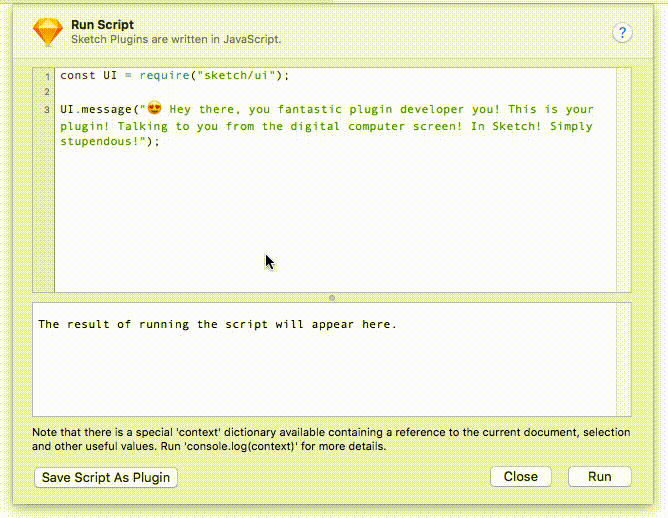
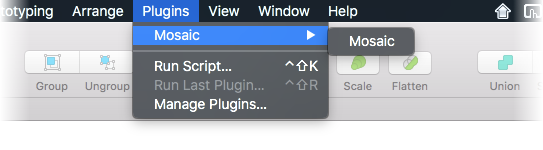
Believe it or not, we’re already done — all that’s left is to eat the cake we just baked. Here comes the fun part. Opening the Plugins menu once again, you should see something like this: your brand-spanking-new plugin listed as “Mosaic”! Click on it!

Congratulations, you’ve just written your first Sketch plugin!
What you should see after clicking “Mosaic” should be like the short video above, with an unobtrusive tooltip message appearing at the bottom of the screen beginning with the words “Hey there…” — which is exactly what the code we pasted in tells it to do. This is what it makes this technique so great: it makes it easy to paste, modify and test code without having to build a plugin from scratch. If you’re familiar with or have ever played with your browser’s web console, this is basically that. Having this tool in your back pocket as you build and test code is a must-have.
Let’s do a quick rundown of what the code you added does:
First, it imports the sketch/ui module of Sketch’s built-in JS library, and assigns it to the UI variable. This module contains a couple of useful interface-related methods, one of which we’ll use:
const UI = require("sketch/ui");
Next, it calls the message method (which is part of the sketch/ui module) with the string of text we want displayed in the tooltip we saw:
UI.message("😍 Hey there, you fantastic plugin developer you! This is your plugin! Talking to you from the digital computer screen! In Sketch! Simply stupendous!");
The message() method provides a great way to present an unobtrusive message to the user; it’s great for cases where you don’t need to steal focus (non-modal) and don’t need any fancy buttons or text fields. There’s also other ways to present common UI elements like alerts, prompts, and such, some of which we’ll be using as we build Mosaic.
Customizing Our Plugin’s Metadata
We now have a basic plugin to start from, but we still need to tweak it further and make it truly ours. Our next step will be to change the plugin’s metadata.
For this step, we’ll need to peek into what’s called the plugin bundle. When you hit save in the ‘Run Script’ window, Sketch saved your plugin as a folder named Mosaic.sketchplugin that you can find in the
~/Library/Application Support/com.bohemiancoding.sketch3/Plugins directory. That’s a bit long and annoying to remember; as a shortcut, you can also pull it up via Plugins -> Manage Plugins -> (right-click your plugin) -> Reveal Plugins Folder. Even though it appears in Finder as a single file, it’s actually a folder containing everything our plugin needs for Sketch to run it. The reason it appears as a single file despite being a folder is because when you first installed Sketch, Sketch registered the .sketchplugin extension as a “bundle” (a special kind of folder that appears as a file) and asked for it to automatically open in Sketch when opened.
Let’s take a peek inside. Right-click Mosaic.sketchplugin, then click “Show Package Contents”. Inside, you should see the following directory structure:
Contents/
└ Resources/
└ Sketch/
  └ manifest.json
  └ script.cocoascript
You might be wondering why there’s a file in there with the extension .cocoascript. Don’t worry — it’s just a regular JavaScript file, and only contains the code we entered earlier. Go ahead and rename this file to index.js, which will change the directory structure to look like the one below:
Contents/
└ Resources/
└ Sketch/
  └ manifest.json
  └ index.js
The most common way of organizing the files inside a plugin bundle is as follows: your code (JavaScript) and manifest.json belong in Sketch/, and resources (think images, audio files, text files, etc.) belong in Resources/.
Let’s start by tweaking the file named manifest.json. Open it inside your favorite code editor, such as Visual Studio Code or Atom.
You’ll see that at the moment there’s relatively little inside here, but we’ll add more soon. The plugin manifest serves primarily two purposes:
- First, it provides metadata that describes the plugin to the user — things like its name, version, the author’s name, and so on. Sketch uses this information in the
Sketch -> Preferences -> Pluginsdialog to create a listing and description for your plugin. - Second, it also tells Sketch about how to get down to your business; that is, it tells Sketch how you’d like your plugin’s menu to look, what hotkeys to assign to your plugin, and where your plugin’s code lives (so Sketch can run it).
Considering purpose #1, describing the plugin to the user, you’ll probably notice that right now there’s no description or author given, which would be confusing for the user and make the plugin difficult to identify. Let’s fix that by adjusting the relevant keys’ values to:
{
        "description": "Generate awesome designs and repeating patterns from your layers!",
        "author": "=> Your name here <="
}
Next, let’s adjust the plugin’s identifier. This identifier uses what is called a “reverse domain notation” which is a really concise (or boring, take your pick) way to say “take your site’s domain, reverse the order, then put your product’s name at the end.” This will come out something like: com.your-company-or-your-name-its-not-that-big-a-deal.yourproduct.
You don’t have to stick to this naming convention — you can put whatever you want here, so long as it’s unique enough to avoid conflicts with other plugins (though it’s probably a good idea to stick to the RDN format, especially as it provides a simple, reusable system for your plugin identifiers).
To that effect, change your identifier to com.your-name.mosaic:
{
    "identifier": "com.your-name.mosaic"
}
I personally like to take all metadata related keys (title, author, identifier, etc.) and group them near the top of the manifest so they’re not spread out all over the place and help preserve my sanity when I need to find them.
Next, let’s take a look at the menu and commands keys. These two are responsible for telling Sketch what code to call and in response to what.
If you look at the menu key, you’ll see it contains a title key, whose value is the name our plugin will show up with in the Plugins menu. It also has an items key, which is a list of command identifiers:
{
  "menu": {
    "title": "Mosaic",
    "items": [
        "com.bohemiancoding.sketch.runscriptidentifier"
    ]
  }
}
Right now there’s only one command identifier in this list, "com.bohemiancoding.sketch.runscriptidentifier". Command identifiers always point to a command in the commands list. Right now our plugin only has one command, which is the one with this identifier:
{
  "commands": [
    {
      "script" : "script.cocoascript",
      "name" : "Mosaic",
      "handlers" : {
              "run" : "onRun"
      },
      "identifier" : "com.bohemiancoding.sketch.runscriptidentifier"
    }
  ]
}
Whenever you add a command identifier to a menu entry, Sketch will look up the command entry that has that identifier and will display the value of its name key (which in this case is “Mosaic”) and will show it in your plugin’s menu instead of the identifier.
As for the role commands play, we can think of a command entry as a way to tell Sketch what function in our plugin’s JavaScript code we want to run when that command is invoked, the “invocation” usually being the user’s click on the associated menu item. The command entry doesn’t do anything on its own, it’s just JSON — it simply provides a description to Sketch of where to look for the JavaScript it needs to run when the command is invoked.
So far, we’ve talked about what a command’s name and identifier keys do, but there are two other keys in a command that need to be addressed: script and handlers.
The script key tells Sketch where the JavaScript file that it should run is. Note how Sketch assumes that the script file in question is in the Sketch/ folder, which is why for simplicity’s sake you’ll want to make sure all your JavaScript code lives somewhere under the Sketch/ folder. Before we move on from this key it’s important that you make sure you change this key’s value to index.js, just like we renamed the file earlier. Otherwise, Sketch won’t be able to find and run your JavaScript file.
The value of the handlers key is what Sketch looks at to determine what function in your JavaScript to call. Here, we only have one handler set: run, with the value onRun. run is the name of a predefined, built-in Sketch action. This run action will always be called when a user clicks a menu item that references this command. onRun is the name of a function in the auto-generated script.cocoascript file (which we renamed to index.js), and the function we want to be called when the run event occurs, i.e., when the user clicks the menu item.
In the example we have so far, this process plays out something like this:
- The user clicks our menu item.
- Sketch finds the command associated with that menu item.
- Sketch finds the script file the command refers to and runs it (which in this case means it executes the JavaScript in
index.js). - Since this command was invoked by a menu item click, it’s considered a
runaction. That means Sketch will look at the command’shandlers.runvalue for the function to call next, which in this case isonRun. - Sketch calls the
onRunfunction.
Commands are most commonly called in response to a user clicking on one of your menu items, but they can also be called in response to other user actions, such as the user changing the selection or a property on a layer. However, for this plugin, we won’t be using any of these other actions. (You can learn more about actions and how they work in the Action API help page.)
Before we move on from this manifest, we’ll want to make two other tweaks. Right now, our menu has the structure:
Mosaic
└ Mosaic
…which is a bit redundant since our plugin only has one menu item. It also adds a bit of unnecessary friction for our user as our plugin now takes two clicks to invoke rather than one. We can fix this by adding isRoot: true to our menu:
{
  "menu": {
    "title" : "Mosaic",
    "items" : [
            "com.bohemiancoding.sketch.runscriptidentifier"
    ],
    "isRoot": true
}
}
This tells Sketch to place the first level of menu items directly under the Plugins menu, rather than nesting them under the menu’s title.
Hit save and return to Sketch. You should see that now Mosaic -> Mosaic has been replaced by just Mosaic — perfect!
As for our second tweak, let’s go ahead and rename this command identifier to something less unwieldy. Since command identifiers only need to be unique within the context of an individual plugin, we can safely rename it to something more concise and obvious, like "open":
{
  "commands": [
    {
            ...
            "identifier" : "open"
    }
],

"menu": {
    ...
    "items" : [
            "open"
    ]
  }
}
Before we move on, it’s useful to note that menus can contain also other menus. You could easily create a sub-menu by nesting another { title: ..., items: ... } entry inside another menu’s items list:
{
  "menu": {
    "title" : "Mosaic",
    "items" : [
      "open",
      {
        "title" : "I'm a sub-menu!",
        "items" : [
                "another-command-identifier"
        ]
      }
    ]
  }
}
Building The Plugin’s User Interface
So far, we’ve written some demo code and customized our plugin’s manifest. We’ll now move on to creating its user interface, which is essentially a web page embedded in a window (similarly to the browsers you’re familiar with using):
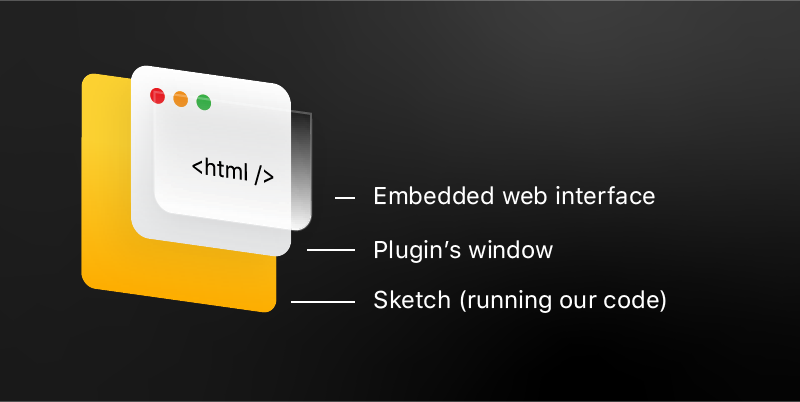
The Window
Mosaic’s user interface design has its own window, which we can consider the most basic component; we’ll start with it. In order to create and display a window, we’ll have to make use of a class that’s built into macOS by default, called NSWindow. Over the remainder of this tutorial, we’ll actually be doing this quite a bit (using built-in APIs like NSWindow) which might seem a little daunting if you’re unfamiliar with it, but don’t worry — I’ll explain everything along the way!
Note: While we’re talking about built-in APIs, the reason we’re able to use this class at all is thanks to a bridge present in the JavaScript runtime used by Sketch plugins. This bridge automatically imports these built-in classes, methods, and functions that would normally only be available to native applications.
Open Sketch/index.js in your code editor, delete what’s already there, and paste in the following:
function onRun(context){
  const window = NSWindow.alloc().initWithContentRect_styleMask_backing_defer_(
    NSMakeRect(0, 0, 145, 500),
    NSWindowStyleMaskClosable | NSWindowStyleMaskTitled | NSWindowStyleMaskResizable,
    NSBackingStoreBuffered,
    false
  );

  window.releasedWhenClosed = false;

  window.makeKeyAndOrderFront(nil);
};
Let’s take a look at what this first bit of code does:
function onRun(context){
Remember earlier when we talked about commands and how they function, and we told Sketch to call in response to a menu-click was called onRun? (If you need a refresher, revisit that part above, then come back.) All this bit does is create that function. You’ll also notice our onRun function takes a context argument. This is an argument Sketch will call your command handlers with that can provide us with certain information. Later on, we’ll use it in order to get the URL of our plugin bundle on the user’s computer.
const window = NSWindow.alloc().initWithContentRect_styleMask_backing_defer(
  NSMakeRect(0, 0, 145, 500),
  NSWindowStyleMaskClosable | NSWindowStyleMaskTitled | NSWindowStyleMaskResizable,
  NSBackingStoreBuffered,
  false
);
Here we’re actually doing a few things:
- First, we call
alloc()onNSWindow; this basically means “set aside some memory for an instance of NSWindow”. It’s sufficient to know that you’ll have to do this for every instance of a native class you want to create. Theallocmethod is available in every native class. - Next, we call
NSWindow’s initializer method (that is, the method that actually creates an instance ofNSWindow), which is namedinitWithContentRect:styleMask:backing:defer:. You’ll notice that’s different from what we call in our code above — it’s got a bunch of colons (:) between every argument. Since we can’t use that syntax in JavaScript, Sketch conveniently renames it to something we can actually use by replacing the colons with underscores, which is how we get its JS name:initWithContentRect_styleMask_backing_defer. - Next, we pass in each of the arguments the method needs. For the first argument,
contentRect, we supply a rectangle with a size large enough for our user interface. - For
styleMask, we use a bitmask which says that we want our window to have a close button, a title bar, and to be resizable. - The next two arguments,
backinganddefer, are always going to be set toNSBackingStoreBufferedandfalse, so we don’t really need to worry about them. (The documentation for this method goes into further detail as to why this is.)
window.releasedWhenClosed = false;

window.makeKeyAndOrderFront(null);
Here we set NSWindow’s releasedWhenClosed property to false, which means: “Hey! don’t delete this window from memory just because the user closes it.” Then we call makeKeyAndOrderFront(null) which means: “Move this window to the forefront, and give it keyboard focus.”
Web View: The Interface
To make things easier, I’ve already written the HTML and CSS code of the plugin’s web user interface we’re going to be using; the only remaining code we’re going to have to add to it will deal with making sure we’re able to communicate between it and our Sketch plugin code.
Next, download the HTML and CSS code. Once you’ve downloaded it, extract it, then move the folder named “web-ui” into our plugin’s Resources folder.
Note: Writing and optimizing the actual HTML/CSS code is outside of the scope of this tutorial, as its focus is on JavaScript which powers the plugin’s core features; but there are a ton of tutorials on the web on this topic, should you want to learn more.
If you run our plugin now, you’ll see that it shows a window — yay, progress! But it’s empty, without a title, and not particularly useful yet. We need to get it to show our web interface. In order to do that, we’ll need to use another native class, WKWebView, which is a view specifically made for displaying web content.
We’ll add the code needed to create our WKWebView beneath the code we wrote for our window:
function onRun(context){
    //        Create window

    const window = NSWindow.alloc().initWithContentRect_styleMask_backing_defer(
            NSMakeRect(0, 0, 145, 500),
            NSWindowStyleMaskClosable | NSWindowStyleMaskTitled | NSWindowStyleMaskResizable,
            NSBackingStoreBuffered,
            false
    );

    window.releasedWhenClosed = false;

    //        Create web view, and set it as the view for our window to display

    const webView = WKWebView.alloc().init();

    window.contentView = webView;

    //        Load our UI into the web view

    const webUIFolderURL = context.scriptURL
            .URLByDeletingLastPathComponent()
            .URLByAppendingPathComponent("../Resources/web-ui/");

    const indexURL = webUIFolderURL.URLByAppendingPathComponent("index.html");

    webView.loadFileURL_allowingReadAccessToURL(indexURL, webUIFolderURL);

    //        Make window key and move to front

    window.makeKeyAndOrderFront(nil);
};
If we run our plugin now, we’ll see that now we’ve got a window open that displays our web user interface. Success!
Again, before moving on, let’s examine what the code we added does:
const webView = WKWebView.alloc().init();
This should look familiar — it’s basically the same as what we did when we made our NSWindow: allocate memory for a web view, then initialize it.
window.contentView = webView;
This line of code tells our window to display the web view we just made.
const webUIFolderURL = context.scriptURL
  .URLByDeletingLastPathComponent()
  .URLByAppendingPathComponent("../Resources/web-ui/");
Here our goal is to create a URL that points to the web-ui folder that we made earlier. In order to get that URL, we need some way to figure out where our plugin’s bundle is in the user’s filesystem. Here we use the context.scriptURL property, which gives us the URL of the currently running script. However, this doesn’t give us a JavaScript String as you might expect, but an instance of a native class, NSURL, that has a few methods on it that make manipulating URL strings easier.
We need to turn what context.scriptURL gives us —
file://path-to-your-plugin/Contents/Sketch/index.js
— into:
file://path-to-your-plugin/Contents/Resources/web-ui/
Step by step:
- Calling
URLByDeletingLastPathComponent()the first time gives usfile://path-to-your-plugin/Contents/Sketch/ - Calling
URLByDeletingLastPathComponent()again gives usfile://path-to-your-plugin/Contents/ - And lastly, adding
Resources/web-ui/onto the end usingURLByAppendingPathComponent("Resources/web-ui/")gives usfile://path-to-your-plugin/Contents/Resources/web-ui/
We also need to create a second URL that points directly to the index.html file:
const indexURL = webUIFolderURL.URLByAppendingPathComponent("index.html");
Finally, we tell our web view to load index.html and give it access to the contents of the web-ui folder:
webView.loadFileURL_allowingReadAccessToURL(indexURL, webUIFolderURL);
Alright. So far, we have a window that displays our web user interface, just like we wanted. However, it’s not quite yet complete — our original design doesn’t have a title bar (or “chrome”), but our current window does. There’s also the fact that when we click inside a Sketch document, that document moves in front of our window, which isn’t what we want — we want the user to be able to interact with the plugin window and the Sketch document without having to constantly refocus from one window to the other.
To fix this, we first need to get rid of the default window chrome and keep only the buttons. Adding the two lines of code below will get rid of the title bar.
Note: Like before, all of the properties and methods we’re using below are documented in NSWindow’s documentation page.
window.titlebarAppearsTransparent = true;
window.titleVisibility = NSWindowTitleHidden;
These next two lines of code will remove the window buttons (also known as “traffic lights” in MacOS lingo) that we don’t need — “zoom” and “minimize” — leaving only the “close” button:
window.standardWindowButton(NSWindowZoomButton).hidden = true;
window.standardWindowButton(NSWindowMiniaturizeButton).hidden = true;
While we’re at it, let’s also go ahead and change the window’s background color to match that of our web UI:
window.backgroundColor = NSColor.colorWithRed_green_blue_alpha(1, 0.98, 0.98, 1);
Next, we need to do something to keep our floating plugin window on top of other windows, so the user can interact with their Sketch documents without having to worry about the Mosaic’s window disappearing. We can use a special type of NSWindow for this, called NSPanel, which is able to “stay on top” of other windows. All that’s needed for this is to change NSWindow to NSPanel, which is a single-line code change:
const window = NSPanel.alloc().initWithContentRect_styleMask_backing_defer(
Now we tell our panel window to float (stay on top of all others), and only take keyboard/mouse focus when necessary:
window.floatingPanel = true;
window.becomesKeyOnlyIfNeeded = true;
We can also tweak our window so that it automatically reopens in the last position it was at:
window.frameAutosaveName = "mosaic-panel-frame";
This line basically says “remember this window’s position by saving it with Sketch’s preferences under the key mosaic-panel-frame”.
All together, we now have the following code:
function onRun(context){
    //        Create window

    const window = NSPanel.alloc().initWithContentRect_styleMask_backing_defer(
            NSMakeRect(0, 0, 145, 500),
            NSWindowStyleMaskClosable | NSWindowStyleMaskTitled | NSWindowStyleMaskResizable,
            NSBackingStoreBuffered,
            false
    );

    window.becomesKeyOnlyIfNeeded = true;
    window.floatingPanel = true;

    window.frameAutosaveName = "mosaic-panel-frame";

    window.releasedWhenClosed = false;

    window.standardWindowButton(NSWindowZoomButton).hidden = true;
    window.standardWindowButton(NSWindowMiniaturizeButton).hidden = true;

    window.titlebarAppearsTransparent = true;
    window.titleVisibility = NSWindowTitleHidden;

    window.backgroundColor = NSColor.colorWithRed_green_blue_alpha(1, 0.98, 0.98, 1);

    //        Create web view, and set it as the view for our window to display

    const webView = WKWebView.alloc().init();

    window.contentView = webView;

    //        Load our UI into the webview

    const webUIFolderURL = context.scriptURL
            .URLByDeletingLastPathComponent()
            .URLByAppendingPathComponent("../Resources/web-ui/");

    const indexURL = webUIFolderURL.URLByAppendingPathComponent("index.html");

    webView.loadFileURL_allowingReadAccessToURL(indexURL, webUIFolderURL);

    //        Make window key and move to front

    window.makeKeyAndOrderFront(nil);
};
Organizing The Code
Before we move to the next part, it’s a good idea to organize our code so that it’s easier to navigate and tweak. Since we still have a lot more code to add and we want to avoid index.js becoming a messy dumping ground for all of our code, let’s split things up a bit and move our UI-specific code into a file named ui.js, under the Sketch folder. We’ll also extract some of the UI tasks we do, like creating the web view and window, into their own functions.
Create a new file called ui.js and insert the code below inside it:
//        Private

var _window;

function createWebView(pageURL){
        const webView = WKWebView.alloc().init();

        webView.loadFileURL_allowingReadAccessToURL(pageURL, pageURL.URLByDeletingLastPathComponent());

        return webView;
};

function createWindow(){
        const window = NSPanel.alloc().initWithContentRect_styleMask_backing_defer(
                NSMakeRect(0, 0, 420, 646),
                NSWindowStyleMaskClosable | NSWindowStyleMaskTitled | NSWindowStyleMaskResizable,
                NSBackingStoreBuffered,
                false
        );

        window.becomesKeyOnlyIfNeeded = true;
        window.floatingPanel = true;

        window.frameAutosaveName = "mosaic-panel-frame";

        window.releasedWhenClosed = false;

        window.standardWindowButton(NSWindowZoomButton).hidden = true;
        window.standardWindowButton(NSWindowMiniaturizeButton).hidden = true;

        window.titlebarAppearsTransparent = true;
        window.titleVisibility = NSWindowTitleHidden;

        window.backgroundColor = NSColor.colorWithRed_green_blue_alpha(1, 0.98, 0.98, 1);

        return window;
};

function showWindow(window){
        window.makeKeyAndOrderFront(nil);
};

//        Public

function loadAndShow(baseURL){
        if(_window){
                showWindow(_window);

                return;
        }

        const pageURL = baseURL
                .URLByDeletingLastPathComponent()
                .URLByAppendingPathComponent("../Resources/web-ui/index.html");

        const window = createWindow();
        const webView = createWebView(pageURL);

        window.contentView = webView;

        _window = window;

        showWindow(_window);
};

function cleanup(){
        if(_window){
                _window.orderOut(nil);
                _window = null;
        }
};

//        Export

module.exports = { loadAndShow, cleanup };
There are a couple of key changes we made here that are important to note. Besides the fact that we’ve created specific functions for the creation, hiding and showing of our window and its web view, we’ve also modularized our user interface code.
Notice the module.exports = { loadAndShow, cleanup } line at the bottom? This is a way for us to specify exactly what objects and functions scripts who import this UI code can use (and hiding those we don’t want to them to worry about), which means we now have a more organized API for interacting with, showing and destroying our UI.
Recommended reading: Unleashing The Full Potential Of Symbols In Sketch
Let’s see what this looks like in practice. Back in index.js, remove the old code and add the following:
const UI = require("./ui");

function onRun(context){
        UI.loadAndShow(context.scriptURL);
};
We’re using a special function that Sketch automatically makes available to us, require, to import our ui.js code and assign the returned module to the UI variable. This gives us access to a simplified API for triggering our user interface. Things are much tidier now and easy to find!
Conclusion
Well done — you’ve come far! In the next part of this tutorial, we’ll give our web UI the ability to send us a message when the “Apply” button is clicked, and we’ll focus on the main plugin functionality: actually generating layer mosaics!


