A Pain-Free Workflow For Issue Reporting And Resolution

Email Newsletter
Weekly tips on front-end & UX.
Trusted by 182,000+ folks.
(This is a sponsored post.) Errors, bugs and other issues are bound to arise in web development. Even if they aren’t outright errors, clients often have feedback about how something was designed, where it was placed or how certain elements work. It’s just part of the gig.
It can be a very painful part of the gig, too.
Take this scenario, for instance:
Email #1 from client: “I can’t see the button anymore. Can you please put it back on the home page?”
Email #2 from you: “Which button are you referring to? Can you send me a screenshot?”
You try to call the client, but get their voicemail instead.
Email #3 from the client: “The button to book a demo.”
You look at the attached screenshot and see that the Book a Demo section is intact, but the button doesn’t show. You pull up the website on Chrome and Safari and see it in both browsers: a big blue button that says “Schedule Demo”. You pull it up on your iPhone and see it there, too.
Email #4 from you: “Can you tell me which device and browser you’re seeing the issue on?”
Email #5 from client: “My phone.”
You know how this chain of messages will go and it’s only going to lead to frustration on both ends. Not to mention the cost to your business every time you have to pause from work to try to interpret a bug report and then work through it.
Then, there’s the cost of bugs to your clients you have to think about. When something goes wrong after launch and your client is actively trying to send traffic to the website, a bug could hurt their sales.
When that happens, who do you think they’re going to come after?
A Pain-Free Workflow For Issue Reporting And Repairs
It doesn’t matter what the size of the bug or issue is. When it’s detected and reported, it needs to be dealt with. There are a number of reasons why.
For starters, it’s the only way you’re going to get your client to sign off on a project as complete. Plus, swift and immediate resolution of bugs leads to better relations with your client who sees how invested you are in creating an impressive (and error-free) website for their business. And, of course, the more efficiently you resolve errors, the quicker you can get back to finishing this job and moving on to others!
So, here’s what you need to do to more effectively and painlessly tackle these issues.
- Assign Someone To Triage
- Use An Issue Resolution Workflow
- Give Your Users A Bug Reporting Tool
- Give Your Triage Manager A Tracking Platform
- Work In A Local Testing Platform
- Always Close The Loop
1. Assign Someone To Triage
The first thing to do is decide who’s going to triage issues.
If you work on your own, then that responsibility is yours to own. If you work on a team, it should go to a project manager or dev lead that can manage reported issues just as effectively as they would manage the team’s workload.
This person will then be in charge of:
- Monitoring for reported issues.
- Adding the bugs to the queue.
- Ushering them through the resolution workflow.
- Resolving and closing up bug reports.
- Analyzing trends and revising your processes to reduce the likelihood that recurring bugs appear again.
Once you know who will manage the process, it’s time to design your workflow and build a series of tools around it.
2. Use An Issue Resolution Workflow
Your triage manager can’t do this alone. They’re going to need a process they can closely follow to take each issue from Point A (detection) to Point B (resolution).
To ensure you’ve covered every step, use a visualization tool like Lucidchart to lay out the steps or stages of your workflow.
Here’s an example of how your flow chart might look:
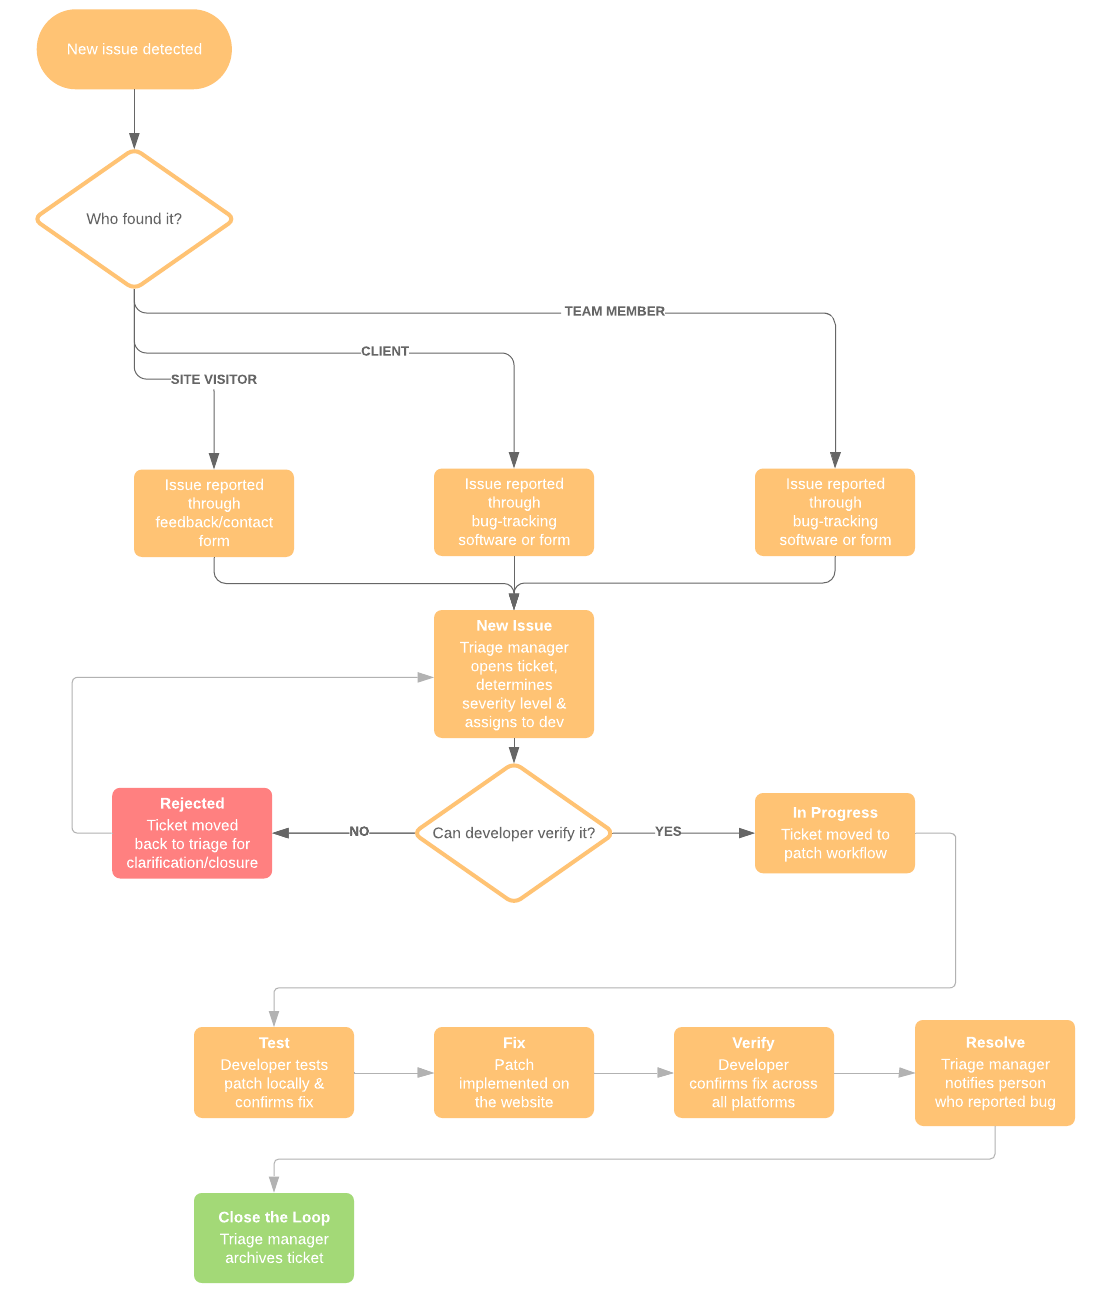
Let’s break it down:
You’ll start by identifying where the issue was detected and through which channel it was reported. This example doesn’t get too specific, but let’s say the new issue detected was the one mentioned before: the Book a Demo button is missing on the home page.
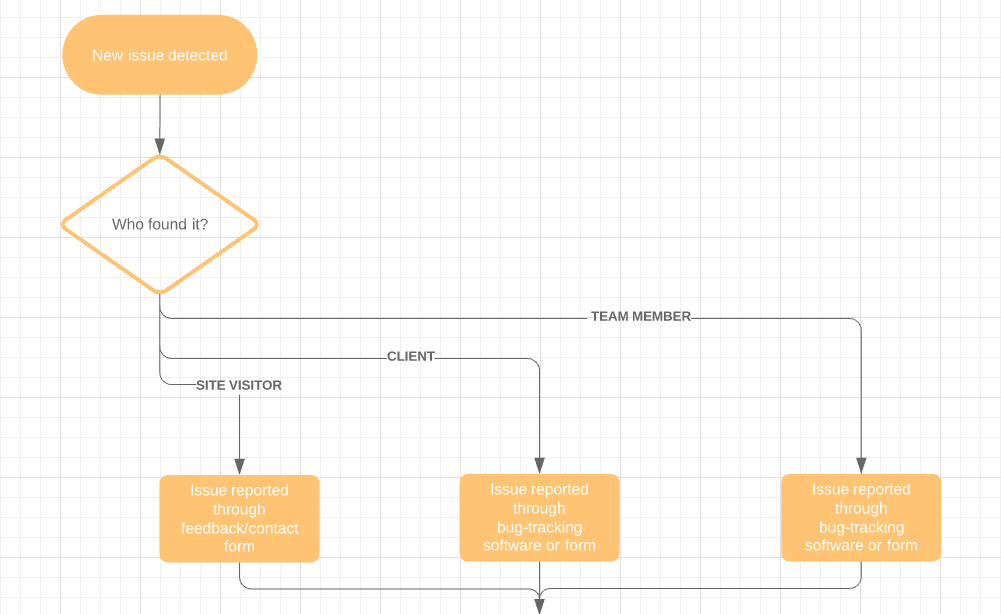
The next thing to do is to answer the question: “Who found it?” In most cases, this will be feedback submitted by your client from your bug-tracking software (more on that shortly).
Next, you’re going to get into the various stages your issues will go through:
This is the part of the process where the triage manager will determine how severe the issue of a missing Book a Demo button is (which is “Severe” since it will cost the client conversions). They’ll then pass it on to the developer to verify it.
Depending on how many developers or subject matter experts are available to resolve the issue, you might also want to break up this stage based on the type of bug (e.g. broken functionality vs. design updates).
Regardless, once the bug has been verified, and under what context (like if it were only on iPhone 7 or earlier), the ticket is moved to “In Progress”.
Finally, your flow chart should break out the subsequent steps for issues that can be resolved:
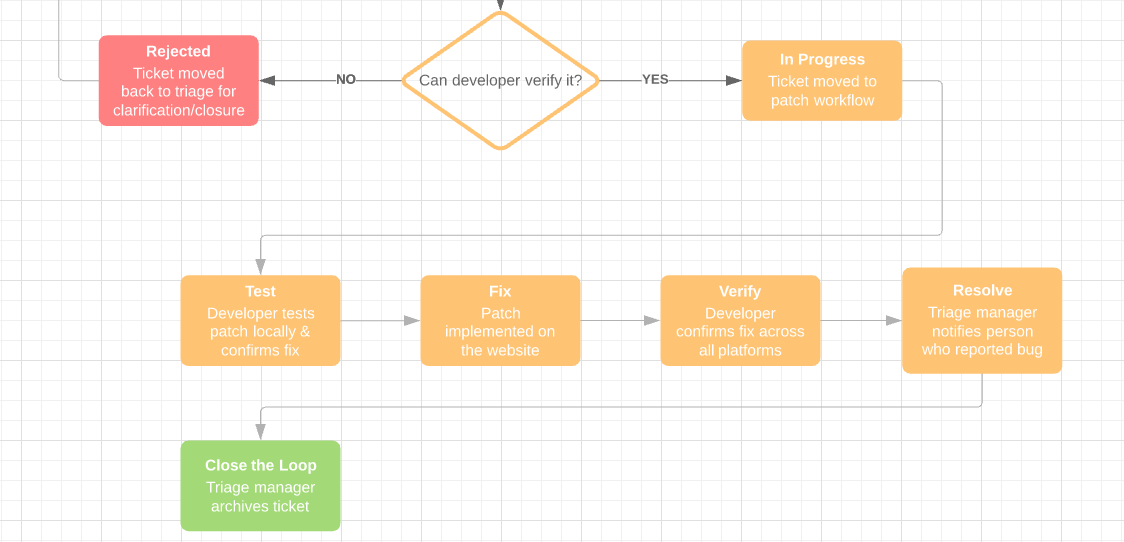
You can name these steps however you choose. In the example above, each step very specifically explains what needs to happen:
- New Issue
- In Progress
- Test
- Fix
- Verify
- Resolve
- Close the Loop.
To simplify things, you could instead use a resolution flow like this:
- New Issue
- Todo
- Doing
- Done
- Archive.
However you choose to set up your patch workflow, just make sure that the bug patch is tested and verified before you close up the ticket.
3. Give Your Users A Bug Reporting Tool
When it comes to choosing a bug reporting tool for your website, you want one that will make it easy for your team and clients to leave feedback and even easier for you to process it.
One such tool that does this well is called BugHerd.
Basically, BugHerd is a simple way for non-technical people to report issues to you visually and contextually. Since there’s no need to train users on how to get into the bug reporting tool or to use it, it’s one less thing you have to spend your time on in this process.
What’s more, BugHerd spares you the trouble of having to deal with the incessant back-and-forth that takes place when feedback is communicated verbally and out of context.
With BugHerd, though, users drop feedback onto the website just as easily as they’d leave a sticky note on your desk. What’s more, the feedback is pinned into place on the exact spot where the bug exists.
Let me show you how it works:
When you first add your client’s website to BugHerd (it’s the very first step), you’ll be asked to install the BugHerd browser extension. This is what allows BugHerd to pin the feedback bar to the website.
It looks like this:

This pinned feedback bar makes it incredibly easy for clients to leave feedback without actually altering the live website.
This is what the bug tracker pop-up looks like:
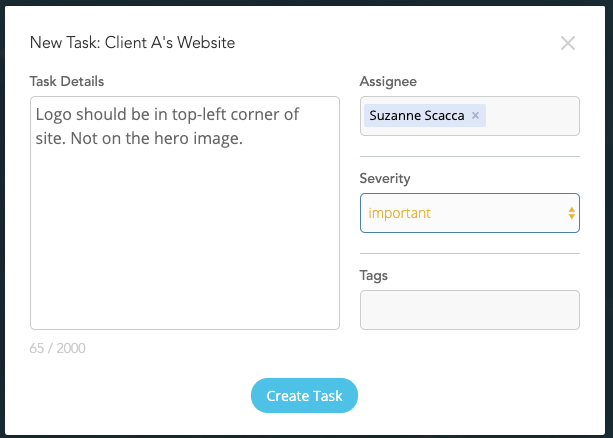
As you can see, it’s a very simple form. And, really, all your clients need to do is select the element on the page that contains the bug, then enter the details. The rest can be populated by your triage manager.
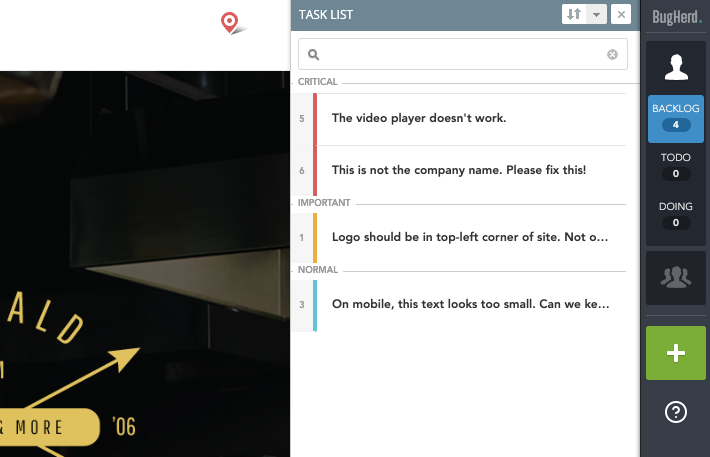
As new feedback is added, comments are pinned to the page where they left it. For example:
You’ll also notice in the screenshot above that tasks that have been assigned a severity level are marked as such. They’re also listed from top-to-bottom on how critical they are.
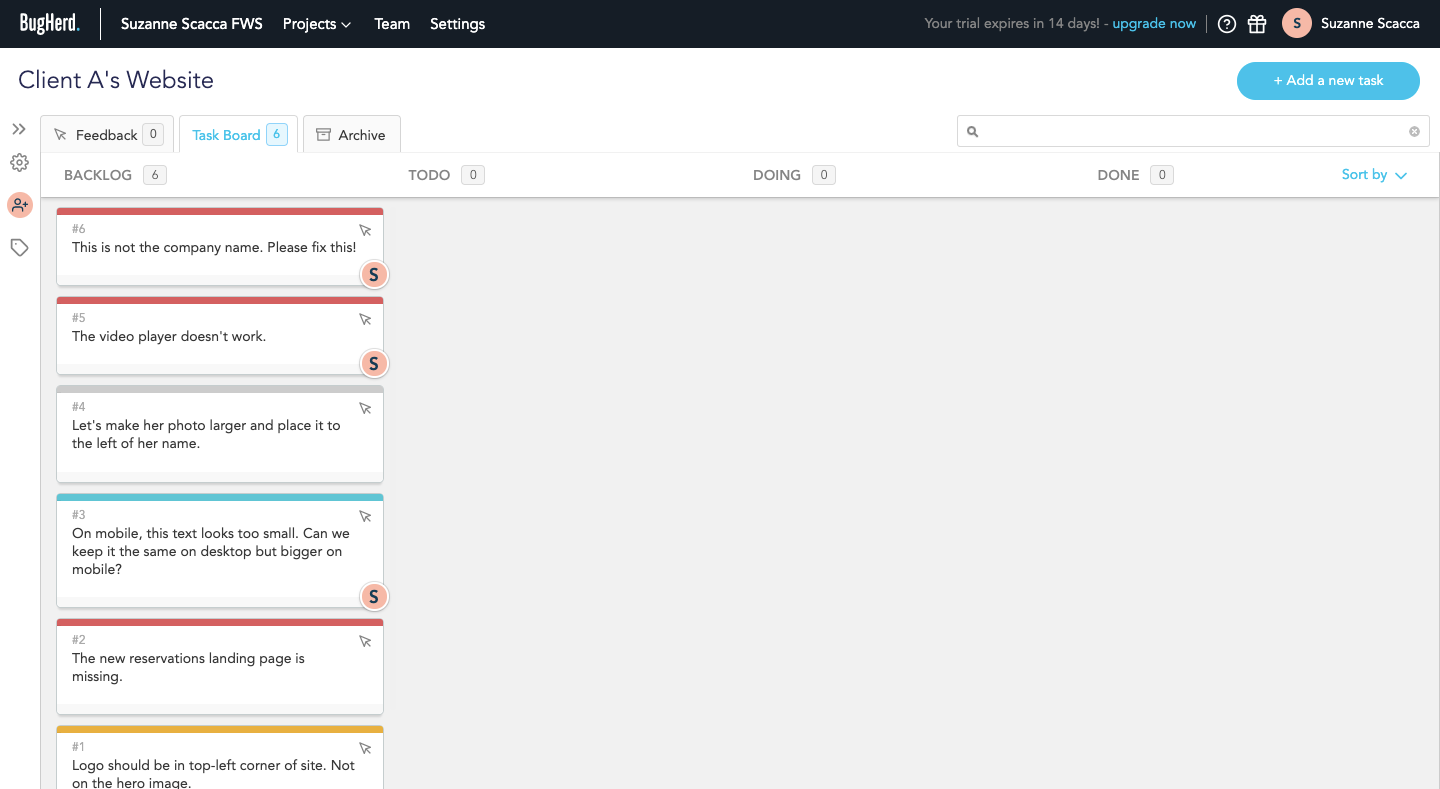
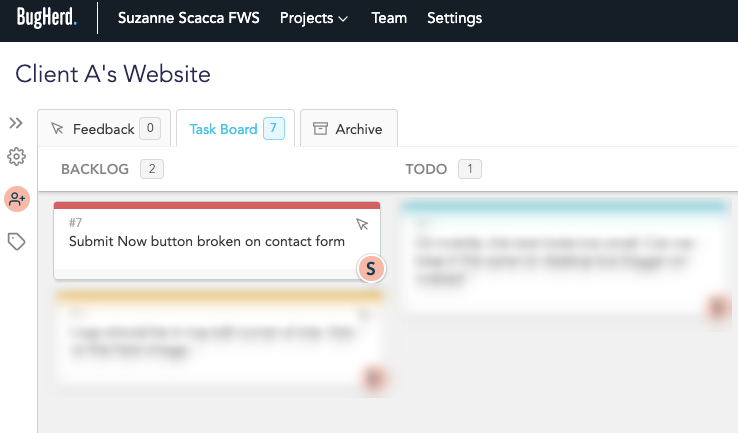
On your side of things, you have a choice as to where you view your feedback. You can open the site and review the notes pinned to each page. Or you can go into the BugHerd app and review the comments from your Kanban board:
By default, all bugs enter the Backlog to start. It’s your triage manager’s job to populate each bug with missing details, assign to a developer and move it through the steps to resolution.
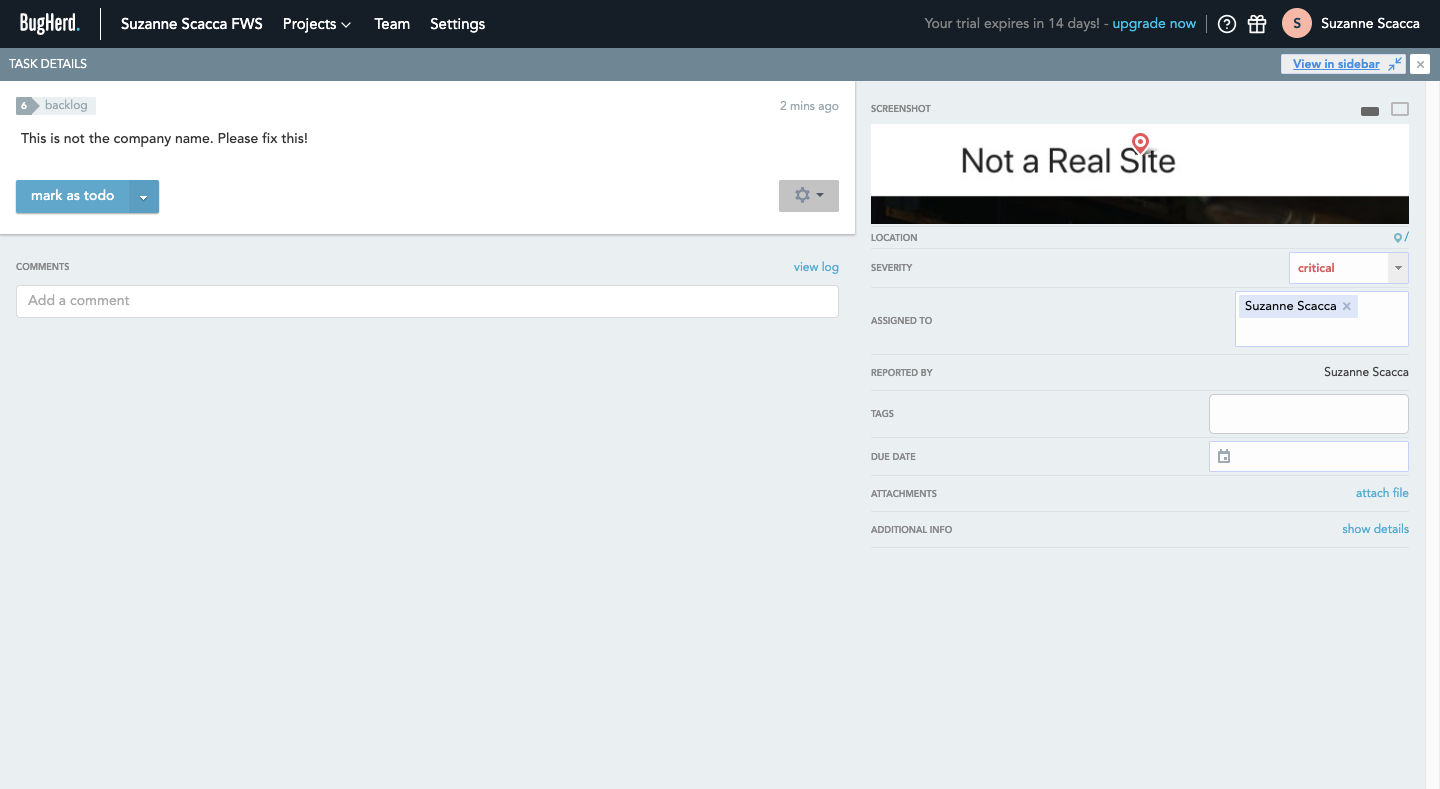
That said, BugHerd takes on a lot of the more tedious work of capturing bug reports for you. For example, when you click on any of the reported bugs in your kanban board, this “Task Details” sidebar will appear:
This panel provides extra details about the issue, shows a screenshot of where it exists on the site, and also lets you know who left the comment.
What’s more, BugHerd captures “Additional Info”:
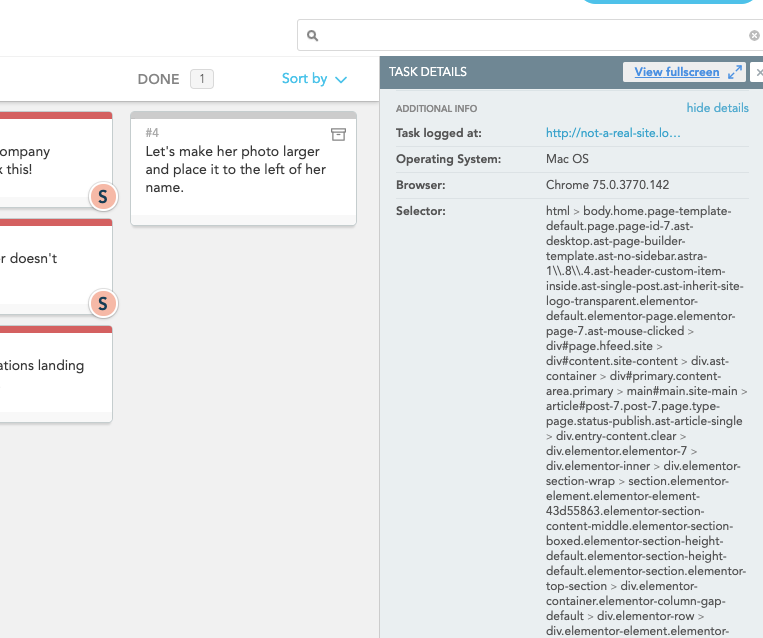
This way, you don’t have to worry about the client not providing you with the full context of the issue. These details tell you what device and browser they were on, how big the screen was and what color resolution they were viewing it through.
You also get a look at the code of the buggy element. If there’s something actually broken or improperly coded, you might be able to spot it from here.
All in all, BugHerd is a great tool to simplify how much everyone has to do from all sides and ensure each request is tackled in a timely manner.
4. Give Your Triage Manager A Tracking Platform
If you want to keep this workflow as simple as possible, you can use the BugHerd dashboard to track and manage your requests:

Your triage manager and dev team will probably want to use something to complement the bug reporting capabilities of BugHerd. But good luck asking your client to use a platform like Jira to help you manage bugs.
In that case, I’d recommend adding another tool to this workflow.
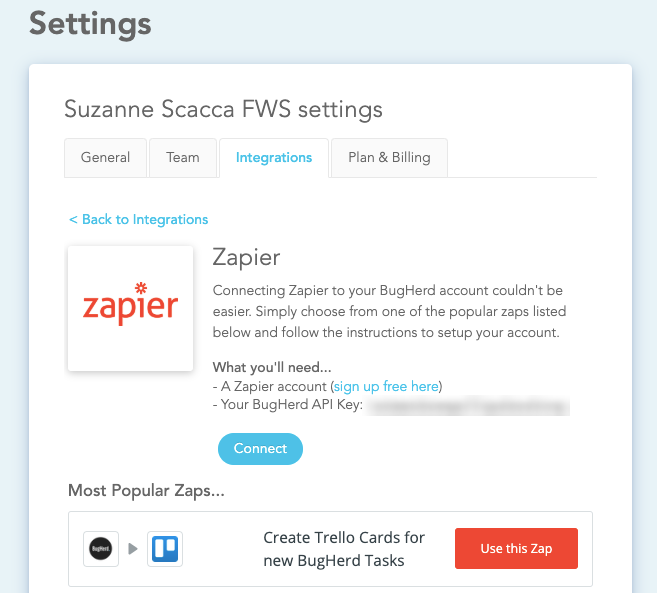
Luckily for you, BugHerd seamlessly integrates with issue tracking and helpdesk software like Jira, Zendesk and Basecamp, so you don’t have to worry about using multiple tools to manage different parts of the same process. Once the connection is made between your two platforms, any task created in BugHerd will automatically be copied to your issue resolution center.
Now, if there’s a tool your team is already using, but that BugHerd doesn’t directly integrate with, that’s okay. You can use Zapier to help you connect with even more platforms.
For example, this is how easy it is to instantly create a “zap” that copies new BugHerd tasks to your Trello cards. And it all takes place from within BugHerd!
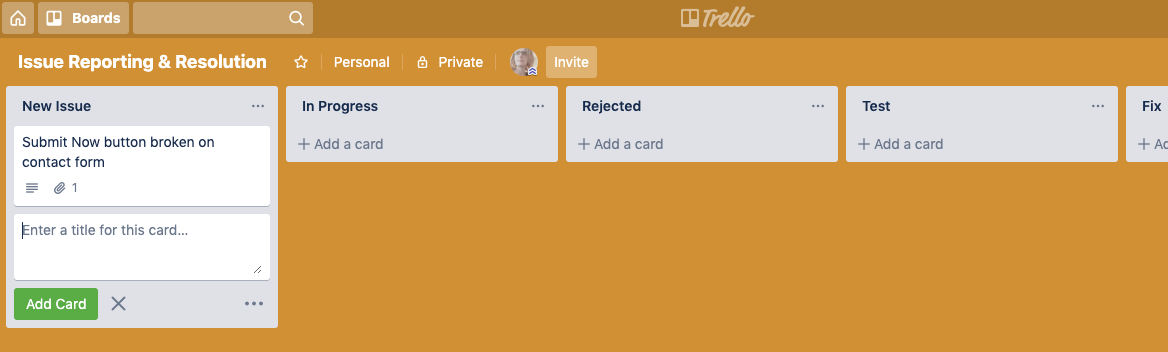
Once the connection is made, your triage manager can start working from the task management or issue tracking platform of its choosing. In this case, this is what happens when Zapier connects BugHerd and Trello:
This is a new task I just created in BugHerd. Within seconds, the card was placed into the exact Trello project and list that I configured the zap for:
This will make your triage manager’s job much easier as they won’t be limited by the stages available in BugHerd while also still having all the same information readily at their fingertips.
5. Work In A Local Testing Platform
When bugs are reported, you don’t want to test and implement the assumed fixes on the live website. That’s too risky.
Instead, work on resolving issues from a local testing platform. This article has some great suggestions on local development tools for WordPress you can use for this.
These tools enable you to:
- Quickly make a copy of your website.
- Reproduce the bug with the same server conditions.
- Test possible fixes until you find one that works.
Only then should you work on patching the bug on the website.
6. Always Close The Loop
Finally, it’s up to your triage manager to bring each issue to a formal close.
First, they should inform the client (or visitor) who originally reported the issue that it has been resolved. This kind of transparency and accountability will give your agency a more polished look while helping you build trust with clients who might be unnerved by discovering bugs in the first place.
Once things are closed client-side, the triage manager can then archive the bug report.
It shouldn’t end there though.
Like traditional project managers, a triage manager should regularly track trends as well as the overall severity of bugs found on their websites. The data might reveal that there’s a deeper issue at play. That way, your team can focus on resolving the underlying problem and stop spending so much time repairing the same kinds of bugs and issues.
Wrapping Up
Think about all of the ways in which issues and bugs may be reported: through a contact form, by email, over the phone, through chat or, worse, in a public forum like social media.
Now, think about all of the different people who might report these issues to you: your team, the client, a customer of your client, a person who randomly found it while looking at the website and so on.
There are just too many variables in this equation, which makes it easy to lose sight of open issues. Worse, when feedback comes through vague, subjective, or unable to account for without any context, it becomes too difficult to resolve issues completely or in a timely fashion.
With the right system of reporting, tracking and organizing feedback in place, though, you can bring order to this chaos and more effectively wipe out bugs found on your website.
Further Reading
- Transforming The Relationship Between Designers And Developers
- How To Hack Your Google Lighthouse Scores In 2024
- Long Live The Test Pyramid
- Scaling Success: Key Insights And Practical Takeaways