Create A Bookmarking Application With FaunaDB, Netlify And 11ty

Email Newsletter
Weekly tips on front-end & UX.
Trusted by 182,000+ folks.

 Celebrating 10 million developers

 Custom Web Forms for Angular, React, & Vue. Your backend.
The JAMstack (JavaScript, APIs and Markup) revolution is in full swing. Static sites are secure, fast, reliable and fun to work on. At the heart of the JAMstack are static site generators (SSGs) that store your data as flat files: Markdown, YAML, JSON, HTML, and so on. Sometimes, managing data this way can be overly complicated. Sometimes, we still need a database.
With that in mind, Netlify — a static site host and FaunaDB — a serverless cloud database — collaborated to make combining both systems easier.
Why A Bookmarking Site?
The JAMstack is great for many professional uses, but one of my favorite aspects of this set of technology is its low barrier to entry for personal tools and projects.
There are plenty of good products on the market for most applications I could come up with, but none would be exactly set up for me. None would give me full control over my content. None would come without a cost (monetary or informational).
With that in mind, we can create our own mini-services using JAMstack methods. In this case, we’ll be creating a site to store and publish any interesting articles I come across in my daily technology reading.
I spend a lot of time reading articles that have been shared on Twitter. When I like one, I hit the “heart” icon. Then, within a few days, it’s nearly impossible to find with the influx of new favorites. I want to build something as close to the ease of the “heart,” but that I own and control.
How are we going to do that? I’m glad you asked.
"Interested in getting the code? You can grab it on Github or just deploy straight to Netlify from that repository!"
Our Technologies
Hosting And Serverless Functions: Netlify
For hosting and serverless functions, we’ll be utilizing Netlify. As an added bonus, with the new collaboration mentioned above, Netlify’s CLI — “Netlify Dev” — will automatically connect to FaunaDB and store our API keys as environment variables.
Database: FaunaDB
FaunaDB is a “serverless” NoSQL database. We’ll be using it to store our bookmarks data.
Static Site Generator: 11ty
I’m a big believer in HTML. Because of this, the tutorial won’t be using front-end JavaScript to render our bookmarks. Instead, we’ll utilize 11ty as a static site generator. 11ty has built-in data functionality that makes fetching data from an API as easy as writing a couple of short JavaScript functions.
iOS Shortcuts
We’ll need an easy way to post data to our database. In this case, we’ll use iOS’s Shortcuts app. This could be converted to an Android or desktop JavaScript bookmarklet, as well.
Setting Up FaunaDB Via Netlify Dev
Whether you have already signed up for FaunaDB or you need to create a new account, the easiest way to set up a link between FaunaDB and Netlify is via Netlify’s CLI: Netlify Dev. You can find full instructions from FaunaDB here or follow along below.

If you don’t already have this installed, you can run the following command in Terminal:
npm install netlify-cli -gFrom within your project directory, run through the following commands:
netlify init // This will connect your project to a Netlify project

netlify addons:create fauna // This will install the FaunaDB "addon"

netlify addons:auth fauna // This command will run you through connecting your account or setting up an account
Once this is all connected, you can run netlify dev in your project. This will run any build scripts we set up, but also connect to the Netlify and FaunaDB services and grab any necessary environment variables. Handy!
Creating Our First Data
From here, we’ll log into FaunaDB and create our first data set. We’ll start by creating a new Database called “bookmarks.” Inside a Database, we have Collections, Documents and Indexes.
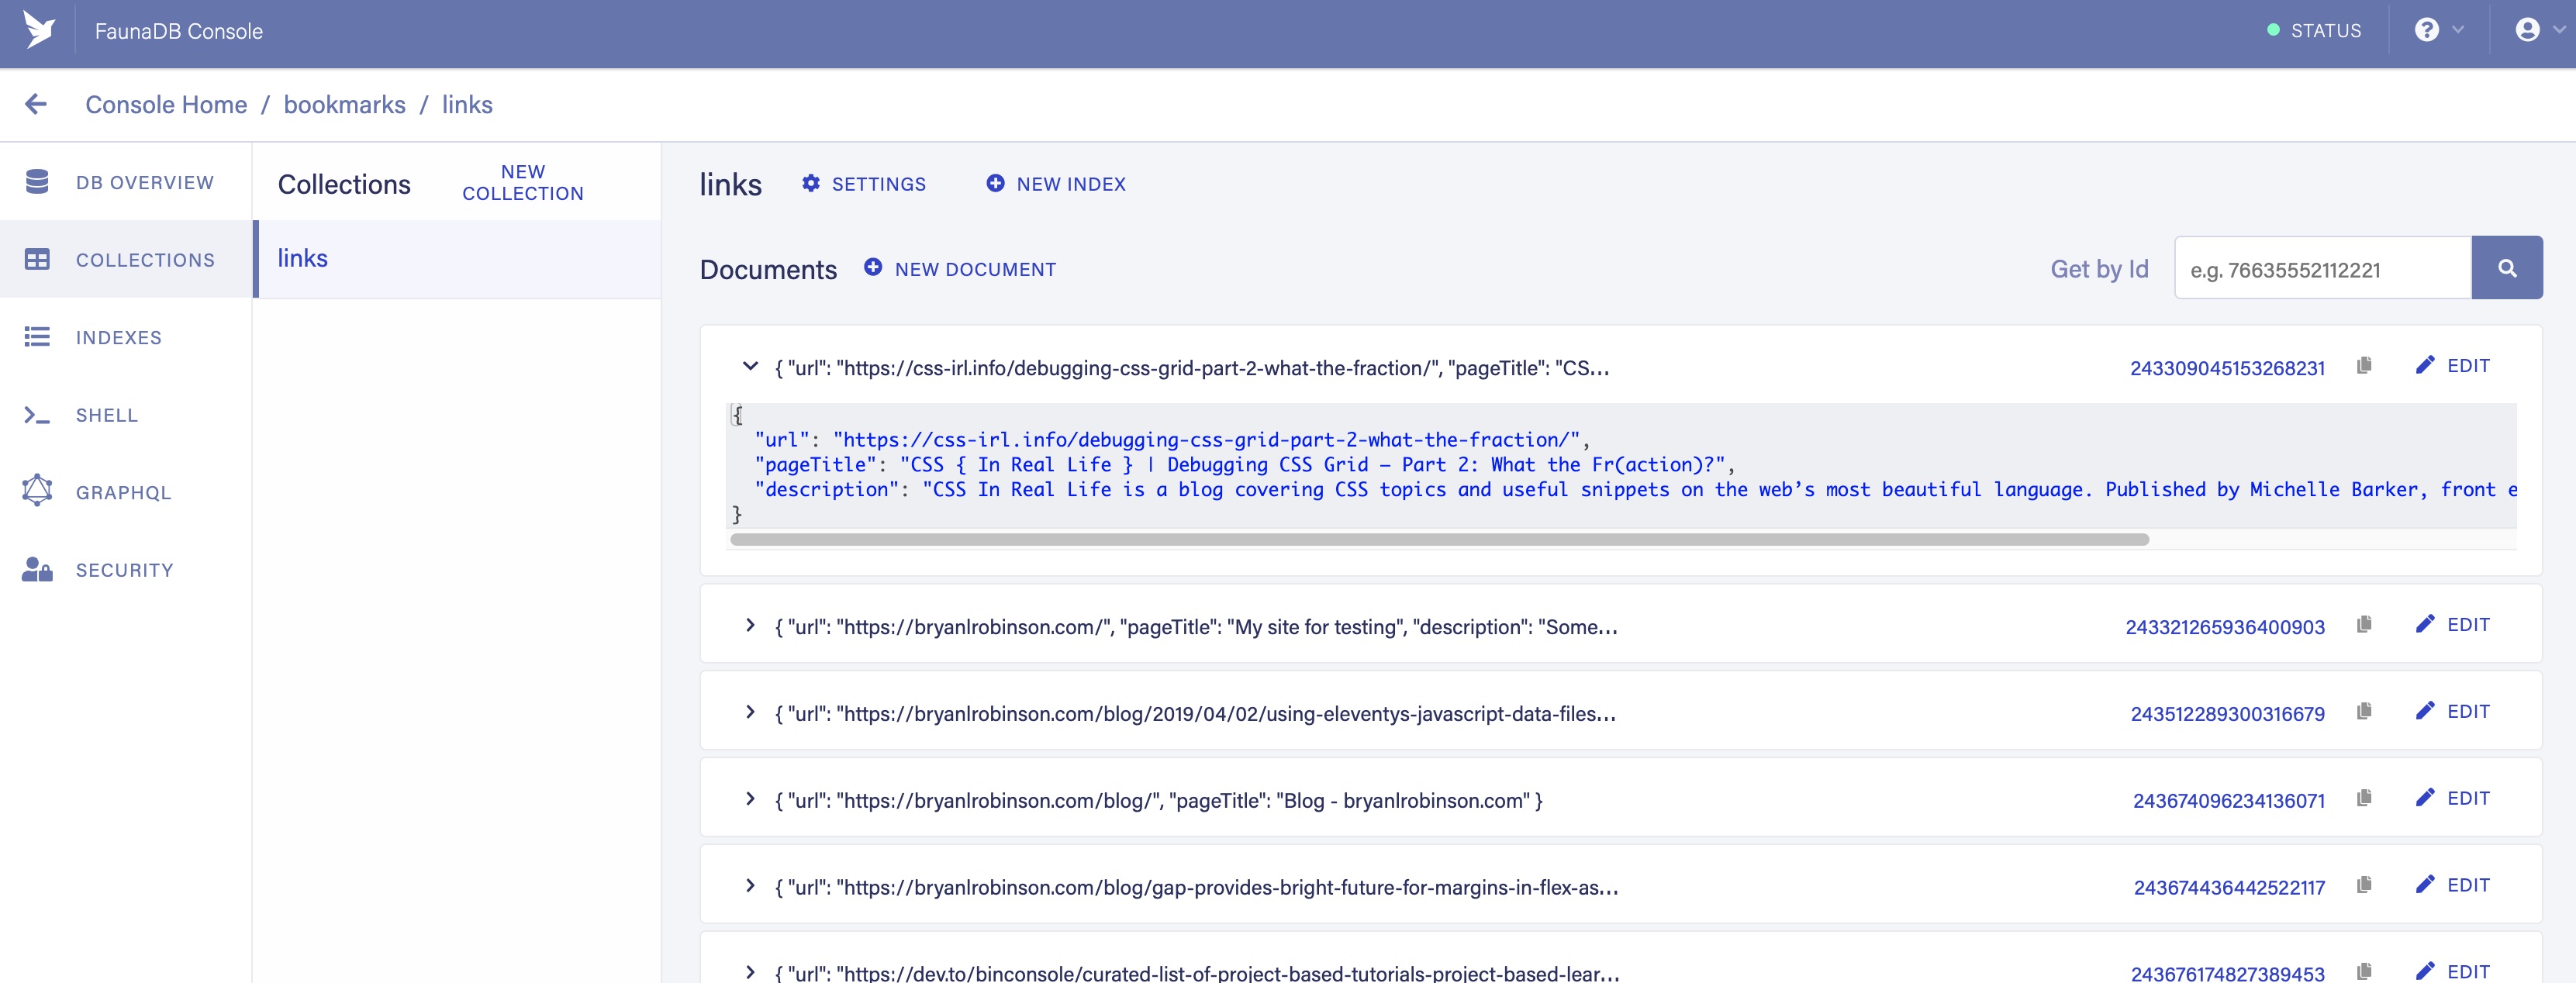
A Collection is a categorized group of data. Each piece of data takes the form of a Document. A Document is a “single, changeable record within a FaunaDB database,” according to Fauna’s documentation. You can think of Collections as a traditional database table and a Document as a row.
For our application, we need one Collection, which we’ll call “links.” Each document within the “links” Collection will be a simple JSON object with three properties. To start, we’ll add a new Document that we’ll use to build our first data fetch.
{
  "url": "https://css-irl.info/debugging-css-grid-part-2-what-the-fraction/",
  "pageTitle": "CSS { In Real Life } | Debugging CSS Grid – Part 2: What the Fr(action)?",
  "description": "CSS In Real Life is a blog covering CSS topics and useful snippets on the web’s most beautiful language. Published by Michelle Barker, front end developer at Ordoo and CSS superfan."
}
This creates the basis for the information we’ll need to pull from our bookmarks as well as provides us with our first set of data to pull into our template.
If you’re like me, you want to see the fruits of your labor right away. Let’s get something on the page!
Installing 11ty And Pulling Data Into A Template
Since we want the bookmarks to be rendered in HTML and not fetched by the browser, we’ll need something to do the rendering. There are many great ways of doing it, but for ease and power, I love using the 11ty static site generator.
Since 11ty is a JavaScript static site generator, we can install it via NPM.
npm install --save @11ty/eleventyFrom that installation, we can run eleventy or eleventy --serve in our project to get up and running.
Netlify Dev will often detect 11ty as a requirement and run the command for us. To have this work - and make sure we’re ready to deploy, we can also create “serve” and “build” commands in our package.json.
"scripts": {
    "build": "npx eleventy",
    "serve": "npx eleventy --serve"
  }
11ty’s Data Files
Most static site generators have an idea of a “data file” built-in. Usually, these files will be JSON or YAML files that allow you to add extra information to your site.
In 11ty, you can use JSON data files or JavaScript data files. By utilizing a JavaScript file, we can actually make our API calls and return the data directly into a template.
By default, 11ty wants data files stored in a _data directory. You can then access the data by using the file name as a variable in your templates. In our case, we’ll create a file at _data/bookmarks.js and access that via the {{ bookmarks }} variable name.
If you want to dig deeper into data file configuration, you can read through examples in the 11ty documentation or check out this tutorial on using 11ty data files with the Meetup API.
The file will be a JavaScript module. So in order to have anything work, we need to export either our data or a function. In our case, we’ll export a function.
module.exports = async function() {
    const data = mapBookmarks(await getBookmarks());

    return data.reverse()
}
Let’s break that down. We have two functions doing our main work here: mapBookmarks() and getBookmarks().
The getBookmarks() function will go fetch our data from our FaunaDB database and mapBookmarks() will take an array of bookmarks and restructure it to work better for our template.
Let’s dig deeper into getBookmarks().
getBookmarks()
First, we’ll need to install and initialize an instance of the FaunaDB JavaScript driver.
npm install --save faunadbNow that we’ve installed it, let’s add it to the top of our data file. This code is straight from Fauna’s docs.
// Requires the Fauna module and sets up the query module, which we can use to create custom queries.
const faunadb = require('faunadb'),
      q = faunadb.query;

// Once required, we need a new instance with our secret
var adminClient = new faunadb.Client({
   secret: process.env.FAUNADB_SERVER_SECRET
});
After that, we can create our function. We’ll start by building our first query using built-in methods on the driver. This first bit of code will return the database references we can use to get full data for all of our bookmarked links. We use the Paginate method, as a helper to manage cursor state should we decide to paginate the data before handing it to 11ty. In our case, we’ll just return all the references.
In this example, I’m assuming you installed and connected FaunaDB via the Netlify Dev CLI. Using this process, you get local environment variables of the FaunaDB secrets. If you didn’t install it this way or aren’t running netlify dev in your project, you’ll need a package like dotenv to create the environment variables. You’ll also need to add your environment variables to your Netlify site configuration to make deploys work later.
adminClient.query(q.Paginate(
       q.Match( // Match the reference below
           q.Ref("indexes/all_links") // Reference to match, in this case, our all_links index
       )
   ))
   .then( response => { ... })
This code will return an array of all of our links in reference form. We can now build a query list to send to our database.
adminClient.query(...)
    .then((response) => {
        const linkRefs = response.data; // Get just the references for the links from the response
        const getAllLinksDataQuery = linkRefs.map((ref) => {
        return q.Get(ref) // Return a Get query based on the reference passed in
   })

return adminClient.query(getAllLinksDataQuery).then(ret => {
    return ret // Return an array of all the links with full data
       })
   }).catch(...)
From here, we just need to clean up the data returned. That’s where mapBookmarks() comes in!
mapBookmarks()
In this function, we deal with two aspects of the data.
First, we get a free dateTime in FaunaDB. For any data created, there’s a timestamp (ts) property. It’s not formatted in a way that makes Liquid’s default date filter happy, so let’s fix that.
function mapBookmarks(data) {
    return data.map(bookmark => {
        const dateTime = new Date(bookmark.ts / 1000);
        ...
    })
}
With that out of the way, we can build a new object for our data. In this case, it will have a time property, and we’ll use the Spread operator to destructure our data object to make them all live at one level.
function mapBookmarks(data) {
    return data.map(bookmark => {
        const dateTime = new Date(bookmark.ts / 1000);

        return { time: dateTime, ...bookmark.data }
    })
}
Here’s our data before our function:
{
  ref: Ref(Collection("links"), "244778237839802888"),
  ts: 1569697568650000,

  data: {
    url: 'https://sample.com',
    pageTitle: 'Sample title',
    description: 'An escaped description goes here'
  }
}
Here’s our data after our function:
{
    time: 1569697568650,
    url: 'https://sample.com',
    pageTitle: 'Sample title'
    description: 'An escaped description goes here'
}
Now, we’ve got well-formatted data that’s ready for our template!
Let’s write a simple template. We’ll loop through our bookmarks and validate that each has a pageTitle and a url so we don’t look silly.
<div class="bookmarks">
   {% for link in bookmarks %}
       {% if link.url and link.pageTitle %} // confirms there’s both title AND url for safety

        <div class="bookmark">
            <h2><a href="{{ link.url }}">{{ link.pageTitle }}</a></h2>
            <p>Saved on {{ link.time | date: "%b %d, %Y"  }}</p>
            {% if link.description != "" %}
                <p>{{ link.description }}</p>
            {% endif %}
        </div>

       {% endif %}
   {% endfor %}
</div>
We’re now ingesting and displaying data from FaunaDB. Let’s take a moment and think about how nice it is that this renders out pure HTML and there’s no need to fetch data on the client side!
But that’s not really enough to make this a useful app for us. Let’s figure out a better way than adding a bookmark in the FaunaDB console.
Enter Netlify Functions
Netlify’s Functions add-on is one of the easier ways to deploy AWS lambda functions. Since there’s no configuration step, it’s perfect for DIY projects where you just want to write the code.
This function will live at a URL in your project that looks like this: https://myproject.com/.netlify/functions/bookmarks assuming the file we create in our functions folder is bookmarks.js.
Basic Flow
- Pass a URL as a query parameter to our function URL.
- Use the function to load the URL and scrape the page’s title and description if available.
- Format the details for FaunaDB.
- Push the details to our FaunaDB Collection.
- Rebuild the site.
Requirements
We’ve got a few packages we’ll need as we build this out. We’ll use the netlify-lambda CLI to build our functions locally. request-promise is the package we’ll use for making requests. Cheerio.js is the package we’ll use to scrape specific items from our requested page (think jQuery for Node). And finally, we’ll need FaunaDb (which should already be installed.
npm install --save netlify-lambda request-promise cheerioOnce that’s installed, let’s configure our project to build and serve the functions locally.
We’ll modify our “build” and “serve” scripts in our package.json to look like this:
"scripts": {
    "build": "npx netlify-lambda build lambda --config ./webpack.functions.js && npx eleventy",
    "serve": "npx netlify-lambda build lambda --config ./webpack.functions.js && npx eleventy --serve"
}
Warning: There’s an error with Fauna’s NodeJS driver when compiling with Webpack, which Netlify’s Functions use to build. To get around this, we need to define a configuration file for Webpack. You can save the following code to a new — or existing — webpack.config.js.
const webpack = require('webpack');

module.exports = {
  plugins: [ new webpack.DefinePlugin({ "global.GENTLY": false }) ]
};
Once this file exists, when we use the netlify-lambda command, we’ll need to tell it to run from this configuration. This is why our “serve” and “build scripts use the --config value for that command.
Function Housekeeping
In order to keep our main Function file as clean as possible, we’ll create our functions in a separate bookmarks directory and import them into our main Function file.
import { getDetails, saveBookmark } from "./bookmarks/create";getDetails(url)
The getDetails() function will take a URL, passed in from our exported handler. From there, we’ll reach out to the site at that URL and grab relevant parts of the page to store as data for our bookmark.
We start by requiring the NPM packages we need:
const rp = require('request-promise');
const cheerio = require('cheerio');
Then, we’ll use the request-promise module to return an HTML string for the requested page and pass that into cheerio to give us a very jQuery-esque interface.
const getDetails = async function(url) {
    const data = rp(url).then(function(htmlString) {
        const $ = cheerio.load(htmlString);
        ...
}
From here, we need to get the page title and a meta description. To do that, we’ll use selectors like you would in jQuery.
Note: In this code, we use 'head > title' as the selector to get the title of the page. If you don’t specify this, you may end up getting <title> tags inside of all SVGs on the page, which is less than ideal.
const getDetails = async function(url) {
  const data = rp(url).then(function(htmlString) {
    const $ = cheerio.load(htmlString);
    const title = $('head > title').text(); // Get the text inside the tag
    const description = $('meta[name="description"]').attr('content'); // Get the text of the content attribute

// Return out the data in the structure we expect
    return {
      pageTitle: title,
      description: description
    };
  });
  return data //return to our main function
}
With data in hand, it’s time to send our bookmark off to our Collection in FaunaDB!
saveBookmark(details)
For our save function, we’ll want to pass the details we acquired from getDetails as well as the URL as a singular object. The Spread operator strikes again!
const savedResponse = await saveBookmark({url, ...details});In our create.js file, we also need to require and setup our FaunaDB driver. This should look very familiar from our 11ty data file.
const faunadb = require('faunadb'),
      q = faunadb.query;

const adminClient = new faunadb.Client({
   secret: process.env.FAUNADB_SERVER_SECRET
});
Once we’ve got that out of the way, we can code.
First, we need to format our details into a data structure that Fauna is expecting for our query. Fauna expects an object with a data property containing the data we wish to store.
const saveBookmark = async function(details) {
const data = {
   data: details
};

...

}
Then we’ll open a new query to add to our Collection. In this case, we’ll use our query helper and use the Create method. Create() takes two arguments. First is the Collection in which we want to store our data and the second is the data itself.
After we save, we return either success or failure to our handler.
const saveBookmark = async function(details) {
const data = {
   data: details
};

return adminClient.query(q.Create(q.Collection("links"), data))
   .then((response) => {
        /* Success! return the response with statusCode 200 */
        return {
             statusCode: 200,
             body: JSON.stringify(response)
         }
     }).catch((error) => {
        /* Error! return the error with statusCode 400 */
        return  {
             statusCode: 400,
             body: JSON.stringify(error)
         }
     })
}
Let’s take a look at the full Function file.
import { getDetails, saveBookmark } from "./bookmarks/create";
import { rebuildSite } from "./utilities/rebuild"; // For rebuilding the site (more on that in a minute)

exports.handler = async function(event, context) {
    try {
        const url = event.queryStringParameters.url; // Grab the URL

        const details = await getDetails(url); // Get the details of the page
        const savedResponse = await saveBookmark({url, ...details}); //Save the URL and the details to Fauna

        if (savedResponse.statusCode === 200) {
            // If successful, return success and trigger a Netlify build
            await rebuildSite();
            return { statusCode: 200, body: savedResponse.body }
         } else {
            return savedResponse //or else return the error
         }
     } catch (err) {
        return { statusCode: 500, body: `Error: ${err}` };
     }
};
rebuildSite()
The discerning eye will notice that we have one more function imported into our handler: rebuildSite(). This function will use Netlify’s Deploy Hook functionality to rebuild our site from the new data every time we submit a new — successful — bookmark save.
In your site’s settings in Netlify, you can access your Build & Deploy settings and create a new “Build Hook.” Hooks have a name that appears in the Deploy section and an option for a non-master branch to deploy if you so wish. In our case, we’ll name it “new_link” and deploy our master branch.
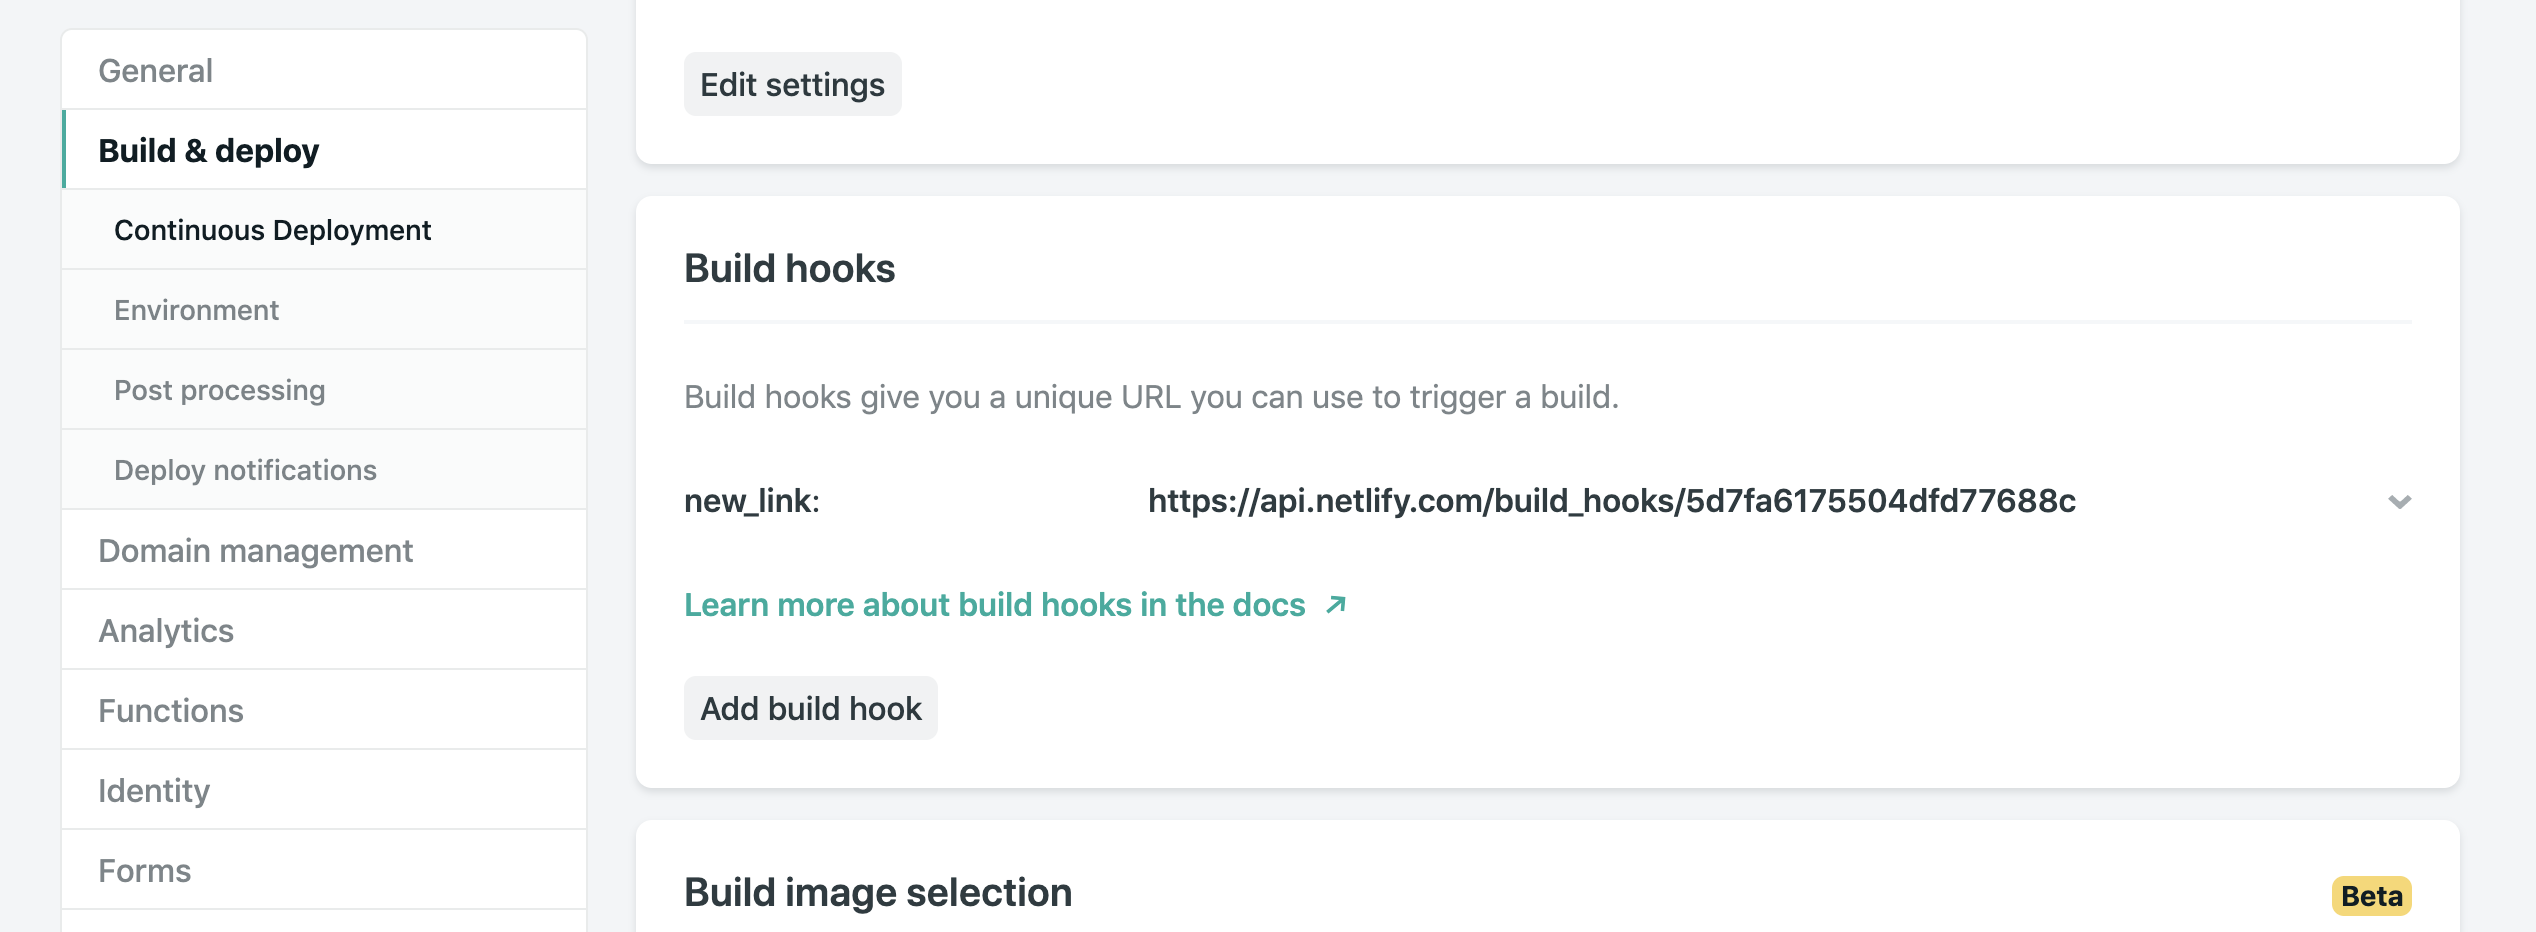
From there, we just need to send a POST request to the URL provided.
We need a way of making requests and since we’ve already installed request-promise, we’ll continue to use that package by requiring it at the top of our file.
const rp = require('request-promise');

const rebuildSite = async function() {
    var options = {
         method: 'POST',
         uri: 'https://api.netlify.com/build_hooks/5d7fa6175504dfd43377688c',
         body: {},
         json: true
    };

    const returned = await rp(options).then(function(res) {
         console.log('Successfully hit webhook', res);
     }).catch(function(err) {
         console.log('Error:', err);
     });

    return returned
}
Setting Up An iOS Shortcut
So, we have a database, a way to display data and a function to add data, but we’re still not very user-friendly.
Netlify provides URLs for our Lambda functions, but they’re not fun to type into a mobile device. We’d also have to pass a URL as a query parameter into it. That’s a LOT of effort. How can we make this as little effort as possible?
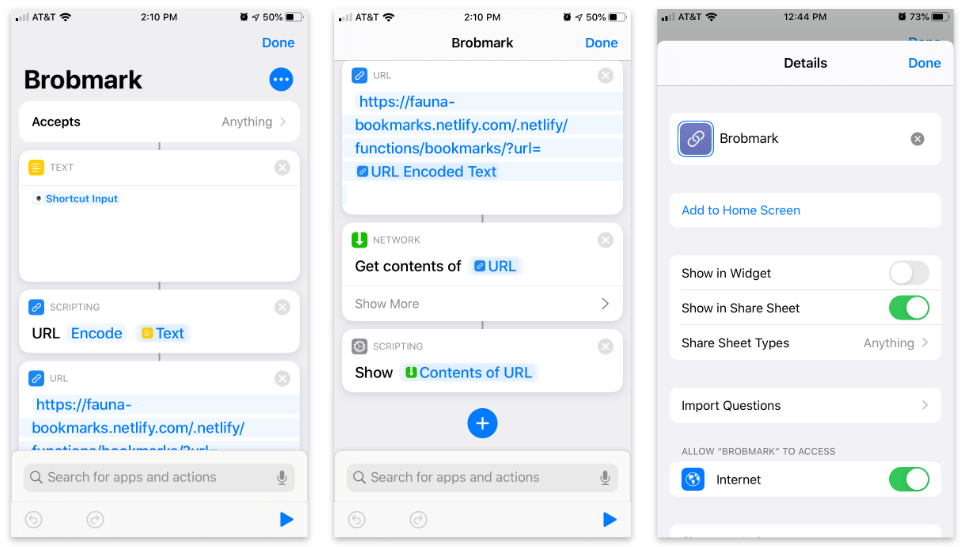
Apple’s Shortcuts app allows the building of custom items to go into your share sheet. Inside these shortcuts, we can send various types of requests of data collected in the share process.
Here’s the step-by-step Shortcut:
- Accept any items and store that item in a “text” block.
- Pass that text into a “Scripting” block to URL encode (just in case).
- Pass that string into a URL block with our Netlify Function’s URL and a query parameter of
url. - From “Network” use a “Get contents” block to POST to JSON to our URL.
- Optional: From “Scripting” “Show” the contents of the last step (to confirm the data we’re sending).
To access this from the sharing menu, we open up the settings for this Shortcut and toggle on the “Show in Share Sheet” option.
As of iOS13, these share “Actions” are able to be favorited and moved to a high position in the dialog.
We now have a working “app” for sharing bookmarks across multiple platforms!
Go The Extra Mile!
If you’re inspired to try this yourself, there are a lot of other possibilities to add functionality. The joy of the DIY web is that you can make these sorts of applications work for you. Here are a few ideas:
- Use a faux “API key” for quick authentication, so other users don’t post to your site (mine uses an API key, so don’t try to post to it!).
- Add tag functionality to organize bookmarks.
- Add an RSS feed for your site so that others can subscribe.
- Send out a weekly roundup email programmatically for links that you’ve added.
Really, the sky is the limit, so start experimenting!
Further Reading
- Uniting Web And Native Apps With 4 Unknown JavaScript APIs
- Penpot’s CSS Grid Layout: Designing With Superpowers
- Building The SSG I’ve Always Wanted: An 11ty, Vite And JAM Sandwich
- A Deep Dive Into Eleventy Static Site Generator


