Getting Started With An Express And ES6+ JavaScript Stack

Email Newsletter
Weekly tips on front-end & UX.
Trusted by 182,000+ folks.


 Custom Web Forms for Angular, React, & Vue. Your backend.

 Celebrating 10 million developers
This article is the second part in a series, with part one located here, which provided basic and (hopefully) intuitive insight into Node.js, ES6+ JavaScript, Callback Functions, Arrow Functions, APIs, the HTTP Protocol, JSON, MongoDB, and more.
In this article, we’ll build upon the skills we attained in the previous one, learning how to implement and deploy a MongoDB Database for storing user booklist information, build an API with Node.js and the Express Web Application framework to expose that database and perform CRUD Operations upon it, and more. Along the way, we’ll discuss ES6 Object Destructuring, ES6 Object Shorthand, the Async/Await syntax, the Spread Operator, and we’ll take a brief look at CORS, the Same Origin Policy, and more.
In a later article, we’ll refactor our codebase as to separate concerns by utilizing three-layer architecture and achieving Inversion of Control via Dependency Injection, we’ll perform JSON Web Token and Firebase Authentication based security and access control, learn how to securely store passwords, and employ AWS Simple Storage Service to store user avatars with Node.js Buffers and Streams — all the while utilizing PostgreSQL for data persistence. Along the way, we will re-write our codebase from the ground up in TypeScript as to examine Classical OOP concepts (such as Polymorphism, Inheritance, Composition, and so on) and even design patterns like Factories and Adapters.
A Word Of Warning
There is a problem with the majority of articles discussing Node.js out there today. Most of them, not all of them, go no further than depicting how to setup Express Routing, integrate Mongoose, and perhaps utilize JSON Web Token Authentication. The problem is that they don’t talk about architecture, or security best practices, or about clean coding principles, or ACID Compliance, Relational Databases, Fifth Normal Form, the CAP Theorem or Transactions. It’s either assumed that you know about all of that coming in, or that you won’t be building projects large or popular enough to warrant that aforementioned knowledge.
There appear to be a few different types of Node developers — among others, some are new to programming in general, and others come from a long history of enterprise development with C# and the .NET Framework or the Java Spring Framework. The majority of articles cater to the former group.
In this article, I’m going to do exactly what I just stated that too many articles are doing, but in a follow up article, we are going to refactor our codebase entirely, permitting me to explain principles such as Dependency Injection, Three-Layer Architecture (Controller/Service/Repository), Data Mapping and Active Record, design patterns, unit, integration, and mutation testing, SOLID Principles, Unit of Work, coding against interfaces, security best practices like HSTS, CSRF, NoSQL and SQL Injection Prevention, and so on. We will also migrate from MongoDB to PostgreSQL, using the simple query builder Knex instead of an ORM — permitting us to build our own data access infrastructure and to get close up and personal with the Structured Query Language, the different types of relations (One-to-One, Many-to-Many, etc.), and more. This article, then, should appeal to beginners, but the next few should cater to more intermediate developers looking to improve their architecture.
In this one, we are only going to worry about persisting book data. We won’t handle user authentication, password hashing, architecture, or anything complex like that. All of that will come in the next and future articles. For now, and very basically, we’ll just build a method by which to permit a client to communicate with our web server via the HTTP Protocol as to save book information in a database.
Note: I’ve intentionally kept it extremely simple and perhaps not all that practical here because this article, in and of itself, is extremely long, for I have taken the liberty of deviating to discuss supplemental topics. Thus, we will progressively improve the quality and complexity of the API over this series, but again, because I’m considering this as one of your first introductions to Express, I’m intentionally keeping things extremely simple.
ES6 Object Destructuring
ES6 Object Destructuring, or Destructuring Assignment Syntax, is a method by which to extract or unpack values from arrays or objects into their own variables. We’ll start with object properties and then discuss array elements.
const person = {
    name: 'Richard P. Feynman',
    occupation: 'Theoretical Physicist'
};

// Log properties:
console.log('Name:', person.name);
console.log('Occupation:', person.occupation);
Such an operation is quite primitive, but it can be somewhat of a hassle considering we have to keep referencing person.something everywhere. Suppose there were 10 other places throughout our code where we had to do that — it would get quite arduous quite fast. A method of brevity would be to assign these values to their own variables.
const person = {
    name: 'Richard P. Feynman',
    occupation: 'Theoretical Physicist'
};

const personName = person.name;
const personOccupation = person.occupation;

// Log properties:
console.log('Name:', personName);
console.log('Occupation:', personOccupation);
Perhaps this looks reasonable, but what if we had 10 other properties nested on the person object as well? That would be many needless lines just to assign values to variables — at which point we’re in danger because if object properties are mutated, our variables won’t reflect that change (remember, only references to the object are immutable with const assignment, not the object’s properties), so basically, we can no longer keep “state” (and I’m using that word loosely) in sync. Pass by reference vs pass by value might come into play here, but I don’t want to stray too far from the scope of this section.
ES6 Object Destructing basically lets us do this:
const person = {
    name: 'Richard P. Feynman',
    occupation: 'Theoretical Physicist'
};

// This is new. It’s called Object Destructuring.
const { name, occupation } = person;

// Log properties:
console.log('Name:', name);
console.log('Occupation:', occupation);
We are not creating a new object/object literal, we are unpacking the name and occupation properties from the original object and putting them into their own variables of the same name. The names we use have to match the property names that we wish to extract.
Again, the syntax const { a, b } = someObject; is specifically saying that we expect some property a and some property b to exist within someObject (i.e, someObject could be { a: 'dataA', b: 'dataB' }, for example) and that we want to place whatever the values are of those keys/properties within const variables of the same name. That’s why the syntax above would provide us with two variables const a = someObject.a and const b = someObject.b .
What that means is that there are two sides to Object Destructuring. The “Template” side and the “Source” side, where the const { a, b } side (the left-hand side) is the template and the someObject side (the right-hand side) is the source side — which makes sense — we are defining a structure or “template” on the left that mirrors the data on “source” side.
Again, just to make this clear, here are a few examples:
// ----- Destructure from Object Variable with const ----- //
const objOne = {
    a: 'dataA',
    b: 'dataB'
};

// Destructure
const { a, b } = objOne;

console.log(a); // dataA
console.log(b); // dataB

// ----- Destructure from Object Variable with let ----- //
let objTwo = {
    c: 'dataC',
    d: 'dataD'
};

// Destructure
let { c, d } = objTwo;

console.log(c); // dataC
console.log(d); // dataD

// Destructure from Object Literal with const ----- //
const { e, f } = { e: 'dataE', f: 'dataF' }; // <-- Destructure

console.log(e); // dataE
console.log(f); // dataF

// Destructure from Object Literal with let ----- //
let { g, h } = { g: 'dataG', h: 'dataH' }; // <-- Destructure

console.log(g); // dataG
console.log(h); // dataH
In the case of nested properties, mirror the same structure in your destructing assignment:
const person = {
    name:  'Richard P. Feynman',
    occupation: {
        type:  'Theoretical Physicist',
        location: {
            lat:  1,
            lng:  2
        }
    }
};

// Attempt one:
const { name, occupation } = person;

console.log(name); // Richard P. Feynman
console.log(occupation); // The entire `occupation` object.

// Attempt two:
const { occupation: { type, location } } = person;

console.log(type); // Theoretical Physicist
console.log(location) // The entire `location` object.

// Attempt three:
const { occupation: {  location: { lat, lng } } } = person;

console.log(lat); // 1
console.log(lng); // 2
As you can see, the properties you decide to pull off are optional, and to unpack nested properties, simply mirror the structure of the original object (the source) in the template side of your destructuring syntax. If you attempt to destructure a property that does not exist on the original object, that value will be undefined.
We can additionally destructure a variable without first declaring it — assignment without declaration — using the following syntax:
let name, occupation;

const person = {
    name: 'Richard P. Feynman',
    occupation: 'Theoretical Physicist'
};

;({ name, occupation } = person);

console.log(name); // Richard P. Feynman
console.log(occupation); // Theoretical Physicist
We precede the expression with a semicolon as to ensure we don’t accidentally create an IIFE (Immediately Invoked Function Expression) with a function on a previous line (if one such function exists), and the parentheses around the assignment statement are required as to stop JavaScript from treating your left-hand (template) side as a block.
A very common use case of destructuring exists within function arguments:
const config = {
    baseUrl: '<baseURL>',
    awsBucket: '<bucket>',
    secret: '<secret-key>' // <- Make this an env var.
};

// Destructures `baseUrl` and `awsBucket` off `config`.
const performOperation = ({ baseUrl, awsBucket }) => {
    fetch(baseUrl).then(() => console.log('Done'));
    console.log(awsBucket); // <bucket>
};

performOperation(config);
As you can see, we could have just used the normal destructuring syntax we are now used to inside of the function, like this:
const config = {
    baseUrl: '<baseURL>',
    awsBucket: '<bucket>',
    secret: '<secret-key>' // <- Make this an env var.
};

const performOperation = someConfig => {
    const { baseUrl, awsBucket } = someConfig;
    fetch(baseUrl).then(() => console.log('Done'));
    console.log(awsBucket); // <bucket>
};

performOperation(config);
But placing said syntax inside the function signature performs destructuring automatically and saves us a line.
A real-world use case of this is in React Functional Components for props:
import React from 'react';

// Destructure `titleText` and `secondaryText` from `props`.
export default ({ titleText, secondaryText }) => (
    <div>
        <h1>{titleText}</h1>
        <h3>{secondaryText}</h3>
    </div>
);
As opposed to:
import React from 'react';

export default props => (
    <div>
        <h1>{props.titleText}</h1>
        <h3>{props.secondaryText}</h3>
    </div>
);
In both cases, we can set default values to the properties as well:
const personOne = {
    name:  'User One',
    password:  'BCrypt Hash'
};

const personTwo = {
    password:  'BCrypt Hash'
};

const createUser = ({ name = 'Anonymous', password }) => {
    if (!password) throw  new  Error('InvalidArgumentException');

    console.log(name);
    console.log(password);

    return {
        id: Math.random().toString(36) // <--- Should follow RFC 4122 Spec in real app.
                .substring(2, 15) + Math.random()
                .toString(36).substring(2, 15),
        name: name,        // <-- We’ll discuss this next.
        password: password // <-- We’ll discuss this next.
    };
}

createUser(personOne); // User One, BCrypt Hash
createUser(personTwo); // Anonymous, BCrypt Hash
As you can see, in the event that name is not present when destructured, we provide it a default value. We can do this with the previous syntax as well:
const { a, b, c = 'Default' } = { a: 'dataA', b: 'dataB' };
console.log(a); // dataA
console.log(b); // dataB
console.log(c); // Default
Arrays can be destructured too:
const myArr = [4, 3];

// Destructuring happens here.
const [valOne, valTwo] = myArr;

console.log(valOne); // 4
console.log(valTwo); // 3

// ----- Destructuring without assignment: ----- //
let a, b;

// Destructuring happens here.
;([a, b] = [10, 2]);

console.log(a + b); // 12
A practical reason for array destructuring occurs with React Hooks. (And there are many other reasons, I’m just using React as an example).
import React, { useState } from "react";

export default () => {
  const [buttonText, setButtonText] = useState("Default");

  return (
    <button onClick={() => setButtonText("Toggled")}>
      {buttonText}
    </button>
  );
}
Notice useState is being destructured off the export, and the array functions/values are being destructured off the useState hook. Again, don’t worry if the above doesn’t make sense — you’d have to understand React — and I’m merely using it as an example.
While there is more to ES6 Object Destructuring, I’ll cover one more topic here: Destructuring Renaming, which is useful to prevent scope collisions or variable shadows, etc. Suppose we want to destructure a property called name from an object called person, but there is already a variable by the name of name in scope. We can rename on the fly with a colon:
// JS Destructuring Naming Collision Example:
const name = 'Jamie Corkhill';

const person = {
    name: 'Alan Turing'
};

// Rename `name` from `person` to `personName` after destructuring.
const { name: personName } = person;

console.log(name); // Jamie Corkhill <-- As expected.
console.log(personName); // Alan Turing <-- Variable was renamed.
Finally, we can set default values with renaming too:
const name = 'Jamie Corkhill';

const person = {
    location: 'New York City, United States'
};

const { name: personName = 'Anonymous', location } = person;

console.log(name); // Jamie Corkhill
console.log(personName); // Anonymous
console.log(location); // New York City, United States
As you can see, in this case, name from person (person.name) will be renamed to personName and set to the default value of Anonymous if non-existent.
And of course, the same can be performed in function signatures:
const personOne = {
    name:  'User One',
    password:  'BCrypt Hash'
};

const personTwo = {
    password:  'BCrypt Hash'
};

const  createUser  = ({  name: personName =  'Anonymous', password }) => {
    if (!password) throw  new  Error('InvalidArgumentException');
    console.log(personName);
    console.log(password);

    return {
        id: Math.random().toString(36).substring(2, 15) + Math.random().toString(36).substring(2, 15),
        name: personName,
        password: password // <-- We’ll discuss this next.
    };
}

createUser(personOne); // User One, BCrypt Hash
createUser(personTwo); // Anonymous, BCrypt Hash
ES6 Object Shorthand
Suppose you have the following factory: (we’ll cover factories later)
const createPersonFactory = (name, location, position) => ({
    name: name,
    location: location,
    position: position
});
One might use this factory to create a person object, as follows. Also, note that the factory is implicitly returning an object, evident by the parentheses around the brackets of the Arrow Function.
const person = createPersonFactory('Jamie', 'Texas', 'Developer');
console.log(person); // { ... }
That’s what we already know from the ES5 Object Literal Syntax. Notice, however, in the factory function, that the value of each property is the same name as the property identifier (key) itself. That is — location: location or name: name. It turned out that that was a pretty common occurrence with JS developers.
With the shorthand syntax from ES6, we may achieve the same result by rewriting the factory as follows:
const createPersonFactory = (name, location, position) => ({
    name,
    location,
    position
});

const person = createPersonFactory('Jamie', 'Texas', 'Developer');
console.log(person);
Producing the output:
{ name: 'Jamie', location: 'Texas', position: 'Developer' }It’s important to realize that we can only use this shorthand when the object we wish to create is being dynamically created based on variables, where the variable names are the same as the names of the properties to which we want the variables assigned.
This same syntax works with object values:
const createPersonFactory = (name, location, position, extra) => ({
    name,
    location,
    position,
    extra        // <- right here.
});

const extra = {
    interests: [
        'Mathematics',
        'Quantum Mechanics',
        'Spacecraft Launch Systems'
    ],
    favoriteLanguages: [
        'JavaScript',
        'C#'
    ]
};

const person = createPersonFactory('Jamie', 'Texas', 'Developer', extra);
console.log(person);
Producing the output:
{
    name: 'Jamie',
    location: 'Texas',
    position: 'Developer',
    extra: {
        interests: [
            'Mathematics',
            'Quantum Mechanics',
            'Spacecraft Launch Systems'
        ],
        favoriteLanguages: [ 'JavaScript', 'C#' ]
     }
}
As a final example, this works with object literals as well:
const id = '314159265358979';
const name = 'Archimedes of Syracuse';
const location = 'Syracuse';

const greatMathematician = {
    id,
    name,
    location
};
ES6 Spread Operator (…)
The Spread Operator permits us to do a variety of things, some of which we’ll discuss here.
Firstly, we can spread out properties from one object on to another object:
const myObjOne = { a: 'a', b: 'b' };
const myObjTwo = { ...myObjOne }:
This has the effect of placing all properties on myObjOne onto myObjTwo, such that myObjTwo is now { a: 'a', b: 'b' }. We can use this method to override previous properties. Suppose a user wants to update their account:
const user = {
    name: 'John Doe',
    email: 'john@domain.com',
    password: '',
    bio: 'Lorem ipsum'
};

const updates = {
    password: '',
    bio: 'Ipsum lorem',
    email: 'j@domain.com'
};

const updatedUser = {
    ...user,    // <- original
    ...updates  // <- updates
};

console.log(updatedUser);

/*
 {
     name: 'John Doe',
     email: 'j@domain.com',    // Updated
     password: '',   // Updated
     bio: 'Ipsum lorem'
 }
 */
The same can be performed with arrays:
const apollo13Astronauts = ['Jim', 'Jack', 'Fred'];
const apollo11Astronauts = ['Neil', 'Buz', 'Michael'];

const unionOfAstronauts = [...apollo13Astronauts, ...apollo11Astronauts];

console.log(unionOfAstronauts);
// ['Jim', 'Jack', 'Fred', 'Neil', 'Buz, 'Michael'];
Notice here that we created a union of both sets (arrays) by spreading the arrays out into a new array.
There is a lot more to the Rest/Spread Operator, but it is out of scope for this article. It can be used to attain multiple arguments to a function, for example. If you want to learn more, view the MDN Documentation here.
ES6 Async/Await
Async/Await is a syntax to ease the pain of promise chaining.
The await reserved keyword permits you to “await” the settling of a promise, but it may only be used in functions marked with the async keyword. Suppose I have a function that returns a promise. In a new async function, I can await the result of that promise instead of using .then and .catch.
// Returns a promise.
const myFunctionThatReturnsAPromise = () => {
    return new Promise((resolve, reject) => {
        setTimeout(() => resolve('Hello'), 3000);
    });
}

const myAsyncFunction = async () => {
    const promiseResolutionResult = await myFunctionThatReturnsAPromise();
    console.log(promiseResolutionResult);
};

// Writes the log statement after three seconds.
myAsyncFunction();
There are a few things to note here. When we use await in an async function, only the resolved value goes into the variable on the left-hand side. If the function rejects, that’s an error that we have to catch, as we’ll see in a moment. Additionally, any function marked async will, by default, return a promise.
Let’s suppose I needed to make two API calls, one with the response from the former. Using promises and promise chaining, you might do it this way:
const makeAPICall = route => new  Promise((resolve, reject) => {
    console.log(route)
    resolve(route);
});

const main = () => {
    makeAPICall('/whatever')
        .then(response => makeAPICall(response + ' second call'))
        .then(response => console.log(response + ' logged'))
        .catch(err => console.error(err))
};

main();

// Result:
/*
/whatever
/whatever second call
/whatever second call logged
*/
What’s happening here is that we first call makeAPICall passing to it /whatever, which gets logged the first time. The promise resolves with that value. Then we call makeAPICall again, passing to it /whatever second call, which gets logged, and again, the promise resolves with that new value. Finally, we take that new value /whatever second call which the promise just resolved with, and log it ourselves in the final log, appending on logged at the end. If this doesn’t make sense, you should look into promise chaining.
Using async/await, we can refactor to the following:
const main = async () => {
    const resultOne = await makeAPICall('/whatever');
    const resultTwo = await makeAPICall(resultOne + ' second call');
    console.log(resultTwo + ' logged');
};
Here is what will happen. The entire function will stop executing at the very first await statement until the promise from the first call to makeAPICall resolves, upon resolution, the resolved value will be placed in resultOne. When that happens, the function will move to the second await statement, again pausing right there for the duration of the promise settling. When the promise resolves, the resolution result will be placed in resultTwo. If the idea about function execution sounds blocking, fear not, it’s still asynchronous, and I’ll discuss why in a minute.
This only depicts the “happy” path. In the event that one of the promises reject, we can catch that with try/catch, for if the promise rejects, an error will be thrown — which will be whatever error the promise rejected with.
const main = async () => {
    try {
        const resultOne = await makeAPICall('/whatever');
        const resultTwo = await makeAPICall(resultOne + ' second call');
        console.log(resultTwo + ' logged');
    } catch (e) {
        console.log(e)
    }
};
As I said earlier, any function declared async will return a promise. So, if you want to call an async function from another function, you can use normal promises, or await if you declare the calling function async. However, if you want to call an async function from top-level code and await its result, then you’d have to use .then and .catch.
For example:
const returnNumberOne = async () => 1;

returnNumberOne().then(value => console.log(value)); // 1
Or, you could use an Immedieately Invoked Function Expression (IIFE):
(async () => {
    const value = await returnNumberOne();
    console.log(value); // 1
})();
When you use await in an async function, the execution of the function will stop at that await statement until the promise settles. However, all other functions are free to proceed with execution, thus no extra CPU resources are allocated nor is the thread ever blocked. I’ll say that again — operations in that specific function at that specific time will stop until the promise settles, but all other functions are free to fire. Consider an HTTP Web Server — on a per-request basis, all functions are free to fire for all users concurrently as requests are made, it’s just that the async/await syntax will provide the illusion that an operation is synchronous and blocking as to make promises easier to work with, but again, everything will remain nice and async.
This isn’t all there is to async/await, but it should help you to grasp the basic principles.
Classical OOP Factories
We are now going to leave the JavaScript world and enter the Java world. There can come a time when the creation process of an object (in this case, an instance of a class — again, Java) is fairly complex or when we want to have different objects produced based upon a series of parameters. An example might be a function that creates different error objects. A factory is a common design pattern in Object-Oriented Programming and is basically a function that creates objects. To explore this, let us move away from JavaScript into the world of Java. This will make sense to developers who come from a Classical OOP (i.e, not prototypal), statically typed language background. If you are not one such developer, feel free to skip this section. This is a small deviation, and so if following along here interrupts your flow of JavaScript, then again, please skip this section.
A common creational pattern, the Factory Pattern permits us to create objects without exposing the required business logic to perform said creation.
Suppose we are writing a program that permits us to visualize primitive shapes in n-dimensions. If we provide a cube, for example, we’d see a 2D cube (a square), a 3D cube (a cube), and a 4D cube (a Tesseract, or Hypercube). Here is how this might be done, trivially, and barring the actual drawing part, in Java.
// Main.java

// Defining an interface for the shape (can be used as a base type)
interface IShape {
    void draw();
}

// Implementing the interface for 2-dimensions:
class TwoDimensions implements IShape {
    @Override
    public void draw() {
        System.out.println("Drawing a shape in 2D.");
    }
}

// Implementing the interface for 3-dimensions:
class ThreeDimensions implements IShape {
    @Override
    public void draw() {
        System.out.println("Drawing a shape in 3D.");
    }
}

// Implementing the interface for 4-dimensions:
class FourDimensions implements IShape {
    @Override
    public void draw() {
        System.out.println("Drawing a shape in 4D.");
    }
}

// Handles object creation
class ShapeFactory {
    // Factory method (notice return type is the base interface)
    public IShape createShape(int dimensions) {
        switch(dimensions) {
            case 2:
                return new TwoDimensions();
            case 3:
                return new ThreeDimensions();
            case 4:
                return new FourDimensions();
            default:
                throw new IllegalArgumentException("Invalid dimension.");
        }
    }
}

// Main class and entry point.
public class Main {
    public static void main(String[] args) throws Exception {
        ShapeFactory shapeFactory = new ShapeFactory();
        IShape fourDimensions = shapeFactory.createShape(4);
        fourDimensions.draw(); // Drawing a shape in 4D.
    }
}
As you can see, we define an interface that specifies a method for drawing a shape. By having the different classes implement the interface, we can guarantee that all shapes can be drawn (for they all must have an overridable draw method as per the interface definition). Considering this shape is drawn differently depending upon the dimensions within which it’s viewed, we define helper classes that implement the interface as to perform the GPU intensive work of simulating n-dimensional rendering. ShapeFactory does the work of instantiating the correct class — the createShape method is a factory, and like the definition above, it is a method that returns an object of a class. The return type of createShape is the IShape interface because the IShape interface is the base type of all shapes (because they have a draw method).
This Java example is fairly trivial, but you can easily see how useful it becomes in larger applications where the setup to create an object might not be so simple. An example of this would be a video game. Suppose the user has to survive different enemies. Abstract classes and interfaces might be used to define core functions available to all enemies (and methods that can be overridden), perhaps employing the delegation pattern (favor composition over inheritance as the Gang of Four suggested so you don’t get locked into extending a single base class and to make testing/mocking/DI easier). For enemy objects instantiated in different ways, the interface would permit factory object creation while relying on the generic interface type. This would be very relevant if the enemy was created dynamically.
Another example is a builder function. Suppose we utilize the Delegation Pattern to have a class delegate work to other classes that honor an interface. We could place a static build method on the class to have it construct its own instance (assuming you were not using a Dependency Injection Container/Framework). Instead of having to call each setter, you can do this:
public class User {
    private IMessagingService msgService;
    private String name;
    private int age;

    public User(String name, int age, IMessagingService msgService) {
        this.name = name;
        this.age = age;
        this.msgService = msgService;
    }

    public static User build(String name, int age) {
        return new User(name, age, new SomeMessageService());
    }
}
I’ll be explaining the Delegation Pattern in a later article if you’re not familiar with it — basically, through Composition and in terms of object-modeling, it creates a “has-a” relationship instead of an “is-a” relationship as you’d get with inheritance. If you have a Mammal class and a Dog class, and Dog extends Mammal, then a Dog is-a Mammal. Whereas, if you had a Bark class, and you just passed instances of Bark into the constructor of Dog, then Dog has-a Bark. As you might imagine, this especially makes unit testing easier, for you can inject mocks and assert facts about the mock as long as mock honors the interface contract in the testing environment.
The static “build” factory method above simply creates a new object of User and passes a concrete MessageService in. Notice how this follows from the definition above — not exposing the business logic to create an object of a class, or, in this case, not exposing the creation of the messaging service to the caller of the factory.
Again, this is not necessarily how you would do things in the real world, but it presents the idea of a factory function/method quite well. We might use a Dependency Injection container instead, for example. Now back to JavaScript.
Starting With Express
Express is a Web Application Framework for Node (available via an NPM Module) that permits one to create an HTTP Web Server. It’s important to note that Express is not the only framework to do this (there exists Koa, Fastify, etc.), and that, as seen in the previous article, Node can function without Express as a stand-alone entity. (Express is merely a module that was designed for Node — Node can do many things without it, although Express is popular for Web Servers).
Again, let me make a very important distinction. There is a dichotomy present between Node/JavaScript and Express. Node, the runtime/environment within which you run JavaScript, can do many things — such as permitting you to build React Native apps, desktop apps, command-line tools, etc. — Express is nothing but a lightweight framework that permits you to use Node/JS to build web servers as opposed to dealing with Node’s low-level network and HTTP APIs. You don’t need Express to build a web server.
Before starting this section, if you are not familiar with HTTP and HTTP Requests (GET, POST, etc.), then I encourage you to read the corresponding section of my former article, which is linked above.
Using Express, we’ll set up different routes to which HTTP Requests may be made, as well as the related endpoints (which are callback functions) that will fire when a request is made to that route. Don’t worry if routes and endpoints are currently non-sensical — I’ll be explaining them later.
Unlike other articles, I’ll take the approach of writing the source code as we go, line-by-line, rather than dumping the entire codebase into one snippet and then explaining later. Let’s begin by opening a terminal (I’m using Terminus on top of Git Bash on Windows — which is a nice option for Windows users who want a Bash Shell without setting up the Linux Subsystem), setting up our project’s boilerplate, and opening it in Visual Studio Code.
mkdir server && cd server
touch server.js
npm init -y
npm install express
code .
Inside the server.js file, I’ll begin by requiring express using the require() function.
const express = require('express');require('express') tells Node to go out and get the Express module we installed earlier, which is currently inside the node_modules folder (for that’s what npm install does — create a node_modules folder and puts modules and their dependencies in there). By convention, and when dealing with Express, we call the variable that holds the return result from require('express') express, although it may be called anything.
This returned result, which we have called express, is actually a function — a function we’ll have to invoke to create our Express app and set up our routes. Again, by convention, we call this app — app being the return result of express() — that is, the return result of calling the function that has the name express as express().
const express = require('express');
const app = express();

// Note that the above variable names are the convention, but not required.
// An example such as that below could also be used.

const foo = require('express');
const bar = foo();

// Note also that the node module we installed is called express.
The line const app = express(); simply puts a new Express Application inside of the app variable. It calls a function named express (the return result of require('express')) and stores its return result in a constant named app. If you come from an object-oriented programming background, consider this equivalent to instantiating a new object of a class, where app would be the object and where express() would call the constructor function of the express class. Remember, JavaScript allows us to store functions in variables — functions are first-class citizens. The express variable, then, is nothing more than a mere function. It’s provided to us by the developers of Express.
I apologize in advance if I’m taking a very long time to discuss what is actually very basic, but the above, although primitive, confused me quite a lot when I was first learning back-end development with Node.
Inside the Express source code, which is open-source on GitHub, the variable we called express is a function entitled createApplication, which, when invoked, performs the work necessary to create an Express Application:
A snippet of Express source code:
exports  =  module.exports  = createApplication;

/*
 * Create an express application
 */

// This is the function we are storing in the express variable. (- Jamie)
function createApplication() {

   // This is what I mean by "Express App" (- Jamie)
   var app = function(req, res, next) {

      app.handle(req, res, next);

   };

   mixin(app, EventEmitter.prototype, false);
   mixin(app, proto, false);

   // expose the prototype that will get set on requests

   app.request = Object.create(req, {

      app: { configurable: true, enumerable: true, writable: true, value: app      }

   })

   // expose the prototype that will get set on responses

   app.response = Object.create(res, {

      app: { configurable: true, enumerable: true, writable: true, value: app }

   })

   app.init();

   // See - `app` gets returned. (- Jamie)
   return app;
}
GitHub: https://github.com/expressjs/express/blob/master/lib/express.js
With that short deviation complete, let’s continue setting up Express. Thus far, we have required the module and set up our app variable.
const express = require('express');
const app = express();
From here, we have to tell Express to listen on a port. Any HTTP Requests made to the URL and Port upon which our application is listening will be handled by Express. We do that by calling app.listen(...), passing to it the port and a callback function which gets called when the server starts running:
const PORT = 3000;

app.listen(PORT, () => console.log(`Server is up on port {PORT}.`));
We notate the PORT variable in capital by convention, for it is a constant variable that will never change. You could do that with all variables that you declare const, but that would look messy. It’s up to the developer or development team to decide on notation, so we’ll use the above sparsely. I use const everywhere as a method of “defensive coding” — that is, if I know that a variable is never going to change then I might as well just declare it const. Since I define everything const, I make the distinction between what variables should remain the same on a per-request basis and what variables are true actual global constants.
Here is what we have thus far:
const express = require('express');
const app = express();

const PORT = 3000;

// We will build our API here.
// ...

// Binding our application to port 3000.
app.listen(PORT, () => {
   console.log(`Server is up on port ${PORT}.`);
});
Let’s test this to see if the server starts running on port 3000.
I’ll open a terminal and navigate to our project’s root directory. I’ll then run node server/server.js. Note that this assumes you have Node already installed on your system (You can check with node -v).
If everything works, you should see the following in the terminal:
Server is up on port 3000.
Go ahead and hit Ctrl + C to bring the server back down.
If this doesn’t work for you, or if you see an error such as EADDRINUSE, then it means you may have a service already running on port 3000. Pick another port number, like 3001, 3002, 5000, 8000, etc. Be aware, lower number ports are reserved and there is an upper bound of 65535.
At this point, it’s worth taking another small deviation as to understand servers and ports in the context of computer networking. We’ll return to Express in a moment. I take this approach, rather than introducing servers and ports first, for the purpose of relevance. That is, it is difficult to learn a concept if you fail to see its applicability. In this way, you are already aware of the use case for ports and servers with Express, so the learning experience will be more pleasurable.
A Brief Look At Servers And Ports
A server is simply a computer or computer program that provides some sort of “functionality” to the clients that talk to it. More generally, it’s a device, usually connected to the Internet, that handles connections in a pre-defined manner. In our case, that “pre-defined manner” will be HTTP or the HyperText Transfer Protocol. Servers that use the HTTP Protocol are called Web Servers.
When building an application, the server is a critical component of the “client-server model”, for it permits the sharing and syncing of data (generally via databases or file systems) across devices. It’s a cross-platform approach, in a way, for the SDKs of platforms against which you may want to code — be they web, mobile, or desktop — all provide methods (APIs) to interact with a server over HTTP or TCP/UDP Sockets. It’s important to make a distinction here — by APIs, I mean programming language constructs to talk to a server, like XMLHttpRequest or the Fetch API in JavaScript, or HttpUrlConnection in Java, or even HttpClient in C#/.NET. This is different from the kind of REST API we’ll be building in this article to perform CRUD Operations on a database.
To talk about ports, it’s important to understand how clients connect to a server. A client requires the IP Address of the server and the Port Number of our specific service on that server. An IP Address, or Internet Protocol Address, is just an address that uniquely identifies a device on a network. Public and private IPs exist, with private addresses commonly used behind a router or Network Address Translator on a local network. You might see private IP Addresses of the form 192.168.XXX.XXX or 10.0.XXX.XXX. When articulating an IP Address, decimals are called “dots”. So 192.168.0.1 (a common router IP Addr.) might be pronounced, “one nine two dot one six eight dot zero dot one”. (By the way, if you’re ever in a hotel and your phone/laptop won’t direct you to the AP captive portal, try typing 192.168.0.1 or 192.168.1.1 or similar directly into Chrome).
For simplicity, and since this is not an article about the complexities of computer networking, assume that an IP Address is equivalent to a house address, allowing you to uniquely identify a house (where a house is analogous to a server, client, or network device) in a neighborhood. One neighborhood is one network. Put together all of the neighborhoods in the United States, and you have the public Internet. (This is a basic view, and there are many more complexities — firewalls, NATs, ISP Tiers (Tier One, Tier Two, and Tier Three), fiber optics and fiber optic backbones, packet switches, hops, hubs, etc., subnet masks, etc., to name just a few — in the real networking world.) The traceroute Unix command can provide more insight into the above, displaying the path (and associated latency) that packets take through a network as a series of “hops”.
A Port Number identifies a specific service running on a server. SSH, or Secure Shell, which permits remote shell access to a device, commonly runs on port 22. FTP or File Transfer Protocol (which might, for example, be used with an FTP Client to transfer static assets to a server) commonly runs on Port 21. We might say, then, that ports are specific rooms inside each house in our analogy above, for rooms in houses are made for different things — a bedroom for sleeping, a kitchen for food preparation, a dining room for consumption of said food, etc., just like ports correspond to programs that perform specific services. For us, Web Servers commonly run on Port 80, although you are free to specify whichever Port Number you wish as long they are not in use by some other service (they can’t collide).
In order to access a website, you need the IP Address of the site. Despite that, we normally access websites via a URL. Behind the scenes, a DNS, or Domain Name Server, converts that URL into an IP Address, allowing the browser to make a GET Request to the server, get the HTML, and render it to the screen. 8.8.8.8 is the address of one of Google’s Public DNS Servers. You might imagine that requiring the resolution of a hostname to an IP Address via a remote DNS Server will take time, and you’d be right. To reduce latency, Operating Systems have a DNS Cache — a temporary database that stores DNS lookup information, thereby reducing the frequency of which said lookups must occur. The DNS Resolver Cache can be viewed on Windows with the ipconfig /displaydns CMD command and purged via the ipconfig /flushdns command.
On a Unix Server, more common lower number ports, like 80, require root level (escalated if you come from a Windows background) privileges. For that reason, we’ll be using port 3000 for our development work, but will allow the server to choose the port number (whatever is available) when we deploy to our production environment.
Finally, note that we can type IP Addresses directly in Google Chrome’s search bar, thus bypassing the DNS Resolution mechanism. Typing 216.58.194.36, for example, will take you to Google.com. In our development environment, when using our own computer as our dev server, we’ll be using localhost and port 3000. An address is formatted as hostname:port, so our server will be up on localhost:3000. Localhost, or 127.0.0.1, is the loopback address, and means the address of “this computer”. It is a hostname, and its IPv4 address resolves to 127.0.0.1. Try pinging localhost on your machine right now. You might get ::1 back — which is the IPv6 loopback address, or 127.0.0.1 back — which is the IPv4 loopback address. IPv4 and IPv6 are two different IP Address formats associated with different standards — some IPv6 addresses can be converted to IPv4 but not all.
Returning To Express
I mentioned HTTP Requests, Verbs, and Status Codes in my previous article, Get Started With Node: An Introduction To APIs, HTTP And ES6+ JavaScript. If you do not have a general understanding of the protocol, feel free to jump to the “HTTP and HTTP Requests” section of that piece.
In order to get a feel for Express, we are simply going to set up our endpoints for the four fundamental operations we’ll be performing on the database — Create, Read, Update, and Delete, known collectively as CRUD.
Remember, we access endpoints by routes in the URL. That is, although the words “route” and “endpoint” are commonly used interchangeably, an endpoint is technically a programming language function (like ES6 Arrow Functions) that performs some server-side operation, while a route is what the endpoint is located behind of. We specify these endpoints as callback functions, which Express will fire when the appropriate request is made from the client to the route behind which the endpoint lives. You can remember the above by realizing that it is endpoints that perform a function and the route is the name that is used to access the endpoints. As we’ll see, the same route can be associated with multiple endpoints by using different HTTP Verbs (similar to method overloading if you come from a classical OOP background with Polymorphism).
Keep in mind, we are following REST (REpresentational State Transfer) Architecture by permitting clients to make requests to our server. This is, after all, a REST or RESTful API. Specific requests made to specific routes will fire specific endpoints which will do specific things. An example of such a “thing” that an endpoint might do is adding new data to a database, removing data, updating data, etc.
Express knows what endpoint to fire because we tell it, explicitly, the request method (GET, POST, etc.) and the route — we define what functions to fire for specific combinations of the above, and the client makes the request, specifying a route and method. To put this more simply, with Node, we’ll tell Express — “Hey, if someone makes a GET Request to this route, then go ahead and fire this function (use this endpoint)”. Things can get more complicated: “Express, if someone makes a GET Request to this route, but they don’t send up a valid Authorization Bearer Token in the header of their request, then please respond with an HTTP 401 Unauthorized. If they do possess a valid Bearer Token, then please send down whatever protected resource they were looking for by firing the endpoint. Thanks very much and have a nice day.” Indeed, it’d be nice if programming languages could be that high level without leaking ambiguity, but it nonetheless demonstrates the basic concepts.
Remember, the endpoint, in a way, lives behind the route. So it’s imperative that the client provides, in the header of the request, what method it wants to use so that Express can figure out what to do. The request will be made to a specific route, which the client will specify (along with the request type) when contacting the server, allowing Express to do what it needs to do and us to do what we need to do when Express fires our callbacks. That’s what it all comes down to.
In the code examples earlier, we called the listen function which was available on app, passing to it a port and callback. app itself, if you remember, is the return result from calling the express variable as a function (that is, express()), and the express variable is what we named the return result from requiring 'express' from our node_modules folder. Just like listen is called on app, we specify HTTP Request Endpoints by calling them on app. Let’s look at GET:
app.get('/my-test-route', () => {
   // ...
});
The first parameter is a string, and it is the route behind which the endpoint will live. The callback function is the endpoint. I’ll say that again: the callback function — the second parameter — is the endpoint that will fire when an HTTP GET Request is made to whatever route we specify as the first argument (/my-test-route in this case).
Now, before we do any more work with Express, we need to know how routes work. The route we specify as a string will be called by making the request to www.domain.com/the-route-we-chose-earlier-as-a-string. In our case, the domain is localhost:3000, which means, in order to fire the callback function above, we have to make a GET Request to localhost:3000/my-test-route. If we used a different string as the first argument above, the URL would have to be different to match what we specified in JavaScript.
When talking about such things, you’ll likely hear of Glob Patterns. We could say that all of our API’s routes are located at the localhost:3000/** Glob Pattern, where ** is a wildcard meaning any directory or sub-directory (note that routes are not directories) to which root is a parent — that is, everything.
Let’s go ahead and add a log statement into that callback function so that altogether we have:
// Getting the module from node_modules.
const express = require('express');

// Creating our Express Application.
const app = express();

// Defining the port we’ll bind to.
const PORT = 3000;

// Defining a new endpoint behind the "/my-test-route" route.
app.get('/my-test-route', () => {
   console.log('A GET Request was made to /my-test-route.');
});

// Binding the server to port 3000.
app.listen(PORT, () => {
   console.log(`Server is up on port ${PORT}.`)
});
We’ll get our server up and running by executing node server/server.js (with Node installed on our system and accessible globally from system environment variables) in the project’s root directory. Like earlier, you should see the message that the server is up in the console. Now that the server is running, open a browser, and visit localhost:3000 in the URL bar.
You should be greeted with an error message that states Cannot GET /. Press Ctrl + Shift + I on Windows in Chrome to view the developer console. In there, you should see that we have a 404 (Resource not found). That makes sense — we have only told the server what to do when someone visits localhost:3000/my-test-route. The browser has nothing to render at localhost:3000 (which is equivalent to localhost:3000/ with a slash).
If you look at the terminal window where the server is running, there should be no new data. Now, visit localhost:3000/my-test-route in your browser’s URL bar. You might see the same error in Chrome’s Console (because the browser is caching the content and still has no HTML to render), but if you view your terminal where the server process is running, you’ll see that the callback function did indeed fire and the log message was indeed logged.
Shut down the server with Ctrl + C.
Now, let’s give the browser something to render when a GET Request is made to that route so we can lose the Cannot GET / message. I’m going to take our app.get() from earlier, and in the callback function, I’m going to add two arguments. Remember, the callback function we are passing in is getting called by Express behind the scenes, and Express can add whatever arguments it wants. It actually adds two (well, technically three, but we’ll see that later), and while they are both extremely important, we don’t care about the first one for now. The second argument is called res, short for response, and I’ll access it by setting undefined as the first parameter:
app.get('/my-test-route', (undefined, res) => {
    console.log('A GET Request was made to /my-test-route.');
});
Again, we can call the res argument whatever we want, but res is convention when dealing with Express. res is actually an object, and upon it exist different methods for sending data back to the client. In this case, I’m going to access the send(...) function available on res to send back HTML which the browser will render. We are not limited to sending back HTML, however, and can choose to send back text, a JavaScript Object, a stream (streams are especially beautiful), or whatever.
app.get('/my-test-route', (undefined, res) => {
    console.log('A GET Request was made to /my-test-route.');
    res.send('<h1>Hello, World!</h1>');
});
If you shut down the server and then bring it back up, and then refresh your browser at the /my-test-route route, you’ll see the HTML get rendered.
The Network Tab of the Chrome Developer Tools will allow you to see this GET Request with more detail as it pertains to headers.
At this point, it’ll serve us well to start learning about Express Middleware — functions that can be fired globally after a client makes a request.
Express Middleware
Express provides methods by which to define custom middleware for your application. Indeed, the meaning of Express Middleware is best defined in the Express Docs, here)
Middleware functions are functions that have access to the request object (
req), the response object (res), and the next middleware function in the application’s request-response cycle. The next middleware function is commonly denoted by a variable namednext.
Middleware functions can perform the following tasks:
- Execute any code.
- Make changes to the request and the response objects.
- End the request-response cycle.
- Call the next middleware function in the stack.
In other words, a middleware function is a custom function that we (the developer) can define, and that will act as an intermediary between when Express receives the request and when our appropriate callback function fires. We might make a log function, for example, that will log every time a request is made. Note that we can also choose to make these middleware functions fire after our endpoint has fired, depending upon where you place it in the stack — something we’ll see later.
In order to specify custom middleware, we have to define it as a function and pass it into app.use(...).
const myMiddleware = (req, res, next) => {
    console.log(`Middleware has fired at time ${Date().now}`);
    next();
}

app.use(myMiddleware); // This is the app variable returned from express().
All together, we now have:
// Getting the module from node_modules.
const express =  require('express');

// Creating our Express Application.
const app =  express();

// Our middleware function.
const myMiddleware = (req, res, next) => {
    console.log(`Middleware has fired at time ${Date().now}`);
    next();
}

// Tell Express to use the middleware.
app.use(myMiddleware);

// Defining the port we’ll bind to.
const PORT =  3000;

// Defining a new endpoint behind the "/my-test-route" route.
app.get('/my-test-route', () => {
    console.log('A GET Request was made to /my-test-route.');
});

// Binding the server to port 3000.
app.listen(PORT, () => {
    console.log(`Server is up on port ${PORT}.`)
});
If you make the requests through the browser again, you should now see that your middleware function is firing and logging timestamps. To foster experimentation, try removing the call to the next function and see what happens.
The middleware callback function gets called with three arguments, req, res, and next. req is the parameter we skipped over when building out the GET Handler earlier, and it is an object containing information regarding the request, such as headers, custom headers, parameters, and any body that might have been sent up from the client (such as you do with a POST Request). I know we are talking about middleware here, but both the endpoints and the middleware function get called with req and res. req and res will be the same (unless one or the other mutates it) in both the middleware and the endpoint within the scope of a single request from the client. That means, for example, you could use a middleware function to sanitize data by stripping any characters that might be aimed at performing SQL or NoSQL Injections, and then handing the safe req to the endpoint.
res, as seen earlier, permits you to send data back to the client in a handful of different ways.
next is a callback function that you have to execute when the middleware has finished doing its job in order to call the next middleware function in the stack or the endpoint. Be sure to take note that you will have to call this in the then block of any async functions you fire in the middleware. Depending on your async operation, you may or may not want to call it in the catch block. That is, the myMiddleware function fires after the request is made from the client but before the endpoint function of the request is fired. When we execute this code and make a request, you should see the Middleware has fired... message before the A GET Request was made to... message in the console. If you don’t call next(), the latter part will never run — your endpoint function to the request will not fire.
Note also that I could have defined this function anonymously, as such (a convention to which I’ll be sticking):
app.use((req, res, next) => {
    console.log(`Middleware has fired at time ${Date().now}`);
    next();
});
For anyone new to JavaScript and ES6, if the way in which the above works does not make immediate sense, the below example should help. We are simply defining a callback function (the anonymous function) which takes another callback function (next) as an argument. We call a function that takes a function argument a Higher Order Function. Look at it the below way — it depicts a basic example of how the Express Source Code might work behind the scenes:
console.log('Suppose a request has just been made from the client.\n');

// This is what (it’s not exactly) the code behind app.use() might look like.
const use = callback => {
    // Simple log statement to see where we are.
    console.log('Inside use() - the "use" function has been called.');

    // This depicts the termination of the middleware.
    const next = () => console.log('Terminating Middleware!\n');

    // Suppose req and res are defined above (Express provides them).
    const req = res = null;

    // "callback" is the "middleware" function that is passed into "use".
    // "next" is the above function that pretends to stop the middleware.
    callback(req, res, next);
};

// This is analogous to the middleware function we defined earlier.
// It gets passed in as "callback" in the "use" function above.
const myMiddleware = (req, res, next) => {
    console.log('Inside the myMiddleware function!');
    next();
}

// Here, we are actually calling "use()" to see everything work.
use(myMiddleware);

console.log('Moving on to actually handle the HTTP Request or the next middleware function.');
We first call use which takes myMiddleware as an argument. myMiddleware, in and of itself, is a function which takes three arguments - req, res, and next. Inside use, myMiddlware is called, and those three arguments are passed in. next is a function defined in use. myMiddleware is defined as callback in the use method. If I’d placed use, in this example, on an object called app, we could have mimicked Express’s setup entirely, albeit without any sockets or network connectivity.
In this case, both myMiddleware and callback are Higher Order Functions, because they both take functions as arguments.
If you execute this code, you will see the following response:
Suppose a request has just been made from the client.

Inside use() - the "use" function has been called.
Inside the middleware function!
Terminating Middleware!

Moving on to actually handle the HTTP Request or the next middleware function.
Note that I could have also used anonymous functions to achieve the same result:
console.log('Suppose a request has just been made from the client.');

// This is what (it’s not exactly) the code behind app.use() might look like.
const use = callback => {
    // Simple log statement to see where we are.
    console.log('Inside use() - the "use" function has been called.');

    // This depicts the termination of the middlewear.
    const  next  =  ()  => console.log('Terminating Middlewear!');

    // Suppose req and res are defined above (Express provides them).
    const req = res = null;

    // "callback" is the function which is passed into "use".
    // "next" is the above function that pretends to stop the middlewear.
    callback(req, res, () => {
        console.log('Terminating Middlewear!');
    });
};

// Here, we are actually calling "use()" to see everything work.
use((req, res, next) => {
    console.log('Inside the middlewear function!');
    next();
});

console.log('Moving on to actually handle the HTTP Request.');
With that hopefully settled, we can now return to the actual task at hand — setting up our middleware.
The fact of the matter is, you will commonly have to send data up through an HTTP Request. You have a few different options for doing so — sending up URL Query Parameters, sending up data that will be accessible on the req object that we learned about earlier, etc. That object is not only available in the callback to calling app.use(), but also to any endpoint. We used undefined as a filler earlier so we could focus on res to send HTML back to the client, but now, we need access to it.
app.use('/my-test-route', (req, res) => {
    // The req object contains client-defined data that is sent up.
    // The res object allows the server to send data back down.
});
HTTP POST Requests might require that we send a body object up to the server. If you have a form on the client, and you take the user’s name and email, you will likely send that data to the server on the body of the request.
Let’s take a look at what that might look like on the client side:
<!DOCTYPE html>
<html>
    <body>
        <form action="https://localhost:3000/email-list" method="POST" >
            <input type="text" name="nameInput">
            <input type="email" name="emailInput">
            <input type="submit">
       </form>
   </body>
</html>
On the server side:
app.post('/email-list', (req, res) => {
    // What do we now?
    // How do we access the values for the user’s name and email?
});
To access the user’s name and email, we’ll have to use a particular type of middleware. This will put the data on an object called body available on req. Body Parser was a popular method of doing this, available by the Express developers as a standalone NPM module. Now, Express comes pre-packaged with its own middleware to do this, and we’ll call it as so:
app.use(express.urlencoded({ extended: true }));Now we can do:
app.post('/email-list', (req, res) => {
    console.log('User Name: ', req.body.nameInput);
    console.log('User Email: ', req.body.emailInput);
});
All this does is take any user-defined input which is sent up from the client, and makes them available on the body object of req. Note that on req.body, we now have nameInput and emailInput, which are the names of the input tags in the HTML. Now, this client-defined data should be considered dangerous (never, never trust the client), and needs to be sanitized, but we’ll cover that later.
Another type of middleware provided by express is express.json(). express.json is used to package any JSON Payloads sent up in a request from the client onto req.body, while express.urlencoded will package any incoming requests with strings, arrays, or other URL Encoded data onto req.body. In short, both manipulate req.body, but .json() is for JSON Payloads and .urlencoded() is for, among others, POST Query Parameters.
Another way of saying this is that incoming requests with a Content-Type: application/json header (such as specifying a POST Body with the fetch API) will be handled by express.json(), while requests with header Content-Type: application/x-www-form-urlencoded (such as HTML Forms) will be handled with express.urlencoded(). This hopefully now makes sense.
Starting Our CRUD Routes For MongoDB
Note: When performing PATCH Requests in this article, we won’t follow the JSONPatch RFC Spec — an issue we’ll rectify in the next article of this series.
Considering that we understand that we specify each endpoint by calling the relevant function on app, passing to it the route and a callback function containing the request and response objects, we can begin to define our CRUD Routes for the Bookshelf API. Indeed, and considering this is an introductory article, I won’t be taking care to follow HTTP and REST specifications completely, nor will I attempt to use the cleanest possible architecture. That will come in a future article.
I’ll open up the server.js file that we have been using thus far and empty everything out as to start from the below clean slate:
// Getting the module from node_modules.
const express = require('express');

// This creates our Express App.
const app = express();

// Define middleware.
app.use(express.json());
app.use(express.urlencoded({ extended: true ));

// Listening on port 3000 (arbitrary).
// Not a TCP or UDP well-known port.
// Does not require superuser privileges.
const PORT = 3000;

// We will build our API here.
// ...

// Binding our application to port 3000.
app.listen(PORT, () => console.log(`Server is up on port ${PORT}.`));
Consider all following code to take up the // ... portion of the file above.
To define our endpoints, and because we are building a REST API, we should discuss the proper way to name routes. Again, you should take a look at the HTTP section of my former article for more information. We are dealing with books, so all routes will be located behind /books (the plural naming convention is standard).
| Request | Route |
|---|---|
| POST | /books |
| GET | /books/id |
| PATCH | /books/id |
| DELETE | /books/id |
As you can see, an ID does not need to be specified when POSTing a book because we’ll (or rather, MongoDB), will be generating it for us, automatically, server-side. GETting, PATCHing, and DELETing books will all require that we do pass that ID to our endpoint, which we’ll discuss later. For now, let’s simply create the endpoints:
// HTTP POST /books
app.post('/books', (req, res) => {
    // ...
    console.log('A POST Request was made!');
});

// HTTP GET /books/:id
app.get('/books/:id', (req, res) => {
    // ...
    console.log(`A GET Request was made! Getting book ${req.params.id}`);
});

// HTTP PATCH /books/:id
app.patch('/books/:id', (req, res) => {
    // ...
    console.log(`A PATCH Request was made! Updating book ${req.params.id}`);
});

// HTTP DELETE /books/:id
app.delete('/books/:id', (req, res) => {
    // ...
    console.log(`A DELETE Request was made! Deleting book ${req.params.id}`);
});
The :id syntax tells Express that id is a dynamic parameter that will be passed up in the URL. We have access to it on the params object which is available on req. I know “we have access to it on req” sounds like magic and magic (which doesn’t exist) is dangerous in programming, but you have to remember that Express is not a black box. It’s an open-source project available on GitHub under an MIT LIcense. You can easily view it’s source code if you want to see how dynamic query parameters are put onto the req object.
All together, we now have the following in our server.js file:
// Getting the module from node_modules.
const express = require('express');

// This creates our Express App.
const app = express();

// Define middleware.
app.use(express.json());
app.use(express.urlencoded({ extended: true }));

// Listening on port 3000 (arbitrary).
// Not a TCP or UDP well-known port.
// Does not require superuser privileges.
const PORT = 3000;

// We will build our API here.
// HTTP POST /books
app.post('/books', (req, res) => {
    // ...
    console.log('A POST Request was made!');
});

// HTTP GET /books/:id
app.get('/books/:id', (req, res) => {
    // ...
    console.log(`A GET Request was made! Getting book ${req.params.id}`);
});

// HTTP PATCH /books/:id
app.patch('/books/:id', (req, res) => {
    // ...
    console.log(`A PATCH Request was made! Updating book ${req.params.id}`);
});

// HTTP DELETE /books/:id
app.delete('/books/:id', (req, res) => {
    // ...
    console.log(`A DELETE Request was made! Deleting book ${req.params.id}`);
});

// Binding our application to port 3000.
app.listen(PORT, () => console.log(`Server is up on port ${PORT}.`));
Go ahead and start the server, running node server.js from the terminal or command line, and visit your browser. Open the Chrome Development Console, and in the URL (Uniform Resource Locator) Bar, visit localhost:3000/books. You should already see the indicator in your OS’s terminal that the server is up as well as the log statement for GET.
Thus far, we’ve been using a web browser to perform GET Requests. That is good for just starting out, but we’ll quickly find that better tools exist to test API routes. Indeed, we could paste fetch calls directly into the console or use some online service. In our case, and to save time, we’ll use cURL and Postman. I use both in this article (although you could use either or) so that I can introduce them for if you haven’t used them. cURL is a library (a very, very important library) and command-line tool designed to transfer data using various protocols. Postman is a GUI based tool for testing APIs. After following the relevant installation instructions for both tools on your operating system, ensure your server is still running, and then execute the following commands (one-by-one) in a new terminal. It’s important that you type them and execute them individually, and then watch the log message in the separate terminal from your server. Also, note that the standard programming language comment symbol // is not a valid symbol in Bash or MS-DOS. You’ll have to omit those lines, and I only use them here to describe each block of cURL commands.
// HTTP POST Request (Localhost, IPv4, IPv6)
curl -X POST https://localhost:3000/books
curl -X POST https://127.0.0.1:3000/books
curl -X POST https://[::1]:3000/books

// HTTP GET Request (Localhost, IPv4, IPv6)
curl -X GET https://localhost:3000/books/123abc
curl -X GET https://127.0.0.1:3000/books/book-id-123
curl -X GET https://[::1]:3000/books/book-abc123

// HTTP PATCH Request (Localhost, IPv4, IPv6)
curl -X PATCH https://localhost:3000/books/456
curl -X PATCH https://127.0.0.1:3000/books/218
curl -X PATCH https://[::1]:3000/books/some-id

// HTTP DELETE Request (Localhost, IPv4, IPv6)
curl -X DELETE https://localhost:3000/books/abc
curl -X DELETE https://127.0.0.1:3000/books/314
curl -X DELETE https://[::1]:3000/books/217
As you can see, the ID that is passed in as a URL Parameter can be any value. The -X flag specifies the type of HTTP Request (it can be omitted for GET), and we provide the URL to which the request will be made thereafter. I’ve duplicated each request three times, allowing you to see that everything still works whether you use the localhost hostname, the IPv4 Address (127.0.0.1) to which localhost resolves, or the IPv6 Address (::1) to which localhost resolves. Note that cURL requires wrapping IPv6 Addresses in square brackets.
We are in a decent place now — we have the simple structure of our routes and endpoints set up. The server runs correctly and accepts HTTP Requests as we expect it to. Contrary to what you might expect, there is not long to go at this point — we just have to set up our database, host it (using a Database-as-a-Service — MongoDB Atlas), and persist data to it (and perform validation and create error responses).
Setting Up A Production MongoDB Database
To set up a production database, we’ll head over to the MongoDB Atlas Home Page and sign up for a free account. Thereafter, create a new cluster. You can maintain the default settings, picking a fee tier applicable region. Then hit the “Create Cluster” button. The cluster will take some time to create, and then you’ll be able to attain your database URL and password. Take note of these when you see them. We’ll hardcode them for now, and then store them in environment variables later for security purposes. For help in creating and connecting to a cluster, I’ll refer you to the MongoDB Documentation, particularly this page and this page, or you can leave a comment below and I’ll try to help.
Creating A Mongoose Model
It’s recommended that you have an understanding of the meanings of Documents and Collections in the context of NoSQL (Not Only SQL — Structured Query Language). For reference, you might want to read both the Mongoose Quick Start Guide and the MongoDB section of my former article.
We now have a database that is ready to accept CRUD Operations. Mongoose is a Node module (or ODM — Object Document Mapper) that will allow us to perform those operations (abstracting away some of the complexities) as well as set up the schema, or structure, of the database collection.
As an important disclaimer, there is a lot of controversy around ORMs and such patterns as Active Record or Data Mapper. Some developers swear by ORMs and others swear against them (believing they get in the way). It’s also important to note that ORMs abstract a lot away like connection pooling, socket connections, and handling, etc. You could easily use the MongoDB Native Driver (another NPM Module), but it would talk a lot more work. While it’s recommended that you play with the Native Driver before using ORMs, I omit the Native Driver here for brevity. For complex SQL operations on a Relational Database, not all ORMs will be optimized for query speed, and you may end up writing your own raw SQL. ORMs can come into play a lot with Domain-Driven Design and CQRS, among others. They are an established concept in the .NET world, and the Node.js community has not completely caught up yet — TypeORM is better, but it’s not NHibernate or Entity Framework.
To create our Model, I’ll create a new folder in the server directory entitled models, within which I’ll create a single file with the name book.js. Thus far, our project’s directory structure is as follows:
- server
  - node_modules
  - models
    - book.js
  - package.json
  - server.js
Indeed, this directory structure is not required, but I use it here because it’s simple. Allow me to note that this is not at all the kind of architecture you want to use for larger applications (and you might not even want to use JavaScript — TypeScript could be a better option), which I discuss in this article’s closing. The next step will be to install mongoose, which is performed via, as you might expect, npm i mongoose.
The meaning of a Model is best ascertained from the Mongoose documentation:
Models are fancy constructors compiled from
Schemadefinitions. An instance of a model is called a document. Models are responsible for creating and reading documents from the underlying MongoDB database.
Before creating the Model, we’ll define its Schema. A Schema will, among others, make certain expectations about the value of the properties provided. MongoDB is schemaless, and thus this functionality is provided by the Mongoose ODM. Let’s start with a simple example. Suppose I want my database to store a user’s name, email address, and password. Traditionally, as a plain old JavaScript Object (POJO), such a structure might look like this:
const userDocument = {
    name: 'Jamie Corkhill',
    email: 'jamie@domain.com',
    password: 'Bcrypt Hash'
};
If that above object was how we expected our user’s object to look, then we would need to define a schema for it, like this:
const schema = {
    name: {
        type: String,
        trim: true,
        required: true
    },
    email: {
        type: String,
        trim: true,
        required: true
    },
    password: {
        type: String,
        required: true
    }
};
Notice that when creating our schema, we define what properties will be available on each document in the collection as an object in the schema. In our case, that’s name, email, and password. The fields type, trim, required tell Mongoose what data to expect. If we try to set the name field to a number, for example, or if we don’t provide a field, Mongoose will throw an error (because we are expecting a type of String), and we can send back a 400 Bad Request to the client. This might not make sense right now because we have defined an arbitrary schema object. However, the fields of type, trim, and required (among others) are special validators that Mongoose understands. trim, for example, will remove any whitespace from the beginning and end of the string. We’ll pass the above schema to mongoose.Schema() in the future and that function will know what to do with the validators.
Understanding how Schemas work, we’ll create the model for our Books Collection of the Bookshelf API. Let’s define what data we require:
Title
ISBN Number
Author
First Name
Last Name
Publishing Date
Finished Reading (Boolean)
I’m going to create this in the book.js file we created earlier in /models. Like the example above, we’ll be performing validation:
const mongoose = require('mongoose');

// Define the schema:
const mySchema = {
    title: {
        type: String,
        required: true,
        trim: true,
    },
    isbn: {
        type: String,
        required: true,
        trim: true,
    },
    author: {
        firstName:{
            type: String,
            required: true,
            trim: true
        },
        lastName: {
            type: String,
            required: true,
            trim: true
        }
    },
    publishingDate: {
        type: String
    },
    finishedReading: {
        type: Boolean,
        required: true,
        default: false
    }
}
default will set a default value for the property if none is provided — finishedReading for example, although a required field, will be set automatically to false if the client does not send one up.
Mongoose also provides the ability to perform custom validation on our fields, which is done by supplying the validate() method, which attains the value that was attempted to be set as its one and only parameter. In this function, we can throw an error if the validation fails. Here is an example:
// ...
isbn: {
    type: String,
    required: true,
    trim: true,
    validate(value) {
        if (!validator.isISBN(value)) {
            throw new Error('ISBN is invalid.');
        }
    }
}
// ...
Now, if anyone supplies an invalid ISBN to our model, Mongoose will throw an error when trying to save that document to the collection. I’ve already installed the NPM module validator via npm i validator and required it. validator contains a bunch of helper functions for common validation requirements, and I use it here instead of RegEx because ISBNs can’t be validated with RegEx alone due to a tailing checksum. Remember, users will be sending a JSON body to one of our POST routes. That endpoint will catch any errors (such as an invalid ISBN) when attempting to save, and if one is thrown, it’ll return a blank response with an HTTP 400 Bad Request status — we haven’t yet added that functionality.
Finally, we have to define our schema of earlier as the schema for our model, so I’ll make a call to mongoose.Schema() passing in that schema:
const bookSchema = mongoose.Schema(mySchema);To make things more precise and clean, I’ll replace the mySchema variable with the actual object all on one line:
const bookSchema = mongoose.Schema({
    title:{
        type: String,
        required: true,
        trim: true,
    },
    isbn:{
        type: String,
        required: true,
        trim: true,
        validate(value) {
           if (!validator.isISBN(value)) {
                throw new Error('ISBN is invalid.');
           }
        }
    },
    author:{
        firstName: {
            type: String
            required: true,
            trim: true
        },
        lastName:{
            type: String,
            required: true,
            trim: true
        }
    },
    publishingDate:{
        type: String
    },
    finishedReading:{
        type: Boolean,
        required: true,
        default: false
    }
});
Let’s take a final moment to discuss this schema. We are saying that each of our documents will consist of a title, an ISBN, an author with a first and last name, a publishing date, and a finishedReading boolean.
titlewill be of typeString, it’s a required field, and we’ll trim any whitespace.isbnwill be of typeString, it’s a required field, it must match the validator, and we’ll trim any whitespace.authoris of typeobjectcontaining a required, trimmed,stringfirstName and a required, trimmed,stringlastName.publishingDateis of type String (although we could make it of typeDateorNumberfor a Unix timestamp.finishedReadingis a requiredbooleanthat will default tofalseif not provided.
With our bookSchema defined, Mongoose knows what data and what fields to expect within each document to the collection that stores books. However, how do we tell it what collection that specific schema defines? We could have hundreds of collections, so how do we correlate, or tie, bookSchema to the Book collection?
The answer, as seen earlier, is with the use of models. We’ll use bookSchema to create a model, and that model will model the data to be stored in the Book collection, which will be created by Mongoose automatically.
Append the following lines to the end of the file:
const Book = mongoose.model('Book', bookSchema);

module.exports = Book;
As you can see, we have created a model, the name of which is Book (— the first parameter to mongoose.model()), and also provided the ruleset, or schema, to which all data is saved in the Book collection will have to abide. We export this model as a default export, allowing us to require the file for our endpoints to access. Book is the object upon which we’ll call all of the required functions to Create, Read, Update, and Delete data which are provided by Mongoose.
Altogether, our book.js file should look as follows:
const mongoose = require('mongoose');
const validator = require('validator');

// Define the schema.
const bookSchema = mongoose.Schema({
    title:{
        type: String,
        required: true,
        trim: true,
    },
    isbn:{
        type: String,
        required: true,
        trim: true,
        validate(value) {
            if (!validator.isISBN(value)) {
                throw new Error('ISBN is invalid.');
            }
        }
    },
    author:{
        firstName: {
            type: String,
            required: true,
            trim: true
        },
        lastName:{
            type: String,
            required: true,
            trim: true
        }
    },
    publishingDate:{
        type: String
    },
    finishedReading:{
        type: Boolean,
        required: true,
        default: false
    }
});

// Create the "Book" model of name Book with schema bookSchema.
const Book = mongoose.model('Book', bookSchema);

// Provide the model as a default export.
module.exports = Book;
Connecting To MongoDB (Basics)
Don’t worry about copying down this code. I’ll provide a better version in the next section. To connect to our database, we’ll have to provide the database URL and password. We’ll call the connect method available on mongoose to do so, passing to it the required data. For now, we are going hardcode the URL and password — an extremely frowned upon technique for many reasons: namely the accidental committing of sensitive data to a public (or private made public) GitHub Repository. Realize also that commit history is saved, and that if you accidentally commit a piece of sensitive data, removing it in a future commit will not prevent people from seeing it (or bots from harvesting it), because it’s still available in the commit history. CLI tools exist to mitigate this issue and remove history.
As stated, for now, we’ll hard code the URL and password, and then save them to environment variables later. At this point, let’s look at simply how to do this, and then I’ll mention a way to optimize it.
const mongoose = require('mongoose');

const MONGODB_URL = 'Your MongoDB URL';

mongoose.connect(MONGODB_URL, {
    useNewUrlParser: true,
    useCreateIndex: true,
    useFindAndModify: false,
    useUnifiedTopology: true
});
This will connect to the database. We provide the URL that we attained from the MongoDB Atlas dashboard, and the object passed in as the second parameter specifies features to use as to, among others, prevent deprecation warnings.
Mongoose, which uses the core MongoDB Native Driver behind the scenes, has to attempt to keep up with breaking changes made to the driver. In a new version of the driver, the mechanism used to parse connection URLs was changed, so we pass the useNewUrlParser: true flag to specify that we want to use the latest version available from the official driver.
By default, if you set indexes (and they are called “indexes” not “indices”) (which we won’t cover in this article) on data in your database, Mongoose uses the ensureIndex() function available from the Native Driver. MongoDB deprecated that function in favor of createIndex(), and so setting the flag useCreateIndex to true will tell Mongoose to use the createIndex() method from the driver, which is the non-deprecated function.
Mongoose’s original version of findOneAndUpdate (which is a method to find a document in a database and update it) pre-dates the Native Driver version. That is, findOneAndUpdate() was not originally a Native Driver function but rather one provided by Mongoose, so Mongoose had to use findAndModify provided behind the scenes by the driver to create findOneAndUpdate functionality. With the driver now updated, it contains its own such function, so we don’t have to use findAndModify. This might not make sense, and that’s okay — it’s not an important piece of information on the scale of things.
Finally, MongoDB deprecated its old server and engine monitoring system. We use the new method with useUnifiedTopology: true.
What we have thus far is a way to connect to the database. But here’s the thing — it’s not scalable or efficient. When we write unit tests for this API, the unit tests are going to use their own test data (or fixtures) on their own test databases. So, we want a way to be able to create connections for different purposes — some for testing environments (that we can spin up and tear down at will), others for development environments, and others for production environments. To do that, we’ll build a factory. (Remember that from earlier?)
Connecting To Mongo — Building An Implementation Of A JS Factory
Indeed, Java Objects are not analogous at all to JavaScript Objects, and so, subsequently, what we know above from the Factory Design Pattern won’t apply. I merely provided that as an example to show the traditional pattern. To attain an object in Java, or C#, or C++, etc., we have to instantiate a class. This is done with the new keyword, which instructs the compiler to allocate memory for the object on the heap. In C++, this gives us a pointer to the object that we have to clean up ourselves so we don’t have hanging pointers or memory leaks (C++ has no garbage collector, unlike Node/V8 which is built on C++) In JavaScript, the above need not be done — we don’t need to instantiate a class to attain an object — an object is just {}. Some people will say that everything in JavaScript is an object, although that is technically not true because primitive types are not objects.
For the above reasons, our JS Factory will be simpler, sticking to the loose definition of a factory being a function that returns an object (a JS object). Since a function is an object (for function inherits from object via prototypal inheritance), our below example will meet this criterion. To implement the factory, I’ll create a new folder inside of server called db. Within db I’ll create a new file called mongoose.js. This file will make connections to the database. Inside of mongoose.js, I’ll create a function called connectionFactory and export it by default:
// Directory - server/db/mongoose.js

const mongoose = require('mongoose');

const MONGODB_URL = 'Your MongoDB URL';

const connectionFactory = () => {
    return mongoose.connect(MONGODB_URL, {
        useNewUrlParser: true,
        useCreateIndex: true,
        useFindAndModify: false
    });
};

module.exports = connectionFactory;
Using the shorthand provided by ES6 for Arrow Functions that return one statement on the same line as the method signature, I’ll make this file simpler by getting rid of the connectionFactory definition and just exporting the factory by default:
// server/db/mongoose.js
const mongoose = require('mongoose');

const MONGODB_URL = 'Your MongoDB URL';

module.exports = () => mongoose.connect(MONGODB_URL, {
    useNewUrlParser: true,
    useCreateIndex: true,
    useFindAndModify: true
});
Now, all one has to do is require the file and call the method that gets exported, like this:
const connectionFactory = require('./db/mongoose');
connectionFactory();

// OR

require('./db/mongoose')();
You could invert control by having your MongoDB URL be provided as a parameter to the factory function, but we are going to dynamically change the URL as an environment variable based on environment.
The benefits of making our connection as a function are that we can call that function later in code to connect to the database from files aimed at production and those aimed at local and remote integration testing both on-device and with a remote CI/CD pipeline/build server.
Building Our Endpoints
We now begin to add very simple CRUD related logic to our endpoints. As previously stated, a short disclaimer is in order. The methods by which we go about implementing our business logic here are not ones that you should mirror for anything other than simple projects. Connecting to databases and performing logic directly within endpoints is (and should be) frowned upon, for you lose the ability to swap out services or DBMSs without having to perform an application wide refactor. Nonetheless, considering this is a beginner’s article, I employ these bad practices here. A future article in this series will discuss how we can increase both the complexity and the quality of our architecture.
For now, let’s go back to our server.js file and ensure we both have the same starting point. Notice I added the require statement for our database connection factory and I imported the model we exported from ./models/book.js.
const express = require('express');

// Database connection and model.
require('./db/mongoose.js');
const Book = require('./models/book.js');

// This creates our Express App.
const app = express();

// Define middleware.
app.use(express.json());
app.use(express.urlencoded({ extended: true }));

// Listening on port 3000 (arbitrary).
// Not a TCP or UDP well-known port.
// Does not require superuser privileges.
const PORT = 3000;

// We will build our API here.
// HTTP POST /books
app.post('/books', (req, res) => {
    // ...
    console.log('A POST Request was made!');
});

// HTTP GET /books/:id
app.get('/books/:id', (req, res) => {
    // ...
    console.log(`A GET Request was made! Getting book ${req.params.id}`);
});

// HTTP PATCH /books/:id
app.patch('/books/:id', (req, res) => {
    // ...
    console.log(`A PATCH Request was made! Updating book ${req.params.id}`);
});

// HTTP DELETE /books/:id
app.delete('/books/:id', (req, res) => {
    // ...
    console.log(`A DELETE Request was made! Deleting book ${req.params.id}`);
});

// Binding our application to port 3000.
app.listen(PORT, () => console.log(`Server is up on port ${PORT}.`));
I’m going to start with app.post(). We have access to the Book model because we exported it from the file within which we created it. As stated in the Mongoose docs, Book is constructable. To create a new book, we call the constructor and pass the book data in, as follows:
const book = new Book(bookData);In our case, we’ll have bookData as the object sent up in the request, which will be available on req.body.book. Remember, express.json() middleware will put any JSON data that we send up onto req.body. We are to send up JSON in the following format:
{
    "book": {
        "title": "The Art of Computer Programming",
        "isbn": "ISBN-13: 978-0-201-89683-1",
        "author": {
            "firstName": "Donald",
            "lastName": "Knuth"
        },
        "publishingDate": "July 17, 1997",
        "finishedReading": true
    }
}
What that means, then, is that the JSON we pass up will get parsed, and the entire JSON object (the first pair of braces) will be placed on req.body by the express.json() middleware. The one and only property on our JSON object is book, and thus the book object will be available on req.body.book.
At this point, we can call the model constructor function and pass in our data:
app.post('/books', async (req, res) => {    // <- Notice 'async'
    const book = new Book(req.body.book);
    await book.save();                      // <- Notice 'await'
});
Notice a few things here. Calling the save method on the instance we get back from calling the constructor function will persist the req.body.book object to the database if and only if it complies with the schema we defined in the Mongoose model. The act of saving data to a database is an asynchronous operation, and this save() method returns a promise — the settling of which we much await. Rather than chain on a .then() call, I use the ES6 Async/Await syntax, which means I must make the callback function to app.post async.
book.save() will reject with a ValidationError if the object the client sent up does not comply with the schema we defined. Our current setup makes for some very flaky and badly written code, for we don’t want our application to crash in the event of a failure regarding validation. To fix that, I’ll surround the dangerous operation in a try/catch clause. In the event of an error, I’ll return an HTTP 400 Bad Request or an HTTP 422 Unprocessable Entity. There is some amount of debate over which to use, so I’ll stick with a 400 for this article since it is more generic.
app.post('/books', async (req, res) => {
    try {
        const book = new Book(req.body.book);
        await book.save();
        return res.status(201).send({ book });
    } catch (e) {
        return res.status(400).send({ error: 'ValidationError' });
    }
});
Notice that I use the ES6 Object Shorthand to just return the book object right back to the client in the success case with res.send({ book }) — that would be equivalent to res.send({ book: book }). I also return the expression just to make sure my function exits. In the catch block, I set the status to be 400 explicitly, and return the string ‘ValidationError’ on the error property of the object that gets sent back. A 201 is the success path status code meaning “CREATED”.
Indeed, this isn’t the best solution either because we can’t really be sure the reason for failure was a Bad Request on the client’s side. Maybe we lost connection (supposed a dropped socket connection, thus a transient exception) to the database, in which case we should probably return a 500 Internal Server error. A way to check this would be to read the e error object and selectively return a response. Let’s do that now, but as I’ve said multiple times, a followup article will discuss proper architecture in terms of Routers, Controllers, Services, Repositories, custom error classes, custom error middleware, custom error responses, Database Model/Domain Entity data mapping, and Command Query Separation (CQS).
app.post('/books', async (req, res) => {
    try {
        const book =  new  Book(req.body.book);
        await book.save();
        return res.send({ book });
    } catch (e) {
        if (e instanceof mongoose.Error.ValidationError) {
            return res.status(400).send({  error:  'ValidationError' });
        } else {
            return res.status(500).send({  error:  'Internal Error' });
        }
    }
});
Go ahead and open Postman (assuming you have it, otherwise, download and install it) and create a new request. We’ll be making a POST Request to localhost:3000/books. Under the “Body” tab within the Postman Request section, I’ll select the “raw” radio button and select “JSON” in the dropdown button to the far right. This will go ahead and automatically add the Content-Type: application/json header to the request. I’ll then copy and paste the Book JSON Object from earlier into the Body text area. This is what we have:
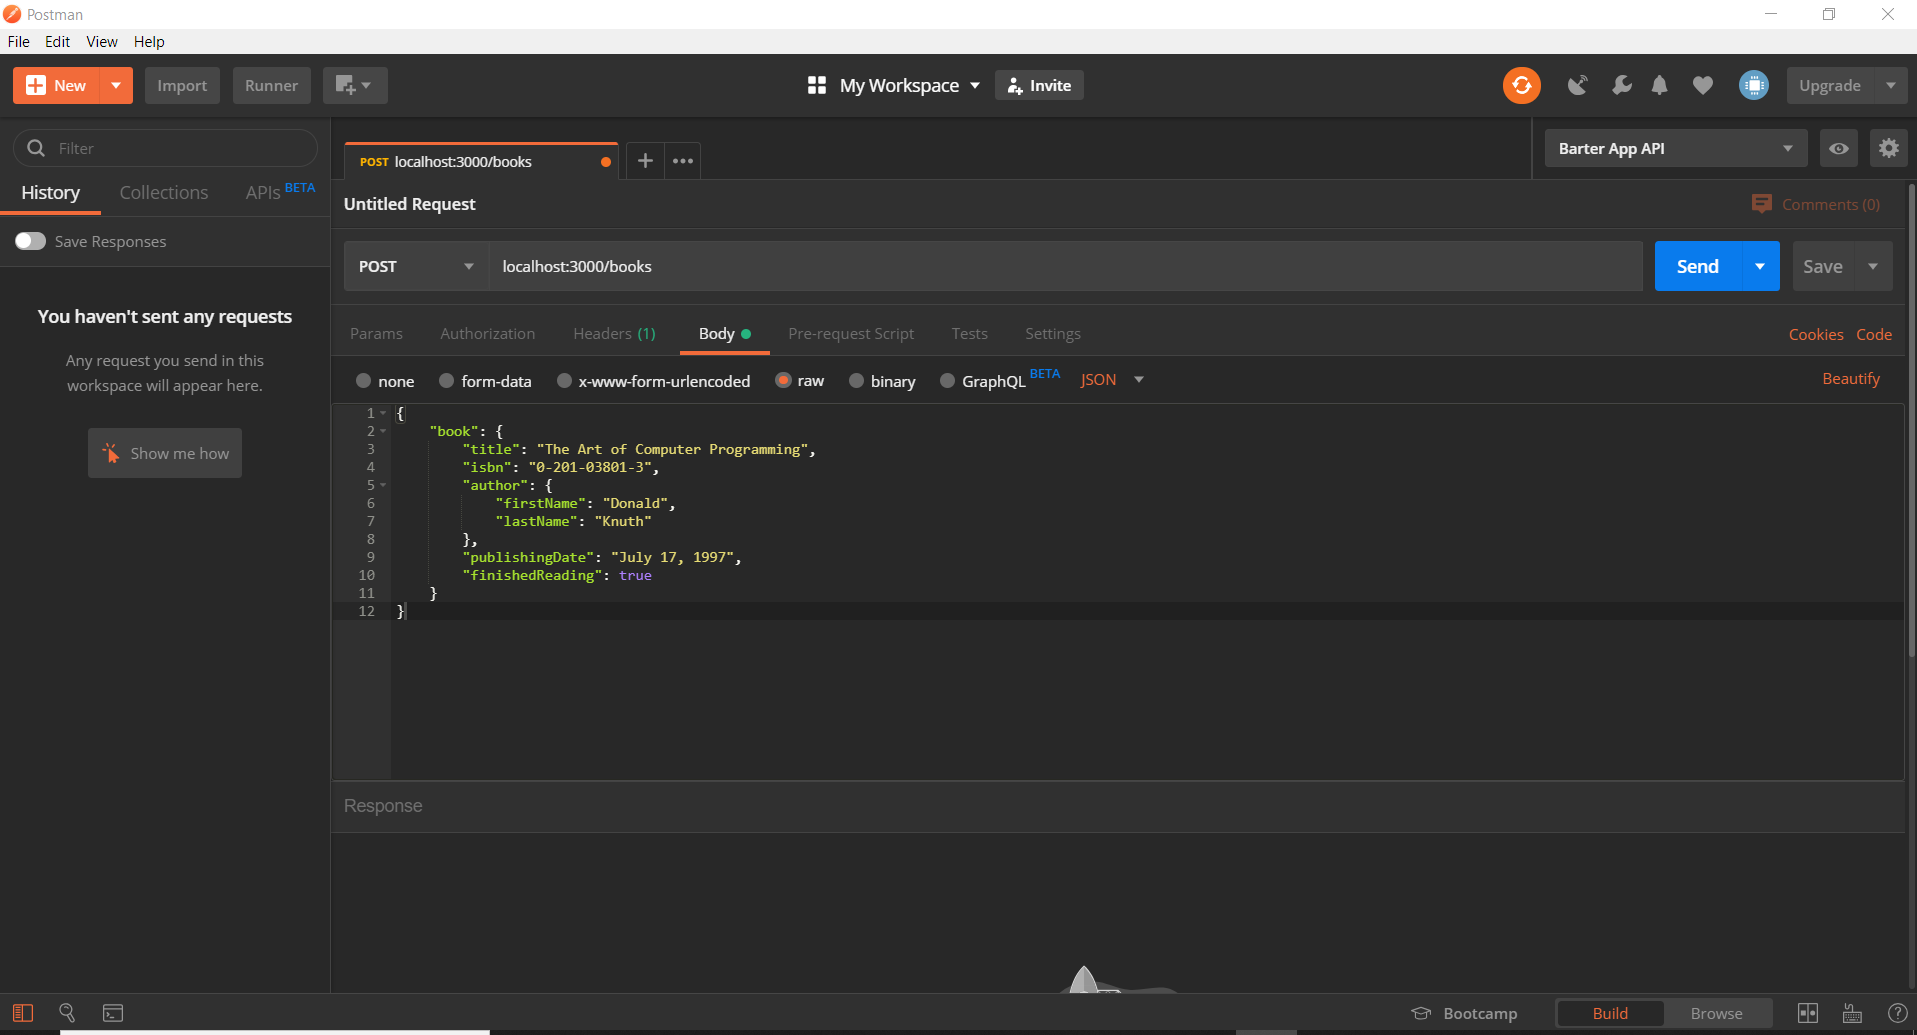
Thereafter, I’ll hit the send button, and you should see a 201 Created response in the “Response” section of Postman (the bottom row). We see this because we specifically asked Express to respond with a 201 and the Book object — had we just done res.send() with no status code, express would have automatically responded with a 200 OK. As you can see, the Book object is now saved to the database and has been returned to the client as the Response to the POST Request.

If you view the database Book collection through MongoDB Atlas, you’ll see that the book was indeed saved.
You can also tell that MongoDB has inserted the __v and _id fields. The former represents the version of the document, in this case, 0, and the latter is the document’s ObjectID — which is automatically generated by MongoDB and is guaranteed to have a low collision probability.
A Summary Of What We Have Covered Thus Far
We have covered a lot thus far in the article. Let’s take a short reprieve by going over a brief summary before returning to finish the Express API.
We learned about ES6 Object Destructuring, the ES6 Object Shorthand Syntax, as well as the ES6 Rest/Spread operator. All three of those let us do the following (and more, as discussed above):
// Destructuring Object Properties:
const { a: newNameA = 'Default', b } = { a: 'someData', b: 'info' };
console.log(`newNameA: ${newNameA}, b: ${b}`); // newNameA: someData, b: info

// Destructuring Array Elements
const [elemOne, elemTwo] = [() => console.log('hi'), 'data'];
console.log(`elemOne(): ${elemOne()}, elemTwo: ${elemTwo}`); // elemOne(): hi, elemTwo: data

// Object Shorthand
const makeObj = (name) => ({ name });
console.log(`makeObj('Tim'): ${JSON.stringify(makeObj('Tim'))}`); // makeObj('Tim'): { "name": "Tim" }

// Rest, Spread
const [c, d, ...rest] = [0, 1, 2, 3, 4];
console.log(`c: ${c}, d: ${d}, rest: ${rest}`) // c: 0, d: 1, rest: 2, 3, 4
We also covered Express, Expess Middleware, Servers, Ports, IP Addressing, etc. Things got interesting when we learned that there exist methods availabile on the return result from require('express')(); with the names of the HTTP Verbs, such as app.get and app.post.
If that require('express')() part didn’t make sense to you, this was the point I was making:
const express = require('express');
const app = express();
app.someHTTPVerb
It should make sense in the same way that we fired off the connection factory before for Mongoose.
Each route handler, which is the endpoint function (or callback function), gets passed in a req object and a res object from Express behind the scenes. (They technically also get next, as we’ll see in a minute). req contains data specific to the incoming request from the client, such as headers or any JSON sent up. res is what permits us to return responses to the client. The next function is also passed into handlers.
With Mongoose, we saw how we can connect to the database with two methods — a primitive way and a more advanced/practical way that borrows from the Factory Pattern. We’ll end up using this when we discuss Unit and Integration Testing with Jest (and mutation testing) because it’ll permit us to spin up a test instance of the DB populated with seed data against which we can run assertions.
After that, we created a Mongoose schema object and used it to create a model, and then learned how we can call the constructor of that model to create a new instance of it. Available on the instance is a save method (among others), which is asynchronous in nature, and which will check that the object structure we passed in complies with the schema, resolving the promise if it does, and rejecting the promise with a ValidationError if it does not. In the event of a resolution, the new document is saved to the database and we respond with an HTTP 200 OK/201 CREATED, otherwise, we catch the thrown error in our endpoint, and return an HTTP 400 Bad Request to the client.
As we continue you building out our endpoints, you’ll learn more about some of the methods available on the model and the model instance.
Finishing Our Endpoints
Having completed the POST Endpoint, let’s handle GET. As I mentioned earlier, the :id syntax inside the route lets Express know that id is a route parameter, accessible from req.params. You already saw that when you match some ID for the param “wildcard” in the route, it was printed to the screen in the early examples. For instance, if you made a GET Request to “/books/test-id-123”, then req.params.id would be the string test-id-123 because the param name was id by having the route as HTTP GET /books/:id.
So, all we need to do is retrieve that ID from the req object and check to see if any document in our database has the same ID — something made very easy by Mongoose (and the Native Driver).
app.get('/books/:id', async (req, res) => {
    const book = await Book.findById(req.params.id);
    console.log(book);
    res.send({ book });
});
You can see that accessible upon our model is a function we can call that will find a document by its ID. Behind the scenes, Mongoose will cast whatever ID we pass into findById to the type of the _id field on the document, or in this case, an ObjectId. If a matching ID is found (and only one will ever be found for ObjectId has an extremely low collision probability), that document will be placed in our book constant variable. If not, book will be null — a fact we’ll use in the near future.
For now, let’s restart the server (you must restart the server unless you’re using nodemon) and ensure that we still have the one book document from before inside the Books Collection. Go ahead and copy the ID of that document, the highlighted portion of the image below:

And use it to make a GET Request to /books/:id with Postman as follows (note that the body data is just left over from my earlier POST Request. It’s not actually being used despite the fact that it’s depicted in the image below):
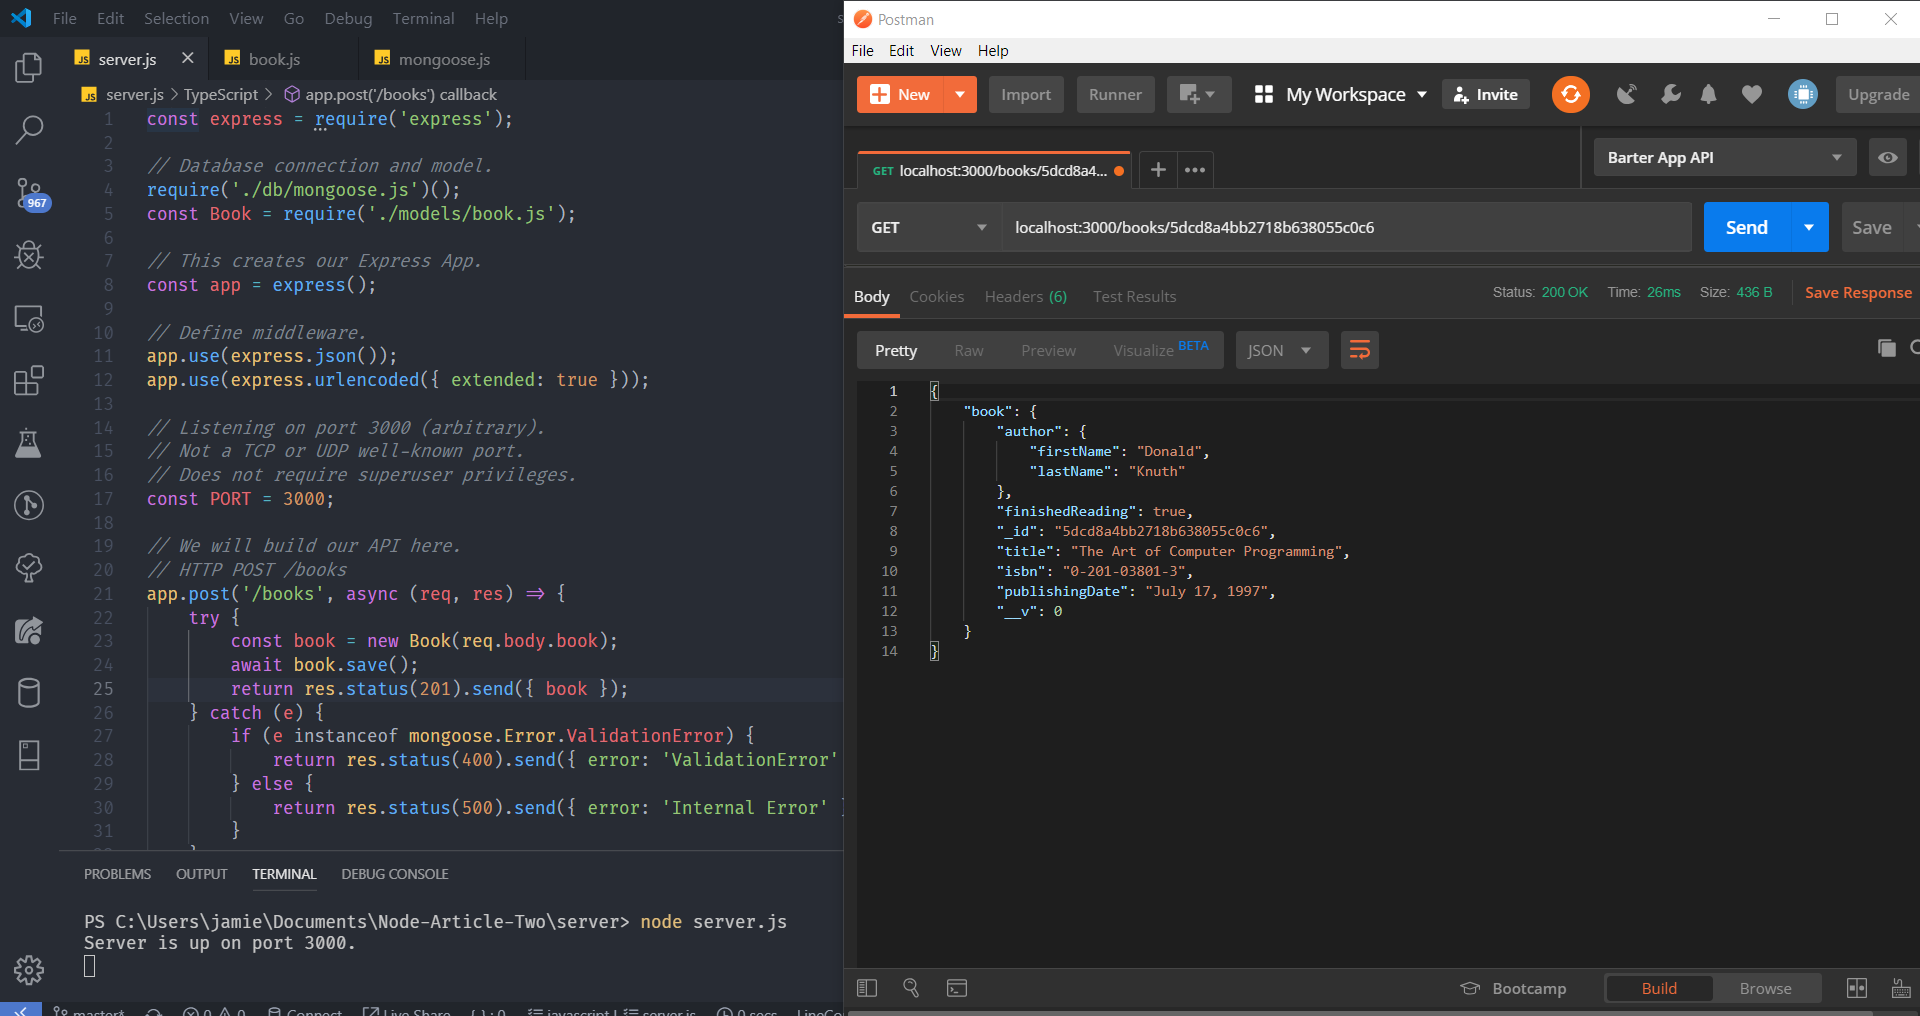
Upon doing so, you should get the book document with the specified ID back inside the Postman response section. Notice that earlier, with the POST Route, which is designed to “POST” or “push” new resources to the server, we responded with a 201 Created — because a new resource (or document) was created. In the case of GET, nothing new was created — we just requested a resource with a specific ID, thus a 200 OK status code is what we got back, instead of 201 Created.
As is common in the field of software development, edge cases must be accounted for — user input is inherently unsafe and erroneous, and it’s our job, as developers, to be flexible to the types of input we can be given and to respond to them accordingly. What do we do if the user (or the API Caller) passes us some ID that can’t be cast to a MongoDB ObjectID, or an ID that can be cast but that doesn’t exist?
For the former case, Mongoose is going to throw a CastError — which is understandable because if we provide an ID like math-is-fun, then that’s obviously not something that can be cast to an ObjectID, and casting to an ObjectID is specifically what Mongoose is doing under the hood.
For the latter case, we could easily rectify the issue via a Null Check or a Guard Clause. Either way, I’m going to send back and HTTP 404 Not Found Response. I’ll show you a few ways we can do this, a bad way and then a better way.
Firstly, we could do the following:
app.get('/books/:id', async (req, res) => {
    try {
        const book = await Book.findById(req.params.id);

        if (!book) throw new Error();

        return res.send({ book });
    } catch (e) {
        return res.status(404).send({ error: 'Not Found' });
    }
});
This works and we can use it just fine. I expect that the statement await Book.findById() will throw a Mongoose CastError if the ID string can’t be cast to an ObjectID, causing the catch block to execute. If it can be cast but the corresponding ObjectID does not exist, then book will be null and the Null Check will throw an error, again firing the catch block. Inside catch, we just return a 404. There are two problems here. First, even if the Book is found but some other unknown error occurs, we send back a 404 when we should probably give the client a generic catch-all 500. Second, we are not really differentiating between whether the ID sent up is valid but non-existent, or whether it’s just a bad ID.
So, here is another way:
const mongoose = require('mongoose');

app.get('/books/:id', async (req, res) => {
    try {
        const book = await Book.findById(req.params.id);

        if (!book) return res.status(404).send({ error: 'Not Found' });

        return res.send({ book });
    } catch (e) {
        if (e instanceof mongoose.Error.CastError) {
            return res.status(400).send({ error: 'Not a valid ID' });
        } else {
            return res.status(500).send({ error: 'Internal Error' });
        }
    }
});
The nice thing about this is that we can handle all three cases of a 400, a 404 and a generic 500. Notice that after the Null Check on book, I use the return keyword on my response. This is very important because we want to make sure we exit the route handler there.
Some other options might be for us to check if the id on req.params can be cast to an ObjectID explicitly as opposed to permitting Mongoose to cast implicitly with mongoose.Types.ObjectId.isValid('id);, but there is an edge case with 12-byte strings that causes this to sometimes work unexpectedly.
We could make said repetition less painful with Boom, an HTTP Response library, for example, or we could employ Error Handling Middleware. We could also transform Mongoose Errors into something more readable with Mongoose Hooks/Middleware as described here. An additional option would be to define custom error objects and use global Express Error Handling Middleware, however, I’ll save that for an upcoming article wherein we discuss better architectural methods.
In the endpoint for PATCH /books/:id, we’ll expect an update object to be passed up containing updates for the book in question. For this article, we’ll allow all fields to be updated, but in the future, I’ll show how we can disallow updates of particular fields. Additionally, you’ll see that the error handling logic in our PATCH Endpoint will be the same as our GET Endpoint. That’s an indication that we are violating DRY Principles, but again, we’ll touch on that later.
I’m going to expect that all updates are available on the updates object of req.body (meaning the client will send up JSON containing an updates object) and will use the Book.findByAndUpdate function with a special flag to perform the update.
app.patch('/books/:id', async (req, res) => {
    const { id } = req.params;
    const { updates } = req.body;

    try {
        const updatedBook = await Book.findByIdAndUpdate(id, updates, { runValidators: true, new: true });

        if (!updatedBook) return res.status(404).send({ error: 'Not Found' });

        return res.send({ book: updatedBook });
    } catch (e) {
        if (e instanceof mongoose.Error.CastError) {
            return res.status(400).send({ error: 'Not a valid ID' });
        } else {
            return res.status(500).send({ error: 'Internal Error' });
        }
    }
});
Notice a few things here. We first destructure id from req.params and updates from req.body.
Available on the Book model is a function by the name of findByIdAndUpdate that takes the ID of the document in question, the updates to perform, and an optional options object. Normally, Mongoose won’t re-perform validation for update operations, so the runValidators: true flag we pass in as the options object forces it to do so. Furthermore, as of Mongoose 4, Model.findByIdAndUpdate no longer returns the modified document but returns the original document instead. The new: true flag (which is false by default) overrides that behavior.
Finally, we can build out our DELETE endpoint, which is quite similar to all of the others:
app.delete('/books/:id', async (req, res) => {
    try {
        const deletedBook = await Book.findByIdAndDelete(req.params.id);

        if (!deletedBook) return res.status(404).send({ error: 'Not Found' });

        return res.send({ book: deletedBook });
    } catch (e) {
        if (e instanceof mongoose.Error.CastError) {
            return res.status(400).send({ error: 'Not a valid ID' });
        } else {
            return res.status(500).send({ error: 'Internal Error' });
        }
    }
});
With that, our primitive API is complete and you can test it by making HTTP Requests to all endpoints.
A Short Disclaimer About Architecture And How We’ll Rectify It
From an architectural standpoint, the code we have here is quite bad, it’s messy, it’s not DRY, it’s not SOLID, in fact, you might even call it abhorrent. These so-called “Route Handlers” are doing a lot more than just “handing routes” — they are directly interfacing with our database. That means there is absolutely no abstraction.
Let’s face it, most applications will never be this small or you could probably get away with serverless architectures with the Firebase Database. Maybe, as we’ll see later, users want the ability to upload avatars, quotes, and snippets from their books, etc. Maybe we want to add a live chat feature between users with WebSockets, and let’s even go as far as saying we’ll open up our application to let users borrow books with one another for a small charge — at which point we need to consider Payment Integration with the Stripe API and shipping logistics with the Shippo API.
Suppose we proceed with our current architecture and add all of this functionality. These route handers, also known as Controller Actions, are going to end up being very, very large with a high cyclomatic complexity. Such a coding style might suit us fine in the early days, but what if we decide that our data is referential and thus PostgreSQL is a better database choice than MongoDB? We now have to refactor our entire application, stripping out Mongoose, altering our Controllers, etc., all of which could lead to potential bugs in the rest of the business logic. Another such example would be that of deciding that AWS S3 is too expensive and we wish to migrate to GCP. Again, this requires an application-wide refactor.
Although there are many opinions around architecture, from Domain-Driven Design, Command Query Responsibility Segregation, and Event Sourcing, to Test-Driven Development, SOILD, Layered Architecture, Onion Architecture, and more, we’ll focus on implementing simple Layered Architecture in future articles, consisting of Controllers, Services, and Repositories, and employing Design Patterns like Composition, Adapters/Wrappers, and Inversion of Control via Dependency Injection. While, to an extent, this could be somewhat performed with JavaScript, we’ll look into TypeScript options to achieve this architecture as well, permitting us to employ functional programming paradigms such as Either Monads in addition to OOP concepts like Generics.
For now, there are two small changes we can make. Because our error handling logic is quite similar in the catch block of all endpoints, we can extract it to a custom Express Error Handling Middleware function at the very end of the stack.
Cleaning Up Our Architecture
At present, we are repeating a very large amount of error handling logic across all our endpoints. Instead, we can build an Express Error Handling Middleware function, which is an Express Middleware Function that gets called with an error, the req and res objects, and the next function.
For now, let’s build that middleware function. All I’m going to do is repeat the same error handling logic we are used to:
app.use((err, req, res, next) => {
    if (err instanceof mongoose.Error.ValidationError) {
        return res.status(400).send({  error:  'Validation Error' });
    } else if (err instanceof mongoose.Error.CastError) {
        return res.status(400).send({  error:  'Not a valid ID' });
    } else {
        console.log(err); // Unexpected, so worth logging.
        return res.status(500).send({  error:  'Internal error' });
    }
});
This doesn’t appear to work with Mongoose Errors, but in general, rather than using if/else if/else to determine error instances, you can switch over the error’s constructor. I’ll leave what we have, however.
In a synchronous endpoint/route handler, if you throw an error, Express will catch it and process it with no extra work required on your part. Unfortunately, that’s not the case for us. We are dealing with asynchronous code. In order to delegate error handling to Express with async route handlers, we much catch the error ourselves and pass it to next().
So, I’ll just permit next to be the third argument into the endpoint, and I’ll remove the error handling logic in the catch blocks in favor of just passing the error instance to next, as such:
app.post('/books', async (req, res, next) => {
    try {
        const book =  new  Book(req.body.book);
        await book.save();
        return res.send({ book });
    } catch (e) {
        next(e)
    }
});
If you do this to all route handlers, you should end up with the following code:
const express = require('express');
const mongoose = require('mongoose');

// Database connection and model.
require('./db/mongoose.js')();
const Book = require('./models/book.js');

// This creates our Express App.
const app = express();

// Define middleware.
app.use(express.json());
app.use(express.urlencoded({ extended: true }));

// Listening on port 3000 (arbitrary).
// Not a TCP or UDP well-known port.
// Does not require superuser privileges.
const PORT = 3000;

// We will build our API here.
// HTTP POST /books
app.post('/books', async (req, res, next) => {
    try {
        const book = new Book(req.body.book);
        await book.save();
        return res.status(201).send({ book });
    } catch (e) {
        next(e)
    }
});

// HTTP GET /books/:id
app.get('/books/:id', async (req, res) => {
    try {
        const book = await Book.findById(req.params.id);

        if (!book) return res.status(404).send({ error: 'Not Found' });

        return res.send({ book });
    } catch (e) {
           next(e);
    }
});

// HTTP PATCH /books/:id
app.patch('/books/:id', async (req, res, next) => {
    const { id } = req.params;
    const { updates } = req.body;

    try {
        const updatedBook = await Book.findByIdAndUpdate(id, updates, { runValidators: true, new: true });

        if (!updatedBook) return res.status(404).send({ error: 'Not Found' });

        return res.send({ book: updatedBook });
    } catch (e) {
        next(e);
    }
});

// HTTP DELETE /books/:id
app.delete('/books/:id', async (req, res, next) => {
    try {
        const deletedBook = await  Book.findByIdAndDelete(req.params.id);

        if (!deletedBook) return res.status(404).send({  error:  'Not Found' });

        return res.send({ book: deletedBook });
    } catch (e) {
        next(e);
    }
});

// Notice - bottom of stack.
app.use((err, req, res, next) => {
    if (err instanceof mongoose.Error.ValidationError) {
        return res.status(400).send({  error:  'Validation Error' });
    } else if (err instanceof mongoose.Error.CastError) {
        return res.status(400).send({  error:  'Not a valid ID' });
    } else {
        console.log(err); // Unexpected, so worth logging.
        return res.status(500).send({  error:  'Internal error' });
    }
});

// Binding our application to port 3000.
app.listen(PORT, () => console.log(`Server is up on port ${PORT}.`));
Moving further, it would be worth separating our error handling middleware into another file, but that’s trivial, and we’ll see it in future articles in this series. Additionally, we could use an NPM module named express-async-errors as to permit us to not have to call next in the catch block, but again, I’m trying to show you how things are done officially.
A Word About CORS And The Same Origin Policy
Suppose your website is served from the domain myWebsite.com but your server is at myOtherDomain.com/api. CORS stands for Cross-Origin Resource Sharing and is a mechanism by which cross-domain requests can be performed. In the case above, since the server and front-end JS code are at different domains, you’d be making a request across two different origins, which is commonly restricted by the browser for security reasons, and mitigated by supplying specific HTTP headers.
The Same Origin Policy is what performs those aforementioned restrictions — a web browser will only permit requires to be made across the same origin.
We’ll touch on CORS and SOP later when we build a Webpack bundled front-end for our Book API with React.
Conclusion And What’s Next
We have discussed a lot in this article. Perhaps it wasn’t all fully practical, but it hopefully got you more comfortable working with Express and ES6 JavaScript features. If you are new to programming and Node is the first path down which you are embarking, hopefully the references to statically types languages like Java, C++, and C# helped to highlight some of the differences between JavaScript and its static counterparts.
Next time, we’ll finish building out our Book API by making some fixes to our current setup with regards to the Book Routes, as well as adding in User Authentication so that users can own books. We’ll do all of this with a similar architecture to what I described here and with MongoDB for data persistence. Finally, we’ll permit users to upload avatar images to AWS S3 via Buffers.
In the article thereafter, we’ll be rebuilding our application from the ground up in TypeScript, still with Express. We’ll also move to PostgreSQL with Knex instead of MongoDB with Mongoose as to depict better architectural practices. Finally, we’ll update our avatar image uploading process to use Node Streams (we’ll discuss Writable, Readable, Duplex, and Transform Streams). Along the way, we’ll cover a great amount of design and architectural patterns and functional paradigms, including:
- Controllers/Controller Actions
- Services
- Repositories
- Data Mapping
- The Adapter Pattern
- The Factory Pattern
- The Delegation Pattern
- OOP Principles and Composition vs Inheritance
- Inversion of Control via Dependency Injection
- SOLID Principles
- Coding against interfaces
- Data Transfer Objects
- Domain Models and Domain Entities
- Either Monads
- Validation
- Decorators
- Logging and Logging Levels
- Unit Tests, Integration Tests (E2E), and Mutation Tests
- The Structured Query Language
- Relations
- HTTP/Express Security Best Practices
- Node Best Practices
- OWASP Security Best Practices
- And more.
Using that new architecture, in the article after that, we’ll write Unit, Integration, and Mutation tests, aiming for close to 100 percent testing coverage, and we’ll finally discuss setting up a remote CI/CD pipeline with CircleCI, as well as Message Busses, Job/Task Scheduling, and load balancing/reverse proxying.
Hopefully, this article has been helpful, and if you have any queries or concerns, let me know in the comments below.


