How To Ease Your Team’s Development Workflow With Git Hooks

Email Newsletter
Weekly tips on front-end & UX.
Trusted by 182,000+ folks.


 Custom Web Forms for Angular, React, & Vue. Your backend.
 Celebrating 10 million developers
One of the major requirements working for a team or an open-source project is using a version control system (VCS). Git is a free and open-source distributed version control system for tracking source code changes during software development. It’s been created by Linus Torvalds in 2005 for the development of the Linux kernel. It is easy to learn and has a tiny footprint with lightning fast performance.
There is a big chance you have already used Git (since it is one of the most popular and well-adopted VCS tools available in the development community), and you most probably already have some knowledge about staging and committing your code by pushing and pulling it from a remote repository. This article won’t address the basics of git workflows but will mostly focus on git hooks and how to utilize them in order to achieve better collaboration in your team. With teams growing in size, it’s becoming even more important to keep contributors in line and maintain different rules about the code.
What Are Git Hooks?
Git hooks are scripts that are triggered when specific actions or events are performed in a git repository. These actions are about parts of the version control workflow such as committing and pushing. Hooks can be really useful by automating tasks on your git workflow. For example, they can help us validate the syntax of our codebase based on some specific rules, or run some tests before committing our changes.
How To Get Them Set?
Git hooks are a built-in feature, meaning that we are able to access them and start using them as long as a git repository is initialized. Let’s have a look in more detail what that means by trying to get them set.
Using your favorite terminal, create a new git repository.
mkdir my-new-repository && cd my-new-repository
git init
ls -la
You will notice that a new hidden directory has just been created. This folder .git is used from git for storing repository related information, such as version control hashes, information about commits, remote repository addresses, and so on. This is also the folder where hooks actually live for git .git/hooks. You can find some pre-populated sample scripts automatically created during the initialisation. These are actually the scripts that will get triggered after specific actions.
ls .git/hooks
Some of the samples you can find are:
pre-commit.sample: invoked just before making the commit.commit-msg.sample: edit the message file in place.post-receive.sample: invoked after the remote repository has updated.
Under The Hood
Now that we know where we can find hooks, let’s take a step back in order to understand how do they actually work.
Git hooks are event-based, so as long as we execute a git command in the development flow, git will check hooks folders in order to find if there is an associated script to run. Some of these scripts will run before or after these development flow actions.
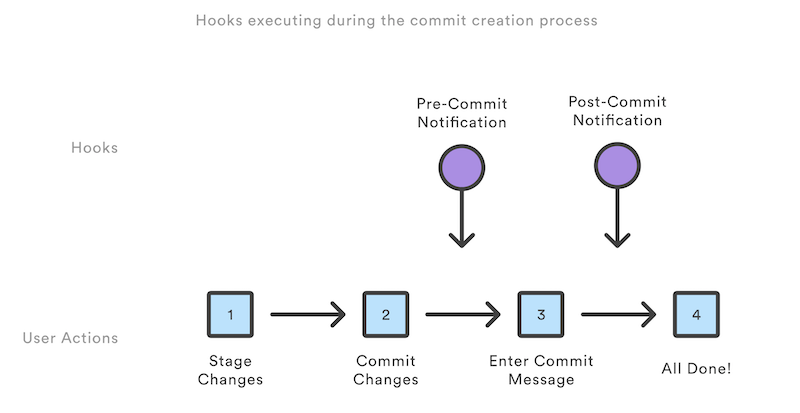
A good example for us to go through and more specifically understand the flow under which hooks get triggered is the committing workflow which is a quite familiar use case.
Whenever we commit any changes to our codebase, some of these related hooks are triggered in the following order:
pre-commit: inspects the snapshot that’s about to be committed and verify what is to be committed.prepare-commit-msg: lets you edit the default message before the commit author sees it.commit-msg: sets commit message to a template.post-commit: runs an action just after the commit has been completed, and sends a notification for instance.
In the above repository, let’s now try and add some custom pre- and post-commit scripts in order to further visualize how git hooks actually work.
nano .git/hooks/pre-commit
Add the following snippet:
#!/bin/sh
echo Changes are about to be committed
Make sure our scripts are executable:
chmod +x .git/hooks/pre-commit
Repeat the above process for the post-commit script:
nano .git/hooks/post-commit
#!/bin/sh
echo Changes have been committed
chmod +x .git/hooks/post-commit
Now we can add a new file nano index.html with a small HTML snippet just for demonstration purposes (no need to let HTML validators know about this).
<h1>Hello world from our new repository!</h1>
We’ll be adding the changes in our codebase through staging and then committing this:
git add .
git commit
After committing has been successfully processed, we can see the following output of the two above-added scripts:
Changes are about to be committed
Changes have been committed
As expected, git triggered hooks in the committing flow. The pre-commit and post-commit scripts that have been added are running and will get executed in the correct sequence (based on the order we mentioned earlier).
This was a simple demonstration in order to understand how the committing workflow scripts work and how they are executed. For more details on this workflow, you can read more in the documentation.
In the above example, we chose to write these two scripts in bash but the truth is that git supports hooks that can be written in any scripting language we want. Ruby, Python or JavaScript are great alternatives, as long as we set the correct shebang at the first line of our executable script.
For example, we can rewrite the pre-commit hook as a Node.js script like below:
#!/usr/bin/env node
console.log("Changes are about to be commited")
Local And Remote Hooks
Hooks are separated between local and remote (or client and server). While local hooks run before or after specific actions on the local repository, remote hooks run before or after pushes to the server. Local ones cannot be used for enforcing policies since their nature lets developers easily alter them. They are mostly used for sticking to some specific guidelines that we want to apply within a team. In case we want to get stricter and enforce some policies for our repository, we reside in remote hooks.
Local Hooks
pre-commitprepare-commit-msgcommit-msgpost-commitapplypatch-msgpre-applypatchpost-applypatchpre-rebasepost-rewritepost-checkoutpost-mergepre-push
Remote Hooks
pre-receiveupdatepost-receive
Sharing Hooks
Git hooks are all about sharing them within the team. This is the main reason they exist: promoting better team collaboration, automating detrimental processes, and letting us focus only on the important parts of the codebase.
As stated before, .git/hooks is the folder that hosts our customized hooks, but this is not really helpful when we need to share these scripts within the team since this folder is not tracked by git.
A good approach for solving this is adding all of our custom hooks on a separate folder inside our repository. For example, we can add a .githooks folder and save the executable scripts over there. Then, on project initialization, we can either explicitly copy or symlink these scripts to the original folder for keeping our hooks .git/hooks.
find .git/hooks -type l -exec rm {} \\;
find .githooks -type f -exec ln -sf ../../{} .git/hooks/ \\;
Alternatively, if you’re using the latest git version (speaking of 2.9 and above) we are able to directly configure the git hooks path to our custom folder:
git config core.hooksPath .githooks
Git Hooks Made Easy (A JavaScript Codebase Use Case)
There are tools that help us further integrate git hooks to the needs of our codebase. Specifically for JavaScript codebases, there is Husky with which we can easily customize actions on git events through configuration.
For example, we can easily lint our code or run some tests in the pre-commit event and proceed to commit based on whether the linting, testing or both are successful or not.
This can be accomplished by extending the package.json configuration simply as:
{
    "scripts": {
        "test": "echo Running tests"
    },
    "devDependencies": {
        "eslint": "5.16.0",
    },
    "husky": {
        "hooks": {
            "pre-commit": "eslint . && npm test",
        }
    }
}
Conclusion
In this article, we’ve found out that different actions taken on a git repository can optionally trigger custom scripts to run. Those scripts can be under the control of the developer locally or managed more centrally for a team or project on a remote. We’ve also learned that scripts are often written in a shell script like bash, but can actually use almost any scripting language, even JavaScript.
Git hooks can be a really powerful part of a well-designed workflow, and I’d encourage you to give them a try and see what you can do for your own projects.
Further Reading
- How To Hack Your Google Lighthouse Scores In 2024
- Converting Plain Text To Encoded HTML With Vanilla JavaScript
- Recovering Deleted Files From Your Git Working Tree
- Improving The CI/CD Flow For Your Application


