Creating Secure Password Flows With NodeJS And MySQL

Email Newsletter
Weekly tips on front-end & UX.
Trusted by 182,000+ folks.

 SurveyJS: White-Label Survey Solution for Your JS App
 Celebrating 10 million developers

 Register Free Now
If you’re anything like me, you’ve forgotten your password more than once, especially on sites you haven’t visited in a while. You’ve probably also seen, and/or been mortified by, reset password emails that contain your password in plain text.
Unfortunately, the reset password workflow gets short shrift and limited attention during application development. This not only can lead to a frustrating user experience, but can also leave your application with gaping security holes.
We’re going to cover how to build a secure reset password workflow. We’ll be using NodeJS and MySQL as our base components. If you’re writing using a different language, framework, or database, you can still benefit from following the general "Security Tips" outlined in each section.
A reset password flow consists of the following components:
- A link to send the user to the start of the workflow.
- A form that lets the user submit their email.
- A lookup that validates the email and sends an email to the address.
- An email that contains the reset token with an expiry that allows the user to reset their password.
- A form that let’s the user generate a new password.
- Saving the new password and letting the user log in again with the new password.
Besides Node, Express & MySQL, we'll be using the following libraries:
- Sequelize ORM
- Nodemailer
Sequelize is a NodeJS database ORM that makes it easier to run database migrations as well as security create queries. Nodemailer is a popular NodeJS email library that we’ll use to send password reset emails.
Security Tip 1
Some articles suggest secure password flows can be designed using JSON Web Tokens (JWT), which eliminate the need for database storage (and thus are easier to implement). We don’t use this approach on our site, because JWT token secrets are usually stored right in code. We want to avoid having ‘one secret’ to rule them all (for the same reason you don’t salt passwords with the same value), and therefore need to move this information into a database.
Installation
First, install Sequelize, Nodemailer, and other associated libraries:
$ npm install --save sequelize sequelize-cli mysql crypto nodemailerIn the route where you want to include your reset workflows, add the required modules. If you need a refresher on Express and routes, check out their guide.
const nodemailer = require('nodemailer');And configure it with your email SMTP credentials.
const transport = nodemailer.createTransport({
    host: process.env.EMAIL_HOST,
    port: process.env.EMAIL_PORT,
    secure: true,
    auth: {
       user: process.env.EMAIL_USER,
       pass: process.env.EMAIL_PASS
    }
});
The email solution I'm using is AWS's Simple Email Service, but you can use anything (Mailgun, etc).
If this is your first time setting up your email sending service, you'll need to spend some time configuring the appropriate Domain Keys and setting up authorizations. If you use Route 53 along with SES, this is super simple and done virtually automatically, which is why I picked it. AWS has some tutorials on how SES works with Route53.
Security tip 2
To store the credentials away from my code, I use dotenv, which lets me create a local .env file with my environment variables. That way, when I deploy to production, I can use different production keys that aren’t visible in code, and therefore lets me restrict permissions of my configuration to only certain members of my team.
Database Setup
Since we're going to be sending reset tokens to users, we need to store those tokens in a database.
I am assuming you have a functioning users table in your database. If you’re using Sequelize already, great! If not, you may want to brush up on Sequelize and the Sequelize CLI.
If you haven’t used Sequelize yet in your app, you can set it up by running the command below in your app’s root folder:
$ sequelize initThis will create a number of new folders in your setup, including migrations and models.
This will also create a config file. In your config file, update the development block with the credentials to your local mysql database server.
Let's use Sequelize's CLI tool to generate the database table for us.
$ sequelize model:create --name ResetToken --attributes email:string,token:string,expiration:date,used:integer
$ sequelize db:migrate
This table has the following columns:
- Email address of user,
- Token that has been generated,
- Expiration of that token,
- Whether the token has been used or not.
In the background, sequelize-cli is running the following SQL query:
CREATE TABLE `ResetTokens` (
  `id` int(11) NOT NULL AUTO_INCREMENT,
  `email` varchar(255) DEFAULT NULL,
  `token` varchar(255) DEFAULT NULL,
  `expiration` datetime DEFAULT NULL,
  `createdAt` datetime NOT NULL,
  `updatedAt` datetime NOT NULL,
  `used` int(11) NOT NULL DEFAULT '0',
  PRIMARY KEY (`id`)
) ENGINE=InnoDB AUTO_INCREMENT=21 DEFAULT CHARSET=utf8mb4 COLLATE=utf8mb4_0900_ai_ci;
Verify this worked properly using your SQL client or the command line:
mysql> describe ResetTokens;
+------------+--------------+------+-----+---------+----------------+
| Field      | Type         | Null | Key | Default | Extra          |
+------------+--------------+------+-----+---------+----------------+
| id         | int(11)      | NO   | PRI | NULL    | auto_increment |
| email      | varchar(255) | YES  |     | NULL    |                |
| token      | varchar(255) | YES  |     | NULL    |                |
| expiration | datetime     | YES  |     | NULL    |                |
| createdAt  | datetime     | NO   |     | NULL    |                |
| updatedAt  | datetime     | NO   |     | NULL    |                |
| used       | int(11)      | NO   |     | 0       |                |
+------------+--------------+------+-----+---------+----------------+
7 rows in set (0.00 sec)
Security Tip 3
If you're not currently using an ORM, you should consider doing so. An ORM automates the writing and proper escaping of SQL queries, making your code more readable and more secure by default. They’ll help you avoid SQL injection attacks by properly escaping your SQL queries.
Set Up Reset Password Route
Create the get route in user.js:
router.get('/forgot-password', function(req, res, next) {
  res.render('user/forgot-password', { });
});
Then create the POST route, which is the route that is hit when the reset password form is posted. In the code below, I’ve included a couple of important security features.
Security Tips 4-6
- Even if we don’t find an email address, we return 'ok' as our status. We don’t want untoward bots figuring out what emails are real vs not real in our database.
- The more random bytes you use in a token, the less likely it can be hacked. We are using 64 random bytes in our token generator (do not use less than 8).
- Expire the token in 1 hour. This limits the window of time the reset token works.
router.post('/forgot-password', async function(req, res, next) {
  //ensure that you have a user with this email
  var email = await User.findOne({where: { email: req.body.email }});
  if (email == null) {
  /**
   * we don't want to tell attackers that an
   * email doesn't exist, because that will let
   * them use this form to find ones that do
   * exist.
   **/
    return res.json({status: 'ok'});
  }
  /**
   * Expire any tokens that were previously
   * set for this user. That prevents old tokens
   * from being used.
   **/
  await ResetToken.update({
      used: 1
    },
    {
      where: {
        email: req.body.email
      }
  });

  //Create a random reset token
  var fpSalt = crypto.randomBytes(64).toString('base64');

  //token expires after one hour
  var expireDate = new Date(new Date().getTime() + (60 * 60 * 1000))

  //insert token data into DB
  await ResetToken.create({
    email: req.body.email,
    expiration: expireDate,
    token: fpSalt,
    used: 0
  });

  //create email
  const message = {
      from: process.env.SENDER_ADDRESS,
      to: req.body.email,
      replyTo: process.env.REPLYTO_ADDRESS,
      subject: process.env.FORGOT_PASS_SUBJECT_LINE,
      text: 'To reset your password, please click the link below.\n\nhttps://'+process.env.DOMAIN+'/user/reset-password?token='+encodeURIComponent(token)+'&email='+req.body.email
  };

  //send email
  transport.sendMail(message, function (err, info) {
     if(err) { console.log(err)}
     else { console.log(info); }
  });

  return res.json({status: 'ok'});
});
You’ll see a User variable referenced above — what is this? For the purposes of this tutorial, we’re assuming you have a User model that connects to your database to retrieve values. The code above is based on Sequelize, but you can modify as needed if you query the database directly (but I recommend Sequelize!).
We now need to generate the view. Using Bootstrap CSS, jQuery, and the pug framework built into the Node Express framework, the view looks like the following:
extends ../layout

block content
  div.container
    div.row
      div.col
        h1 Forgot password
        p Enter your email address below. If we have it on file, we will send you a reset email.
        div.forgot-message.alert.alert-success(style="display:none;") Email address received. If you have an email on file we will send you a reset email. Please wait a few minutes and check your spam folder if you don't see it.
        form#forgotPasswordForm.form-inline(onsubmit="return false;")
          div.form-group
            label.sr-only(for="email") Email address:
            input.form-control.mr-2#emailFp(type='email', name='email', placeholder="Email address")
          div.form-group.mt-1.text-center
            button#fpButton.btn.btn-success.mb-2(type='submit') Send email

  script.
    $('#fpButton').on('click', function() {
      $.post('/user/forgot-password', {
        email: $('#emailFp').val(),
      }, function(resp) {
        $('.forgot-message').show();
        $('#forgotPasswordForm').remove();
      });
    });
Here's the form on the page:
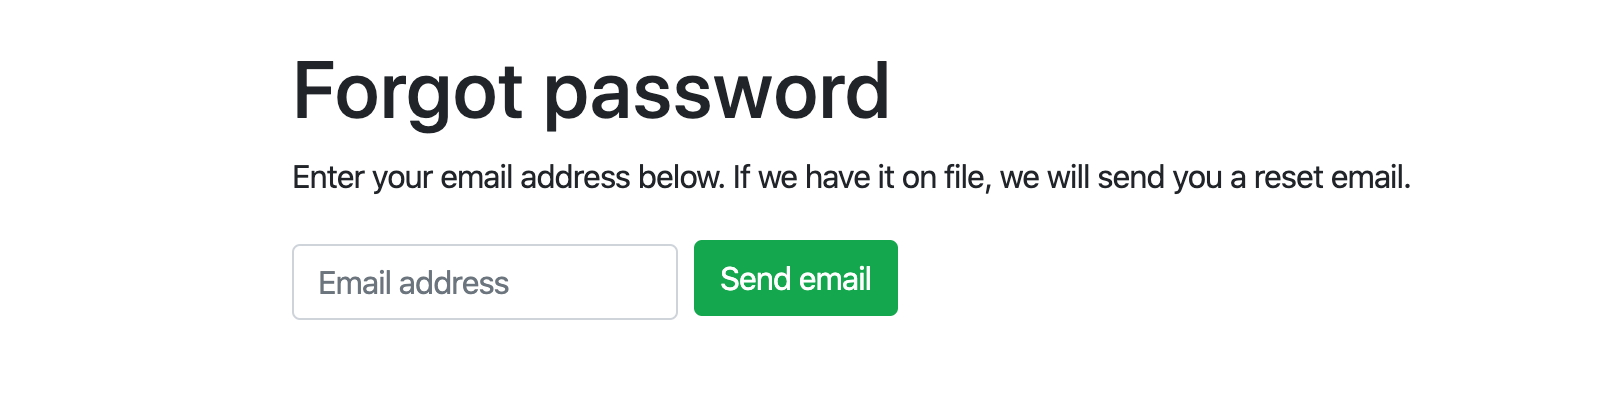
At this point, you should be able to fill out the form with an email address that's in your database, and then receive a reset password email at that address. Clicking the reset link won't do anything yet.
Set Up “Reset Password” Route
Now let's go ahead and set up the rest of the workflow.
Add the Sequelize.Op module to your route:
const Sequelize = require('sequelize');
const Op = Sequelize.Op;
Now let's build the GET route for users that have clicked on that reset password link. As you’ll see below, we want to make sure we’re validating the reset token appropriately.
Security Tip 7:
Ensure you’re only looking up reset tokens that have not expired and have not been used.
For demonstration purposes, I also clear up all expired tokens on load here to keep the table small. If you have a large website, move this to a cronjob.
router.get('/reset-password', async function(req, res, next) {
  /**
   * This code clears all expired tokens. You
   * should move this to a cronjob if you have a
   * big site. We just include this in here as a
   * demonstration.
   **/
  await ResetToken.destroy({
    where: {
      expiration: { [Op.lt]: Sequelize.fn('CURDATE')},
    }
  });

  //find the token
  var record = await ResetToken.findOne({
    where: {
      email: req.query.email,
      expiration: { [Op.gt]: Sequelize.fn('CURDATE')},
      token: req.query.token,
      used: 0
    }
  });

  if (record == null) {
    return res.render('user/reset-password', {
      message: 'Token has expired. Please try password reset again.',
      showForm: false
    });
  }

  res.render('user/reset-password', {
    showForm: true,
    record: record
  });
});
Now let's create the POST route which is what is hit once the user fills out their new password details.
Security Tip 8 Through 11:
- Make sure that the passwords match and meet your minimum requirements.
- Check the reset token again to make sure it has not been used and has not expired. We need to check it again because the token is being sent by a user via the form.
- Before resetting the password, mark the token as used. That way, if something unforeseen happens (server crash, for example), the password won’t be reset while the token is still valid.
- Use a cryptographically secure random salt (in this case, we use 64 random bytes).
router.post('/reset-password', async function(req, res, next) {
//compare passwords
if (req.body.password1 !== req.body.password2) {
return res.json({status: 'error', message: 'Passwords do not match. Please try again.'});
}
/**
* Ensure password is valid (isValidPassword
* function checks if password is >= 8 chars, alphanumeric,
* has special chars, etc)
**/
if (!isValidPassword(req.body.password1)) {
return res.json({status: 'error', message: 'Password does not meet minimum requirements. Please try again.'});
}
var record = await ResetToken.findOne({
where: {
email: req.body.email,
expiration: { [Op.gt]: Sequelize.fn('CURDATE')},
token: req.body.token,
used: 0
}
});
if (record == null) {
return res.json({status: 'error', message: 'Token not found. Please try the reset password process again.'});
}
var upd = await ResetToken.update({
used: 1
},
{
where: {
email: req.body.email
}
});
var newSalt = crypto.randomBytes(64).toString('hex');
var newPassword = crypto.pbkdf2Sync(req.body.password1, newSalt, 10000, 64, 'sha512').toString('base64');
await User.update({
password: newPassword,
salt: newSalt
},
{
where: {
email: req.body.email
}
});
return res.json({status: 'ok', message: 'Password reset. Please login with your new password.'});
});
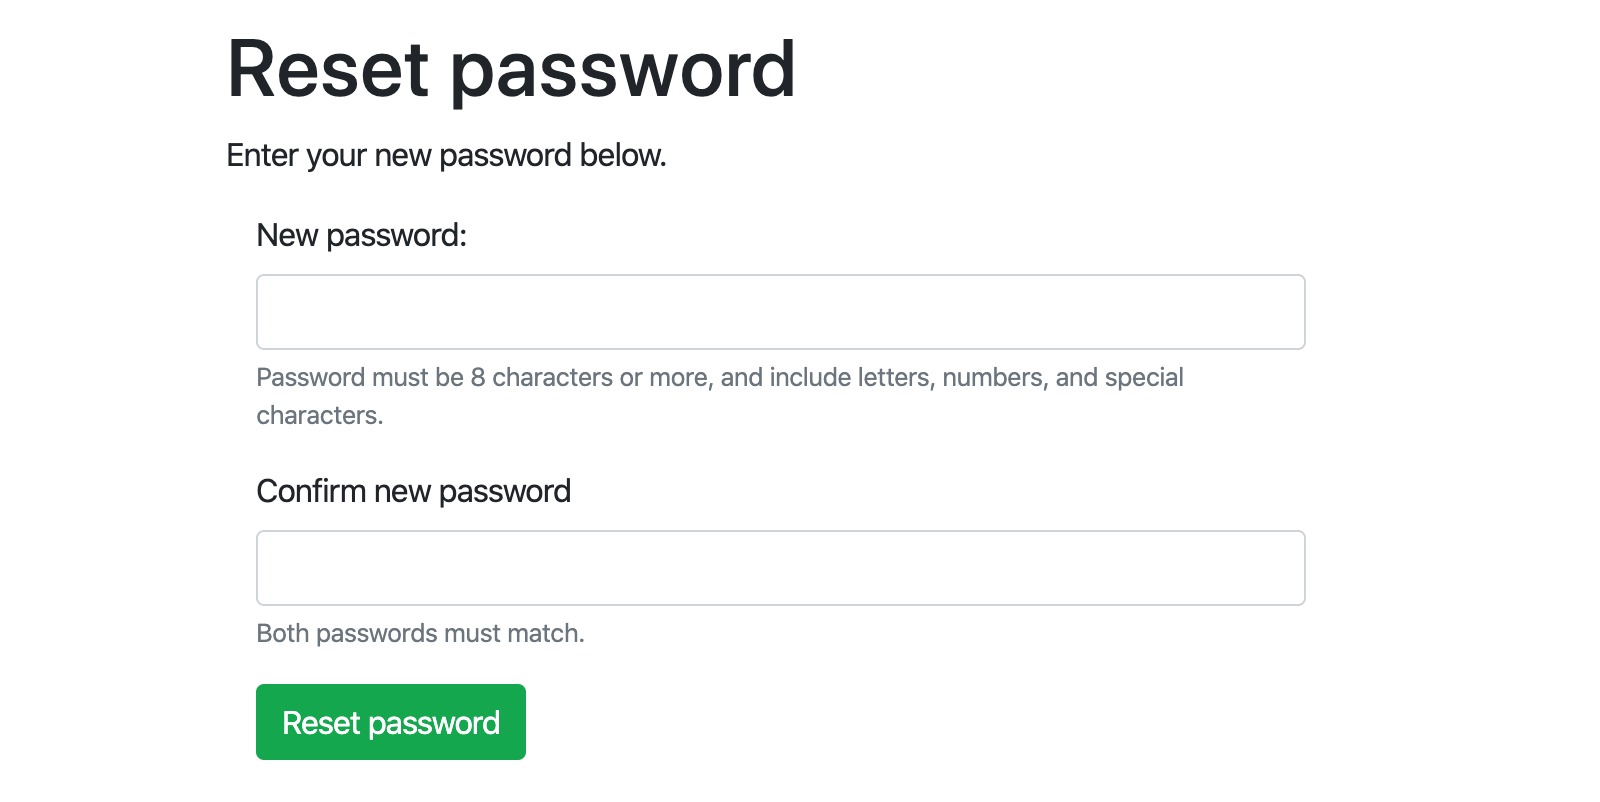
And again, the view:
extends ../layout
block content
div.container
div.row
div.col
h1 Reset password
p Enter your new password below.
if message
div.reset-message.alert.alert-warning #{message}
else
div.reset-message.alert(style='display:none;')
if showForm
form#resetPasswordForm(onsubmit="return false;")
div.form-group
label(for="password1") New password:
input.form-control#password1(type='password', name='password1')
small.form-text.text-muted Password must be 8 characters or more.
div.form-group
label(for="password2") Confirm new password
input.form-control#password2(type='password', name='password2')
small.form-text.text-muted Both passwords must match.
input#emailRp(type='hidden', name='email', value=record.email)
input#tokenRp(type='hidden', name='token', value=record.token)
div.form-group
button#rpButton.btn.btn-success(type='submit') Reset password
script.
$('#rpButton').on('click', function() {
$.post('/user/reset-password', {
password1: $('#password1').val(),
password2: $('#password2').val(),
email: $('#emailRp').val(),
token: $('#tokenRp').val()
}, function(resp) {
if (resp.status == 'ok') {
$('.reset-message').removeClass('alert-danger').addClass('alert-success').show().text(resp.message);
$('#resetPasswordForm').remove();
} else {
$('.reset-message').removeClass('alert-success').addClass('alert-danger').show().text(resp.message);
}
});
});
This is what it should look like:
Add The Link To Your Login Page
Lastly, don’t forget to add a link to this flow from your login page! Once you do this, you should have a working reset password flow. Be sure to test thoroughly at each stage of the process to confirm everything works and your tokens have a short expiration and are marked with the correct status as the workflow progresses.
Next Steps
Hopefully this helped you on your way to coding a secure, user-friendly reset password feature.
- If you are interested in learning more about cryptographic security, I recommend Wikipedia’s summary (warning, it’s dense!).
- If you want to add even more security to your app’s authentication, look into 2FA. There are a lot of different options out there.
- If I’ve scared you off from building your own reset password flow, you can rely on third-party login systems like Google and Facebook. PassportJS is a middleware you can use for NodeJS that implements these strategies.
Further Reading
- Building And Dockerizing A Node.js App With Stateless Architecture With Help From Kinsta
- Rethinking Authentication UX
- Uniting Web And Native Apps With 4 Unknown JavaScript APIs
- Passkeys: A No-Frills Explainer On The Future Of Password-Less Authentication


