Building A Web App With Headless CMS And React

Email Newsletter
Weekly tips on front-end & UX.
Trusted by 182,000+ folks.


 Custom Web Forms for Angular, React, & Vue. Your backend.
 Celebrating 10 million developers
In this tutorial, you’ll learn what Headless CMS is, and the pros and cons of Headless CMS. In the end, youll have built a shopping cart using GraphCMS (a (backend-only content management system). After that, you can go ahead and build any web app of your choice using a headless CMS and React.
To follow along, you need to have Node and npm/yarn installed on your machine. If you do not have that done already, follow these quick guides to install yarn or npm on your machine. You also need to have a basic understanding of React, Node.js and GraphQL queries. (You can always brush up on React and GraphQL skills, of course!)
As digital products continue to evolve, so does the content we consume. A scalable, cross-platform content management system is crucial to ensuring a product’s growth velocity. Traditional CMS gives the comfort of having the content, the editing interface, templates and custom codes, in a single environment. But with the changes in this mobile era, that’s no longer enough. We need a new breed of CMS — one that can make content available through any channel at which point a Headless CMS is required. A headless CMS gives you the benefits of managing the content and delivering it to any channel. The API makes contents available through any channel and on any device using most favorite tools and programming languages plus it also provides a higher level of security and much better scalability.
What Does This Look Like In Practice?
What happens when you take away the frontend of a CMS? The biggest distinction is that a website can’t be built with a headless CMS on its own. With a traditional CMS, everything happens in the same place.
A headless CMS doesn’t have the features that let you build your site — it doesn’t have site themes or templates. To use a headless CMS, you have to build a site or app, or other experience first, then use the CMS’s API to plug your content into it.
Why Should You Care About Headless?
A headless CMS comes with an API friendly approach, which makes it possible to publish content through an API (either RESTful or GraphQL). It allows you to use the same API to deliver content across various channels such as Android or IOS apps, smartwatches, AR/VR, etc. A headless CMS gives developers the ability to harness creativity quickly. With a traditional CMS, changes can be time-consuming, for example, to tweak a part of your site, you need to re-implement the entire CMS. With a headless CMS, you can make changes to your frontend without having any impact on the back-end infrastructure, hence saving yourself time and resources, which makes it much better.
Traditional Vs Headless CMS: The Pros And Cons
It can be complicated to choose between a headless and a traditional CMS. The fact is, they both have potential advantages and drawbacks.
Traditional CMS Pros
- It allows for easy customization. A lot of them have drag and drop, this makes it easy for a person without programming experience to work seamlessly with them.
- It’s easier to set up your content on a traditional CMS as everything you need (content management, design, etc) are already available.
Traditional CMS Cons
- The coupled front-end and back-end results in more time and money for maintenance and customization.
- Traditional CMS e.g Wordpress relies heavily on plugins and themes which may contain malicious codes or bugs and slow the speed of the website or blog. Here’s a list of 18,305 vulnerable WordPress plugins, themes. Here are security measures for Drupal developers. Check here for more facts.
Headless CMS Pros
- Since the frontend and backend are separated from each other, it makes it possible for you to pick which front-end technology suits your needs. This also gives the developer flexibility during the development stage.
- Platforms (blogs, websites, etc) built with headless CMS can be deployed to work on various displays such as web, mobile, AR/VR, and so on.
Headless CMS Cons
- They give you the hassle of managing back-end infrastructures, setting up the presentation component of your site, app.
- They can be more costly to implement — the cost involved in building a user-friendly platform with analytics is high when compared to using traditional CMS.
Best Use Cases For Headless CMS
Headless CMS can have the following use cases:
- Static Site Generators (e.g. Gridsome, Gatsby)
Many Jamstack sites created with static site generators like Gridsome, Hugo or Gatsby make use of the headless CMS to manage content, they cannot access a database, Hence content can be stored in a headless CMS and fetched through an API during build time and deployed as static files.
- Mobile Apps (iOS, Android)
The advantage of a headless CMS for mobile engineers is that the API enables them to deliver content to an IOS/Android app from the same backend that manages content for their web site, which keeps things in sync.
- Web Applications
This approach involves serving content through an API which is then consumed by a web application but offers a centralized place for managing content. An example is an e-commerce application built using HTML, CSS, and JavaScript with content and product data that are maintained in the CMS and served via an external API.
Types Of Headless CMS
There is a list of headless CMSs you might what to check out.
Please note that this article is not written to promote any services or products.
- Contentful
An API-driven headless CMS designed to create, manage and distribute content to any platform. Unlike a traditional CMS, they offer the ability to create your content model so that you can decide what type of content you want to manage. - GraphCMS
A headless CMS for users who want to build a GraphQL content infrastructure for their digital products. This CMS is fully built as API focused from the ground up, allowing creators to define the structures, permissions, and relations for the API parameters. In this article, we’d be using GraphCMS because of its GraphQL API approach. - ButterCMS
A CMS that gives complete freedom to build a website or a branded blog with full SEO and supports any tech stack. This tool saves you money and the time for site development time. Butter CMS is a maintenance-free headless CMS tool and can integrate with any language or framework. The powerful interface helps you define and customize every element of your website without any hassle. - Directus
An open-source tool that wraps custom SQL databases with a dynamic API and provides an intuitive admin app for managing its content. Self-host for free, or use the on-demand Cloud service to manage all your omnichannel digital experiences. - Sanity
Another API driven platform for managing structured content. With Sanity, you can manage your text, images, and other media with APIs. You can also use the open-source single page application Sanity Studio to quickly set up an editing environment that you can customize. - Agility
A JAMStack focused Headless CMS with Page Management built-in. Faster to build, manage, and deploy. Agility CMS is a Content-First Headless CMS, allowing you to choose any programming language while also getting the flexibility, speed, and power that comes from lightweight APIs. From there, add features like Page Management, Ecommerce, Online Ticketing, and Search. Agility CMS becomes a complete Digital Experience Platform–saving time, removing limitations and allowing for seamless experiences across all digital channels. - Netlify CMS
A free and open-source, git-based CMS created by Netlify. It allows you to define your content model, integrates third-party authentication and extends the capabilities of its backend (a single-page app built on React).
Note: All of the examples mentioned above have free and paid versions, except Directus and Netlify CMS which are free. For a list of more headless CMS, check here.
In this article, we’re using GraphCMS — a GraphqQL API-oriented headless content management system that takes care of our back-end architecture.
Using GraphCMS
Content is both dynamic and multi-channeled, however current content management systems (CMS) lack the flexibility to meet the demands of modern-day digital content distribution. GraphCMS is the first HeadlessCMS built around GraphQL and offers a solution to this problem with its mission to facilitate painless content flow between content creators, developers, and consumers.
GraphCMS accept almost any kind of data you can imagine ranging from images, maps, etc. It even makes roles and permissions easy. While other headless CMS solutions exist, GraphCMS aims to provide a hassle-free experience for developers; through leveraging an API specification called GraphQL. It eliminates the need for multiple SDKs to interact with content delivery and provides simple multi-channel content accessibility. It makes creating rich content apps very easy.
GraphCMS And GraphQL
GraphCMS solely relies on GraphQL, its backbone API specification. GraphQL is API query language and runtime. It was developed by Facebook in 2012 and released open-sourced in 2015. Since then, the likes of Pinterest, Github, Twitter, Intuit, Coursera have all adopted GraphQL to power their mobile apps, websites, and APIs. GraphQL is similar to REST in its core purpose of providing a specification for building and utilizing APIs. However, unofficially dubbed “REST 2.0”, GraphQL has optimized different key functionality offered by REST.
The main uniqueness of GraphQL includes protocol-agnostic usage, controlled data fetching, editable fields, and types and in-depth error handling. The results include removal of code redundancy, prevention of over and under fetching data, and significant reduction of network requests.
As a concrete example, let’s take the relationship of a query to a newsfeed. A newsfeed post has an author, a title and comments. If we use a REST-based CMS, we would have to make 3 different server requests for these 3 different endpoints, whereas, in a GraphQL based CMS, we would only have to make 1 request for all 3. Consequently, the results offer relatively quicker queries and less network flooding — in a practical use case, it would not just be one entity making multiple requests, but thousands and millions.
GraphQL reduces the complexity of building APIs by abstracting all requests to a single endpoint. Unlike traditional REST APIs, it is declarative; whatever is requested is returned.
GraphCMS has a generous free tier of 1 million API operations requests per month and 500 GB assets traffic. Also, GraphCMS provides a Graphiql admin interface that provides you full access to your data and you could just download it all and then execute a create many mutations against your new backend to migrate everything over.
In this article, we’ll be using the free tier of 1 million API operations per month and 500 GB asset traffic. You can make use of the same tier for testing, for projects that need more than this, do well to check out their pricing page.
Building Our Project
To see the power of Headless CMS using GraphCMS we would be building a simple shopping cart.
Getting Started
To get started with GraphCMS follow the steps.
- Create an account on GraphCMS. You can use the free tier.

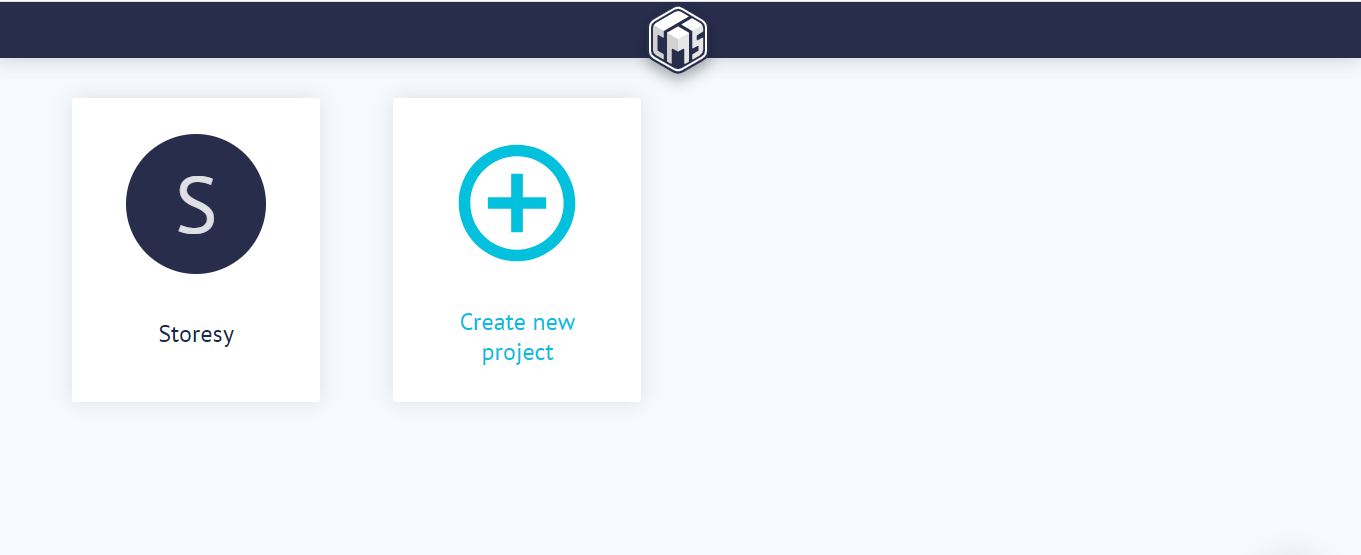
- At successful signup, you’ll be taken to your dashboard. Click on create a new project.
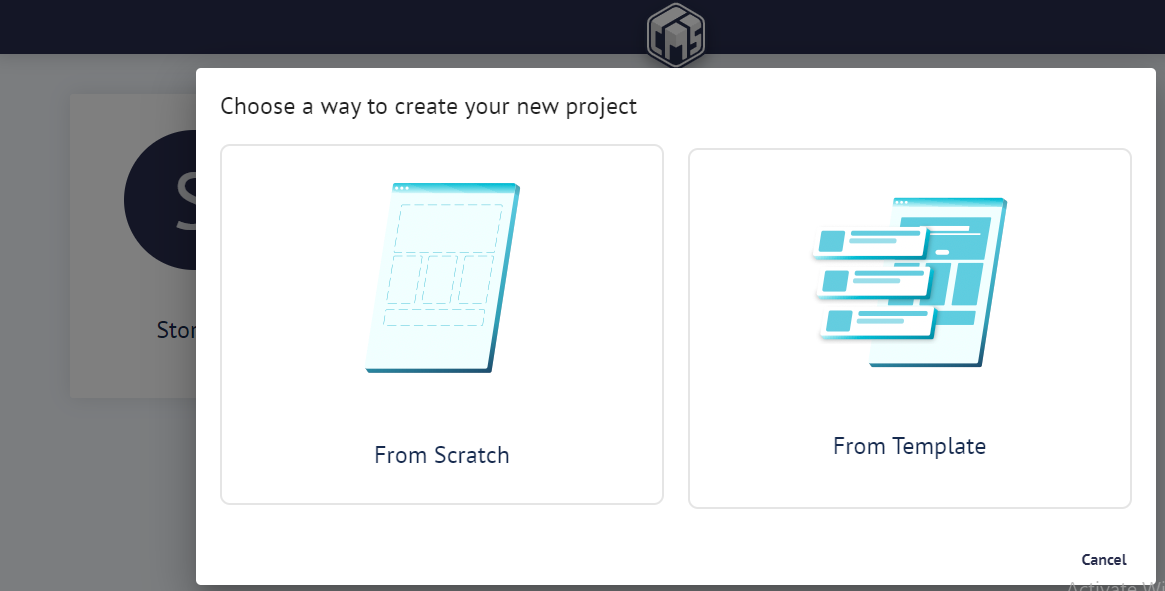
- Ensure you click on create a project from scratch.
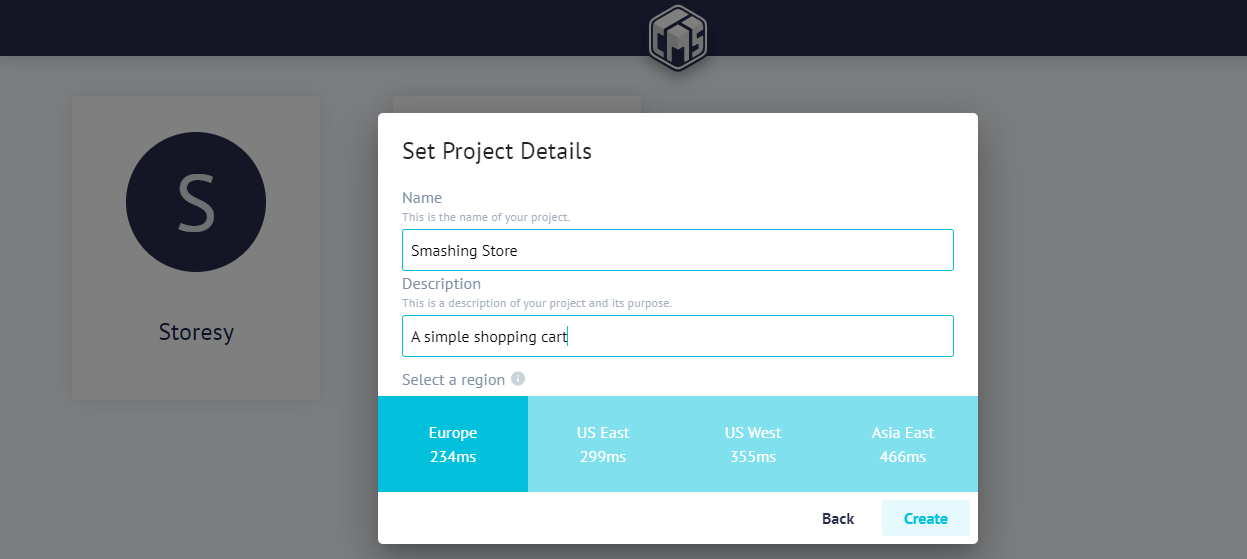
- Set project details for the project fill in what is in the image below and click create.
- In our dashboard, we would create our models and content.
- Select the schema in the sidebar of the dashboard to create a schema.
GraphCMS has an awesome drag and drop UI, that make it easy to seamlessly create schema in minutes.
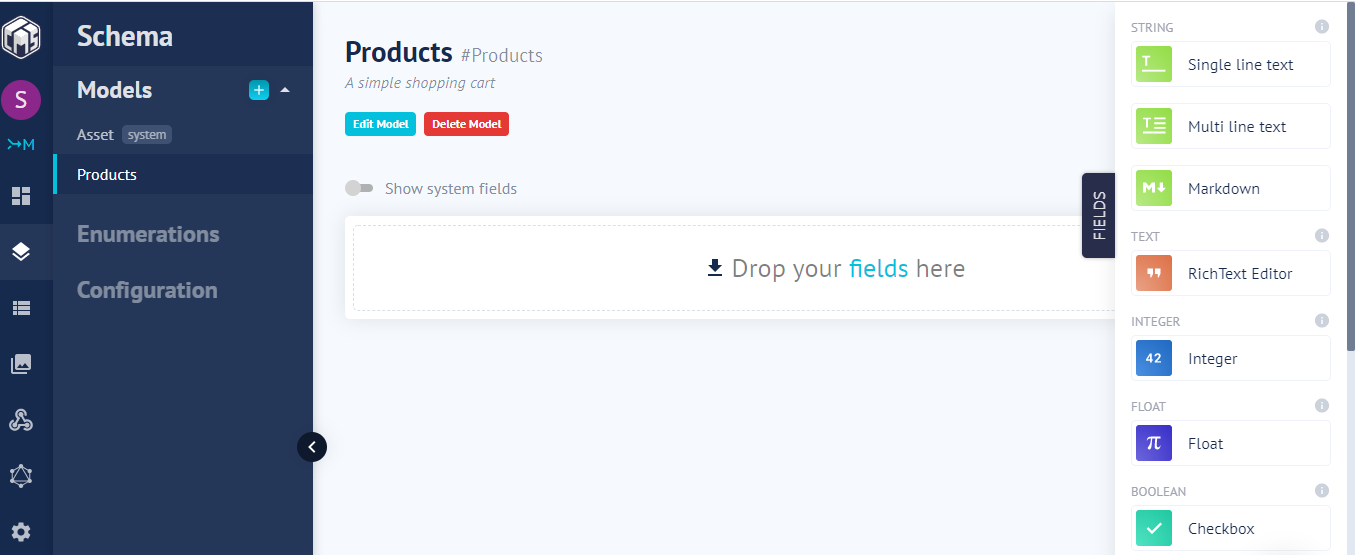
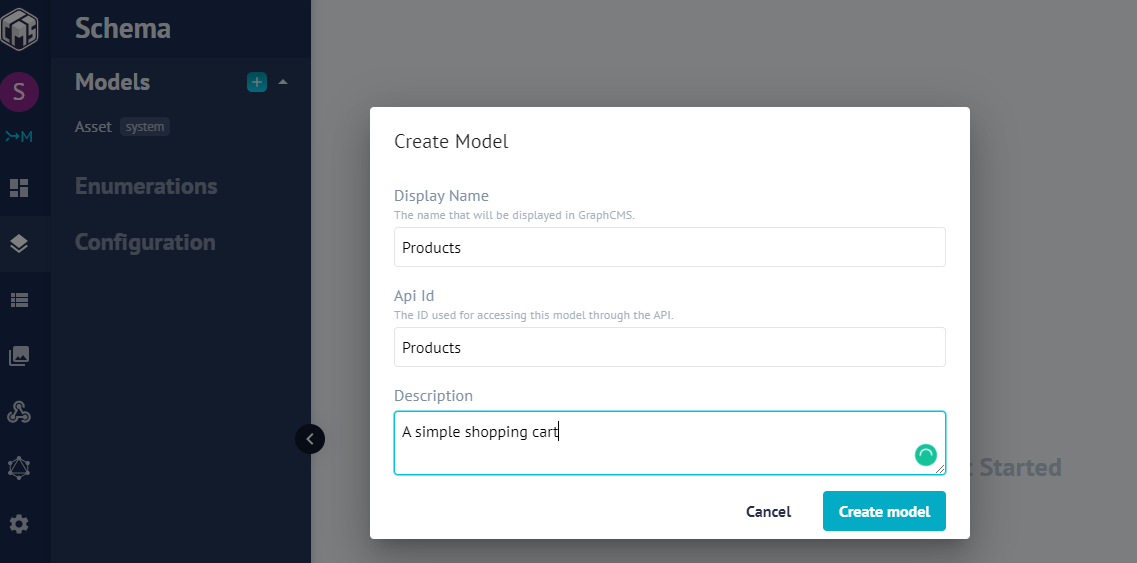
- Let’s go ahead and create our
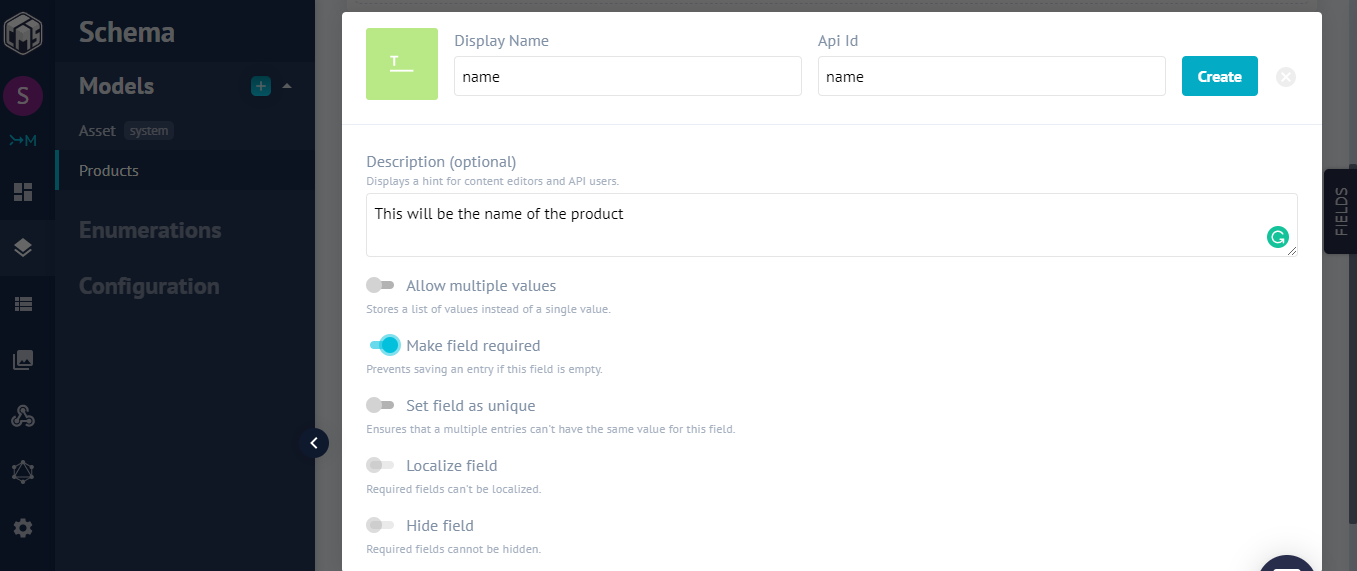
system fieldsin our schema.- name: “”
- type: The field type is a String, Single line Text.
- Is required
- description: It’s the name of the product.
- price: “”
- type: The field type is int.
- Is required
- description: It will contain the price of our product.
- description: “”
- type: The field type is a String, Multi-line Text.
- Is required
- description: This field will contain the description of our product.
- image: “”
- type: The field type is the file, which is an Asset Picker.
- Is required
- description: This image field will contain the image of our product.
Note: Click on the ‘Advance’ tab to select the required option in our fields.
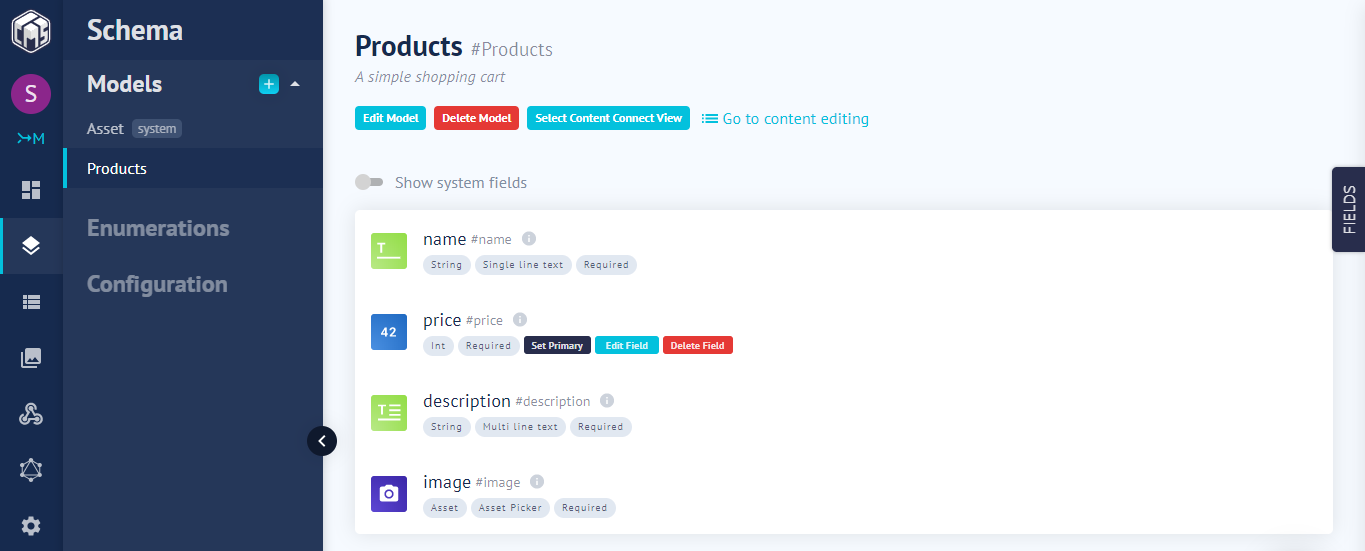
- If all went well, you should have our schema looking the image below:
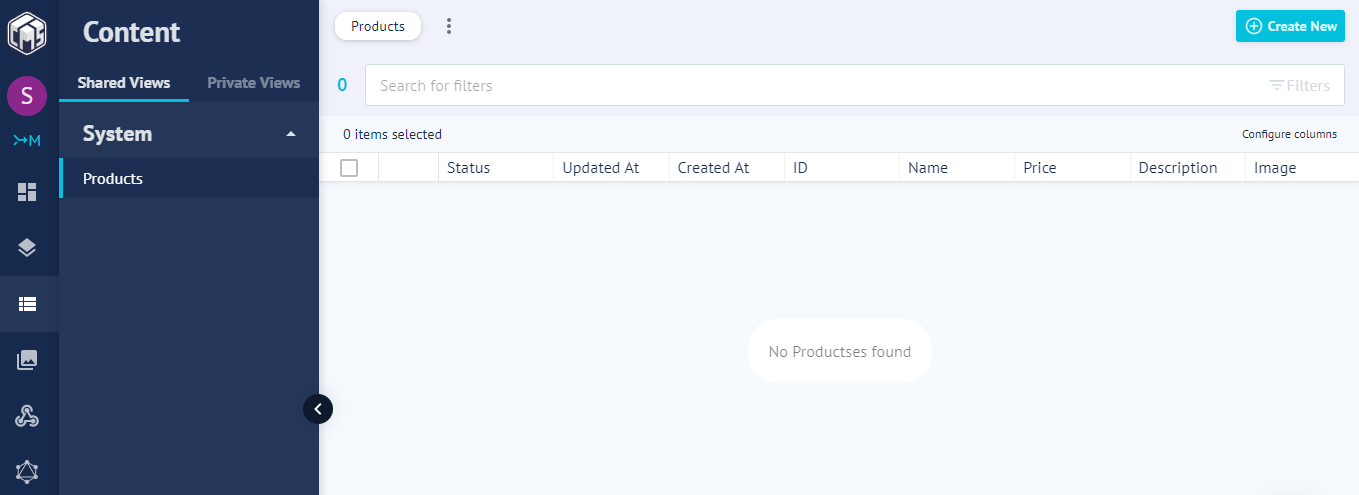
- Currently, we have no content. Click on ‘Content’ in the sidebar that should take you the Content section, and click on ‘Create New’.
- Let’s add a few contents so we can display them later in our app using React.
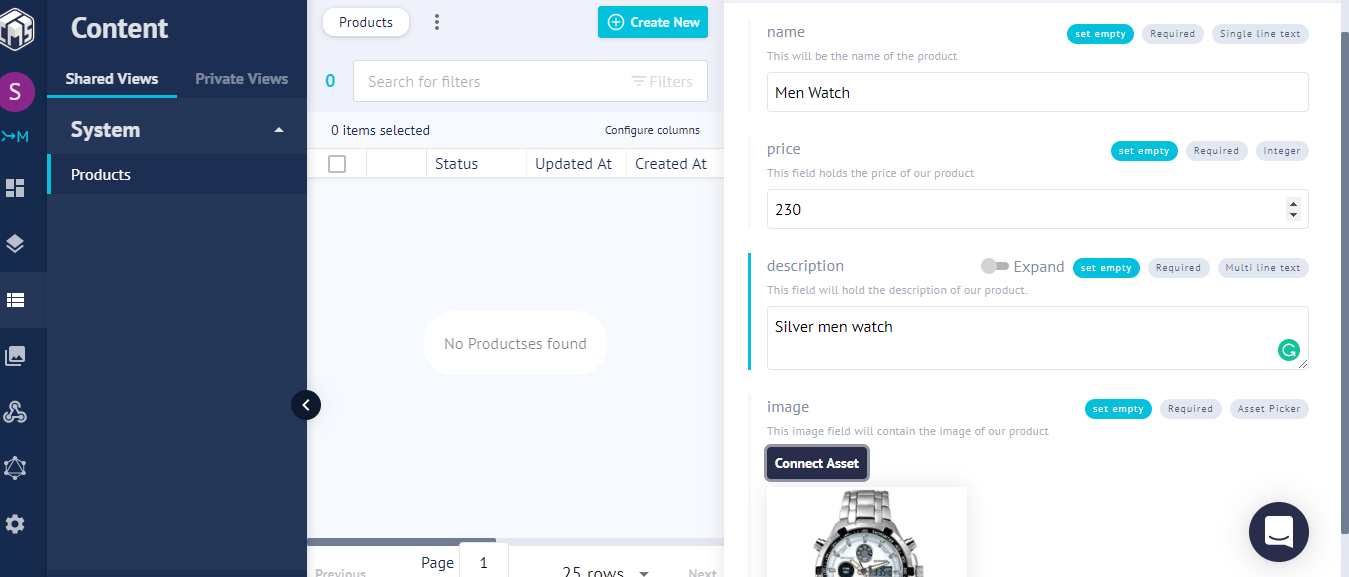
- Add a few more content if you desire. Here’s our result.

- Next, copy the API endpoint URL (Click on the Dashboard) — this is the single endpoint for communication between our React front end and GraphCMS back end.

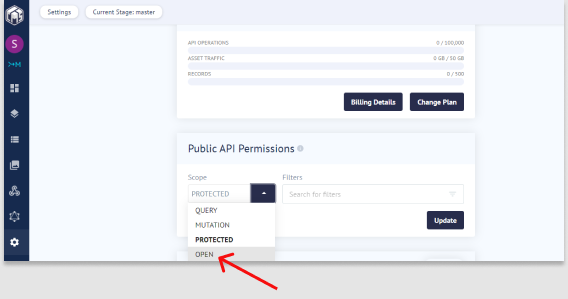
Next, let’s make our API endpoint accessible.
- Navigate to Settings Under Public API Permission and click on the drop-down and select OPEN and click the update button.
Setting Up React
The easiest way to set up React is to use Create-React-App. (This is an officially supported way to create single-page React applications, and offers a modern build setup with no configuration.) We’ll make use of it to bootstrap the application we’ll be building.
From your terminal, run the command below:
npx create-react-app smashing-stores && cd smashing-storesOnce the installation is successful, start the React server by running npm start.
Creating Our Layout
In creating the layout for our project, we will have five different components.
Navbar | To hold our navigation and cart icon |
Allproducts | To display a list of all products |
Product | The markup for a single product |
Footer | The footer of our app |
Cart | To hold the items in our cart |
For a quick setup, we will be using Bootstrap to create our components. To include Bootstrap, we would use bootstrap CDN, open up your index.html in the public folder, add the link to the head section:
https://stackpath.bootstrapcdn.com/bootstrap/4.4.1/css/bootstrap.min.cssNow we can make use of bootstrap classes in our application.
Next, create a /components folder and create the following files inside it:
- Navbar.js
- Allproducts.js
- Product.js
- Footer.js
- Cart.js
Creating Our Navbar
Open up the Navbar.js and add the following code:
import React from 'react';

const Navbar = () => {
  return (
    <nav className="navbar navbar-light bg-light">
      <a href="/" className="navbar-brand">Smashing Stores</a>
        <button className="btn btn-outline-success my-2 my-sm-0" type="submit">Cart</button>
    </nav>
  );
};
export default Navbar;
We declared a functional component Navbar, we return our nav tag with a bootstrap class of navbar navbar-light bg-light. What these classes do is to apply a Navbar with a light background. Inside our nav element, we included an anchor tag with a link to just forward-slash(Homepage) and a class of navbar-brand.
The styled button in the Navbar component has a class named navbar navbar-light bg-light. What this class does it to ensure that our button has a light blue background color and a shadow when hovered.
Creating Our Footer.js
Next, let’s create our Footer. Open up the Footer.js file and add the following code to it:
import React from 'react';
import '../App.css';
const Footer = () => {
  return (
      <footer className="page-footer font-small bg-blue pt-4">
        <div className="container text-center text-md-left">
          <div className="row">
            <div className="col-md-6 mt-md-0 mt-3">
              <h5 className="text-uppercase font-weight-bold">Contact Us</h5>
              <p>You can contact us on hi@smashingstores.com</p>
            </div>
            <div className="col-md-6 mb-md-0 mb-3">
              <h5 className="text-uppercase font-weight-bold">Smashing Stores</h5>
              <p>Built with 💕 by <a href="https://twitter.com/beveloper">beveloper</a></p>
            </div>
          </div>
        </div>
        <div className="footer-copyright text-center py-3">© 2020 Copyright
          <span> Smashing Stores</span>
        </div>
      </footer>
  );
};
export default Footer;
We added contact-us email using h5 and paragraph element. Lastly, on this footer section, we added copyright with the name “Smashing Stores”.
Our footer needs some styling so we’d add the following styles to the App.css file:
footer {
  position: absolute;
  bottom: -55px;
  width: 100%;
  background-color: #333;
  color:#fff;
}
Before we create our product component, we need to query GraphCMS to send us our product details to display. Let’s do that now.
Connecting To The GraphCMS Backend With GraphQL
To connect our application to the backend, we need to install a couple of GraphQL packages. One of the libraries we can use is apollo-boost which gives a client the avenue for connecting to the GraphQL backend using a URI (Uniform Resource Identifier).
The URI is the endpoint provided by GraphCMS and is available on the endpoint section of the dashboard.
Run the following command in your terminal to install the necessary packages:
npm install apollo-boost graphql graphql-tag react-apolloOnce you’re done with the installation update the index.js file in the /src directory to the following code:
import React from 'react';
import ReactDOM from 'react-dom';
import './index.css';
import App from './App';
import { ApolloProvider } from "react-apollo";
import ApolloClient from "apollo-boost";
import * as serviceWorker from './serviceWorker';

const client = new ApolloClient({
  uri: "<YOUR_GRAPHCMS_ENDPOINT>"
});

ReactDOM.render(
  <ApolloProvider client={client}>
    <App />
  </ApolloProvider>,
  document.getElementById('root')
);

serviceWorker.unregister();
Here, we wrapped our entire application with the ApolloProvider which takes a single prop: the client. The ApolloProvider loads the Graph CMS schema and gives us access to all properties of the data model inside our application which is possible because our App component is a child of the ApolloProvider component.
Displaying Our Products
If you got this far, pat yourself on the back. 👍 We’ve been able to load our schema from GraphCMS into our application.
The next step is to fetch and display our products. Create an /all-product folder under the /component folder and then create an index.js file and add the following to it:
import gql from "graphql-tag";
const PRODUCTS_QUERY = gql`
  query {
    productses {
      id
      name
      price
      description
      createdAt
      image {
        id
        url
      }
    }
  }
`;
export default PRODUCTS_QUERY;
What are “productses”? Our model name is products, but GraphQL pluralizes models, hence the name.
Next, we created a variable called PRODUCTS_QUERY that stores the query from our GraphQl back end. The gql function is used to parse (analyze an object, as it were in our schema) the plain string that contains the GraphQL code (if you’re unfamiliar with the backtick-syntax, you can read up on JavaScript’s tagged template literals).
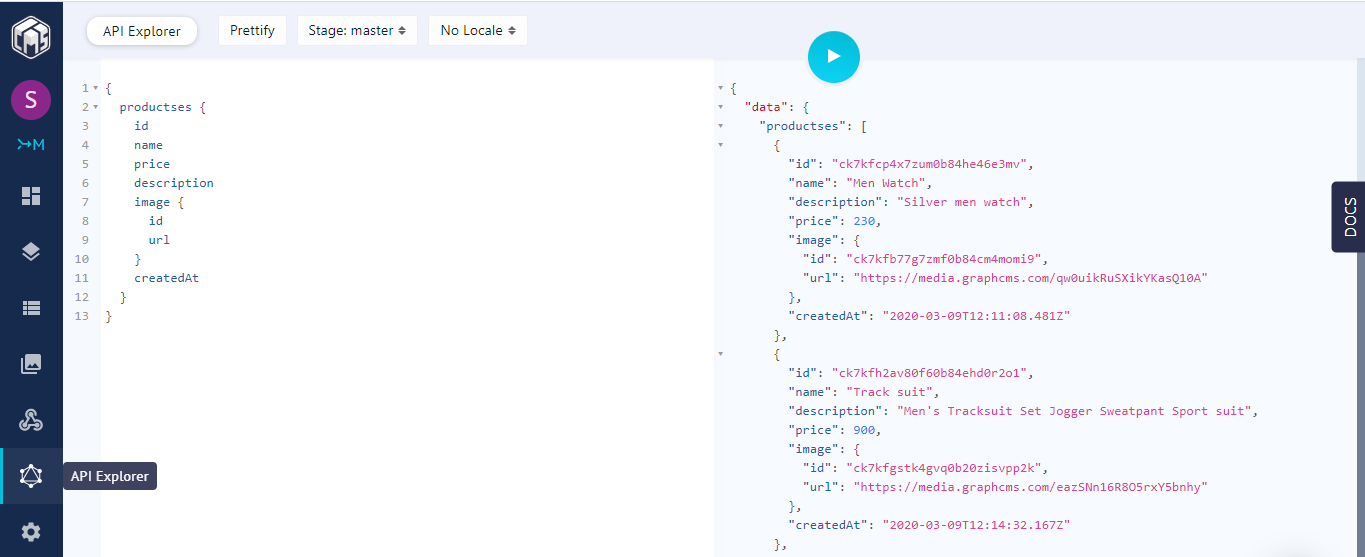
GraphCMS provides a handy GraphQL explorer named (graphiql) specifically for testing our query.
Now that our query works as it should. Let’s go ahead and create our product’s components.
Creating The Allproducts Component
Open up the Allproducts.js file and add the following code to it:
import React, { Component } from 'react';
import { Query } from 'react-apollo';
import PRODUCTS_QUERY from './all-products/index';
import Product from './Product';
import Cart from './Cart';
import Navbar from './Navbar';
class Allproducts extends Component {
  constructor(props) {
    super(props);
    this.state = {
      cartitems: []
    };
  }
    addItem = (item) => {
      this.setState({
          cartitems : this.state.cartitems.concat([item])
      });
    }
  render() {
    return (
      <Query query={PRODUCTS_QUERY}>
       {({ loading, error, data }) => {

          if (loading) return <div>Fetching products.....</div>
          if (error)   return <div>Error fetching products</div>

          const items = data.productses;
          return (
            <div>
              <Navbar/>
              <div className="container mt-4">
                <div className="row">
                   {items.map(item => <Product key={item.id} product={item} addItem={this.addItem} />)}
                </div>
              </div>
            </div>
          )
        }}
      </Query>
    );
  }

};
export default AllProducts;
Here, we wrapped our products with the <Query/> component and passed the PRODUCTS_QUERY as props. Apollo injected several props into the component’s render prop function. These props themselves provide information about the state of the network request:
loading | This occurs during ongoing requests. |
error | This occurs when the requests fail. |
data | This is data received from the server. |
Finally, we loop through all the received items and pass them as a prop to our Product component. Before we see what it looks like, let’s create our Product component.
Creating Product Component
Open up Product.js and add the following code to it:
import React from 'react';
const Product = (props) => {
  return (
      <div className="col-sm-4">
          <div className="card" style={{width: "18rem"}}>
            <img src={props.product.image.url} className="card-img-top" alt="shirt"/>
            <div className="card-body">
              <h5 className="card-title">{props.product.name}</h5>
              <p className="card-title">$ {props.product.price}</p>
              <p className="card-title">{props.product.description}</p>
              <button className="btn btn-primary" onClick={() => props.addItem(props.product)}>Buy now</button>
            </div>
          </div>
      </div>
  );
}
export default Product;
Since our Product.js is a functional component that receives product details via props and displays them, we call the addItem function on the onClick event listener to add the current product to the cart when it clicked.
Importing Our Components Into App.js
With our components setup, it’s time we import our components into our App.js base component.
Open it up and add the following to it:
import React from 'react';
import './App.css';
import Footer from './components/Footer';
import Products from './components/Allproducts';
function App() {
  return (
    <div className="App">
      <Products />
      <Footer/>
    </div>
  );
}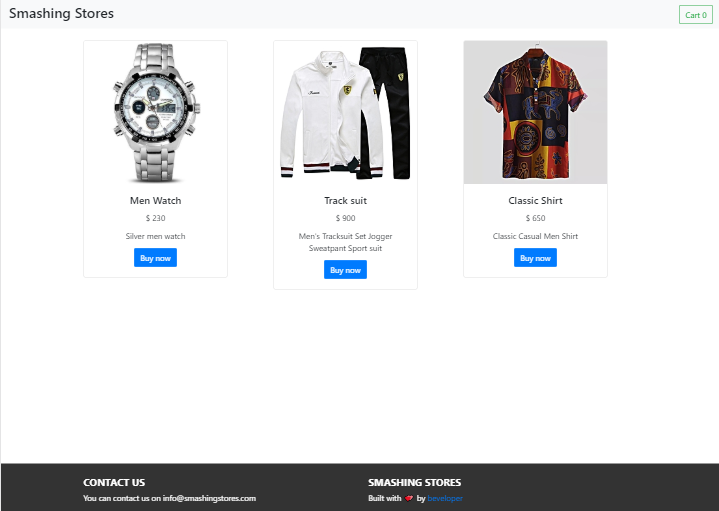
export default App;- From lines 3-4, we imported both Footer and Products component in the App component.
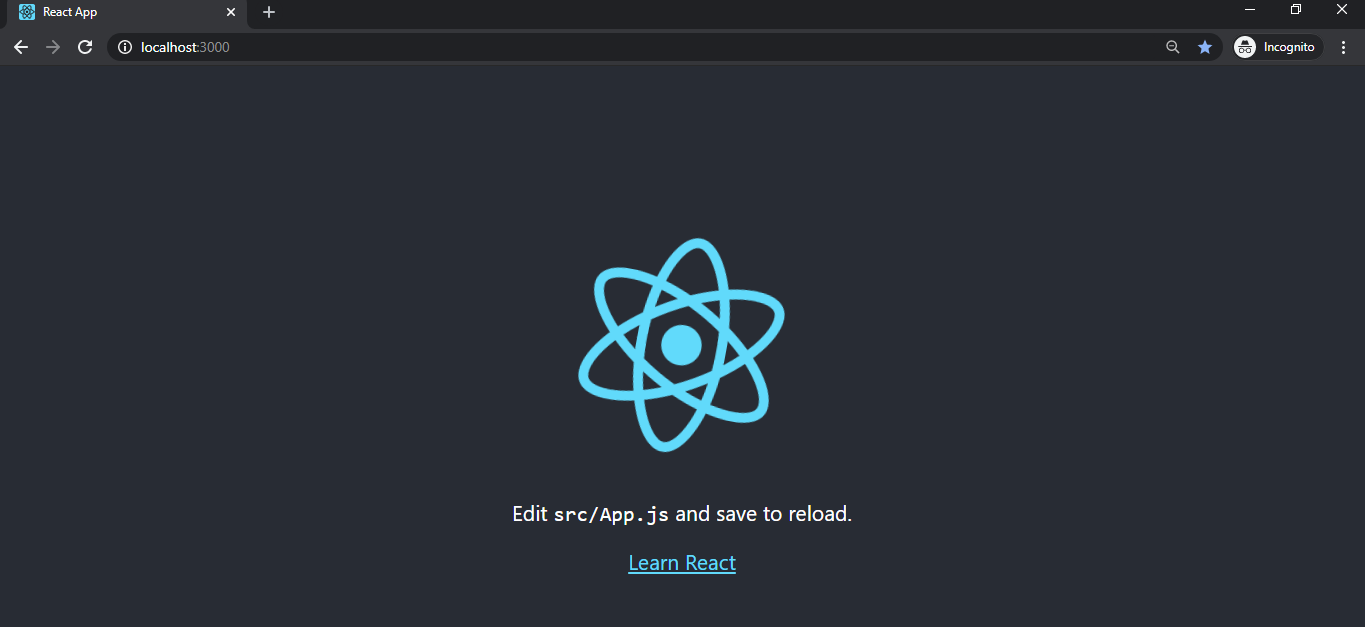
Next, type npm start in your terminal then navigate to https://localhost:3000 in your browser, and you will see the following:
We’re close to the end of our project, but our products need a feature that adds items to the cart.
Creating Our Cart Component
To include our cart functionality, we’d need to add some methods to our components.
Let’s update our Allproducts.js file to this:
import React, { Component } from 'react';
import { Query } from 'react-apollo';
import PRODUCTS_QUERY from './all-products/index';
import Product from './Product';
import Cart from './Cart';
import Navbar from './Navbar';
class Allproducts extends Component {
  constructor(props) {
    super(props);
    this.state = {
      cartitems: [],
      show: false
    };
  }
    addItem = (item) => {
      this.setState({
          cartitems : this.state.cartitems.concat([item])
      });
    }
    showModal = () => {
      this.setState({ show: true });
    };
    hideModal = () => {
      this.setState({ show: false });
    };
  render() {
    return (
          <Query query={PRODUCTS_QUERY}>
           {({ loading, error, data }) => {
              if (loading) return <div>Fetching</div>
              if (error)   return <div>Error</div>
              const items = data.productses
              const itemssent = this.state.cartitems;
               return (
                <div>
                 <Navbar cart={itemssent} show={this.showModal} />
                 <Cart show={this.state.show} items={itemssent} handleClose={this.hideModal}>
                  </Cart>
                  <div className="container mt-4">
                    <div className="row">
                       {items.map(item => <Product key={item.id} product={item} addItem={this.addItem} />)}
                    </div>
                  </div>
                </div>
              )
            }}
          </Query>
      )
   };
};
export default Allproducts;
showModal
This method sets the show state to true so that the modal can be visible to the user.hideModal
This method sets the show state to false to hide the modal.- We created a variable named
itemssentthat holds the state of all cart items we get from the backend.
Navbar
cart
It passes the items in the cart data to our Navbar.show
It triggers our modal method.
Cart
show
It opens up the cart modal.Items
It receives and stores the data sent from the Navbar so it can be displayed when needed.handleClose
It closes the modal.
Updating Navbar
Let’s update our Navbar.js file with the following code:
import React from 'react';

const Navbar = (props) => {
  return (
    <nav className="navbar navbar-light bg-light">
      <h3>Smashing Stores</h3>
        <button className="btn btn-outline-success my-2 my-sm-0" onClick={() => props.show()}>Cart {(props.cart.length)}</button>
    </nav>
  );
};
export default Navbar;- We added an on click event that takes a function, which triggers that cart modal.
- Lastly, we check for the number of items in our cart by using the
.lengthJavaScript method.
Next, create a Cart.js file and add the following code to it:
import React from 'react';

const Cart = ({ handleClose, show, items }) => {
  return (
    <div className={show ? "modal display-block" : "modal display-none"}>
      <section className="main-modal">
        {items.map(item =>
           <div className="card" style={{width: "18rem"}}>
              <img src={item.image.url} className="card-img-top" alt="shirt"/>
              <div className="card-body">
                <h5 className="card-title">{item.name}</h5>
                <h6 className="card-title">$ {item.price}</h6>
              </div>
            </div>
        )}
         Total items: {items.length}
        <button className="btn btn-warning ml-2" onClick={handleClose}>close</button>
      </section>
    </div>
  );
};
export default Cart;
In our parent div, we used a ternary operator that toggles between visibility and hidden state. Next, in other for us to display the items in our cart modal we map through our items.
Lastly, in this section to check out for the total number of items in our cart we used the .length JavaScript method.
Open up your app.css and add the following code to it:
.modal {
position: fixed;
top: 0;
left: 0;
width:100%;
height: 100%;
background: rgba(0, 0, 0, 0.6);
}
.main-modal {
position:fixed;
background: white;
width: 80%;
height: auto;
top:50%;
left:50%;
padding: 10px;
transform: translate(-50%,-50%);
}
.display-block {
display: block;
}
.display-none {
display: none;
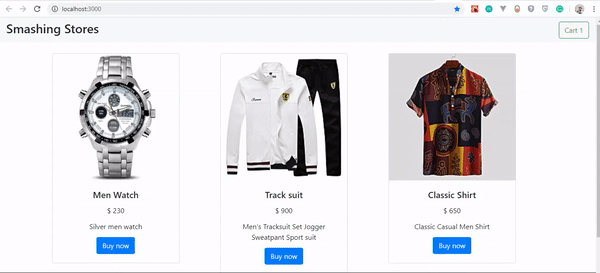
}Finally open the shopping cart, add items to it and view it via the ‘Cart’ button:
Conclusion
The concept learned in this article can help you create almost anytime of web apps without paying so much attention to your back-end infrastructure. You can take it further by creating a full-fledged e-commerce store and adding payment etc. I’ll love to see what you were able to make in the comments section.
The supporting repo for this article is available on Github.
References
Further Reading
- The Forensics Of React Server Components (RSCs)
- Headless In Times Of Accessibility
- Modern Methods For Improving Drupal’s Largest Contentful Paint Core Web Vital
- Knip: An Automated Tool For Finding Unused Files, Exports, And Dependencies


