React Error Handling And Reporting With Error Boundary And Sentry
In this article, we’ll look at error boundaries in React. We’ll learn what they are and how to use them to deliver a better user experience, even when something breaks in our app. We’ll also learn how to integrate with Sentry for realtime error monitoring.
This tutorial is aimed at React developers of every level who wants to start using error boundaries in their react apps.
The only prerequisite is that you have some familiarity with React class components.
I will be using Yarn as my package manager for this project. You’ll find installation instructions for your specific operating system over here.
What Is An Error Boundary And Why Do We Need It?
A picture, they say, is worth a thousand words. For that reason, I’d like to talk about error boundaries using — you guessed it — pictures.
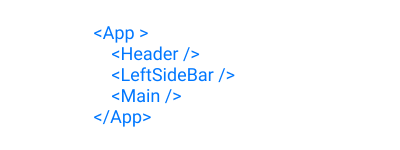
The illustration below shows the component tree of a simple React app. It has a header, a sidebar on the left, and the main component, all of which is wrapped by a root <App /> component.
On rendering these components, we arrive at something that looks like the picture below.
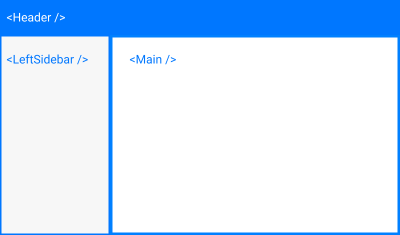
In an ideal world, we would expect to see the app rendered this way every single time. But, unfortunately, we live in a non-ideal world. Problems, (bugs), can surface in the frontend, backend, developer’s end, and a thousand other ends. The problem could happen in either of our three components above. When this happens, our beautifully crafted app comes crashing down like a house of cards.
React encourages thinking in terms of components. Composing multiple smaller components is better than having a single giant component. Working this way helps us think about our app in simple units. But aside from that won’t it be nice if we could contain any errors that might happen in any of the components? Why should a failure in a single component bring down the whole house?
In the early days of React, this was very much the case. And worse, sometimes you couldn’t even figure out what the problem was. The React repository on Github has some of such notable errors here, here, and here.
React 16 came to the rescue with the concept of an “error boundary”. The idea is simple. Erect a fence around a component to keep any fire in that component from getting out.
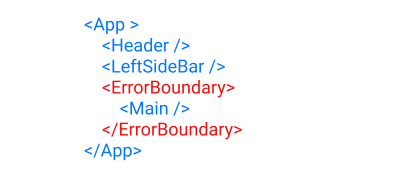
The illustration below shows a component tree with an <ErrorBoundary /> component wrapping the <Main /> component. Note that we could certainly wrap the other components in an error boundary if we wanted. We could even wrap the <App /> component in an error boundary.
The red outline in the below illustration represents the error boundary when the app is rendered.
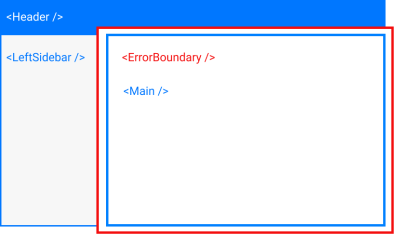
As we discussed earlier, this red line keeps any errors that occur in the <Main /> component from spilling out and crashing both the <Header /> and <LeftSideBar /> components. This is why we need an error boundary.
Now that we have a conceptual understanding of an error boundary, let’s now get into the technical aspects.
What Makes A Component An Error Boundary?
As we can see from our component tree, the error boundary itself is a React component. According to the docs,
"A class component becomes an error boundary if it defines either (or both) of the lifecycle methodsstatic getDerivedStateFromError()orcomponentDidCatch()."
There are two things to note here. Firstly, only a class component can be used as an error boundary. Even if you’re writing all your components as function, you still have to make use of a class component if you want to have an error boundary. Secondly, it must define either (or both) of static getDerivedStateFromError() or componentDidCatch(). Which one(s) you define depends on what you want to accomplish with your error boundary.
Functions Of An Error Boundary
An error boundary isn’t some dumb wall whose sole purpose in life is to keep a fire in. Error boundaries do actual work. For starters, they catch javascript errors. They can also log those errors, and display a fallback UI. Let’s go over each of \these functions one after the other.
Catch JavaScript Errors
When an error is thrown inside a component, the error boundary is the first line of defense. In our last illustration, if an error occurs while rendering the <Main /> component, the error boundary catches this error and prevents it from spreading outwards.
Logs Those Errors
This is entirely optional. You could catch the error without logging it. It is up to you. You can do whatever you want with the errors thrown. Log them, save them, send them somewhere, show them to your users (you really don’t want to do this). It’s up to you.
But to get access to the errors you have to define the componentDidCatch() lifecycle method.
Render A Fallback UI
This, like logging the errors, is entirely optional. But imagine you had some important guests, and the power supply was to go out. I’m sure you don’t want your guests groping in the dark, so you invent a technology to light up the candles instantaneously. Magical, hmm. Well, your users are important guests, and you want to afford them the best experience in all situations.
You can render a fallback UI with static getDerivedStateFromError() after an error has been thrown.
It is important to note that error boundaries do not catch errors for the following situations:
- Errors inside event handlers.
- Errors in asynchronous code (e.g.
setTimeoutorrequestAnimationFramecallbacks). - Errors that happen when you’re doing some server-side rendering.
- Errors are thrown in the error boundary itself (rather than its children). You could have another error boundary catch this error, though.
Working With Error Boundaries
Let’s now dive into our code editor. To follow along, you need to clone the repo. After cloning the repo, check out the 01-initial-setup branch. Once that is done, run the following commands to start the app.
# install project dependencies
yarn install

# start the server
yarn start
When started, the app renders to what we have in the picture below.
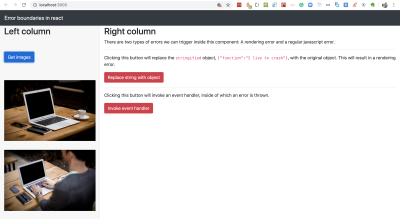
The app currently has a header and two columns. Clicking on Get images in the left column makes an API call to the URL https://picsum.photos/v2/list?page=0&limit=2 and displays two pictures. On the right column, we have some description texts and two buttons.
When we click the Replace string with object button, we’ll replace the text {"function":"I live to crash"}, which has been stringified, with the plain JavaScript object. This will trigger an error as React does not render plain JavaScript objects. This will cause the whole page to crash and go blank. We’ll have to refresh the page to get back our view.
Try it for yourself.
Now refresh the page and click the Invoke event handler button. You’ll see an error screen popup, with a little X at the top right corner. Clicking on it removes the error screen and shows you the rendered page, without any need to refresh. In this case, React still knows what to display even though an error is thrown in the event handler. In a production environment, this error screen won’t show up at all and the page will remain intact. You can only see that something has gone wrong if you look in the developer console.
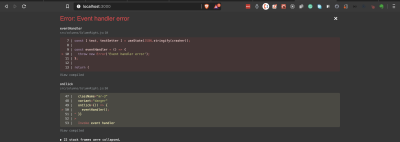
Note: To run the app in production mode requires that you install serve globally. After installing the server, build the app, and start it with the below command.
# build the app for production
yarn build

# serve the app from the build folder
serve -s build
Having seen how React handles two types of errors, (rendering error, and event handler error), let’s now write an error boundary component.
Create a new ErrorBoundary.js file inside the /src folder and let’s build the error boundary component piece by piece.
import React, { Component } from 'react';
import PropTypes from 'prop-types';

export default class ErrorBoundary extends Component {
  state = {
    error: '',
    errorInfo: '',
    hasError: false,
  };
  static getDerivedStateFromError(error) {
    return { hasError: true, error };
  }
  componentDidCatch(error, errorInfo) {
    // eslint-disable-next-line no-console
    console.log({ error, errorInfo });
    this.setState({ errorInfo });
  }
  render() {
    // next code block goes here
  return this.props.children;
  }
}
ErrorBoundary.propTypes = {
  children: PropTypes.oneOfType([ PropTypes.object, PropTypes.array ]).isRequired,
};
We define both of the two lifecycle methods that make a component an error boundary. Whenever an error occurs inside the error boundary’s child component, both of our lifecycle methods are activated.
static getDerivedStateFromError()receives the error and updates the state variables,errorandhasError.componentDidCatch()receives theerror, which represents the error that was thrown anderrorInfowhich is an object with acomponentStackkey containing information about which component threw the error. Here we logged the error and also update the state with theerrorInfo. It’s totally up to you what you want to do with these two.
Then in the render method, we return this.props.children, which represents whatever component that this error boundary encloses.
Let’s add the final piece of code. Copy the following code and paste it inside the render() method.
const { hasError, errorInfo } = this.state;
if (hasError) {
  return (
    <div className="card my-5">
      <div className="card-header">
        <p>
          There was an error in loading this page.{' '}
          <span
            style={{ cursor: 'pointer', color: '#0077FF' }}
            onClick={() => {
              window.location.reload();
            }}
          >
            Reload this page
          </span>{' '}
        </p>
      </div>
      <div className="card-body">
        <details className="error-details">
          <summary>Click for error details</summary>
          {errorInfo && errorInfo.componentStack.toString()}
        </details>
      </div>
    </div>
  );
}
In the render() method, we check if hasError is true. If it is, then we render the <div className="card my-5"></div> div, which is our fallback UI. Here, we’re showing information about the error and an option to reload the page. However, in a production environment, it is not advised to show the error to the user. Some other message would be fine.
Let’s now make use of our ErrorBoundary component. Open up App.js, import ErrorBoundary and render ColumnRight inside it.
# import the error boundary
import ErrorBoundary from './ErrorBoundary';

# wrap the right column with the error boundary
<ErrorBoundary>
  <ColumnRight />
</ErrorBoundary>
Now click on Replace string with object. This time, the right column crashes and the fallback UI is displayed. We’re showing a detailed report about where the error happened. We also see the error log in the developer console.
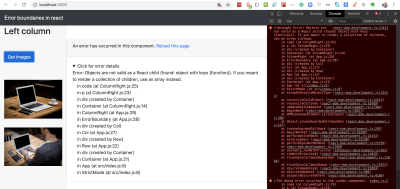
We can see that everything else remains in place. Click on Get images to confirm that it still works as expected.
At this point, I want to mention that with error boundaries, you can go as granular as you want. This means that you can use as many as necessary. You could even have multiple error boundaries in a single component.
With our current use of Error Boundary, clicking Replace string with object crashes the whole right column. Let’s see how we can improve on this.
Open up src/columns/ColumnRight.js, import ErrorBoundary and render the second <p> block inside it. This is the paragraph that crashes the <ColumnRight /> component.
# import the component
import ErrorBoundary from '../ErrorBoundary';

# render the erring paragraph inside it.
<ErrorBoundary>
  <p>
  Clicking this button will replace the stringified object,{' '}
    <code>{text}</code>, with the original object. This will result in a
  rendering error.
  </p>
</ErrorBoundary>
Now click on Replace string with object.
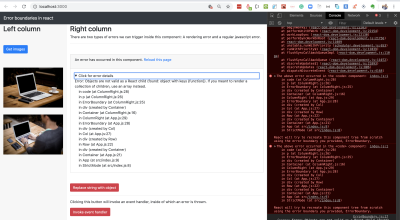
This time, we still have most of the page intact. Only the second paragraph is replaced with our fallback UI.
Click around to make sure everything else is working.
If you’d like to check out my code at this point you should check out the 02-create-eb branch.
In case you’re wondering if this whole error boundary thing is cool, let me show you what I captured on Github a few days ago. Look at the red outline.
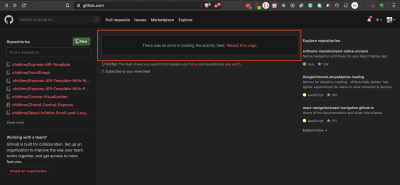
I’m not certain about what is happening here, but it sure looks like an error boundary.
Error boundaries are cool, but we don’t want errors in the first place. So, we need to monitor errors as they occur so we can get a better idea of how to fix them. In this section, we’ll learn how Sentry can help us in that regard.
Integrating With Sentry
As I opened the Sentry homepage while writing this line, I was greeted by this message.
"Software errors are inevitable. Chaos is not.
Sentry provides self-hosted and cloud-based error monitoring that helps all software teams discover, triage, and prioritize errors in real-time."
Sentry is a commercial error reporting service. There are many other companies that provide similar services. My choice of Sentry for this article is because it has a free developer plan that lets me log up to 5,000 events per month across all my projects (pricing docs). An event is a crash report (also known as an exception or error). For this tutorial, we will be making use of the free developer plan.
You can integrate Sentry with a lot of web frameworks. Let’s go over the steps to integrate it into our React project.
- Visit the Sentry website and create an account or login if you already have one.
- Click on
Projectsin the left navigation. Then, click onCreate Projectto start a new project. - Under
Choose a platform, select React. - Under
Set your default alert settingscheckAlert me on every new issue. - Give your project a name and click
Create project. This will create the project and redirect you to the configuration page.
Let’s install the Sentry browser SDK.
# install Sentry
yarn add @sentry/browser
On the configuration page, copy the browser SDK initialization code and paste it into your index.js file.
import * as Sentry from '@Sentry/browser';

# Initialize with Data Source Name (dsn)
Sentry.init({ dsn: 'dsn-string' });
And that is enough for Sentry to start sending error alerts. It says in the docs,
Note: On its own, @Sentry/browser will report any uncaught exceptions triggered from your application.
Click on Got it! Take me to the issue stream to proceed to the issues dashboard. Now return to your app in the browser and click on the red buttons to throw some error. You should get email alerts for each error (Sometimes the emails are delayed). Refresh your issues dashboard to see the errors.
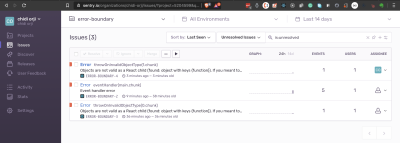
The Sentry dashboard provides a lot of information about the error it receives. You can see information such as a graph of the frequency of occurrence of each error event type. You can also assign each error to a team member. There’s a ton of information. Do take some time to explore them to see what is useful to you.
You can click on each issue to see more detailed information about the error event.
Now let’s use Sentry to report errors that are caught by our error boundary. Open ErrorBoundary.js and update the following pieces of code.
# import Sentry
import * as Sentry from '@sentry/browser'

# add eventId to state
state = {
  error: '',
  eventId: '', // add this to state
  errorInfo: '',
  hasError: false,
};

# update componentDidCatch
componentDidCatch(error, errorInfo) {
  // eslint-disable-next-line no-console
  console.log({ error, errorInfo });
  Sentry.withScope((scope) => {
    scope.setExtras(errorInfo);
    const eventId = Sentry.captureException(error);
    this.setState({ eventId, errorInfo });
  });
}
With this setup, Sentry sends all errors captured by our error boundary to our issue dashboard using the Sentry.captureException method.
Sentry also gives us a tool to collect user feedback. Let’s add the feedback button as part of our fallback UI inside our error boundary.
Open ErrorBoundary.js and add the feedback button just after the div with a className of card-body. You could place this button anywhere you like.
<div className="card-body">
  ...
</div>

# add the Sentry button
<button
  className="bg-primary text-light"
  onClick={() =>
    Sentry.showReportDialog({ eventId: this.state.eventId })
  }
>
  Report feedback
</button>
Now, whenever our fallback UI is rendered, the Report feedback button is displayed. Clicking on this button opens a dialog that the user can fill to provide us with feedback.
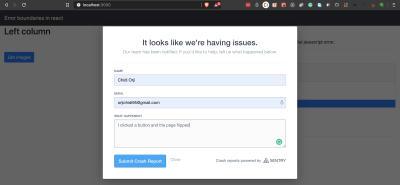
Go ahead and trigger an error, then, fill and submit the feedback form. Now go to your Sentry dashboard and click on User Feedback in the left navigation. You should see your reported feedback.

Currently, we get alerts for every error, even those that happen during development. This tends to clog our issue stream. Let’s only report errors that happen in production.
On the left navigation click on Settings. Underneath the ORGANIZATION menu, click on Projects. In that list, click on your error boundary project. From Project Settings on the lefthand side, click on Inbound Filters. Look for Filter out events coming from localhost and enable it. This is just one of the numerous configurations that are available in Sentry. I encourage you to have a look around to see what might be useful for your project.
If you’d like to take a look at my code, the corresponding branch in my repo is 03-integrate-sentry.
Conclusion
If you haven’t been using error boundaries in your React app, you should immediately add one at the top level of your app. Also, I encourage you to integrate an error reporting service into your project. We’ve seen how easy it is to get started with Sentry for free.
The finished version of the app is hosted on Netlify.
Related Resources
Further Reading
- An Introduction To Full Stack Composability
- The Era Of Platform Primitives Is Finally Here
- How To Hack Your Google Lighthouse Scores In 2024
- A Simple Guide To Retrieval Augmented Generation Language Models


