What’s New In Vue 3?

Email Newsletter
Weekly tips on front-end & UX.
Trusted by 182,000+ folks.
 Custom Web Forms for Angular, React, & Vue. Your backend.


 Celebrating 10 million developers
With the release of Vue 3, developers have to make the upgrade from Vue 2 as it comes with a handful of new features that are super helpful in building easy-to-read and maintainable components and improved ways to structure our application in Vue. We’re going to be taking a look at some of these features in this article.
At the end of this tutorial, the readers will;
- Know about
provide / injectand how to use it. - Have a basic understanding of Teleport and how to use it.
- Know about Fragments and how to go about using them.
- Know about the changes made to the Global Vue API.
- Know about the changes made to the Events API.
This article is aimed at those that have a proper understanding of Vue 2.x. You can find all the code used in this example in GitHub.
provide / inject
In Vue 2.x, we had props that made it easy to pass data (string, arrays, objects, etc) from a parent component directly to its children component. But during development, we often found instances where we needed to pass data from the parent component to a deeply nested component which was more difficult to do with props. This resulted in the use of Vuex Store, Event Hub, and sometimes passing data through the deeply nested components. Let’s look at a simple app;
It is important to note that Vue 2.2.0 also came with provide / inject which was not recommended to use in generic application code.
# parentComponent.vue

<template>
  <div class="home">
    <img alt="Vue logo" src="../assets/logo.png" />
    <HelloWorld msg="Vue 3 is liveeeee!" :color="color" />
    <select name="color" id="color" v-model="color">
      <option value="" disabled selected> Select a color</option>
      <option :value="color" v-for="(color, index) in colors" :key="index">{{
        color
      }}</option></select
    >
  </div>
</template>
<script>
  import HelloWorld from "@/components/HelloWorld.vue";
  export default {
    name: "Home",
    components: {
      HelloWorld,
    },
    data() {
      return {
        color: "",
        colors: ["red", "blue", "green"],
      };
    },
  };
</script>
# childComponent.vue

<template>
  <div class="hello">
    <h1>{{ msg }}</h1>
    <color-selector :color="color"></color-selector>
  </div>
</template>
<script>
  import colorSelector from "@/components/colorComponent.vue";
  export default {
    name: "HelloWorld",
    components: {
      colorSelector,
    },
    props: {
      msg: String,
      color: String,
    },
  };
</script>
<!-- Add "scoped" attribute to limit CSS to this component only -->
<style scoped>
  h3 {
    margin: 40px 0 0;
  }
  ul {
    list-style-type: none;
    padding: 0;
  }
  li {
    display: inline-block;
    margin: 0 10px;
  }
  a {
    color: #42b983;
  }
</style>
# colorComponent.vue

<template>
  <p :class="[color]">This is an example of deeply nested props!</p>
</template>
<script>
  export default {
    props: {
      color: String,
    },
  };
</script>
<style>
  .blue {
    color: blue;
  }
  .red {
    color: red;
  }
  .green {
    color: green;
  }
</style>
Here, we have a landing page with a dropdown containing a list of colors and we’re passing the selected color to childComponent.vue as a prop. This child component also has a msg prop that accepts a text to display in the template section. Finally, this component has a child component (colorComponent.vue) that accepts a color prop from the parent component which is used in determining the class for the text in this component. This is an example of passing data through all the components.
But with Vue 3, we can do this in a cleaner and short way using the new Provide and inject pair. As the name implies, we use provide as either a function or an object to make data available from a parent component to any of its nested component regardless of how deeply nested such a component is. We make use of the object form when passing hard-coded values to provide like this;
# parentComponent.vue

<template>
  <div class="home">
    <img alt="Vue logo" src="../assets/logo.png" />
    <HelloWorld msg="Vue 3 is liveeeee!" :color="color" />
    <select name="color" id="color" v-model="color">
      <option value="" disabled selected> Select a color</option>
      <option :value="color" v-for="(color, index) in colors" :key="index">{{
        color
      }}</option></select
    >
  </div>
</template>
<script>
  import HelloWorld from "@/components/HelloWorld.vue";
  export default {
    name: "Home",
    components: {
      HelloWorld,
    },
    data() {
      return {
        colors: ["red", "blue", "green"],
      };
    },
    provide: {
      color: 'blue'
    }
  };
</script>
But for instances where you need to pass a component instance property to provide, we use the function mode so this is possible;
# parentComponent.vue

<template>
  <div class="home">
    <img alt="Vue logo" src="../assets/logo.png" />
    <HelloWorld msg="Vue 3 is liveeeee!" />
    <select name="color" id="color" v-model="selectedColor">
      <option value="" disabled selected> Select a color</option>
      <option :value="color" v-for="(color, index) in colors" :key="index">{{
        color
      }}</option></select
    >
  </div>
</template>
<script>
  import HelloWorld from "@/components/HelloWorld.vue";
  export default {
    name: "Home",
    components: {
      HelloWorld,
    },
    data() {
      return {
        selectedColor: "blue",
        colors: ["red", "blue", "green"],
      };
    },
    provide() {
      return {
        color: this.selectedColor,
      };
    },
  };
</script>
Since we don’t need the color props in both the childComponent.vue and colorComponent.vue, we’re getting rid of it. The good thing about using provide is that the parent component does not need to know which component needs the property it is providing.
To make use of this in the component that needs it in this case, colorComponent.vue we do this;
# colorComponent.vue

<template>
  <p :class="[color]">This is an example of deeply nested props!</p>
</template>
<script>
  export default {
    inject: ["color"],
  };
</script>
<style>
  .blue {
    color: blue;
  }
  .red {
    color: red;
  }
  .green {
    color: green;
  }
</style>
Here, we use inject which takes in an array of the required variables the component needs. In this case, we only need the color property so we only pass that. After that, we can use the color the same way we use it when using props.
We might notice that if we try to select a new color using the dropdown, the color does not update in colorComponent.vue and this is because by default the properties in provide are not reactive. To Fix that, we make use of computed method.
# parentComponent.vue

<template>
  <div class="home">
    <img alt="Vue logo" src="../assets/logo.png" />
    <HelloWorld msg="Vue 3 is liveeeee!" />
    <select name="color" id="color" v-model="selectedColor">
      <option value="" disabled selected> Select a color</option>
      <option :value="color" v-for="(color, index) in colors" :key="index">{{
        color
      }}</option></select
    >
  </div>
</template>
<script>
  import HelloWorld from "@/components/HelloWorld.vue";
  import { computed } from "vue";
  export default {
    name: "Home",
    components: {
      HelloWorld,
    },
    data() {
      return {
        selectedColor: "",
        todos: ["Feed a cat", "Buy tickets"],
        colors: ["red", "blue", "green"],
      };
    },
    provide() {
      return {
        color: computed(() => this.selectedColor),
      };
    },
  };
</script>
Here, we import computed and pass our selectedColor so that it can be reactive and update as the user selects a different color. When you pass a variable to the computed method it returns an object which has a value. This property holds the value of your variable so for this example, we would have to update colorComponent.vue to look like this;
# colorComponent.vue

<template>
  <p :class="[color.value]">This is an example of deeply nested props!</p>
</template>
<script>
  export default {
    inject: ["color"],
  };
</script>
<style>
  .blue {
    color: blue;
  }
  .red {
    color: red;
  }
  .green {
    color: green;
  }
</style>
Here, we change color to color.value to represent the change after making color reactive using the computed method. At this point, the class of the text in this component would always change whenever selectedColor changes in the parent component.
Teleport
There are instances where we create components and place them in one part of our application because of the logic the app uses but are intended to be displayed in another part of our application. A common example of this would be a modal or a popup that is meant to display and cover the whole screen. While we can create a workaround for this using CSS’s position property on such elements, with Vue 3, we can also do using using Teleport.
Teleport allows us to take a component out of its original position in a document, from the default #app container Vue apps are wrapped in and move it to any existing element on the page it’s being used. A good example would be using Teleport to move an header component from inside the #app div to an header It is important to note that you can only Teleport to elements that are existing outside of the Vue DOM.

The Teleport component accepts two props that determine the behavior of this component and they are;
to
This prop accepts either a class name, an id, an element or a data-* attribute. We can also make this value dynamic by passing a:toprop as opposed totoand change the Teleport element dynamically.:disabled
This prop accepts aBooleanand can be used to toggle the Teleport feature on an element or component. This can be useful for dynamically changing the position of an element.
An ideal example of using Teleport looks like this;
# index.html**

<!DOCTYPE html>
<html lang="en">
<head>
    <meta charset="utf-8" />
    <meta http-equiv="X-UA-Compatible" content="IE=edge" />
    <meta name="viewport" content="width=device-width,initial-scale=1.0" />
    <link rel="icon" href="<%= BASE_URL %>favicon.ico" />
    <title>
        <%= htmlWebpackPlugin.options.title %>
    </title>
</head>
<!-- add container to teleport to -->
<header class="header"></header>
<body>
    <noscript>
      <strong
        >We're sorry but <%= htmlWebpackPlugin.options.title %> doesn't work
        properly without JavaScript enabled. Please enable it to
        continue.</strong
      >
    </noscript>
    <div id="app"></div>
    <!-- built files will be auto injected -->
</body>
</html>
In the default index.html file in your Vue app, we add an header element because we want to Teleport our header component to that point in our app. We also added a class to this element for styling and for easy referencing in our Teleport component.
# Header.vue**

<template>
  <teleport to="header">
    <h1 class="logo">Vue 3 🥳</h1>
    <nav>
      <router-link to="/">Home</router-link>
    </nav>
  </teleport>
</template>
<script>
  export default {
    name: "app-header",
  };
</script>
<style>
  .header {
    display: flex;
    align-items: center;
    justify-content: center;
  }
  .logo {
    margin-right: 20px;
  }
</style>
Here, we create the header component and add a logo with a link to the homepage on our app. We also add the Teleport component and give the to prop a value of header because we want this component to render inside this element. Finally, we import this component into our app;
# App.vue

<template>
  <router-view />
  <app-header></app-header>
</template>
<script>
  import appHeader from "@/components/Header.vue";
  export default {
    components: {
      appHeader,
    },
  };
</script>
In this file, we import the header component and place it in the template so it can be visible in our app.
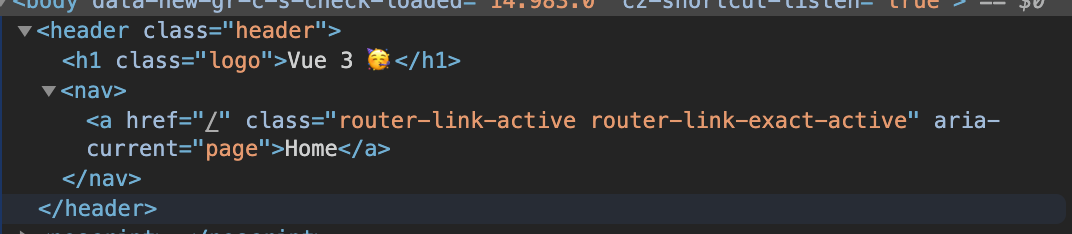
Now if we inspect the element of our app, we would notice that our header component is inside the headerelement;
Fragments
With Vue 2.x, it was impossible to have multiple root elements in the template of your file and as a workaround, developers started wrapping all elements in a parent element. While this doesn’t look like a serious issue, there are instances where developers want to render a component without a container wrapping around such elements but have to make do with that.
With Vue 3, a new feature called Fragments was introduced and this feature allows developers to have multiple elements in their root template file. So with Vue 2.x, this is how an input field container component would look like;
# inputComponent.vue

<template>
  <div>
    <label :for="label">label</label>
    <input :type="type" :id="label" :name="label" />
  </div>
</template>
<script>
  export default {
    name: "inputField",
    props: {
      label: {
        type: String,
        required: true,
      },
      type: {
        type: String,
        required: true,
      },
    },
  };
</script>
<style></style>
Here, we have a simple form element component that accepts two props, label and type, and the template section of this component is wrapped in a div. This is not necessarily an issue but if you want the label and input field to be directly inside your form element. With Vue 3, developers can easily rewrite this component to look like this;
# inputComponent.vue

<template class="testingss">
  <label :for="label">{{ label }}</label>
  <input :type="type" :id="label" :name="label" />
</template>
With a single root node, attributes are always attributed to the root node and they are also known as Non-Prop Attributes. They are events or attributes passed to a component that do not have corresponding properties defined in props or emits. Examples of such attributes are class and id. It is, however, required to explicitly define which of the elements in a multi-root node component should be attributed to.
Here’s what this means using the inputComponent.vue from above;
- When adding
classto this component in the parent component, it must be specified which component would thisclassbe attributed to otherwise the attribute has no effect.
<template>
  <div class="home">
    <div>
      <input-component
        class="awesome__class"
        label="name"
        type="text"
      ></input-component>
    </div>
  </div>
</template>
<style>
  .awesome__class {
    border: 1px solid red;
  }
</style>
When you do something like this without defining where the attributes should be attributed to, you get this warning in your console;

And the border has no effect on the component;

- To fix this, add a
v-bind="$attrs"on the element you want such attributes to be distributed to;
<template>
  <label :for="label" v-bind="$attrs">{{ label }}</label>
  <input :type="type" :id="label" :name="label" />
</template>
Here, we’re telling Vue that we want the attributes to be distributed to the label element which means we want the awesome__class to be applied to it. Now, if we inspect our element in the browser we would see that the class has now been added to label and hence a border is now around the label.

Global API
It was not uncommon to see Vue.component or Vue.use in main.js file of a Vue application. These types of methods are known are Global APIs and there are quite a number of them in Vue 2.x. One of the challenges of this method is that it makes it impossible to isolate certain functionalities to one instance of your app (if you have more than one instance in your app) without it affecting other apps because they are all mounted on Vue. This is what I mean;
Vue.directive('focus', {
  inserted: el => el.focus()
})

Vue.mixin({
  /* ... */
})

const app1 = new Vue({ el: '#app-1' })
const app2 = new Vue({ el: '#app-2' })
For the above code, it is impossible to state that the Vue Directive be associated with app1 and the Mixin with app2 but instead, they’re both available in the two apps.
Vue 3 comes with a new Global API in an attempt to fix this type of problem with the introduction of createApp. This method returns a new instance of a Vue app. An app instance exposes a subset of the current global APIs. With this, all APIs (component, mixin, directive, use, etc) that mutate Vue from Vue 2.x are now going to be moved to individual app instances and now, each instance of your Vue app can have functionalities that are unique to them without affecting other existing apps.
Now, the above code can be rewritten as;
const app1 = createApp({})
const app2 = createApp({})
app1.directive('focus', {
    inserted: el => el.focus()
})
app2.mixin({
    /* ... */
})
It is however possible to create functionalities that you want to be share among all your apps and this can be done by using a factory function.
Events API
One of the most common ways developers adopted for passing data among components that don’t have a parent to child relationship other than using the Vuex Store is the use of Event Bus. One of the reasons why this method is common is because of how easy it is to get started with it;
# eventBus.js

const eventBus = new Vue()

export default eventBus;
After this, the next thing would be to import this file into main.js to make it globally available in our app or to import it in files that you need it;
# main.js

import eventBus from 'eventBus'
Vue.prototype.$eventBus = eventBus
Now, you can emit events and listen for emitted events like this;
this.$eventBus.$on('say-hello', alertMe)
this.$eventBus.$emit('pass-message', 'Event Bus says Hi')
There is a lot of Vue codebase that is filled with code like this. However, with Vue 3, it would be impossible to do because $on, $off, and $once have all been removed but $emit is still available because it is required for children component to emit events to their parent components. An alternative to this would be using provide / inject or any of the recommended third-party libraries.
Conclusion
In this article, we have covered how you can pass data around from a parent component down to a deeply nested child component using the provide / inject pair. We have also looked at how we can reposition and transfer components from one point in our app to another. Another thing we looked at is the multi-root node component and how to ensure we distribute attributes so they work properly. Finally, we also covered the changes to the Events API and Global API.
Other Resources
- “JavaScript Factory Functions with ES6+,” Eric Elliott, Medium
- “Using Event Bus to Share Props Between Vue Components,” Kingsley Silas, CSS-Tricks
- Using Multiple Teleports On The Same Target, Vue.js Docs
- Non-Prop Attributes, Vue.js Docs
- Working With Reactivity, Vue.js Docs
teleport, Vue.js Docs- Fragments, Vue.js Docs
- 2.x Syntax, Vue.js Docs
Further Reading
- How To Deal With Big Tooling Upgrades In Large Organizations
- Generating Unique Random Numbers In JavaScript Using Sets
- Build A Static RSS Reader To Fight Your Inner FOMO
- Building A Retro Draggable Web Component With Lit


