Tools And Practices To Speed Up The Vue.js Development Process

Email Newsletter
Weekly tips on front-end & UX.
Trusted by 182,000+ folks.


 Celebrating 10 million developers
 Custom Web Forms for Angular, React, & Vue. Your backend.
Throughout this tutorial, we will be looking at practices that should be adopted, things that should be avoided, and have a closer look at some helpful tools to make writing Vue.js easier. I’ll be focusing mostly on Vue 2 as most folks and organizations still use the older version. No reason to worry though, as most things mentioned here still apply to Vue 3 since it’s just a supercharged and faster version. Still, if you already know Vue 2 and just want to learn about what’s new in Vue 3, then you can check out the migration guide to learn more.
Note: This article is aimed at both beginners and seasoned developers who want to better their Vue.js skills. Basic knowledge of JavaScript and Vue.js will be of great benefit as you work your way throughout this tutorial.
Module-Based Vs File-Based Project Structuring
Let’s start by looking at how to structure files by modules, how file-based structuring might not be a good idea when it comes to building projects of scale, and how to structure modules to fit in with business requirements.
As we are newly creating a project with Vue.js CLI, we are getting the default file structure that has been mapped out by the Vue.js team. Using the proposed file structure is not a bad way of structuring your project per se, but as your project grows, you will need a better structure as your code becomes clustered and harder to navigate and access files.
This is where the module-based method of structuring your project comes into play.
A bad way of structuring your project will involve storing different data that is not related to the same folder, such as the notification component and the authentication component in the root component folder:
+-- src/
|   +-- assets/
|       +-- logo.png
|       +-- userprofile.png
|   +-- components
|       +-- NotificationBar.vue
|       +-- LoginForm.vue
|       +-- DashboardInfo.vue
|       +-- AuthenticationModal.vue
|   +-- main.js
So what we want to do is decouple the project based on business logic and concerns so that we have something like authentication module, product module, service module, and so on. This way we can make sure that anything concerning that particular feature is put in the module, making our code neater and navigating not so hard.
+-- modules/
|   +-- AuthModule/
|       +-- assets/
|           +-- userprofile.png
|       +-- Components/
|           +-- Authentication.vue
|           +-- login.vue
|   +-- NotificationModule
|       +-- assets/
|            +-- Alert.png
|       +-- Components/
|            +-- NotificationBar.vue
|   +-- ProductModule/
Organizing Modules
There are two ways you can organize your modules:
- Vue.js core modules,
- App feature modules.
The Vue.js core modules are here to facilitate your Vue.js development. Modules like the service module containing all the network requests needed by the company are kept in this core module and all corresponding network requests are made from here.
Modularizing your app according to features is a great way of making a better file structure in your app. This will allow separation of your concern and make sure that you are only working on the feature that you or your team is assigned to. Another advantage of modularizing according to feature is its maintainability and ability to avoid technical debt in the long term where there might need to be a rework on the app.
Now whenever there is a need to add, remove or change the state of a particular feature, all we need to do is to navigate to that feature and make changes without breaking the app. This method of modularization allows for efficient program development and easy debugging and modification in our application.
For example, a payout feature assigned to you and your team is a good time to implement a payout module that encapsulates all functionalities and data for the feature.
+-- modules/
|   +-- payout/
|       +-- index.js
|       +-- assets/
|       +-- Components/
|            +-- PayOut.vue
|            +-- UserInfo.vue
|       +-- store/
|            +-- index.js
|            +-- actions.js
|            +-- mutations.js
|       +-- Test/
Based on our payout feature above, we have an index.js file to import and use plugins associated only with the payout module. The asset folder houses all the assets (images and styles) for the module. Our component folder contains components related to the payout feature. The store folder contains our actions, mutations, and getters used to manage the state of this feature. There is also a test folder to carry out testing for this feature.
Using Custom Directives
Directives in Vue.js are a way for us to tell Vue.js to do something or exhibit a certain behavior for us. Examples of directives are v-if, v-model, v-for, etc. In our Vue.js app, when we use something like v-model to tie data to an input in a form, we are giving the Vue.js code some certain instructions that are peculiar to Vue.js. But what if we want a particular action or behavior that our Vue.js provided directive doesn’t allow us to do, what do we do then? We can create what we call custom directives.
Registering Custom Directives And Directives Hooks
We can go about registering directives in two ways:
- Globally
In ourmain.jsfile. - Locally
In our component.
Hooks in directives are like methods that fire when a certain action happens in our directives. Like the created and mounted hook life cycle hooks, we are provided with hooks to use in our directives.
Let’s say we are building an application and in one of our pages, we want the background color to always change each time we navigate to it. We are going to name this directive colorChange. We can achieve that with the help of a directive.
Our template looks something like this:
<template>
  <div id="app" v-color-change>
    <HelloWorld msg="Hello Vue in CodeSandbox!"/>
  </div>
</template>
We can see the custom directive above, but to make it work, in our main.js file we add:
// custom directive
Vue.directive("color-change", {
  bind: function (el) {
    const random = Math.floor(Math.random() * 900000) + 100000;
    el.style.backgroundColor = `#${random}`
  }
})
The above Vue.js directive takes in the directive name as the first argument then an Object as the second argument that controls the behavior of the directives. bind is one of the hooks we talked about and will be called once the directive is bound to the element. It accepts the following arguments:
el
This is the element node we have attached the directive to.binding
It contains helpful properties that change the behavior of the directive.vnode
This is the virtual node of Vue.js.
We have created a random set of 6-digit numbers so that we can use it in changing the hex code of our background color style.
Best Practices When Writing Custom Directives
We have created a custom directive for the above, but we need to take note of a few things. Apart from el, never modify hook arguments and make sure the arguments are read-only because the hook arguments are objects with native methods that can cause side effects if modified. If necessary, use the Vue.js dataset to share information among hooks.
If we are using the CLI build of Vue.js, custom directives should be in the main.js file so that all the .vue files can have access to it. Your directive name should be something that resonates with what that particular directive does, very descriptive about the directive functionality.
You can see and play more with the code in this codesandbox I have created. You can also read more about this in the Vue docs.
Controlling Updates
Vue.js reactivity system is powerful in a way that it detects things that need updating and updates them without you as the developer doing anything. For example, re-rendering a page each time we navigate to it. At times the case can be different as we might find ourselves writing code that requires us to force an update.
Note: If you find yourself needing to force an update, which is a rare occasion, then you may need to really understand Vue’s Reactivity and how to properly use props in communicating dynamic data.
Forcing An Update To Occur
In most cases, when the value in the vue data object changes, the view automatically re-renders, but it’s not always like this. a classic case of our view, not re-rendering is when we are using a v-for in our template to loop over some data in the data object, and we do not add a :key value in the v-for loop.
<div v-for="item in itemsArray" :key="item">This gives Vue.js a way to track each node’s identity and re-render the view for any change.
A rare situation that can cause us to force an update is if we intentionally or accidentally set an array item with the index.
var app = new Vue({
  data: {
    items: ['1', '2']
  }
})
app.items[1] = '7' //vue does not notice any change
There are different ways to force an update or re-render. Some are very bad practices like the use of v-if to re-render the page when it’s true, and when false, the component disappears and no longer exists. This is bad practice because the template is never destroyed but just hidden till it can be re-used.
<template>
    <div v-if="show">
       <button @click="rerender">re-render</button>
    </div>
</template>
<script>
export default {
data() {
return {
show: true,
};
},
methods: {
rerender() {
this.show= false;
this.$nextTick(() => {
this.show = true;
});
}
}
};
</script>In the code above, the state of show is initially set to true, meaning our component is initially rendered. Then, when we click on the button, the rerender() function is called and the state of show is set to false, and the component is no longer rendered. On the next tick, which is a single DOM update cycle, show is set to true and our component is rendered again. This is a very hacky way of re-rendering.
I would like to talk about two legit ways this can be done:
- Vue’s
$forceUpdate. - Key changing pattern.
Vue’s $forceUpdate: In the use of $forceUpdate, the child components do not render, only the Vue.js instance, the instance, and child components with slots.
Globally we can force the update:
import Vue from 'vue';
Vue.forceUpdate();
And locally too:
export default {
  methods: {
    methodThatForcesUpdate() {
      this.$forceUpdate();
    }
  }
}
Using the key changing pattern which is much better than the $forceUpdate method is another way to go about this. The reason behind the key changing pattern being better is that it allows Vue.js to know which component is tied to a specific data and when the key changes, it destroys the old component to create a new one, according to matthiasg on this Github issue I ran into. You can use a :key attribute to let Vue.js know which component is attached to a specific piece of data. When the key changes, it causes Vue.js to destroy the old component and a new one is created.
<template>
  <Child
    :key="key"
  />
</template>

<script>
  export default {
    data() {
      return {
        key: 0,
      };
    },
    methods: {
      forceRerender() {
        this.key += 1;
      }
    }
  }
</script>
Third Party Libraries And Optimization
It is almost inevitable that we do not use third-party libraries in our apps. Third-party libraries can begin to be a problem if we turn a blind eye to it, increasing bundle size and slowing down our application.
I recently used the Vuetify component library in a project and checked to see that the overall bundle size was a whooping 500kb minified. Things like this can become a bottleneck in our application. You can check the bundle size of your app by using webpack-bundle-analyzer. You can install it by running:
npm install --save-dev webpack-bundle-analyzerand include it in your webpack config file:
const BundleAnalyzerPlugin = require('webpack-bundle-analyzer').BundleAnalyzerPlugin;

module.exports = {
  plugins: [
    new BundleAnalyzerPlugin()
  ]
}
Good Practices To Optimize Your Vue App
- Our main bundle should only contain dependencies that are critical to our app, like
vue,vuex. We should avoid putting libraries that are used in specific routes in our app in the main bundle. - When using component libraries, you can import individual components from the libraries, instead of importing everything. For example, vuetify:
<template>
  <v-app>
    <v-navigation-drawer app>
    <!-- -->
  </v-navigation-drawer>
  <v-app-bar app>
    <!-- -->
  </v-app-bar>
 </v-app>
</template>
<script>
import { VApp, VNavigationDrawer, VAppBar } from 'vuetify/lib'

export default {
  components: {
    VApp,
    VNavigationDrawer,
    VAppBar,
  }
}
</script>
By doing the above we have reduced the bundle size and redundant code, only using the components we want to use in that particular route.
Making Early Decisions To Use Vuex
Often I have found myself wondering if I should start up a project with Vuex. Sometimes I just want to start a small side project and I start it up without Vuex to manage my state and communication using props begins to get messy.
So when should we use Vuex? To answer this, we need to consider:
- Size of the project,
- The simplicity of the code,
- Routing,
- Dataset involved,
- Components nesting.
If your app begins to grow, it’s only appropriate to include Vuex to manage the state in your application. If you’re ever in doubt if you should use a state manager when starting your project, then just use it. However, there is a talk of the new Vue3 composition API being a replacement for vuex.
How Vuex Should Be Set Up For Large Applications
We have four components in the vuex store:
- State: Store data in our store.
- Getters: Retrieve state data.
- Mutations: Used to mutate state data.
- Action: Used to commit mutations.
When we use the above in Vuex we should keep in mind that actions should always commit mutations no matter what. This allows our devtools to be able to track changes and revert to a particular period in our state and asynchronous operations or business logic should be carried out in the actions.
You can create a separate file for each of the Vuex components to look like this:
├── services
├── main.js
└── store
    ├── index.js
    ├── actions.js
    ├── mutations.js
    └── Getters.js
├── components
Moduling According To Feature
If our project is a very large project with a team, we can modularize our store according to app features. This is done especially when there are complex and large projects with many files and folders and we just want an organized way of handling the structuring of our app. We have to be careful the way we go about this, if not we can do more harm than good. A simple store modularized according to the feature looks like this:
store/
   ├── index.js
   └── modules/
       ├── cart
           ├── index.js
           ├── actions.js
           ├── mutations.js
       ├── product.js
       ├── login.js
Good Practice When Using Vuex Modules
As the modules we have created become more complicated, it becomes harder to manually import and organize. It is advised that your modules have an index.js file at the root of your module, bringing the files altogether.
Make sure you have a standard naming pattern in your store as this will increase maintainability. You can use camelCase for naming the modules then a .store.js extension. Example: CartData.store.js.
modules/
       ├── cart.js
           ├── index.js   -> auto export module
           ├── userProduct.store.js
           ├── userData.store.js
Code related to business logic or async code should not run inside mutations because of its blocking behavior, instead, actions should be used. It is considered best practice not to directly access a state object. Instead, use the getter function because it can be mapped into any vue component using the mapGetters behaving like a computed property with the getters result cached based on its dependencies. Also, make sure each module is namespaced and not to access them using the global state scope.
Using The Provide/Inject Method To Pass Data Around
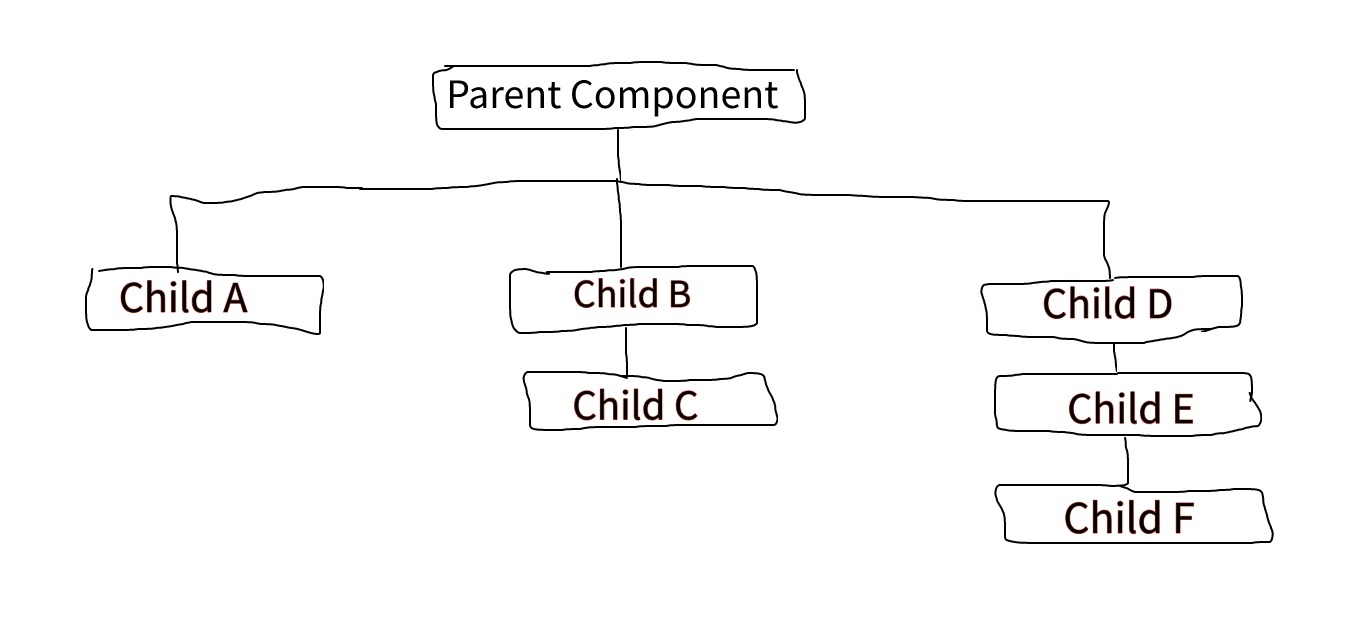
Think of an app that has different components. We have the parent component and the parent component has many child components. From the image below, we see our Child component A, B, and D as top components, then we see Component E nested in component D and component F nested in component E. What if we have app data (like User Address), that we want to use in child Component A, C, and F, and this User address data is in our parent component.
To do this, we need to:
- Provide value in the parent component (Dependency provider).
- Inject the value in component F (dependency consumer).
In our parent component we provide the data:
app.component('parent-component', {
  data() {
    return {
      user: {name:"Uma Victor", address:"No 33 Rumukwurushi"}
    }
  },
  provide() {
    return {
     userAddress: this.user.address
    }
  },
  template: `
    ...
  `
})
We use provide as a function by returning an object to access component instance properties.
In our child-f component, we have the following:
app.component('child-f', {
  inject: ['userAddress'],
  template: `
    <h2>Injected property: {{ this.userAddress }}</h2>
  `
})
However, we noticed that if we change our user.address to another address, the change won’t be reflected in our injected value, this is because the data provided to the provide/inject are not reactive initially. We can fix this by passing a reactive object to provide. We have to assign a computed property to our user object.
app.component('parent-component', {
  data() {
    return {
      user: {name:"Uma Victor", address:"No 33 Rumukwurushi"}
    }
  },
  provide() {
    return {
     userAddress: Vue.computed(() => this.user)

    }
  },
  template: `
    ...
  `
})
This pattern can be very useful and simpler than using Vuex.
However, with Vue3, and the recent upgrade, we can now use context providers, enabling us to share data between multiple components just like vuex.
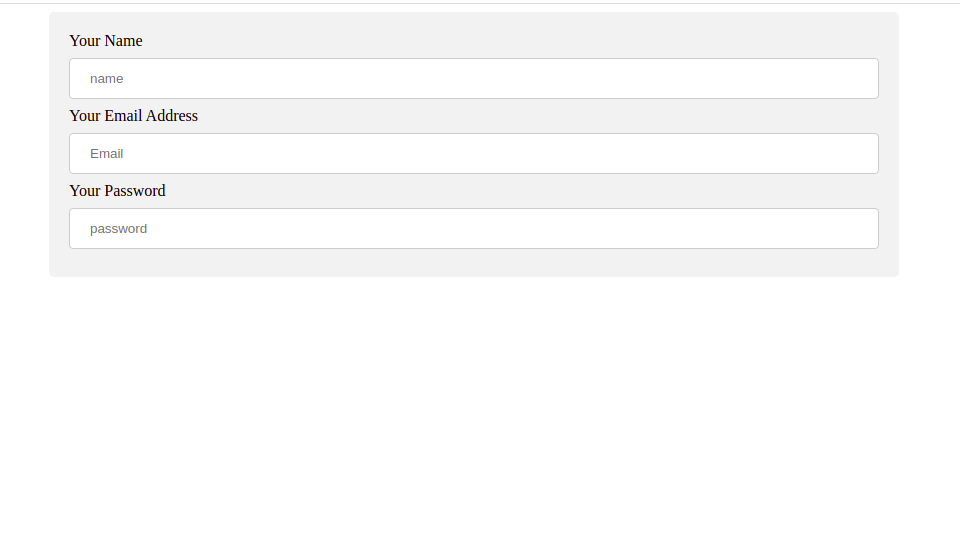
Proper Use of Props For Form Components
Building forms on the web is one of those things not everyone loves doing. Vue.js makes building excellent forms easy. To achieve this we need to know how to properly use props in our form components. In a traditional app where we have signup, logins, or product page we want to have consistent behavior and design. For example, the sign-in page below.
With the code:
<template>
  <div class="form-group">
  <form>
    <label for="email">Your Name</label>
    <input
      type="text"
      id="name"
      class="form-control"
      placeholder="name"
      v-model="userData.name"
    />
    <label for="email">Your Email Address</label>
    <input
      type="text"
      id="email"
      class="form-control"
      placeholder="Email"
      v-model="userData.email"
    />
    <label for="email">Your Password</label>
    <input
      type="text"
      id="password"
      class="form-control"
      placeholder="password"
      v-model="userData.password"
    />
  </form>
  </div>
</template>
<script>
    export default {
        data() {
            return {
                userData: {
                    name: '',
                    email: '',
                    password: ''
                }
            }
        },
    }
</script>
We will like to have a BaseInput component that we can use for the three form inputs above. Our BaseInput looks like this:
<template>
 <div>
   <label v-if="label">{{ label }}</label>
   <input type="email" @value="value" @input="updateInput" v-bind="$attrs">
 </div>
</template>
<script>
    export default {
      props: {
        label: {
          type: String,
          default: ""
        },
        value: [String, Number]
      },
      methods: {
        updateInput(event) {
          this.$emit('input', event.target.value)
        }
      }
    }
</script>
We want our BaseInput to accept a label prop which is always a string, and if the Input has a label, we show it in our template as we can see above.
When we fill the form, the updateInput method is triggered. The updateInput method takes the input event as an argument and it emits an event with the name of Input, along with the payload event.target.value which is the name (John Doe) in the form:
<BaseInput label="Your Name" v-model="userData.name" placeholder="Name"/>The v-model will be listening for the input event and then when it gets it, it sets our userData.name to the payload it got.
If we want to set a placeholder for an input, we might experience an error, this is because in vue2 attributes always attach themselves to the parent, so to fix this we set inheritAttrs to false and bind attrs.
<script>
    export default {
      inheritAttrs: false,
      props: {
        label: {
          type: String,
          default: ""
        },
        value: [String, Number]
      },
      methods: {
        updateInput(event) {
          this.$emit('input', event.target.value)
        }
      }
    }
</script>
To where we want the placeholder attribute to be. Our form page code looks like this now:
<template>
  <div class="form-group">
    <form>
      <BaseInput label="Your Name" v-model="userData.name" placeholder="Name"/>
      <BaseInput label="Your Email Address" v-model="userData.email" placeholder="Email"/>
      <BaseInput label="Your Password" v-model="userData.password" placeholder="Password"/>
    </form>
  </div>
</template>
We finally have a standalone reusable form component. You can play with the code in the codesandbox I made.
Note: $Attrs in Vue3 now includes all of your listeners, style bindings, and classes.
Getting Familiar With Vue Devtools
Vue.js Devtools is a very powerful tool as it helps us effectively debug our application in real-time. It is most powerful when we use Vuex and we have to manage mutations and track changes in our app. Most Vue.js developers use devtools as an extension, but we can also install it as a standalone app.
Note: The Vue.js devtools only work in the development mode of your build and won’t work in production so other people can’t use it to inspect your app.
Installing Devtools As a Standalone App
You might be wondering why we would want to install a standalone app for devtools when we can use the browser extension for it? It is because when you install it as a standalone app locally, you can use it from any browser.
We install it:
// Globally
npm install -g @vue/devtools
// or locally
npm install --save-dev @vue/devtools
Once it’s done installing, run:
vue-devtoolsThen in our index.html file, located in the public folder in the root of our Vue.js application we add:
<script src="https://localhost:8098"></script>Once your app is reloaded, it will automatically connect.
Some Operations We Can Do With Vue Devtools
Here are some helpful operations you can do on Vue.js DevTools.
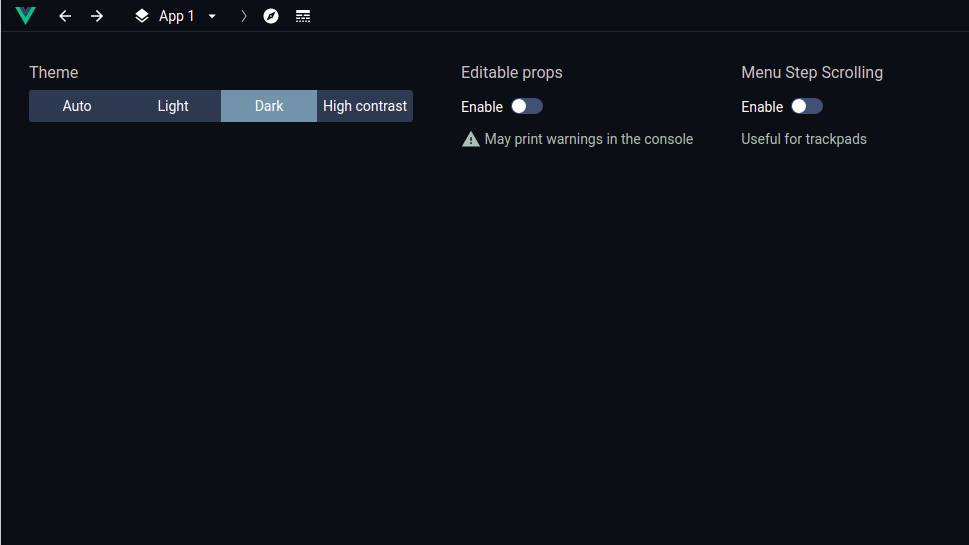
- Dark Theme
In the new DevTools, there is now an option to set between light, dark, or contrast themes. You can do this by going to your global settings and selecting it.
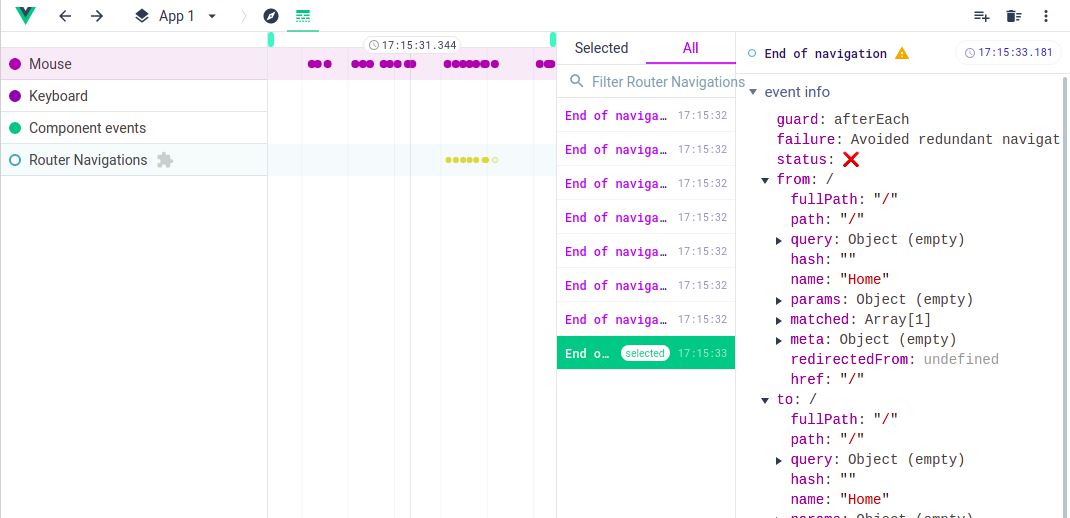
- Timeline
The new timeline in the devtools displays information about events that occur and it’s arranged in chronological order. It is located next to the inspector and settings view.
- Format component name
You can choose to display your component name in either camelCase or kebab-case.
There are many other operations that you can utilize in the vue devtools. You can check out their changelog.
Tools to Make Work In Vue Easier
When working with Vuejs, we might encounter some features we would love to implement, but it might take a lot of time to hard code or just a little bit difficult to implement. As professional developers, we add certain tools and helper libraries to make things easier and we would be looking at some of them.
Testing libraries
Testing can play a crucial role when building large-scale applications. It helps us to avoid unnecessary bugs during development when working with a team. Let’s look at the three types of testing we can carry out in our Vue application and their frameworks.
- Component Testing
Vue Testing Library, Vue Test Utils. - Unit testing
Jest, Mocha. - End to End Tests
Nightwatch.js, Cypress.
Component Libraries
A component library is a set of reusable components we can use in our application to make UI development much faster and more consistent in our application. Like React and Angular, Vue has its own set of component libraries. Some of them include:
- Vue Material Kit
A “Badass” Vue.js UI kit built upon material design. It contains more than 60+ handcrafted components. - Buefy
A lightweight component library based on the Bulma CSS framework. If you are comfortable with SASS, you will have no problem using it. - Vuetify
This is also a material design component framework with the availability of already made scaffolding for code, with a large community and regular updates - Quasar
My personal favorite, when it comes to the component framework. Quasar with its high performant frontend stack allows you to build cross-platform applications for Web, Mobile, and Desktop.
Other Interesting Libraries
Other note worthy libraries are:
- FilePond
This Vue.js library uploads any image you give it and optimizes those images with a silky-smooth experience. - Vuelidate
This library is very important when working with forms and you need a way to validate user inputs on the frontend. It is a simple and lightweight Model-based validation. - vue-Clickaway
Vue doesn’t have a native event listener to know when a user has clicked outside an element, for example, a dropdown, that’s whyvue-clickawayexists to detect click events.
There are many more libraries out there. You can check out a plethora of them on madewithvuejs.com and vuejsexamples.com.
Helpful Extensions To Help You In Writing Vue
Extensions are really helpful tools, which can make a big difference in your daily productivity when writing vuejs. During the time I have spent writing Vuejs code, I have found the following extensions Very helpful:
- Vetur
This is the number one extension on my list. Saving me hours when writing Vuejs. It provides specific highlighting, snippets, Intellisense, debugging, and much more for Vue.js. - Bookmarks
This extension comes in very handy when working on a large project because you can mark and set a bookmark in places in your code and jump to that specific place when you want to. - Eslint
Eslint helps us to easily find coding errors by throwing a warning if we do something wrong in the code. It is advisable to use it in a prettier format. - Vue.js Extension Pack
This extension pack contains a collection of other extensions that will help in your Vue.js development like Prettier, Vetur, Night Owl, Etc.
Conclusion
In this tutorial, we have looked at some tips and tools to help you become a better Vue developer. We started with some helpful insights on organizing our projects for scale and other great points to note and we rounded it up with Tools and extensions that make writing Vuejs so much easier.
Keep in mind that most of what is learned in this article is centered on Vue.js 2, to avoid misunderstandings.
Other Resources
Here are some useful links you can check out if you want to dive deeper into some of the things we discussed above.
- “Custom Directives,” Official Docs
- “Vue’s Reactivity,” Official Docs
- “Vue Devtools,” website
- Talk on Composition API vs Vuex
- Useful tools vue javascript development by Timi Omoyeni
Further Reading
- 35 Beautiful Vintage and Retro Photoshop Tutorials
- 60 Rare and Unusual Vintage Signs
- Vintage and Retro Typography Showcase
- Rediscovering The Joy Of Design


