Getting Started With CSS Cascade Layers

Email Newsletter
Weekly tips on front-end & UX.
Trusted by 182,000+ folks.


 Custom Web Forms for Angular, React, & Vue. Your backend.
 Celebrating 10 million developers
@layer. The intent is to help CSS authors be more intentional about ordering the “layers” of CSS rules as a new method of cascade management.CSS recently turned 25 years old, and over that time, many techniques and tools have been created to help developers work with the cascade. Within the last year, a new spec to orchestrate the “C” in CSS was drafted and is now an official candidate recommendation: cascade layers.
"Cascade layers allow controlling the specificity and order of rule sets across stylesheets."
We all have run into CSS collisions and sudden regressions in our codebases when new styles are written or 3rd-party styles are added. This is because of the interdependence of styles due to source order, specificity, and inheritance. Some ways to control the cascade have included methodologies like ITCSS and BEM and other newer native features like CSS custom properties and :where/:is. Cascade layers will be the ultimate native solution for resolving conflicts between multiple sources of styles.
You can experiment with cascade layers in the following browsers where they are enabled by default with no flag needed:
- Chrome Canary/Chromium 99+,
- Firefox Nightly 97+,
- Safari Technical Preview 137+.
What Are Cascade Layers Solving?
Miriam Suzanne, the spec author for cascade layers, noted in her original explainer (some information is now outdated) that “Cascade Layers would allow authors to define their own layering scheme and avoid specificity or source-order conflicts across concerns.” We’ll learn more about those key concepts of specificity and source order (aka “order of appearance”) to understand better when to use layers.
A foundational principle of the cascade that will help understand the purpose of cascade layers is that of origins. When the browser composites styles, there are three primary origins:
- Author origin
The stylesheets you add to your website. - User origin
Styles that browsers may allow providing as preferences such as default font, font size, and colors. - User-Agent origin
The default styles applied by the browser.
Additionally, both transitions and animations are considered origins due to the “virtual“ rules they create while running.
These origins are the highest priority when the browser determines which rule in the cascade “wins“ for a given element. Each origin also considers whether a definition is flagged with !important, which reverses the order of origins, resulting in !important in lower origins taking priority. So, use of !important updates the origin order to:
- important User-Agent origin,
- important User origin,
- important Author origin,
- normal Author origin,
- normal User origin,
- normal User-Agent origin.
The cascade sorting order determines the styles that the browser will apply. When a higher level fails to resolve the styles to use, the next level is evaluated until a winning declaration is found.
The sort order by priority is as follows:
- origins and importance;
- context (inside a shadow DOM, for example);
- element-attached styles (within the
styleattribute); - specificity;
- order of appearance — aka “last one wins“.
Once cascade layers are supported, they will slot into the sorting order between element-attached styles and specificity.
OK, so what does all that really mean for how cascade layers will impact styles? Let’s consider for a moment some of the many ways you might author your styles:
- all in a single stylesheet;
- aided by a framework;
- using a preprocessor like Sass;
- with a methodology like BEM;
- via CSS-in-JS.
Regardless of how you write CSS, you still are only working within the author origin. And within that origin, to work out the “right” styles to apply to an element, you are dealing with the last two sorting layers: specificity and order of appearance.
Frameworks, methodologies, and JS-related solutions directly result from trying to allow authors to exert some control over the cascade. For example, BEM (Block, Element, Modifier) encourages classes for every level within your components to provide some encapsulation. When BEM naming is adhered to, the resulting styles mostly bypass the order of appearance level (unless purposely using a modifier) while enabling control over specificity.
Without those tools and techniques as guardrails, it is notoriously easy to get in a battle against specificity and order of appearance. Even with using these approaches, rogue third-party styles or simply lack of discipline can result in increased usage of stronger selectors and rules littered with !important in an attempt to regain control. For some folks, this leads to significant frustration when writing CSS.
Cascade layers aim to place control of specificity and order back in the hands of authors. Use of @layer grants explicit power to orchestrate exactly how styles from varying sources are evaluated and prioritized.
The Cascade, Specificity, And Order Of Appearance
Let’s do a quick refresher on the basics of specificity and how order of appearance comes into play. These concepts are critical to understanding how layers work, and how powerful they will be for authors.
Here is a paragraph with the class of royal.
<p class="royal">Lorem, ipsum dolor.</p>What color do you think the paragraph will be given the following rules?
p {
  color: green;
}

.royal {
  color: royalblue;
}

:first-child {
  color: red;
}
The element tag has the lowest specificity, so it is not considered since the paragraph has a class with a matching rule. However, the class of royal and the pseudo-class have the same specificity, so the browser moves to order of appearance to determine which to apply. Since the :first-child rule is defined last, the paragraph will be red.
Now, if you always wanted the royal class to apply, some options would be to:
- add an
!importantonto thecolordefinition; - move the
.royalrule after the:first-childrule; - increase the specificity of the rule, such as updating it to
p.royalfor the added power of the element selector.
But there are consequences for each of these.
!importantis likely to result in issues for modifying the element with other styles later.- Moving the rule might not be a permanent fix as you might continue to have conflicts with rules of the same specificity.
- Increasing specificity may also reduce reusability; as in our example,
p.royalremoves the ability to use theroyalclass for other elements.
Let’s move on to learning how cascade layers work, and how they alleviate these points of conflict.
Defining Cascade Layers
As noted in the intro, cascade layers involve the new at-rule of @layer. There are multiple ways to define layers.
The first key concept of using @layer is that the order of layers matters because layers change the game regarding specificity. And by “order,” we’re talking about that idea we reviewed on “order of appearance.” A powerful feature of layers is that their order can be defined early and then styles added to later, which we’ll look at shortly.
One way to define a layer is to use the @layer rule and a name to create a block for the layer styles. Here, we’re making a layer called base:
@layer base {
  body { ... }
}
You can also add the layer() function to an @import but keep in mind that the use of @import has a performance cost. However, this feature can be very useful for defining a framework or third-party script as a layer.
@import url(bootstrap.css) layer(bootstrap);We can also use an @layer statement to define layers, formatted either as a multi or single line. This feature becomes incredibly important for allowing authors to define their layer order in one location at the top of their styles. They can then add styles later via the block or import methods by referencing the same layer name.
In this example, we’re essentially giving the Bootstrap framework styles the lowest priority as a layer, followed by our own base styles, and finally allowing for an application layer.
@layer bootstrap, base, application;

@import url(bootstrap.css) layer(bootstrap);

@layer base {
  body {... }
}Note: The spec is particular about the order of including @import. Once you add a @layer after an @import, any use of @import after that layer will be invalid and not loaded. So, if you had multiple @import to add, you’ll need to group them prior to creating more layers.
Nesting Cascade Layers
You can also nest @layer rules. Then, to add onto nested rules later, you reference the parent and nested rules together using dot notation.
@layer framework {
  @layer reset, base, components;
}

@layer framework.reset { ... }
Alternatively, you can define nested layers up-front using dot notation:
@layer framework.reset, framework.base, framework.components;If you re-use a name within a nested layer, it will not reference the outer layer but rather start a new layer with that name. So, in this example, we would be creating the framework.base layer, not appending styles to the outer base layer.
@layer base;

@layer framework {
  @layer base { ... }
}
Unnamed Layers
Finally, naming is optional. You can define unnamed (anonymous) layers. The downside is you cannot add to them later, and wherever they are added determines their priority against the order of other layers.
@layer { /* rules */ }
@import url(framework.css) layer;
You may choose to use anonymous layers to re-enforce that layers be defined in one location for your application. Or, you may use them as “private” layers if you intentionally do not want later authors to be able to manipulate them.
Specificity Of Cascade Layers And Layer Rules
Earlier I mentioned cascade layers were a gamechanger for specificity. While the rules we briefly reviewed about specificity will still apply within and outside layers, including layers introduces a new paradigm.
The first part of specificity for layers is the order. Therefore, layers defined later will have their rules take priority over layers defined earlier.
Let’s consider the following layer stack:
@layer reset, base, theme, components, utilities;Selectors defined in theme will take priority over reset and base, and the utilities layer styles will be prioritized over all of the previous layers.
Now, the outcome of that priority might surprise you. Recall that layers are intended to place control of the cascade back with authors. And a critical component of that control is being able to manage specificity. To fulfill that intention, the resulting behavior is that a more simple selector in a later layer can override what historically would have been a stronger selector in an earlier layer.
In the following example, the simple h2 element selector would make all of the h2s blue due to the theme layer order of appearance being after the base layer.
@layer base {
  article h2 {
    color: purple;
  }
}

@layer theme {
  h2 {
    color: blue;
  }
}
However, within an individual layer, the classic specificity rules apply.
Note: If you nest layers, this specificity behavior still exists. So, if the previous layers were nested in a framework layer, the h2 in framework.theme would still override the h2 in framework.base.
Hopefully, the reason these are called “layers” is becoming clear!
"A metaphor the CSSWG group used in planning layers was comparing them to PhotoShop layers, where the top layer overrides lower layers, but is also “see through” for parts where it doesn’t apply."
Specificity Of Unlayered Styles
Given layers are not presently fully supported, not to mention the shift they’ll be bringing, the CSS working group wanted to ensure an upgrade path. And as part of that discussion, they determined that the styles you’re currently used to writing — aka “unlayered styles” — would always take the highest priority. In other words, styles outside of layers will ultimately “win” over styles within layers.
If a paragraph has a class of blue and that class is defined in the utilities layer, it will be overridden by the p selector that lives outside of a layer. So here, the paragraph (and all others in the application) would end up red.
@layer utilities {
  .blue {
    color: blue;
  }
}

/* wins */
p {
  color: red;
}
Unlayered styles have priority even if they are ordered before any layers are defined. Meaning we could have placed the p rule before the utilities layer, and the paragraph would still become red.
Unlayered Styles Within Nested Layers
If you write styles inside a layer and then add nested layers, the rules outside of nested layers act like unlayered styles in terms of the cascade specificity. In this layer block, the paragraph will remain green.
@layer typography {
  p {
    color: green;
  }

  @layer content;
}

@layer typography.content {
  p {
    color: blue;
  }
}
So, if your nested layers have the potential to override each other, you may want to insure all styles with the parent layer are themselves within layers.
Use Of !important In Layers
As with the unlayered cascade sorting order, marking a property definition as !important raises its priority. In cascade layers, adding in !important reverses the sorting order such that competing !important styles in a layer defined earlier win over !important styles in later layers. This was designed to match the !important behavior we reviewed for origins. Additionally, the use of !important within a layer will also win over an unlayered style.
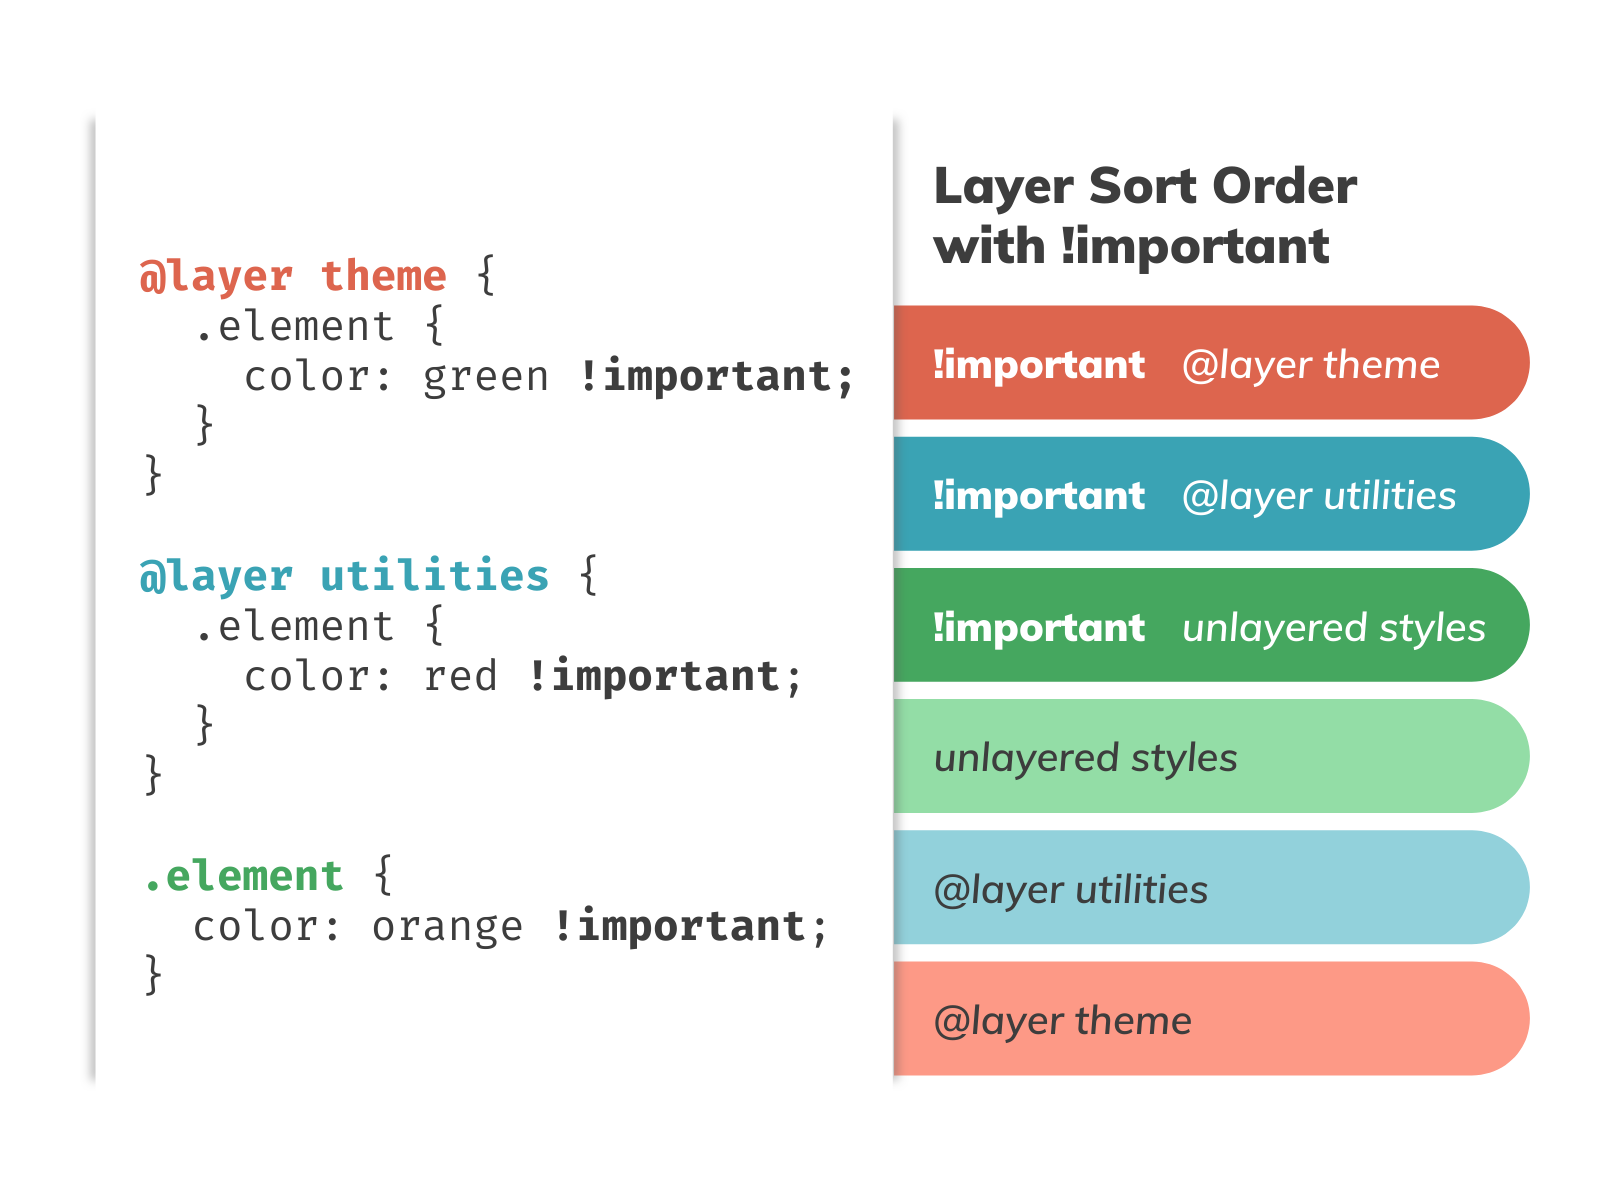
.element and marked as !important. Colored bars help emphasize the layer sort order which for the code sample shown is: !important @layer theme, !important @layer utilities, !important unlayered styles, unlayered styles, @layer utilities, and lastly @layer theme. (Large preview)Here are three rules where color on .lead has been marked !important. Two rules are within layers and one in the unlayered style. Due to the sort order reversal caused by !important, the element .lead is applied to will be green where cascade layers are supported.
/* wins */
@layer theme {
  .lead {
    color: green !important;
  }
}

@layer utilities {
  .lead {
    color: red !important;
  }
}

.lead {
  color: orange !important;
}
Consequently, to override a style marked !important within a layer, you must define a layer before that layer and continue marking the rule !important. Or, remove the use of !important and refactor.
This CodePen includes the styles we’ve reviewed so far to demonstrate the rules around specificity within and outside of layers and the impact of !important.
See the Pen [@layer specificity and !important](https://codepen.io/smashingmag/pen/podzPbJ) by Stephanie Eckles.
At time of writing, browser devtools for the current implementations of layers did not indicate that a style was coming from a layer. However, tooling is on the way, so stay tuned!
Combining Cascade Layers And Preprocessor Includes
CSS preprocessors like Sass and LESS allow you to combine styles from multiple stylesheets.
For example, in Sass, you might build up your primary stylesheet by including other files via the @use directive, like so:
@use "reset";
@use "theme";
Once layers are well supported, you may decide to wrap each include within a layer, depending on how granular you prefer to architect your styles. You could do that individually in each include before using it, or you can use the built-in Sass mixin for load-css to populate a layer with styles from an include:
@use 'sass:meta';

@layer theme {
  @include meta.load-css('theme');
}
If you were offering styles within a framework or design system where downstream authors could modify which layers were included, you could create an overrideable $layers list. Then, loop through list values to output the corresponding layer styles. This demo code assumes you have named your Sass stylesheets the same as your expected layers.
@use "sass:meta";
@use "sass:list";

$layers: "reset", "theme" !default;

// Outputs the list of layers
@layer #{$layers};

// Outputs each layer's styles via their include
@each $layer in $layers {
  @layer #{$layer} {
    @include meta.load-css($layer);
  }
}
Use Cases For Cascade Layers
We’ve hit pretty hard on the rules of layers regarding specificity and order of appearance. So, let’s consider some use cases of when those usually clash that layers will likely help resolve.
As you explore these scenarios, keep in mind that the browser will still download a complete stylesheet to process the rules. So, while layers can manage competing definitions, beware of creating file size bloat.
Resets Or Baseline Styles
When styles are authored with the intent of being re-used, there is usually a reset and/or set of baseline styles. These may be to smooth over browser inconsistencies for common elements or provide sensible defaults for the expected application. Styles in these categories usually are intended to have the lowest priority, which makes them good candidates to list as your first layer.
Additionally, having these styles in layers means that authors can later amend or add to styles within these layers. This idea is beneficial in the other scenarios we’ll review since it keeps the same specificity as originally intended.
Maybe your reset layer sets the font-family to sans-serif and then is distributed within a WordPress theme. You could tap into that layer within output from a settings panel to update the font-family to a user-defined value and ensure the low specificity is kept vs. adding a standard inline style.
Framework And Library Overrides
A primary reason folks use frameworks and libraries is for the preset styles. Generally, the framework and library authors will likely have tried to keep specificity low and offer customization methods. But there are always unique situations that you as the implementor will encounter where you may still need to override some styles.
Using layers, you can first place the framework entirely within its own layer to demote it to the lowest specificity against your custom layers. We briefly looked at this idea when learning the @layer syntax with Bootstrap as the example.
It’s certainly possible that as layers gain support, frameworks and libraries will offer a version that uses layers, thus giving you an entry point to more easily add your customizations. For example, if Bootstrap wrapped each component in a layer, you could override its styles by calling that same layer name and providing your styles.
Keeping with our Bootstrap example, they offer Sass and customization via Sass variables. But, Sass variables are applied at compilation time. So, there would still be value in having the library-supplied layers available if you needed to add a user stylesheet post-compilation.
Subsequently, without attaching user styles to those library layers, you may run into the issue of order of appearance. For example, if you intend to override base component styles while still allowing utility styles to modify variations successfully. Due to the specificity between layered and unlayered styles, you would run the risk of utility styles’ specificity no longer being high enough if you added the base customizations as “normal” styles.
Dark Mode And Other Theming
One aspect of cascade layers we haven’t covered is that they can be created or added to within other at-rules such as @media.
The use of layers means these rules do not need to be ordered next to the original theme rules, which provides more flexibility in architecting your styles. Updating the values using layers within a media query results in the styles keeping their original specificity defined by layer order. So, you can more safely modify styles to create a new theme even if the styles live in different layers.
You may consider using nested @layer to set the order of a series of potential themes. Then, you can set the layer styles within the associated media query (if there is one).
Here we’ve defined a series of possible themes associated with media queries and a final layer open for a user theme. This demonstrates defining the dark theme styles to update the related custom properties within the prefers-color-scheme media query.
@layer theme {
  @layer light, dark, prefers-contrast, forced-colors, user;

  @layer light {
    body {
      --background: #f9f9f9;
      --color: #222;

      background-color: var(--background);
      color: var(--color);
    }
  }
}

@media (prefers-color-scheme: dark) {
  @layer theme.dark {
    body {
      --background: #222;
      --color: #fff;
    }
  }
}
Given this type of setup, wherever it might make sense to add in the optional user theme stylesheet, you would be confident it would be able to override any previously set theme layers.
Components
When we first started describing layers, if you are used to a component architecture, you may have thought about creating a layer per component. While you certainly could, keep in mind all we’ve learned about how layers handle specificity.
You likely want component styles to be able to override more general styles, and you have two options of how to include them as layers. If you contain all your component styles within a single layer, then within that layer, they follow the “normal” rules of specificity. However, if you break them into separate layers, you’re affording the later layers higher priority to override previous layers.
As you consider these options, know that layers are not intended to solve scoping or encapsulation of styles. For that, keep an eye on another spec also being authored by Miriam Suzanne for actual native CSS scoping.
Element States
An excellent use case for a layer is to contain element states, such as :disabled or :focus.
In the past, I’ve written a more complex selector to add styles for buttons where I excluded the disabled state:
.button:not(:disabled) { ... }That rule increases specificity in a way that has to be matched or exceeded by downstream authors who wanted to change properties defined in that rule. Instead, layers will allow defining specific component styles that simpler state selectors can also override.
Here’s an example of how I might update my button styles in the future for both :focus-visible and :disabled states. These state rules will technically apply to any interactive element, including links, buttons, and form elements.
@layer components, states;

@layer components {
  .button {
    --focus-color: rebeccapurple;

    background-color: rebeccapurple;
    color: #fff;
  }
}

@layer states {
  :disabled {
    background-color: #ddd;
    color: #999;
  }

  :focus-visible {
    outline: 2px solid var(--focus-color, currentColor);
    outline-offset: 2px;
  }
}
This technique is demonstrated in this CodePen:
See the Pen [@layer for element state](https://codepen.io/smashingmag/pen/MWOgmjK) by Stephanie Eckles.
Do We Really Need Cascade Layers?
If you are writing small, contained projects that are not shared with a team or not meant for re-use, you may not see much value in cascade layers. Most certainly, they won’t be needed on every project.
However, the ability to define layer order and then append to layers later in your stylesheets is incredibly powerful. The level of confidence this allows in ensuring the intended specificity of styles stays intact is worth a lot.
Consider developing styles for a theme, or design system, or with a preprocessor or JS framework or library. These are scenarios where you are likely to have rules spread across several stylesheets and includes for the sake of overall organization. Injecting layers into these scenarios would allow adding and amending styles without extra architecture to maintain the original order of appearance and specificity.
Can We Start Using Cascade Layers?
With new CSS features, we can often begin using them as a progressive enhancement. For example, with properties like aspect-ratio or selectors like :is(), we can use @supports to include new features while supporting fallbacks. Or, sometimes features can be added, and graceful degradation is acceptable without a comparable fallback.
However, cascade layers are such an all-encompassing change that it will be difficult to start moving to use them until a polyfill is available. Unfortunately, @supports doesn’t currently work with at-rules, and even if it did, it would not be entirely sufficient for cascade layers since unlayered styles always win over layered ones.
You can certainly start experimenting with cascade layers to learn more about using them! Then, when a polyfill is ready, you’ll be better prepared to assess if they are a feature you’d like to incorporate into your projects. Also, keep in mind that more browsers have moved to be “evergreen” so after a while you may feel browsers have an acceptable level of support for your audiences.
Alternative Solutions For Managing Specificity
While sufficient support for cascade layers without a polyfill may be a few years away, there are still modern CSS options to aid in managing specificity today.
Two complementary pseudo-classes already have excellent support in evergreen browsers: :is() and :where(). Both pseudo-classes allow listing multiple selectors within the parenthesis. The difference is in how they treat the specificity of those selectors.
:is()takes on the specificity of strongest selector listed, for example, with:is(.class, #id), the entire rule would have the specificity of the id.:where()is always zero-specificity for the listed selectors.
Particularly for :where(), the benefit of zero-specificity can be used for setting up resets and baseline styles that are intended to be overridden. Sometimes those initial styles have bumped up specificity by including attributes or states.
For example, I enjoy attaching list-style removal if my list element has added role="list" (to ensure assistive tech still announces it as a list). But, adding that attribute selector bumps specificity, and I have to include it again if I want to change padding and margin. So, instead, I can use :where() to write the selector with zero-specificity. This creates a default with no issue in overriding it later in component styles with a simpler selector.
:where(ul, ol):where([role="list"]) { ... }Recently, Mads Stoumann covered using :is() and :where() as a cascade-control method in more depth on CSS-Tricks.
Spec Status
Cascade layers are part of the spec for “CSS Cascading and Inheritance Level 5,” which reached candidate recommendation on January 13, 2022. There are no remaining major issues yet to resolve, but you can find the previously resolved issues on GitHub.
Give cascade layers a try! If you find an issue, you can file it for the working group to consider on GitHub.
Additional Resources
- Bramus Van Damme wrote an excellent in-depth review of cascade layers;
- Check out and bookmark the Candidate Recommendation document to keep tabs on syntax or other changes;
- Review spec author Miriam Suzanne’s original explainer (some syntax is out of date) for more context and history;
- Watch this video update from Miriam Suzanne, where the first two minutes summarizes cascade layers (slides and transcript also provided);
- Una Kravets created a video overview of cascade layers with a demo.
Further Reading
- The Modern Guide For Making CSS Shapes
- What Does AI Really Mean?
- Mastering Typography In Logo Design
- Regexes Got Good: The History And Future Of Regular Expressions In JavaScript


