Those HTML Attributes You Never Use

Email Newsletter
Weekly tips on front-end & UX.
Trusted by 200,000+ folks.


In January, Madison Kanna asked her Twitter followers:
What are the languages/tech you’re excited to learn or learn more deeply this year?
— Madison Kanna (@Madisonkanna) January 3, 2022
mine: typescript, next.js, react, graphql, solidity, node
My answer was easy: HTML. And I wasn’t being sarcastic or mocking in the least. Sure, I pretty much know which tags to use in which instances and how to keep my HTML mostly semantic and accessible.
But there is a whole bunch of lesser-used attributes that I was sure I’d forgotten about, and probably a whole bunch of attributes I didn’t even know existed. This post is the result of my research, and I hope you’ll find some of these useful to you, as you build HTML pages in the coming months.
The enterkeyhint Attribute For Virtual Keyboards
The enterkeyhint attribute is a global attribute that can be applied to form controls or elements that have contenteditable set to true. This attribute assists users on mobile devices that use a virtual on-screen keyboard.
<input type="text" enterkeyhint="done">enterkeyhint accepts one of seven possible values that will determine what the user sees on his ‘enter’ key:
enter,done,go,next,previous,search,send.
You can see how these “hints” can be useful for the user. Is the user progressing through a series of actions? Are they submitting info? Are they saving a setting? Depending on what they’re doing, you can customize the hint to match your app’s needs.
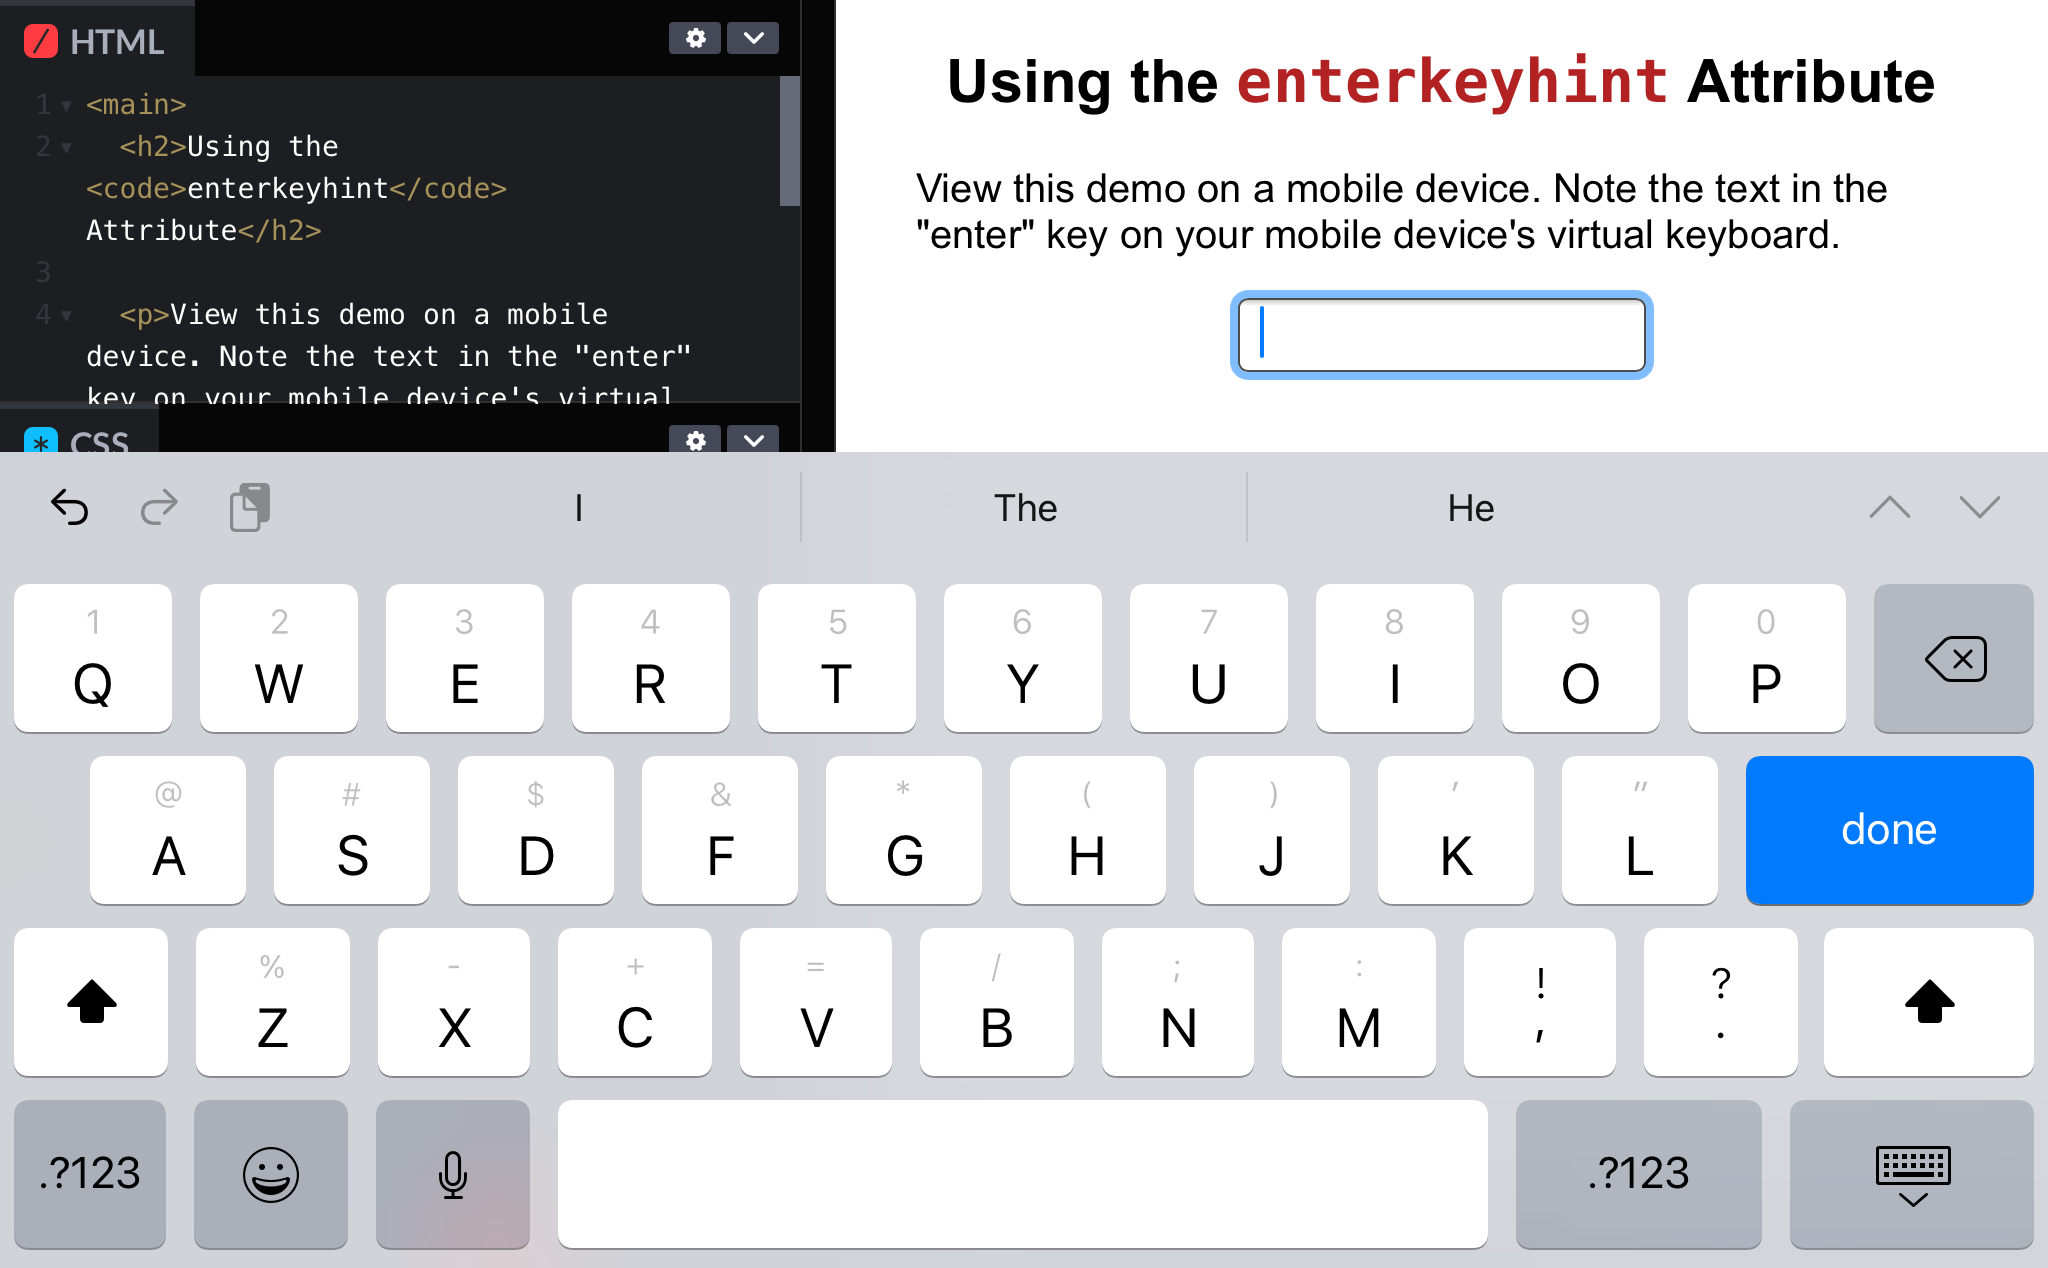
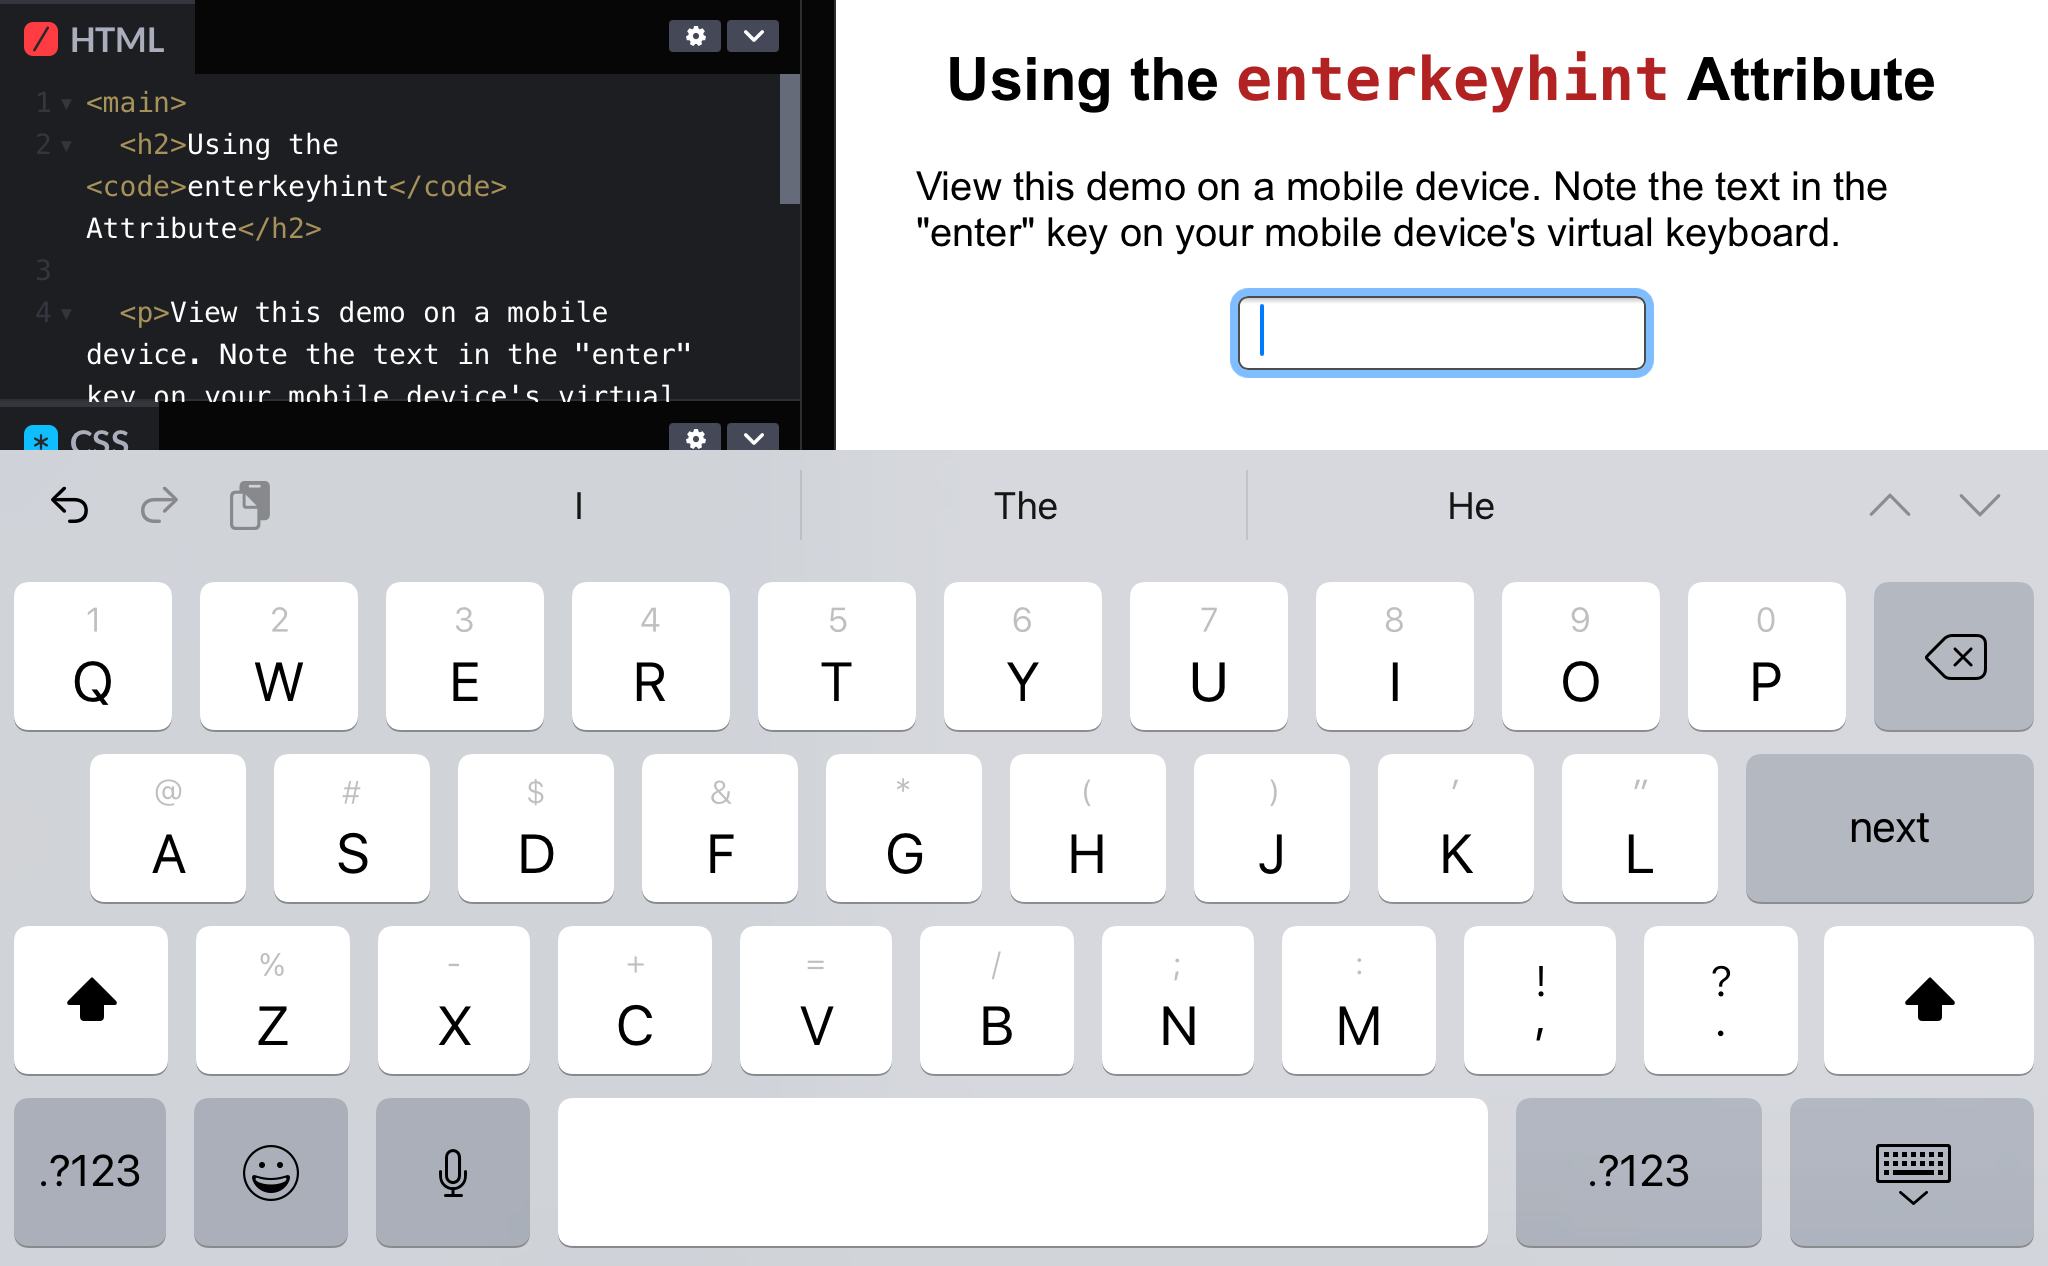
You can try this one out by visiting the CodePen demo below on a mobile device.
See the Pen [Using the enterkeyhint Attribute [forked]](https://codepen.io/smashingmag/pen/bGadMyz) by Louis Lazaris.
On my iOS device, the text for the enter key changes along with the color of the key, depending on the value, as you can see in the screenshots below. This might vary, depending on the user’s device.
And just to emphasize, this attribute doesn’t accept custom values; the value needs to be one of the seven shown above. An unrecognized value will just default to whatever the device’s default text is for the enter key.
The title Attribute On Stylesheets
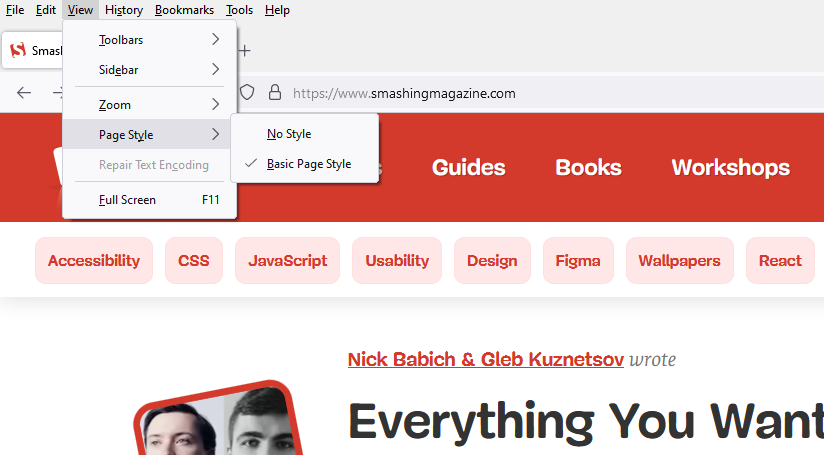
This one was brand new to me when doing research for this article and might be the most interesting one in this list. As a bit of background, in case you didn’t know, Firefox has an option that lets you select which style sheet you want to use when viewing a page. Normally, this feature displays two options: “Basic Page Style” and “No Style”, as shown in the image below on my Windows machine.
This lets you quickly test how a page will look when styles are disabled, and it also allows you to view the page with any alternate stylesheets.
The alternate stylesheet feature is enabled with two attributes: The title attribute and rel=alternate applied to a <link> element, as shown in the code below:
<link href="main.css" rel="stylesheet" title="Default">
<link href="contrast.css" rel="alternate stylesheet" title="High Contrast">
<link href="readable.css" rel="alternate stylesheet" title="Readable">
In this case, my “default” styles will apply automatically, but the alternate stylesheets will only apply if I select them using Firefox’s “Page Style” option. You can try out the above example by visiting the following CodePen, using Firefox or another compatible browser:
See the Pen [Alternate Stylesheets Using rel title Attributes [forked]](https://codepen.io/smashingmag/pen/ExojRgm) by Louis Lazaris.
The screenshot below shows the stylesheet options in Firefox:

As mentioned, this feature works in Firefox, but I wasn’t able to get it to work in any Chromium-based browser. MDN’s article on alternate stylesheets says it can be enabled in other browsers using an extension, but I couldn’t find an active extension that does this.
The cite Attribute For The <blockquote> And <q> Elements
I’m sure you use the <blockquote> element pretty regularly. You can use it plainly without an attribute, but you also have the option to use the cite attribute. Here’s an example that quotes the MDN article that describes using cite on <blockquote>:
<blockquote cite="https://developer.mozilla.org/en-US/docs/Web/HTML/Element/blockquote#attr-cite">
      A URL that designates a source document or message for the information quoted. This attribute is intended to point to information explaining the context or the reference for the quote.
</blockquote>
Since my blockquote above is from the MDN article that explains what cite does, I’ve set the URL that points to the page as the cite value.
You can see how this is useful, because it wraps up the quote and the source of the quote in one element. But note this further explanation in the HTML spec:
“User agents may allow users to follow such citation links, but they are primarily intended for private use (e.g., by server-side scripts collecting statistics about a site’s use of quotations), not for readers.”
And naturally, the same concepts apply to use of cite on the <q> element, which is used for inline quotations.
Attributes For Custom Ordered Lists
Ordered lists using the <ol> element are used often. Some lesser known features that allow you to customize the behaviour of the numbering that appears in such a list are:
- the
reversedattribute, to number the items in reverse order (high to low instead of the default low to high); - the
startattribute, to define what number to start from; - the
typeattribute, to define whether to use numbers, letters, or Roman numerals; - the
valueattribute, to specify a custom number on a specific list item.
As you can see, ordered lists are a lot more flexible with plain HTML than you might normally be accustomed to.
The reversed attribute is an interesting one, because it doesn’t actually reverse the contents of the list itself; it only reverses the numbers next to each list item.
<ol reversed>
    <li>List item...</li>
    <li>List item...</li>
    <li>List item...</li>
</ol>
The CodePen demo below adds some JavaScript, so you can interactively toggle the reversed attribute.
See the Pen [Reverse Ordered Lists with HTML [forked]](https://codepen.io/smashingmag/pen/jOYPKxW) by Louis Lazaris.
Notice, that the list itself stays the same, but the numbers change. Keep that in mind if you’re looking for a way to reverse the contents. That’s something you would do with JavaScript, CSS, or directly in the HTML source.
Above, I also mentioned three other attributes. Let’s incorporate those into the list to see how they can be used:
<ol reversed start="20" type="1">
    <li>Typee: A Peep at Polynesian Life (1846)</li>
    <li>Omoo: A Narrative of Adventures in the South Seas (1847)</li>
    <li>Mardi: and a Voyage Thither (1849)</li>
    <li>Redburn: His First Voyage (1849)</li>
    <li value="100">White-Jacket; or, The World in a Man-of-War (1850)</li>
    <li>Moby-Dick; or, The Whale (1851)</li>
    <li>Pierre; or, The Ambiguities (1852)</li>
    <li>Isle of the Cross (1853 unpublished, and now lost)</li>
</ol>
Note, the type and start attributes that have been added as well as the value attribute on an individual list item. The type attribute accepts one of the five single-character values (a, A, i, I, 1) representing the numbering type.
Try it using the following interactive demo:
See the Pen [Reverse Ordered Lists with start, type, and value Attributes [forked]](https://codepen.io/smashingmag/pen/RwxPqgN) by Louis Lazaris.
Use the radio buttons to select one of the five values for the type attribute. Then try reversing the list using the Toggle Reversed button. As you can see, there is a ton of possibilities beyond the default behaviour of ordered lists!
The download Attribute For The <a> Element
As ubiquitous as links are on the web, it’s always nice to have an attribute that makes links even more powerful. The download attribute was added to the spec a number of years ago, and it allows you to specify that when a link is clicked, it should be downloaded rather than visited.
<a href="/example.pdf" download>Download File</a>With no value, the download attribute forces the linked page to be downloaded. Alternatively, you can provide a value which the browser uses as the suggested file name for the downloaded resource.
<a href="/example.pdf" download="my-download.pdf">Download File</a>As a bonus trick involving this attribute, you can combine this feature with some JavaScript to create a way for the user to download content they create themselves. I covered it a little bit previously in this post, and you can try it out by using the demo below.
See the Pen [The download Attribute Combined with a Data URI + JavaScript to Let the User Download Custom HTML [forked]](https://codepen.io/smashingmag/pen/abEOQyQ) by Louis Lazaris.
The decoding Attribute For The <img> Element
This is another one that was brand new to me when researching this article — and it seems to be fairly new in the spec. Adding the decoding attribute to an image element provides an image decoding hint to the browser.
<img src="/images/example.png" alt="Example" decoding="async">This attribute is similar to using the async attribute on scripts. The time it takes to load the image doesn’t change, but the manner in which its “decoded” (and thus its content becomes visible in the viewport) is determined by the decoding attribute.
Values are:
sync
Decode the image synchronously, which is generally how browsers do it.async
Decode the image asynchronously to avoid delaying presentation of other content.auto
The default which allows the browser to use its own built-in method of decoding.
If you’re curious about the concept of decoding images, the spec has a good explanation that’s not too difficult to follow.
The loading Attribute For The <iframe> Element
As you probably already know, image elements can now include a loading attribute that puts lazy loading into the browser as a feature, something we’ve been doing for years with JavaScript solutions. But don’t forget that the loading attribute can also be used on <iframe> elements:
<iframe src="/page.html" width="300" height="250" loading="lazy">As with images, the loading attribute accepts either a value of eager (the default browser behaviour) or lazy, which defers loading of the iframe’s contents until the iframe is about to enter the viewport. The only down-side to this attribute is the fact that its use on iframes is not supported in Firefox (though, Firefox does support loading on images).
The form Attribute For Form Fields
In most cases, you’re going to nest your form inputs and controls inside a <form> element. But if your app or layout requires something a little different, you have the option to put a form input anywhere you want and associate it with any <form> element — even one that’s not the element’s parent.
<form id="myForm" action="/form.php">
  <input id="name">
  <button type="submit">
</form>

<input type="email" form="myForm">
As you can see above, the email <input> that’s outside the form has the form attribute set to myForm, which is set to the same value as the id of the form. You can associate a form control (including the submit button) with any form in a document by using this attribute and the form’s id.
You can try this out using this demo page. The form submits using a GET request, so you can see the values submitted in the URL’s query string. On that page, the “comments” box is outside the <form> element.
The only complaint I have with this attribute is that it probably should have been given a more unique name, maybe something like “formowner”. Nonetheless, it’s a useful one to remember, should your design or layout require a parent-less form field.
The cite And datetime Attributes For Deletions/Insertions
I’ve already mentioned cite when dealing with blockquotes, but this attribute can also be used with deletions and insertions marked up with the <del> and <ins> elements. Additionally, both elements can include a datetime attribute.
<del
  cite="https://bugzilla.mozilla.org/show_bug.cgi?id=1620467"
  datetime="2020-07-23"
>Firefox doesn't support CSS's standard <code>appearance</code> property, so you can only use it prefixed.</del>

<ins
  cite="https://bugzilla.mozilla.org/show_bug.cgi?id=1620467"
  datetime="2020-07-23"
>The <code>appearance</code> property, previously only available prefixed in Firefox, can now be used in all modern browers unprefixed.</ins>
For each element, here’s what the two attributes represent:
cite
A URL pointing to a resource that explains why the content was deleted or inserted.datetime
Date that the deletion or insertion was made.
In my case, I’m using the example of some text, describing a CSS property that required a vendor prefix in Firefox. This might be an old blog post. Once the prefixes were removed, I could delete the old text and insert the new text using the <del> and <ins> elements. I can then use the cite attribute to reference the bug report where the problem was resolved.
The label Attribute For The <optgroup> Element
Finally, this last one is a bit of a golden oldie, but because it doesn’t get used too often, maybe you didn’t even know it existed. This one is a combination of an element along with an attribute.
If you have a long list of items included in the options for a <select> drop-down, you can group the options into visible categories using the <optgroup> element along with its associated label attribute:
<select>
  <option>--Your Favourite Animal--</option>
  <optgroup label="Birds">
    <option>Blue Jay</option>
    <option>Cardinal</option>
    <option>Hummingbird</option>
  </optgroup>
  <optgroup label="Sea Creatures">
    <option>Shark</option>
    <option>Clownfish</option>
    <option>Whale</option>
  </optgroup>
  <optgroup label="Mammals">
    <option>Lion</option>
    <option>Squirrel</option>
    <option>Quokka</option>
  </optgroup>
</select>
You can try out an example by using the following CodePen:
See the Pen [Using the label Attribute with optgroup Elements [forked]](https://codepen.io/smashingmag/pen/xxpGQjB) by Louis Lazaris.
Notice, each <optgroup> has a label attribute that defines a heading for each group — but the headings can’t be selected. As a bonus tip, you can also use the disabled attribute on an <optgroup> to disable all the options in that section of the <select> drop-down.
The imagesizes And imagesrcset Attributes For Preloading Responsive Images
This is another pair of attributes that were new to me when researching this article, and both of them are relatively new in the spec as well.
Both of these attributes can be defined along with rel=preload and as on the <link> element, as follows:
<link rel="preload"
      as="image"
      imagesrcset="images/example-480.png 480w,
             images/example-800.png 800w,
             images/example.png 2000w"
     imagesizes="(max-width: 600px) 480px,
            (max-width: 1000px) 800px,
            1000px"
     src="images/example.png"
     alt="Example Image">
Use of rel=preload here informs the browser that we want the indicated resources to load in priority, so they’re not blocked by things like scripts and stylesheets. The as attribute specifies the type of content requested.
You can preload regular images by using the href attribute along with preload and as. But on top of that, you can use the imagesrcset and imagesizes attributes, as I’ve done in the code above.
This allows you to preload the correct image, depending on the size of the viewport or other media features you’ve specified in the imagesizes attribute.
Honorable Mentions
In addition to the attributes I’ve already described and demonstrated in detail, there are some others you might want to look into that I’ll just mention briefly here:
- The
crossoriginattribute which can apply to multiple elements, including<audio>,<img>,<link>,<script>, and<video>, providing support for cross-origin resource sharing (CORS); - The
titleattribute for<dfn>and<abbr>; - The new
disablepictureinpictureattribute for the<video>element; - The
integrityattribute for scripts, which helps the browser verify that the resource hasn’t been improperly manipulated; - The
disabledattribute for the<fieldset>element, to easily disable multiple form elements simultaneously; - The
multipleattribute for email and file inputs.
If you’ve used any of the attributes mentioned in this article, or if you know of another HTML feature that you’ve personally benefited from using in one of your projects, feel free to let me know in the comments.
Further Reading
- Lesser Known Uses Of Better Known Attributes
- What Does AI Really Mean?
- Integrations: From Simple Data Transfer To Modern Composable Architectures
- Transitioning Top-Layer Entries And The Display Property In CSS


