Implementing Okta Authentication In React

Email Newsletter
Weekly tips on front-end & UX.
Trusted by 182,000+ folks.

 Celebrating 10 million developers


 Custom Web Forms for Angular, React, & Vue. Your backend.
When we’re building an application, one essential factor is authentication. For many developers, building an authentication architecture is straightforward. Still, teams have to consider security and ease of integration with third-party platforms such as Google and Facebook. Soon enough, building your own authentication system becomes complex.
This tutorial will be helpful to readers who are interested in learning how to authenticate users with Okta or an alternative in their React applications. This article requires a basic understanding of React and JavaScript.
Authentication In React Applications
Most React applications are a mixture of pages that are available to everyone and pages that require some form of authentication. React developers need to validate user-specific details to determine whether a user is authenticated and then assign a role to that user. Roles range from simple client access to more sophisticated admin access. Users generally need to do the following:
- Sign up
This can be done with an email address, phone number, and password, and you would save the user’s information for when they next want to access those private pages. - Log in
Authenticated users need to be able to log in to their own private pages.
Authentication in a React application can be done in a variety of ways, including native authentication methods (for example, token-based authentication tools like JSON Web Tokens (JWTs)), libraries such as Stormpath, and authentication managers such as Auth0, Okta, and OneLogin.
How Does Okta Work?
Like many authentication managers, Okta allows developers to control access to a React application using the OAuth 2.0 specification. Okta can be used as an authorization server to store all user information and issue user tokens for authentication and authorization.
With Okta, all of the user’s data and authentication information is stored securely in the cloud by Okta and can be managed from the Okta admin dashboard.
To retrieve user data from Okta, you’ll need to access it using Okta’s getUser method on OktaAuthService. More information is available in the documentation.
What Is Okta?
Okta is an enterprise-level identity-as-a-service cloud platform that is used for authorization by individuals and organizations. Unlike several other identity platforms, Okta works perfectly with on-premises applications and cloud applications.
With Okta, project and IT managers can manage access to employees on all resources and applications in the organization. Okta runs effectively in the cloud on a secured platform and integrated with on-premises directories, applications, and identity-management systems.
The core of Okta includes the following methods and features:
- Okta Identity Engine
This is the core feature of Okta. It allows managers to customize their Okta cloud components to solve a wide range of authorization use cases. Managers can use more than the default authorization features defined by Okta and can create customized solutions to their identity needs. - Single Sign-On (SSO)
With Okta, managers have a single built-in sign-on accessibility feature for cloud and mobile applications. Once you’ve logged in with your Okta account, you will be able to access your application on any other device without needing to re-enter your credentials. You can also integrate Okta with their on-premises and cloud-based applications. - Okta Provisioning
For automating users’ account and management processes, Okta provides advanced lifecycle hooks. Managers can use the built-in Okta integration network or a custom API connection to support users between Okta and cloud. Okta also provides a web API for managing user accounts. - Okta Mobility Management
This feature enhances the management and identities of users. From Okta mobile management, project and product managers can manage access policies from a central cloud-based console. This provides high protection to data, people, and apps from directories to any mobile device. To prevent unauthorized users from accessing some endpoints, Okta allows managers to build contextual user access.
Why Use Okta?
Okta’s main objective is to improve enterprise-level authorization and identity management for IT teams and organizations and to make it easier to manage permission for users.
Okta also provides sign-in widgets and advanced lifecycle-management hooks to authenticate users. The customizations will allow an organization to extend its identity-management needs. Several identity managers are available for React and React Native applications, including Azure AD, OneLogin, and Auth0. The table below shows why Okta is often regarded as a smarter choice for teams and organizations.
| Okta | OneLogin | Azure AD |
|---|---|---|
| Provides 2-factor authentication | Provides 2FA | Provides 2FA |
| Provides batch permissions and access for large organizations | Does not provide batch permissions and access | Provides batch permissions for select admin roles |
| Data import and export for teams and individuals | Does not provide data import and export for teams and individuals | Data import and export for teams and individuals |
| Email and Google Apps integration | Does not provide email and Google Apps integration | Data import and export for teams and individuals |
| Proficient cross-platform capabilities | Limited cross-platform capability | Limited cross-platform capability |
Build An Application With Okta
Now that we know the core features of Okta, let’s build a rent-management system. This application will allow a landlord to see information about each tenant, the house number, and an image of the room. Using Okta, a landlord and a tenant will be able to log in and see this information.
Without further ado, let’s start!
Set Up Okta
The first requirement is to create an account on Okta. This will allow us to create an application and to onboard users to our Okta admin dashboard. Here, we will assign a sign-in method using “Okta sign-in” and also add an application type in our Okta dashboard. You can see this in the image below.
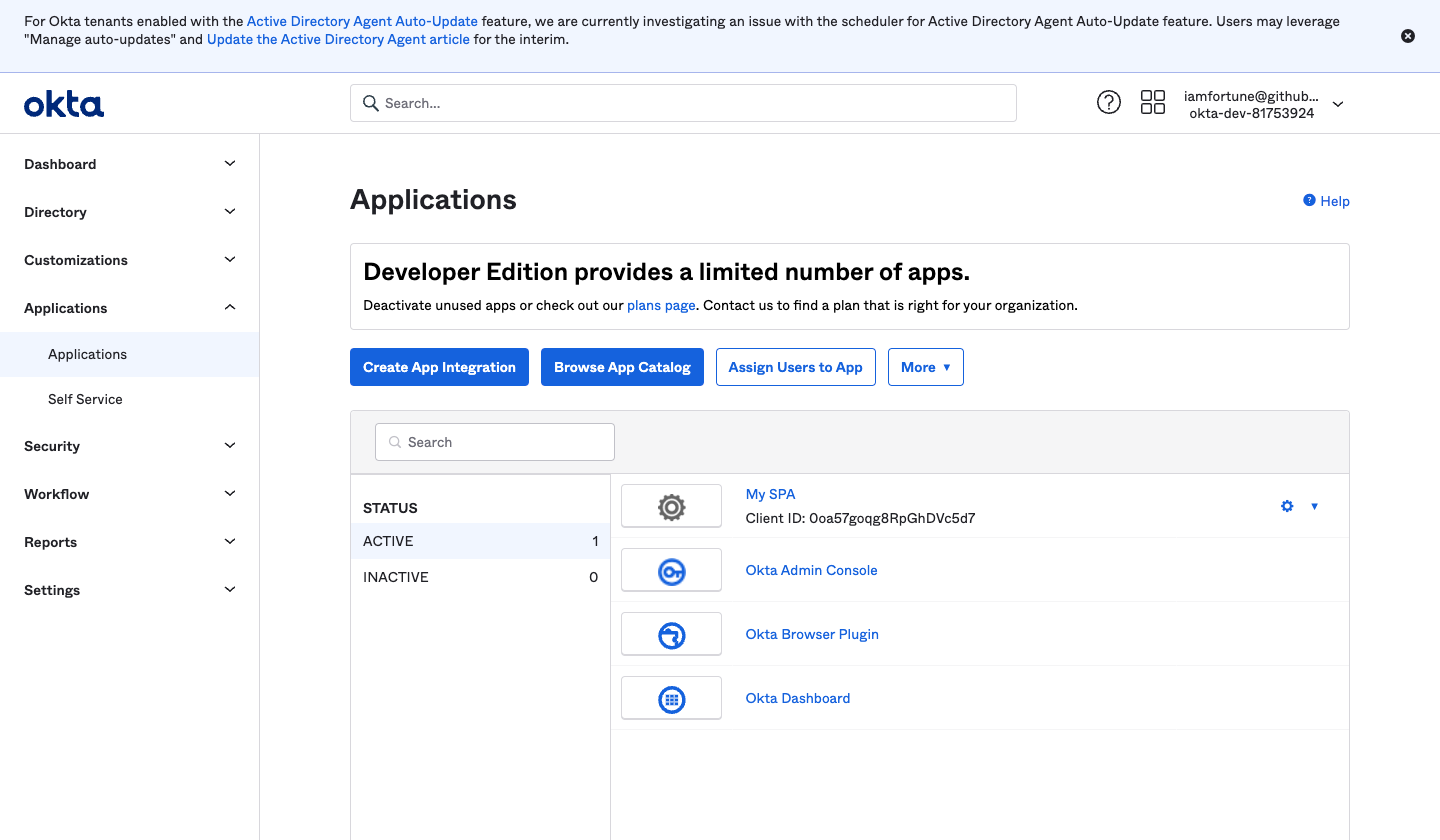
After clicking on the “Applications” tab, navigate to the “Create App Integration” button.
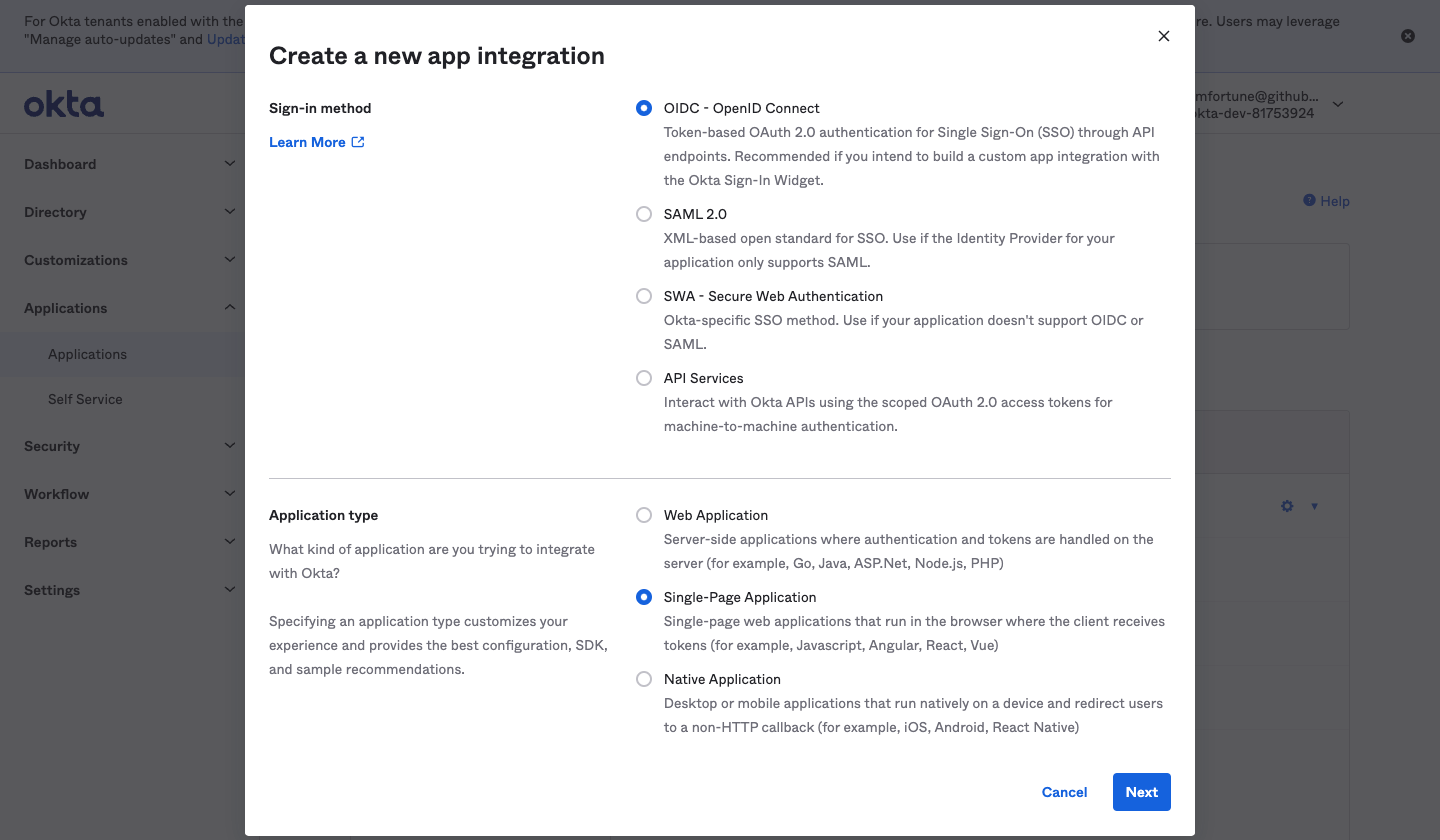
Here, we selected the “OpenID Connect” sign-in method. This provides us with a sign-in widget from Okta (this is optional — you can also build a custom log-in). Next, we selected our application type, which is a single-page application. Click on the “Next” button after selecting these credentials.
Next, we will specify a sign-in URI and a sign-out URI. We will set our redirect URIs to localhost:3000 for this tutorial, as seen below:

As shown in the image above, we added a sign-in redirect URI to redirect users once they’ve logged in to our application and a sign-out URI to redirect users once they’ve logged out.
In our Okta dashboard, we can configure the type of authentication that we want for users and add sign-in and sign-out routes. Now, we’re ready to create our React application with Okta!
Creating A React Application
Let’s get started with creating a React application using Create React App. Run the command below to create a new project:
npx create-react-app {project name}Alternatively, you can use Yarn:
yarn create-react-app {project name}Next, cd into the project directory, and start your development server using the command below:
cd {project name} && yarn run devConfigure Okta for the React Application
Now, we’ll install the @okta/okta-react, @okta/okta-signin-widget, and @okta/okta-auth-js dependencies in our application.
Use this for npm:
npm install @okta/okta-react @okta/okta-signin-widget @okta/okta-auth-jsAnd use this for Yarn:
yarn add @okta/okta-react @okta/okta-signin-widget @okta/okta-auth-jsNext, let’s install the dotenv package, which we’ll use to store our Okta environment variables. We also add styled-components, which we’ll use to style our application.
Using npm:
npm install dotenv styled-componentsUsing Yarn:
yarn add dotenv styled-componentsCreate a new file, .env, in the root directory of our project, and add the following credentials, provided by Okta:
REACT_APP_OKTA_BASE_URL="Your Okta base URL goes here"
REACT_APP_OKTA_CLIENT_ID="Your unique ID goes here"
The BASE_URL includes your log-in email hosted by Okta. It’s a public identifier for OAuth flows provided by Okta. Your CLIENT_ID can be found in your Okta dashboard under the client credentials. Next, let’s complete our Okta authentication by setting up a user for our application.
Configure Okta in React App
To use Okta for our React application, first, we will need to initialize a primary user in our application. Create a new file, config.js, in the root directory of our project application, and in it add the code block below:
export const oktaAuthConfig = {
    issuer: `https://${process.env.REACT_APP_BASE_URL}/oauth2/default`,
    clientId: process.env.REACT_APP_CLIENT_ID,
    redirectUri: `${window.location.origin}/login/callback`,
    scopes: ["openid", "profile", "email"],
    pkce: true,
};
In this code block, we’ve created an object named oktaAuthConfig. In that, we created an issuer, our BASE_URL, and a clientID from Okta. The redirectUri is the callback that we set up in our Okta dashboard. You can read more about Okta React configuration in the documentation.
Building App Components
Create a Navbar.js file in the src/components/Navbar directory. We’ll create a functional Navbar component with two Okta-assisted links for logging in and signing out. Let’s do that below:
import { Link } from "react-router-dom";
import styled from "styled-components";
import { useOktaAuth } from "@okta/okta-react";

 const Nav = () => {
        const { oktaAuth, authState } = useOktaAuth();
        const loggingIn = async () => oktaAuth.signInWithRedirect({ originalUri: "/" });
        const loggingOut = async () => oktaAuth.signOut();
In the code above, we imported useOktaAuth from Okta. Using the useOktaAuth hook, we get access to our Okta state and oktaAuth object. For logging in, we created a function, login, that will call oktaAuth to sign in a user, and another function, logout, to sign them out.
Next, we created a button. In it, we rendered log-in functionality to the user if they’re not authenticated yet, and we rendered log-out functionality if the user is authenticated.
To complete our component, we will add styles and a navbar menu that contains the name of the landlord’s estate, and a link to a profile page for users. Let’s do that below:
    return (
        <Section>
            <Link to="/">
                <h2>Regents Housing</h2>
            </Link>
            <ul>
                <li>
                    <Link to="/profile">Profile</Link>
                </li>
                <li>
                    {
                      authState?.isAuthenticated ? (
                            <button onClick={logout}>Logout</button>
                        ) : (
                            <button onClick={login}>Login</button>
                        )
                    }
                </li>
            </ul>
    </Section>
};
Let’s add styles to our application, export the component, and see the result below:
 const Section = styled.nav`
        width: 90%;
        margin: 1rem auto;
        display: flex;
        align-items: center;
        justify-content: space-between;
        h2 {
            font-style: oblique;
        }
        a {
            text-decoration: none;
        }


        & ul {
            display: flex;
            justify-content: space-between;
            align-items: center;

            & li {
                list-style-type: none;
                &:hover {
                    text-decoration: underline;
                }
                &:nth-last-child(1) {
                    margin-left: 1rem;
                }
                a {
                    color: #333;
                    font-weight: 500;
                    font-size: 1rem;
                    text-decoration: none;
                }
                & button {
                    font-size: 1rem;
                    color: #333;
                    font-weight: 500;
                    cursor: pointer;
                    outline: none;
                    border: none;
                    background: transparent;
                }
            }
        }
    `;
export default Navbar;
Our Nav component should look like the image below:
Building A Room Card Component
In this section, we will build a Card component to render each room in the estate. We’ll create a simple component to render the occupant’s name, room number, and the rent due date.
Let’s do this by first creating a folder named RoomCard in the components folder. In it, add a new file named RoomCard.js, and in that add the code block below:
import styled from "styled-components";

const Card = ({ roomNo, occupantName, rentDueDate, coverImg }) => {
    return (
        <Wrapper coverImg={coverImg}>
            <div className="bg" />
            <div className="body">
                <h4>Room No: {roomNo}</h4>
                <footer>
                    <p>Occupant: {occupantName}</p>
                    <p>Rent Due Date: {rentDueDate}</p>
                </footer>
            </div>
        </Wrapper>
    );
};

   const Wrapper = styled.div`
        border-radius: 7px;
        box-shadow: -2px 7px 8px 3px rgba(204, 204, 204, 0.63);
        width: 15rem;

        & > .bg {
            background: url(${(props) => props.coverImg}) no-repeat center center/cover;
            height: 10rem;
        }

        h4 {
                text-align: center;
            }
        & .body {
            flex-direction: column;
            align-items: center;
            padding: 0.5rem 0 1rem;
            display: flex;


            footer {
                margin-top: 0.7rem;
                & p {
                    font-size: 0.9rem;
                }
            }
        }
    `;

export default Card;
Here, we’ve created a component, CardWrapper, that contains our props. This component will be the skeleton component to render the details of our occupants. We also created styles with styled-components.
Next, we imported styled-components to style this component. We created a form component that takes roomNo, occupantName, rentDueDate, and coverImg as props.
Creating A Data Table
Now, we will create an object containing all of the occupants’ information in our estate application. In the root directory of our application, create a new file, data.js, and in it let’s add some occupants and their details as an object:
export const Data = [
    {
            id: 1,
            roomNo: 1,
            coverImg:
                " https://images.unsplash.com/photo-1653463174260-8e974b584704?ixlib=rb-1.2.1&ixid=MnwxMjA3fDB8MHxwaG90by1wYWdlfHx8fGVufDB8fHx8&auto=format&fit=crop&w=1587&q=80",
            occupantName: "Fortune",
            rentDueDate: "01-09-2021",
        },
        {
            id: 2,
            roomNo: 2,
            coverImg:
                "https://images.unsplash.com/photo-1653191252464-c3f61798ce9a?ixlib=rb-1.2.1&ixid=MnwxMjA3fDB8MHx0b3BpYy1mZWVkfDEwfFJfRnluLUd3dGx3fHxlbnwwfHx8fA%3D%3D&auto=format&fit=crop&w=500&q=60",
            occupantName: "Yemi",
            rentDueDate: "04-01-2022",
        },
        {
            id: 3,
            roomNo: 3,
            coverImg:
                "https://images.unsplash.com/photo-1538430989507-797d5e4ba836?ixlib=rb-1.2.1&ixid=MnwxMjA3fDB8MHx0b3BpYy1mZWVkfDEzfFJfRnluLUd3dGx3fHxlbnwwfHx8fA%3D%3D&auto=format&fit=crop&w=500&q=60",
            occupantName: "Precious",
            rentDueDate: "31-10-2021",
        },
        {
            id: 4,
            roomNo: 4,
            coverImg:
                "https://images.unsplash.com/photo-1600947871775-082dd97e2d96?ixlib=rb-1.2.1&ixid=MnwxMjA3fDB8MHx0b3BpYy1mZWVkfDExfFJfRnluLUd3dGx3fHxlbnwwfHx8fA%3D%3D&auto=format&fit=crop&w=500&q=60",
            occupantName: "Isaac",
            rentDueDate: "11-09-2021",
        },
        {
            id: 5,
            roomNo: 5,
            coverImg:
                "https://images.unsplash.com/photo-1651342490124-c2042b78d41c?ixlib=rb-1.2.1&ixid=MnwxMjA3fDB8MHx0b3BpYy1mZWVkfDIzfFJfRnluLUd3dGx3fHxlbnwwfHx8fA%3D%3D&auto=format&fit=crop&w=500&q=60",
            occupantName: "Victor",
            rentDueDate: "11-09-2021",
        },
        {
            id: 6,
            roomNo: 6,
            coverImg:
                "https://images.unsplash.com/photo-1653162100655-88a23594835f?ixlib=rb-1.2.1&ixid=MnwxMjA3fDB8MHx0b3BpYy1mZWVkfDI2fFJfRnluLUd3dGx3fHxlbnwwfHx8fA%3D%3D&auto=format&fit=crop&w=500&q=60",
            occupantName: "Melvin",
            rentDueDate: "01-08-2021",
        },
];
Here, we’ve added a list of occupants and their details.
Creating A User Authentication Hook
Let’s create a hook to get the user’s details and authenticate them. To do this, in the root directory of our application, create a new folder, hooks, and in it create a new file, getUser.js. Add the code below:
import { useEffect, useState } from "react";
import { useOktaAuth } from "@okta/okta-react";

const useAuthUser = () => {
        const { oktaAuth, authState } = useOktaAuth();
        const [userInfo, setUserInfo] = useState(null);

        useEffect(() => {
                const getUser = async () => {
                        try {
                                const res = await oktaAuth.getUser();
                                setUserInfo(res);
                        } catch (error) {
                                console.log(error);
                        }
                };

                authState?.isAuthenticated && getUser();
        }, [authState, oktaAuth]);

        return userInfo;
};

export default useAuthUser;
To complete our application, we will build our Home and Profile pages using the components that we built in this section. Let’s do that now.
Creating The Home Page
Let’s create the home page using our RoomCard component. This page will get the user’s information when they log in and display a welcome message. It will also contain all rooms and details of occupants.
Create a new folder, pages, in the root directory of our application. In it, create a new directory, home, which will contain the file index.js. We’ll be adding code to it shortly.
To handle authentication, we imported useOktaAuth from okta-react. To style our page, we imported styled-components. Let’s create a data.js file that contains all of the information to be rendered on this page. We will create a function to get the user’s details from Okta, and then set it in our application’s state. Then, we will build a welcome screen and render a list of all occupants of our estate. Let’s do that:
import { useOktaAuth } from "@okta/okta-react";
import useAuthUser from "../hook/getUser";
import styled from "styled-components";
import { Data } from "../data";
import Card from "../components/Card/Card";
const Home = () => {
const { authState } = useOktaAuth();
const userInfo = useAuthUser();
return (
<Container>
{authState?.isAuthenticated ? (
<>
<h2>Welcome back, {userInfo?.name}</h2>
<article>
{Data.map(
({ id, coverImg, roomNo, occupantName, rentDueDate }) => (
<div key={id} className="card">
<Card
coverImg={coverImg}
roomNo={roomNo}
occupantName={occupantName}
rentDueDate={rentDueDate}
/>
</div>
)
)}
</article>
</>
) : (
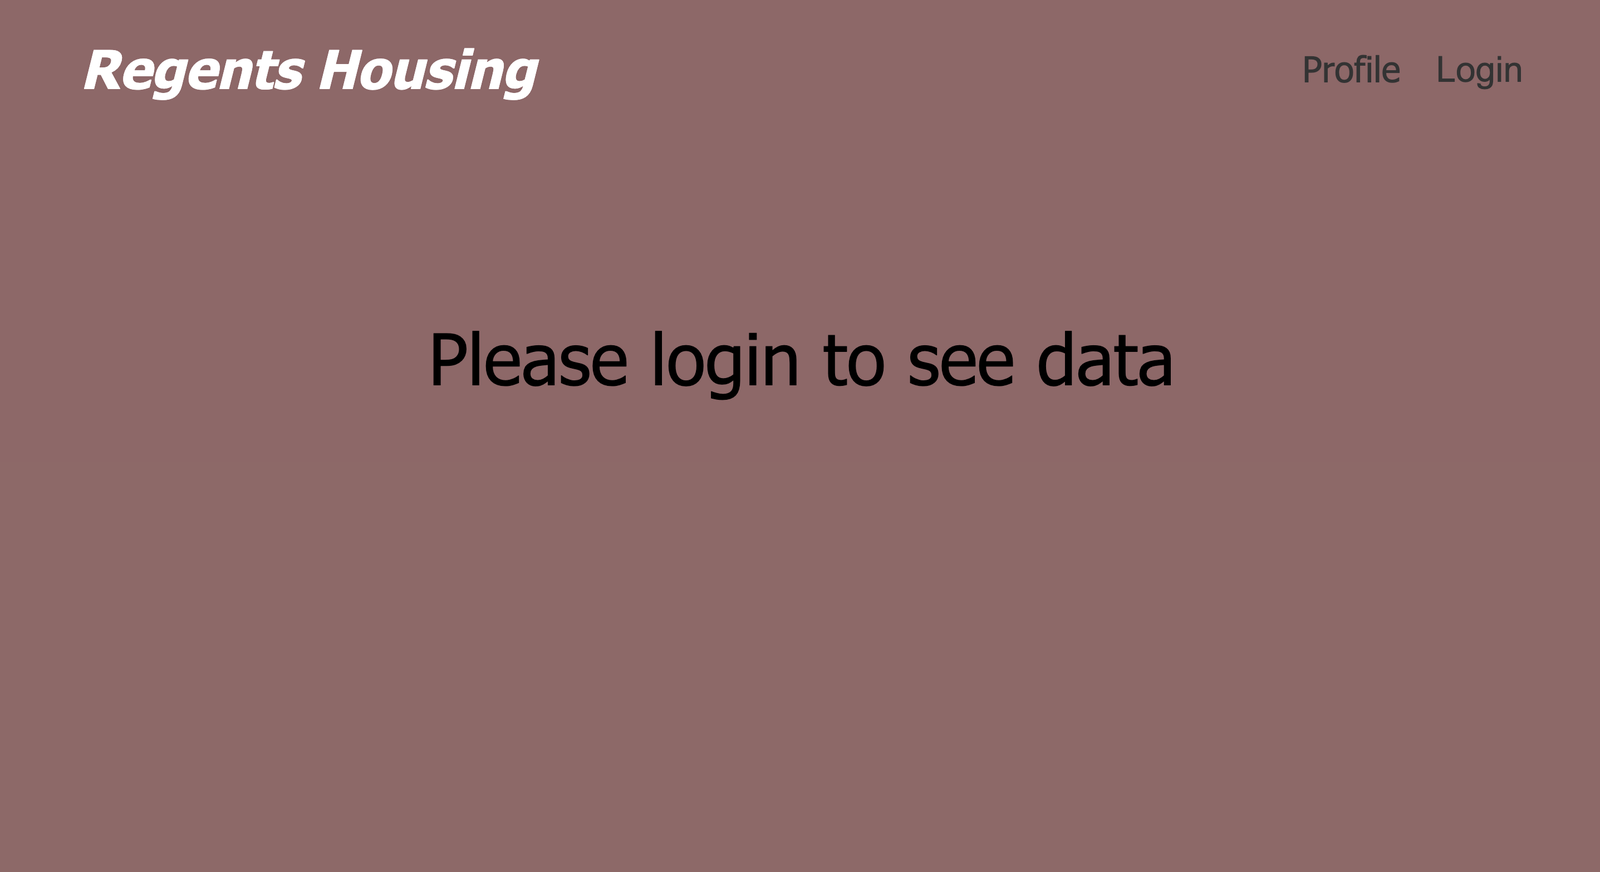
<p style={{ textAlign: "center", marginTop: "6rem", fontSize: '2rem' }}>
Please login to see data
</p>
)}
</Container>
);
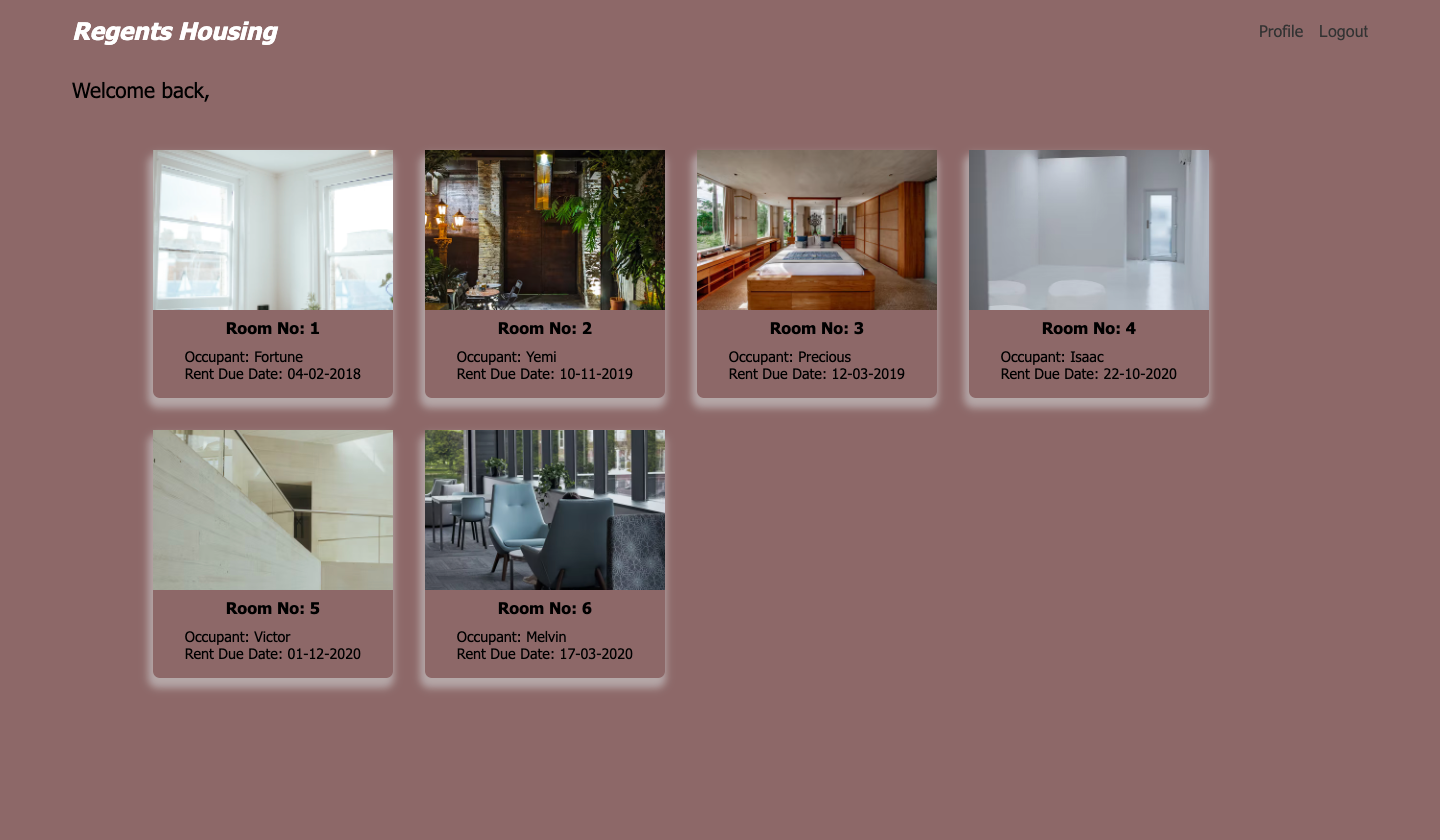
};In the code above, we are checking whether the user is authenticated. If they are, then we display a welcome message with the user’s name and a list of cards containing all of the information about the estate’s occupants. To finish off our application, let’s add some styles:
const Container = styled.section`
       max-width: 90%;
        margin: 2rem auto;
        & h2 {
            font-weight: 500;
            margin-bottom: 2rem;
            font-size: 1.3rem;
        }
        & > article {
            width: 90%;
            margin: auto;
            display: flex;
            flex-wrap: wrap;
            .card {
                margin: 1rem;
            }
        }
    `;
export default Home;
Here, we’ve added styles to our home page. If done correctly, our application should look like this:
In the next section, we will build the profiles page of our primary user.
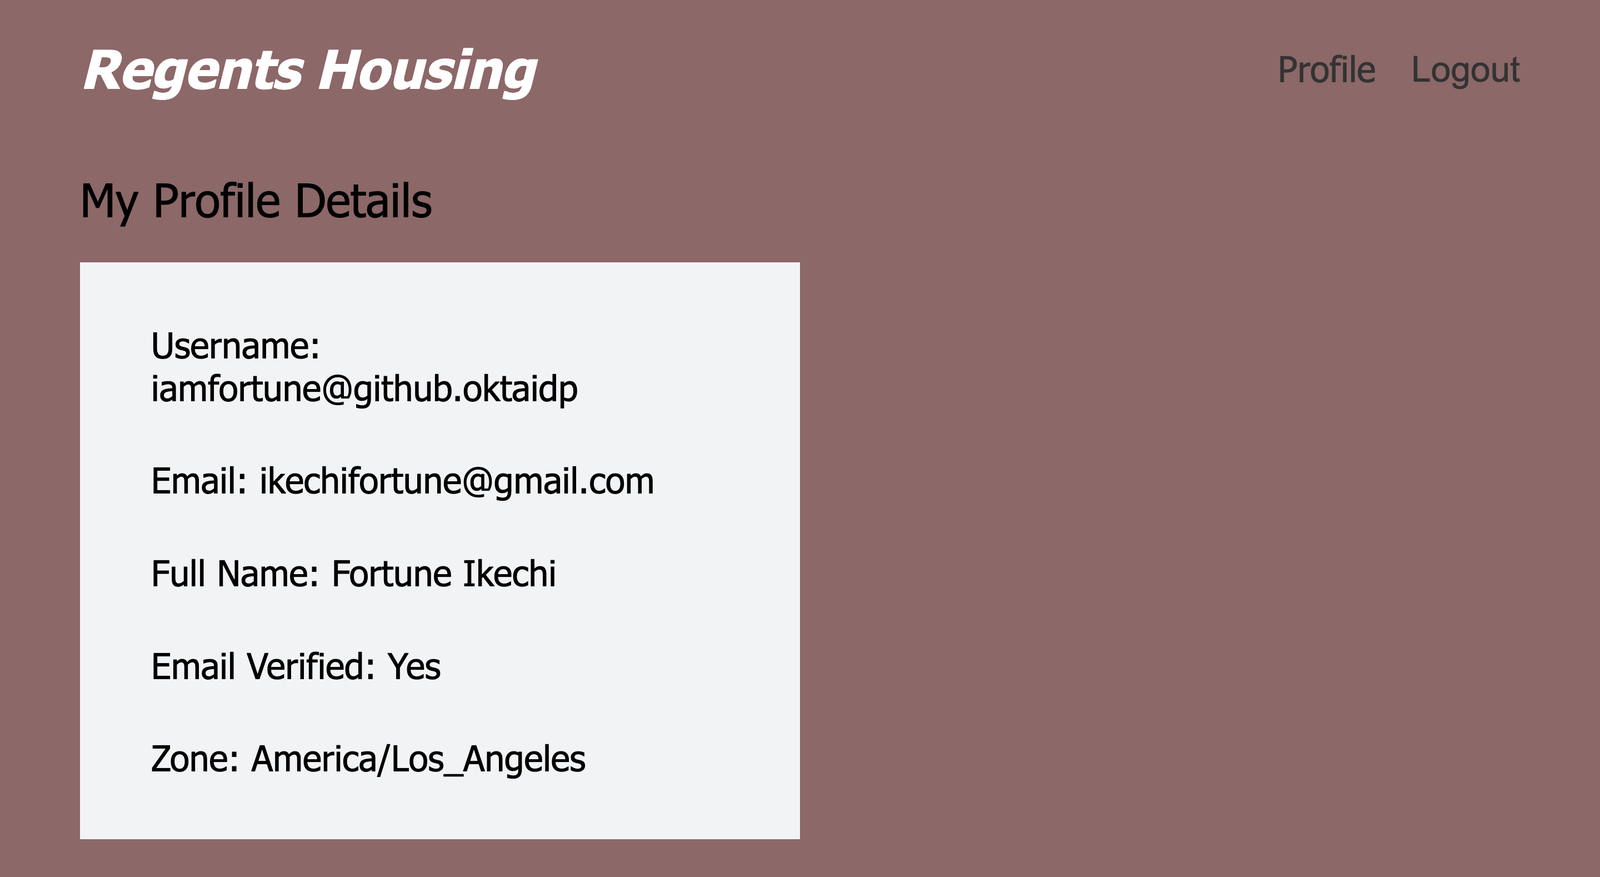
Building Profiles Page
In this section, we will build a profiles page for our application. This page will render the details of users, including username, email address, name, and a verified email from Okta. In the pages directory of our application, create a new folder, Profile, and in it create a new file, index.js, adding the code block below:
import useAuthUser from "../hook/getUser";
import styled from "styled-components";

const Profile = () => {
        const userInfo = useAuthUser();

    return (
        <Container>
            <h2>My Profile Details</h2>
            <section>
                <ul>
                    <li>Username: {userInfo?.preferred_username}</li>
                    <li>Email: {userInfo?.email}</li>
                    <li>Full Name: {userInfo?.name}</li>
                    <li>Email Verified: {userInfo?.email_verified ? "Yes" : "No"} </li>
                    <li>Zone: {userInfo?.zoneinfo}</li>
                </ul>
            </section>
        </Container>
    );
};
Similar to our home page, here we are getting the user’s details from Okta once they are logged in to the application. We then created a Wrapper component that displays the logged-in user’s details.
To complete our application, let’s add styles to our page.
const Container = styled.section`
        max-width: 90%;
        margin: 2rem auto;
        & h2 {
            font-size: 1.3rem;
            font-weight: 500;
            margin-bottom: 1rem;
        }
        & ul {
            width: 50%;
            list-style: none;
            display: flex;
            flex-direction: column;
            background: #f2f3f5;
            padding: 1rem 2rem;
            & li {
                margin: 0.7rem 0;
                font-size: 1rem;
            }
        }
    `;

export default Profile;
We added the wrapper component in the code block above and exported our page as a page.
Our app isn’t complete yet because we haven’t configured our Okta authentication to enable a user to log in. So, we will configure a data table of estate occupants in the next section.
Completing Our Application
To complete our application, let’s add routes to our application. Routes enable Okta to know which users to give specific access to. In our case, we will provide all access to the primary user, who has the email address used to register our Okta application.
Let’s create a file, Routes, in the root directory of our application, and add the code snippet below:
import { Route, Switch, useHistory } from "react-router-dom";
import { Security, SecureRoute, LoginCallback } from "@okta/okta-react";
import { OktaAuth, toRelativeUrl } from "@okta/okta-auth-js";
import Home from "./pages/home";
import Profile from "./pages/profile";
import { oktaAuthConfig } from "./config";
import Nav from "./components/Navbar/Nav";

const oktaAuth = new OktaAuth(oktaAuthConfig);
const Routes = () => {
    const history = useHistory();

    const restoreOriginalUri = async (_oktaAuth, originalUri) => {
        history.replace(toRelativeUrl(originalUri || "/", window.location.origin));
    };
    return (
        <Security oktaAuth={oktaAuth} restoreOriginalUri={restoreOriginalUri}>
            <Navbar />
            <Switch>
                <Route path="/" exact={true} component={Home} />
                <SecureRoute path="/profile" component={Profile} />
                <Route path="/login/callback" component={LoginCallback} />
            </Switch>
        </Security>
    );
};

export default Routes;
In the code above, we created a function, Routes, that redirects the user to our application once they’ve logged in using the Okta sign-in widget. We initialized a new Okta app using Okta config. The storage URL sets our Okta log-in. And the security package from Okta handles authentication in our application.
The log-in route handles the user’s log-in. Next, we added routes for our Home, Profile, and Callback pages. And we imported the security package from Okta.
To complete our application, let’s import the routes to our App.js file, as shown below:
import { BrowserRouter } from "react-router-dom";
import Routes from "./Routes";

const App = () => {
        return (
                <BrowserRouter>
                   <Routes />
                </BrowserRouter>
        );
};

export default App;
We’ve imported the Routes file, which contains the routes for our application and permissions. Our application should now look like the image below.
Conclusion
Authentication and authorization are two essential features in web applications. This article has gone through Okta, an identity-as-a-service platform built for seamless authentication and authorization. We also went through the process of building an estate manager’s application with React. The code for our React estate application can be found on GitHub.
Resources
- Okta Documentation
- “Add User Authentication to Your React App”, Okta Developer
- “Configuring Okta Authentication for React App”, DataHub


