Typographic Hierarchies

Email Newsletter
Weekly tips on front-end & UX.
Trusted by 200,000+ folks.


Simply defined, the concept of typographic hierarchies refers to the visual organization of content in terms of their relative importance. In other words, the manner in which we organize the text, the headers, the subheaders, the columns, the paragraphs, the callouts, and others on the page or space signify their importance.
That sounds easy enough, right? Yes, it does. The problem is that visually accomplishing this is more challenging than it sounds, especially for those unfamiliar with the nuances of typography. Everything in typography behaves like a domino effect causing a chain reaction of changes by the designer. That is why when a client asks for a “small change,” it is never small and never linear. Typography is symbiotic. Each element contributes to the other, even in a very small way.
These two words: typographic and hierarchies are not familiar concepts to those outside our field. In fact, even in the art and design field, fellow artists do not necessarily understand typographic hierarchy. The term typographic refers to matters related to typography: type choice, sizes, weights, how far or close we set the letters, and others. The term hierarchy refers to levels of priority or importance: what comes first, second, and third. Thus, when these two terms are put together, we mean to arrange content in levels of importance with the intention of communicating to the reader.
Choosing typefaces, arranging content in terms of visual importance, and organizing elements (title, subtitles, body copy, images, space, and so on) on the page evoke responses from the reader. When things are in competition on a page, we might feel confused. We all have a sense of it, and we can even recall moments of disgust when we see a printed note with bloody type or a website in which the typography is all jumbled up. However, learning to use typography is elusive. It is a matter of constant practice and honing visual acumen.
While it is true that the advent of the computer to our field has expedited the design and printing process, it is also true that typographic proportions do not look the same when looking at things online versus printing. The relationship between the reader and their monitor differs from the relationship between the reader and anything printed, whether hand-held or seen at a distance.
To provide an example, let me share my experience with typography. Before becoming a designer, I graduated with a BA in Art Education. I understood color, research, composition, contrast, drawing, images, sketching, painting, and so on. When I went back to school to study design and specifically graphic design, I was lost.
My biggest challenge was that I could not see the letters as something other than the semantic symbols of language. Questions constantly flooded my mind. For instance, “What do you mean that the letters have a grid? What do you mean I am doing too much? And what is too much? How is this too big?” The questions were endless and excruciating. My beginner’s typography was, to put it mildly, a prime example of what not to do. I did not know any better, but I also did not understand any better.
My “aha” moment came when another instructor explained to me that typography was like auditioning for a part in a play that I wanted really badly. She suggested that I enunciate the words as if I was playing in the theater. Mind you, I had no experience in theater whatsoever but somehow, the idea resonated with me. It was then that I realized, in a very experiential way, that typography was the spoken language in visual form.
That, somehow, the letters, words, titles, typeface choices, size, weight, color, spacing — all conspired together to emanate a visual language. The page was the stage. The letters, words, titles, paragraphs, and so on were performers on that stage. Another instructor used to say that the typographic hierarchy was like a ballet company where only one was the prima ballerina, and everything else bowed to her. Having a cultural background where music and dance were vital, I started to get the idea.
After I made it into graduate school, my exploration of typography intensified, leading to my thesis work. My graduate thesis combined two things that were special to me: dance, specifically ballroom dancing, and my newfound love for typography. To develop a body of work for my thesis, I used one of my classes’ undergraduate projects — Typographic Hierarchies. Since then, I have been teaching typography and hierarchy using this project.
The typographic hierarchies project is based on two books by professor Rob Carter from Virginia Commonwealth University. These books are Typographic Design: Form and Communication and Experimental Typography. The latter is out of print now. The objective of the project is to isolate six basic variables to establish a typographic hierarchy. These variables are:
- Proximity or space,
- Weight,
- Size,
- Size and weight,
- Color,
- Visual punctuation.
When we look at a typographic composition, a poster, a brochure, or a web page, what we see is the application of these variables together. We don’t often think of dissecting the composition in front of us to say, “How many sizes are there?” Even as designers, we are not accustomed to dissecting design work. Imagine a non-designer, even less, right? Yet, when we come to school or start as designers, we are all non-designers and need to retrain our brains to look at content as a relationship of shapes in a context, format, or space.
In this article, we will discuss the variables mentioned above, learn how to look at each differently, and in turn, design pieces by intentionally modifying each variable to create a typographic hierarchy effectively. Let’s get started with proximity or space.
Note: These are studies done in a university class intended to expose the students to a series of compositional exercises. These exercises will provide students with a skill set to innovate and push the boundaries when appropriate. It will also help them to acquire a good understanding of compositional parameters. Therefore, use your discernment and consider the project’s needs when applying and/or breaking these principles and variables.
Proximity Or Space
This variable requires us to briefly discuss the grid. The grid is an underlying tool that helps us organize elements on a page. It is so foundational that there are books dedicated to it. For example, the book by designer and design educator Timothy Samara, titled Making and Breaking the Grid is one of the most eloquent discussions of it.
A Short Discussion About The Grid
A grid is simply an underlying structure used to organize elements in a context. This context can be a page, printed or web, an app, a brochure, a poster, a book, a newspaper, a building, furniture, and so on. Though this article is not a study of the grid, it is important to understand that the variables we will learn work within a grid. A grid allows us to break up the space into modules or smaller chunks like pieces in a puzzle that must come together to create the bigger picture. There are usually two ways to approach the application of a grid: predetermined or improvisational (also known as a visual or linear association).
Predetermined Grid
A predetermined grid is the division of the space into a certain amount of columns. There is even a one-column grid, also commonly called a manuscript grid (commonly seen in wedding invites and perhaps the first page of an article in a magazine).

We can keep adding columns to our grids and have two, three, four, five, and sometimes more. Software such as Adobe InDesign, Affinity Publisher, and others come equipped with the ability to determine what type of grid we want to use. It is usually easy to spot the grid used in a design piece. For example, if we look at a web page, we can usually spot the type of grid used — two, three, or four columns.
Perhaps the best examples of predetermined grids come from Modernist design and the Swiss Typography schools of thought.
Later on, Post Modern typography came along. Characterized by the juxtaposition of graphic elements, typography, and page use in a more organic way, it sought to find alternative typographic organizational arrangements. John Choi, a former student at NYUAD, wrote on the blog NYUAD Types of Art the following:
“Postmodern typography would be born out of the rejection of the modernist idea that certain forms, due to their inherent characteristics, are able to perform certain objective functions such as neutrality or legibility.”
As a result, the grid became a more organic and playful tool.
Improvisational Grid
Alternatively to a predetermined grid, an improvisational grid can be used. An improvisational grid is created when we lay down one element, perhaps in a very large size, and use it to extend its lines to organize elements around it. Thus, visual alignments or associations are emphasized or highlighted by placing elements following invisible lines emanating from them. For example, the image below does not feature the traditional vertical and horizontal modules that are common on a column grid. The image and the pattern created for the Evince Diagnostics logo at the top are the foundation for the organization of the type on the banner.
It is one of the funniest ways to create hierarchy because it allows for playful and unexpected results. However, it calls for attention to detail and sensitivity to the composition as a whole. Thus, it is both easy and difficult to master. It is frequently achieved by a large letter, but it can also be done with images or graphics.
Now that we have a basic understanding of the grid, let’s discuss our first variable or principle of hierarchy — proximity — in more detail.
Proximity
Proximity refers to the relative distance between elements, right? An easy metaphor is to think of friends, close friends, and strangers. The closer the friend, the closer the distance. The stranger the person, the farthest we stand from them. Our proximity or space shrinks or grows depending on our familiarity with things or people. Because it is usually easier for the students to refer to it as space, we will refer to proximity as space throughout the article.
When we discuss or think of space in a typographic hierarchy, we refer to things like space between letters, words, titles, paragraphs, margins, and how and where we place elements on the page.
In order to really understand proximity or space, we need to set some limits:
- All type has to be 8-12 point size depending on the typeface;
- It all has to be one size (even the titles);
- No color;
- A grid should be used from two to five columns, or an improvisational grid can be used. Please note that though we discussed the use of an improvisational grid based on size, when we leave elements at the same size, an improvisational grid can be used based on space or alignments.
The goal of this variable is to explore only the distance between any elements we choose and where we place our paragraphs and titles. You might be wondering, “how does space work in relation to typographic hierarchies? To answer this question, we will discuss some examples.
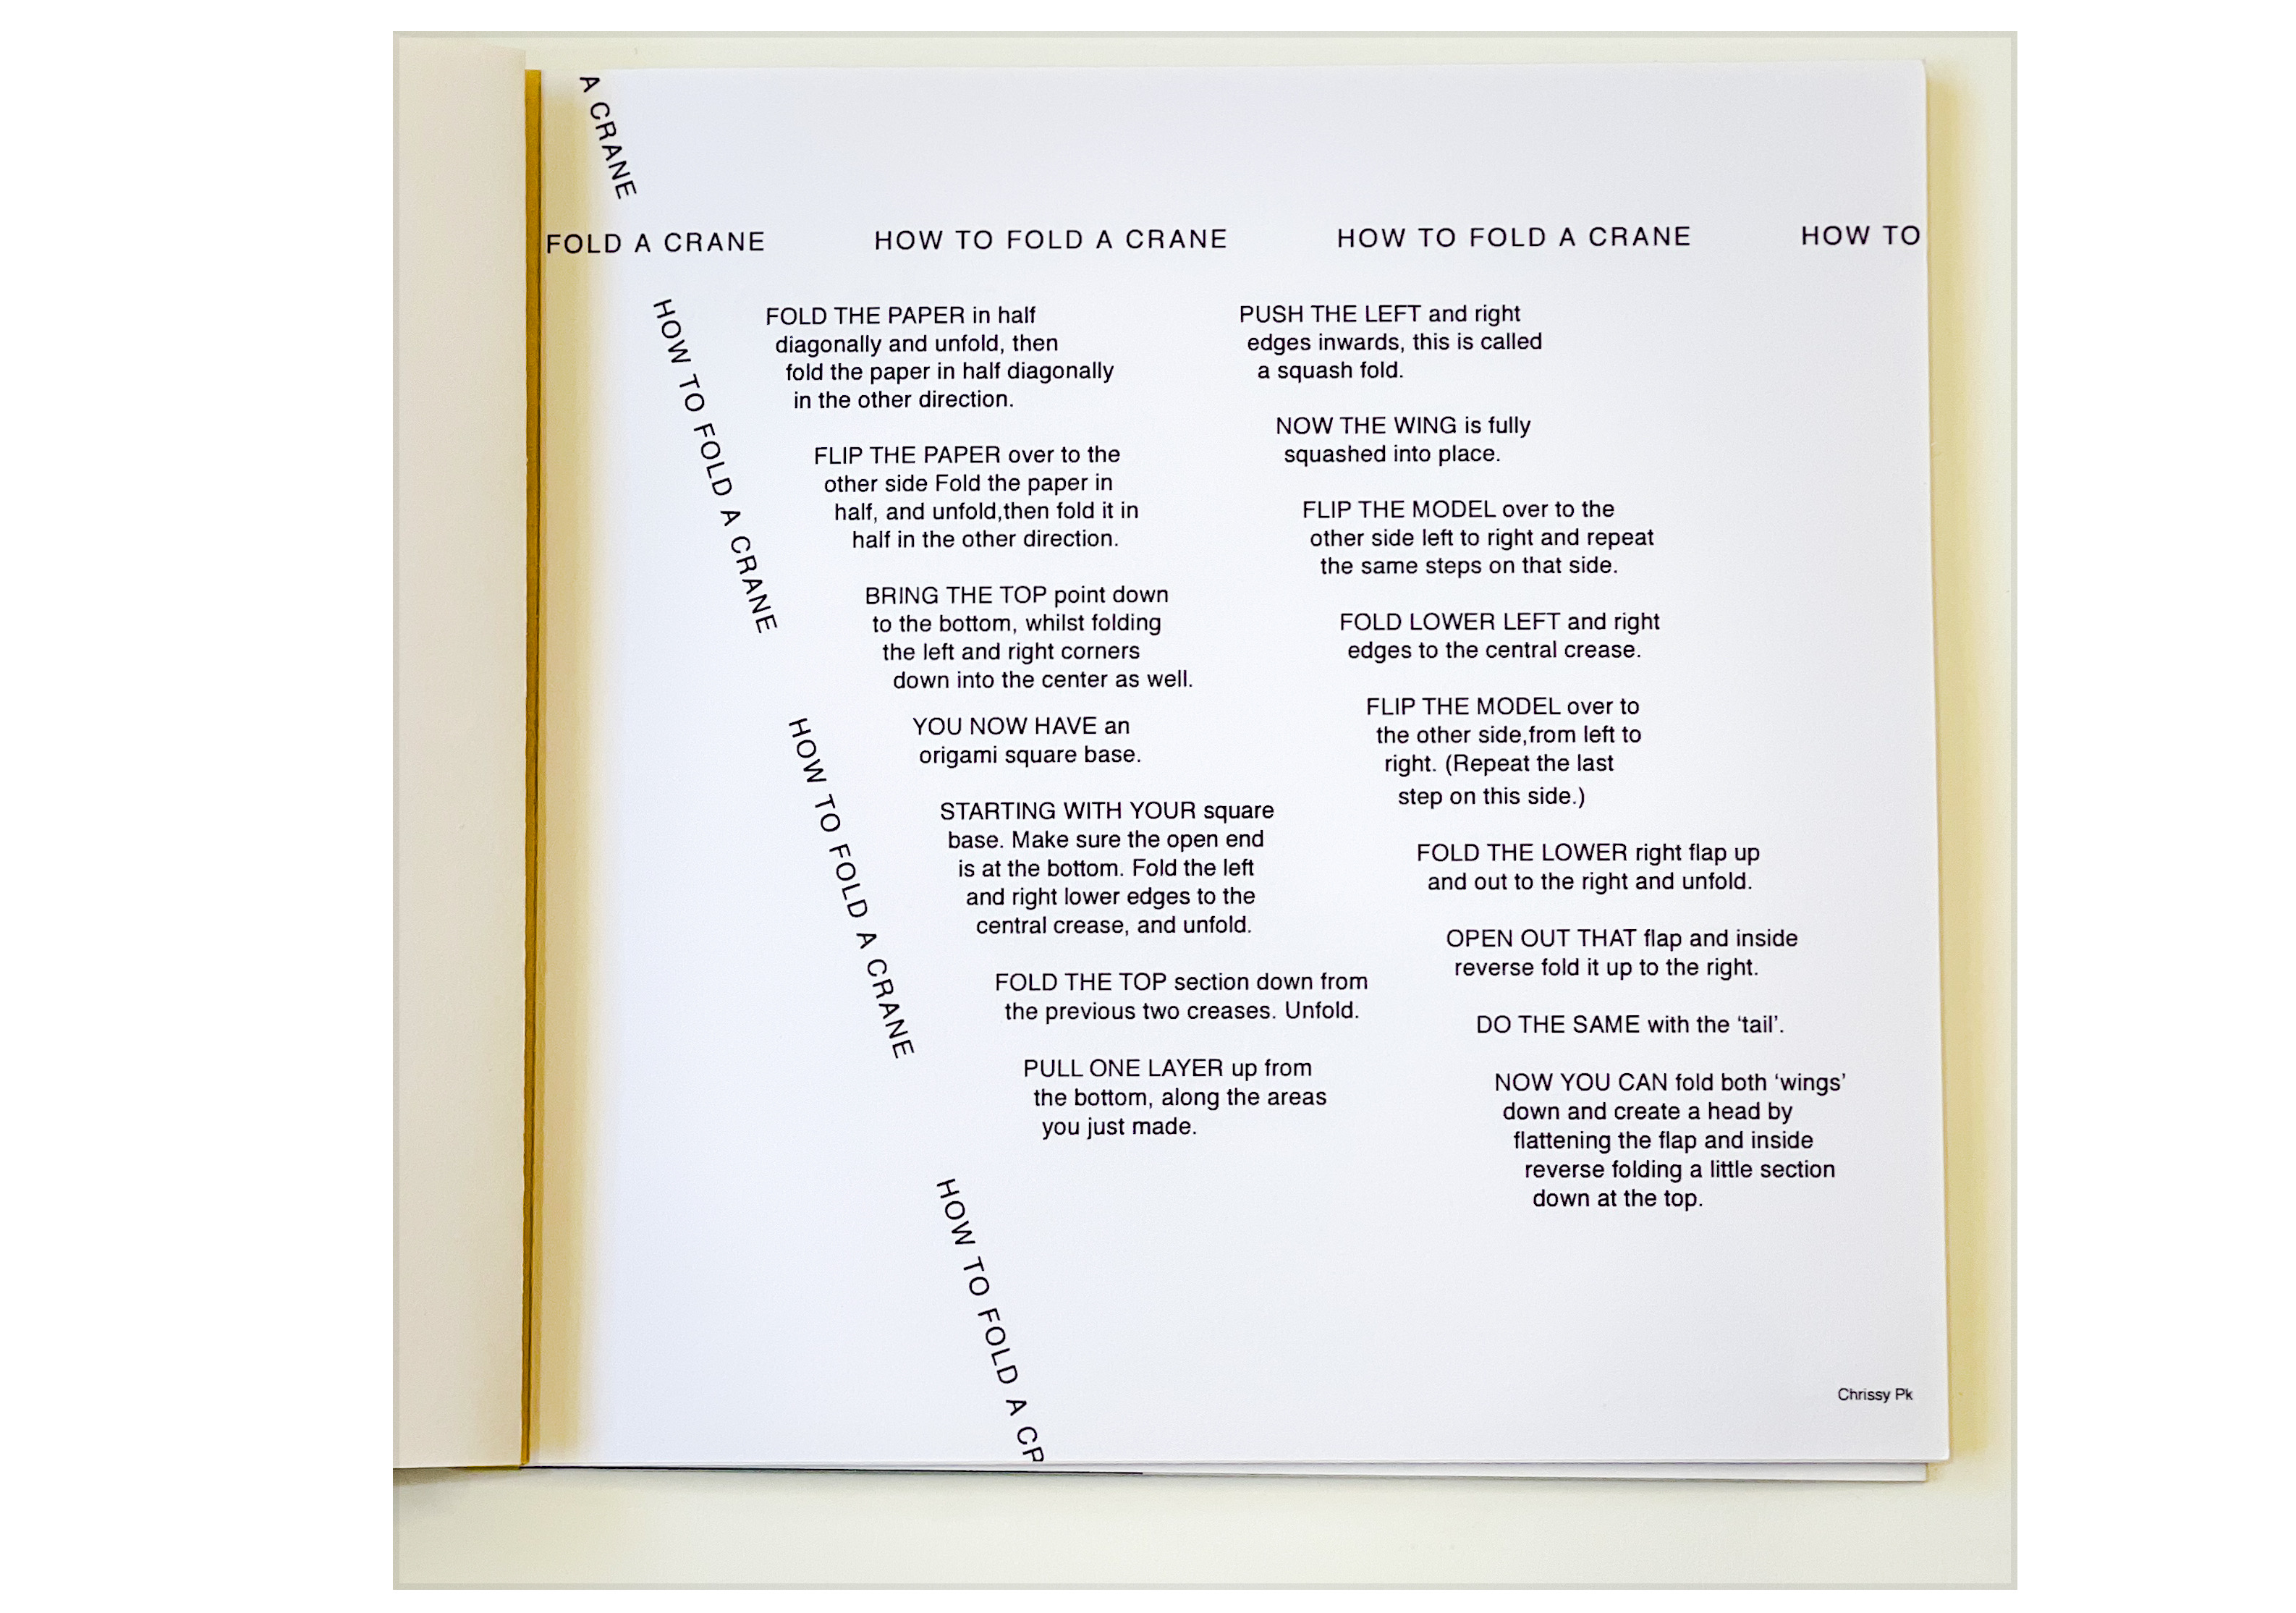
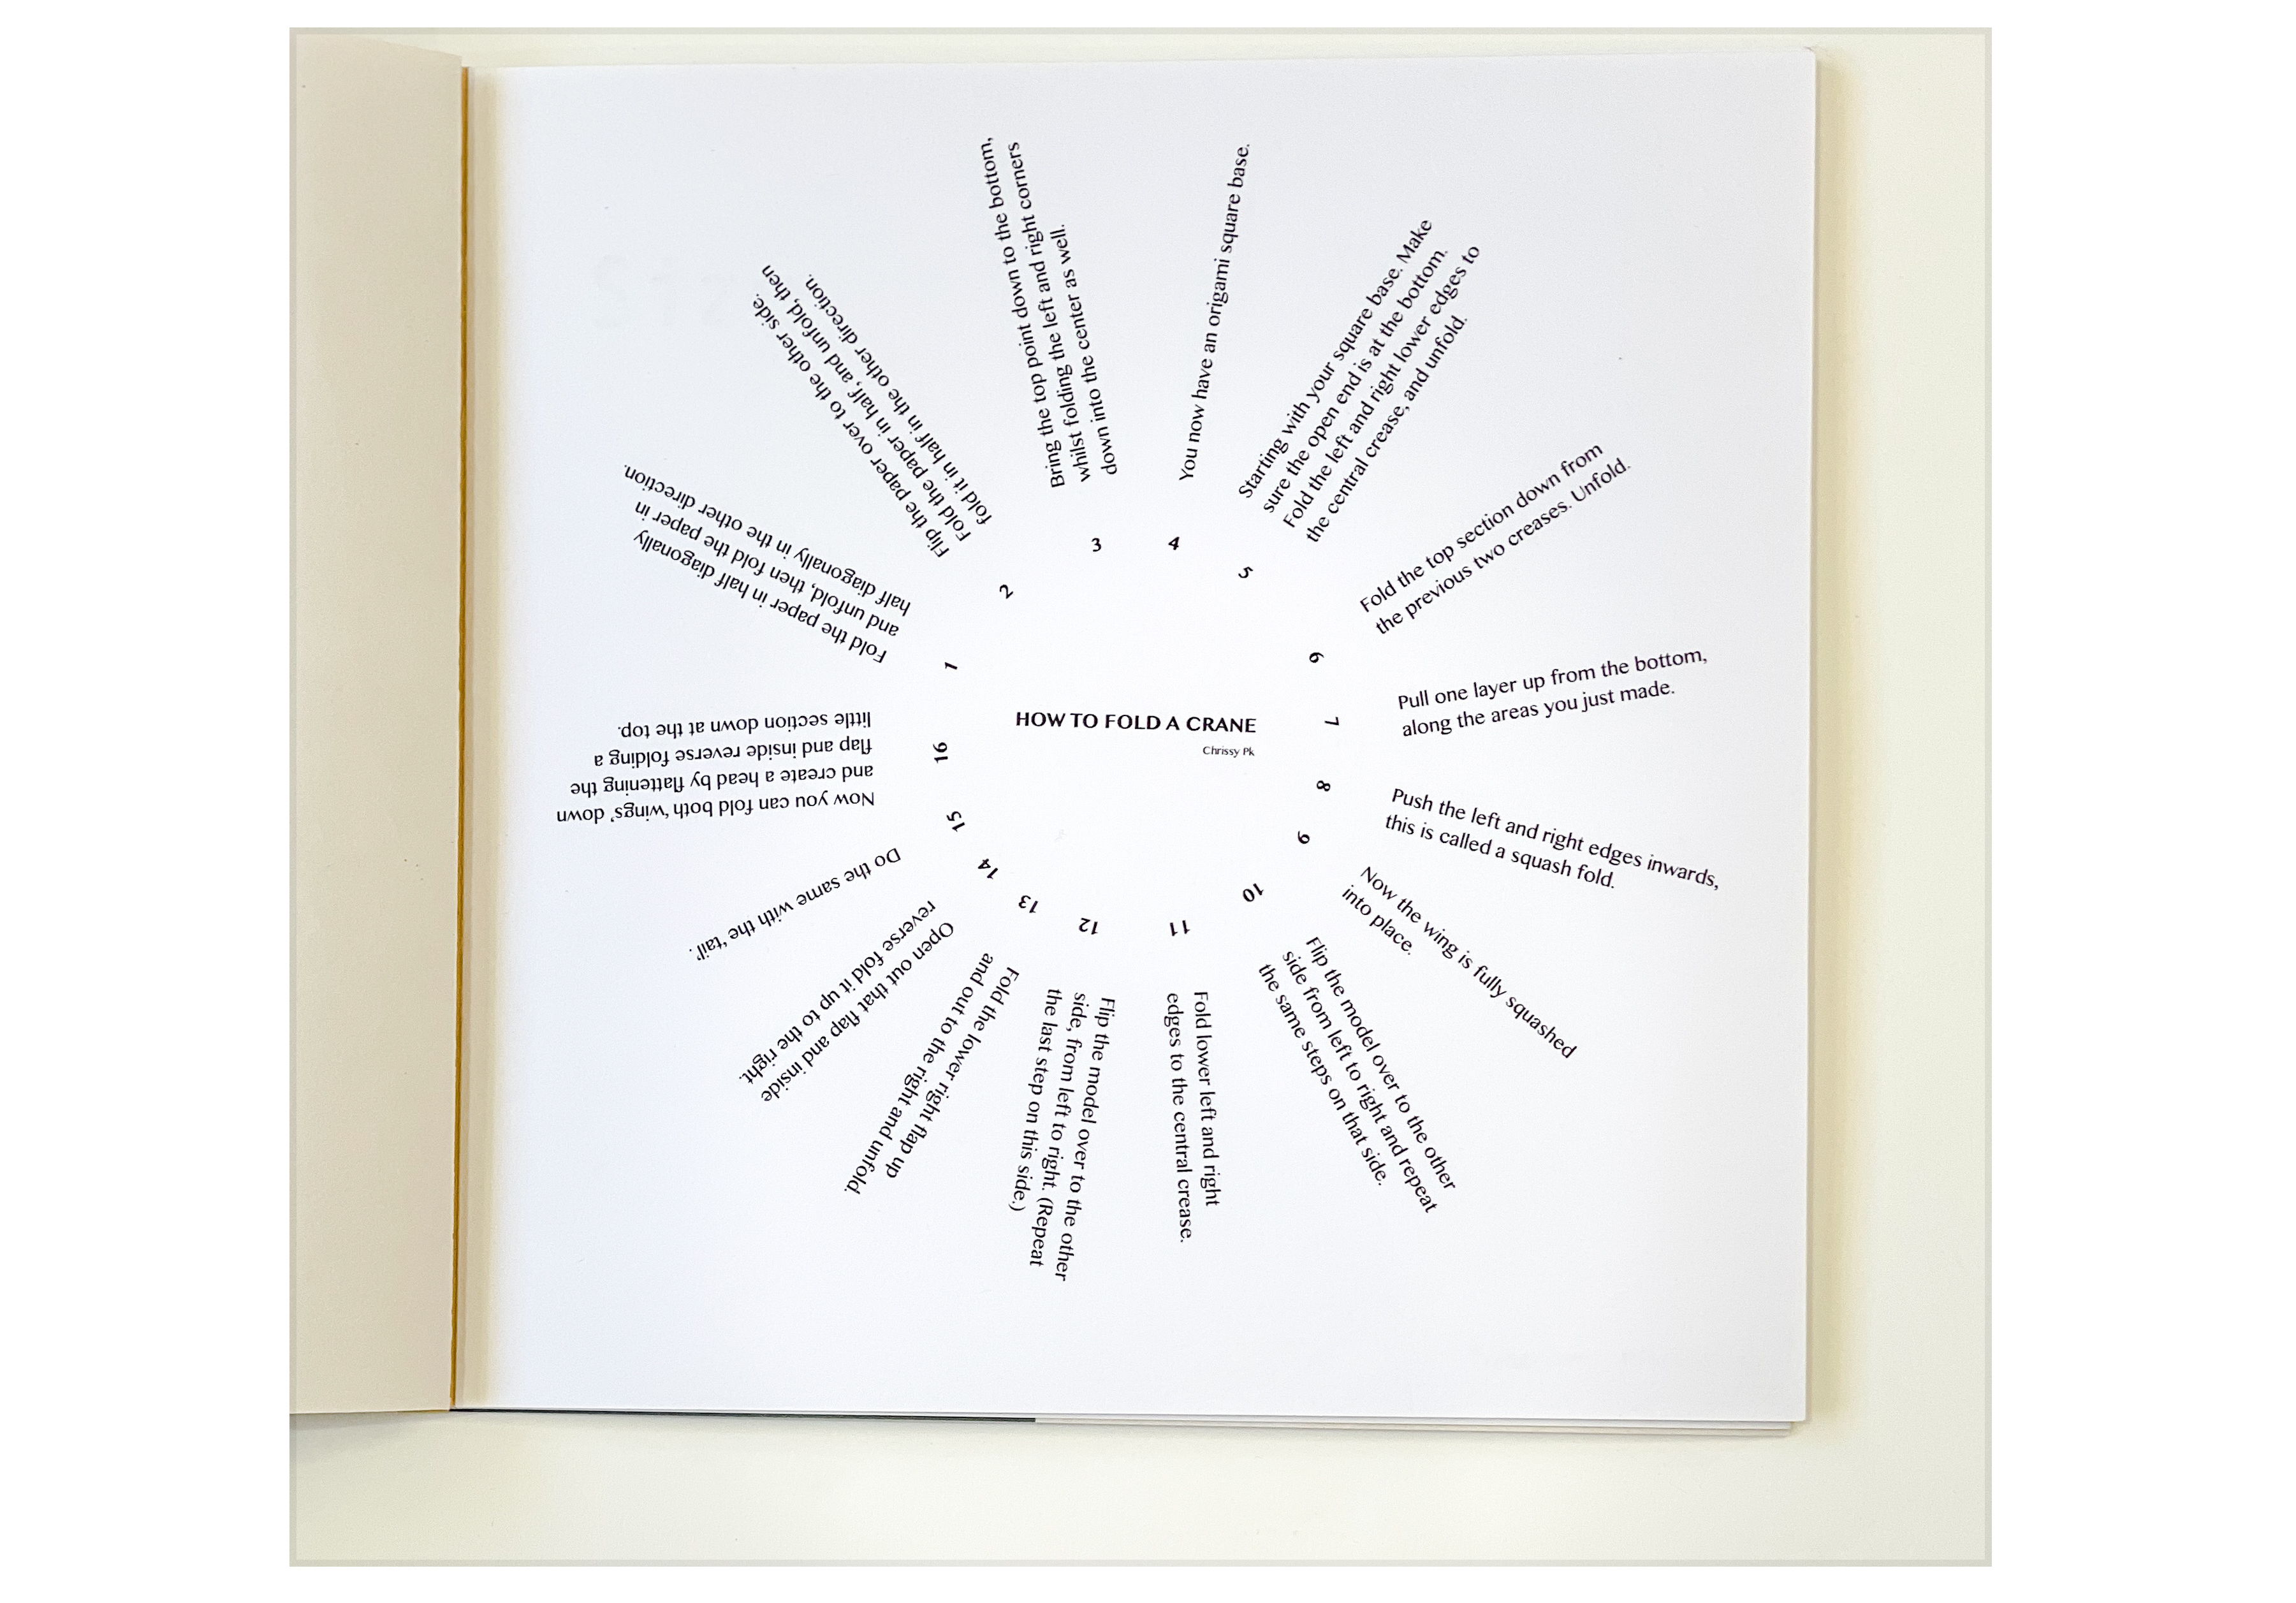
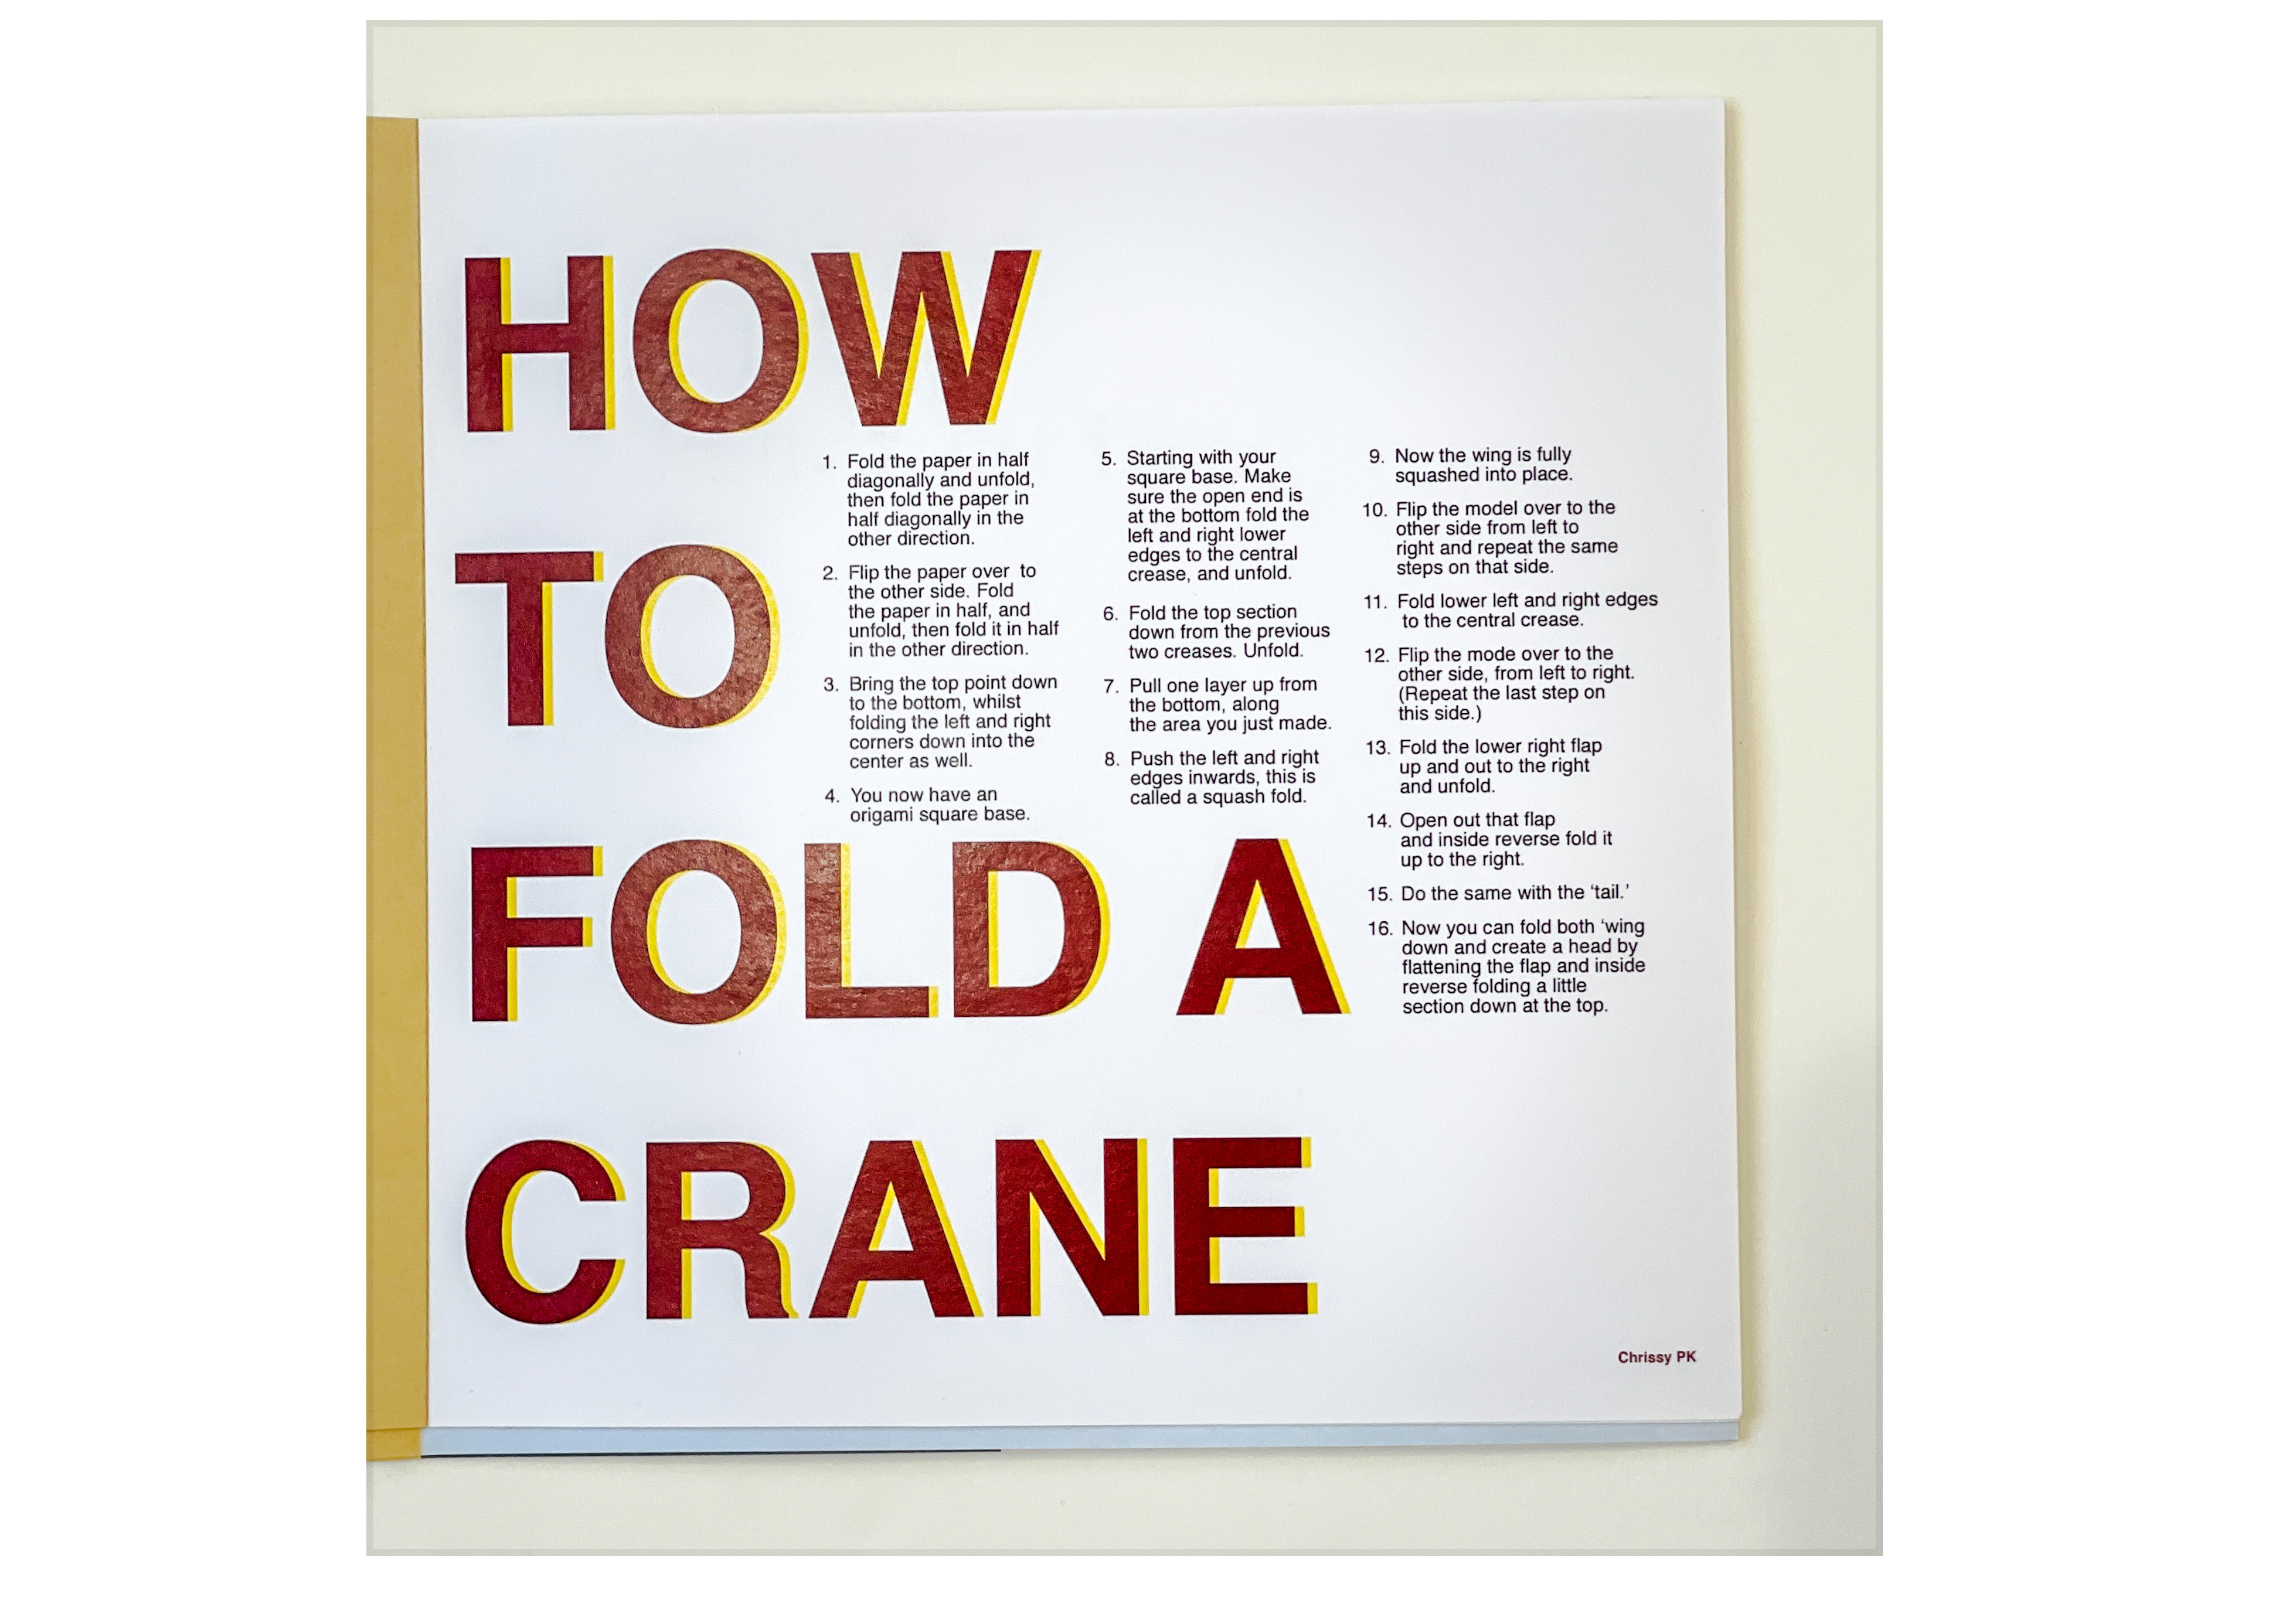
In the example above, we have a set of instructions, How to Fold a Crane, written by Chrissy Pk. As we can see, the columns of text are diagonally arranged. The grid, then, has been set before any other element has been placed on the page. By using diagonals, we create a sense of movement and energy around the composition.
Repetition of the title has been applied to create a sense of framing the page, and it serves to anchor the eye. Otherwise, we might feel that our eyes want to wander away from the page. Having the title repeated creates a kind of loop around the page and helps us keep our eyes contained. The type size is all consistent. The sense of movement and hierarchy comes from the title set in uppercase. To indicate each new step, instead of numbers or bullets, space and upper case letters in the first three words of the sentence are used.
Below are two analyses of the grid. The first one lets us see that the designer has probably divided the page into a four-column grid. In the second example, we can see that the diagonal grid has been applied over the four-column one.


To summarize what we see in this example:
- We can use diagonal columns in place of vertical columns.
- We can use uppercase to create a sense of hierarchy.
- We can add spaces between items that follow a sequence instead of numbers or bullets.
- We can repeat one element as long as it supports the purpose and conceptually keeps our eyes and mind focused on the subject.
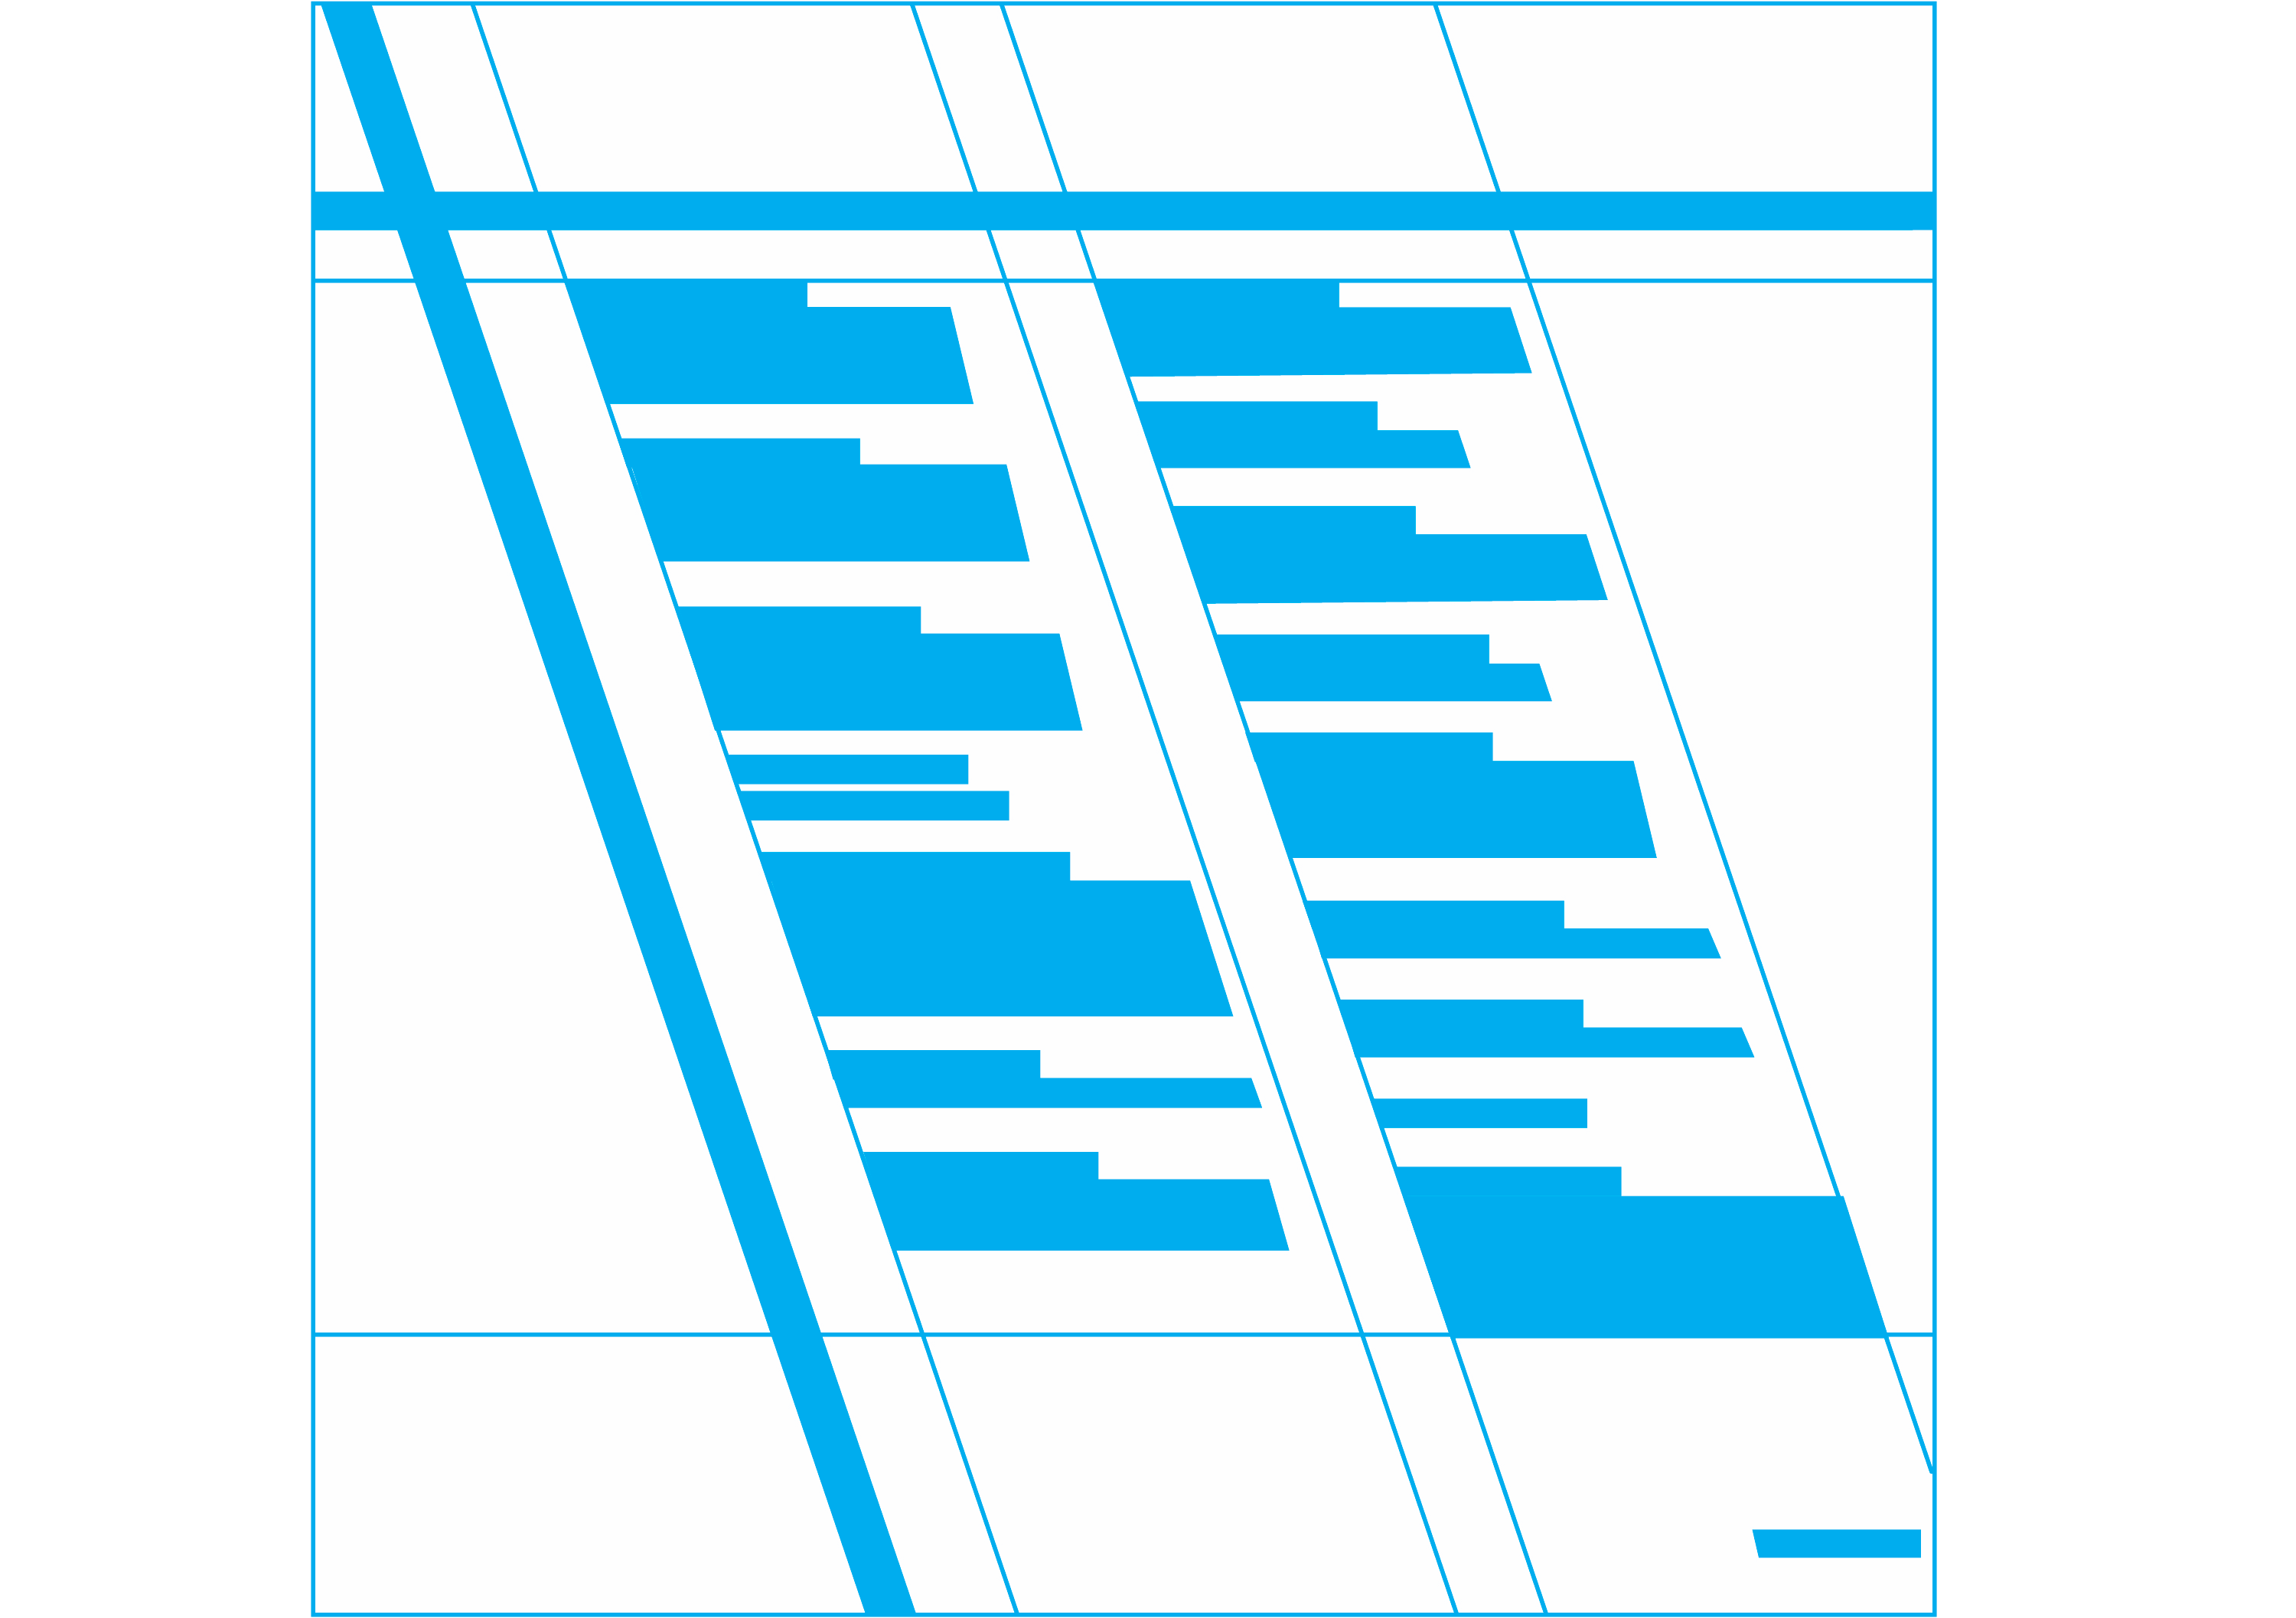
In my experience, my students find that thinking of only the space or proximity is the hardest aspect of this study. But it is all about looking at the paragraphs, sentences, columns, and pages as shapes. If we think of each component in the example above as only shapes, we will see something like this below:
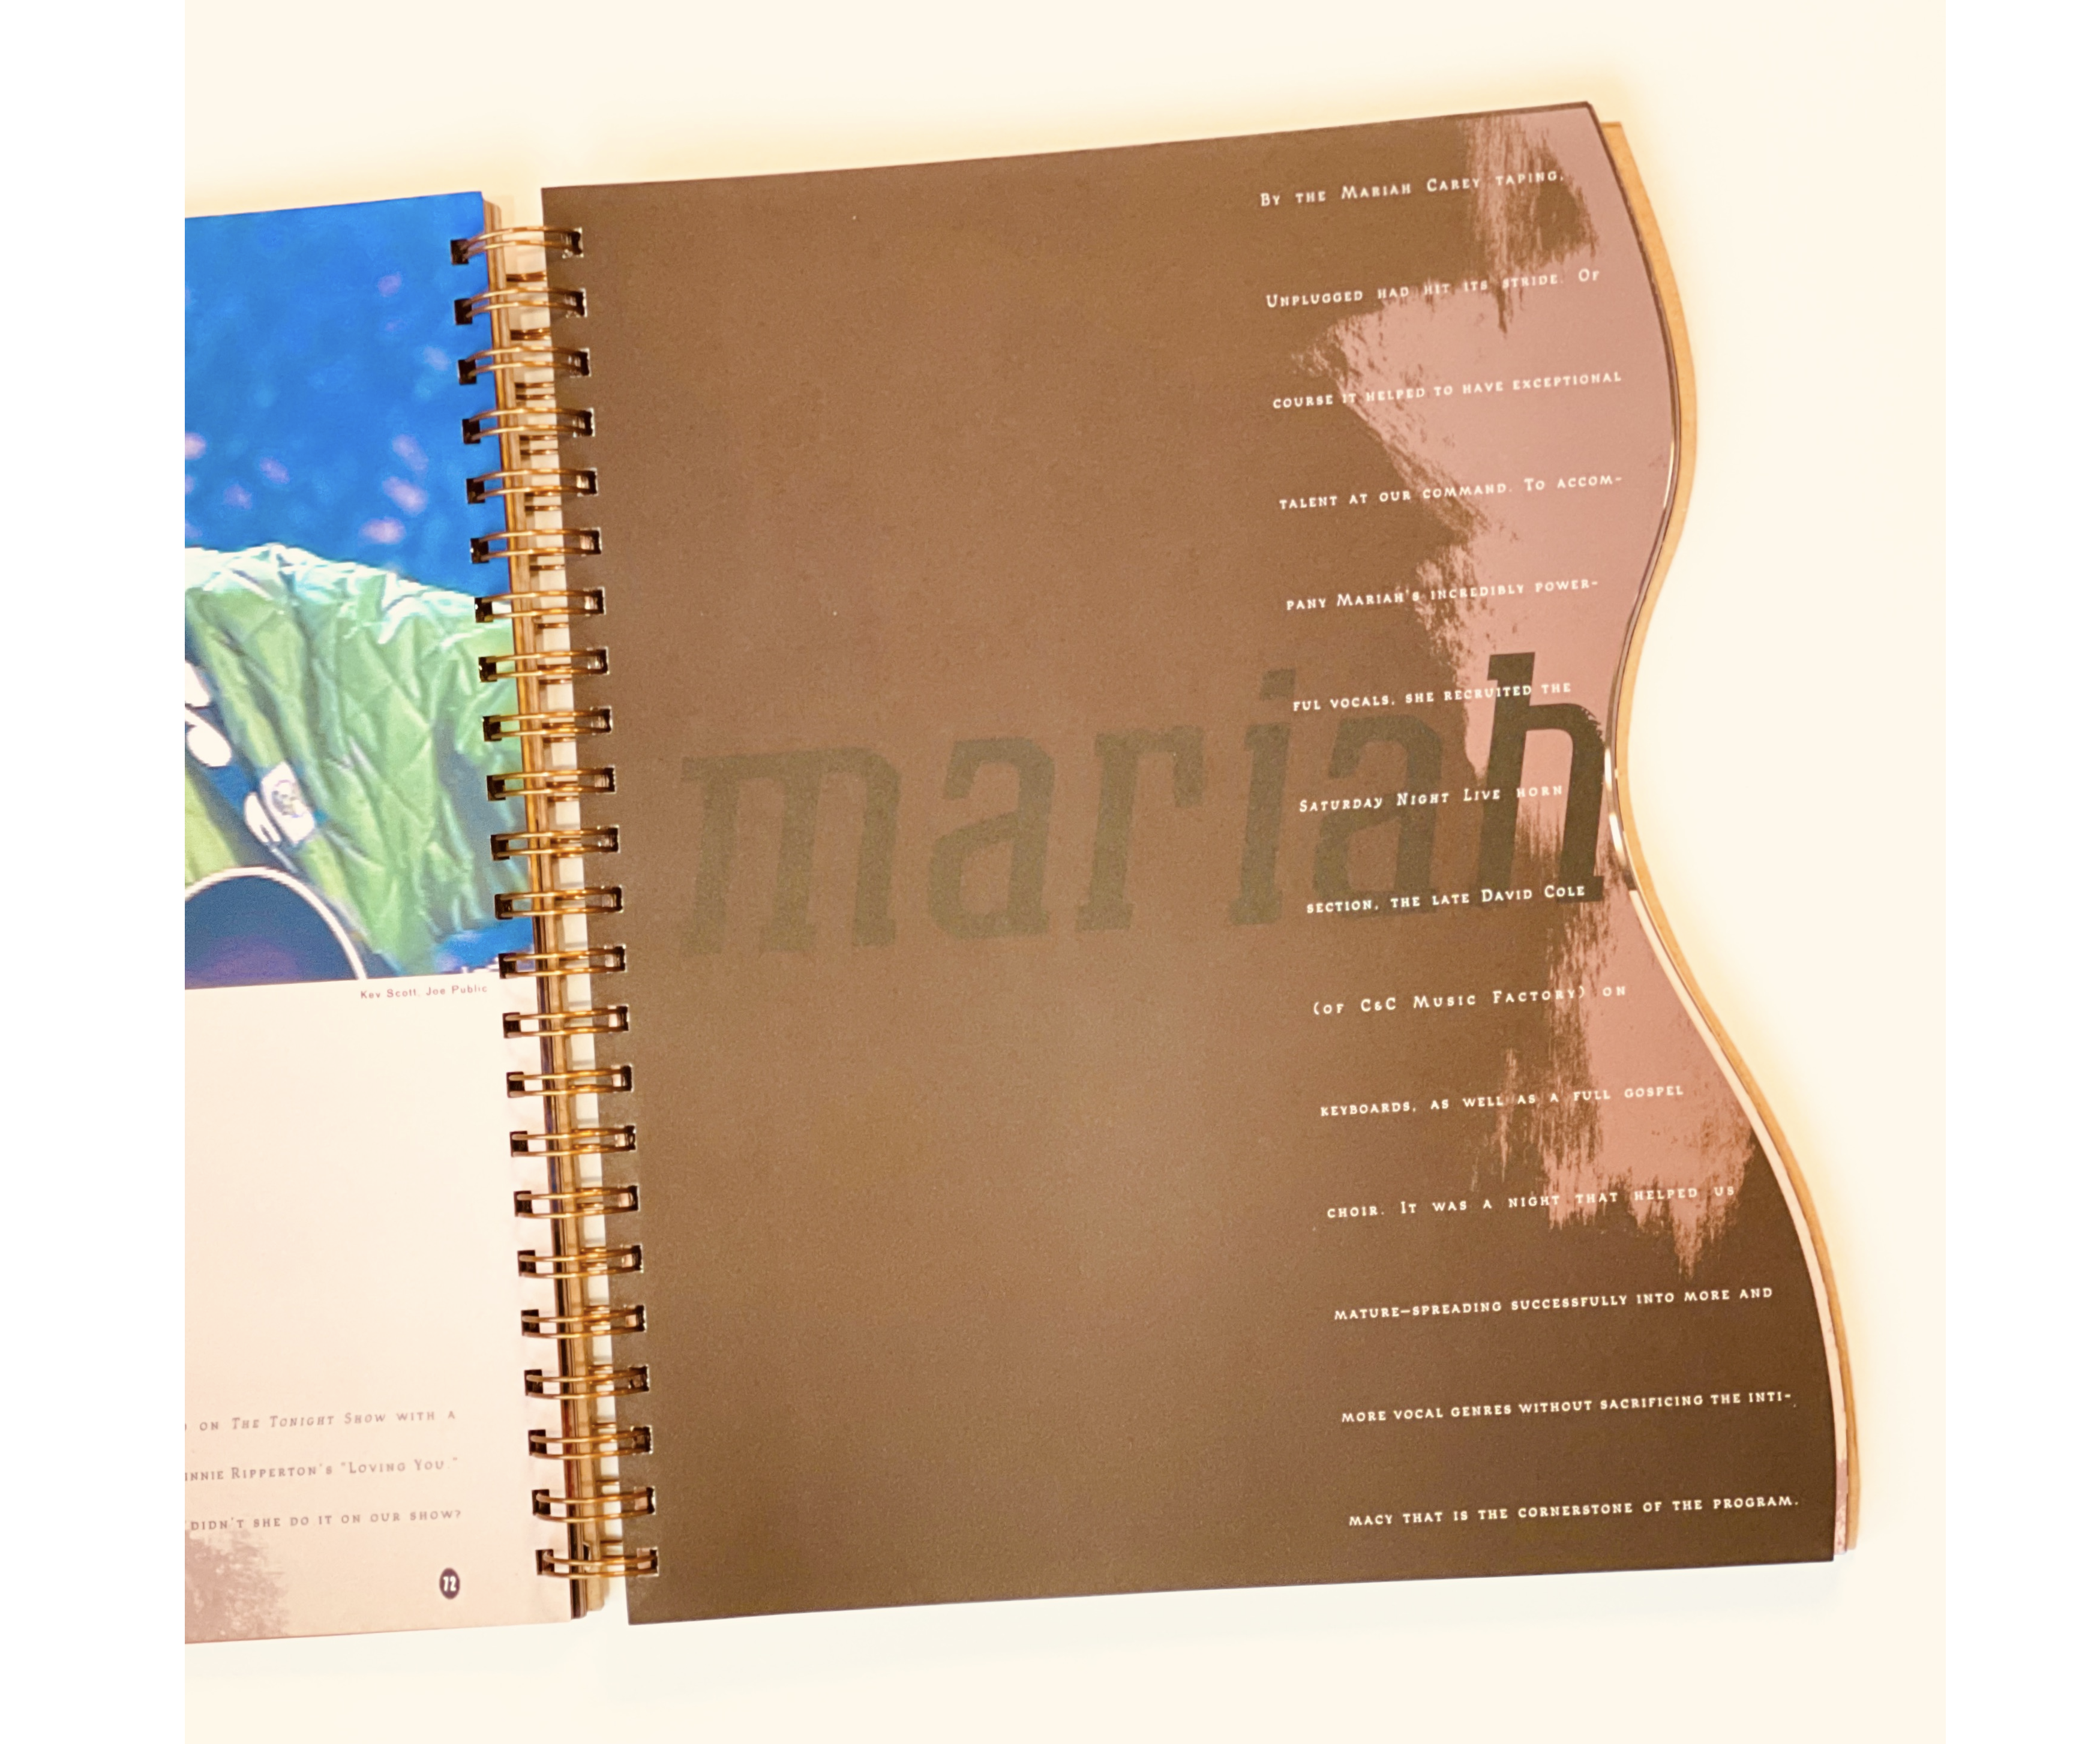
The page, space, and background, whether two or three-dimensional, is a shape. It can be a rectangle in portrait or landscape orientation or something more circular, or something organic like the shape of a guitar like this one titled MTV Unplugged, First Edition by Sarah Maralkey published in 1995:

The text in one of the spreads follows the gentle curve of the book:
If we consider the area we are using to organize our design as a shape, then the rest is a matter of subdividing that space in interesting ways. Thus, we always need to take the format into consideration.
Here is an interesting example of how to use a simple two-column grid:

As we move forward to the next variables, it is essential to note that how we treat the space will continue to be something we experiment with. We do not leave it behind. Let’s see how only changing the weight (bold versus regular + space) changes things around.
Weight
Weight refers to changes in the typeface as bold, regular, italic, heavy, medium, and so on. In this variable, we keep the sizes all even. In other words, we do not change the size at all.
It is worth mentioning that a typeface with no weight options will not be helpful in our exploration, as well as funky or heavily ornamental typefaces. Those are great for one instance or for display purposes such as a poster. However, in creating a hierarchy, it is best to stick to typefaces with well-proportioned shapes and multiple font options in their family.
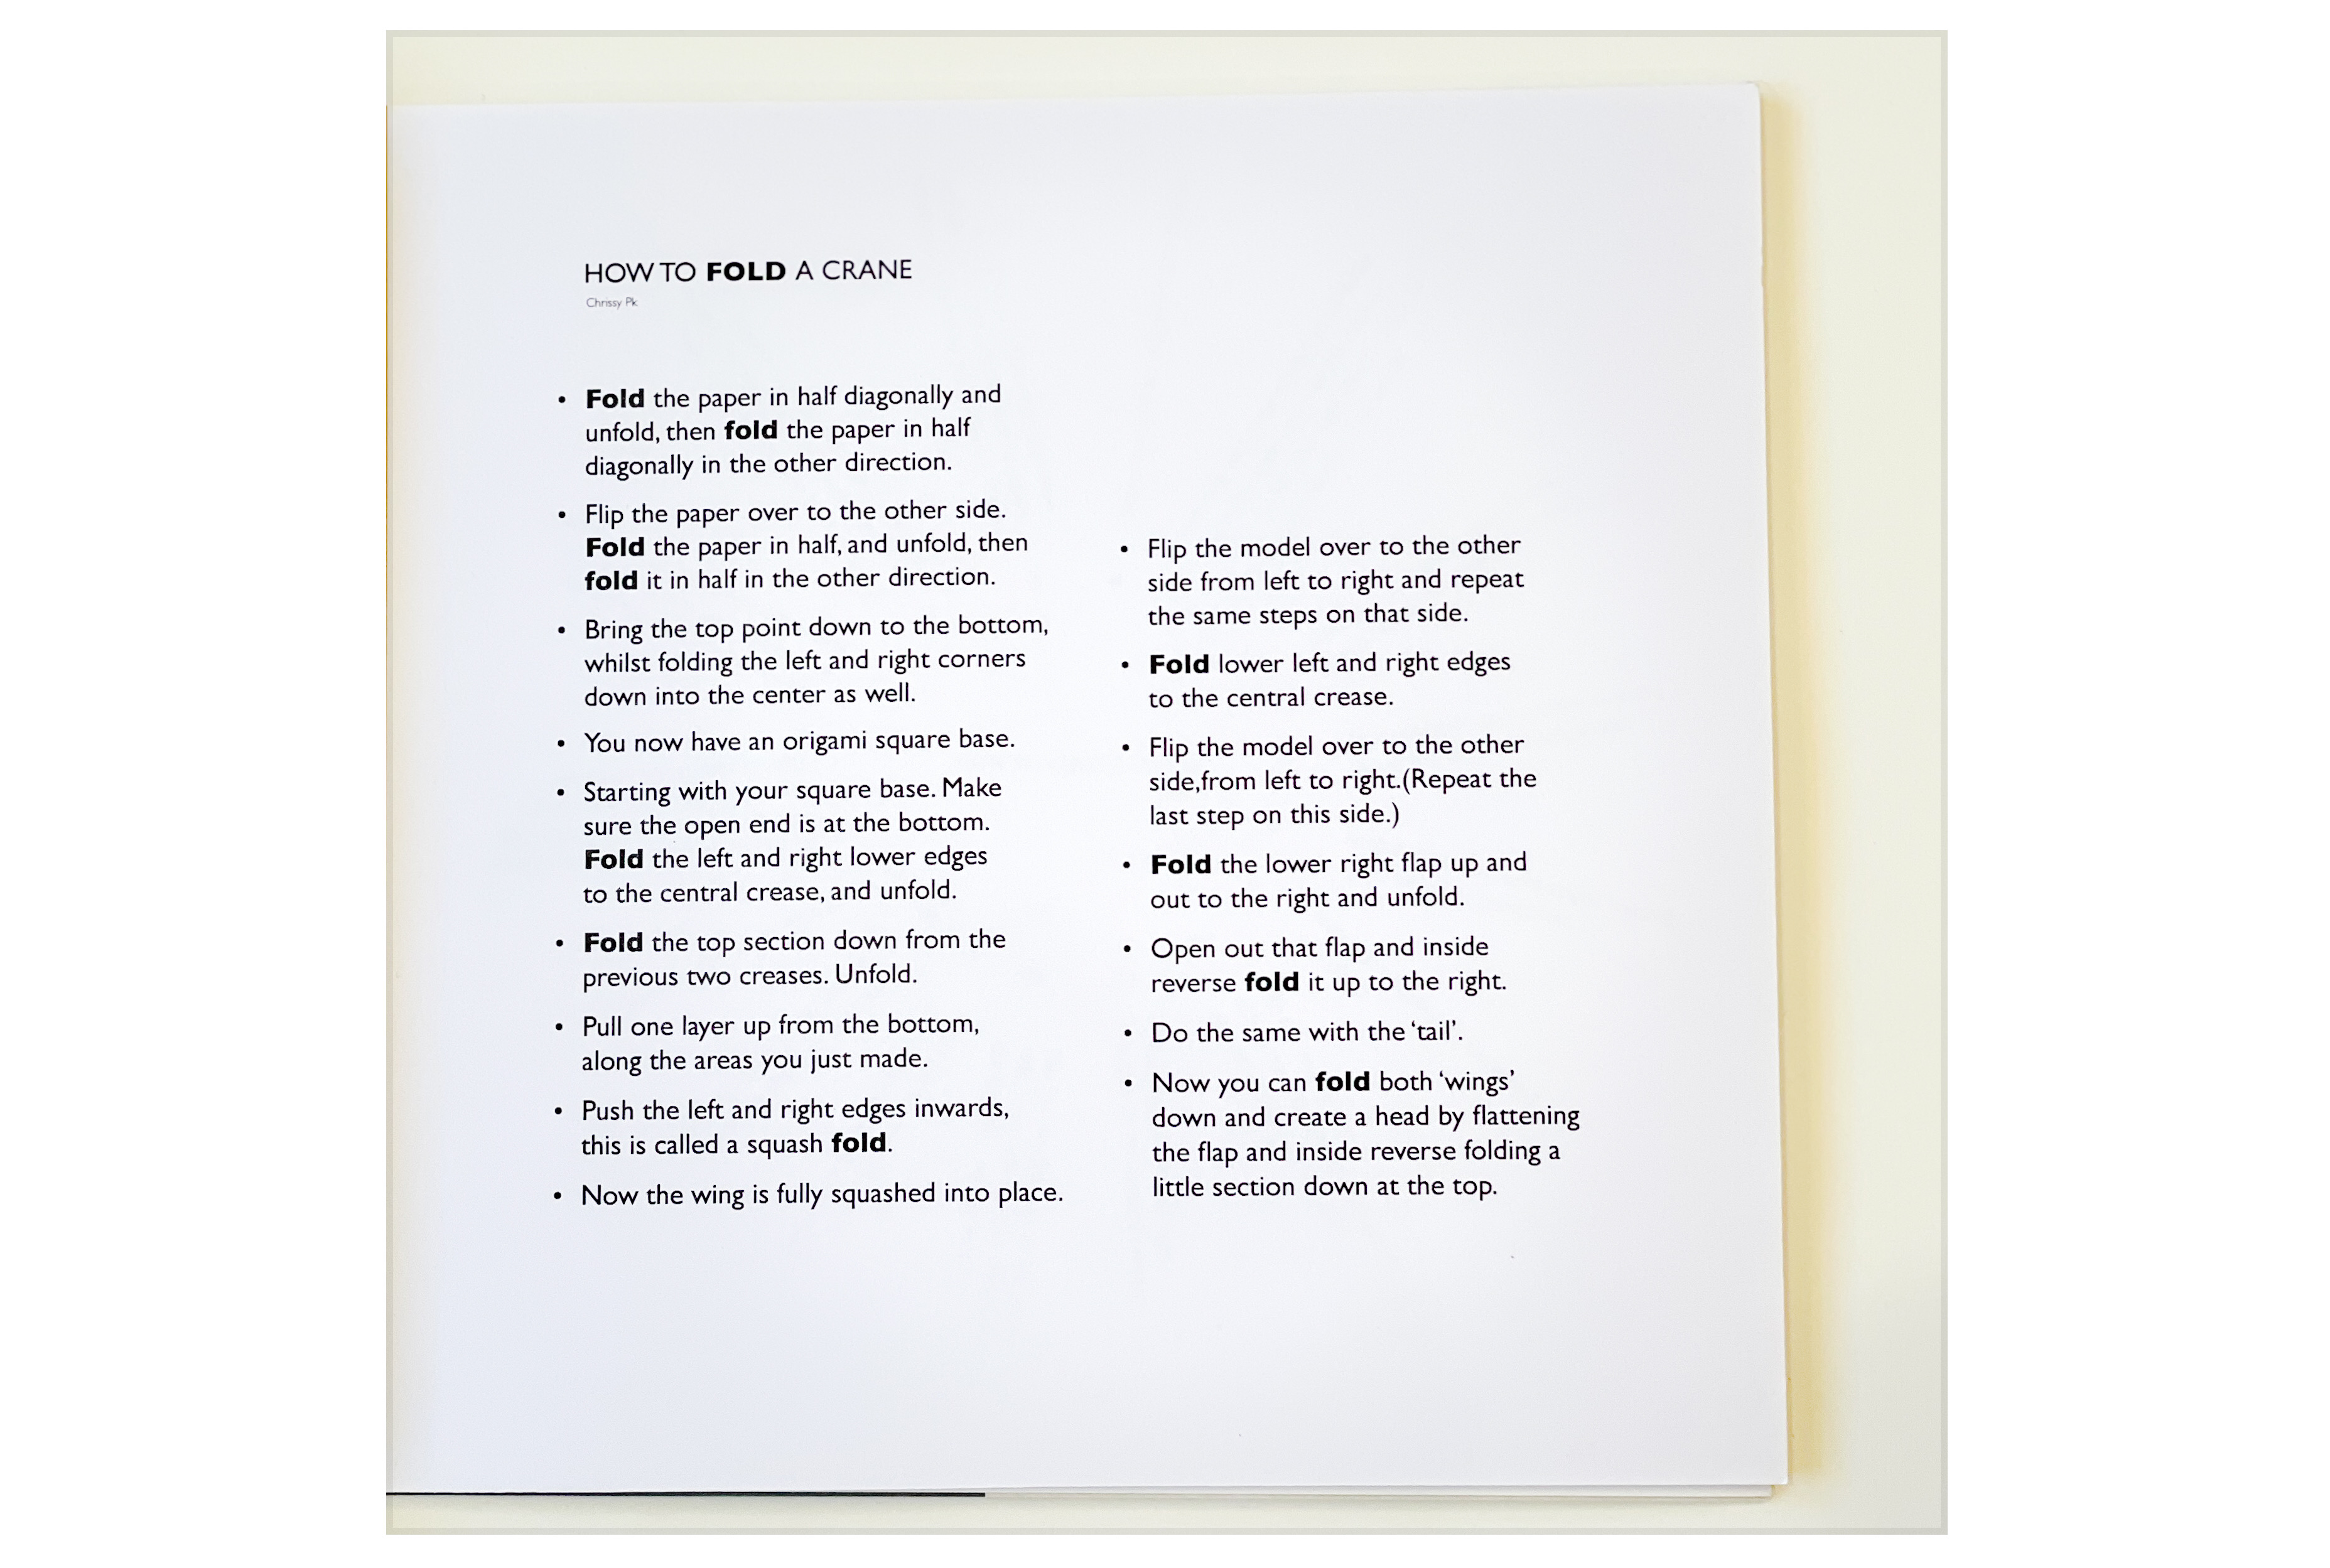
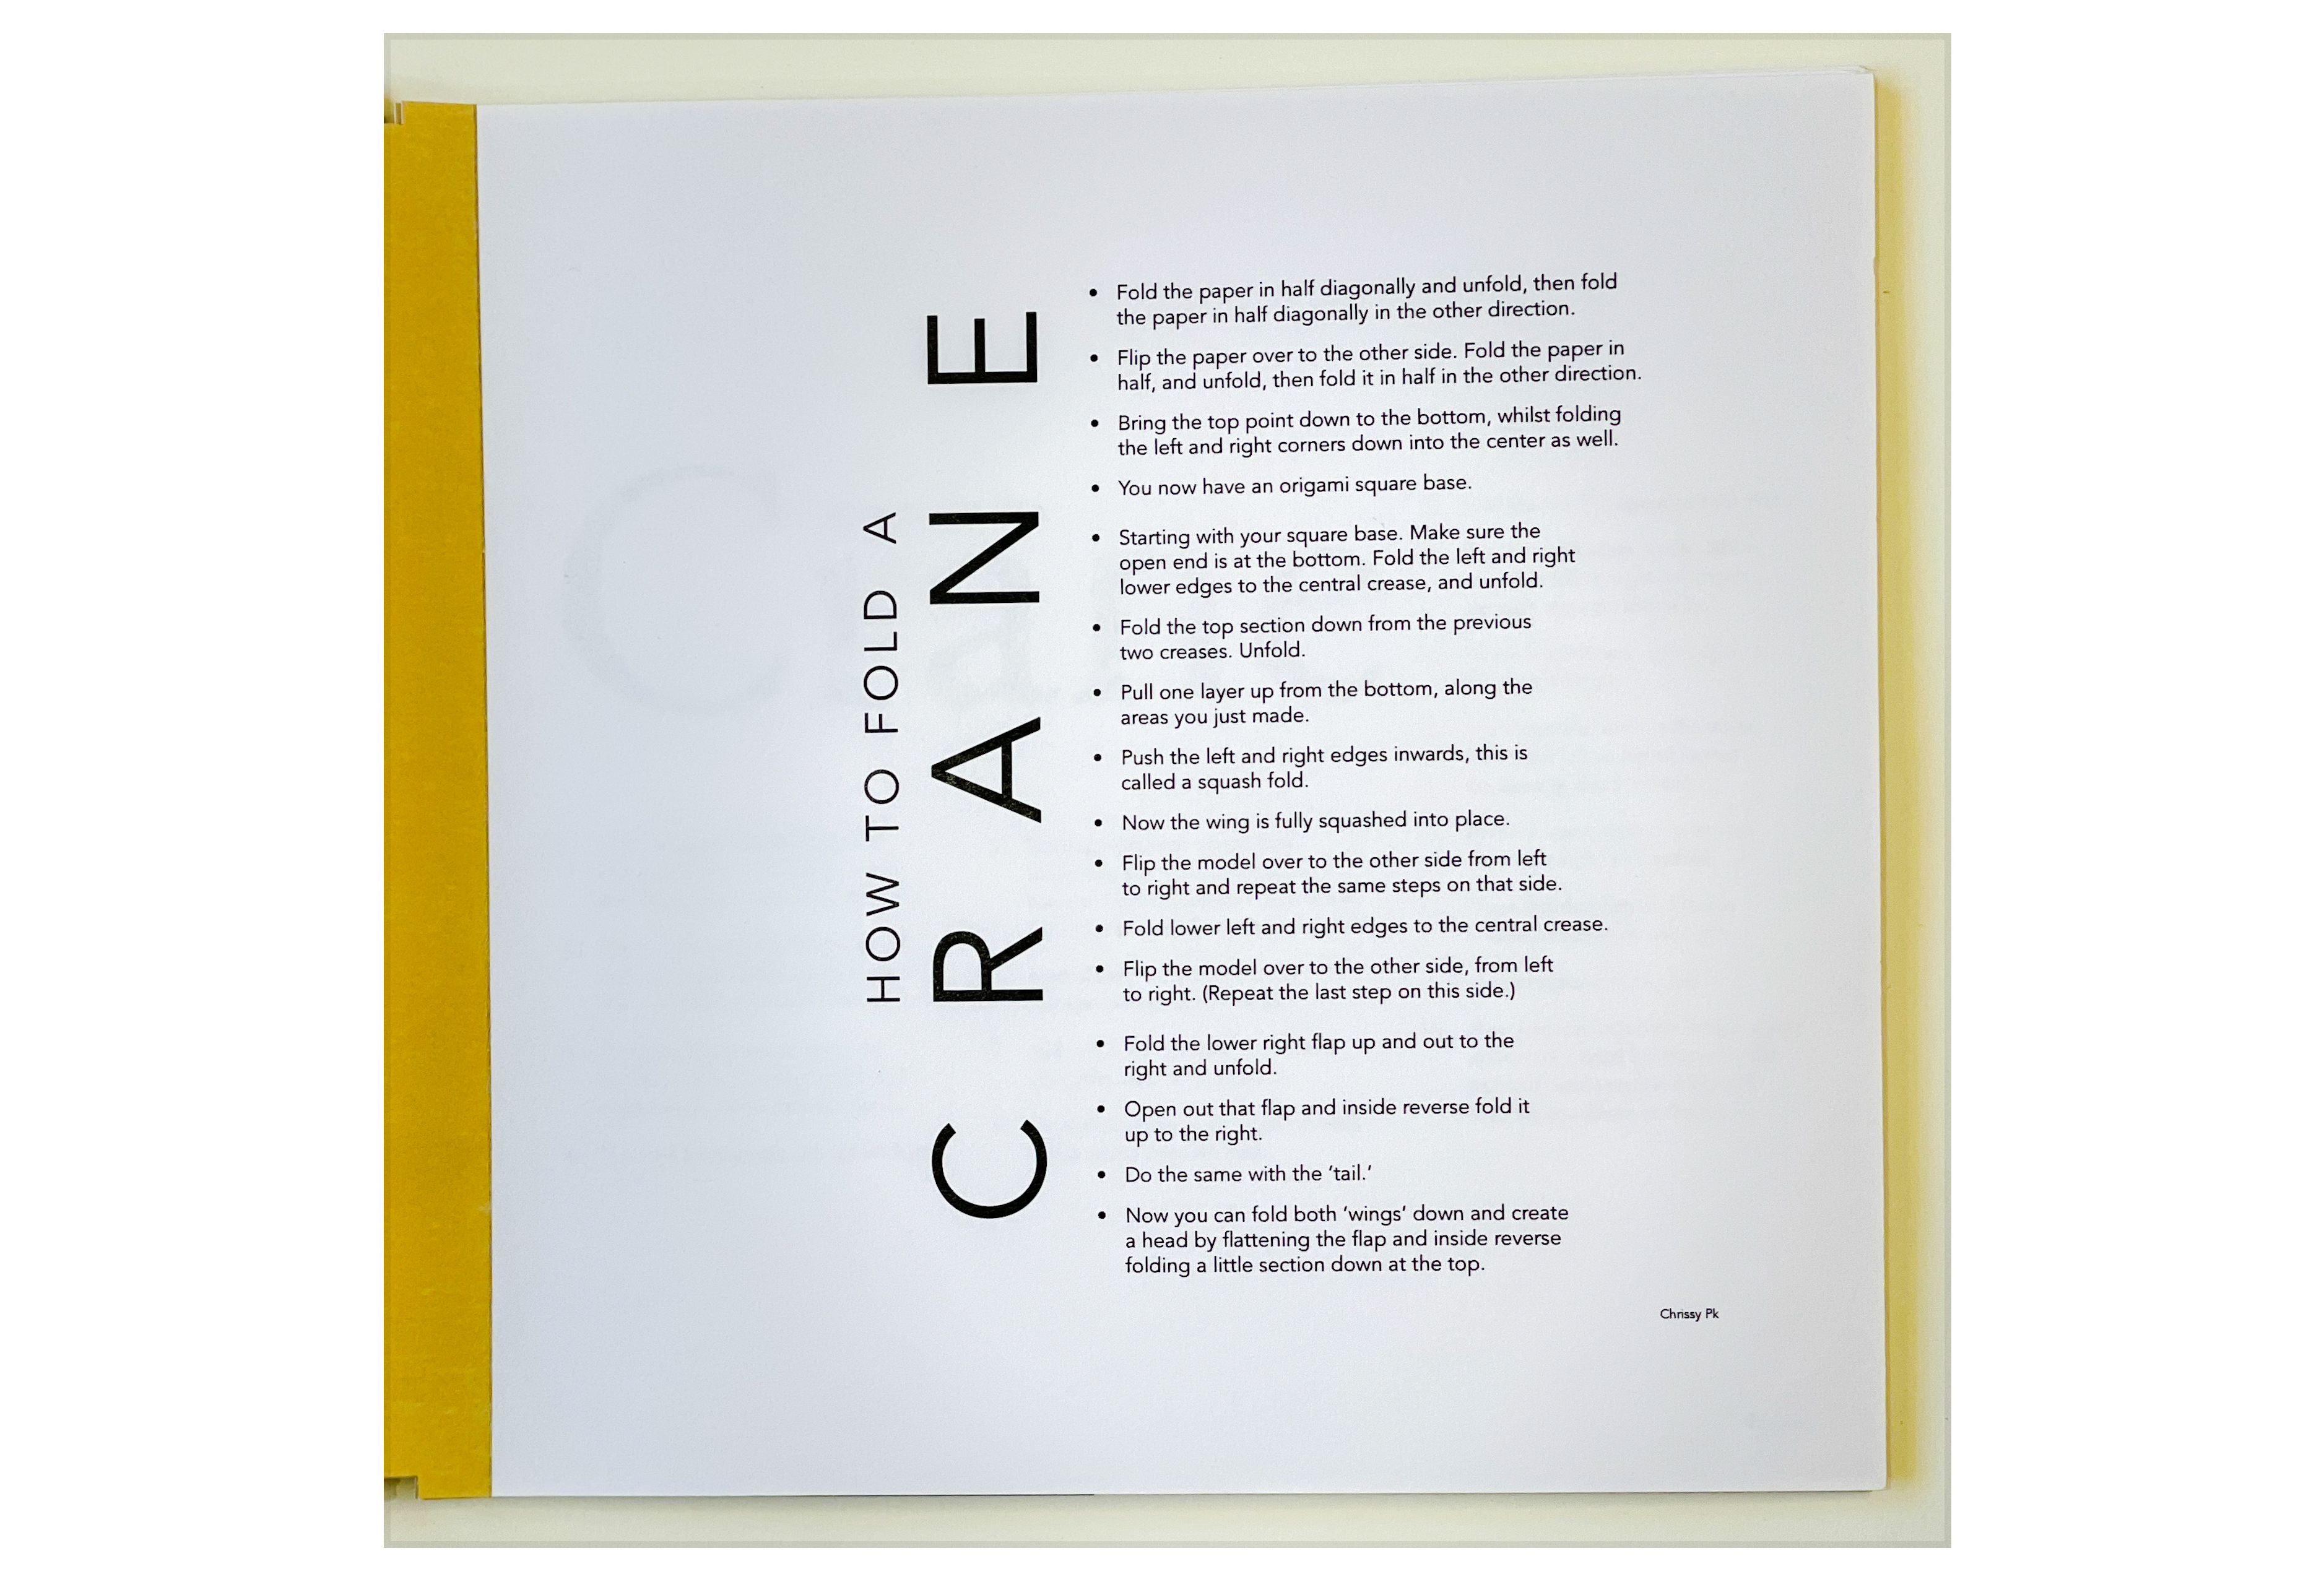
In the image above, the layout is more traditional — a two-column grid with the text aligned to the left. The bold weight is used on the word Fold on the title and in the rest of the content each time the word Fold is used. This visual detail helps with establishing a conceptual and visual connection as well as a hierarchy. It is a visual reminder that these instructions are about learning to fold a crane.
In the following example, we have a much less traditional layout. The designer used a circular grid to subdivide the format or the space in the composition. The bold weight is more delicate here since the typeface is also more delicate. The text’s organization resembles a clock. The design requires more participation from the reader as they would need to turn the page around.
In addition to our first summary, we can add the following:
- We can use organic shapes to subdivide the format.
- We can follow a logical system to establish a visual hierarchy: bold a word and consistently bold the same word throughout the text.
Now, let’s move on to applying size but without weight.
Size
We understand that size refers to, well, sizes. How large or small the font used is displayed. For the purposes of this exercise, we will limit ourselves to three sizes, and we will refer to them in categories:
- Body copy
Depending on the typefaces’ x-height, anywhere from 8 points to 12. Never over 12. - Titles
Here you can have some fun and play with contrast — very, very large. Anything over 14 points is considered a display, but you will find that it is still too small to make an impact. - Subheaders or accents
Depending on what sizes you are using for the titles, you can select something in between the body copy size and the titles.
Something worth mentioning: these parameters are not solely mathematical. There is much to learn about how things look (regardless of size) once something is printed.
Along those lines, let’s discuss a note about titles. The best way to think of titles is to see them as a group of little cousins or a group of best friends who are really tight. The spaces (again, proximity) you create between each word on the title affect how the title is seen. In other words, do the words go together? If so, should there be a gap? This will become more clear in the discussion of the examples below:
We can see how the designer decided to create a sense of upward direction by setting the title along the column pointing towards the beginning of the text. The designer not only used size to create emphasis on the word CRANE but cleverly led the reader to the top. The rest is pretty straightforward, as we can see — using bullet points and space between the steps to conform to the sequential nature of the content.
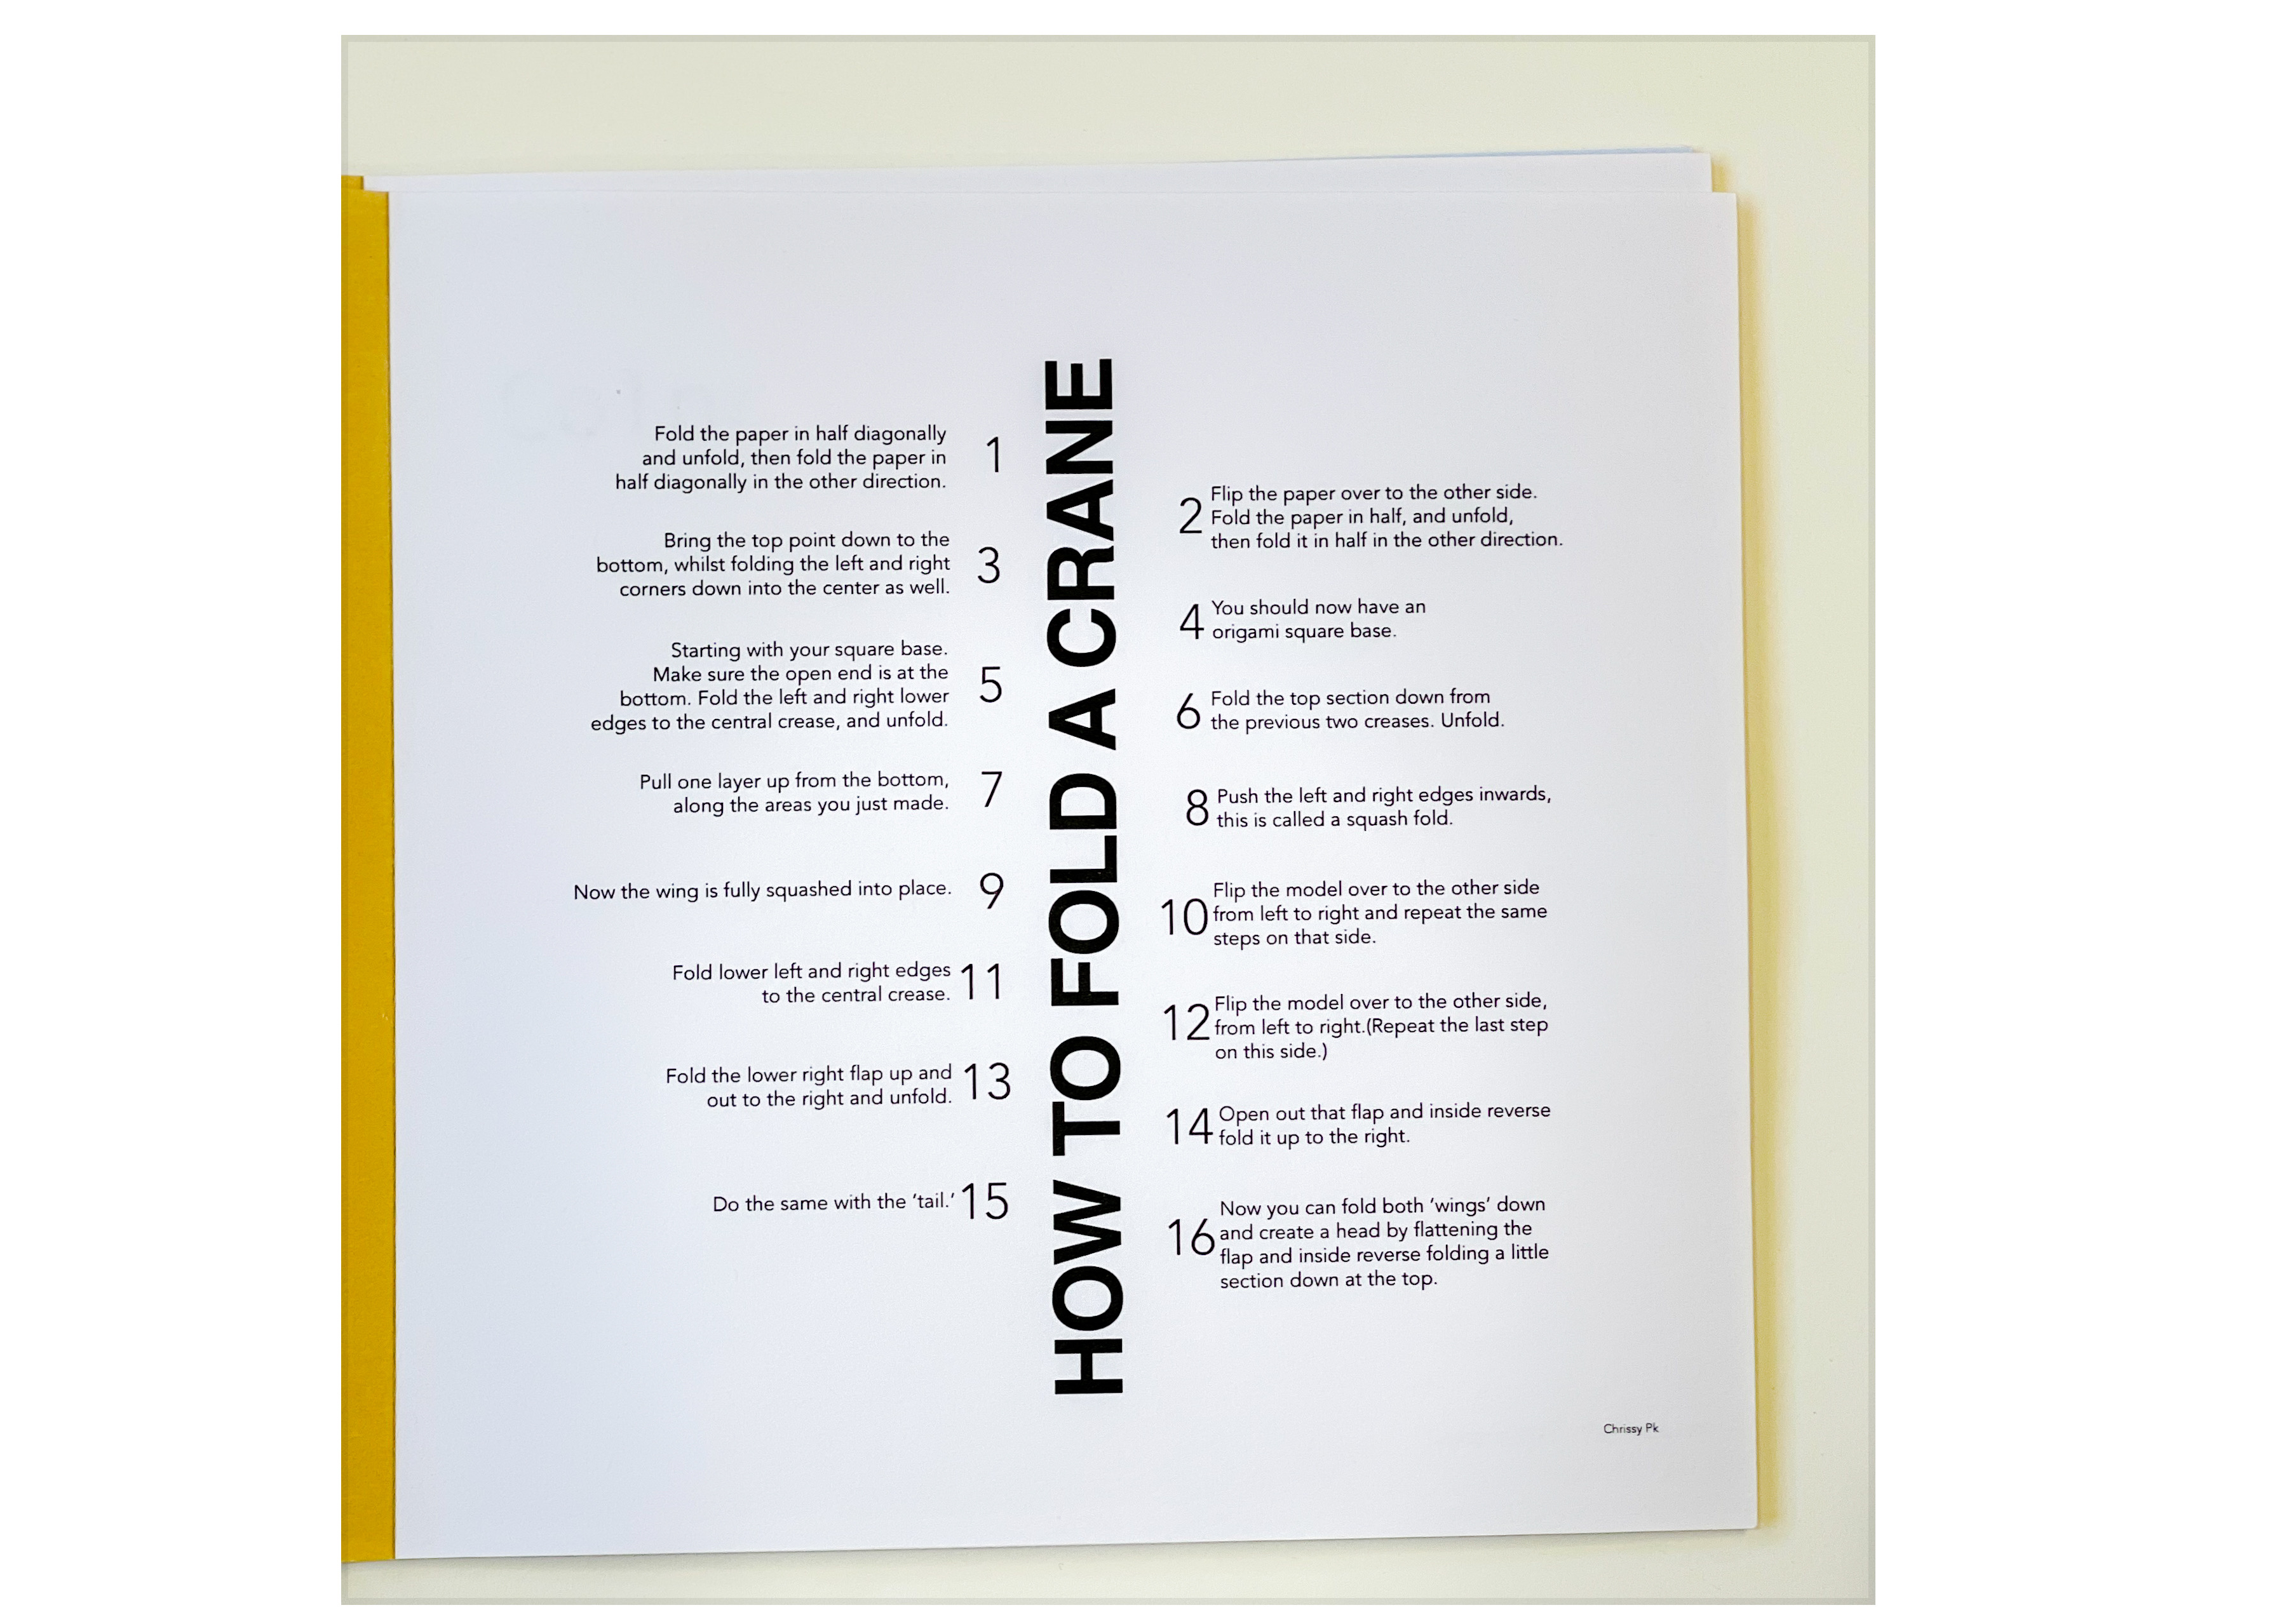
Here we have three sizes used following the expected pattern (title, numbers to indicate sequence, and the text). But, notice how the numbers are not the same size as the text. They are a size in between the title and the text, indicating read the title first and then read in order.
In addition to the items we have added to our summary, we can add the following:
- We can set one word of the title much larger than the rest.
- We can direct the reader with the title to the beginning of the content by setting the title in an upwards orientation.
- We can set numbers slightly larger than the text to indicate the reading order.
Now we will discuss variables in combination.
Size And Weight
We start here by combining two variables and still using proximity to create a hierarchy. We are still limiting ourselves to three size changes. In terms of weight, we can change the weight of words we think need to be seen but are not as important as the title or things like that. We can certainly make a word very large and bold. But, as you are experimenting, keep an eye on the balance of the page. Are things too heavy on one side? Is the page too busy on one side versus the other?
Size and weight experimentation also allow you to start playing with an improvisational grid. When making a letter or word really large, you may use it to establish visual alignments from it.
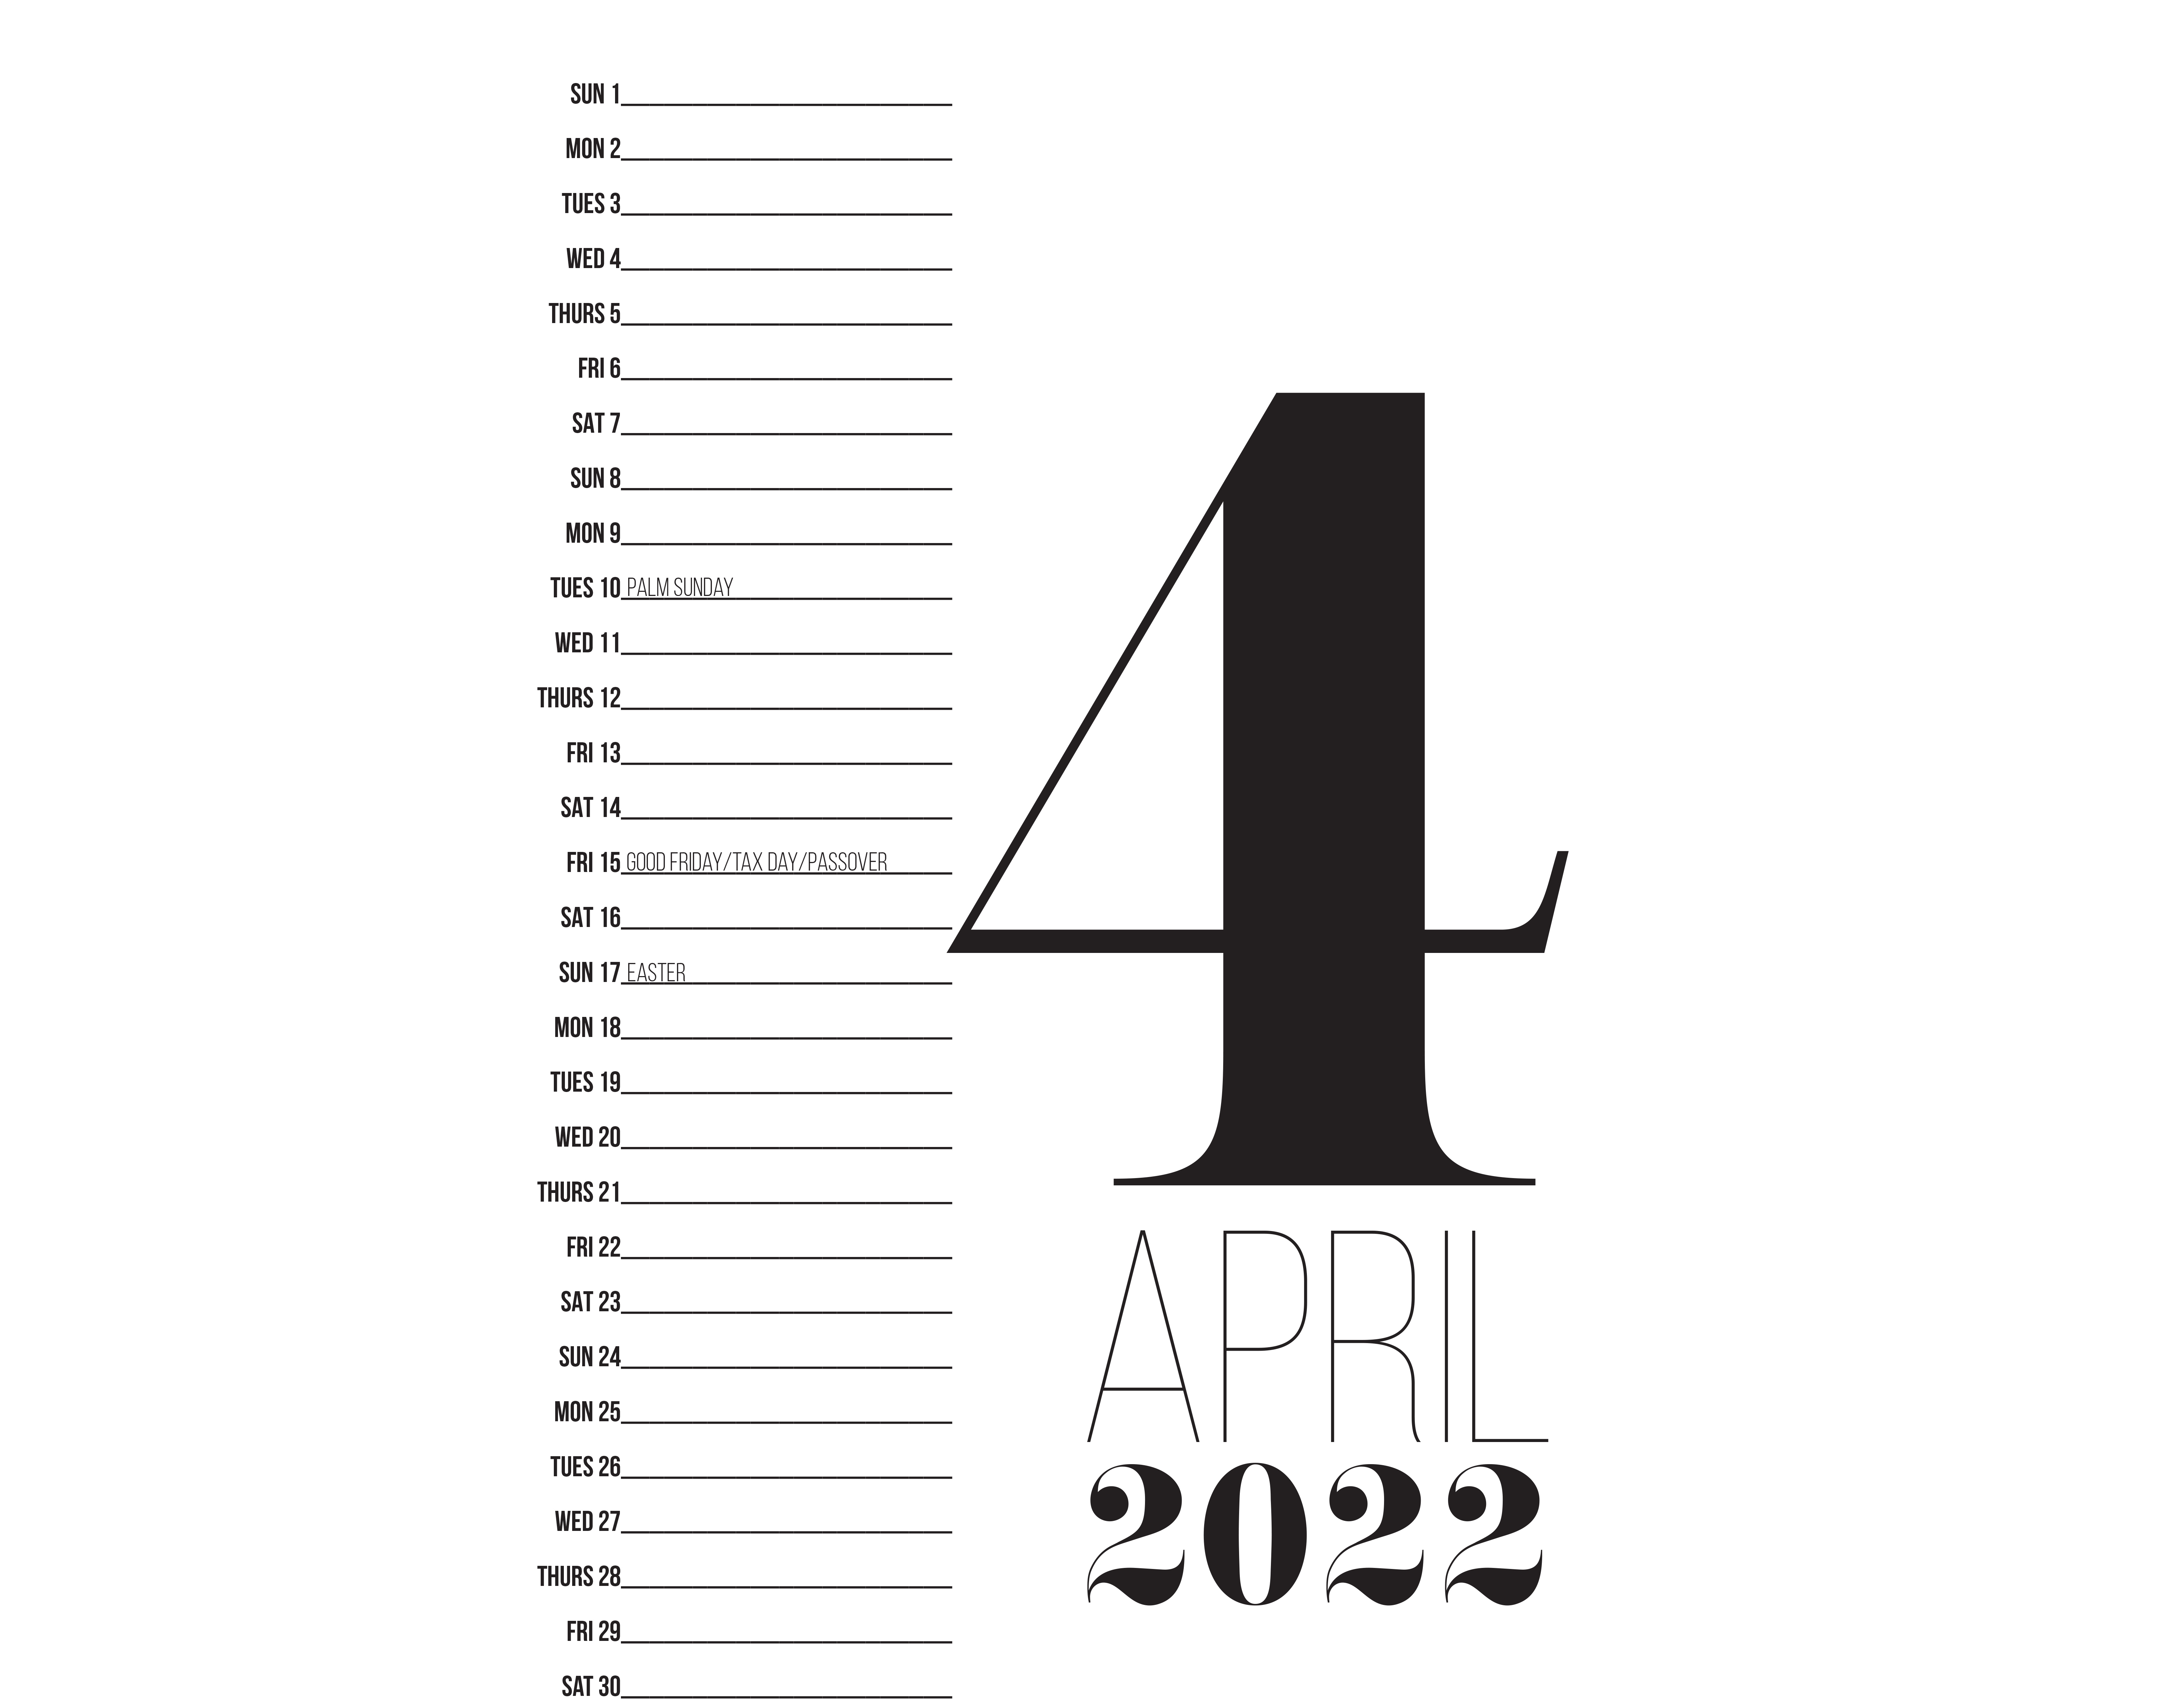
The example below is a page from a calendar I designed last Christmas holiday. Calendars are a great playground to explore sizes and weights. In this instance, I opted for the number of the month, the largest element on the page, while also increasing its weight, but right under the name — April — is very light or thin, creating a nice contrast between the two. The year is smaller but bold, as bold as the number above it. Though the contrast is sharp, the three pieces together create a nice typographic unit working together to create the focal point of the piece. The right side is the list of the month’s dates in bold. The holidays are stated in lightweight.
Of particular note is that if you notice, the words April and 2022 are tucked in under the vertical line of the number. This typeface has serifs (the little eyelashes at the bottom of the number). I aligned the two words under the number within its serifs. By doing this, I reinforce the visual alignment and implied vertical lines of the number.
In addition to the items we have added to our summary, we can add the following:
- We can make a word very large on the page. If you go big, go big.
- We can bold the largest element. Though not always necessary, it can sometimes create a nice and juicy hierarchy.
- We can create units or groupings by keeping the type contained within an imaginary box.
- We can use visual alignments or improvised grids to reinforce the typographic grouping.
With what we have learned so far, we will move on to color.
Color
Discussing color can be an article all by itself. There are many resources available both online and printed about color. Indeed, here are a few Smashing articles by Cameron Chapman covering the subject more broadly:
- “Color Theory For Designers, Part 1: The Meaning of Color”
- “Color Theory For Designers, Part 2: Understanding Concepts And Color Terminology”
- “Color Theory for Designers, Part 3: How To Create Your Own Color Schemes”
In this article, however, we will focus on how color enhances or emphasizes hierarchy, how it helps to create a composition that keeps the eye inside of itself, and how it helps the eye navigate the page. For these reasons, when studying this variable, we limit the use of color to two or three colors. By limiting the use of color, we can focus on how it helps to establish a hierarchy in typography.
Factors That Affect The Use And Application Of Color
I do not mean we use color arbitrarily. It is important to read the content to establish a sense of the article. In other words, let’s assume we are designing a leaflet for a school-aged children’s birthday party. We would probably use vibrant colors and convey a sense of fun. Alternatively, if we are designing a leaflet for hospital patients with instructional material, perhaps the colors we use might be less vibrant, softer, and aimed to provide a sense of calm. There are usually three essential aspects to consider when using color and designing in general:
- Content,
- Audience,
- Context.
The audience determines not only how the content is written but also the typefaces, sizes, weights, and overall design of the content. The context of the content also determines how we design: is the content meant to be read at a distance, as in a poster, or is the content meant to be read closer to us, as in a mobile device or a book? Because color affects how we perceive the content, we must become familiar with that content. Thus, reading the content given to us by our clients helps us make smart design decisions.
Now that we discussed factors that are important for the use of color, let’s look at examples of the use of color as it pertains to this exercise:
In the example above, we can see how all the colors and attention have been dedicated to the title. It has also been added to the name of the author of the instructions, but because of its small size, it does not create conflict. The layout takes advantage of once making everything on the title large; it creates a nice pocket of space where the instructions can be easily tucked in. In this way, even though there is no color used on the body copy, it does not matter because we have no choice but to land our eyes on the beginning of the text.
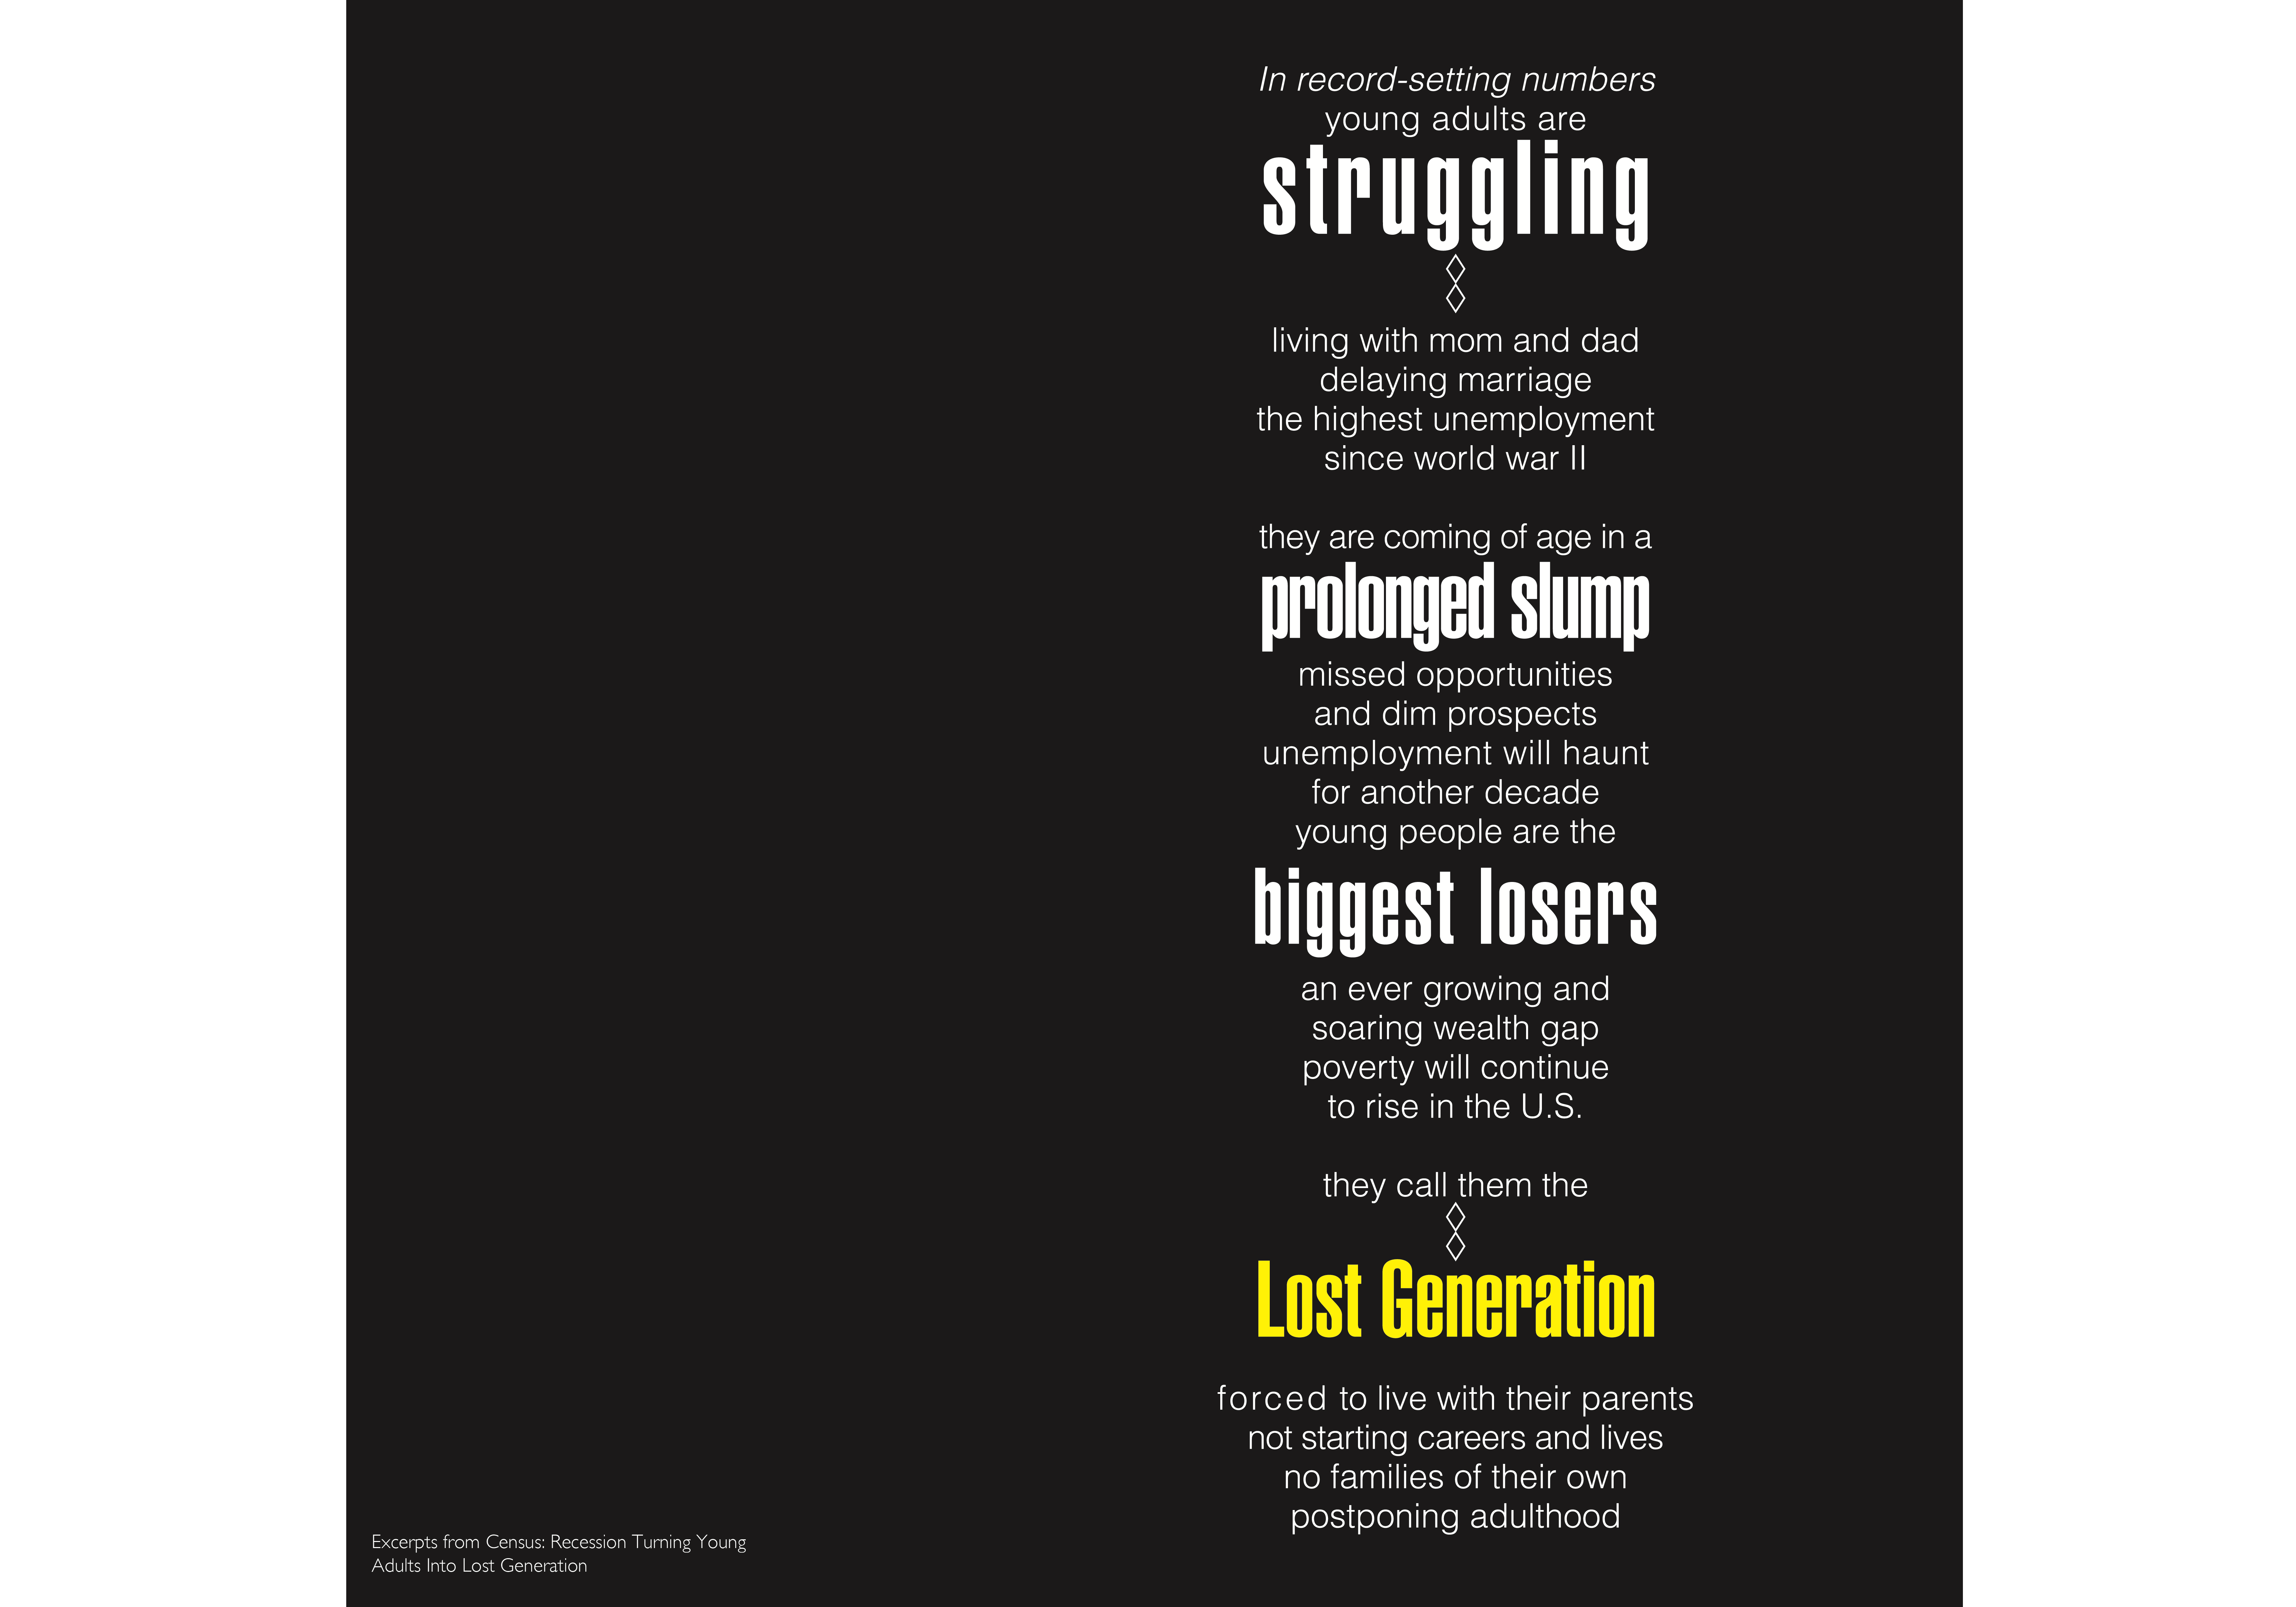
Above, we see how the background has been turned black. Once you read the title and read a little bit of the text, it makes sense. The text has a pessimistic and somber tone to it. Thus, no cheerful colors. With that, notice how the column of text is concentrated to the right side, creating asymmetry, once again creating a sense of visual instability to enhance the text’s meaning.
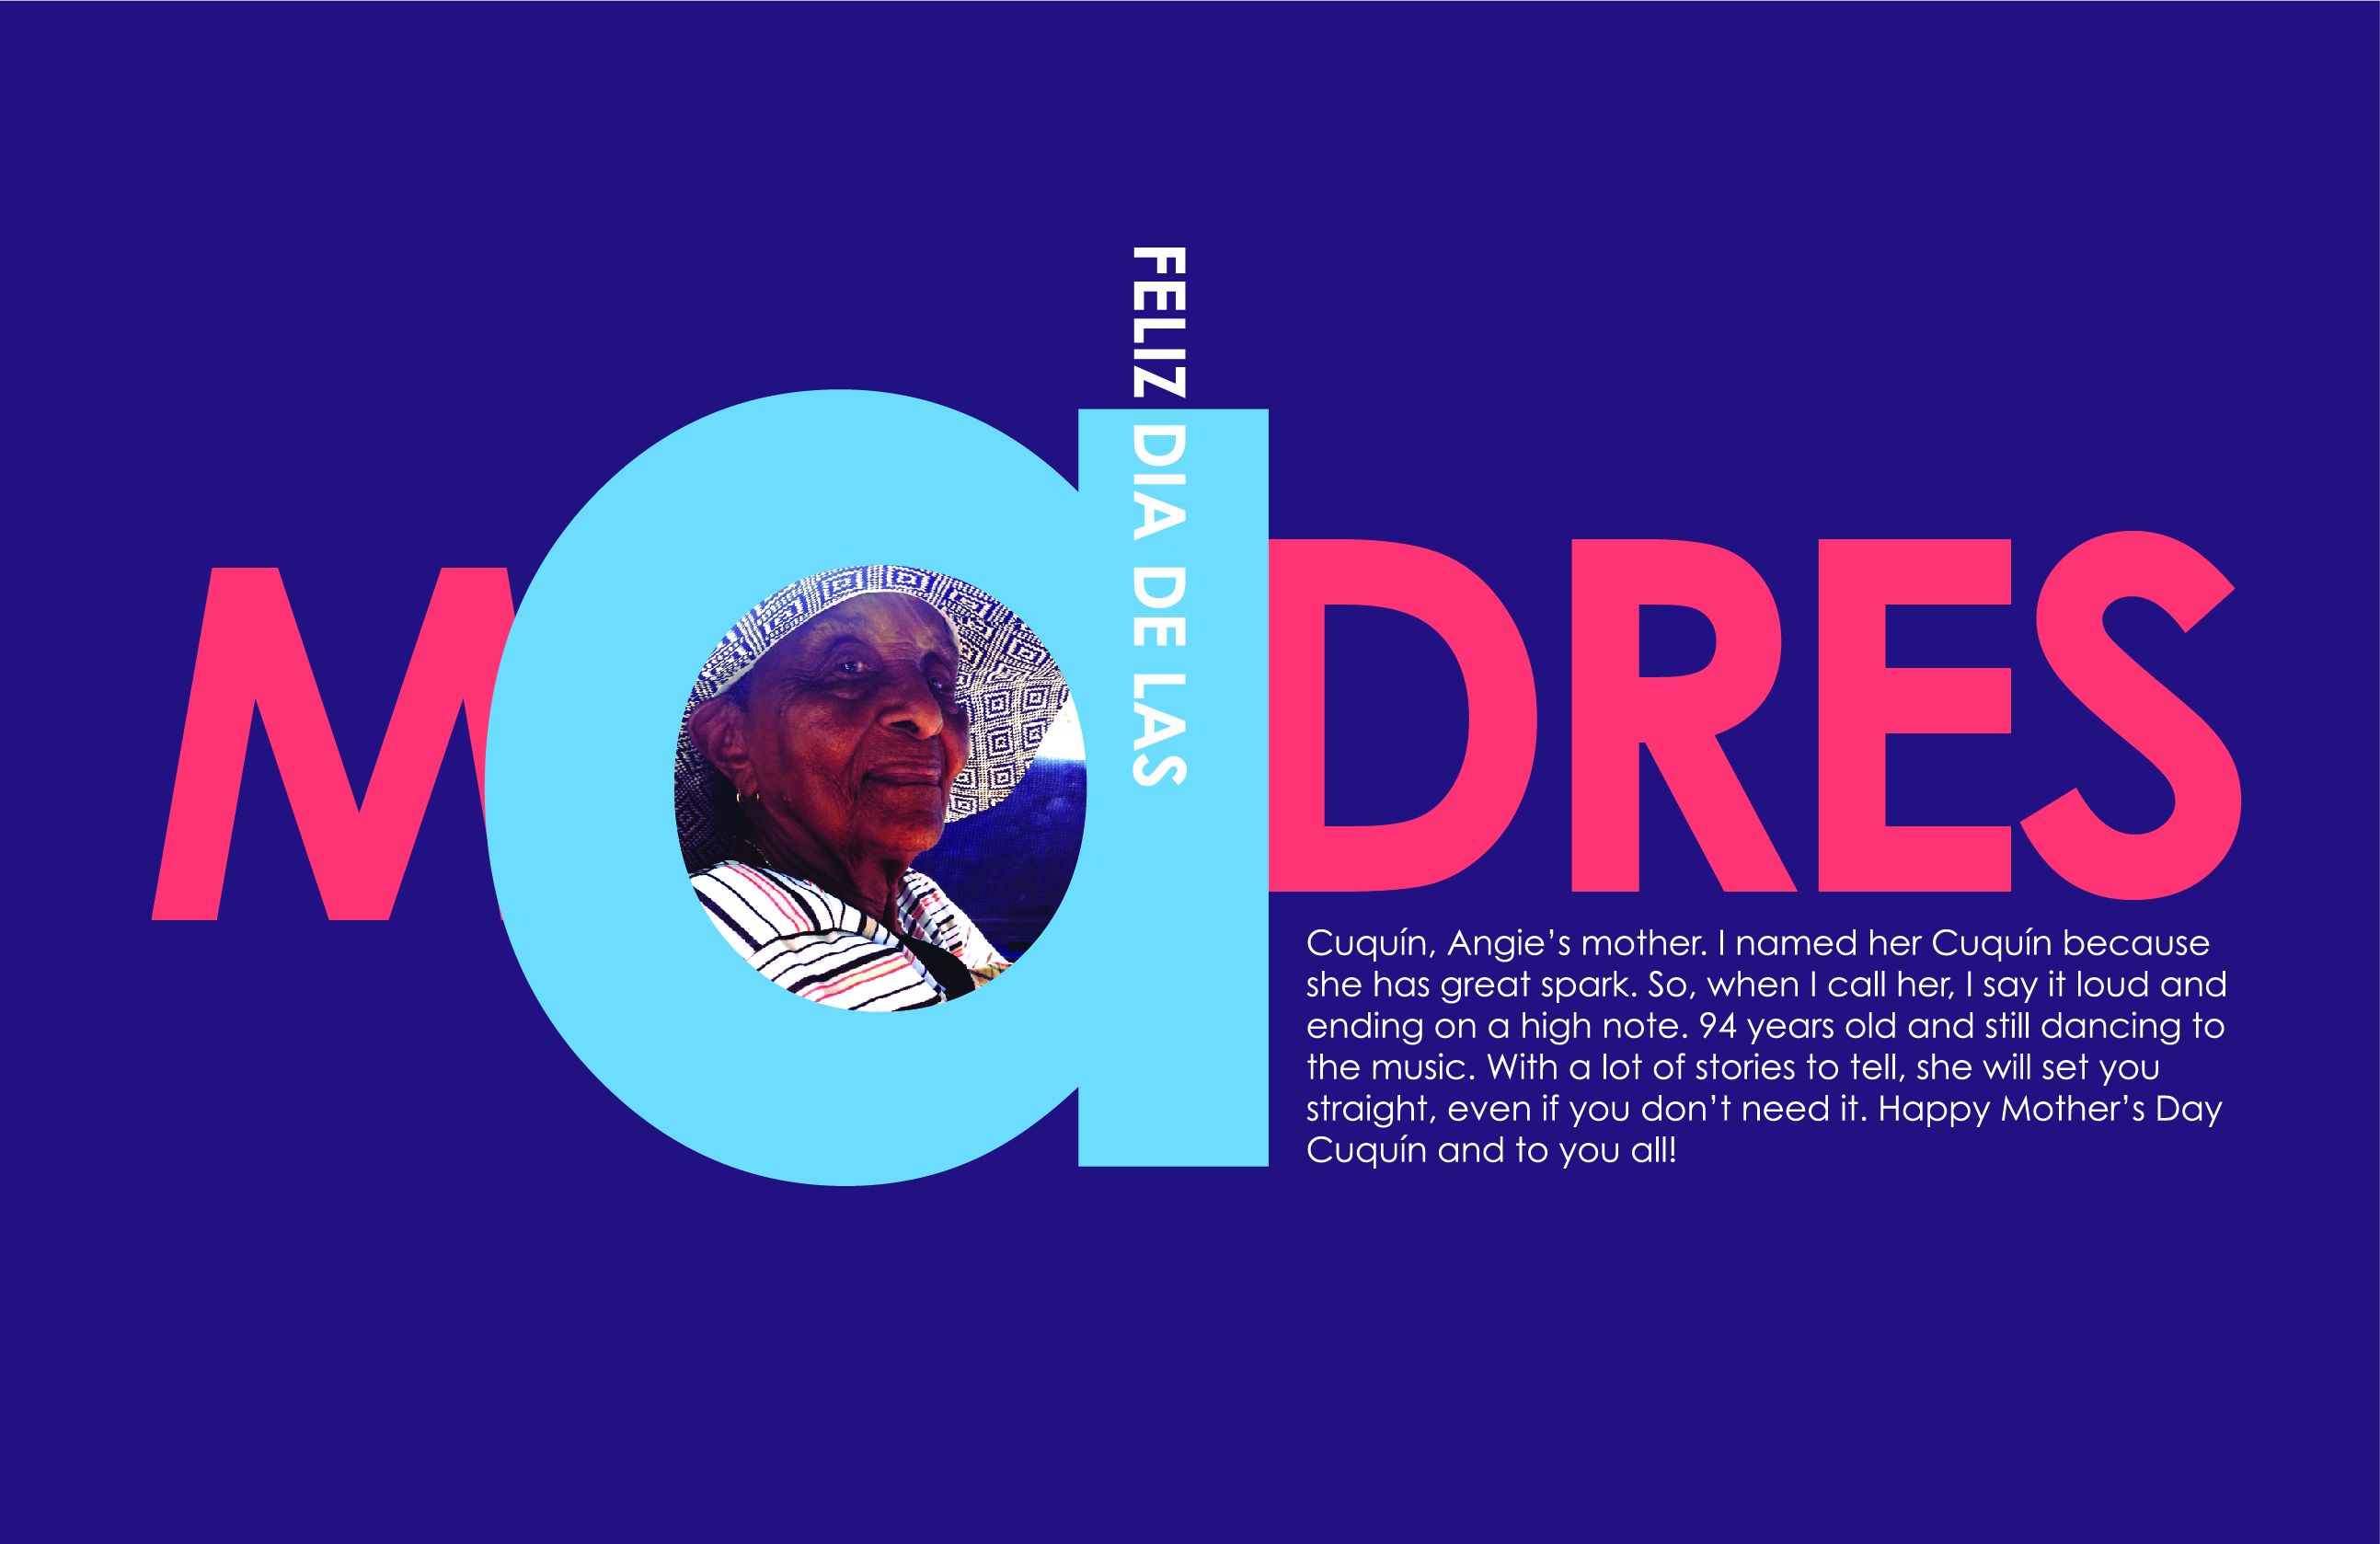
Below is a greeting card for Mother’s Day in the United States. I designed this card to honor my best friend’s mom. Though I am using a picture, it is used in a way that helps the text come together in the lowercase a. The lowercase a is the largest element on the page. Its bowl or empty space creates a nice place to tuck something in — a picture, pattern, letters, and so on. The rest of the letters are capitalized, but the lowercase a continues to be the focal point. We can also notice that there are four sizes here. I broke the rule of using only three sizes… but it does not feel that there is competition. The colors are vibrant because, in this case, Cuquin was a vibrant person, and the colors are needed to honor her.
In addition to the items we have added to our summary, we can add the following:
- We can use color to convey personality and tone.
- We can break a rule as long as it works within the system we have established and does not compete with the focal point.
- We can create spaces within the letters or words to tuck in text, patterns, or pictures.
Our last variable to discuss is visual punctuation. Let’s take a look at how everything comes together in this variable.
Visual Punctuation
A common question I often hear from my students is, “What is visual punctuation?” We see it all the time but don’t think about it. Visual punctuation refers to the use of lines, shapes, symbols, and other geometric elements to enhance the hierarchy. Remember, the goal is always to enhance the hierarchy and help the reader’s eye move around the space.
Let’s see some examples of how visual punctuation is actually frequently used and applied in typographic compositions:

The example above uses visual punctuation in the form of the crane to cleverly point to the title. Then it repeats the use of white in the text at the beginning of the instructions. The similarity established creates unity, and the word FOLD pulls our eye back to the top. Notice how the designer also bolded the beginning of each instruction. We saw this before in the weight discussion. The use of the bold weight on each instruction helps us move from one to the other sequentially. It also helps to signal each new step without numbers.
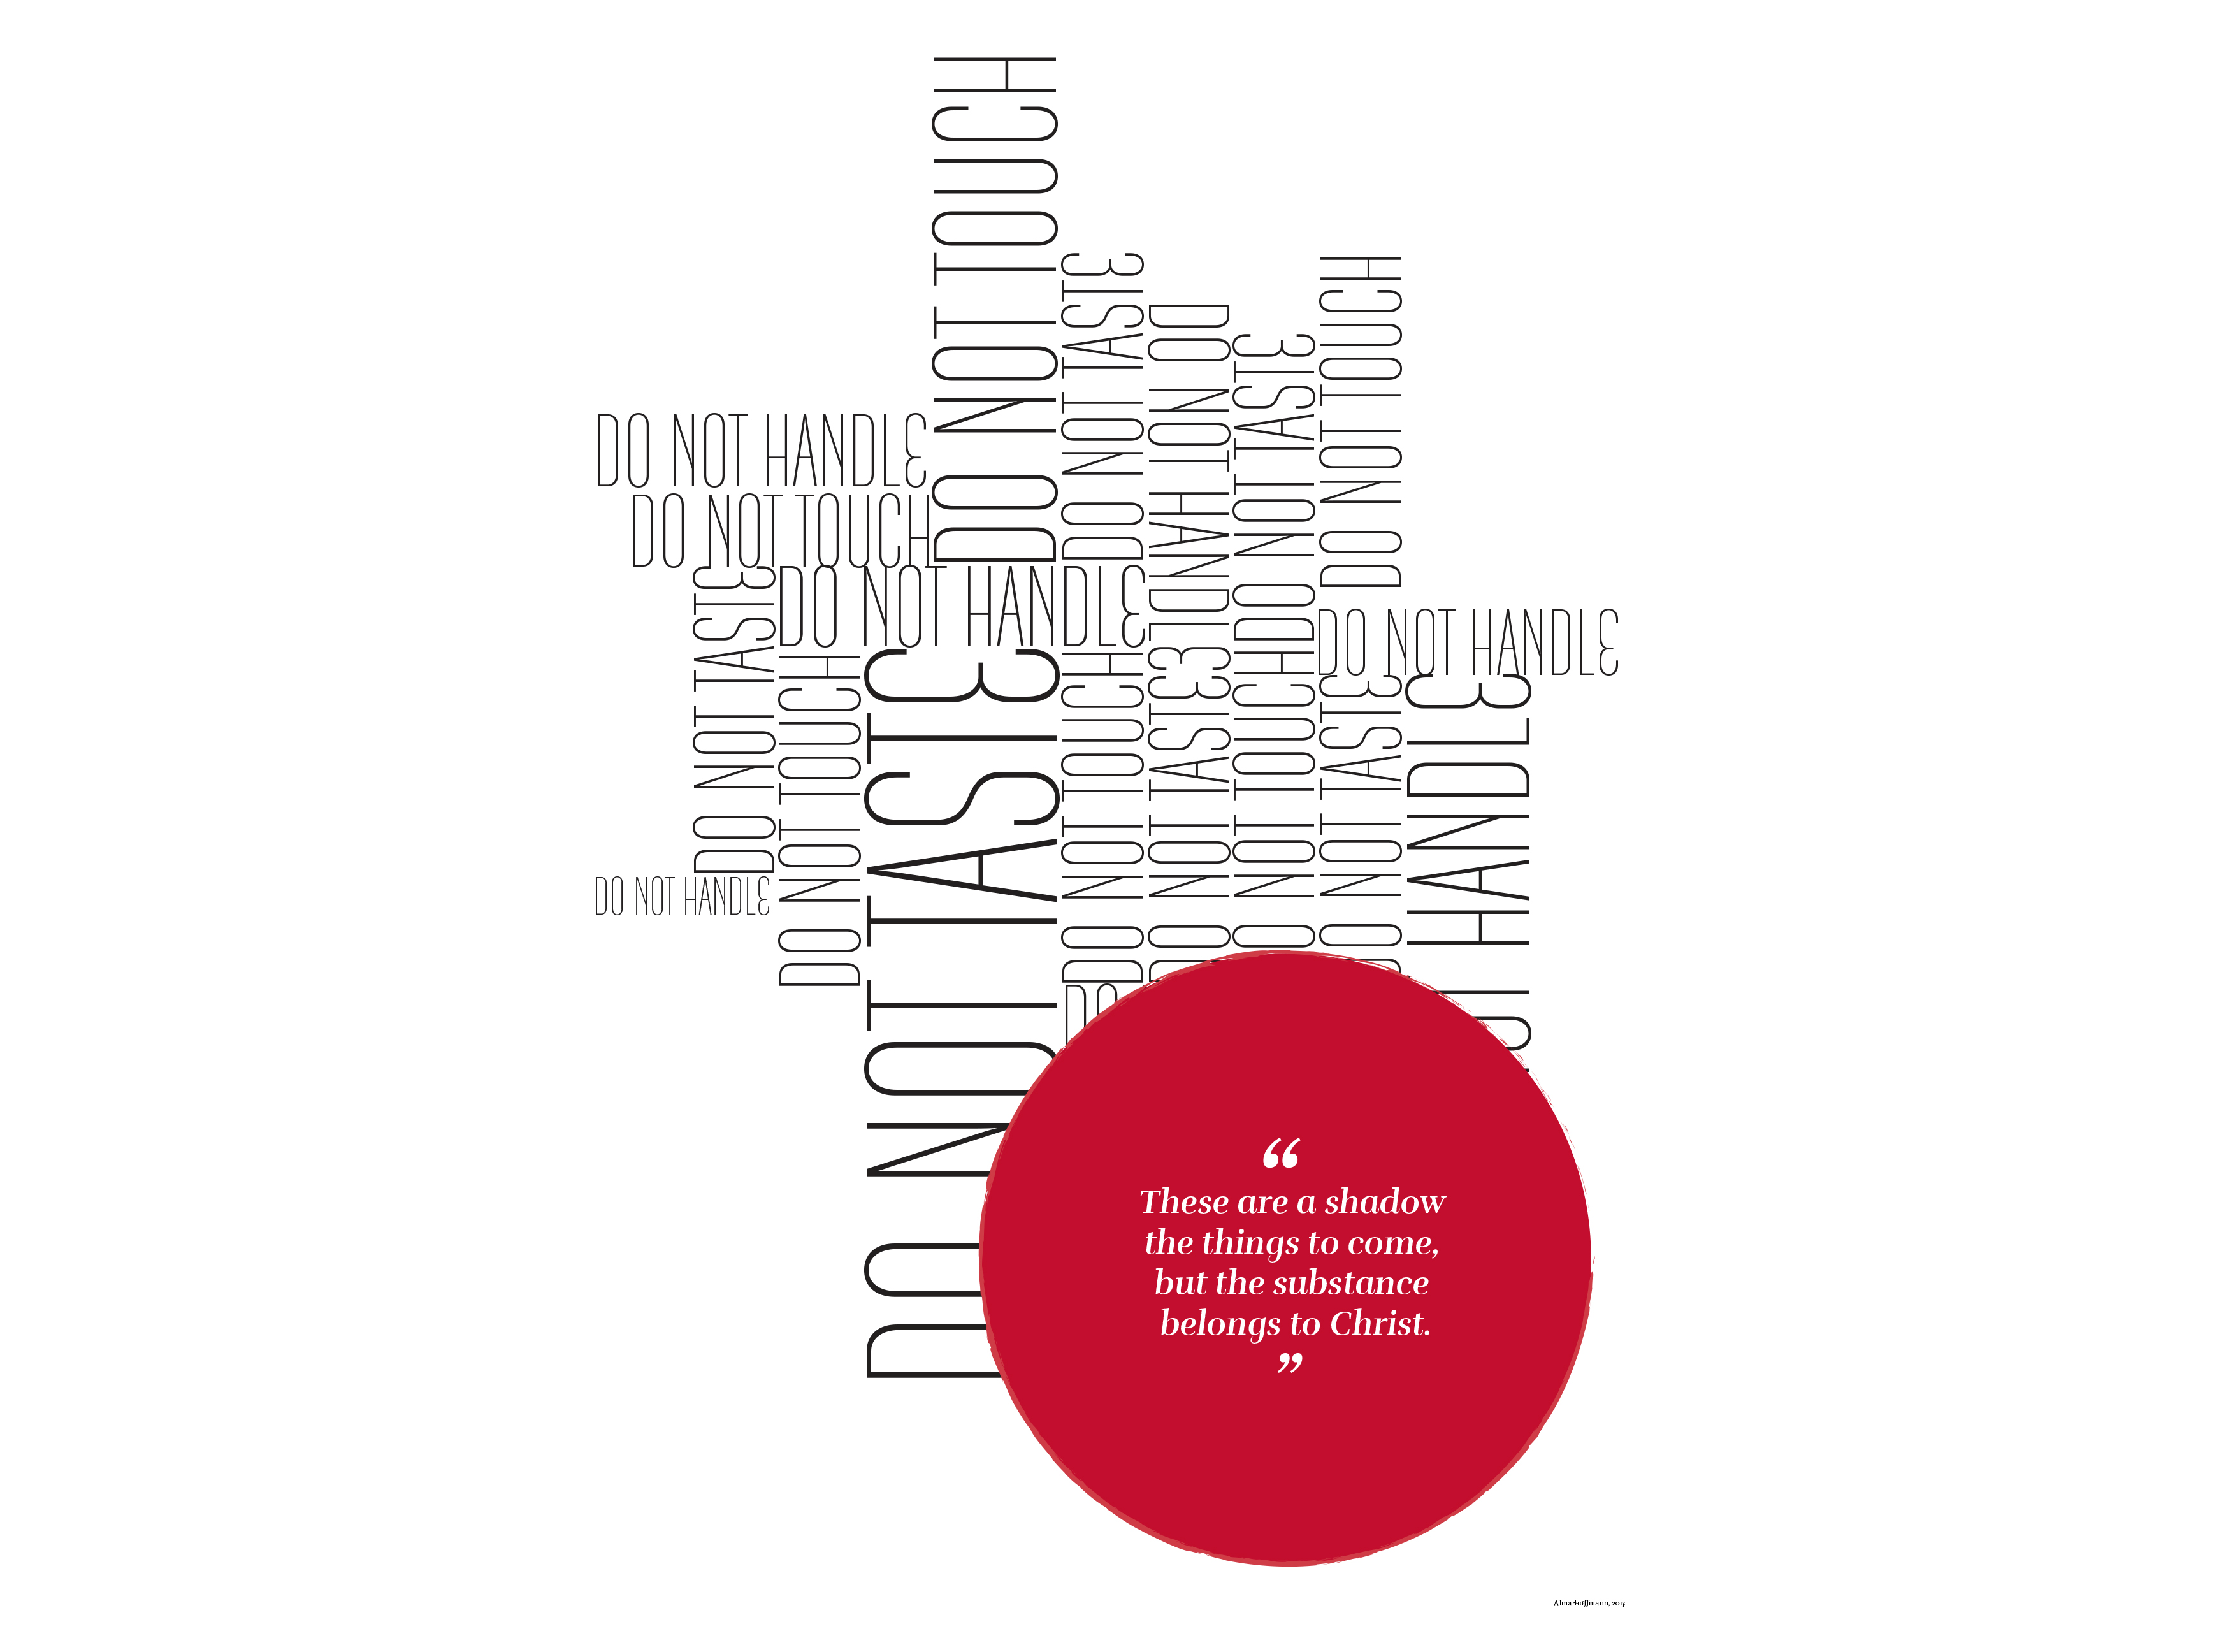
The above example was designed to undermine the sometimes unnecessary rules and regulations that we find in places of worship. The point is not to follow all the rules but rather to focus on the object of affection. Here, a visual point is made to emphasize the conceptual point:
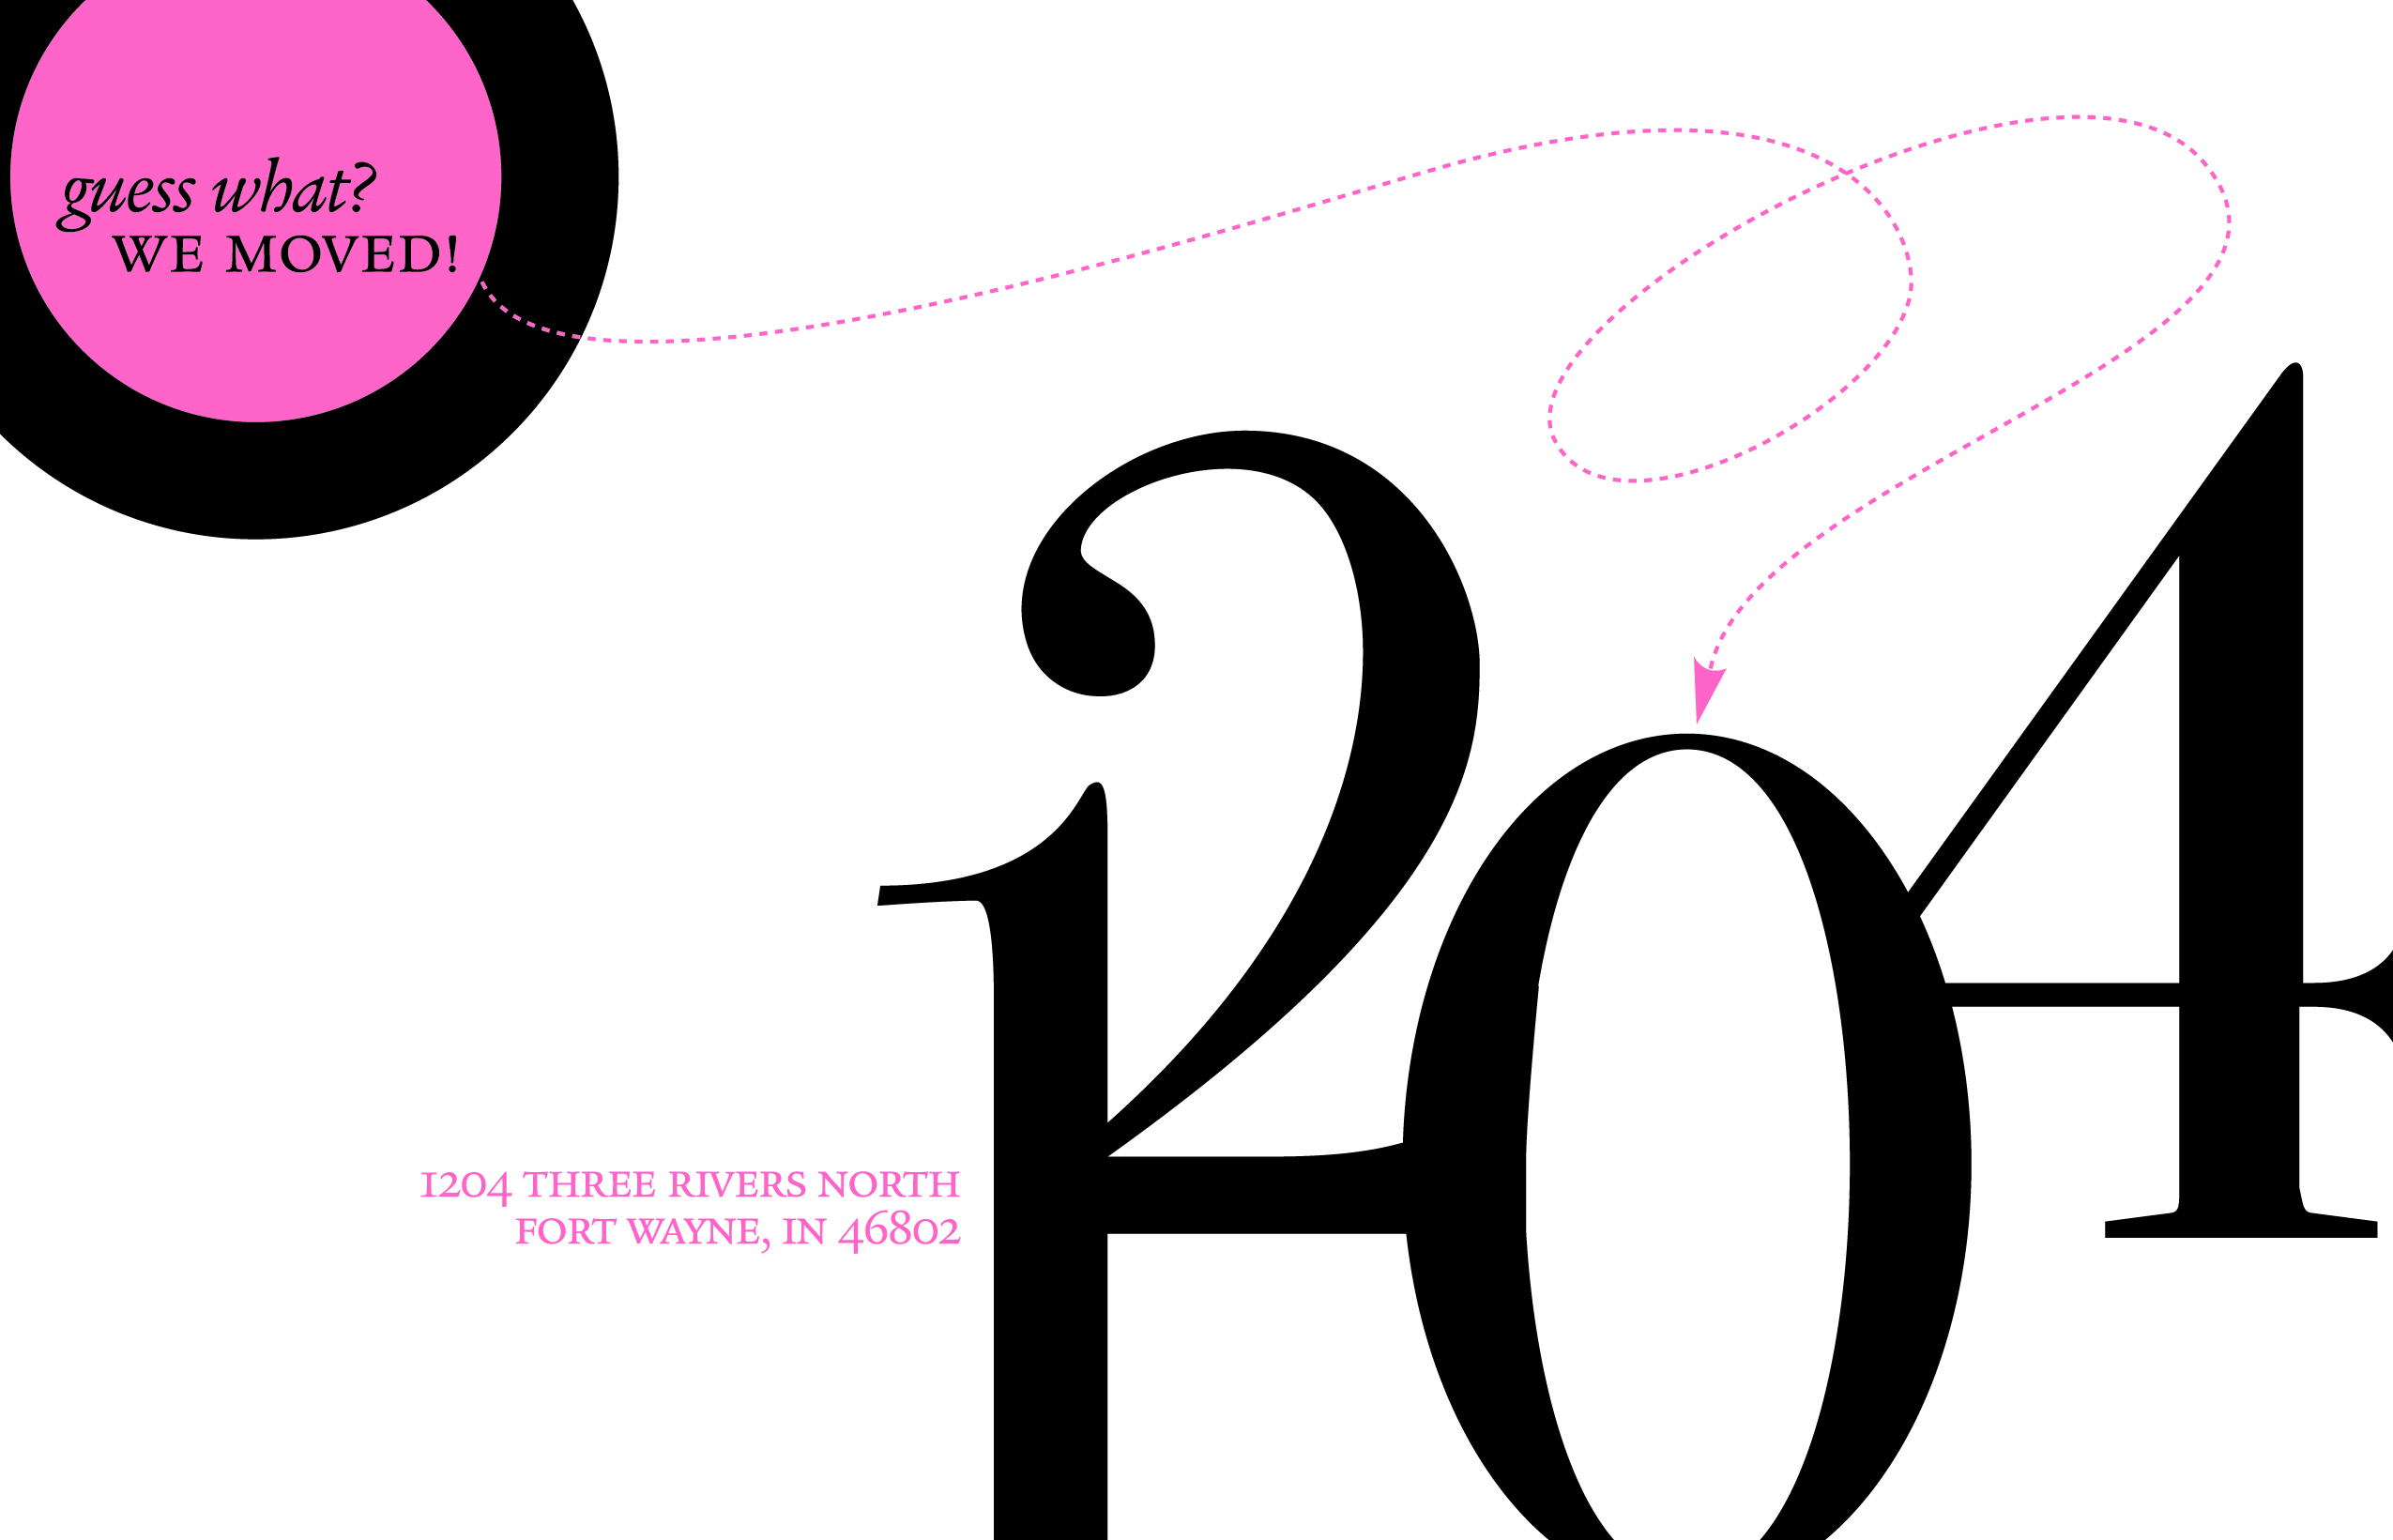
Circles are a great way to call attention to something. And so are the dotted lines. In this example, the dotted and playful line is colored in the same color as the circle on the top left. It points to the new number in the address aligned or set on the imaginary line the base of the number 2 provides. The rest of the address is provided following the same color palette. It creates a type of triangular movement from the top left to the middle right to the bottom left. Notice the sizes too. The numbers are the largest item on the card. There is a nice relationship between the numbers and the top left circle.
In addition to the items we have added to our summary, we can add the following:
- We can and should use visual punctuation to enhance the meaning, the concept, or the message.
- We can use only one color and one shape.
- We can also use more than one color to create a hierarchy.
Now that we have discussed all the variables, it would be a good idea to see them all used together.
All Variables In Examples
We have discussed the variables of proximity, weight, size, size and weight, color, and visual punctuation. Take a look at the following examples and see how many you can identify:

Like these, we can find more examples of the variables used together. In fact, they are used and applied so ubiquitously that we don’t really see them independently from each other. When starting out with typography, it is a good idea to isolate what we see. This is true for any discipline: isolate and then combine them. Learn each one well and then start adding and mixing.
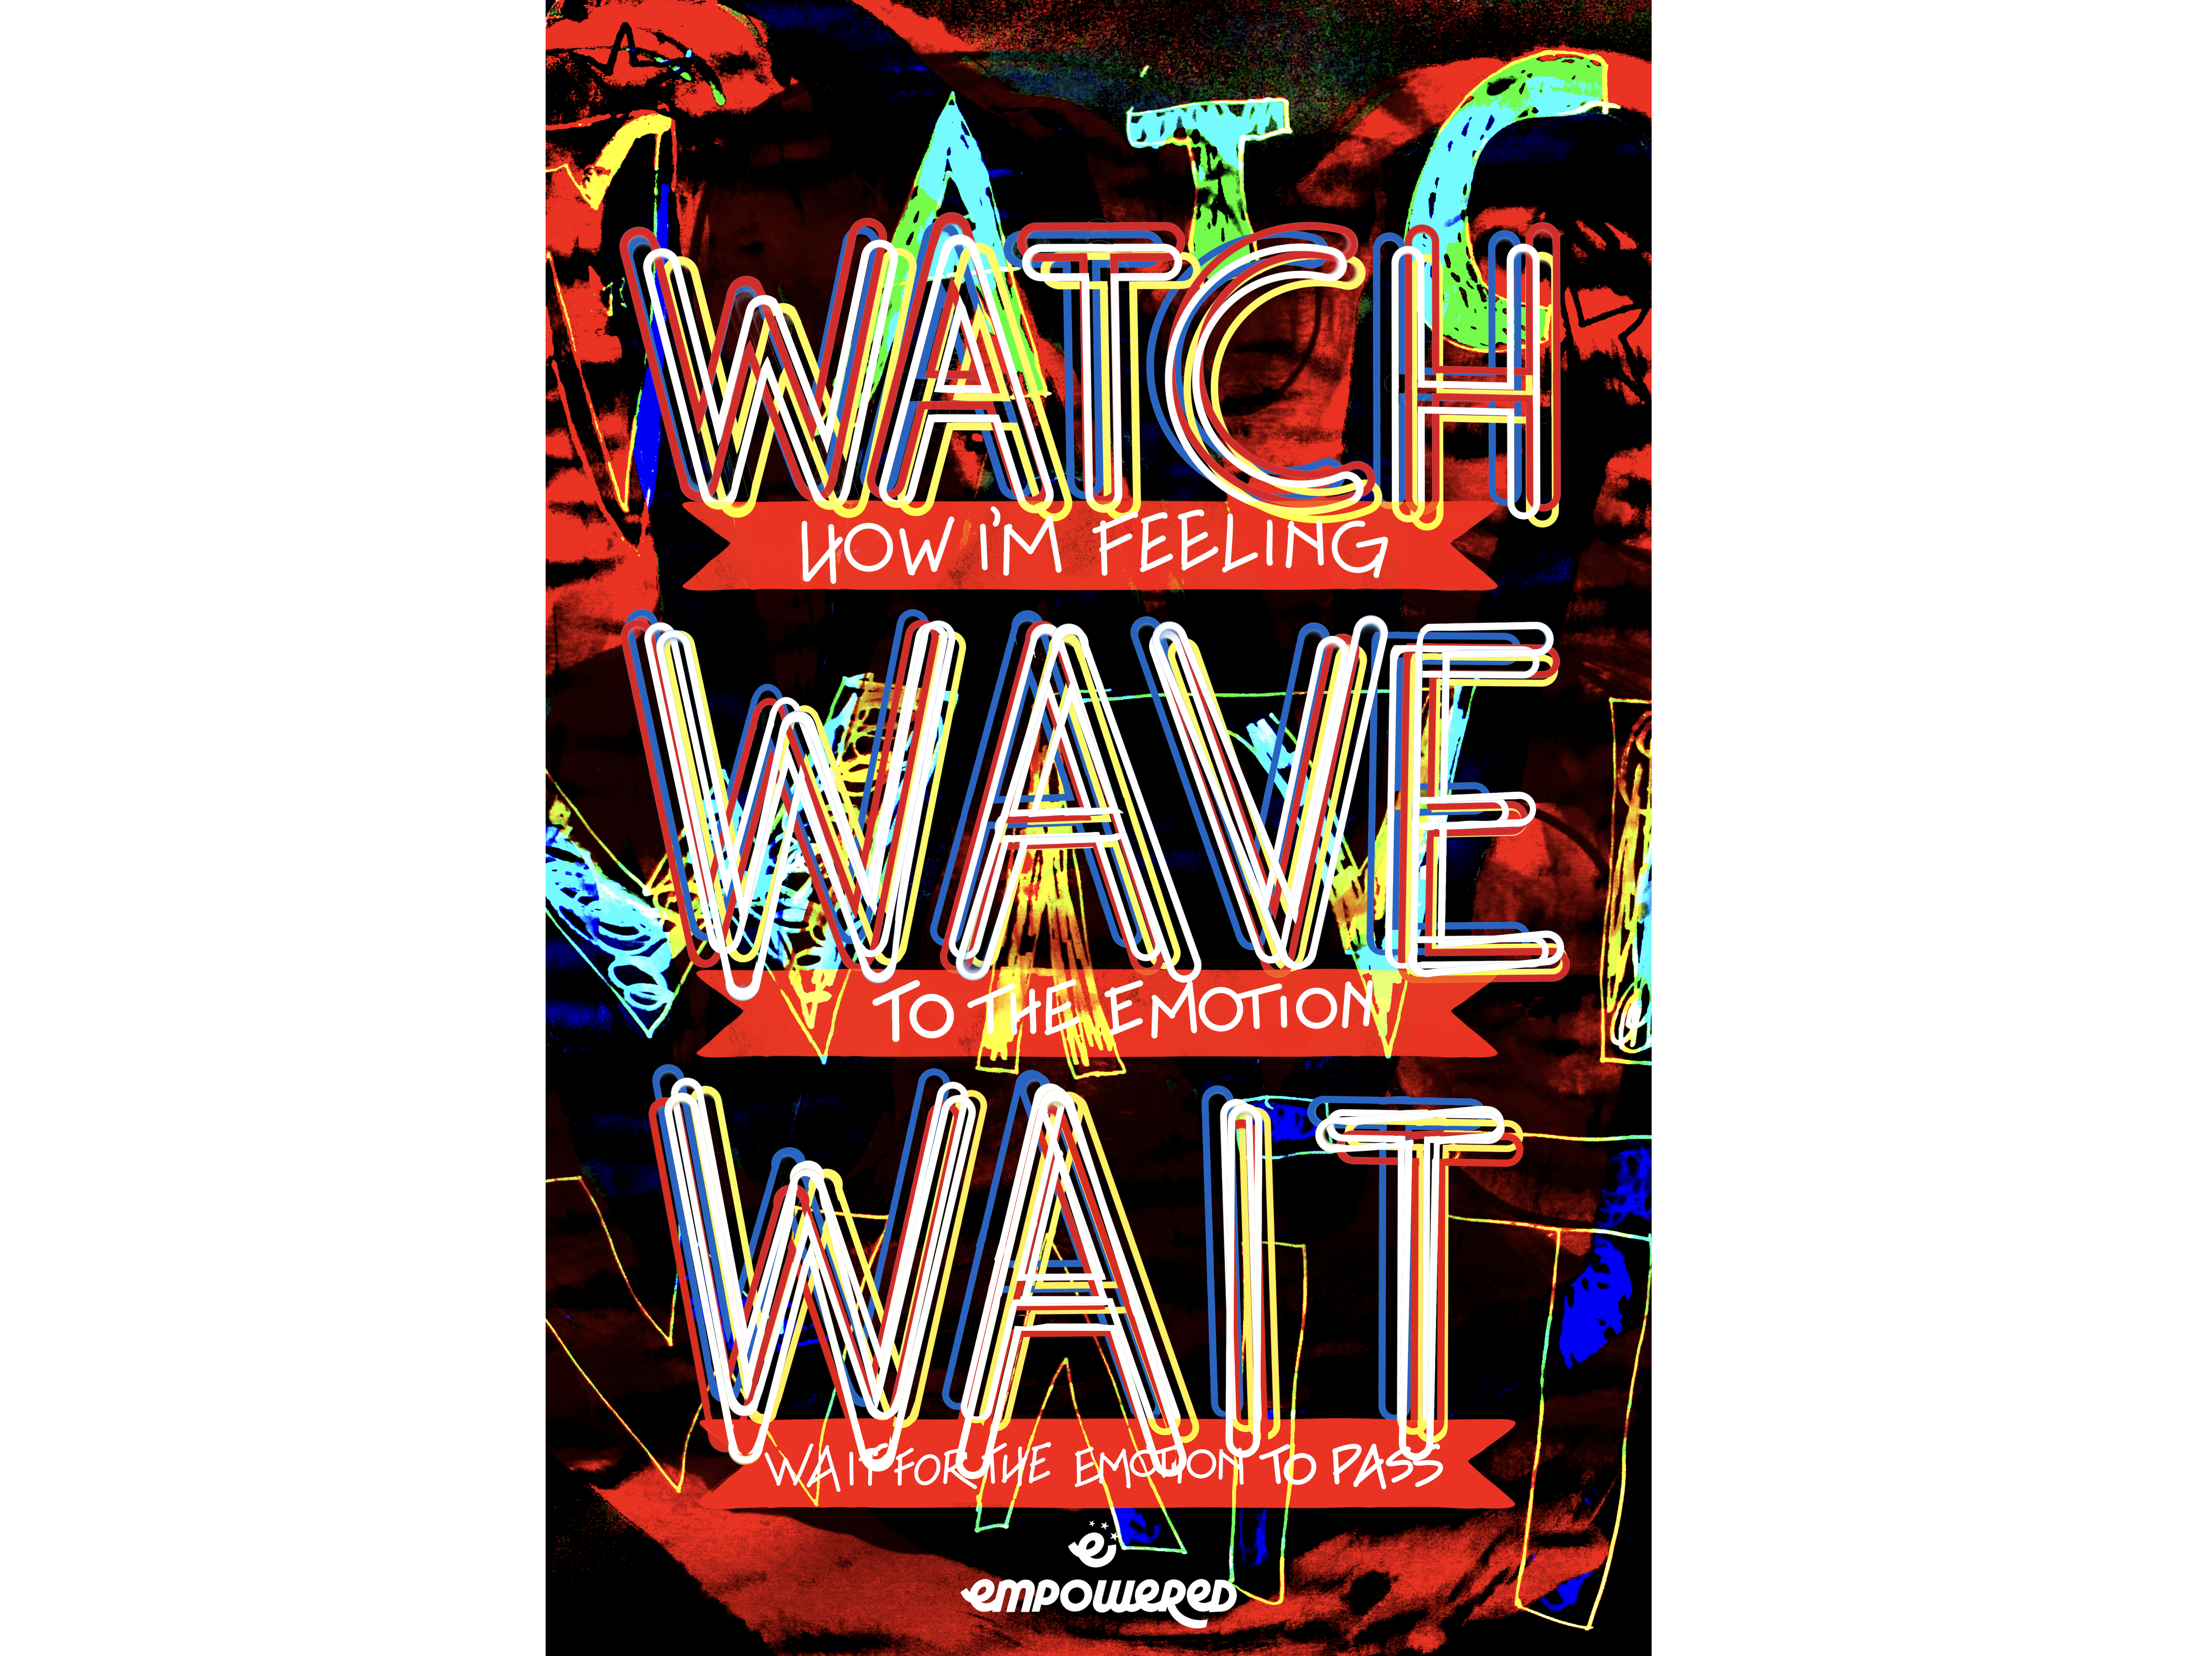
The poster below was designed for a youth program called Empowered. It was a research-based project led by Dr. Krista Mehari with the goal of empowering marginalized young teens to make effective and productive decisions. When she asked me to work with them, we had several brainstorming sessions. The Watch, Wave, and Wait is a poster intended to help the kids memorialize the process of dealing with emotions. In this poster, I broke some rules. While still sticking to the three sizes rule, I managed to create a pattern using repetition of the outline words mimicking the internal thought process we engage in when upset: calm down, calm down, or counting or something similar.
Your Turn!
At this point, after reading this article, you might want to give this process a try. If so, I have prepared a simple table for you to use. Below are some instructions:
- Pick content that isn’t too long. For example, a two-page editorial would be too long. But a set of ten-step instructions would be better suited. An excerpt from an essay would be good too.
- Do not use letter-size pages. Think smaller: eight inches by eight inches format would be best. We do this to focus on the content and not feel strange if the page does not look “full.” Your sketches, which should be small, will also be square.
- Always do your sketches. Always do sketches first. It is the best way to literally think outside the box since you are outside the box, that is, the computer. Do as many sketches as you can think.
- For each of the variables, sketch several. Maybe think of four options for each.
- Then, take the best two or three for each variable and put them on the computer.
- When you print, and you should always print to “see” how the proportions are working, use crop marks to cut the page.
- Once you have printed them, tape them to a wall away from you. But tape them upside down. It is the best way to assess proportions, space, hierarchy, balance, tension, and so on.
- After you do this, revise them on the computer, print them again, and tape them upside down again.
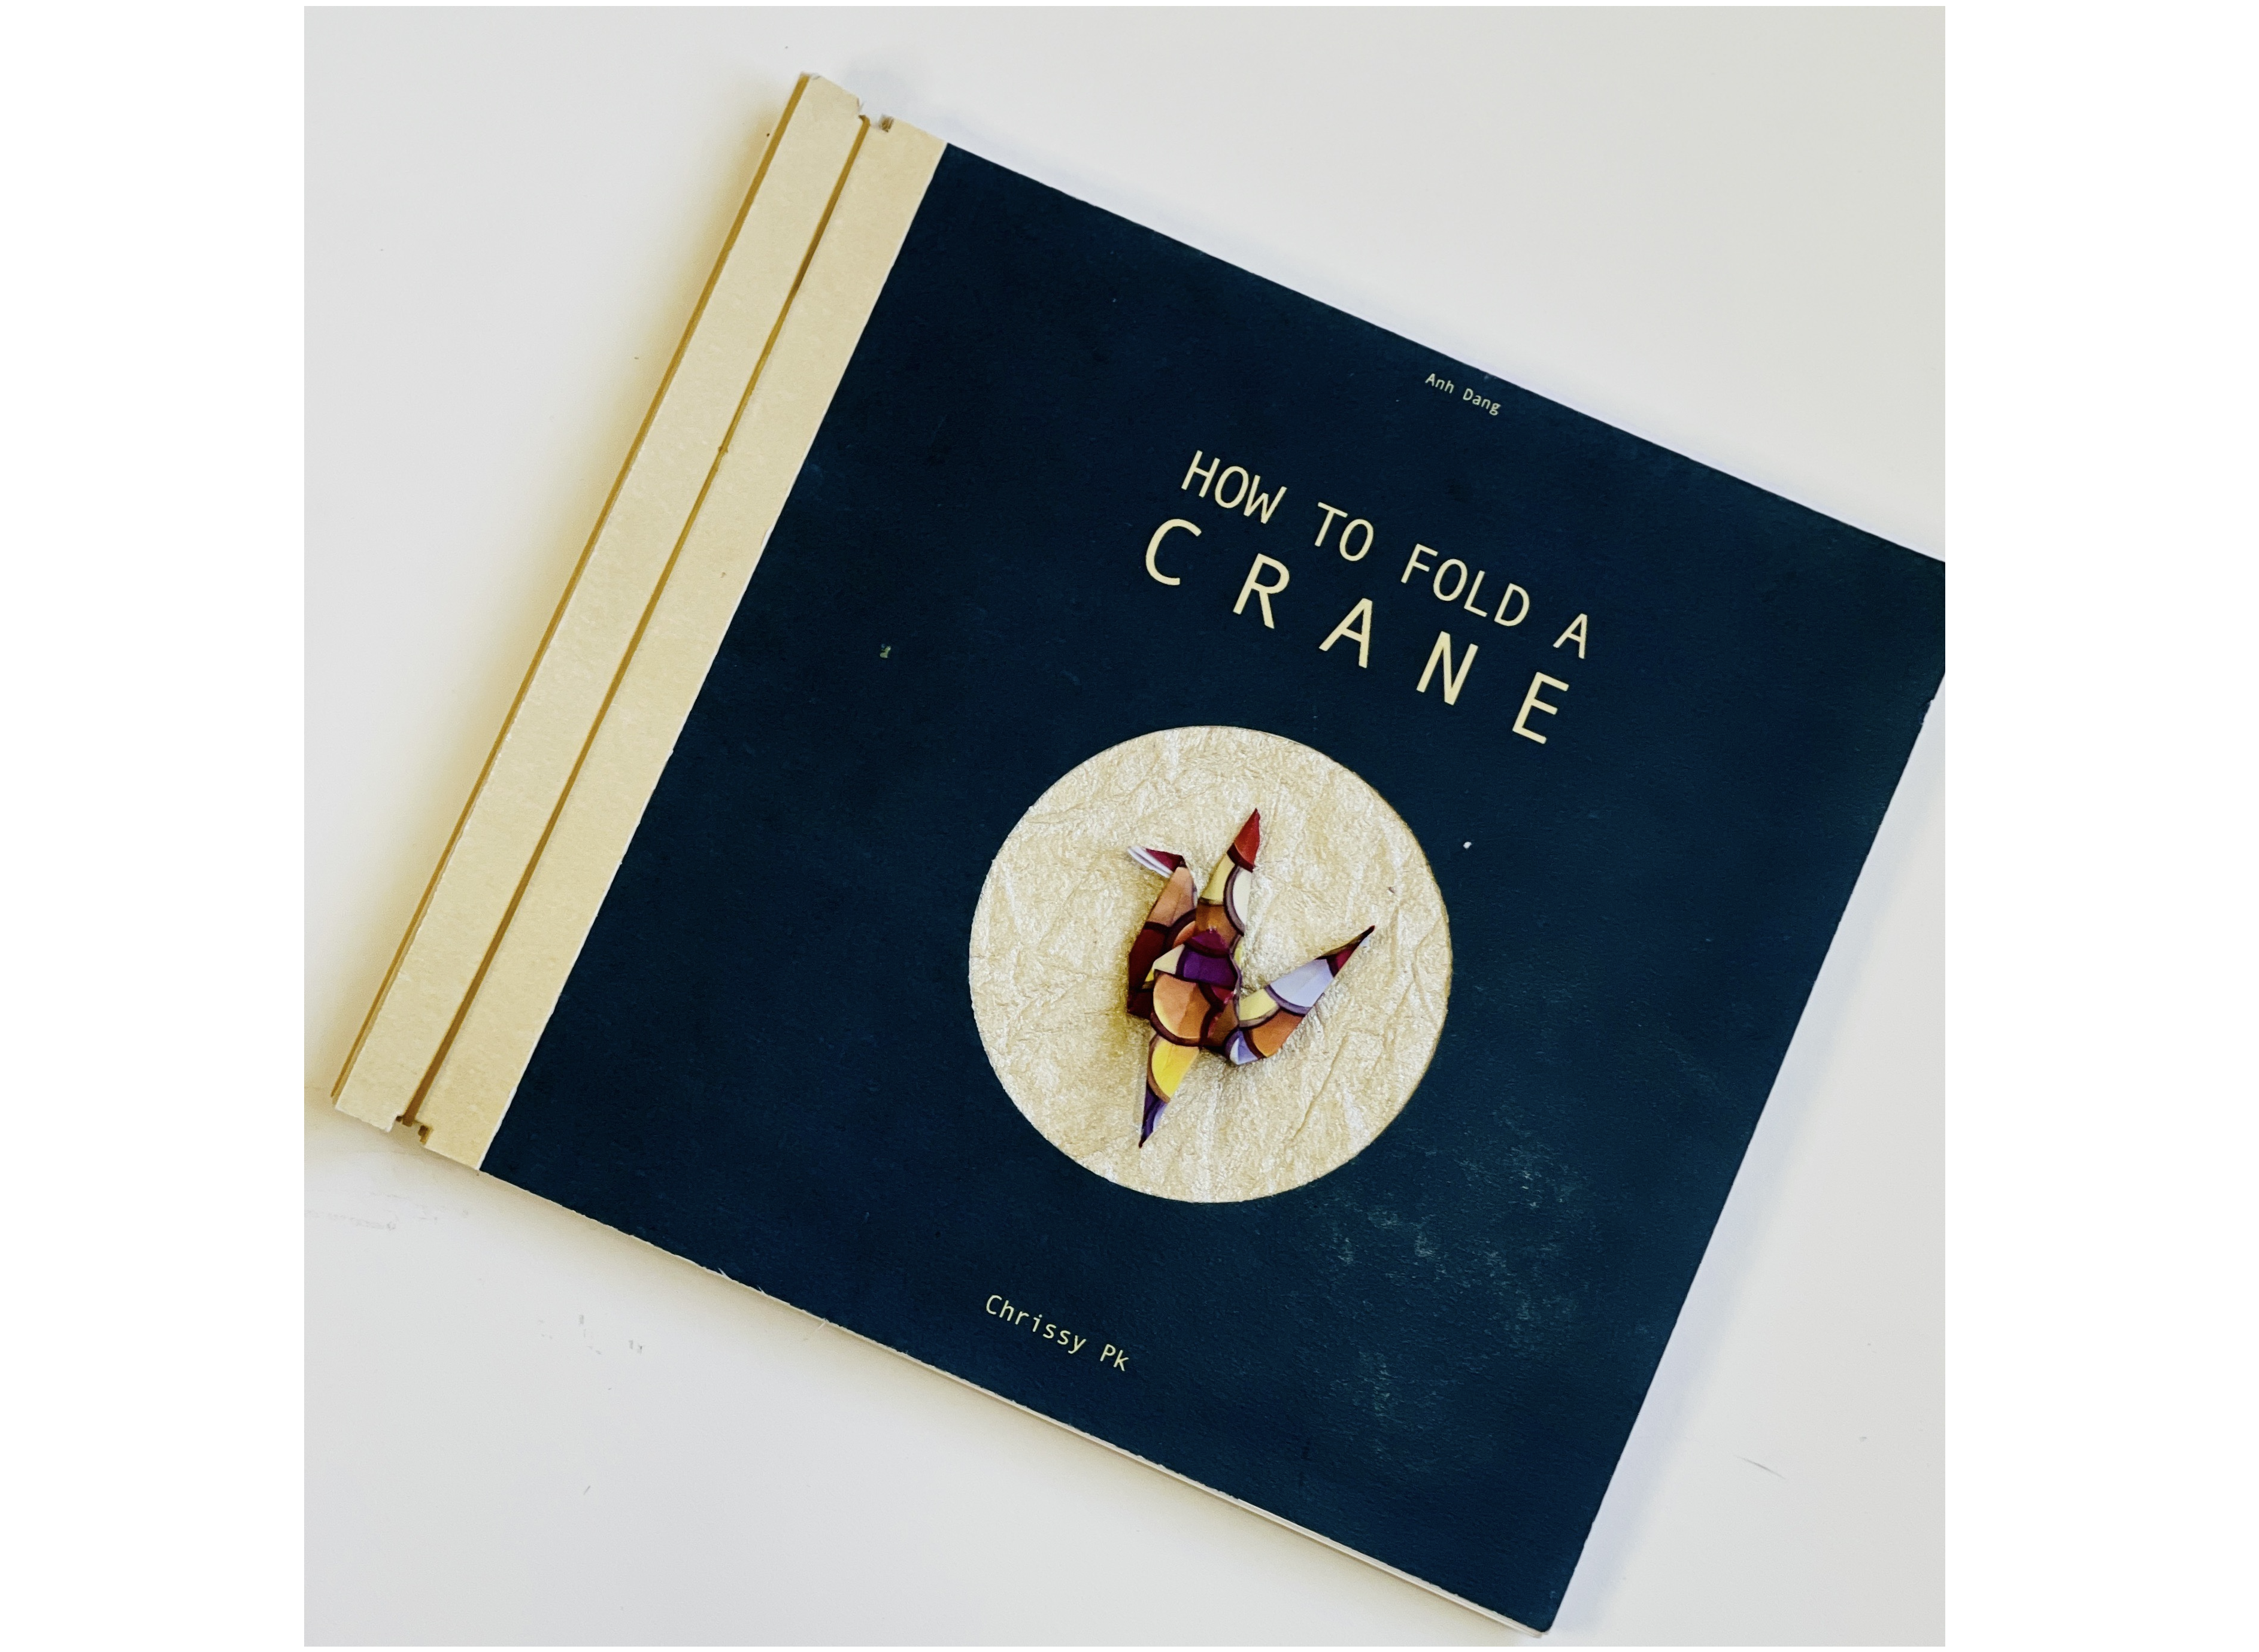
- Once you are certain you have attained a good typographic hierarchy, you can make a small booklet out of them. Below you can see the booklet my former student Anh Dang did for her project, How to Fold a Crane. Or you can create a virtual flipbook showing your masterpieces!
And you needn’t stop there. As you get comfortable with the process, perhaps you want to try designing a poster. Or tackle that two-page editorial layout? Give it a try!
Conclusion
So far, we have seen how these six variables can powerfully transform the content in any format. It is all about how creative we are about organizing things within the parameters. After all, that is what design is about — creative solutions within a set of parameters. The more you practice, the better you get at something, right?
This old adage has proven itself to be true consistently. It applies to typography and anything design. Fine-tuning our senses comes with exposure and repetition. Take any opportunity to design and establish a hierarchy. Even small things like a business card can look incredible when you add a contrast of space, weight, size, size and weight, color, and visual punctuation. If we think about it, we are exposed to these variables daily and constantly. We just don’t look at them as isolated variables that can affect the entire composition. But they do. And once we know how to use them, we can push the boundaries and create pieces with more impact and intention.
Below I am listing resources to look at for more inspiration.
Resources
- Freebie to help you experiment (see below)
- I Love Typography
- I have a very healthy and juicy Pinterest board on all things typography
- Typotheque
- Carnegie Mellon Swiss Posters Collection
- “The Elements of Typographic Style Applied to the Web,” a practical guide to web typography
- Web Design Experiments, Jen Simmons
- Typography 101
- “How to Structure an Effective Typographic Hierarchy,” Cameron Chapman
- “Typographic Hierarchy,” Ilene Strizver


