Delightful UI Animations With Shared Element Transitions API (Part 2)

Email Newsletter
Weekly tips on front-end & UX.
Trusted by 182,000+ folks.
 Celebrating 10 million developers


 Custom Web Forms for Angular, React, & Vue. Your backend.
In the first part of this article, we covered Shared Element Transitions API (SET API) and how we can use it to effortlessly create complex transitions for various UI elements, which would usually require a lot of JavaScript code or an animation library to achieve.
But what about smooth and delightful transition animations between individual pages? This is probably one of the most often requested features in the past few years because even with all the frameworks like React and Svelte and animation libraries like GSAP and Framer Motion, transitions between pages are still really difficult to do.
In this article, we’re going to showcase same-document page transitions commonly found in Single Page Applications and talk about the future of the Shared Element Transitions API for cross-document (Multi Page Application) transitions. I’ll also showcase some awesome React, Astro, and Svelte implementation examples from the dev community.
Note: Shared Element Transitions API is currently supported only in Chrome version 104+ and Canary with the document-transition flag enabled. Examples will be accompanied by a video, so you can easily follow along with the article if you don’t have the required browser installed.
In case you haven’t checked out my previous article on the topic, here is a quick rundown of this exciting new API so you can follow along with the article.
Shared Element Transitions API
With Shared Element Transitions API, the browser does a lot of heavy lifting when it comes to animations allowing us to create complex UI animations in a more streamlined way. The main part of the API is a JavaScript function that takes screenshots of the UI state before and after the DOM update and apples a crossfade animation:
const moveTransition = document.createDocumentTransition();
await moveTransition.start(() => {
  /* Take screenshot of an outgoing state */
  /* Update the DOM - move item from one container to another */
  targetContainer.append(activeItem);
  /* Take screenshot of an incoming state and crossfade the states */
});
Just by calling the start function, we get a neat and simple crossfade animation between the outgoing and incoming states.
Next, we want to tell the SET API to pay attention to certain UI elements on the page and watch for its position and dimensions. This is where CSS page-transition-tag comes in. This tag must be applied to a single element on a page while the transition function is running; otherwise, the transition won’t work as these tags must be unique (think of them like an id attribute in HTML). Multiple elements can each have a unique tag set during the transition. We also need to apply a contain property to that element:
.active-item {
  page-transition-tag: active-item;
  contain: paint;  /* can also be contain: layout */
}
Now, the browser treats this element as a “shared element” between the outgoing and incoming state change. Other elements still have the crossfade animation applied to their outgoing and incoming states.
And finally, we can use CSS animation properties to change how these animations behave by using the new pseudo-elements (I covered them in more detail in my previous article). We can assign custom keyframes and change any other animation property like duration, delay, timing function, and create spectacular state transitions.
::page-transition-container(active-item) {
  animation-duration: 0.3s;
}

::page-transition-image-wrapper(active-item) {
   animation: popIn 0.3s cubic-bezier(0.64, 0.57, 0.67, 2) 0.1s;
}

@keyframes popIn {
  from {
    transform: scale(1.3);
  }
  to {
    transform: scale(1);
  }
}
Page Transitions
Now that we’re all caught up with the basics let’s move on to creating page transition animations using the API. We’re going to cover Single Page Applications (SPA) and Multi Page Applications (MPA) use cases.
At the time of writing this article, only Single Page Application (SPA) solution is supported, so we can use progressive enhancement to add it to our React, Vue, and other frameworks. Support for Multi Page Application (MPA), which is the default behavior, is still in development. However, we’ll still cover how the MPA solution might work based on the specification rough draft.
The reason why the Chrome team started with SPA implementation first is the simplicity — SPAs don’t reload on navigation change, it’s easier to keep track of shared elements in DOM, there are no additional styles that might get loaded by navigating to a page with different head config, and so on. As a result of these different use cases, we’ll probably end up with separate implementations of the API for SPAs and MPAs with different functions and restrictions.
We’ll start with same-document page (SPA) transitions with Shared Element Transitions API by building a simple vinyl showcase app (source code of the finished example) consisting of two types of pages:
- Item list page: on homepage URL;
- Item details page: on the subpage with a unique id (
/item/unique-id/).
We’ll use an elaborate animation only when navigating to the item details page and use a quick and elegant crossfade when navigating back to the item list page. The elaborate transition is a cool-looking animation, but we don’t want to overuse it and want to perform the backward navigation a bit quicker. And as a bonus, we’ll use a nice reveal animation for the vinyl once the page transition has finished using regular CSS animation properties.
Project Setup
I want to showcase vanilla JavaScript and CSS implementation so that you can apply it to your tech stack, but I don’t want to end up with a complex and convoluted codebase. That’s why I chose the superb Eleventy static page generator to easily generate multiple pages from templates and markdown data files. If you are unfamiliar with Eleventy, don’t worry, I’ll use the compiled HTML and CSS code in examples, so you’ll be able to follow along.
Let’s check out the HTML for our card element. Once Eleventy generates HTML from the template with the data from our markdown files, we get the following markup:
<!-- Item grid element on the listing page (homepage) -->
<a href="/item/sorcerer-crowning-of-the-fire-king/" class="card">
  <figure class="card__figure">
    <picture>
     <!-- Prefer AVIF images -->
      <source type="image/avif" srcset="..." />
     <!-- PNG fallback -->
      <img alt="LP sleeve cover" class="card__image" src="..." />
    </picture>
    <figcaption class="card__content">
      <h2 class="card__title">Crowning Of The Fire King</h2>
      <h3 class="card__subtitle">Sorcerer</h3>
    </figcaption>
  </figure>
</a>
But wait, isn’t this an MPA, and didn’t we just say that it’s not currently supported? Well, we’ll turn it into a SPA. I grabbed these handy utility functions from Jake Archibald’s example to simulate the SPA behavior using the Navigation API and adapted them for this example:
async function getPageContent(url) {
    // This is a really scrappy way to do this.
    //Don’t do this in production!
    const response = await fetch(url);
    const text = await response.text();
    // Particularly as it uses regexp
    return /<body[^>]*>([\w\W]*)<\/body>/.exec(text)[1];
}

// Intercept navigations.
// This is a naive usage of the navigation API, to keep things simple
async function onLinkNavigate(callback) {
    // Fallback to regular navigation if API is not supported.
    if (!document.createDocumentTransition) return;

    navigation.addEventListener("navigate", (event) => {
        const toUrl = new URL(event.destination.url);
        if (location.origin !== toUrl.origin) return;
        const handler = function () {
            return callback({
                toPath: toUrl.pathname
            });
        };
        // New syntax (Chrome Canary version 105+)
        if (event.intercept) {
            event.intercept({
                handler,
            });
        } else {
            // Deprecated (will be removed in later versions).
            event.transitionWhile(handler());
        }
    });
}

// Setup the listener on page load.
onLinkNavigate(async ({ toPath }) => {
    const content = await getPageContent(toPath);
    // Scroll back to the top.
    window.scrollTo({ left: 0, top: 0 });
    // Update page content.
    document.body.innerHTML = content;
});

As you can see, we can still navigate between the pages; DOM is updated with the new content, and the URL in the browser changes. We are intercepting the browser’s default navigation behavior and handling the page loading and DOM updates all by ourselves while we remain on the same page.
We got to a starting point that can be found in most JavaScript frameworks, for example, React with react-router-dom (or any other similar router) or SvelteKit with its built-in routing.
We also have a neat CSS animation of the vinyl gatefold sleeve opening and vinyl rolling out when we open the item details page. We need these elements to be hidden during the page transition, so we are toggling the opacity (but not animating it) right after the page transition completes:
.product__media::before {
    content: "";
    opacity: 0;
    transform: rotateZ(0);
    transform-origin: bottom left;
    animation: open 0.25s 0.5s ease-out forwards;
    /* ... */
}
.product__image--deco {
    opacity: 0;
    position: absolute;
    transform: translateX(0) translateY(-50%) rotateZ(0deg);
    animation: rollOut 0.7s 0.6s ease-out forwards;
    /* ... */
}


@keyframes rollOut {
    from {
        opacity: 1;
        transform: translateX(0) translateY(-50%) rotateZ(-45deg);
    }
    to {
        opacity: 1;
        transform: translateX(55%) translateY(-50%) rotateZ(18deg);
    }
}

@keyframes open {
    from {
        opacity: 1;
        transform: rotateZ(0);
    }
    to {
        opacity: 1;
        transform: rotateZ(-1.7deg);
    }
}
Adding A Simple Crossfade Transition
Now that we are hooked into browser navigation and DOM updates, we need to run the Shared Element Transitions API start function and pass a callback function that updates the DOM with new content:
onLinkNavigate(async ({ toPath }) => {
    const content = await getPageContent(toPath);
    const transition = document.createDocumentTransition();

    transition.start(() => {
        window.scrollTo({ left: 0, top: 0 });
        document.body.innerHTML = content;
    });
});
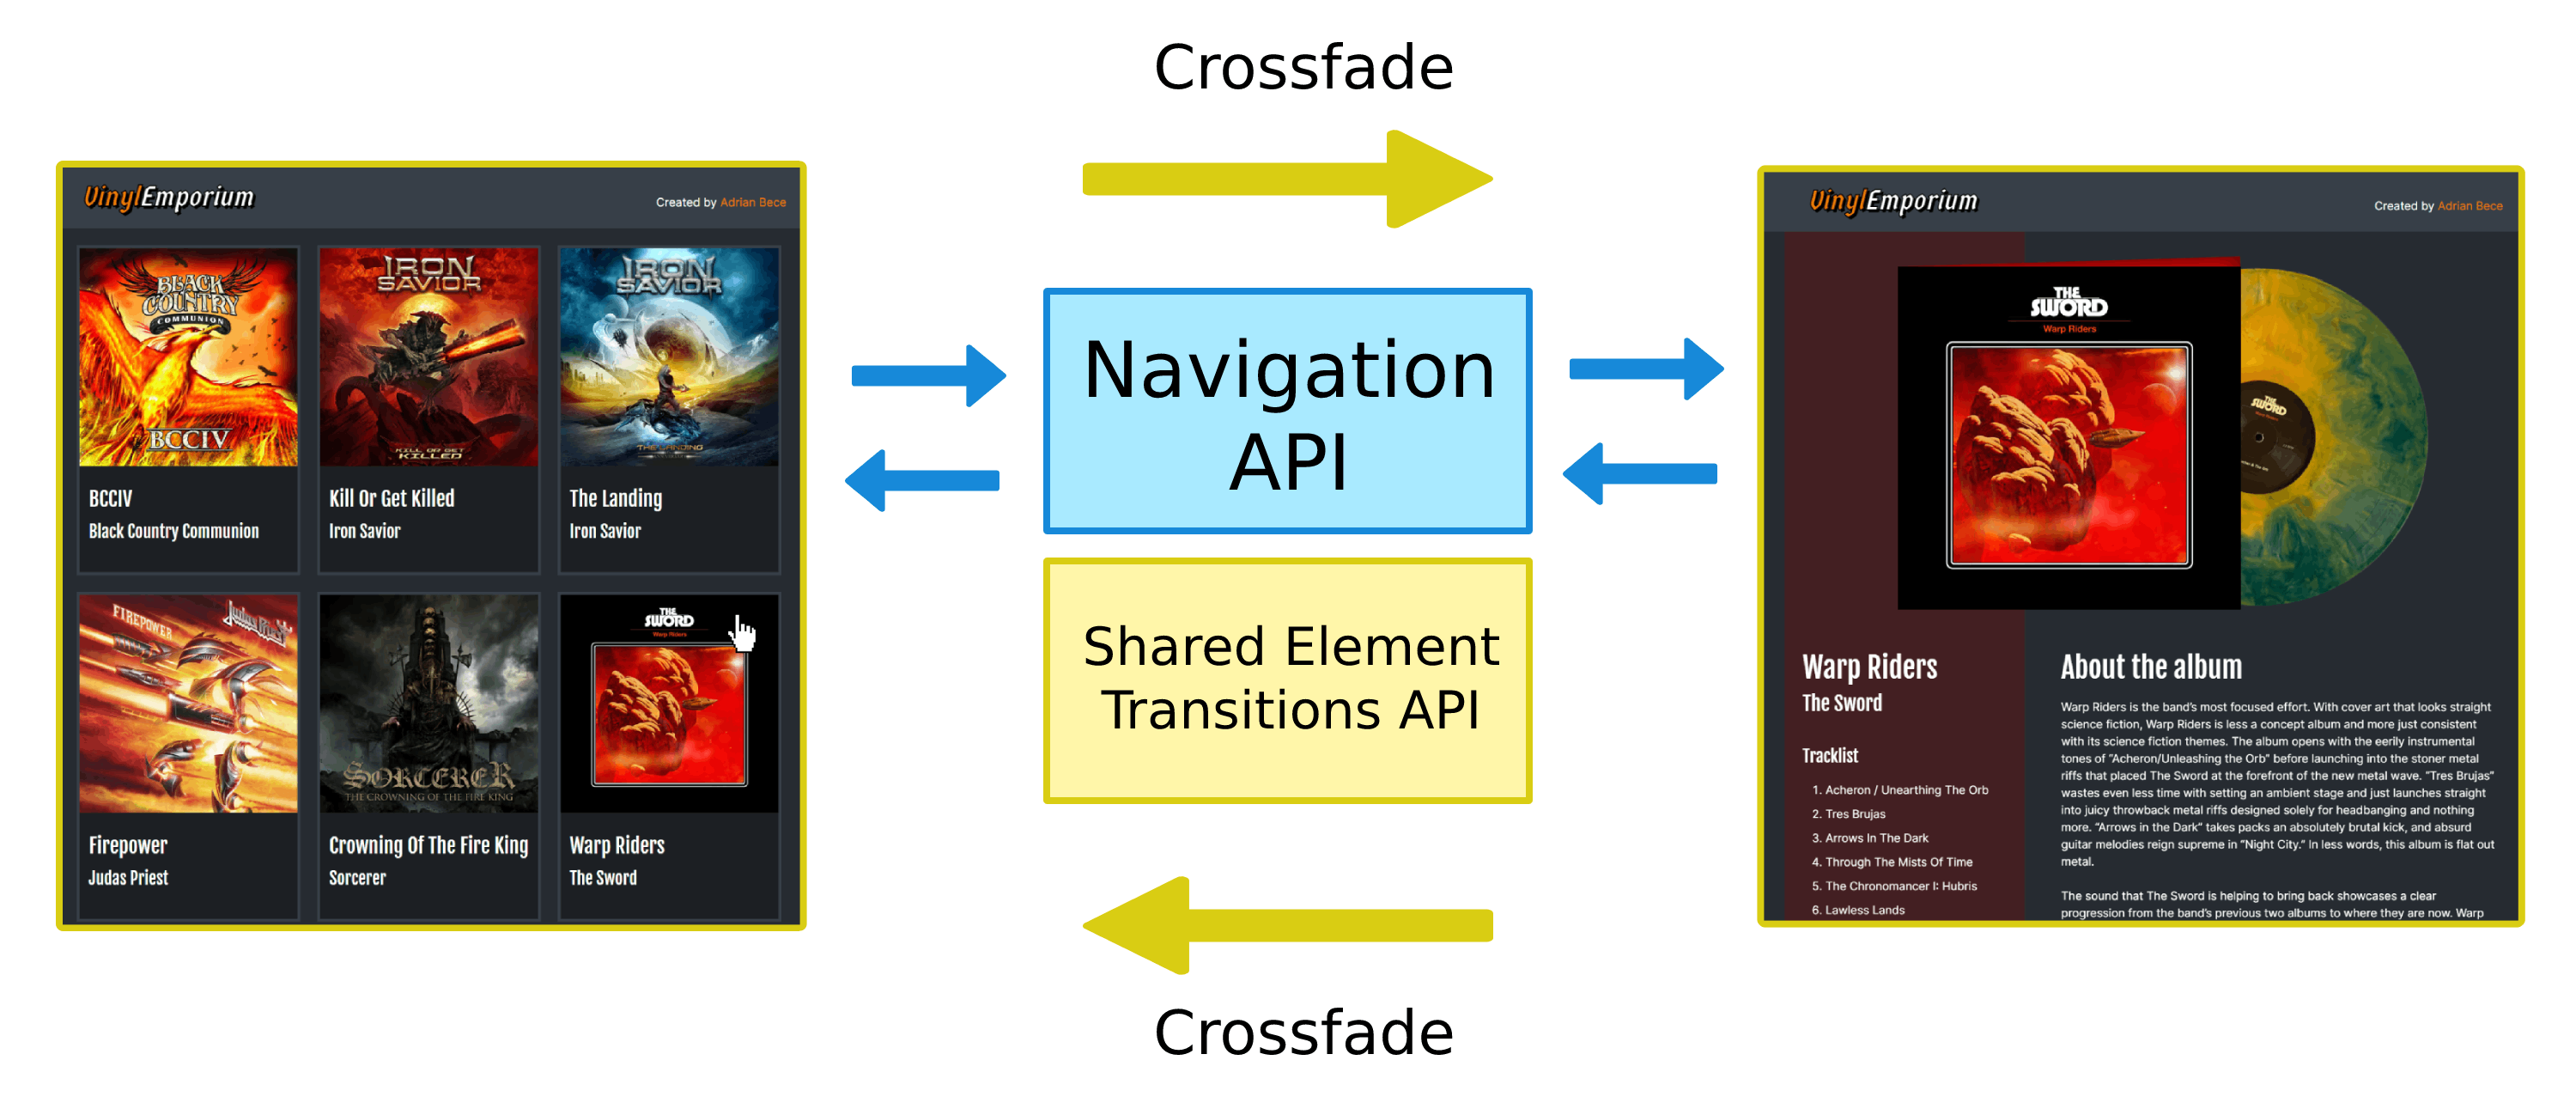
By just passing the DOM update function as a callback to the SET API start function, we get a neat crossfade transition between pages right out of the box!
Adding Shared Page Elements
Now, here is the tricky part. We need to apply a page-transition-tag CSS attribute to the image inside the link that was clicked. Remember that only a single element on a page can hold this tag during the transition. You might be thinking that we just use a click event handler, but we also need to consider forwards navigation as we still want to perform this neat transition on browser events.
Luckily, with the Navigation API, we can have access to the target URL before navigation occurs, and we can use the URL to write a query selector to target the image inside the target link:
function applyTag(url) {
    const image = document.querySelector(
        `a[href="${url.pathname}"] .card__image`
    );
    if (!image) {
        return;
    }
    image.style.pageTransitionTag = "product-image";
}
Now let’s call this function in onLinkNavigate function before we run the DOM update:
async function onLinkNavigate(callback) {
    if (!document.createDocumentTransition) return;
    navigation.addEventListener("navigate", (event) => {
        const toUrl = new URL(event.destination.url);
        if (location.origin !== toUrl.origin) return;

        // Apply the tag before updating the DOM.
        applyTag(toUrl);

        const handler = function () {
            return callback({
                toPath: toUrl.pathname,
            });
        };
        if (event.intercept) {
            event.intercept({
                handler,
            });
        } else {
            event.transitionWhile(handler());
        }
    });
}
We also need to apply the same tag on the item details page so that the browser can keep track of the shared element. This image is the only element with the product-image tag on the item details page, and we can apply it directly with CSS:
<!-- Image element on item details page -->
<article class="product__media">
        <div class="product__image">
            <picture>
              <source type="image/avif" srcset="/...">
              <img alt="LP cover artwork" class="" src="...">
            </picture>
        </div>
        <div class="product__image--deco">
            <picture>
               <source type="image/avif" srcset="...">
               <img loading="eager" decoding="sync" src="...">
            </picture>
        </div>
    </article>
.product__image {
    page-transition-tag: product-image;
}
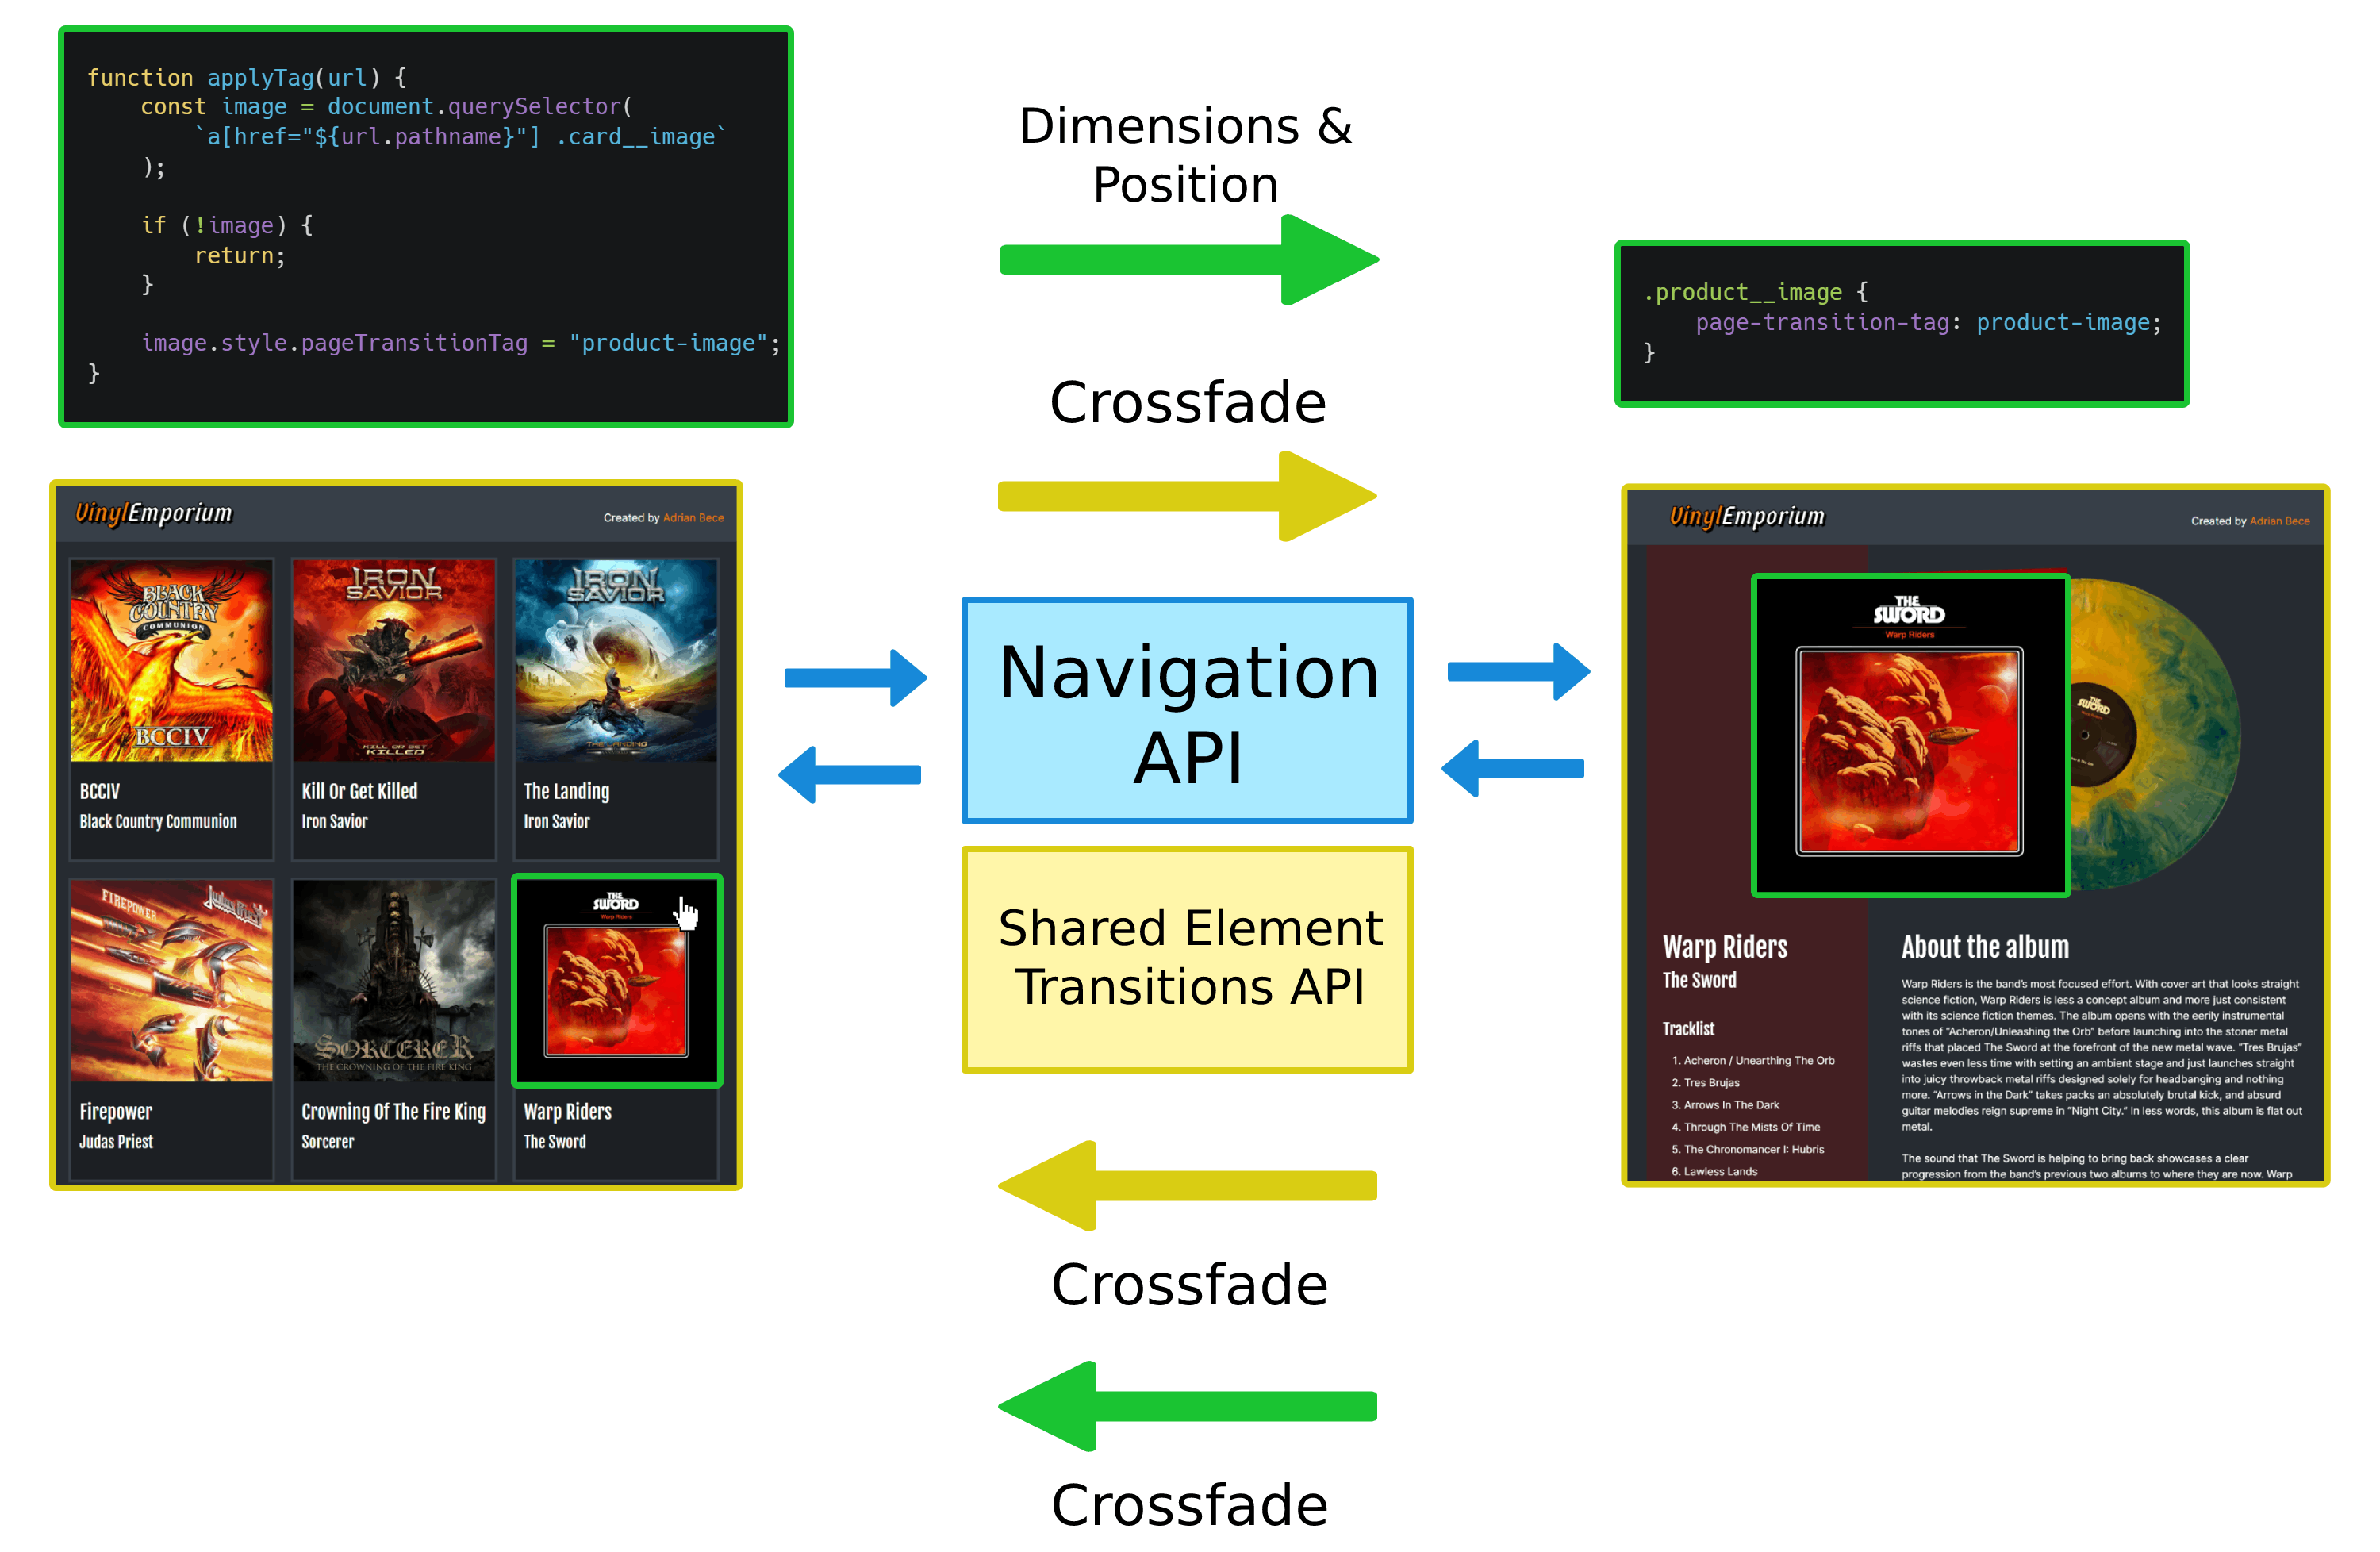
With just a few lines of CSS and JavaScript, we’ve created this beautiful transition animation. All we had to do was to identify the shared element (item image) on a clicked link using a page-transition-tag and signal the browser to keep track of its dimension and position.
We get a crossfade animation on a shared element on backward navigation for free because the selector we used document.querySelector(`a[href="${url.pathname}"] .card__image`) runs on the current page, so when we navigate back to items list page the tag doesn’t get applied and browser cannot match the shared element.
If we want to have the same animation on the shared element when navigating back to the item list page, we have to apply the tag to the correct image element in the grid after we fetch the contents of a target page.
Customizing Page-Transition Animation With CSS
Let’s use CSS animation properties to fine-tune the crossfade and item image animation. We want the crossfade animation to be quick and more subtle, and the more elaborate image animation to be more noticeable and have a nice custom easing function:
/* Speed up crossfade animations */
::page-transition-outgoing-image(*),
::page-transition-incoming-image(*) {
    animation-timing-function: ease-in-out;
    animation-duration: 0.25s;
}

/* Fine-tune shared element position and dimension animation */
::page-transition-container(product-image) {
    animation-timing-function: cubic-bezier(0.22, 1, 0.36, 1);
    animation-duration: 0.5s;
}
We also need to keep in mind that some users might prefer browsing the site without the complex animations with a lot of movement, so we want to either turn them off or provide more appropriate animation:
@media (prefers-reduced-motion) {
  ::page-transition-container(*),
  ::page-transition-outgoing-image(*),
  ::page-transition-incoming-image(*) {
    /* Or add appropriate animation alternatives */
    animation: none !important;
  }
}
Crossfade animations now run faster, and the sizing and position animation runs a bit slower and with a different timing function.
In this example, I’ve only showcased code snippets relevant to creating page transition and SET API. If you are curious about the complete source code or want to check the demo in detail, feel free to check out the project repository and inspect the demo page.
Upcoming Cross-document Transitions
Proper Shared Element Transitions API support for MPAs is still a work in progress, but we can get a general idea of how it’s supposed to work from a rough draft by WICG.
In same-document transitions, we would use pageTransition.start(/* … */) function to let the browser keep track of the DOM updates. As for the cross-document transitions, we need to run the transition request function on the outgoing page before it’s unloaded and run the transition on the incoming page once it’s ready.
The following code snippets are copied from the WICG draft:
// In the outgoing page
document.addEventListener("pagehide", (event) => {
  if (!event.isSameOriginDocumentSwap) return;
  if (looksRight(event.nextPageURL)) {
    // This signals that the outgoing elements should be captured.
    event.pleaseLetTheNextPageDoATransitionPlease();
  }
});
// In the incoming page
document.addEventListener("beforepageshow", (event) => {
  if (
    event.previousPageWantsToDoATransition &&
    looksRight(event.previousPageURL)
  ) {
    const transitionReadyPromise = event.yeahLetsDoAPageTransition();
  }
});
Shared Element Transitions API for cross-document transitions would also need to be heavily restricted for security reasons.
Framework Implementation Examples
During the past few weeks, I saw some jaw-dropping examples of using Shared Element Transitions API for page navigation, added with progressive enhancement to various frameworks like React and Svelte.
Adding page transitions with SET API in frameworks can be tricky. In this example, we’ve had control over the DOM update functions, but this is not usually the case with front-end frameworks. Hopefully, as this API gets proper browser support and traction in the dev community, frameworks and router libraries will follow suit and provide better ways to integrate Shared Element Transitions API in navigation.
So, I would like to highlight some awesome examples of framework implementations from the community, especially those that provide reusable functions and hooks.
React / Preact
Jake Archibald created a great video playlist example using Preact, TypeScript, and a custom page transition hook. This example uses a custom router implementation to apply class names to the html element to customize the animation and toggle different types of animation depending on the navigation direction.
Astro
Maxi Ferreira implemented page transitions similarly as in our example with Navigation API but with Astro and explained the process in great detail on top of building a stunning movie database app.
He also worked with Ben Myers on this awesome guitar shop example with cool animations on both the guitar image and item background, which expands into a full description background container. This is also a good example of how to create elaborate but seamless and tasteful animations that add to the user experience.
Svelte
Moving onto Svelte, Geoff Rich built this neat fruit nutritional data app and explained the whole process in great detail in his article. SvelteKit has a built-in navigating store, and Geoff created a handy util function for intercepting page transitions and applying the Shared Element Transitions API depending on its browser support.
Conclusion
Shared Element Transitions API allows us not only to implement complex UI animations on a component level but also on a page level. Same-document transitions in Single Page Applications can be implemented today with progressive enhancement, and we can achieve impressive app-like page transitions with just a few lines of JavaScript and CSS. And all that without a JavaScript animation library! More popular and more complex cross-document transitions for Multi Page Applications are still a work in progress, and I can see it being a massive game-changer once it’s released and gains wider browser support.
Judging from the impressive examples we’ve seen online, some of which are featured in this article, we can safely say that the community is more than excited about this API. If you’ve built something awesome using Shared Element Transitions API, feel free to reach out on Twitter or LinkedIn and share your work.
Many thanks to Nikola Vranesic for reviewing the article for technical accuracy.
References
- Shared Element Transitions, WICG
- “Smooth and simple page transitions with the shared element transition API,” Jake Archibald
- CSS Shared Element Transitions Module Level 1, W3C


