A Guide To Test-Driven Development Using Node.js

Email Newsletter
Weekly tips on front-end & UX.
Trusted by 182,000+ folks.

 Celebrating 10 million developers
 Custom Web Forms for Angular, React, & Vue. Your backend.

In this guide, you’ll understand what Test-Driven Development is, we’ll look at the different processes involved in Test-Driven Development, and each one will be explained. Sometimes as we develop software, we come across the errors like unexpected results or values in our programs, these errors can be prevented to develop software which produce the correct results.
This guide won’t be complete if Test-Driven Development isn’t done with some code to back it up, so we’ll look at how to do this by using Node.js and Mocha which is one of its frameworks. I will also create a small project based on form validation tests and put all the codes in my GitHub repository. The link to the repository is located in the end of the article. With all that being said, we can go ahead and start.
Prerequisite
In this Guide, we’ll make use of the following:
- Node.js,
- Mocha,
- Chai,
- knowledge in HTML, CSS and JavaScript.
Note: Most of my code is written in VS Code.
Test-Driven Development
Well, you may have heard about Test-Driven Development, but maybe you do not know what it is, or maybe it’s your first time seeing this, that’s ok.
What is Test-Driven Development?
Test-Driven Development is simply an iterative development process, where each iteration starts by writing a test that forms part of the specifications that we are implementing. These iterations can help to provide feedback on the code we are writing.
With this definition, one might also ask why they need Test-Driven Development.
Well, Test-Driven Development is very useful when it comes to testing your code for a specific output. For instance, let’s say you have a particular search box on your website, and you want to find a particular keyword, you could use the Test-Driven Development process in your code to make sure it passes all requirements in other for the right keyword to be displayed. With this little instance, imagine the other things you could do with Test-Driven Development.
Test-Driven Development Process
Since Test-Driven Development is iterative, you would have to know and understand the process which is used in testing. In performing Test-Driven Development, the following stages are involved:
- write a test,
- run the test to Fail,
- put in the implementation code for it to pass and,
- refactor your code.
Write a Test
The first step to achieve Test-Driven Development is to pick a feature to implement and write a unit test for it. The unit test should be short, and it should be based on a single behavior of a function. Tests should not have effects on the interfaces we are implementing, but they should rather describe the interface of what we are working on. When writing a test you should put the input and test against an output.
Allow Test To Fail
Once you are done writing the test, run it and allow it to fail, in other words, our test will be red. This happens because the test that was written only checks the input against the expected output. No code was implemented in the test.
Why would you write a test to fail? Writing the test to fail is just to make sure that we know the current state of our code. While writing the code, we should know how our code is going to fail.
Make The Test Pass
Once the test fails in the expected way, this is where the code implementation comes in. Here, we have to provide a simple solution that solves the test and allows it to pass. In short, our test has to be green.
Refactor Your Code
This is the last step of Test-Driven Development, and it is the most important part. When we talk about code refactoring, we talk about writing a clean code. For instance, after we write our code to make the test pass and it passes, the code might not run the test quickly, or it might be messy. In this case, we will re-write the code, so that the test will still pass but with a faster, more reliable, and clear code.
All of these are processes of Test-Driven Development, and since it is iterative, it starts from the first to the last and goes back to the first again like a loop.
Benefits of Test-Driven Development
There are several benefits of Test-Driven Development, so we’ll get to see most of the benefits:
- Productivity Boost
Using Test-Driven Development can help boost productivity when it comes to building code that works correctly. Though the process may seem a bit time consuming, you can still get used to it if you use it more often in projects. - Code That Works
One of the main benefits is that Test-Driven Development helps to produce codes that work. - Easy Maintenance of Code
When using Test-Driven Development, it helps us produce clean code, especially when it comes to software production teams. - Reduces Production Costs
Imagine you were building software for your company, and Test-Driven Development was not involved, there could be lots of unwanted results, and your company may spend money testing it, and it will take away the time to market. However, with Test-Driven Development time to market speed is reduced, and it increases the quality of software. - Improved Development
As we start by writing tests that describe a particular behavior, Test-Driven Development can help us think about our code before we write it. - Less Debugging
This is another nice benefit of Test-Driven Development, it helps to reduce errors from our code. Therefore, developers have less errors to worry about.
Test-Driven Development Using Node.js
With all that said about Test-Driven Development, we’ll now look at some practical uses of Test-Driven Development using Node.js. Everything needed for this Section is listed as a prerequisite, though I will still walk through most of it.
Frameworks We’ll Use
We’ll be using Node.js for our server side, and we all know what Node.js is. But we’ll also install some dependencies using the NPM installer. Our Dependencies are Mocha and Chai, there are other frameworks in Node.js for testing but for me I will use the two already stated.
- What Mocha Is
Mocha is a JavaScript test framework working on Node.js which is used to make tests. It is used for making asynchronous testing. If you want to use it and learn more about it, check the Mocha API documentation and their main site for more information. - What Chai Is
Chai is a behavior-driven development/test-driven development assertion library for Node.js, and it is paired with a JavaScript testing library. Check the Chai assertion library website for more information and documentation.
Getting Started
For this example, we’ll create tests to check the diameter and area of the circle in our code to see if the code produces the correct result and see how we can refactor the code.
So, let’s get started.
Create a package.json File
In order to start, we have to create our directory, name it testing, open it in VS Code, and create a package.json file, before we can install our Mocha and Chai.
In the VS Code terminal, in order to create the package.json file we type:
npm initto initialize our package.json file in our VS Code terminal, and we get a text like the one below:
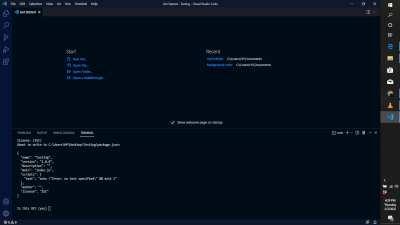
Then press Enter, the package.json file will then appear in the explorer bar inside your testing folder.
Install Mocha Framework and Chai Library
Now we have to install Mocha and Chai by typing:
npm install --save-dev mocha
npm install --save-dev chai
Or just use:
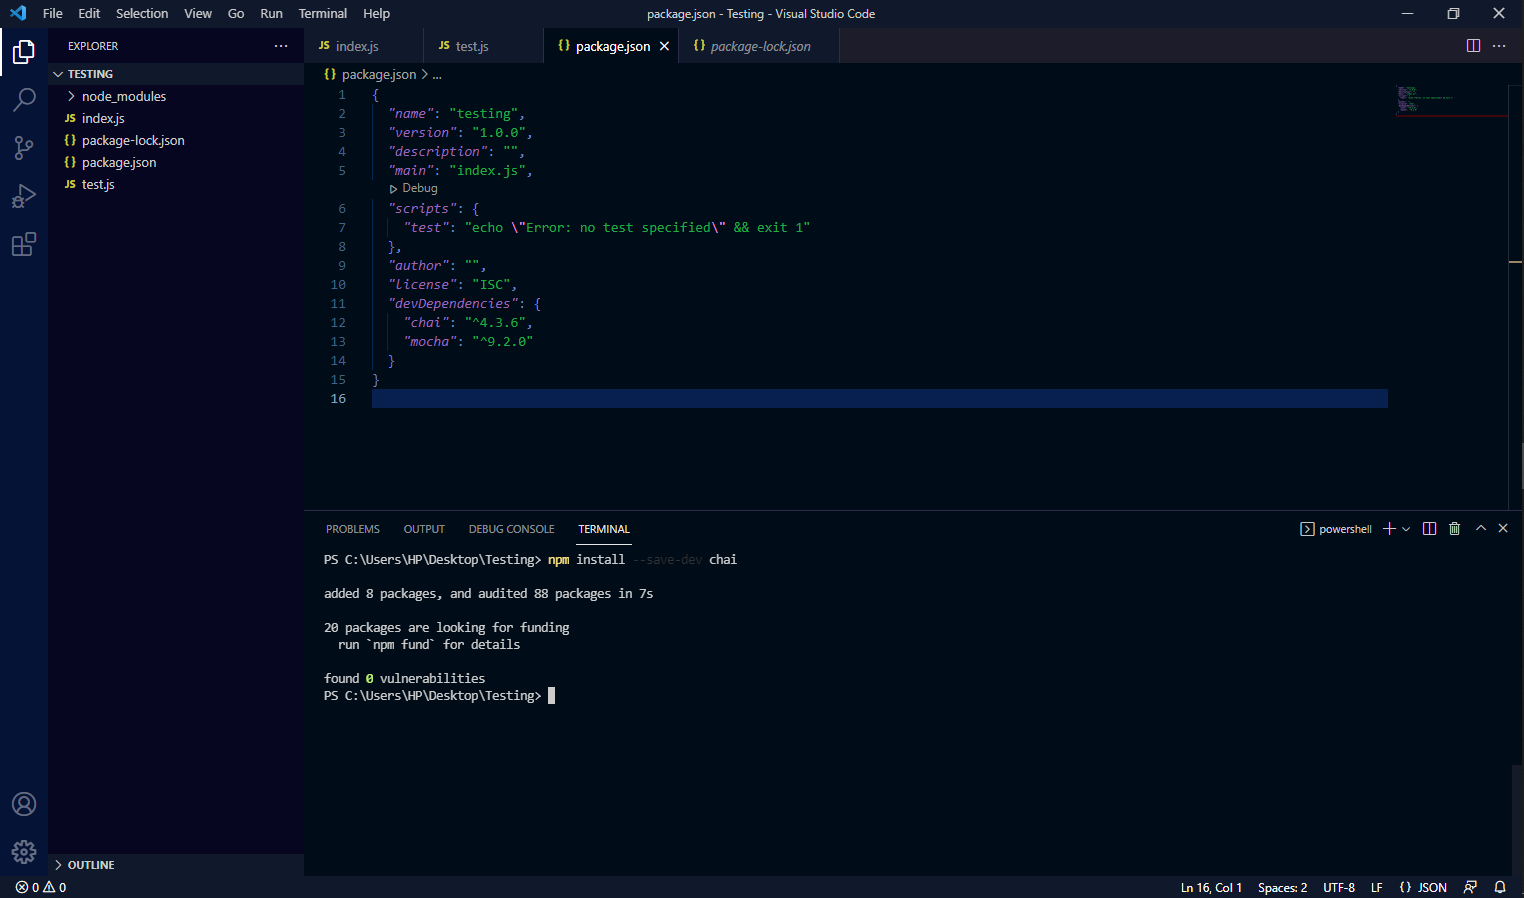
npm install mocha chai --save-devAfter this, your package-lock.json file will appear in your testing folder. In your package.json file your Mocha and Chai will appear as dependencies as shown below.
Create a Test File
Next, we create our index.js file and test.js file. Our test.js file will contain the test code, while our index.js file will contain the code implementation which is the code to test.
Since we are doing a Test-Driven Development, we’ll write in our test code in our test.js file as follows:
//import the function circle from index.js
const circle = require('./index.js').circle;
//import your assertion library from chai
const expect = require('chai').expect;
//write your test here
 describe('Testing Diameter, Area of circle',function() {
     it('Test1. circle Diameter', function(done) {
         let radius = new circle(5);
         expect(radius.getDiameter()).to.equal(10);
         done();
     });
     it('Test2. Circle area', function(done) {

         let radius = new circle(25);
         expect(radius.getArea()).to.equal(79);
         done();
     });
 });
As you can see in the code above, we are trying to write tests to see if our circle diameter and area are correct.
- The function
describe()is used to give a description of the function or functions you are testing. - The function
it()is used to define a particular test and create the tests for functions. - The function
expect()is imported from Chai and is used to tell the test to expect a certain value, the actual test is done by it. - The
done()function signals about the end of the test.
Note: When writing your test file, always import your JavaScript file using the require function and always import the assertion library you’re going to use.
Running Tests to Fail
Run the test file in the terminal by using the command:
npm testThe aim of this is to make sure our test file is running correctly. Based on Test-Driven Development, we first write our tests and then run them.
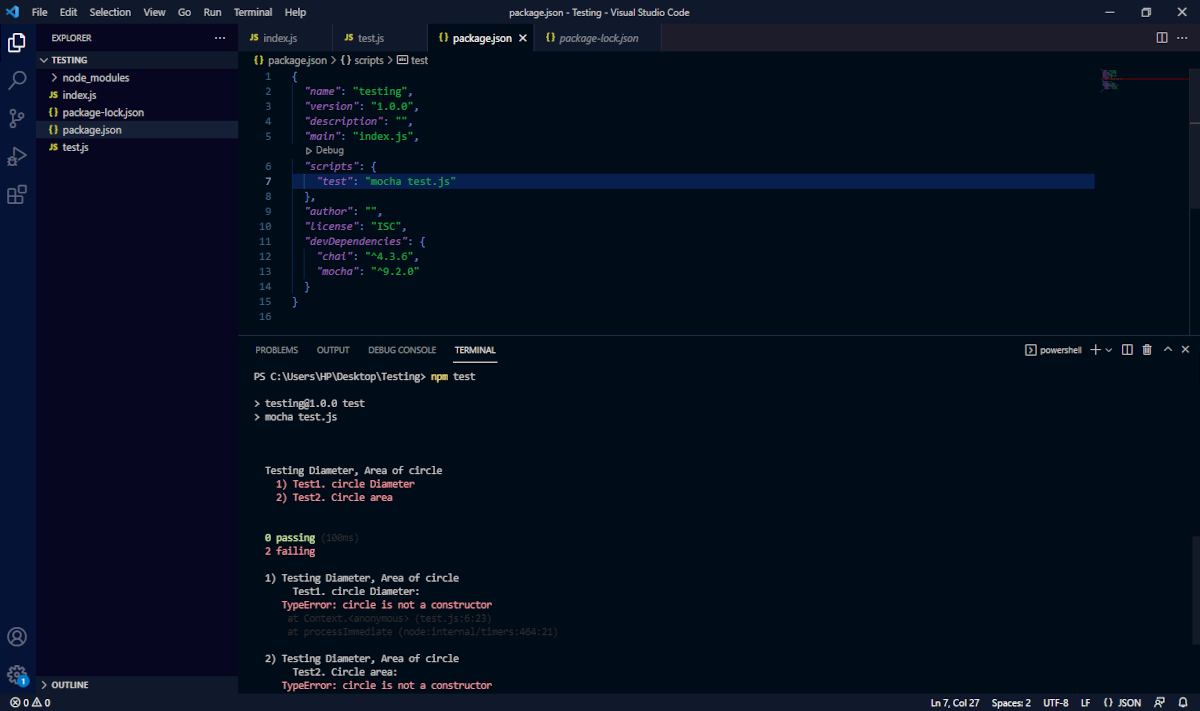
As you can see in the image, there are failing tests. If you observe, you see a TypeError: circle is not a constructor. That is because we do not have a constructor for our circle class. This means that there is no code implementation for our test.js file to test.
Create a File To Test
Now we have to create a code implementation for our test file. This will enable our test file to run with a pass and not a fail. Thus in our index.js file we write the following code:
//implement the class
class circle{
    //create the constructor
    constructor(radius,squareR ) {
        this.radius = radius;
    }
    //create the methods to calculate the diameter and area of circle
    getDiameter() {
        return this.radius * 2;
    }
    getArea() {
        return Math.round(Math.PI * this.radius);
    }
}
//export the class
module.exports = {
    circle:circle
}
Run Tests To Pass
After writing this code, save it and run the code in the node module using the command:
npm testNow we see our tests have passed.
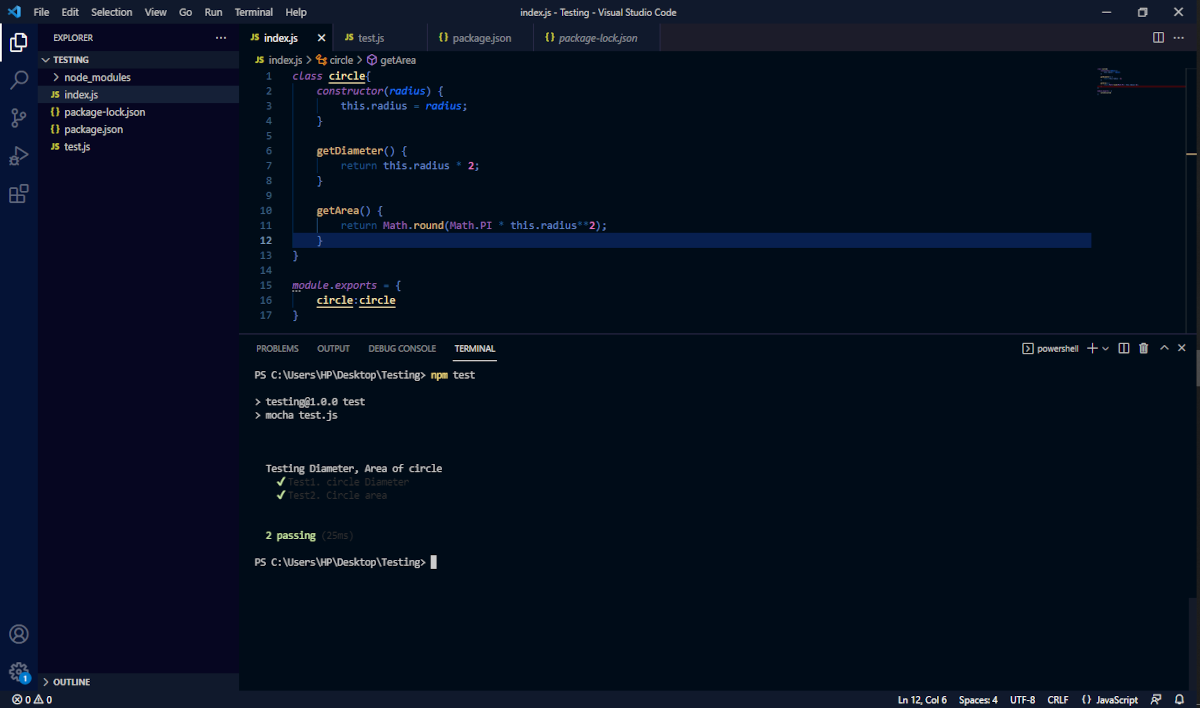
If you look beside the 2 passing tests, you will notice the time our code took to pass the test. Mine took me 25 milliseconds.
Refactor the Code
The final process for Test-Driven Development is refactoring, in this step we get to write a more clean and maintainable code. For the test.js file, I decided to make it accept functions instead of classes:
//import the index.js and its function
const getDiameter = require('./index.js').getDiameter;
const getArea = require('./index.js').getArea;
//require chai library and expect function
const expect = require('chai').expect;
//write your tests
 describe('Testing Diameter, Area of circle',function() {
     it('Test1. circle Diameter', function(done) {
         let radius = getDiameter();
         expect(radius).to.equal(25);
         done();
     });
     it('Test2. Circle area', function(done) {
         let radius = getArea();
         expect(radius).to.equal(79);
         done();
     });
 });
While for the index.js file, I changed the code to just use simple functions:
//enter you radius values
radius = 5;
radius2 = 25;
//export the functions
module.exports = {

    getDiameter: function() {
        return radius ** 2;
    },
    getArea: function() {
        return Math.round(Math.PI * radius2);
    }
}
Notice, that the first index.js file takes more lines of code, but after refactoring the index.js file takes less lines of code, even though both of them give the same result.
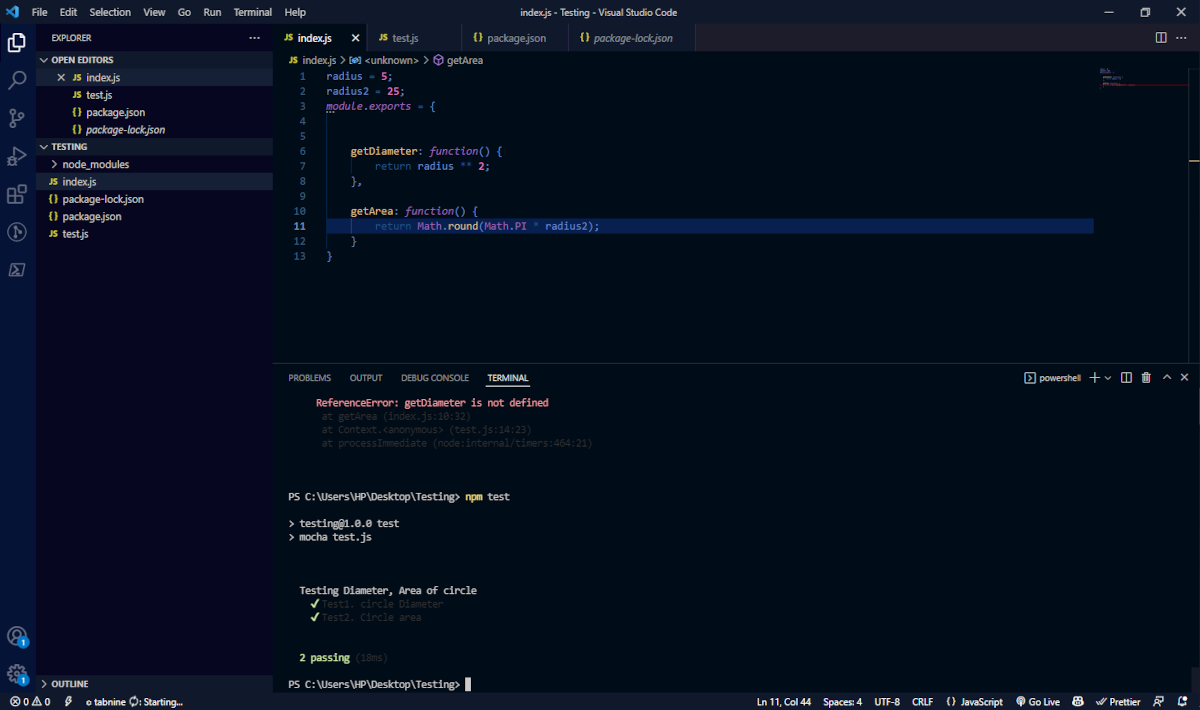
So, the refactored code passes like the first code but takes about 18 milliseconds to do it, which is about 7 milliseconds less. The reason for refactoring the code is to make sure that our code is simple and clean.
With this little demonstration, I’ll guess that you know a bit more about what Test-Driven Development is and how to perform it using the Mocha framework and Chai assertion library.
Conclusion
So, that’s it. In this article, we looked through what Test-Driven Development is, and we looked at how to do it using Mocha framework and Chai assertion library in Node.js. If you want to see more about Mocha and Chai documentation and how to use them, the links will be listed below for references. For the form validation test project, the link to the repository will also be given below. If there are any contributions or changes to be made to the project, please feel free to contribute.
References
Also, don’t forget to check the form validation test project on my GitHub repo.


