In our previous articles on WordPress hacks, we discussed the incredible flexibility of WordPress, which is one of the biggest reasons for its popularity among bloggers worldwide. Custom fields in particular, which let users create variables and add custom values to them, are one of the reasons for WordPress’ flexibility.
In this article, we’ve compiled a list of 10 useful things that you can do with custom fields in WordPress. Among them are setting expiration time for posts, defining how blog posts are displayed on the front page, displaying your mood or music, embedding custom CSS styles, disabling search engine indexing for individual posts, inserting a “Digg this” button only when you need it and, of course, displaying thumbnails next to your posts
1. Set An Expiration Time For Posts

Image source: Richard Vantielcke
The problem. Sometimes (for example, if you’re running a contest), you want to be able to publish a post and then automatically stop displaying it after a certain date. This may seem quite hard to do but in fact is not, using the power of custom fields.
The solution. Edit your theme and replace your current WordPress loop with this “hacked” loop:
<?php
if (have_posts()) :
     while (have_posts()) : the_post(); ?>
         $expirationtime = get_post_custom_values('expiration');
         if (is_array($expirationtime)) {
             $expirestring = implode($expirationtime);
         }

         $secondsbetween = strtotime($expirestring)-time();
         if ( $secondsbetween > 0 ) {
             // For example...
             the_title();
             the_excerpt();
         }
     endwhile;
endif;
?>
To create a post set to expire at a certain date and time, just create a custom field. Specify expiration as a key and your date and time as a value (with the format mm/dd/yyyy 00:00:00). The post will not show up after the time on that stamp.
Code explanation. This code is simply a custom WordPress loop that automatically looks to see if a custom field called expiration is present. If one is, its value is compared to the current date and time.
If the current date and time is equal to or earlier than the value of the custom expiration field, then the post is not displayed.
Note that this code does not remove or unpublish your post, but just prevents it from being displayed in the loop.
Source:
2. Define How Blog Posts Are Displayed On The Home Page
The problem. I’ve always wondered why 95% of bloggers displays all of their posts the same way on their home page. Sure, WordPress has no built-in option to let you define how a post is displayed. But wait: with custom fields, we can do it easily.
The solution. The following hack lets you define how a post is displayed on your home page. Two values are possible:
- Full post
- Post excerpt only
Once more, we’ll use a custom WordPress loop. Find the loop in your index.php file and replace it with the following code:
<?php if (have_posts()) :
    while (have_posts()) : the_post();
         $customField = get_post_custom_values("full");
         if (isset($customField[0])) {
              //Custom field is set, display a full post
              the_title();
              the_content();
         } else {
              // No custom field set, let's display an excerpt
              the_title();
              the_excerpt();
    endwhile;
endif;
?>
In this code, excerpts are displayed by default. To show full posts on your home page, simply edit the post and create a custom field called full and give it any value.
Code explanation. This code is rather simple. The first thing it does is look for a custom field called full. If this custom field is set, full posts are displayed. Otherwise, only excerpts are shown.
Source:
3. Display Your Mood Or The Music You’re Listening To
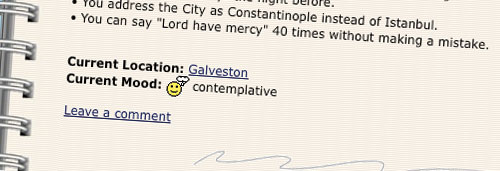
The problem. About five or six years ago, I was blogging on a platform called LiveJournal. Of course it wasn’t great as WordPress, but it had nice features that WordPress doesn’t have. For example, it allowed users to display their current mood and the music they were listening to while blogging.
Even though I wouldn’t use this feature on my blog, I figure many bloggers would be interested in knowing how to do this in WordPress.
The solution. Open your single.php file (or modify your index.php file), and paste the following code anywhere within the loop:
$customField = get_post_custom_values("mood");
if (isset($customField[0])) {
    echo "Mood: ".$customField[0];
}
Save the file. Now, when you write a new post, just create a custom field called mood, and type in your current mood as the value.
Code explanation. This is a very basic use of custom fields, not all that different from the well-known hack for displaying thumbnails beside your posts’ excerpts on the home page. It looks for a custom field called mood. If the field is found, its value is displayed.
Source:
4. Add Meta Descriptions To Your Posts
The problem. WordPress, surprisingly, does not use meta description tags by default.
Sure, for SEO, meta tags are not as important as they used to be. Yet still, they can enhance your blog’s search engine ranking nevertheless.
How about using custom fields to create meta description tags for individual posts?
The solution. Open your header.php file. Paste the following code anywhere within the <head> and </head> tags:
<meta name="description" content="
<?php if ( (is_home()) || (is_front_page()) ) {
    echo ('Your main description goes here');
} elseif(is_category()) {
    echo category_description();
} elseif(is_tag()) {
    echo '-tag archive page for this blog' . single_tag_title();
} elseif(is_month()) {
    echo 'archive page for this blog' . the_time('F, Y');
} else {
    echo get_post_meta($post->ID, "Metadescription", true);
}?>">
Code explanation. To generate meta descriptions, this hack makes extensive use of WordPress conditional tags to determine which page the user is on.
For category pages, tag pages, archives and the home page, a static meta description is used. Edit lines 3, 7 and 9 to define your own. For posts, the code looks for a custom field called Metadescription and use its value for the meta description.
Sources:
5. Link To External Resources

The problem. Many bloggers have asked me the following question: “How can I link directly to an external source, rather than creating a post just to tell visitors to visit another website?”
The solution to this problem is to use custom fields. Let’s see how we can do that.
The solution. The first thing to do is open your functions.php file and paste in the following code:
function print_post_title() {
  global $post;
  $thePostID = $post->ID;
  $post_id = get_post($thePostID);
  $title = $post_id->post_title;
  $perm  = get_permalink($post_id);
  $post_keys = array(); $post_val  = array();
  $post_keys = get_post_custom_keys($thePostID);

  if (!empty($post_keys)) {
      foreach ($post_keys as $pkey) {
          if ($pkey=='url1' || $pkey=='title_url' || $pkey=='url_title') {
              $post_val = get_post_custom_values($pkey);
          }
      }
      if (empty($post_val)) {
          $link = $perm;
      } else {
          $link = $post_val[0];
      }
  } else {
      $link = $perm;
  }
  echo '<h2><a href="'.$link.'" rel="bookmark" title="'.$title.'">'.$title.'</a></h2>';
}
Once that’s done, open your index.php file and replace the standard code for printing titles…
<h2><a href="<?php the_permalink() ?>" rel="bookmark" title="Permanent Link to <?php the_title(); ?>"><?php the_title(); ?></a></h2>
… with a call to our newly created print_post_title() function:
<?php print_post_title() ?>
Now, whenever you feel like pointing one of your posts’ titles somewhere other than your own blog, just scroll down in your post editor and create or select a custom key called url1 or title_url or url_title and put the external URL in the value box.
Code explanation. This is a nice custom replacement function for the the_title() WordPress function.
Basically, this function does the same thing as the good old the_title() function, but also looks for a custom field. If a custom field called url1 or title_url or url_title is found, then the title link will lead to the external website rather than the blog post. If the custom field isn’t found, the function simply displays a link to the post itself.
Sources:
6. Embed Custom CSS Styles

The problem. Certain posts sometimes require additional CSS styling. Sure, you can switch WordPress’ editor to HTML mode and add inline styling to your post’s content. But even when inline styling is useful, it isn’t always the cleanest solution.
With custom fields, we can easily create new CSS classes for individual posts and make WordPress automatically add them to the blog’s header.
The solution. First, open your header.php file and insert the following code between the <head> and </head> HTML tags:
<?php if (is_single()) {
    $css = get_post_meta($post->ID, 'css', true);
    if (!empty($css)) { ?>
        <style type="text/css">
        <?php echo $css; ?>
        <style>
    <?php }
} ?>
Now, when you write a post or page that requires custom CSS styling, just create a custom field called css and paste in your custom CSS styling as the value. As simple as that!
Code explanation. First, the code above makes sure we’re on an actual post’s page by using WordPress’ conditional tag is_single(). Then, it looks for a custom field called css. If one is found, its value is displayed between <style> and </style> tags.
Source:
7. Re-Define TheTag</h2>
<p><img loading="lazy" decoding="async" src="https://archive.smashing.media/assets/344dbf88-fdf9-42bb-adb4-46f01eedd629/a4126cab-71b7-4e2a-974e-a269e58e5ea4/sm1.jpg" alt="Screenshot" /></p>
<p><strong>The problem.</strong> On blogs, as on every other type of website, content is king. And SEO is very important for achieving your goals with traffic. By default, most WordPress themes don’t have an optimized <title> tag.</p>
<p>Some plug-ins, such as the well-known “All in One SEO Pack,” override this, but you can also do it with a custom field.</p>
<p><strong>The solution.</strong> Open your <em>header.php</em> file for editing. Find the <title> tag and replace it with the following code:</p>
<pre><code class="language-php"><title>
<?php if (is_home () ) {
bloginfo('name');
} elseif ( is_category() ) {
single_cat_title(); echo ' - ' ; bloginfo('name');
} elseif (is_single() ) {
$customField = get_post_custom_values("title");
if (isset($customField[0])) {
echo $customField[0];
} else {
single_post_title();
}
} elseif (is_page() ) {
bloginfo('name'); echo ': '; single_post_title();
} else {
wp_title(’,true);
} ?>
</title></code></pre>
<p>Then, if you want to define a custom title tag, simply create a custom field called <em>title</em>, and enter your custom title as a value.</p>
<p><strong>Code explanation.</strong> With this code, I have used lots of template tags to generate a custom <title> tag for each kind of post: home page, page, category page and individual posts.</p>
<p>If the active post is an individual post, the code looks for a custom field called <em>title</em>. If one is found, its value is displayed as the title. Otherwise, the code uses the standard <em>single_post_title()</em> function to generate the post’s title.</p>
<p><strong>Source:</strong></p>
<ul>
<li><a href="https://www.wprecipes.com/how-to-redifine-title-tag-with-a-custom-field">How to: Redefine the title tag with a custom field</a></li>
</ul>
<h2 id="8-disable-search-engine-indexing-for-individual-posts">8. Disable Search Engine Indexing For Individual Posts</h2>
<p><img loading="lazy" decoding="async" src="https://archive.smashing.media/assets/344dbf88-fdf9-42bb-adb4-46f01eedd629/5584df58-1c22-42ad-b7ce-25b2cbb7c3c4/sm8.jpg" alt="Screenshot" /></p>
<p><strong>The problem.</strong> Have you ever wanted to create semi-private posts, accessible to your regular readers but not to search engines? If so, one easy solution is to… you guessed it! Use a custom field.</p>
<p><strong>The solution.</strong> First, get the ID of the post that you’d not like to be indexed by search engines. We’ll use a post ID of 17 for this example.</p>
<p>Open your <em>header.php</em> file and paste the following code between the <head> and </head> tags:</p>
<pre><code class="language-php"><?php $cf = get_post_meta($post->ID, 'noindex', true);
if (!empty($cf)) {
echo '<meta name="robots" content="noindex"/>';
}
?></code></pre>
<p>That’s all. Pretty useful if you want certain info to be inaccessible to search engines!</p>
<p><strong>Code explanation.</strong> In this example, we used the <em>get_post_meta()</em> function to retrieve the value of a custom field called <em>noindex</em>. If the custom field is set, then a <em><meta name=“robots” content=“noindex”/></em> tag is added.</p>
<p><strong>Source:</strong></p>
<ul>
<li><a href="https://www.wprecipes.com/how-to-disable-search-engine-indexing-on-a-single-post">How to: disable search engine indexing of a single post</a></li>
</ul>
<h2 id="9-get-or-print-any-custom-field-value-easily-with-a-custom-function">9. Get Or Print Any Custom Field Value Easily With A Custom Function</h2>
<p><img loading="lazy" decoding="async" src="https://archive.smashing.media/assets/344dbf88-fdf9-42bb-adb4-46f01eedd629/1a1ec189-d97e-4b88-b57f-28a56d185710/sm9.jpg" alt="Screenshot" /></p>
<p><strong>The problem.</strong> Now that we’ve shown you lot of great things you can do with custom fields, how about an automated function for easily getting custom fields values?</p>
<p>Getting custom field values isn’t hard for developers or those familiar with PHP, but can be such a pain for non-developers. With this hack, getting any custom field value has never been easier.</p>
<p><strong>The solution.</strong> Here’s the function. Paste it into your theme’s <em>functions.php</em> file. If your theme doesn’t have this file, create it.</p>
<pre><code class="language-php">function get_custom_field_value($szKey, $bPrint = false) {
global $post;
$szValue = get_post_meta($post->ID, $szKey, true);
if ( $bPrint == false ) return $szValue; else echo $szValue;
}</code></pre>
<p>Now, to call the function and get your custom field value, use the following code:</p>
<pre><code class="language-php"><?php if ( function_exists('get_custom_field_value') ){
get_custom_field_value('featured_image', true);
} ?></code></pre>
<p><strong>Code explanation.</strong> First, we use the PHP <em>function_exists()</em> function to make sure the <em>get_custom_field_value</em> function is defined in our theme. If it is, we use it. The first argument is the custom field name (here, <em>featured_image</em>), and the second lets you echo the value (true) or call it for further PHP use (false).</p>
<p><strong>Sources:</strong></p>
<ul>
<li><span class="removed_link" title="https://www.mattvarone.com/wordpress/useful-functions-for-wordpress/">Useful custom functions for WordPress</span></li>
<li><a href="https://www.wprecipes.com/how-to-easily-get-the-value-of-a-custom-field">How to: Easily get the value of a custom field</a></li>
</ul>
<h2 id="10-insert-a-digg-this-button-only-when-you-need-it">10. Insert A “Digg This” Button Only When You Need It</h2>
<p><img loading="lazy" decoding="async" src="https://archive.smashing.media/assets/344dbf88-fdf9-42bb-adb4-46f01eedd629/d496e761-3e4b-478d-a191-d5bf61773aec/sm10.png" alt="Screenshot" /></p>
<p><strong>The problem.</strong> To get traffic from well-known Digg.com, a good idea is to integrate its “Digg this” button into your posts so that readers can contribute to the posts’ success.</p>
<p>But do <em>all</em> of your posts need this button? Definitely not. For example, if you write an announcement telling readers about improvements to your website, submitting the post to Digg serves absolutely no value.</p>
<p><strong>The solution.</strong> Custom fields to the rescue once again. Just follow these steps to get started:</p>
<ol>
<li><p>Open your <em>single.php</em> file and paste these lines where you want your “Digg this” button to be displayed:</p>
<pre><code><?php $cf = get_post_meta($post->ID, 'digg', true);
if (!emptyempty($cf)) {
echo 'https://digg.com/tools/diggthis.js" type="text/javascript">'} ?>
</code></pre></li>
<li><p>Once you’ve saved the <em>single.php</em> file, you can create a custom field called <em>digg</em> and give it any value. If set, a Digg button will appear in the post.</p></li>
</ol>
<p><strong>Code explanation.</strong> This code is very simple. Upon finding a custom field called <em>digg</em>, the code displays the “Digg this” button. The JavaScript used to display the “Digg this” button is provided by Digg itself.</p></p>
<h2 id="bonus-display-thumbnails-next-to-your-posts">Bonus: Display Thumbnails Next To Your Posts</h2>
<p><img loading="lazy" decoding="async" src="https://archive.smashing.media/assets/344dbf88-fdf9-42bb-adb4-46f01eedd629/3b2471dd-5978-4d80-aad3-49af82785d3c/sm11.png" alt="Screenshot" /></p>
<p><strong>The problem</strong> Most people knows this trick and have implemented it successfully on their WordPress-powered blogs. But I figure some people still may not know how to display nice thumbnails right next to the posts on their home page.</p>
<p>To view examples of this well-known trick, visit my blogs <a href="https://www.wprecipes.com">WpRecipes</a> and <a href="https://www.catswhocode.com">Cats Who Code</a>.</p>
<p><strong>The solution.</strong></p>
<ol>
<li>Start by creating a default image in Photoshop or Gimp. The size in my example is 200x200 pixels but is of course up to you. Name the image <em>default.gif</em>.</li>
<li>Upload your <em>default.gif</em> image to the <em>image</em> directory in your theme.</li>
<li><p>Open the <em>index.php</em> file and paste in the following code where you’d like the thumbnails to be displayed:</p>
<pre><code><?php $postimageurl = get_post_meta($post->ID, 'post-img', true);
if ($postimageurl) {
?>
<a href="<?php the_permalink(); ?>" rel="bookmark"><img loading="lazy" decoding="async" src="<?php echo $postimageurl; ?>" alt="Post Pic" width="200" height="200" /></a>
<?php } else { ?>
<a href="<?php the_permalink(); ?>" rel="bookmark"><img loading="lazy" decoding="async" src="<?php bloginfo('template_url'); ?>/images/wprecipes.gif" alt="Screenshot" width="200" height="200" /></a>
<?php } ?>
</code></pre></li>
<li><p>Save the file.</p></li>
<li><p>In each of your posts, create a custom field called <em>post-img</em>. Set its value as the URL of the image you’d like to display as a thumbnail.</p></li>
</ol>
<p><strong>Code explanation</strong> The code looks for a custom field called <em>post-img</em>. If found, its value is used to display a custom thumbnail.</p>
<p>In case a <em>post-img</em> custom field is not found, the default image is used, so you’ll never have any posts without thumbnails.</p></p>
<h2 id="more-custom-field-resources">More Custom Field Resources</h2>
<p>You may also be interested in the following related posts:</p>
<ul>
<li><a href="https://www.smashingmagazine.com/2009/05/10-custom-fields-hacks-for-wordpress">Custom Fields Hacks For WordPress</a></li>
<li><a href="https://www.smashingmagazine.com/2009/06/10-useful-wordpress-loop-hacks/">10 Useful WordPress Loop Hacks</a></li>
<li><a href="https://www.smashingmagazine.com/2009/08/10-useful-wordpress-hook-hacks/">10 Useful WordPress Hook Hacks</a></li>
<li><a href="https://www.smashingmagazine.com/2009/04/10-exceptional-wordpress-hacks/">10 Exceptional WordPress Hacks</a></li>
</ul>
<div class="signature">
<img src="https://www.smashingmagazine.com/images/logo/logo--red.png" alt="Smashing Editorial" width="35" height="46" loading="lazy" decoding="async" />
<span>(al)</span>
</div>
<div class="category__related--alt">
<span class="italic grey mrs mbm block">Explore more on</span>
<nav class="subnav ib" aria-label="categories">
<ul class="subnav__primary subnav__subtags flex flex-wrap">
<li class="subnav-item subnav-item--green"><a class="nav-item-link" href="/category/wordpress">WordPress</a></li>
<li class="subnav-item subnav-item--green"><a class="nav-item-link" href="/category/hacks">Hacks</a></li>
<li class="subnav-item subnav-item--green"><a class="nav-item-link" href="/category/custom-fields">Custom Fields</a></li>
<li class="subnav-item subnav-item--green"><a class="nav-item-link" href="/category/techniques-wp">Techniques (WP)</a></li>
</ul>
</nav>
</div>
</div>
</div>
</div>
<link href="/css/non-critical-article-manual-felix.css" media="print" onload="this.media='all'" rel="stylesheet">
<link href="/css/article-dark-mode-v3.css" media="(prefers-color-scheme: dark)" rel="stylesheet">
<div aria-hidden="true" class="c-friskies-box partners partners__lead partners__lead-place hidden partners__external" data-audience="non-subscriber" data-remove="true" data-amount="1"></div>
<div aria-hidden="true" class="c-friskies-box partners partners__lead partners__lead-place hidden partners__external" data-audience="non-subscriber" data-remove="true" data-amount="1"></div>
<div id="partners-article-end" data-impression="true" class="c-friskies-box c-friskies-box--ad c-friskies-box--wide partners partners__row hidden partners__external" data-audience="non-subscriber" data-remove="true"></div>
<div id="promo-article-end hidden">
<div class="book-grid">
<figure class="book--featured">
<div class="book--featured__image">
<a data-instant href="/the-smashing-newsletter/"><img loading="lazy" width="202" height="266" src="/images/smashing-cat/cat-in-a-chair--tall.svg" alt="Smashing Newsletter"/></a>
</div>
<figcaption>
<h4 class="book--featured__title">
<a href="/the-smashing-newsletter/">
Smashing Newsletter
</a>
</h4>
<p class="book--featured__desc">
Tips on front-end & UX, delivered weekly in your inbox. Just the things you can actually use.
</p>
</figcaption>
</figure>
<figure class="book--featured">
<div class="book--featured__image">
<a data-instant href="https://www.smashingconf.com/online-workshops/"><img loading="lazy" width="202" height="266" src="https://www.smashingmagazine.com/images/smashing-cat/cat-explorer.svg" alt="Front-End & UX Workshops, Online"/></a>
</div>
<figcaption>
<h4 class="book--featured__title">
<a href="https://www.smashingconf.com/online-workshops/">
Front-End & UX Workshops, Online
</a>
</h4>
<p class="book--featured__desc">
With practical takeaways, live sessions, video recordings and a friendly Q&A.
</p>
</figcaption>
</figure>
<figure class="book--featured">
<div class="book--featured__image">
<a data-instant href="/printed-books/"><img loading="lazy" width="202" height="266" src="https://res.cloudinary.com/indysigner/image/fetch/f_auto,q_auto/w_400/https://archive.smashing.media/assets/344dbf88-fdf9-42bb-adb4-46f01eedd629/c2f2c6d6-4e85-449a-99f5-58bd053bc846/typescript-shop-cover-opt.png" alt="TypeScript in 50 Lessons"/></a>
</div>
<figcaption>
<h4 class="book--featured__title">
<a href="/printed-books/">
TypeScript in 50 Lessons
</a>
</h4>
<p class="book--featured__desc">
Everything TypeScript, with code walkthroughs and examples. And other printed books.
</p>
</figcaption>
</figure>
</div>
</div>
<div data-component="CommentsArea" id="comments-10-custom-fields-hacks-for-wordpress" data-thread="/2009/05/10-custom-fields-hacks-for-wordpress/" data-date="2009-05-13 08:22:00 +0000 UTC"></div>
</div>
</article>
</main>
<div data-component="CookieBanner"></div>
<div id="cart" class="cart-wrapper" data-component="MiniCart"></div>
<footer class="main-footer">
<div class="container">
<div class="col-12">
<div class="footer__topics open">
<h4 class="footer__topics__title" id="topics">Browse All Smashing Magazine Topics</h4>
<ul class="footer__topics__list">
<li class="footer__topics__item">
<a href="/category/accessibility">Accessibility</a>
</li>
<li class="footer__topics__item">
<a href="/category/best-practices">Best practices</a>
</li>
<li class="footer__topics__item">
<a href="/category/business">Business</a>
</li>
<li class="footer__topics__item">
<a href="/category/career">Career</a>
</li>
<li class="footer__topics__item">
<a href="/category/checklists">Checklists</a>
</li>
<li class="footer__topics__item">
<a href="/category/css">CSS</a>
</li>
<li class="footer__topics__item">
<a href="/category/data-visualization">Data Visualization</a>
</li>
<li class="footer__topics__item">
<a href="/category/design">Design</a>
</li>
<li class="footer__topics__item">
<a href="/category/design-patterns">Design Patterns</a>
</li>
<li class="footer__topics__item">
<a href="/category/design-systems">Design Systems</a>
</li>
<li class="footer__topics__item">
<a href="/category/e-commerce">E-Commerce</a>
</li>
<li class="footer__topics__item">
<a href="/category/figma">Figma</a>
</li>
<li class="footer__topics__item">
<a href="/category/freebies">Freebies</a>
</li>
<li class="footer__topics__item">
<a href="/category/html">HTML</a>
</li>
<li class="footer__topics__item">
<a href="/category/illustrator">Illustrator</a>
</li>
<li class="footer__topics__item">
<a href="/category/inspiration">Inspiration</a>
</li>
<li class="footer__topics__item">
<a href="/category/javascript">JavaScript</a>
</li>
<li class="footer__topics__item">
<a href="/category/mobile">Mobile</a>
</li>
<li class="footer__topics__item">
<a href="/category/performance">Performance</a>
</li>
<li class="footer__topics__item">
<a href="/category/privacy">Privacy</a>
</li>
<li class="footer__topics__item">
<a href="/category/react">React</a>
</li>
<li class="footer__topics__item">
<a href="/category/responsive-design">Responsive Design</a>
</li>
<li class="footer__topics__item">
<a href="/category/round-ups">Round-Ups</a>
</li>
<li class="footer__topics__item">
<a href="/category/seo">SEO</a>
</li>
<li class="footer__topics__item">
<a href="/category/typography">Typography</a>
</li>
<li class="footer__topics__item">
<a href="/category/tools">Tools</a>
</li>
<li class="footer__topics__item">
<a href="/category/ui">UI</a>
</li>
<li class="footer__topics__item">
<a href="/category/usability">Usability</a>
</li>
<li class="footer__topics__item">
<a href="/category/ux">UX</a>
</li>
<li class="footer__topics__item">
<a href="/category/vue">Vue</a>
</li>
<li class="footer__topics__item">
<a href="/category/wallpapers">Wallpapers</a>
</li>
<li class="footer__topics__item">
<a href="/category/web-design">Web Design</a>
</li>
<li class="footer__topics__item">
<a href="/category/workflow">Workflow</a>
</li>
</ul>
</div>
</div>
<div class="col-12">
<div class="footer__notes">
<p>With a commitment to quality content for the design community.</p>
<p>Founded by <a href="https://smart-interface-design-patterns.com">Vitaly Friedman</a> and <a href="https://lennartz.cc">Sven Lennartz</a>. <span class="lining-figures">2006–2026</span>.</p>
<p>Smashing is proudly running on <a href="https://www.netlify.com/?utm_source=link&utm_medium=parter&utm_campaign=sm-footer">Netlify</a>, <a href="https://www.tina.io/?utm_source=link&utm_medium=parter&utm_campaign=sm-footer">TinaCMS</a> and <a href="https://www.swell.is/?utm_source=link&utm_medium=parter&utm_campaign=sm-footer">Swell</a>.</p>
<p>Fonts by <a href="http://latinotype.com/">Latinotype</a>.</p>
</div>
<ul class="footer__links">
<li>✎ <a href="/write-for-us/">Write for us</a>
</li>
<li>
<a href="/contact/">Contact us</a>
</li>
<li>
<a href="/about/">About us (Impressum)</a>
</li>
<li>
<a href="/privacy-policy/">Privacy policy</a>
</li>
<li>
<a href="/auth/">Membership login</a>
</li>
<li>
<a href="/delivery-times/">Delivery times</a>
</li>
<li>
<a href="/advertise/">Advertise</a>
</li>
<li>
<a href="/jobs/">Job Board</a>
</li>
<li>
<a href="https://podcast.smashingmagazine.com">Podcasts</a>
</li>
</ul>
</div>
</div>
<div class="back-to-top-wrapper" id="back_top">
<a href="#top" data-scroll="#top" class="back-to-top" title="Back to top">
<svg viewBox="0 0 100 100" width="25px" height="25px" tabindex="-1" role="img" aria-labelledby="title">
<title id="title">Back to top


 Custom Web Forms for Angular, React, & Vue. Your backend.

 Celebrating 10 million developers